Personalizing your WordPress dashboard can improve the user experience. One easy way to do this is by adding or changing admin icons.
Custom icons can improve your workflow and make it easier for new users to navigate the admin area of your site. Plus, a personalized dashboard is more enjoyable to use.
In this article, we will show you how to add or change WordPress admin icons. We will guide you through the process step by step. By the end, your WordPress dashboard will look fresh and unique.
What Are Admin Icons in WordPress?
Admin icons are the tiny images you see in the navigation panel of the WordPress admin area. They appear next to each menu item.
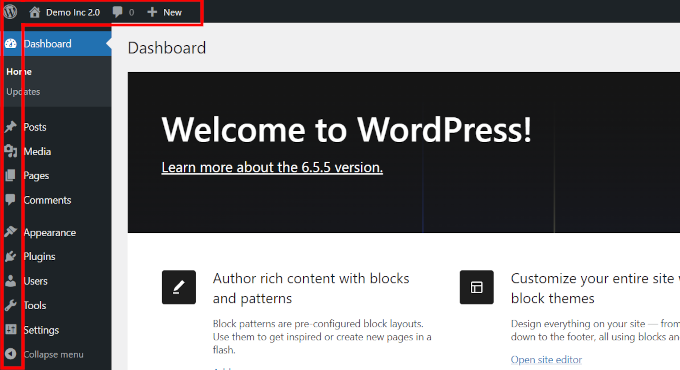
These images use Dashicons, an icon font made for WordPress. It was first introduced in 2013 and has not changed since then.
You may want to give your WordPress admin area a slight makeover by changing these icons. You can swap out existing icons with something you like better or even replace them with your own custom icons.
If you are making a website for clients who are not familiar with WordPress, using custom icons can help them navigate the admin dashboard more easily.
Now, let’s see how you can easily change admin icons. We will show you two ways to do that, and you can choose the one that works best for you:
Method 1: Change Admin Icons in WordPress Admin Using a Plugin
For this method, we will be using the Admin Menu Editor plugin. As the name suggests, it allows you to customize WordPress admin menus easily.
First, you need to install and activate the Admin Menu Editor plugin. For more details, see our tutorial on how to install a WordPress plugin.
After you have activated the plugin, go to the Settings » Menu Editor page. Here, you will see your WordPress admin menu within a neat user interface (UI) where you can customize it.
The UI has a toolbar at the top, which allows you to add or delete menu items, add separators, copy and paste items, and more.
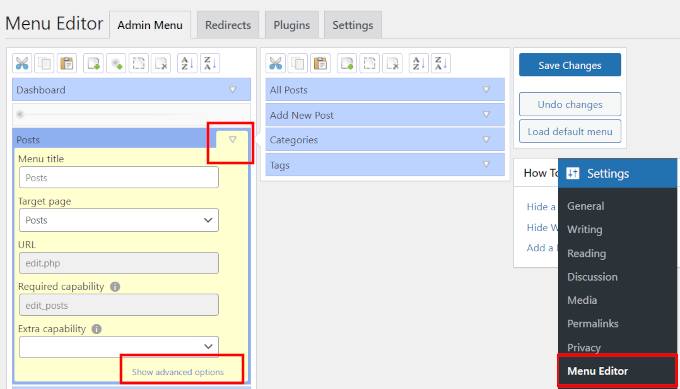
Below that, you can click on a menu item to expand and view its settings. Here, we have expanded the Posts menu item.
When you expand any menu item, you will see more options. If it is a parent menu, you will also see any child menu items in the right column.
To add, replace, or delete a menu icon, click on the ‘Show advanced options’ link at the bottom.
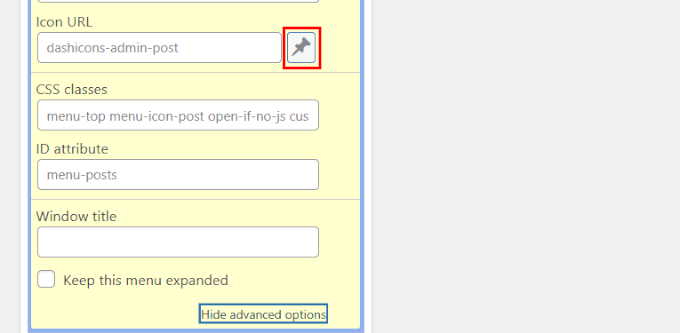
Now, click on the button next to the ‘Icon URL’ field.
This will reveal a popup where you can see all the available Dashicons. Alternatively, you can click on the ‘Media Library’ button to upload your own image icon.
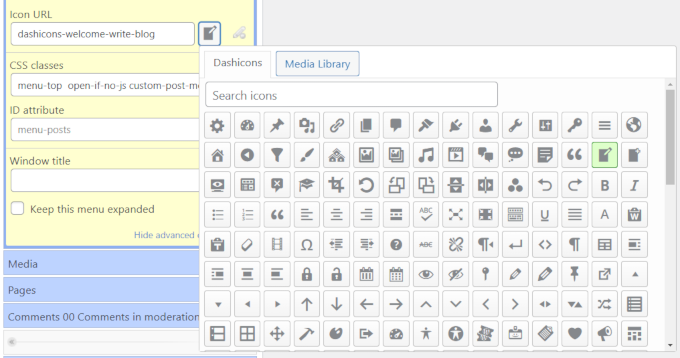
If you want to upload your own image icon, we recommend using a 32×32 image, preferably in transparent PNG format.
After choosing your icon, click on the ‘Save Changes’ button to store your settings.
You will now see your custom menu icon used in the admin menu.
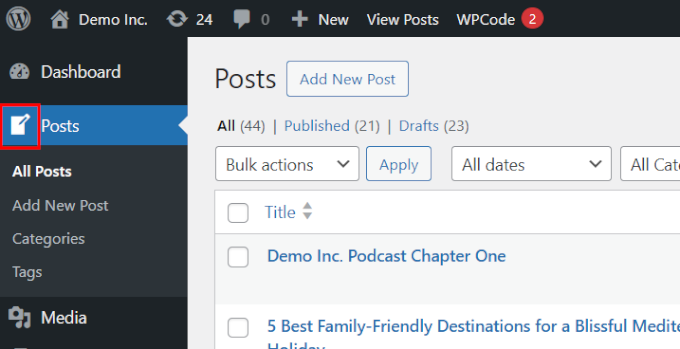
Method 2: Manually Change Admin Menu Icons Using a Code Snippet
This next method requires you to add some custom code to change icons.
If you haven’t done it before, we recommend taking a quick look at our tutorial on adding custom code in WordPress.
The easiest and safest way to add custom code in WordPress is using WPCode. It is the best WordPress code snippets plugin. It allows you to safely add custom code, CSS, and HTML to your WordPress site without accidentally breaking anything.
Note: The plugin also has a free version called WPCode Lite, which will get the job done. However, the pro version gives you extra features that might be helpful.
Example 1. Replacing an Icon Using the Default Dashicons
For this example, we will use the default Dashicons to replace an icon from the existing icon set.
It’s important to note that WordPress already loads Dashicons, which are highly optimized for performance. So, using them will not impact page load speed.
That said, before you run the code, you need to note down the following:
- The URL for the menu item you want to change
- The icon name you want to use
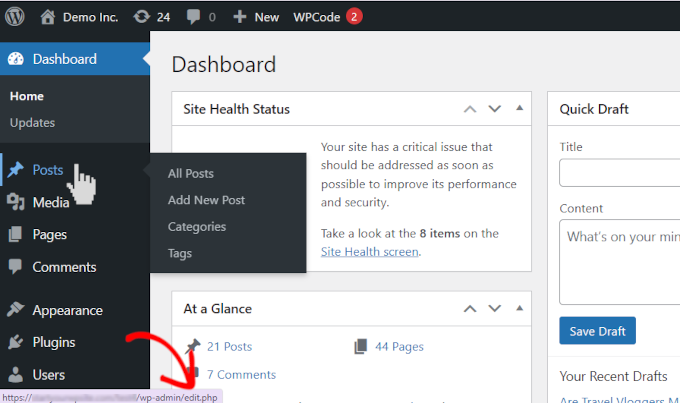
First, you need to find the page URL for the menu item you want to customize. For instance, let’s say you want to change the icon for the ‘Posts’ menu.
Move your mouse over to the Posts menu, and you will see the URL it links to in your browser’s status bar at the bottom of the page. You just need the last part of the URL, which in this case would be edit.php.
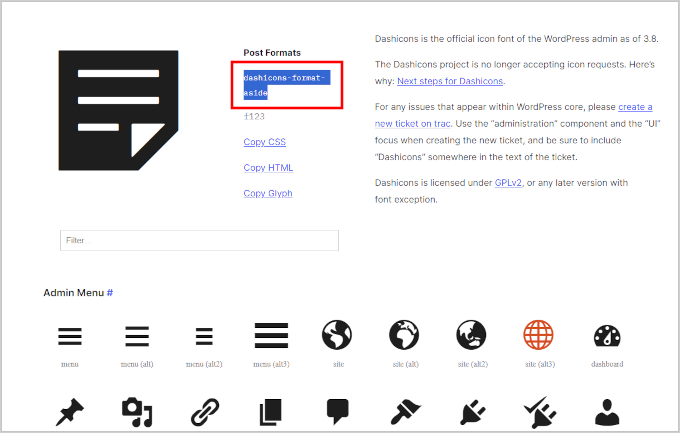
Next, go to the Dashicons website and click on the icon you want to use.
Clicking on any icon will show its name and slug at the top. At this point, you need to copy the slug because you’ll need it in the next step.
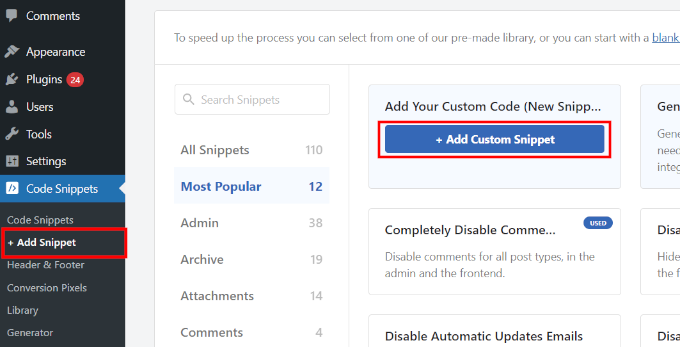
Once you’ve done that, go to the Code Snippets » + Add Snippet page and hover your mouse over the ‘Add Your Custom Code (New Snippet)’ box.
Then, simply click on the ‘+ Add Custom Snippet’ button that appears.
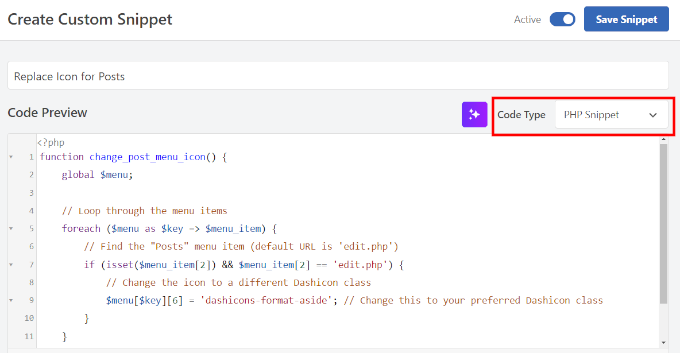
On the next screen, provide a title for your snippet and select PHP Snippet under the Code Type option.
After that, you can copy and paste the following code into the code editor box:
function change_post_menu_icon() {
    global $menu;

    // Loop through the menu items
    foreach ($menu as $key => $menu_item) {
        // Find the "Posts" menu item (default URL is 'edit.php')
        if (isset($menu_item[2]) && $menu_item[2] == 'edit.php') {
            // Change the icon to a different Dashicon class
            $menu[$key][6] = 'dashicons-format-aside'; // Change this to your preferred Dashicon slug
        }
    }
}
add_action('admin_menu', 'change_post_menu_icon');
Don’t forget to change the dashicons-format-aside to the slug you copied earlier.
Your code will appear like this in the editor:
Next, you need to tell WordPress where to run this code.
Admin menu icons appear inside the WordPress admin area. On the same page, scroll to the Insertion section and select ‘Admin Only’ under the Location option.
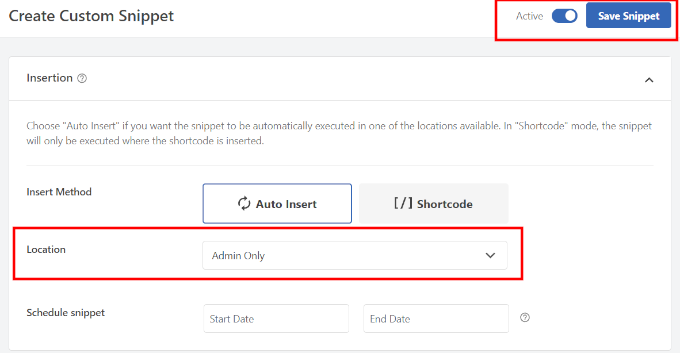
Lastly, switch your snippet to Active and click the ‘Save Snippet’ button to save your changes.
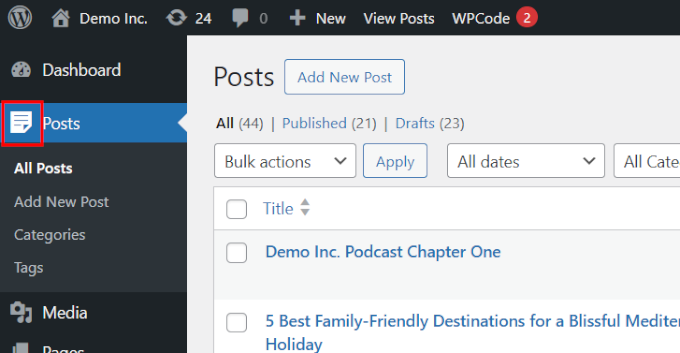
WordPress will now start using the icon you selected for the Posts page.
Example 2. Use Font Awesome Icon for a Menu Item in The WordPress Admin Area
The default Dashicon library has a limited set of icons. The good news is that you can use a font and icon library like Font Awesome, which has a much larger set of icons.
However, this means you will have to load Font Awesome, which may slow down your WordPress admin area slightly (only a few milliseconds).
Before you add any code, first you need to find the icon you want to use. Go to the Font Awesome website and switch to the Free Library.
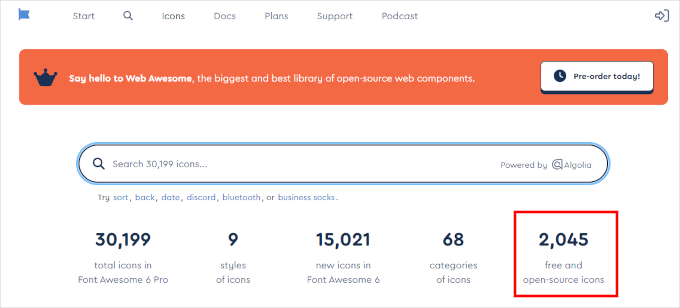
You will see all the icons available for free.
Click on the icon you want to use, and it will open in a popup. From here, you need to copy the icon’s Unicode value.
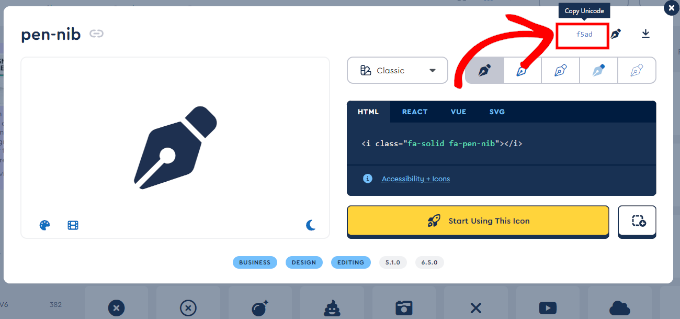
After that, go to the Code Snippets » + Add Snippet page in your WordPress dashboard.
Go ahead and click on the ‘+ Add Custom Snippet’ button within the ‘Add Your Custom Code (New Snippet)’ box.

On the next screen, provide a title for your snippet and select PHP Snippet as the Code Type option.
After that, you can copy and paste the following code into the code editor box:
// Enqueue Font Awesome in the admin area
function enqueue_font_awesome() {
    wp_enqueue_style('font-awesome', 'https://cdnjs.cloudflare.com/ajax/libs/font-awesome/6.0.0-beta3/css/all.min.css');
}
add_action('admin_enqueue_scripts', 'enqueue_font_awesome');

// Add custom class to the Posts menu item
function add_custom_post_menu_class() {
    global $menu;

    foreach ($menu as $key => $menu_item) {
        if (isset($menu_item[2]) && $menu_item[2] == 'edit.php') {
            $menu[$key][4] .= ' custom-post-menu-class';
        }
    }
}
add_action('admin_menu', 'add_custom_post_menu_class');

// Add custom CSS to change the icon to a Font Awesome icon
function custom_admin_menu_icon() {
    echo '<style>
        .custom-post-menu-class .wp-menu-image:before {
            font-family: "Font Awesome 5 Free" !important;
            content: "\f015"; /* Unicode for the Font Awesome icon */
            font-weight: 900; /* Needed for solid icons */
        }
    </style>';
}
add_action('admin_head', 'custom_admin_menu_icon');
Don’t forget to replace \f015 with the Unicode value you copied earlier.
Your code will appear like this in the editor:
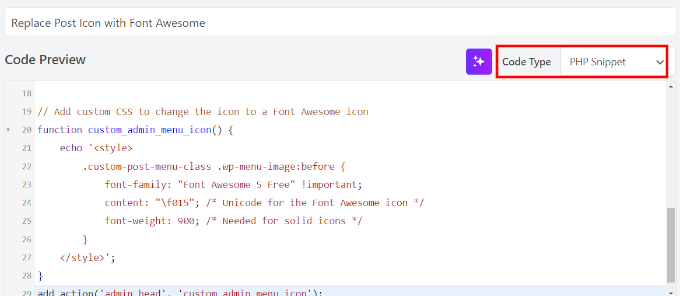
Next, you need to tell WordPress where to run this code.
Admin menu icons appear inside the WordPress admin area, so you can scroll to the Insertion section and select ‘Admin Only’ as the Location option.

Lastly, switch your snippet to Active and click on the ‘Save Snippet’ button to save your changes.
WordPress will now start using the icon you selected for the Posts page.
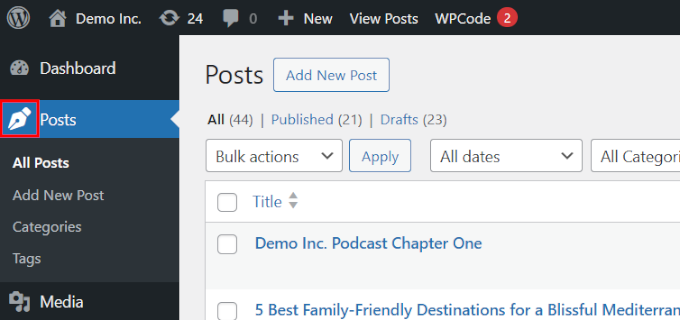
Bonus: Add Icons for Custom Post Types in WordPress
Custom post types allow you to create unique types of content for your WordPress website. These are not default posts or pages but something totally original to your site.
If you are using a custom post type on your WordPress website, you might want to change its icon so that you can easily identify it.
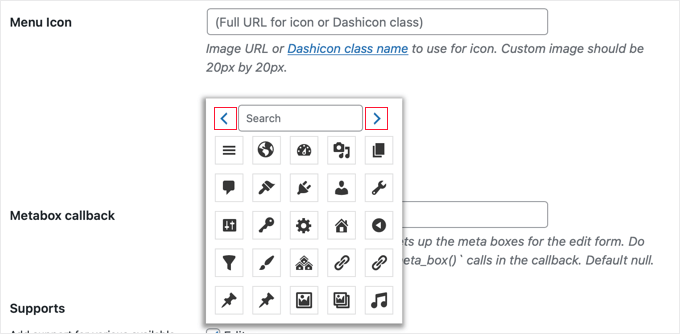
In that case, check out our detailed tutorial on the subject, which shows multiple ways to change or add icons for your custom post types.
We hope this article helped you change or add admin icons in WordPress. You may also want to check out how to white-label the WordPress admin dashboard or view these expert tips on customizing the WordPress admin area for better workflows.
If you liked this article, then please subscribe to our YouTube Channel for WordPress video tutorials. You can also find us on Twitter and Facebook.


Have a question or suggestion? Please leave a comment to start the discussion.