By default, custom post types all look the same, which can be confusing. Unique icons can help you quickly identify different types of content.
Plus, getting the right icons for your custom post types can make a huge difference in navigating your WordPress admin dashboard. When you log in, you will see entries for posts, pages, and custom post types in the sidebar.
In this article, we’ll walk you through how to add different icons for your custom post types.
Why Add Icons for Custom Post Types in WordPress?
You usually use a post or a page when working with your WordPress website. However, you can create other kinds of content using custom post types.
For example, WooCommerce uses a custom post type called ‘Product’ to stock your store.
Custom post types are listed in the WordPress admin area alongside posts and pages in the left-hand menu. Each menu item in WordPress has an icon beside it, which comes from an icon font called Dashicons.
The problem is that all custom post types will use the same icon as posts. So, if you have several custom post types, it will be easier to find the right one if they all have different icons.

With that in mind, we’ll show you how to add icons for custom post types in WordPress. Here’s what we’ll cover in this tutorial:
Ready? Let’s get started.
Adding Icons for Custom Post Types With a Plugin
If you’re new to registering custom post types or are unfamiliar with code, then we recommend using the Custom Post Type UI plugin to create post types and taxonomies.
Creating a Custom Post Type With a Plugin
First, you’ll need to create a custom post type. If you have already done this, then you can skip to the ‘Adding an Icon to a Custom Post Type With a Plugin’ section below.
Once you install and activate the plugin, navigate to CPT UI » Add/Edit Post Types to create a new custom post type. Then, make sure you’re on the ‘Add New Post Type’ tab.
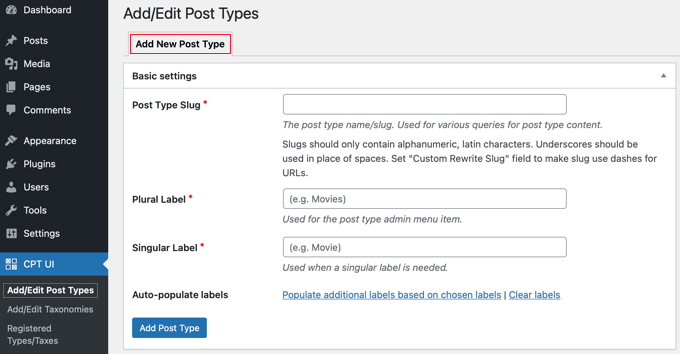
You’ll then need to provide a slug for your custom post type, such as ‘movies.’ Below that, you enter plural and singular names, such as ‘books’ and ‘book.’
After that, you’ll want to click the link that says, ‘Populate additional labels based on chosen labels.’ This will automatically fill in the additional label fields below and usually save you time.
Alternatively, you can manually add the labels to the ‘Additional Labels’ section.
Next, let’s scroll down to the ‘Settings’ section and set up different attributes for your post type. Each option has a brief description explaining its function.
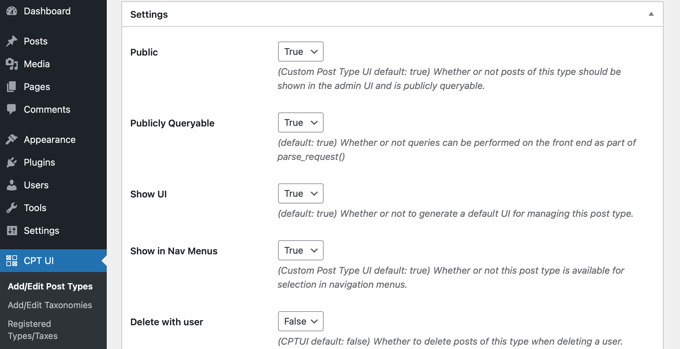
For instance, you can choose how to sort the post type and whether to make it hierarchical.
Below the general settings, you will see options to select which editing features this post type would support. Simply check the options that you want to be included.
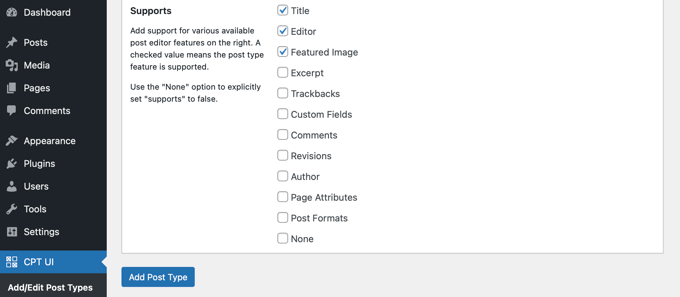
Finally, go ahead and click the ‘Add Post Type’ button to save and create your custom post type.
For more detailed instructions on creating a custom post type using Custom Post Type UI, you might want to see the first method in our guide on how to create a custom post type in WordPress.
Adding an Icon to a Custom Post Type With a Plugin
Once you have created your custom post type, it’s time to choose an icon. This step is easy because the Custom Post Type UI plugin supports Dashicons by default.
First, you’ll want to head over to CPT UI » Add/Edit Post Types and click the ‘Edit Post Types’ tab at the top of the page. From here, make sure the correct post type is selected from the dropdown menu.

Once you’ve done that, simply scroll down to Settings near the bottom of the same page and then locate the ‘Menu Icon’ section.
You should now see two options for adding an icon to the custom post type.
The ‘Choose dashicon’ button lets you pick any Dashicon, and ‘Choose image icon’ allows you to upload or choose an image icon from your media library.

For this tutorial, we’ll click the ‘Choose dashicon’ button.
You can now browse through hundreds of icons using the arrows at the top of the popup. Additionally, you can search for a Dashicon.
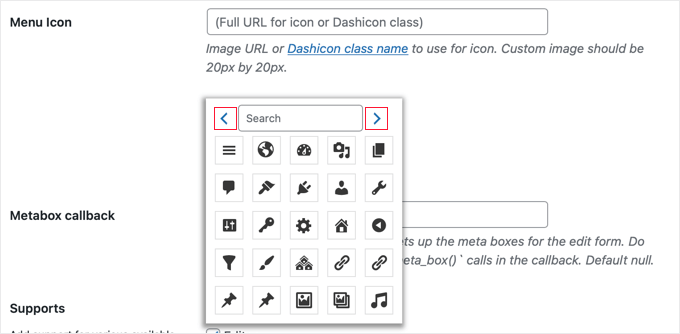
For this tutorial, we’ll search for ‘book.’
Then, we found 4 matching icons, 2 ‘Facebook’ icons, and 2 ‘book’ icons. You can simply click on the one you wish to use.
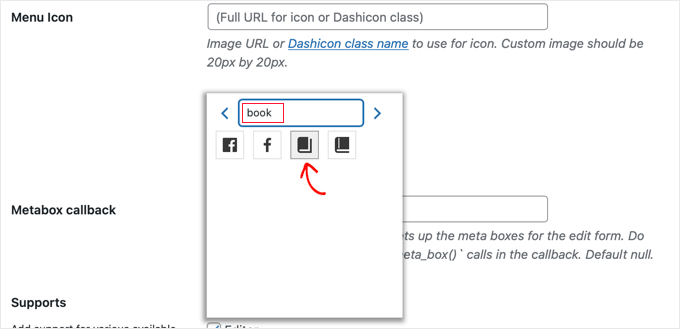
The CSS class of the selected icon will be automatically entered in the ‘Menu Icon’ field.
Then, let’s make sure you scroll down and click the ‘Save Post Type’ button to store your settings.

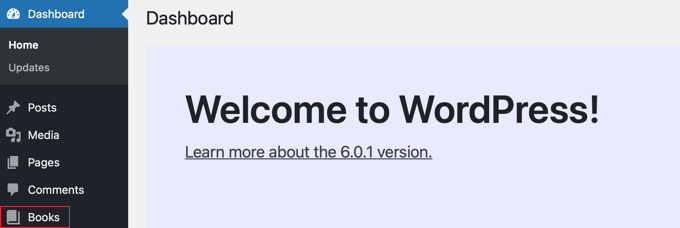
From here, you can go back to your admin dashboard and locate the custom post type in the left-hand sidebar.
You should see the new icon beside the post types in the menu.
Adding Icons for Custom Post Types Manually
If you created your custom post types manually with code, then you’ll also have to add the icons manually.
First, let’s visit the Dashicons website to find the icon you want to use for your post type.
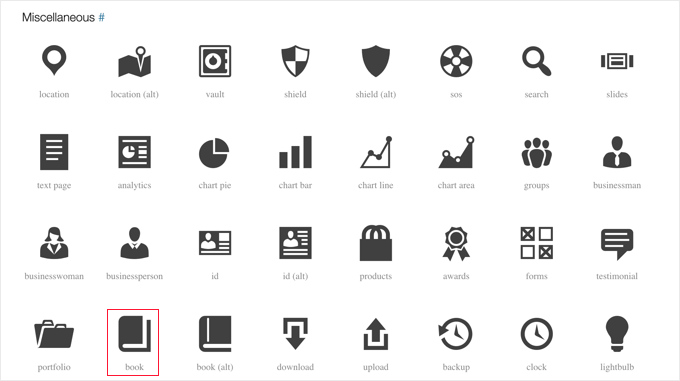
For this tutorial, we’ll scroll down to the ‘Miscellaneous’ section and click the ‘book’ icon.
You’ll then land on a page with more information about the icon, such as the category name and the icon’s CSS class.
For example, in the following screenshot, the category is ‘Miscellaneous’ and the CSS class is ‘dashicons-book.’

Let’s copy the CSS class to the clipboard.
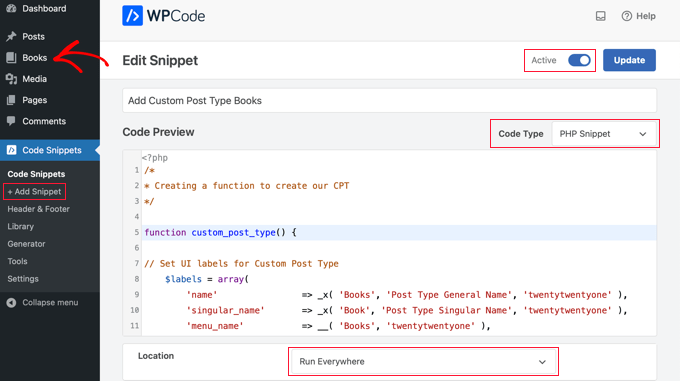
Now, you’ll need to add some code to the place where you created the custom post type. That could be your theme’s functions.php file, or you might have used a code snippet plugin such as WPCode.
To see this in action, the code snippet below creates a custom post type called ‘Books’ and also adds a menu icon by adding a Dashicons CSS class on Line 45.
/*
* Creating a function to create our CPT
*/

function custom_post_type() {

// Set UI labels for Custom Post Type
    $labels = array(
        'name'                => _x( 'Books', 'Post Type General Name', 'twentytwentyone' ),
        'singular_name'       => _x( 'Book', 'Post Type Singular Name', 'twentytwentyone' ),
        'menu_name'           => __( 'Books', 'twentytwentyone' ),
        'parent_item_colon'   => __( 'Parent Book', 'twentytwentyone' ),
        'all_items'           => __( 'All Books', 'twentytwentyone' ),
        'view_item'           => __( 'View Book', 'twentytwentyone' ),
        'add_new_item'        => __( 'Add New Book', 'twentytwentyone' ),
        'add_new'             => __( 'Add New', 'twentytwentyone' ),
        'edit_item'           => __( 'Edit Book', 'twentytwentyone' ),
        'update_item'         => __( 'Update Book', 'twentytwentyone' ),
        'search_items'        => __( 'Search Book', 'twentytwentyone' ),
        'not_found'           => __( 'Not Found', 'twentytwentyone' ),
        'not_found_in_trash'  => __( 'Not found in Trash', 'twentytwentyone' ),
    );

// Set other options for Custom Post Type

    $args = array(
        'label'               => __( 'books', 'twentytwentyone' ),
        'description'         => __( 'Book reviews', 'twentytwentyone' ),
        'labels'              => $labels,
        // Features this CPT supports in Post Editor
        'supports'            => array( 'title', 'editor', 'excerpt', 'author', 'thumbnail', 'comments', 'revisions', 'custom-fields', ),
        // You can associate this CPT with a taxonomy or custom taxonomy.
        'taxonomies'          => array( 'genres' ),
        /* A hierarchical CPT is like Pages and can have
        * Parent and child items. A non-hierarchical CPT
        * is like Posts.
        */
        'hierarchical'        => false,
        'public'              => true,
        'show_ui'             => true,
        'show_in_menu'        => true,
        'show_in_nav_menus'   => true,
        'show_in_admin_bar'   => true,
        'menu_position'       => 5,
        'menu_icon'           => 'dashicons-book',
        'can_export'          => true,
        'has_archive'         => true,
        'exclude_from_search' => false,
        'publicly_queryable'  => true,
        'capability_type'     => 'post',
        'show_in_rest' => true,

    );

    // Registering your Custom Post Type
    register_post_type( 'books', $args );

}

/* Hook into the 'init' action so that the function
* Containing our post type registration is not
* unnecessarily executed.
*/

add_action( 'init', 'custom_post_type', 0 );
To customize the icon when registering a custom post type using the code above, simply add one of the following snippets to Line 45.
'menu_icon' => 'dashicons-book',
Alternatively, you can add an image icon to your ‘Media Library’ and use the URL of the icon instead of the CSS class:
'menu_icon' => 'http://www.example.com/wp-content/uploads/2022/08/your-cpt-icon.png',
The extra spaces in these snippets are intentional and will ensure the code lines up neatly when you paste it into the larger code block above.
Remember that when you use this code, you must change it to your own Dashicon CSS class or image icon URL.

There you have it!
We hope this tutorial helped you learn how to add icons for custom post types in WordPress. Next, you may also want to check out our guides on how to include custom post types in WordPress search results and how to switch/convert custom post types in WordPress.
If you liked this article, then please subscribe to our YouTube Channel for WordPress video tutorials. You can also find us on Twitter and Facebook.


Tasawar
Thanks This article just saved my day
Jonathan
Thanks for this post. I’m not sure why it is not working for me. Any ideas on where to look?
md alamgir miah alam
Your items are good work . Every body can use it .Thanks for it
Karl
Thanks for your helpful article! A tiny information missing is the pixel dimensions of an icon in case you refer to an image by defining a full url. Otherwise very nice!
ryanbowden
Ah that is really Helpful thank you!