When it comes to tracking the performance of your marketing campaigns and website optimization, you will need to know how users interact with your site. The easiest way to do this is by using Google Analytics.
However, many business owners only look at pageviews, referral sources, time spent on a page, and other basic metrics.
For more in-depth insights, you will need to use event tracking. This will help you see where people click, which videos they watch, which forms they submit, and more.
In this article, we will show you how to add Google Analytics event tracking in WordPress.
What Is Event Tracking in Google Analytics?
Event tracking allows you to measure user interactions on your website. These interactions can include clicking on a button, playing a video, downloading files, submitting forms, and more.
Let’s imagine you added a video to your product page and want to know how effective it is for your conversions. Event tracking allows you to track how many users played the video so you can judge for yourself.
Another example is form submissions. If you are using a contact form plugin, then with event tracking, you can see how users interacted with that form. It gives a complete picture of form conversions and abandonment.
The same goes for file downloads included on a page. You can track how many users downloaded a file using event tracking and even which button on the page was clicked most.
Luckily, with Google Analytics, you can easily set up event tracking in WordPress. This allows you to see how users behave on your site. You can then change your strategy to add content that generates more user engagement and interaction. Ultimately this means more sales and conversions on your website.
That said, let’s look at how to add Google Analytics event tracking in WordPress.
Setting Up Google Analytics in WordPress
The first thing you’ll need to do is set up Google Analytics on your WordPress website. However, this requires adding a code snippet to your website, which can be tricky for beginners.
To insert the tracking code, you’ll have to either hire a developer or edit the code yourself. If you make a mistake while adding the code, the analytics might not work properly, and you may risk breaking your website.
An easier way to set up Google Analytics in WordPress is by using MonsterInsights. It is the best analytics solution on the market and has over 3 million users. The plugin lets you connect your analytics account with your site without touching a single line of code.
While the latest Google Analytics 4 version uses an event-based model for tracking, you would still have to manually set up some custom tracking for your website.
On the other hand, MonsterInsights automatically configures event tracking on your website. You don’t have to manually add Google Analytics events or edit code.
For this tutorial, we will use the MonsterInsights Pro version because it offers advanced features and more dashboard reports. There is also a MonsterInsights Lite version, which you can use for free to set up Google Analytics.
First, you’ll need to install and activate the Google Analytics plugin. If you need help, then please see our guide on how to install a WordPress plugin.
Upon activation, the plugin will add a new menu item labeled ‘Insights’ to your WordPress admin menu.
You’ll also see a welcome screen with the setup wizard. Go ahead and click the ‘Launch the Wizard’ button.

Next, you can follow the onscreen instructions to complete the setup. For more details, please see our guide on how to install Google Analytics in WordPress for beginners.
Once Google Analytics is connected to your website, you can start tracking different events on your site.
Tracking Google Analytics Events in WordPress
There are different events you can track in Google Analytics. These include link clicks, button clicks, video plays, download files, form submissions, product purchases, and more. With
Let’s look at some important Google Analytics events you should track on your website.
1. Track Link and Button Clicks
Links and buttons are some of the most common ways users can interact with your website. For example, they can click a link to read a blog post, sign up for a newsletter, click on an affiliate link, or click the buy now button.
With MonsterInsights, you can automatically track link clicks in WordPress. It also shows a report inside the dashboard, so you can quickly see how users are interacting with your website.
To view the report, you can head to Insights » Reports from the WordPress dashboard. From there, simply go to the Publishers » Overview tab.
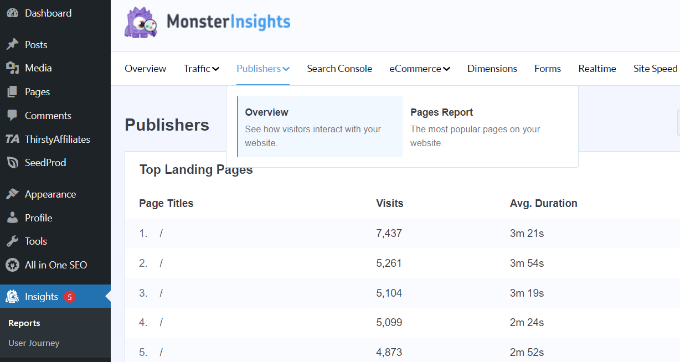
Next, you can scroll down to view your link tracking reports.
For instance, you can see the top outbound links on your site. These are external links to other websites that users click on to leave your site. Using this data, you can generate new content ideas and posts for your website.

Similarly, the top affiliate links show which affiliate is performing the best. You can promote the high-converting affiliate more to boost conversions.
To learn more, please see our guide on how to track link clicks and button clicks in WordPress.
2. Track File Downloads on Your Website
If your website offers downloadable content, then file downloads are another important Google Analytics event to track. File download tracking is great for membership sites or websites that offer free resources like ebooks in exchange for email addresses.
You can uncover which file type your users prefer or the type of content they like to download. Then, using this data, you can create similar resources to boost downloads on your site.
MonsterInsights automatically tracks file downloads for common file types, such as documents, spreadsheets, presentations, PDFs, and zip files. You can also add more file types to track in Google Analytics.
The best part, you get to see the report inside your WordPress dashboard. In the Publishers report, you can also view your Top Download Links. The report will show the file name and the number if clicks it got.
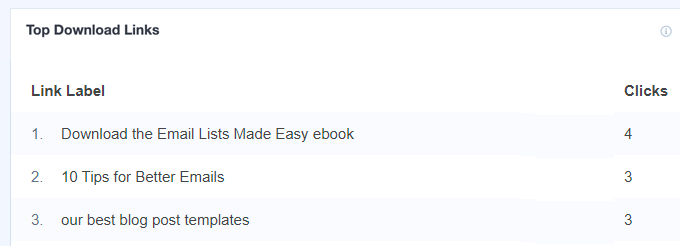
You can also view the report in Google Analytics.
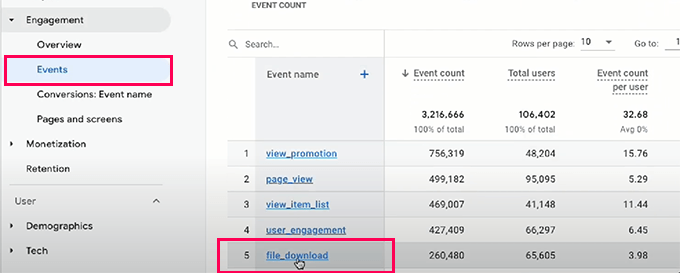
Simply log in to your Google Analytics account and then click on the Reports » Engagement » Events tab.
After that, click on the ‘file_download’ link under the ‘Event name’ column to view your file downloads report.
3. Track Video Analytics in WordPress
Next, you can also track multiple videos on your website by setting up events in Google Analytics. This will help you see which video is performing the best and which topics your audience is interested in.
Now, Google Analytics doesn’t track detailed video analytics by default. You’d have to manually set up events, which requires editing code.
An easier way to do this is by using MonsterInsights. It offers a media addon that automatically tracks YouTube and Vimeo videos embedded on your site.
To view the report, simply go to Insights » Reports and click on the ‘Media’ tab at the top.
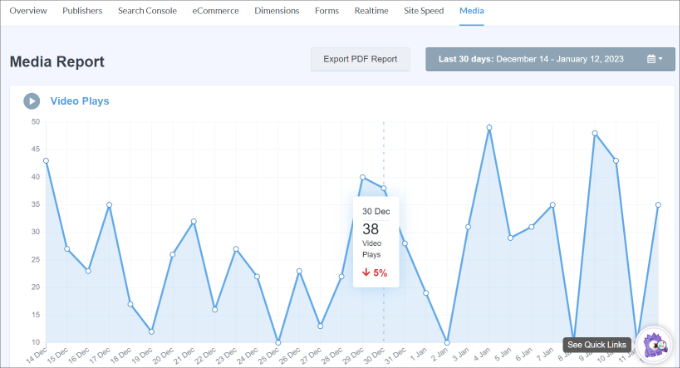
You will now see an overview of the number of video plays in a graph.
If you scroll down, then you’ll also see the number of video plays, average watch time, and completion rate for each video.

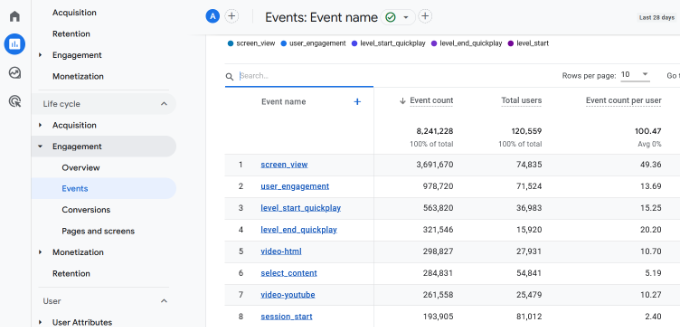
You can also view video event tracking reports in Google Analytics. Simply go to Engagement » Events from the menu on the left and then look for events that include the term ‘video’.
For instance, you can view events like ‘video-youtube,’ ‘video-vimeo,’ or ‘video-html.’
To learn more, please see our guide on how to track video analytics in WordPress.
4. Track Form Submission in WordPress
Forms are an essential part of any website, as they allow visitors to contact you. Plus, you can use forms to build an email list, accept files from users, and grow your business.
Without form tracking, you won’t know how each form is performing on your site. You’ll be using your best guess and shooting in the dark to boost form conversions. By setting up form tracking in Google Analytics, you get to see how different forms are performing on your website.
MonsterInsights works with some of the best WordPress form plugins like WPForms, Formidable Forms, Gravity Forms, and more. It automatically tracks them on your site and shows a report in the WordPress dashboard.
You can view the report by going to Insights » Reports from the WordPress dashboard and then heading to the ‘Forms’ tab.
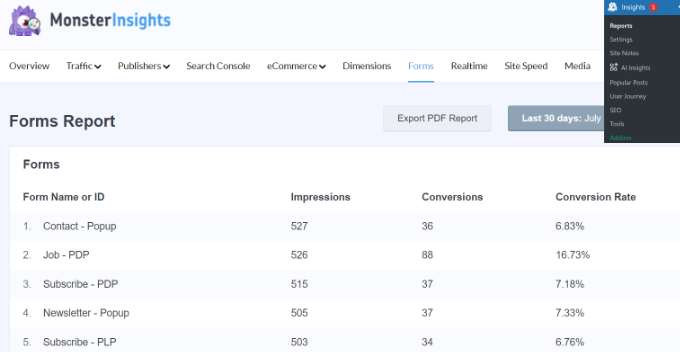
In the report, you’ll see metrics like impressions, which tell the number of people who have viewed your form. Other metrics include conversions, which are the number of people who completed the form, and conversion rates for each form on your website.
You can learn more by following our step-by-step guide on how to set up WordPress form tracking in Google Analytics.
5. Track Purchased Products in eCommerce Store
If you have an eCommerce store, event tracking can help you see how users interact with your products, where they click, and which items they buy.
MonsterInsights easily integrates with popular eCommerce plugins like WooCommerce, Easy Digital Downloads, LifterLMS, and more. Using its eCommerce addon, you can automatically set up event tracking on your online store without manually editing code.
The best part is that you get detailed reports that are easy to understand and get insights.
To view the report, simply go to Insights » Reports from the WordPress dashboard. From here, click on the ‘eCommerce’ tab and head to ‘Overview.’
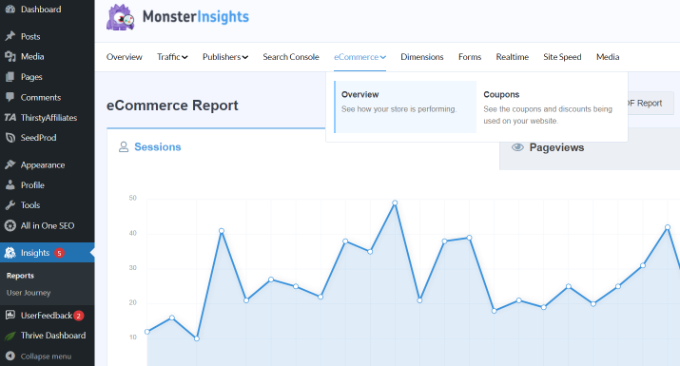
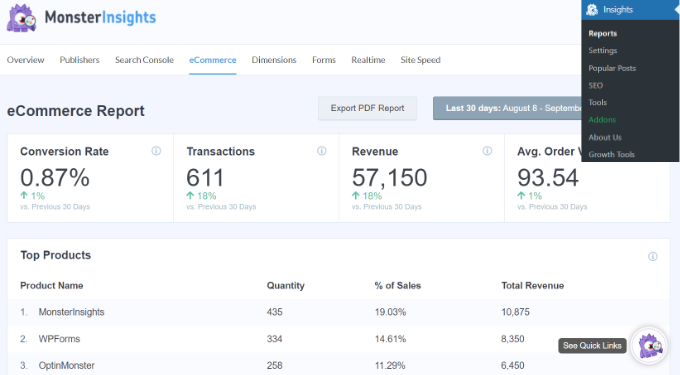
Next, you can scroll down to see different metrics.
For instance, you can see which products people buy the most on your website, along with other metrics like conversion rate, transactions, revenue, and average order value.
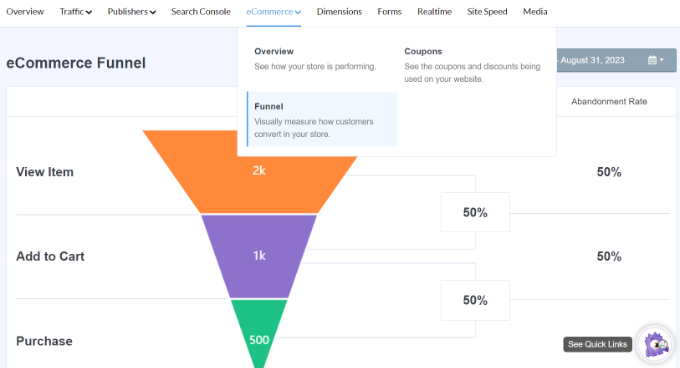
MonsterInsights also shows a Funnel report that helps visualize the path a customer takes on your store. Simply click on the Funnel option under the eCommerce tab.
In this report, you can see the flow of users who viewed an item on your store, added it to the cart, and purchased the item.
See our detailed guide on how to properly set up eCommerce tracking in WordPress for more details.
Manually Add Custom Events to Google Analytics
While MonsterInsights makes it very simple to add event tracking to WordPress, you can also create custom events in Google Analytics as well.
To do that, you’ll need to first log in to your Google Analytics account and then go to the ‘Admin’ settings.
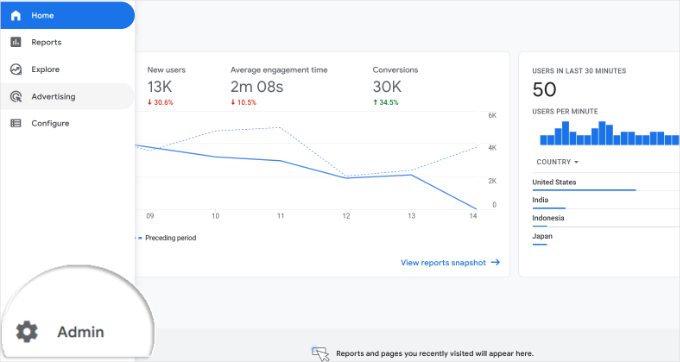
Next, you will see different settings for your property.
Go ahead and click the ‘Events’ option in the Data Display section.
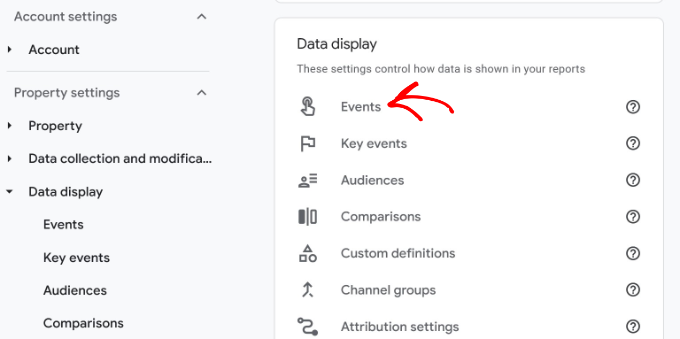
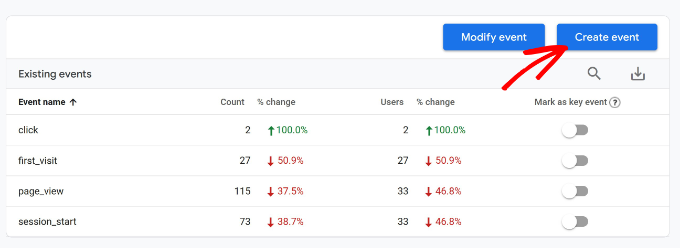
After that, you should see the events that Google Analytics adds by default.
To add a new event, simply click the ‘Create event’ button.
Next, you’ll need to choose a data stream.
Go ahead and click on the website where you’d like to add the new event.

On the next screen, Google Analytics will show your custom events. Since we’re creating it for the first time, this area will be empty.
To continue, click the ‘Create’ button.

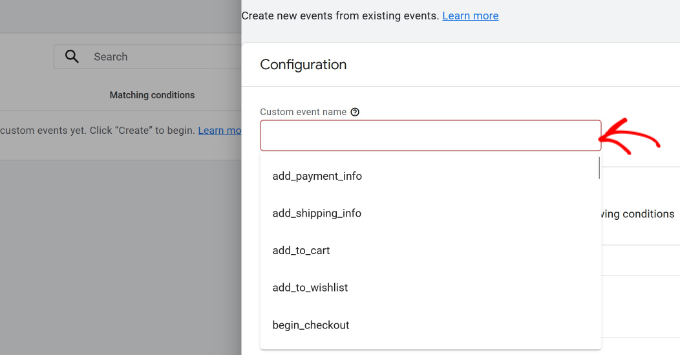
After that, you’ll need to start by selecting an event name.
Simply click the ‘Custom event name’ field and a dropdown menu will open. You can then scroll the list and select an event or manually enter a name.
For this tutorial, we want to see how many people submit their contact details and land on the thank you page.
Next, you’ll need to enter a ‘Value’ in the ‘Matching conditions’ section.
For example, you can enter ‘page_view’ in the Value field. For now, you can leave the parameter and operation fields as default.
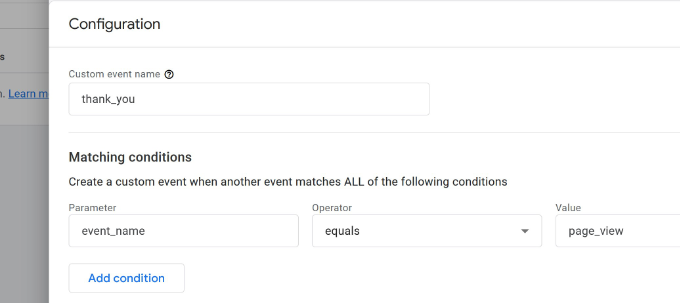
You can now add more conditions to your custom event. To do so, click the ‘Add condition’ button.
Next, you’ll need to set the parameter, operator, and value for your event. To configure this, you can add the following details:
- Parameter – Since we want to track page visits, we’ll select the ‘page_location’ parameter.
- Operator – Set this to the ‘contains’ option. If the page is case-sensitive, then you can also select the ‘contains (ignore case)’ operator.
- Value – Here, you can enter the URL of your thank you page.
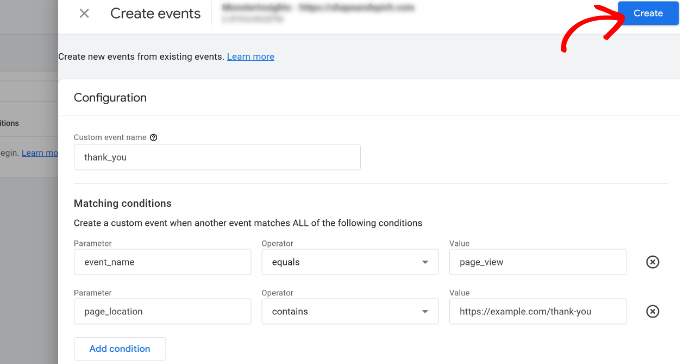
When you’re done, simply click the ‘Create’ button at the top, and your custom event will be ready.
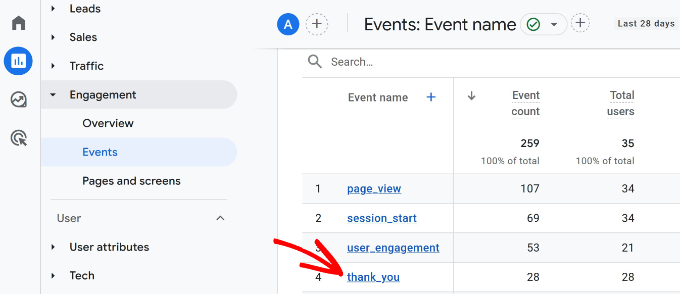
Once your custom event is created, you can view it in Google Analytics by going to Reports » Engagement » Events. From here, navigate to your custom event and click on it to get more details.
We hope this article helped you learn how to add Google Analytics event tracking in WordPress. You may also want to see our guide on how to track user engagement in WordPress and how to get GA4 site annotations in WordPress.
If you liked this article, then please subscribe to our YouTube Channel for WordPress video tutorials. You can also find us on Twitter and Facebook.


David
awesome, super helpful! Thanks guys for the article!! you rock
WPBeginner Support
Glad our article could be helpful
Admin
Andrew Laws
Well thank goodness for this blog post!
I have been banging my head against a wall trying to get Contact Form 7 form submissions to trigger as an event in Analytics for a long time.
I’m struggling to get the event goal working properly in Analytics though. In the goal details I have set up the following but goals are not being recorded:
Category (equals to) – Forms
Action (equals to) – Form submission
Label (equals to) – Contact form
Value (greater than) – 1
Initially I left the value field empty as I can’t enter ‘Submitted’ so it matches the trigger in Tag Manager.
Can you spot where I’m making a glaring mistake here?
Thanks!
michal
thanks, good and helpful !
Nathan
Hey guys!! Awesome article!!
I’ve been having a problem with event tracking on click. I’m using wordpress 4.5 fashionista theme, the problem is:
When I add the tracking code to the link on the text editor it’s everything ok. But If I make any change on the visual editor on the same article after this and save it, the event tracking code simply desapear!!!
Could someone help me with this issue? I’m placing the event code just after the “a” on the beggining of the tag, as the example of the article…
Thank very much!!!
Adam Belson
Hi. We are having problems when adding tracking code (using Tracking on Click). When we do so, we’re seeing that on mobile devices the button no longer works. Not sure if there is anything obvious we need to do differently?
Max
Hey guys!
The article is just brilliant.
I am not sure if there was an upgrade since your post, but i am stuck on “Create Trigger” stage.
First two steps – no problems, but the third (Enable When) and fourth (Fire On) are different for me than what you show.
For you, #3 is “Fire On” with options (All form, some forms) instead of “Enable When” with only filters for me.
So, i have only filters in step 3 “Enable When” and step 4 “Fire On”.
Going through your guide i ended up with both of them having my Form ID in DOM element.
Is that correct?
Honza
Nice article. I was looking for some WP plugin able to do this but now I see it is not necessary.
However, what if I need to know from which site visitor came and submited a form?
I have codes tracking AdWords or Facebook but how to track conversions from regular websites? Any plugin needed?
Thank you for your help.
peter
I set up the goal okay and then inserted the onClick code into the link as described, I hit update, but the code disappears when I go to visual and then back to text view. What am i doing wrong?
WPBeginner Support
Try adding the code when you are done working on your article. Don’t switch to visual mode and just publish or update the post.
Admin
Bob Senoff
Hey Syed,
Excellent piece especially covering Google Tag manager which makes it a lot easier to maintain all of your tags in one place.
Since it’s important to be tracking Google Events on your Call to Action and Buy Now buttons I wanted to point out that MaxButtons Pro lets you do that without any additional coding on the buttons.
Best,
Bob
JANE
This is super helpful. I was able to follow the instructions to make sure that my goals and tags were setup correctly. I was troubleshooting why my goals have 0 completions. It turned out I forgot to publish my tags. Thanks for the step by step instructions.