The default WordPress login page doesn’t provide the best experience and can even confuse your users. That is why we recommend adding a front-end login page to allow users to log in directly from the main part of your website.
This improves the accessibility and overall user satisfaction. Plus, it is convenient, allowing users to access login forms from various parts of your site, such as sidebars or footers.
Over the years, we have created multiple online stores and websites where we offer this functionality for better usability. This has taught us what works and what doesn’t for front-end login pages.
In this article, we will show you how to easily add a front-end login page and widgets in WordPress.
Why and When Do You Need Front-End Login in WordPress?
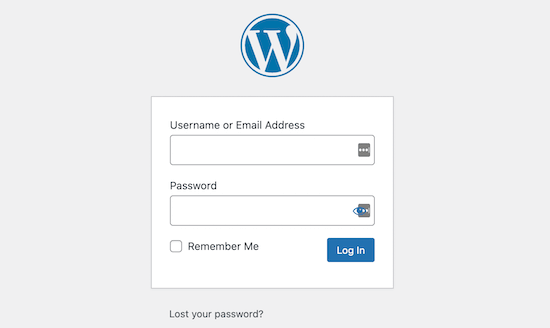
By default, the WordPress login page will show the WordPress branding and usually won’t match the design of your current WordPress website.
This works for smaller WordPress blogs and websites.
However, if you have a membership site, online store, or another site where users can register and log in, then adding a front-end login page and widget offers a better experience for your users.
You can even customize this page with your branding or add a simple login form to your WordPress sidebar.
That being said, let’s see how to easily add a front-end login page and login widget in WordPress. For this tutorial, we will show you the 3 easiest ways to do this, and you can you the links below to jump to the method of your choice:
Video Tutorial
If you’d prefer written instructions, then just keep reading.
Method 1: Add a Front-End Login Page and Widgets in WordPress With WPForms
WPForms is the best WordPress contact form plugin on the market, used by over 6 million websites. It lets you easily create a custom front-end login page and login widget on your website.
First, you’ll need to install and activate the WPForms plugin. For detailed instructions, please see our beginner’s guide on how to install a WordPress plugin.
Note: WPForms also has a free version. However, you’ll need the premium version of the plugin to unlock the User Registration addon.
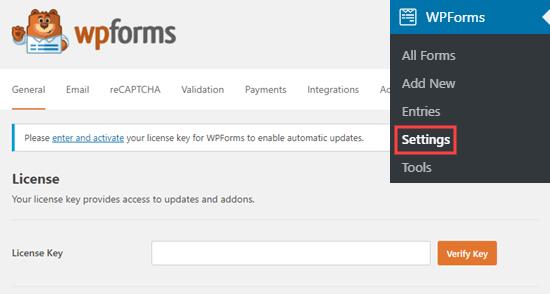
Upon activation, visit the WPForms » Settings page from the WordPress admin sidebar to enter your license key.
You can get this key from your account on the WPForms website.
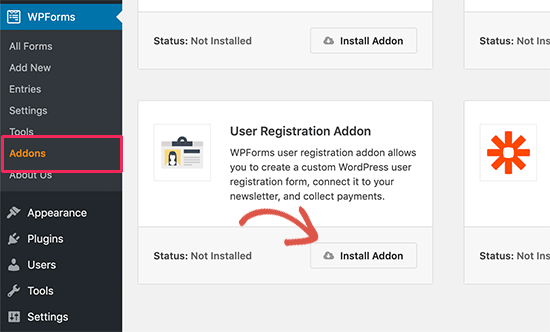
Once you’ve done that, head over to the WPForms » Addons page from the WordPress dashboard to locate the User Registration Addon.
Next, click the ‘Install Addon’ button to download and activate it on your website.
Upon the activation of the User Registration addon, head over to the WPForms » Add New screen from the admin sidebar to launch the form builder.
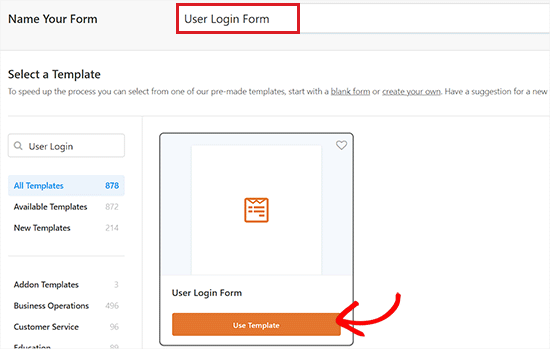
From here, start by typing a name for the form that you are about to create. After that, simply choose the ‘User Login Form’ template to start making your user login form.
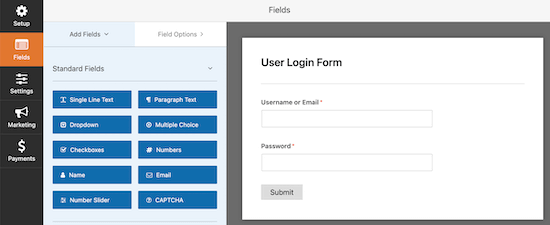
This will launch the template in the form builder, where you will notice a form preview on the right and a column of available fields on the left.
Now, simply drag and drop the fields from the left column to create your login form. For more details, see our guide on how to create a custom login page for WordPress.
Once you are satisfied with your settings, just click the ‘Save’ button to store your changes.
Add Login Form to a Page/Post
Now, to add your login form to a page or post, open the page/post of your choice in the WordPress block editor from the admin area.
Once you are there, click the ‘+’ button to open the block menu and add the WPForms block.
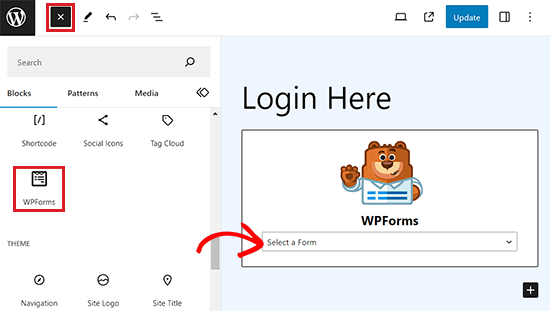
After that, choose the login form that you created from the dropdown menu in the block itself.
Finally, click the ‘Publish’ or ‘Update’ button to store your settings.
Add Login Form to Website Sidebar
If you want to add the login form to your website’s sidebar, then visit the Appearance » Widgets page from the WordPress dashboard.
Here, click the ‘+’ button in the top left corner of the screen to open the block menu.
From here, you need to find and add the WPForms block to the sidebar.
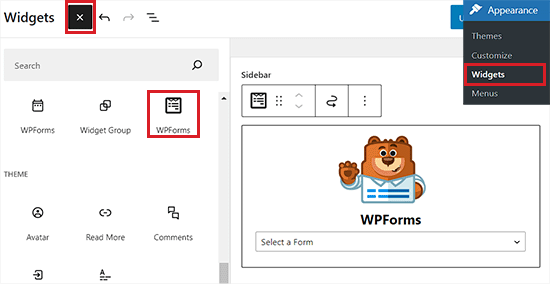
Once you’ve done that, choose the login form from the dropdown menu in the block itself.
Finally, click the ‘Update’ button to store your settings. For more details, see our guide on how to add a login form in your WordPress sidebar.
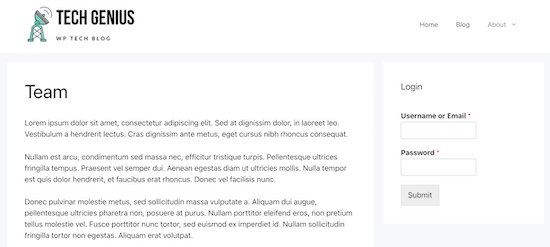
Now, you can visit your WordPress site to view the login form in the sidebar.
Add Login Form in Full Site Editor
If you are using a block-based theme, then you won’t be able to add your login to the website sidebar using the method above.
To add a login form in FSE, visit the Appearance » Editor page from the WordPress dashboard.
This will launch the FSE, where you have to click the ‘+’ button to open the block menu.
From here, locate and add the WPForms block to any place you like on your website.
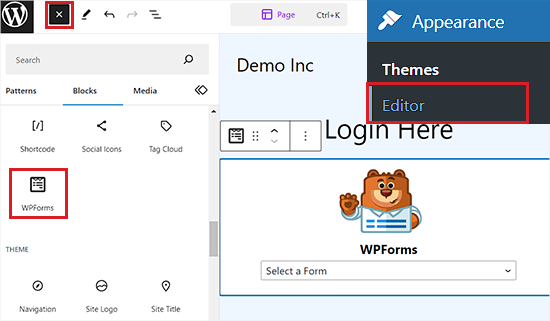
After that, choose the login form that you created from the dropdown menu in the block itself.
Finally, click the ‘Save’ button to store your settings.
Bonus Tip: To further customize your login form, you can see our tutorial on how to style your WordPress forms.
Method 2: Add a Front-End Login Page in WordPress With SeedProd
SeedProd is the best WordPress drag-and-drop page builder on the market, used by over 1 million websites.
It lets you create a completely custom login page that can match the design of your current website or be something unique.
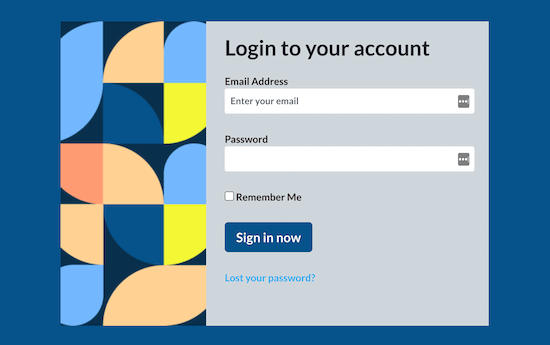
It’s very beginner-friendly and comes with a ton of professionally designed login page templates that you can use to build your login page.
First, you’ll need to install and activate the SeedProd plugin. For details, see our step-by-step guide on how to install a WordPress plugin.
Upon activation, visit the SeedProd » Landing Pages screen from the WordPress admin sidebar and select the ‘Login Page’ option by clicking the ‘Set up a Login Page’ button.
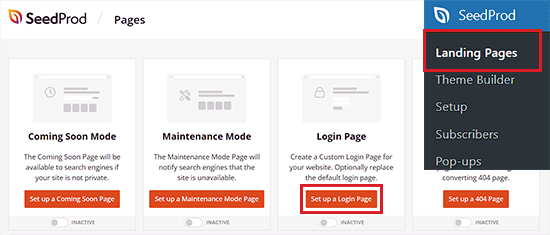
This will direct you to the ‘Templates’ screen, where you can choose a template and use the drag-and-drop builder to customize the page.
Using a blank template, you can even design a custom front-end login page from scratch.
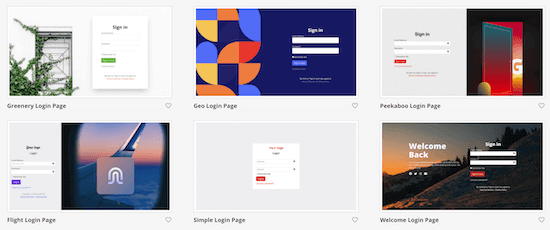
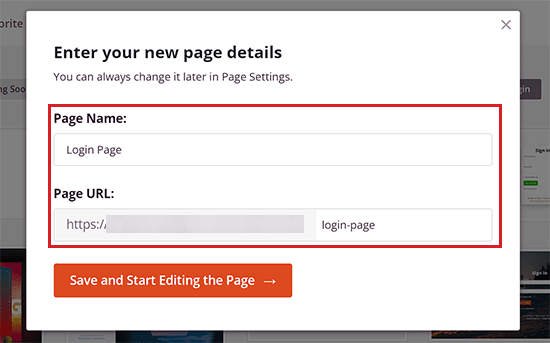
Upon selecting a template of your choice, you’ll be asked to enter a Page Name. SeedProd will then use the page name as the URL for your login form landing page.
Once you’ve done that, click the ‘Save and Start Editing the Page’ button to continue.
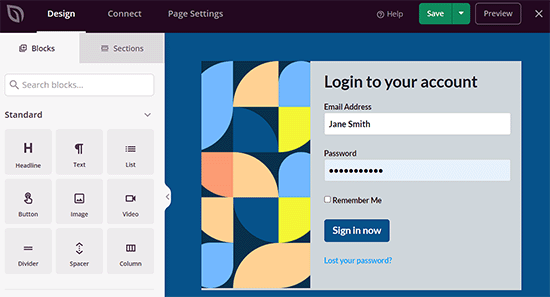
This will launch SeedProd’s drag-and-drop builder, where you’ll see a login page preview on the right with available fields on the left.
From here, you can add any block to the page by simply dragging it from the left menu and placing it anywhere you like.
For more details, see our guide on how to create a custom WordPress login page.
Once you are done designing your page, don’t forget to click the ‘Publish’ button in the dropdown menu at the top to store your settings.
Method 3: Add a Front-End Login Page and Widgets in WordPress With Theme My Login
If you want to add a very simple front-end login page to your site, then you can use the free Theme My Login plugin.
First, you need to install and activate the plugin. For more details, see our beginner’s guide on how to install a WordPress plugin.
Upon activation, the plugin will automatically create pages for login, logout, forget password, and registration.
You can navigate to the Theme My Login » General page from the admin menu and view the plugin settings.
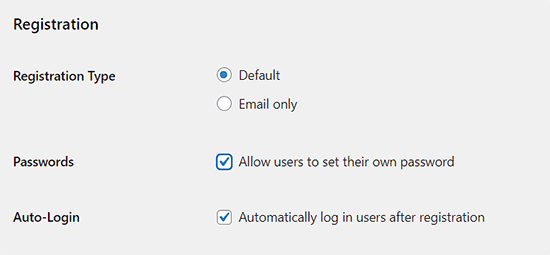
First, you can set the login type. The ‘Default’ setting is the most secure since it asks for an email and password to log in.
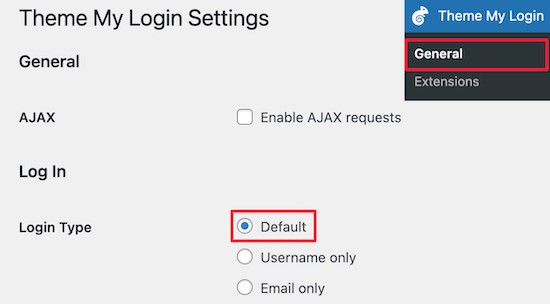
Next, you can choose your Registration settings. We kept the default settings here since they require both email and password to log in.
You can also check the ‘Passwords’ box to let users create their own passwords and the ‘Auto-Login’ box, which automatically logs in users after they register.
After that, you can change your login and registration URLs in the’ Slugs’ settings.
These automatically create redirects. So, the standard “yoursite.com/wp-admin” login URL will redirect to “yoursite.com/login”.
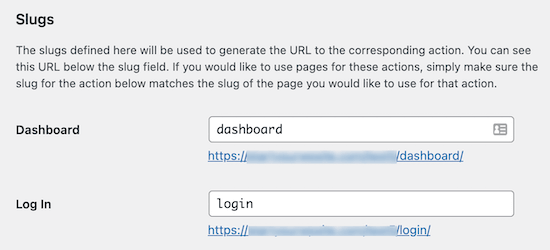
You can keep these URLs the same or change them.
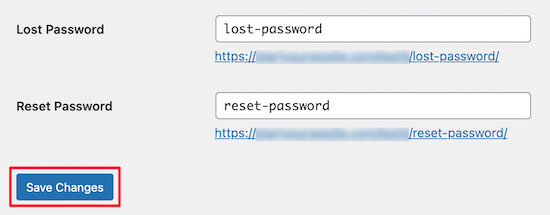
Once you are done making changes, make sure to click the ‘Save Changes’ button.
You can’t add much more advanced functionality unless you upgrade to use their premium extensions.
Still, it is a good solution for users on a budget who want to create a simple front-end login page.
Add the Login Form to a Page/Post
Now, to add the login form created by Theme My Login, open a page/post in the WordPress block editor.
From here, click the ‘+’ button to open the block menu and add the Shortcode block to the page.
After that, add the following shortcode into the block:
[theme-my-login]
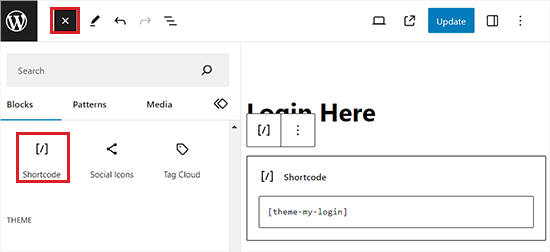
Finally, click the ‘Update’ or ‘Publish’ button to store your settings.
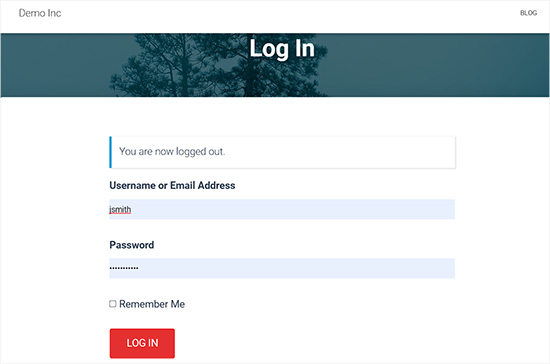
Now, visit your website to view the login form.
Add Login Form to a Widget Area
You can also add a login form to your WordPress widget areas using the Theme My Login block.
Simply navigate to the Appearance » Widgets page and open the block menu by clicking the ‘+’ button.
From here, you must find and add the Theme My Login block to the widget area of your choice.
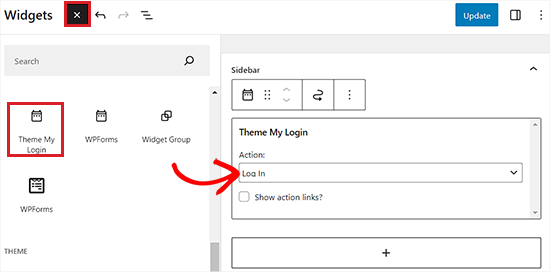
After that, choose the form that you want to add from the dropdown menu in the block itself.
Finally, click the ‘Update’ button to store your settings. Now, visit your WordPress site to view the login form in the widget area.

Bonus: Add CAPTCHA in the WordPress Login Form
Once you have added a custom login form, it is a good idea to add CAPTCHA to it because this page is often a target for hackers and spammers.
Adding CAPTCHA can block spambots and secure your website. You can easily do this with WPForms.
Upon plugin activation, simply visit the WPForms » Settings page from the WordPress dashboard and switch to the ‘CAPTCHA’ tab.
After that, select the ‘reCAPTCHA’ option as your CAPTCHA type.
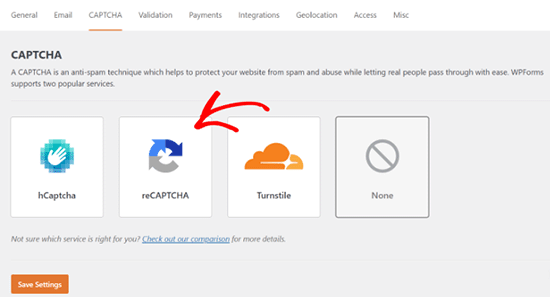
Once you do that, you must visit the Google reCAPTCHA website to create a site key and secret key. These keys will help integrate reCAPTCHA on your WordPress site.
After adding these keys, simply edit the WordPress form that you created earlier and switch to the ‘Settings’ tab.
Then, select the ‘Spam Protection and Security’ option and toggle on the ‘Enable Google v3 reCAPTCHA’ switch. Next, click the ‘Save’ button to store your settings.
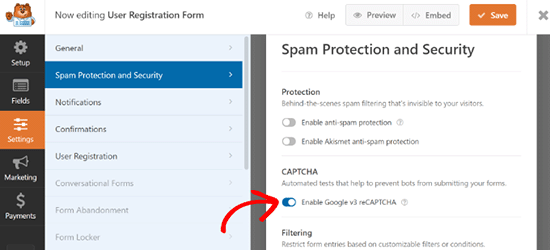
You have now successfully added CAPTCHA to your WordPress login form and made it completely secure. For more detailed instructions, you can see our tutorial on how to add CAPTCHA to WordPress login and registration forms.
We hope this article helped you add a front-end login page and widgets in WordPress. You may also want to see our expert picks of the best WordPress login page plugins and our guide on how to add a custom login URL in WordPress.
If you liked this article, then please subscribe to our YouTube Channel for WordPress video tutorials. You can also find us on Twitter and Facebook.


Jiří Vaněk
Thank you for the tutorial. I’m using a combination of MemberPress and SeedProd, and along with your guides, they’ve helped me create a fantastic membership site. Thanks to this tutorial, I was able to perfect the final detail—the login page. I created it using SeedProd and its templates. It was not only simple but also quick. So now I finally have a personalized login page. For some, this might be just a small detail, but I’m absolutely thrilled about it.
Guy
This plugin is no longer free.
It allows only the most basic functions now.
All the other stuff if set as extensions
WPBeginner Support
Thank you for letting us know, we’ll be sure to take a look at it and update our article when able.
Admin
Ethan
Excellent video voice over perfect very professionnal THANK YOU! The only problem is the video is outdated. The plugin developer made is plugin from free to paid! So we have no access to what you explained
Bobby
Hi, I have a problem that I don’t have the pages. I add their ‘Actions’ but it doesn’t shows anything in the Primary menu.
I download & installed it.
What should I do?
Angela Baker
This video is very well done. Thank you for explaining everything so well.
I was using WP Default login for people to register for my site, but now that isn’t working for some reason. Will this plug in work instead? I don’t want to change any of my admin login, just need a way for the public to register.
Arya
Why recaptcha is not shown in login form?
Navi Singh
Hi dear,
how to enable to any user for post directly there after a login there. if some suitable plugin is avaliable for user post please help me to do that.
Thanks
Chantal
Hi. I have followed your instructions on my WP blog, and the front log in/registration page comes up. But when some one tried to register, it comes up with an error saying “User registration is currently not allowed.”
I have it set up for new user approval.
Can you please help me understand what I have done wrong and how I can get it working.
thanks
Chantal
I have resolved the issue, needed to tick anyone can register in general settings!
Doug Poffinbarger
That was very helpful and well done. Any idea how to add a login authentication in the middle of a post? Instead of downloading a freebie to capture email subscribers, I’d like to require subscription or login in order to “read more” of a given post. This has been really hard to find via google searches. Ideally, it would be a tiny inline form or popup at the end of the truncated article and once they subscribed or logged in, they would automatically see the rest of the article and any others while subscribed.
Jeff
Hello, how do i remove some sections from the user profile page?
The name and type of the form is shown to users on their profile page; please how do i address this?
Mohammad Kashif
Will it work with woocommerce?
WPBeginner Support
Hi Kashif,
Yes, it will work with WooCommerce.
Admin
Mohammad Kashif
Woocommerce already have login page. After install this plugin now i have two login page. How can i make one login page?
WPBeginner Support
Hi Kashif,
You can disable the plugin and use WooCommerce login page.
Mohammad Kashif
How can i redirect woocommerce login page to tml login page?
Rahul
Can you add extra fields to the registration page? If so how? please any one can help me?
HELENANG
I can see that TML provides quite a lot of functionality.
I am simply looking for a login option which will return the user to the page they have come from on our website instead of their profile page. Is there a simpler plugin you would recommend to do just that w/o the chance of conflicting with other plugins? Thanks.
WPBeginner Support
Hi,
You can use WPForms with user registration add on.
Admin
HELENANG
Does This My Login work well with Simple Access Control plugin which provides private access to certain pages of the website?
Does it conflict with the Security provided by the WordFence Security plugin, e.g., Lockout for a certain amount of time after a number of unsuccessful login attempts?
Thanks.
graham
There seem to be quite a few comments on google that woocomerce and TML dont play well together any truth to that?
Don Tedlock
I’m getting an extra, unformatted login and lost password link on my Registration form. How do I remove these links?
Samuel Nyamavor
I’m getting an extra, unformatted login and lost password link on my Registration form. How do I remove these links?
ST
Hi, do you know how to put the login within the Header instead of the sidebar? Thanks! (:
Christina
I would like to know this too.
Saurabh Saneja
Plugin automatically creates login page. Just add it to header menu.
Rachid
It’s a shortcode inside a login page (page created by the plugin once you activited it), you can call the shortcode inside your header php file…(do_shortcode(“…”))
Diane
Hi, is it possible to make the registration page available to admin only?
Tim
Is there a way to add a contact form that saves history with this plugin?
Essentially they would login, they would see an “order form” they could then place an “order”, it would email someone there order. But it would also save their order history so that they could re order items.
Even if you could point me in the right direction, that would be super helpful!
Thanks.
Christian
Is it just me, or is that the wrong video?
WPBeginner Support
Thanks for notifying us. We have added the correct video.
Admin
oliverosM
why is it that every one puts in their title how to do something and it ends up being a plugin setup and not what it says i was expecting something else but it seems every body does the same its easy saying how to make something when its just only a plugin.
Well its a nice article any way.
Matt
Very Helpful – thank you!
Mike Squatrito
Can you add extra fields to the registration page? If so how
Rahul
hey you got this? i also want to add a new field in registration page.
Mr Darlington
Impressive! Let’s check it out…
Leonard Rattini, CCP
Firstly, I do want to commend you for your help to understand WP.
However, as most apps tend to do, and your teaching to accomplish, as well: you headline with a “How to…” complex caption. I prefer to see a headline to include a single noun and single verb that explains “why” I need to do something. Then in its body’s detail instructions, it’s there that tells me “how” to satisfy its “single-purpose” why-objective.
All application sources need to understand, theirs is not the only one we users use. As their “How to’s,” to explain, it’s not always clear what is to be satisfied, and for sure its how-to actions to execute, is not a simple step down bing-bing and done, procedure function.
My 30-years in computer application design is my platform to make this statement. Leonard Rattini, CCP
Rahul Maurya
Is there any method to integrate register or log in using Facebook in this plugin?
Ochelh
Hello,
Very nice tuto. I’de like to add login/logout link to my top menu, this link should switch between login and logout depending if the user is logged in or not. Is it possible to do this with TML and how ?
Regards,