Would you like to customize the WordPress admin toolbar?
The admin bar contains handy links to some of the most used admin pages. However, you might like to add your own shortcuts to the pages you use most when working on your site.
In this article, we’ll show you how to add custom shortcut links to the WordPress admin toolbar.
Why Add Custom Shortcut Links to WordPress Admin Toolbar?
Whenever you are logged in to your WordPress website, you’ll notice a toolbar at the top of the screen. This is the WordPress admin toolbar or admin bar.
There are a few ways to take control of the WordPress admin bar, such as turning it off when viewing your site and disabling it for all users except administrators.
By default, the toolbar displays a set of links to specific administration screens that are found on the admin sidebar. These links allow you to perform common admin tasks quickly.
But everyone has their own list of favorite links that they visit a lot when writing posts or working on their site. These could be pages in your admin area or links to an external resource, service, or website.
You can add those to the WordPress toolbar as custom shortcut links. That way, you and your users can easily access them from your website or admin area. This is especially useful if you run a busy website with multiple authors.
With that being said, let’s take a look at how to add custom shortcut links to the WordPress admin toolbar. We’ll cover three methods:
Adding Custom Shortcut Links to Toolbar With a Plugin
The first thing you need to do is install and activate the WP Custom Admin Interface plugin. For more details, see our step by step guide on how to install a WordPress plugin.
Upon activation, you need to visit the Custom Admin Interface » Admin Toolbar page to configure the plugin. This page displays everything that appears on the toolbar and allows you to add new items.
To add a custom shortcut link to the admin toolbar, you need to click the ‘+ Add Menu Item’ button near the top of the screen.

A new item is added to the top of the list and contains two fields.
One is for the item’s title and the other for the link.

To add a title, you need to click the notebook item to place the title field in edit mode. You can then type the title and then click the checkmark icon to store it.
For this tutorial, we’ll type ’Widgets’.

Similarly, to add the link you need to click the link icon and then type the link. When you’re finished you can click the checkmark icon to save the link.
For this tutorial, we’ll paste the link to the widgets page. It should look like http://example.com/wp-admin/widgets.php. Don’t forget to replace ‘example.com’ with your own domain name.

Make sure you change ‘example.com’ to your own domain name and don’t forget to click the checkmark icon to store the link.
Because the new item is at the top of the list, it will be added to the left side of the admin toolbar. To move it further to the right, you need to move the item further down the list using drag and drop.

Would you like to add more than one custom shortcut link? If so, then simply repeat the same steps to create another item.
If you make a mistake while customizing the admin bar, then you can click the ‘Restore to default WordPress toolbar’ button at the top to remove all your customizations, or the ‘Restore to last save’ button to remove any changes since you last saved.
Finally, you need to scroll to the bottom of the page. Here you can decide which user roles can see the new item and then save your settings.
If you want all logged in users to see your new link, then you need to select ‘Everyone’ from the drop down menu so that the setting reads ‘Implement this for Everyone except’. If you don’t add exceptions, then all users will be able to see the item.

However, if you don’t want users with the Subscribers or Contributors user role to see the item, then you will need to select those roles as exceptions.
You should first click on the ‘+ Add an exception case’ link. This will display a drop down where you can select ‘Role: Subscriber’. Next, click the + icon and add ‘Role: Contributor.’

Another example is if you only want the link to be visible to yourself, or a single user.
In that case, choose the options from the drop down menus so the setting reads ‘Implement this for No-one except User: Person’s Name’.

You’ve almost finished. If you would prefer not to see the custom link when viewing your website, then make sure you also click the checkbox labeled ‘Disable the custom toolbar on the frontend’.
Then, once you have finished configuring the admin toolbar, don’t forget to click the ‘Save All Settings’ button.
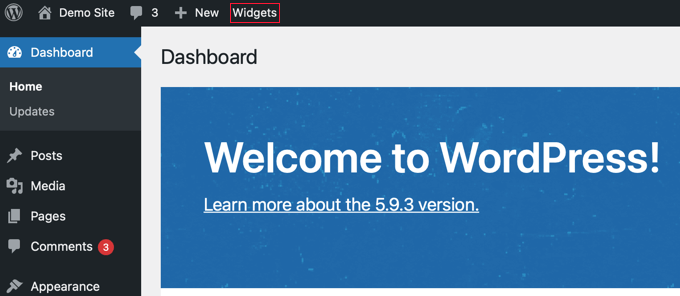
Once you refresh the page or click on another page on the admin sidebar, you will be able to see your custom shortcode link.
Adding a Single Custom Shortcut Link to Toolbar With Code
Here’s another way to add a custom shortcut link to the WordPress toolbar. This method is for those who are comfortable copying code snippets into WordPress.
You need to copy and paste the following code into your theme’s functions.php file, a site-specific plugin, or a code snippets plugin.
// add a link to the WP Toolbar
function custom_toolbar_link($wp_admin_bar) {
    $args = array(
        'id' => 'wpbeginner',
        'title' => 'Search WPBeginner',
        'href' => 'https://www.google.com:443/cse/publicurl?cx=014650714884974928014:oga60h37xim',
        'meta' => array(
            'class' => 'wpbeginner',
            'title' => 'Search WPBeginner Tutorials'
            )
    );
    $wp_admin_bar->add_node($args);
}
add_action('admin_bar_menu', 'custom_toolbar_link', 999);
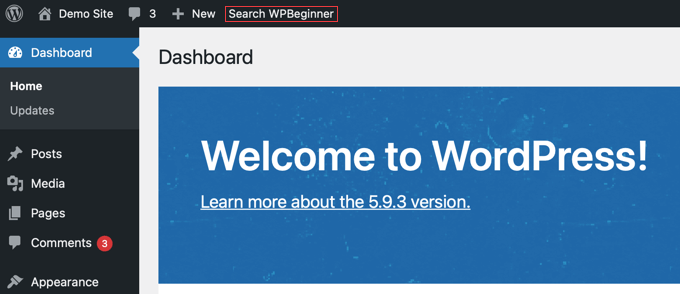
This sample code adds a link to a Google Custom Search engine which will search for WordPress tutorials on WPBeginner. It uses the function add_node with the arguments described in the array.
You need to replace the id, title, href, and meta items with values for your own custom link.
We recommend adding this code in WordPress with WPCode. It’s the best code snippets plugin that makes it easy to add custom code without editing your theme’s functions.php file. So, you don’t have to worry about breaking your site.
To get started, you’ll need to install and activate the free WPCode plugin. For detailed instructions, see this guide on how to install a WordPress plugin.
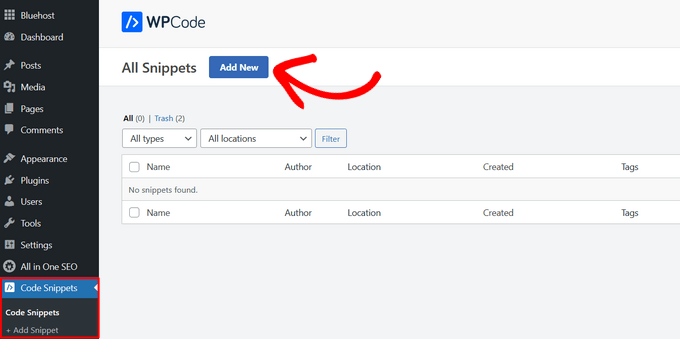
Once the plugin is activated, a new menu item labeled ‘Code Snippets’ will be added to your WordPress dashboard. Clicking on it will show you a list of all the custom code snippets you have saved on your site. Since you just installed the plugin, your list will be empty.
From here, click on the ‘Add New’ button to add your first code snippet.
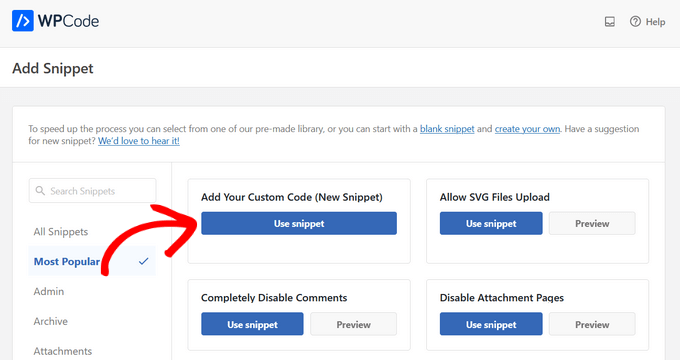
Next, navigate to the ‘Add Your Custom Code (New Snippet)’ option and click on the ‘Use snippet’ button underneath it.
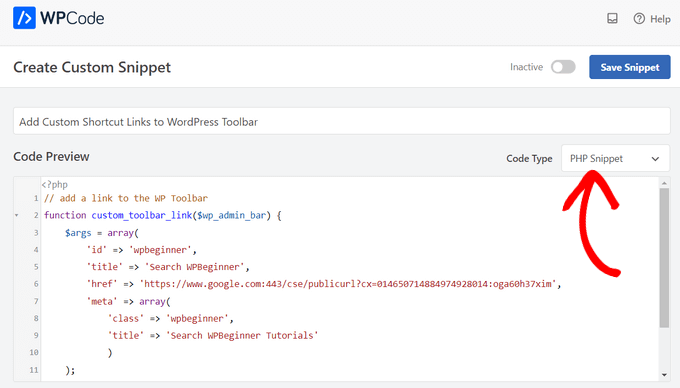
On the ‘Create Custom Snippet’ page, you can start by adding a title for your snippet. This can be anything to help you remember what the snippet is for.
Then, simply paste the code from above into the ‘Code Preview’ box and select ‘PHP Snippet’ as the code type from the dropdown menu.
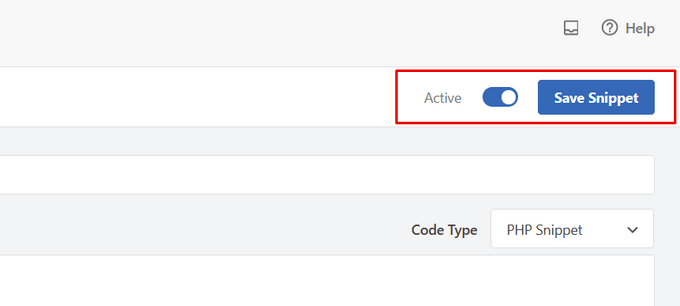
After that, toggle the switch from ‘Inactive’ to ‘Active’ and click on the ‘Save Snippet’ button.
Adding a Group of Custom Shortcut Links to Toolbar With Code
The last method showed you how to add a custom link to the toolbar using code. But what if you want to create a custom menu with a handful of your own shortcuts?
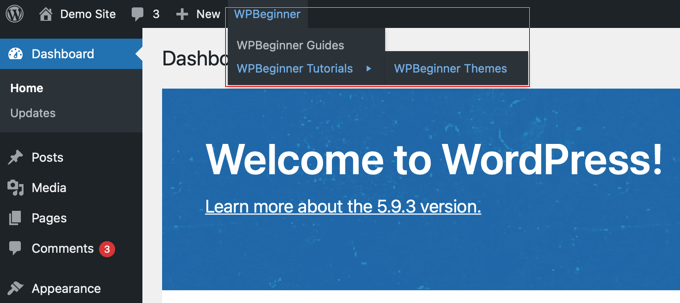
To do that you can group multiple shortcuts under one parent item. The child nodes under the parent link will appear when a user hovers their mouse on the parent link.
Here’s an example of how to add a group of custom links in the WordPress toolbar. Like the previous method, you should copy and paste this code snippet into your theme’s functions.php file, a site-specific plugin, or a code snippets plugin like WPCode.
/*
* add a group of links under a parent link
*/

// Add a parent shortcut link

function custom_toolbar_link($wp_admin_bar) {
    $args = array(
        'id' => 'wpbeginner',
        'title' => 'WPBeginner',
        'href' => 'https://www.wpbeginner.com',
        'meta' => array(
            'class' => 'wpbeginner',
            'title' => 'Visit WPBeginner'
            )
    );
    $wp_admin_bar->add_node($args);

// Add the first child link

    $args = array(
        'id' => 'wpbeginner-guides',
        'title' => 'WPBeginner Guides',
        'href' => 'https://www.wpbeginner.com/category/beginners-guide/',
        'parent' => 'wpbeginner',
        'meta' => array(
            'class' => 'wpbeginner-guides',
            'title' => 'Visit WordPress Beginner Guides'
            )
    );
    $wp_admin_bar->add_node($args);

// Add another child link
$args = array(
        'id' => 'wpbeginner-tutorials',
        'title' => 'WPBeginner Tutorials',
        'href' => 'https://www.wpbeginner.com/category/wp-tutorials/',
        'parent' => 'wpbeginner',
        'meta' => array(
            'class' => 'wpbeginner-tutorials',
            'title' => 'Visit WPBeginner Tutorials'
            )
    );
    $wp_admin_bar->add_node($args);

// Add a child link to the child link

$args = array(
        'id' => 'wpbeginner-themes',
        'title' => 'WPBeginner Themes',
        'href' => 'https://www.wpbeginner.com/category/wp-themes/',
        'parent' => 'wpbeginner-tutorials',
        'meta' => array(
            'class' => 'wpbeginner-themes',
            'title' => 'Visit WordPress Themes Tutorials on WPBeginner'
            )
    );
    $wp_admin_bar->add_node($args);

}

add_action('admin_bar_menu', 'custom_toolbar_link', 999);
In this example code, we first added a custom shortcut link. Next, we added a second custom link and made it a child of the first link. We added the parent link id by adding the argument 'parent' => 'wpbeginner'.
We repeated this to add another link under the same parent. We also used a child link as a parent link to show you how to add sub-items to a sub-item in your custom links menu.
We hope this tutorial helped you learn how to add custom shortcut links to the WordPress admin toolbar. You may also want to learn how to how to create automated workflows in WordPress, or check out our list of the best SEO plugins and tools to grow your site.
If you liked this article, then please subscribe to our YouTube Channel for WordPress video tutorials. You can also find us on Twitter and Facebook.


Rick Rottman
Thanks for posting this!
I’ve always wanted a direct link in the admin bar to my Simple CSS screen. Thanks to this tutorial, I have one.
WPBeginner Support
Glad to hear our guide was helpful!
Admin
Edward Bonthrone
Hi all..
This is all working great for PC view – but the custom toolbar item icons/menus disappear when viewing on mobile with responsive theme.
I have seen this question asked many times but no examples of code I can insert as a test that works on both PC and mobile view?
Anyone give me a menu snippet that will stay visible on mobile phone?
Thanks
WPBeginner Support
Your CSS would be hiding it for your mobile view, if you would like this to appear on mobile you would need to add the following CSS for our examples.
#wpadminbar li#wp-admin-bar-wpbeginner {

    display: block;

}
For your own shortcut links, you would change the -wpbeginner to the ID of your widget, as an example: -yourid
Admin
dan
Why this code is not work for mobile view?
WPBeginner Support
You may want to try disabling your other plugins to ensure there isn’t a plugin that is overriding the default bar on mobile.
Admin
Tayyab Roy
Thanks.
WPBeginner Support
You’re welcome
Admin
Mohammad Kashif
Hi
How can i add tool bar user menu in theme navigation?
And why i don’t receive email notification when i got reply? While i select (Replies to my comments).
Thanks
WPBeginner Support
Hi Kashif,
We are not sure which toolbar user menu you want to add. Please see our guide on how to add navigation menus in WordPress may be that would help.
Admin
Court
This works great, my question is, how do you add a second parent menu item to this code?
Small Details
I don’t know if this is recommended but I was looking for a ‘new window’ solution (see Yassin’s comment). It didn’t work by itself but works fine when combined with ‘meta’:
add_action( ‘admin_bar_menu’, ‘toolbar_link_to_mypage’, 999 );
function toolbar_link_to_mypage( $wp_admin_bar ) {
$args = array(
‘id’ => ‘my_page’,
‘title’ => ‘PRODUCT MANAGEMENT’,
‘href’ => ‘http://www.mexample.com’,
‘meta’ => array( ‘class’ => ‘my-toolbar-page’, ‘target’ => ‘_blank’ )
);
$wp_admin_bar->add_node( $args );
}
Mel
Thanks!! This helped me out a ton!
Frederic
Thanks! Very useful!
Yassin
Great tip
How can we make these custom links open in new tab ?
I try to add ‘target’ => ‘_blank’ but didn’t work
Henry E.
To add a ‘target’ => ‘_blank’ you have to add it to the ‘meta’ => array()
Gary Cook
This is awesome. Thanks. Although, I have added several custom menus and I want to center them all in a group using CSS, if possible? Please.
Marc
Is it possible to add a icon?
Rosendo Cuyasen
Cool! I think this is a cool feature for Wordpress if you’re going to use this toolbar above your web pages. Thanks for sharing.
adolf witzeling
I was looking for something like this. Thanks for sharing this awesome tip.