At WPBeginner, we have been running a successful blog for over 16 years and even created a free video membership site to share exclusive content with our audience. Through our own experience, we’ve found that content locking can be super effective.
By restricting access to content, like videos, you can encourage users to take specific actions, such as subscribing to your newsletter, sharing your content on social media, or signing up for a membership.
This approach can help grow your audience, boost engagement, monetize your website, and drive conversions.
In this article, we will show you how to add content locking in WordPress without annoying users.

What Is Content Locking?
Content locking is a technique used by site owners to encourage their users to take action.
That action might be anything from signing up for an email newsletter to paying for premium content.
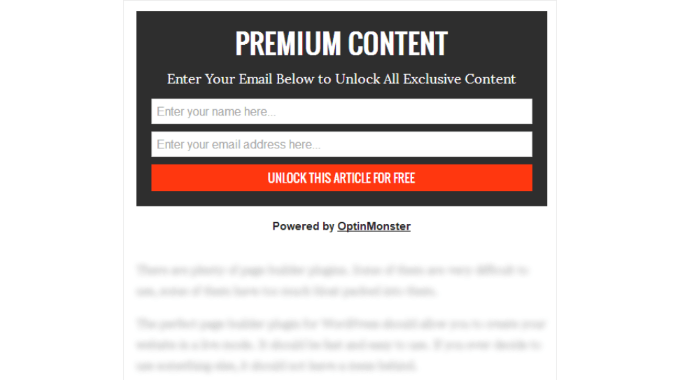
Content locking works similarly to content upgrades. When you offer valuable content on your WordPress websites, such as a course or eBook download, you give your visitors a reason to take the initiative and sign up for a membership.
Doing this effectively can help you generate leads, build an email list, and grow your business. But if you don’t set up content locking in the best way, then visitors to your site may find it annoying.
That being said, let’s see how you can easily add content locking in WordPress the right way. Method 1 is best for exclusive free content, and Method 2 is for premium paid content:
- Method 1: Add Content Locking With OptinMonster (Free Content)
- Method 2: Add Content Locking With MemberPress (Paid Content)
- Bonus: How to Use Content Locking to Grow Your Business
Method 1: Add Content Locking With OptinMonster (Free Content)
OptinMonster is the best lead generation plugin for WordPress on the market. It’s the best choice if you want to use exclusive content to grow your email list.
We have used it several times at WPBeginner to generate leads, and it has never disappointed us. You can read our complete OptinMonster review for more details.
You will need a Plus or higher plan for content locking. WPBeginner users can get a 10% discount by using our OptinMonster coupon.
First, you will need to visit the OptinMonster website and click the ‘Get OptinMonster Now’ button to sign up for a plan.
Next, you need to install and activate the OptinMonster plugin. For more details, see our guide on how to install a WordPress plugin.
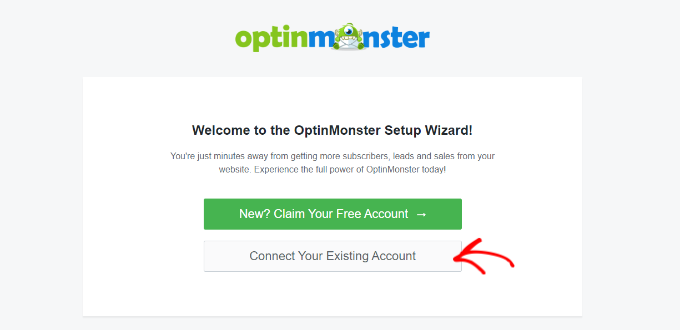
Upon activation, you will see the welcome screen and the setup wizard. Simply click the ‘Connect Your Existing Account’ button and follow the on-screen instructions.
Next, you will see a new popup window open to connect your WordPress site with OptinMonster.
Go ahead and click the ‘Connect To WordPress’ button.

Once you’ve done that, you will then need to log in to your OptinMonster account or create a new one.
After you are successfully connected, you should navigate to the OptinMonster » Campaigns page in your WordPress dashboard. Since you haven’t yet made a campaign, you will be asked to create a new one.

When you click the ‘Create Your First Campaign’ button, a popup window will open.
OptinMonster will ask you to choose from templates or playbooks. If you select the ‘Templates’ option, then you can pick from 300+ designs for your campaign.
On the other hand, you can also opt for the ‘Playbooks’ option and use a ready-to-use campaign inspired by successful brands.
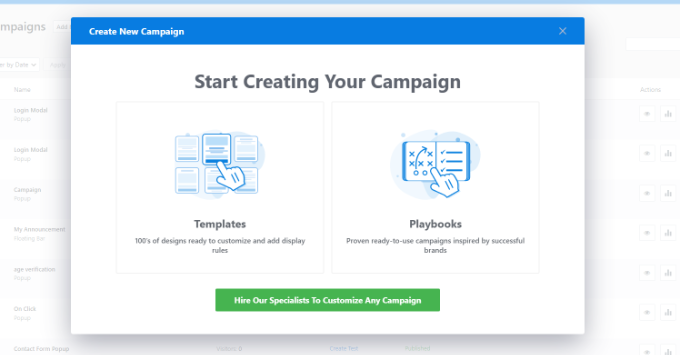
For this tutorial, we will select the ‘Templates’ option.
Next, you will be taken to the OptinMonster website and asked to pick a campaign type.
To add content locking, you will need to choose the Inline option.
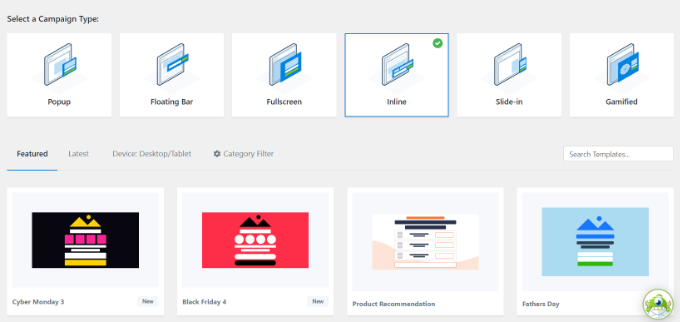
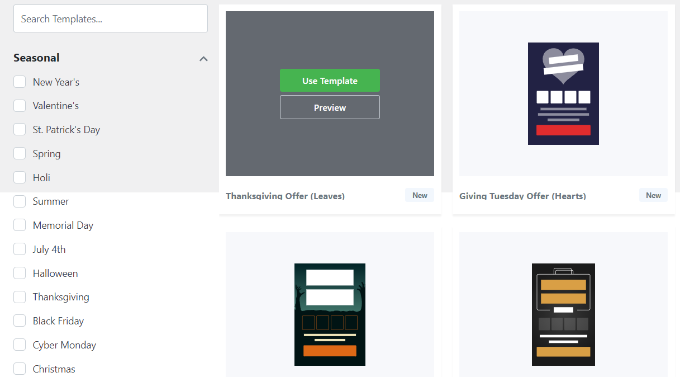
You will then need to scroll down and choose a template. OptinMonster offers multiple templates, and they all work great across any device.
You can view each template by clicking on the ‘Preview’ button. When you find one that matches your needs, click the ‘Use Template’ button.
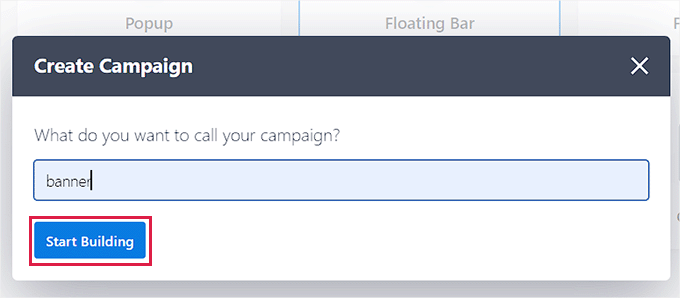
You will then be asked to provide a title for your campaign.
Once you’ve typed it in, simply click the ‘Start Building’ button.
This will open the OptinMonster editor. Here, you can spend time perfecting the content and appearance of the popup.
For instance, you can use the drag-and-drop campaign builder to add different blocks to the template. There are blocks for adding columns, text, images, videos, countdown timers, and more.
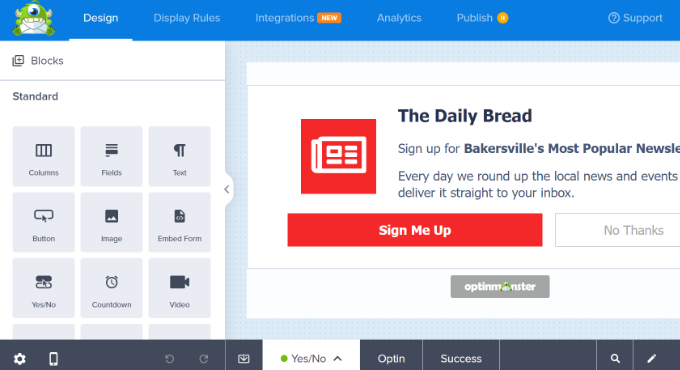
You can click on any section to change the wording, edit fonts, add images, change colors, and more.
You can also customize the success message that’s displayed to your users after they sign up.
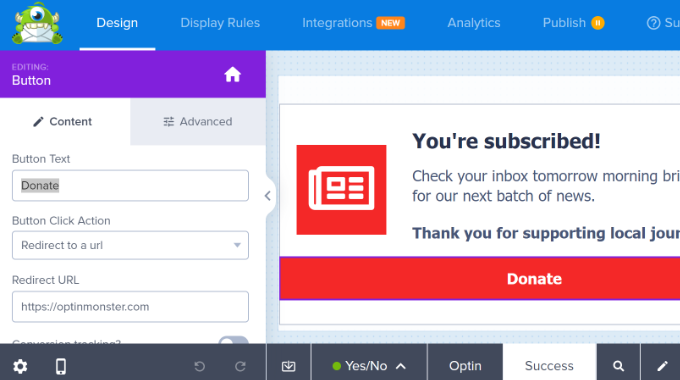
Once you are happy with the way your popup looks, you need to activate content locking.
To do that, you will need to switch to the ‘Display Rules’ tab. Here, you can choose when and where the campaign will be displayed to users.
For instance, you can show the content lock popup on all the pages of your WordPress website or just on selected pages.
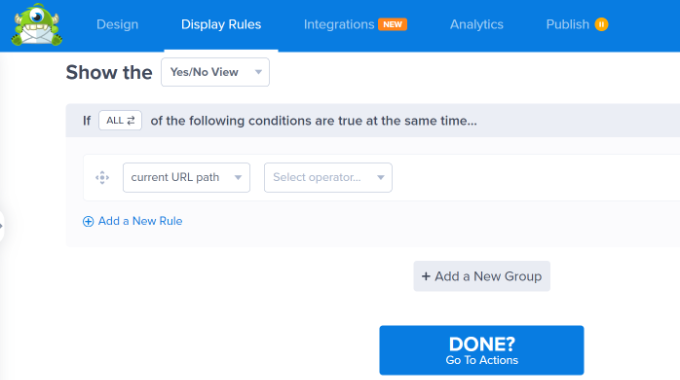
Once you are done, simply click the ‘Done? Go To Actions’ button.
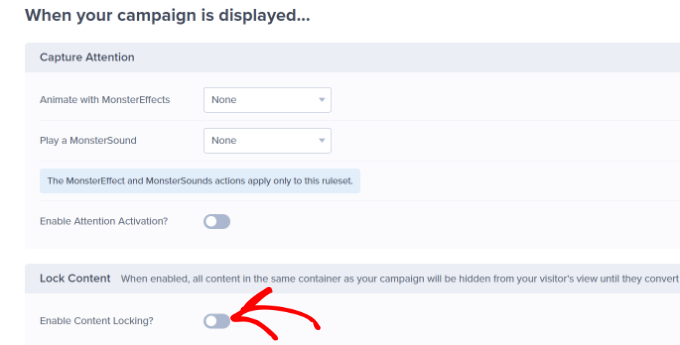
On the next screen, you will see options to add animation with MonsterEffects and play a sound when the popup appears.
To lock content behind the popup, simply go to the ‘Lock Content’ section and click the ‘Enable Content Locking’ toggle.
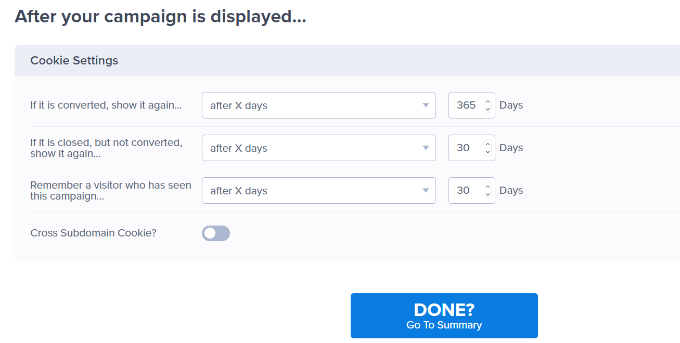
If you scroll down, there are more campaign display options.
For instance, OptinMonster lets you configure the cookie settings and set the days after which the popup will show to different users.
After that, you need to make the campaign active.
Simply click on the ‘Published’ tab at the top of the screen and then click on the ‘Publish’ button.
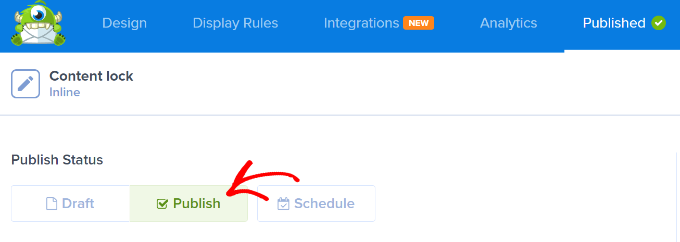
Then, you can save your campaign by clicking the ‘Save’ button at the top right and closing the campaign builder.
Next, you will see the WordPress Output Settings for your campaign. Here, OptinMonster will ask how you’d like to show your inline campaign.
The Automatic option is the simplest to set up. It will lock content automatically after a specified number of words or paragraphs. For example, you could lock all content after the first three paragraphs of each post.
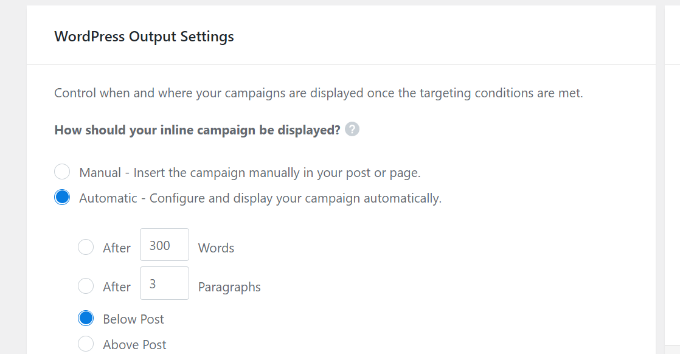
The Manual setting requires a little more work, but it lets you choose exactly which content will be locked.
You can do this by adding a shortcode to each post that you wish to lock.
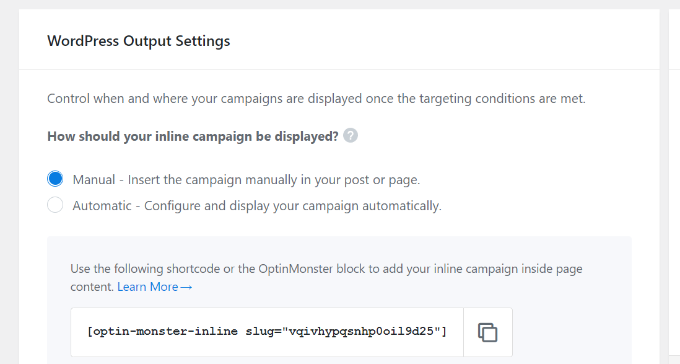
Simply start by copying the shortcode.
To add it to your content, you will need to edit the post or page where you want to enable content locking.
When you are in the WordPress content editor, just add a Shortcode block and paste the shortcode just before the content you wish to lock.
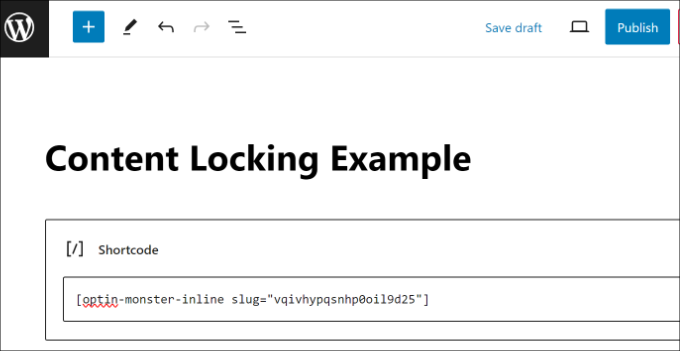
Now, you can save and publish your post or page.
If you’d like to see content locking in action, then simply visit the post or page in a new browser window.
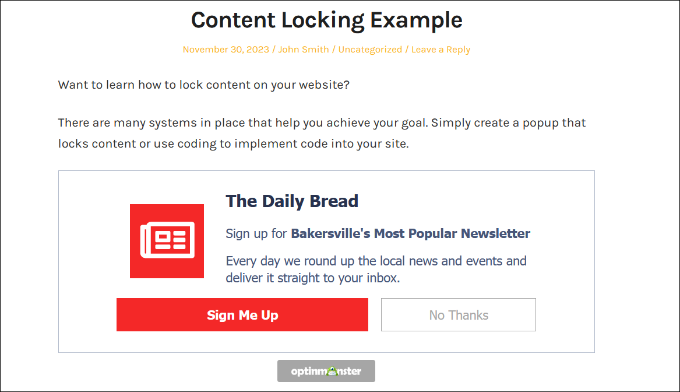
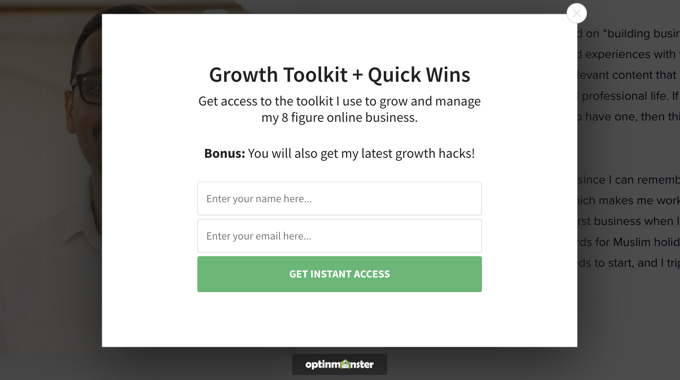
The locked content is blurred or hidden.
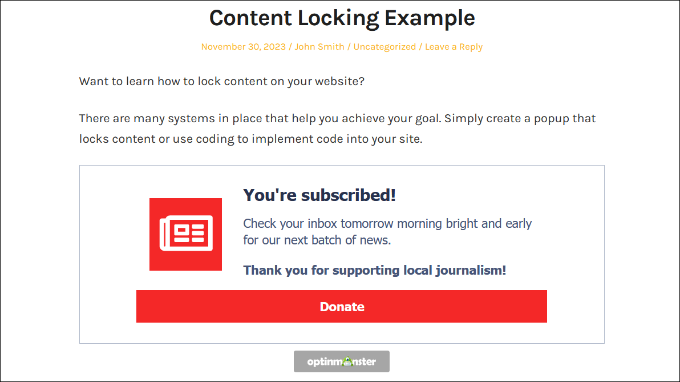
Once a user enters an email address, the locked content will be displayed.
Method 2: Add Content Locking With MemberPress (Paid Content)
MemberPress is the best membership plugin for WordPress, and you can use it to easily and effectively lock your WordPress content. It’s the best choice when you want to make money by charging for premium content.
We have used it to create free courses for our readers and have had a great experience. For details, see our MemberPress review.
You will need at least a Basic plan for content locking. WPBeginner users can save up to $479 off their first year of MemberPress using our MemberPress coupon.
The first thing you need to do is install and activate the MemberPress plugin. For more details, see our guide on how to install a WordPress plugin.
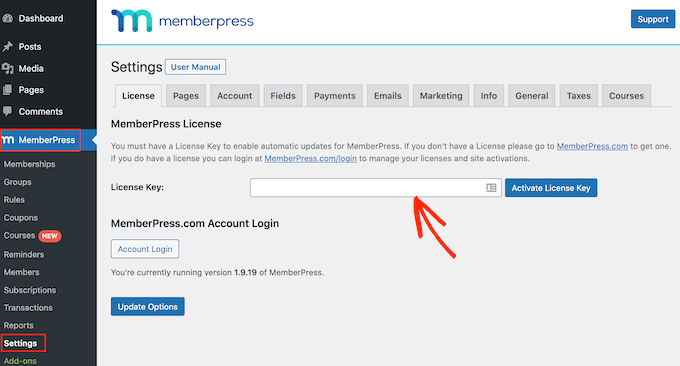
On activation, you will have to enter your MemberPress license key. To do that, navigate to MemberPress » Settings and paste your key into the text box. You then need to click the ‘Activate License Key’ button.
When you first set up your membership site, you will have to select a payment method, decide on pricing, create a signup page, and more.
Check out our ultimate guide on how to create a WordPress membership site for all the details.
In this tutorial, we will show you how to use MemberPress to create a premium subscription and then determine which content can only be accessed after paying for a membership.
Let’s start by setting up a new membership plan for your subscribers. To create a membership level, you need to go to the MemberPress » Memberships page and click on the ‘Add New’ button at the top.
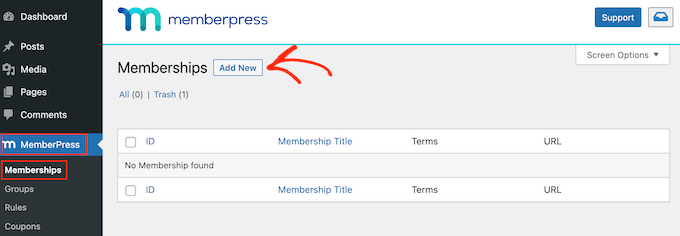
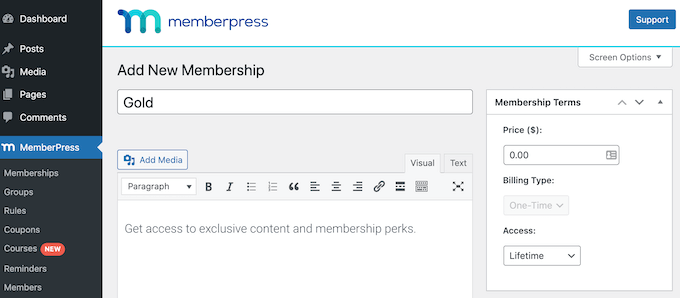
You will need to give the plan a name and decide on the cost of the content and the billing type.
We will create a one-time lifetime payment, but you could choose one of the regular subscription options.
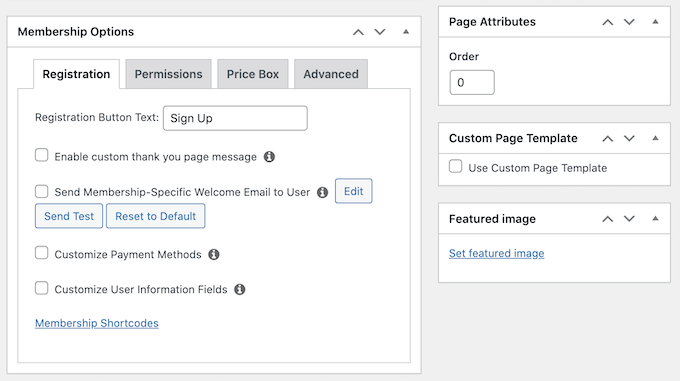
After that, you need to scroll down to the membership options meta box below the post editor.
This is where you can customize permissions and membership options for this particular plan.
If you need more than one membership plan, then go ahead and repeat this process.
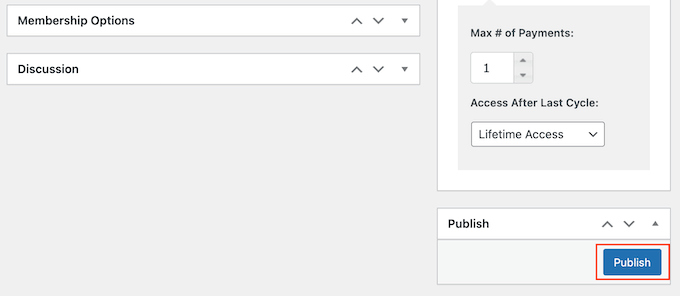
When you are finished, you can click on the ‘Publish’ button on the right of the screen to make it available.
The next step is to select which content is available to each membership plan on your website. MemberPress makes it easy to control access using Rules.
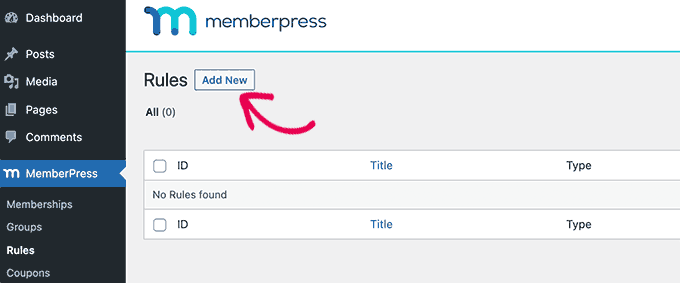
You can set up your rules by visiting the MemberPress » Rules page and clicking on the ‘Add New’ button at the top.
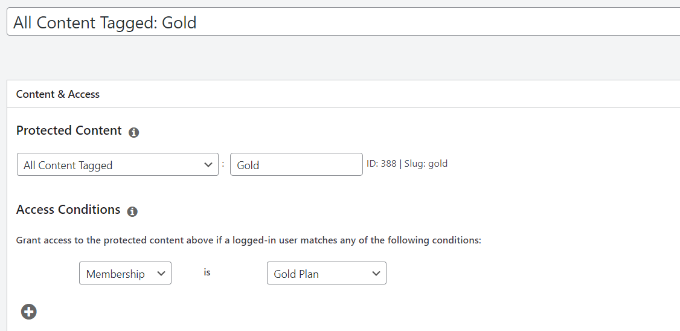
The rule edit page allows you to select different conditions and associate them with a membership plan.
For example, we can protect all content with the ‘Gold’ tag so that it’s available only to members of our Gold plan.
Below the rules editor, you will see the content drip and expiration options. These let you release content gradually and make it unavailable after a period of time.
If you’d like all the content to be available as soon as users sign up and remain available without expiring, then you should leave these boxes unchecked.

You can repeat the process to create more rules as needed for your membership site.
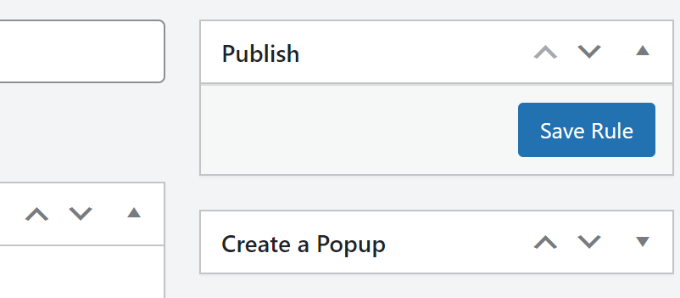
Once you are satisfied, go ahead and click on the ‘Save Rule’ button on the right to save your rule settings.
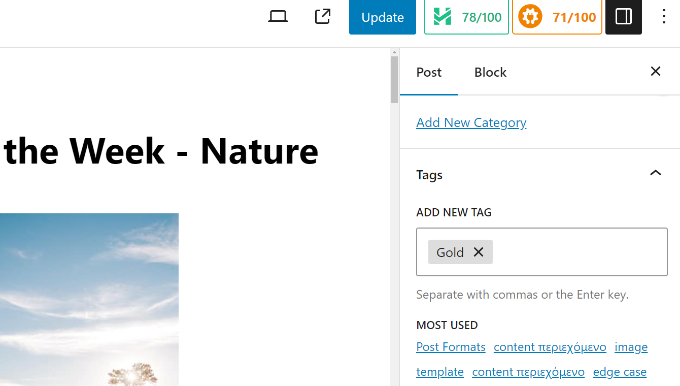
Now, all we need to do is to add our locked content.
In our example, we add the ‘gold’ tag to the posts we want only Premium members to be able to access.
Next, scroll down to the ‘MemberPress Unauthorized Access’ meta box below the post editor.
Here, you can select what logged-out users (non-members) will see when they reach this content.
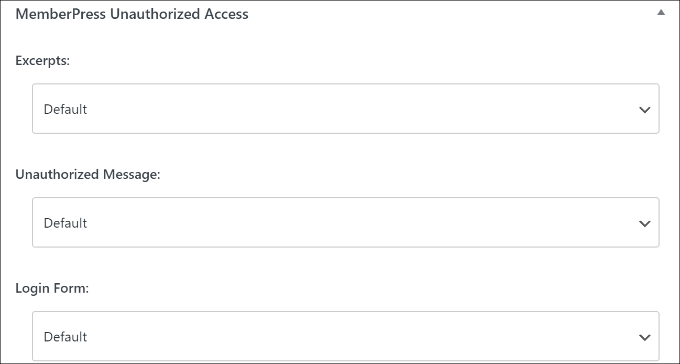
You can see the content lock-in action by visiting your WordPress site.
For example, on our demo site, someone who is not a premium member will see the pricing page when they access the locked content.
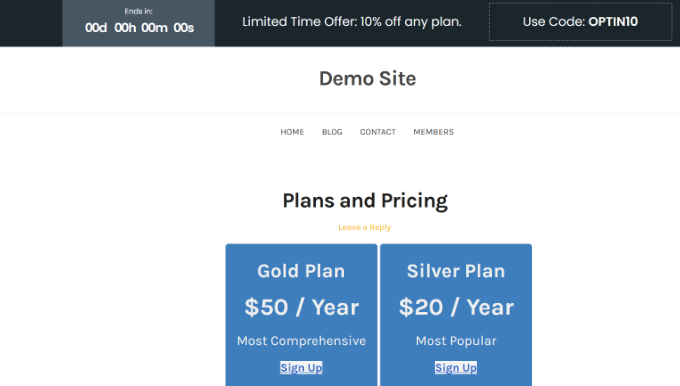
Premium members will be able to see the content when they subscribe to a plan and log in to your WordPress site.
Bonus: How to Use Content Locking to Grow Your Business
Now that you know how to add content locking to your site, let’s look at some use cases for growing your email list.
1. Lock Content for Registered Users
If you are running a membership site and want to make money from your WordPress blog, then you can lock exclusive content for registered users.
For example, you could lock content like interviews, online courses, videos, podcast episodes, cheat sheets, and other content for registered users.

This way, users will have to subscribe to a premium plan and submit their email address to access the exclusive content.
2. Restrict Content Based on User Roles
You can also use content locking to restrict access to specific pages and sections on your site. This is really useful if you run a multi-author website and don’t want writers or contributors to view certain pages.
Similarly, you can restrict content based on user roles on a membership site. For instance, only users with a subscriber user role can view the video section on your site or access online courses.
3. Offer Content Upgrades to Visitors
Content upgrades are pieces of bonus content that users can unlock by signing up for your email list.
You can use content locking to offer free upgrades to visitors and encourage them to join your newsletter. This way, users will have an incentive to get bonus content while you will get more subscribers.
We hope this article helped you add content locking in WordPress. You may also want to learn how to add drip content to your WordPress site and our tutorial on how to sell group memberships in WordPress.
If you liked this article, then please subscribe to our YouTube Channel for WordPress video tutorials. You can also find us on Twitter and Facebook.


Dennis Muthomi
From personal experience, I’ve found that offering valuable content upgrades can significantly boost subscriber numbers.
One tip I’d add is to ensure the locked content truly provides value to avoid disappointing users.
Mrteesurez
I completely agree with your point! Offering content upgrades has been a game-changer for me as well. When I first started using them, my subscriber numbers shot up quickly. However, I learned early on that the real key to success is making sure the upgraded content genuinely offers value. In one instance, I offered a checklist as a freebie, and while it attracted signups, the feedback showed that it didn’t deliver as much value as people expected. Since then, I’ve focused on creating in-depth resources like educational content, ebooks or templates that solve a specific problem. This has not only boosted my subscription rate but also built trust with my audience. Providing value is essential if you want users to stay engaged and feel good about subscribing!
Mrteesurez
Thanks WPbeginner, I deal with some premium contents (educational contents) in one of my website, so I use Memberpress for content locking, it worked perfect as it also provides more other features in addition to contents locking.
Chanakya Sahu
Hello admin, can we add content lock on videos?
Like for example, there is an overlay of email subscription form on the video and when the user signs up for free, the video starts to play. I saw this in some website. I think it’s a great way to collect emails.
WPBeginner Support
The simplest method to do something like that would be to redirect users to a new page with the video when they submit the email address in your optin.
Admin
Chanakya Sahu
This is good way. Thanks
Jiří Vaněk
This is a really interesting method to get, for example, people’s e-mail addresses for the newsletter. However, it’s probably a good idea to first think about what kind of content to put it in. E.g. divide premium content with this content locking and non-premium content. So that it doesn’t have the opposite effect as a result, that people are more likely to leave. For reflection.
Mrteesurez
I appreciate the insight you’ve shared, it’s a thoughtful approach to content strategy. Balancing content locking with user experience is crucial. I remember when I first experimented with content locking on my site, I noticed a drop in engagement because I hadn’t properly segmented premium from non-premium content. It was a learning curve, but after refining the strategy, offering real value before asking for an email, the results were much more positive. It’s definitely a fine line, but when done right, it can be a powerful way to grow your newsletter without alienating your audience.
Jiří Vaněk
Exactly. My point is that many people visit a website only once to find specific information because they come across it via Google. If you lock the content, they might leave, and your bounce rate could significantly increase. That’s why it can be challenging to determine what to lock and what not to. However, every website owner probably has an idea of what could be considered premium content, and as you mentioned, it’s something everyone needs to experiment with. So, I definitely wouldn’t lock the most visited articles without first conducting an analysis to minimize the impact on the bounce rate. But otherwise, I agree with you.
Shivam Bansal
Can we add content locking on video in WordPress?
anne
Hello, Just bought OptinMonster and it seems it doesn’t have this function anymore? I can only put an inline post at the bottom of the article? I really need this function for my client’s website and I don’t know what to do now. Help, anyone?
WPBeginner Support
The function is still available. If you reach out to OptinMonster’s support they can assist you in setting it up.
Admin
Vignesh
Hi is it possible to create folders in WordPress pages ?
Instead of posts displaying directly on the screen, I need a folder in which the posts can be added.
Viklin
Very useful, thanks
John
This Plugin starts from $49/year for the basic version. Not exactly aimed at beginners, is it?
Do you ever review Plugins that DON’T pay you a commission?
WPBeginner Support
Sometimes a paid plugin is the best option to do something really useful. We regularly recommend free plugins, check out our WordPress plugins category where we regularly write about many free plugins. You may also want to see our disclaimer page to learn about how we make money from this website.
Admin
Jacop
I totally agree with John.
Ankit Agarwal
This is awesome. But I have two points for your thoughts.
1. Optin Monster is great but it costs something. If I am not using Optin Monster ( or any other paid service), is there any way to do this with a free option?
2. You said ” If it’s done correctly” Can you please make a separate post ( or a content upgrade on this one) about what ways can it go wrong. I am sure your readers will be really curious to do this correctly.
Nergis Parikh
How can I add this to a site that is not using wordpress but some other custom cms? And can it be added to collect leads before allowing viewers to download specific pdfs only from the website?
WPBeginner Support
Yes, OptinMonster works with any website no matter what CMS you are using. It even works with static websites. Yes it can be used for that.
Admin
Alex
Great idea, but what about Restrict Content Pro? I used it for many clients and i really believe it’s great solution.
Editorial Staff
That’s primarily for membership sites.
This solution can be implemented on any blog with just a few clicks.
Admin
Alex
Agree! Great solution anyway!