Have you ever wandered through a massive store, losing track of where you started and how to get back to the main aisle? Navigating a large online store can feel the same way.
Breadcrumbs are small navigational trails that show you the path you’ve taken on a website, like helpful signs that guide shoppers through your WooCommerce store.
Not only do they make it easier for customers to find their way around, they also give search engines a better understanding of your site’s structure, potentially boosting your SEO.
The good news is that adding breadcrumbs to your WooCommerce store is surprisingly simple. In this article, we will show you some easy methods to add WooCommerce breadcrumbs in no time.
Why Should You Add WooCommerce Breadcrumbs?
Breadcrumbs are navigational links that appear at the top of your product pages or blog posts. These links show your visitors how they ended up on the page they’re currently viewing.
For example, if you have a WooCommerce store that sells clothes, then the breadcrumb menu could look something like this: Home » Men’s Fashion » Shirts & Polo » Formal Shirts.

Enabling breadcrumbs in WooCommerce makes it easier for your customers to navigate your online store and find the products they are looking for. They can easily click the product attributes or categories to view related products.
Breadcrumbs also help search engines understand the hierarchy and structure of the links on your eCommerce store. Search engines like Google even display them in the search results, which can boost your click-through rate.
That being said, let’s look at how you can enable breadcrumbs on your WooCommerce store. We will cover two methods, and the first is recommended for most users:
Option 1: Add WooCommerce Breadcrumbs Using AIOSEO (SEO-Friendly)
The easiest way to enable breadcrumbs in WooCommerce is by using the All in One SEO (AIOSEO) plugin.
It’s the best WordPress SEO plugin on the market and allows you to add breadcrumbs in WooCommerce with a click of a button. The plugin also helps you optimize your store for search engines without any technical skills.
For this tutorial, we will be using the AIOSEO Pro version because it includes breadcrumbs templates and offers more options for customization.
There is also a free version available which includes breadcrumbs but doesn’t offer breadcrumb templates.
First, you’ll need to install and activate the AIOSEO plugin on your website. You can refer to our guide for more details on how to install a WordPress plugin.
Upon activation, you’ll need to navigate to All in One SEO » General Settings and enter your license key. You can find the key in the AIOSEO account area.
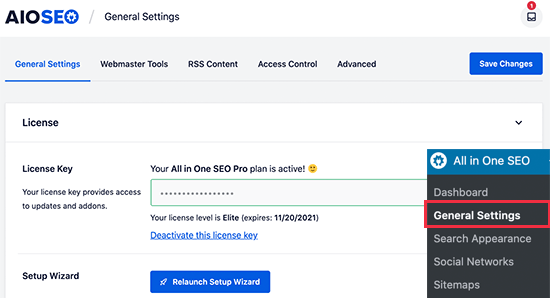
Next, you’ll need to set up AIOSEO on your WooCommerce store using its setup wizard. If you need help, then you can follow our guide on how to set up All in One SEO for WordPress.
Once you’ve correctly configured the plugin on your website, you’ll need to go to the All in One SEO » General Settings page and then click on the ‘Breadcrumbs’ tab.
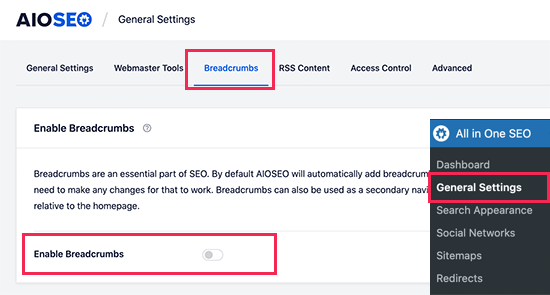
After that, you can turn on the ‘Enable Breadcrumbs’ option, and AIOSEO will automatically add breadcrumbs schema markup to your WooCommerce store’s code.
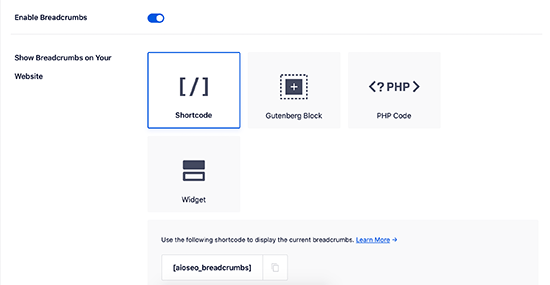
Next, you’ll need to customize the WooCommerce breadcrumbs. Simply scroll down and you’ll see the different ways to add breadcrumbs to your online store.
You can add them to any page or post manually by using a shortcode or block, or add them to a widget area. Advanced users can also use PHP code to add breadcrumbs to their theme template files.
We will show you how to add breadcrumbs to your WooCommerce products below, but first, let’s take a look at the customization options.
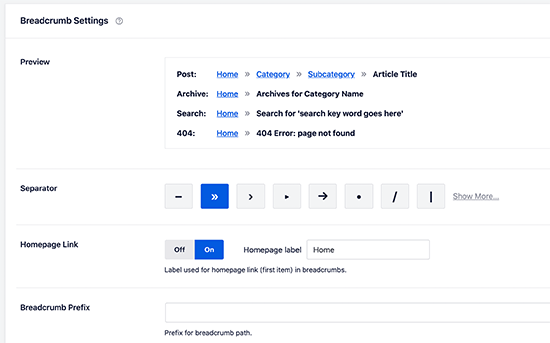
Now, if you scroll down to the Breadcrumbs Settings section, then you’ll see multiple settings to customize your breadcrumbs.
For instance, you can change the separator symbol, enable the homepage link, add a breadcrumb prefix, change the format, and more. You can even see a preview of how your navigational links appear on your WooCommerce store.
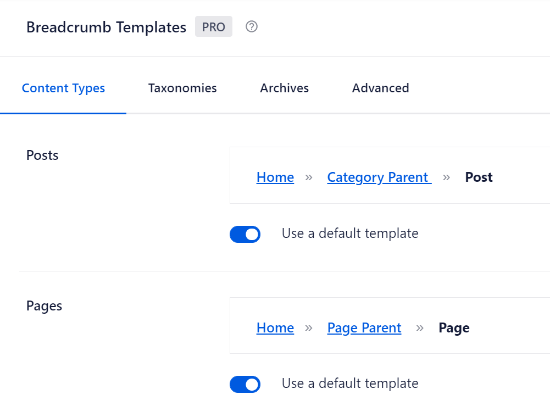
AIOSEO Pro also gives you access to breadcrumb templates.
These templates allow you to show professional-looking breadcrumb links on your website for different content types, taxonomies, and archives.
Not only that, but the WordPress plugin also offers different options to customize the template.
For instance, you can disable the option for ‘Use a default template’ and view more settings.
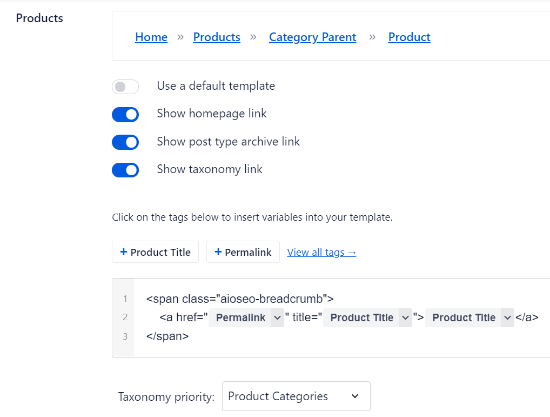
There are options to show the homepage link, post type archive link, taxonomy link, add tags to the template, and select whether you’d want to prioritize categories or tags taxonomy.
If you have parent categories set up for multiple products, then you can also customize them in the breadcrumb template editor.
When you are done, don’t forget to save your changes.
Next, you’ll need to add breadcrumbs to your WooCommerce product pages.
AIOSEO will show four different methods, but the easiest way is by using a shortcode to display the breadcrumbs navigational links on your online store.
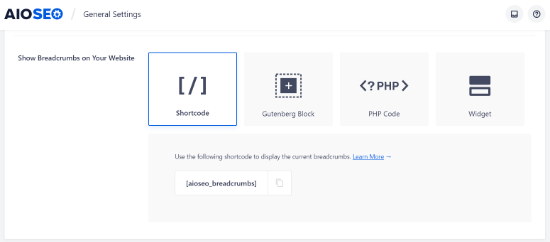
All you have to do is add the following shortcode where you’d like to show the breadcrumbs:
[aioseo_breadcrumbs]
Simply head over to Products » All Products and edit a product page. Next, you can add the shortcode in the WordPress editor’s ‘Text’ view and update your page.
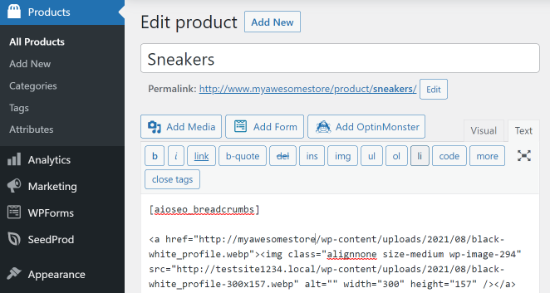
You can now visit your product page to see the breadcrumb navigational links in action.
This is what it looked like on our test website.

Besides that, you can also add breadcrumbs to your WooCommerce store’s sidebar. This way, you won’t have to edit each individual product page to show navigational links, since they’ll appear throughout your site in the sidebar.
To display breadcrumbs in the sidebar, you can head over to Appearance » Widgets from your WordPress admin area.
Click the plus sign icon in the top left, and then search for ‘breadcrumbs’ to find the ‘AIOSEO – Breadcrumbs’ widget. Simply drag and drop it into the sidebar. You can also enter a title for your navigational links.
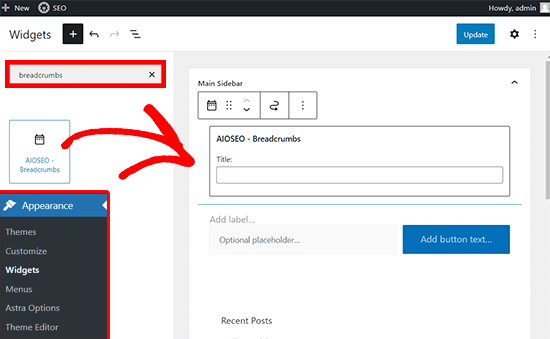
Once that’s done, you can click the ‘Save’ button.
Then, just view your WooCommerce store to see the breadcrumbs in the sidebar.
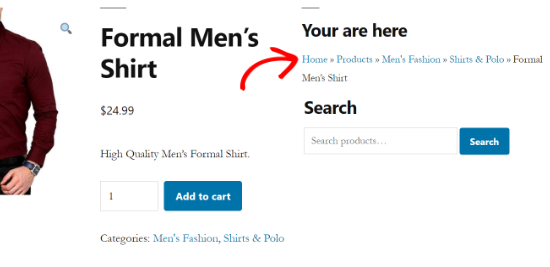
If you want to use other ways to add breadcrumbs to your WooCommerce store, then check out our guide on how to display breadcrumb navigation links in WordPress.
How to Add Breadcrumbs for Multiple Categories
Do you have products on your WooCommerce store that have multiple categories?
If yes, then setting up breadcrumbs correctly can be a challenge because WordPress doesn’t record the path a customer took to land on the product page.
However, AIOSEO automatically adds the first category in the breadcrumb and makes it easy to show the correct navigation menu for products that have multiple categories.
The plugin also offers a breadcrumb template that you can customize for WordPress taxonomies like product categories. All you have to do is head over to All in One SEO » General Settings and then select the ‘Breadcrumbs’ tab.
Next, scroll down to the ‘Breadcrumbs Templates’ section and select the Taxonomies tab. By default, the plugin will show the parent item link in the breadcrumb on your WooCommerce store.
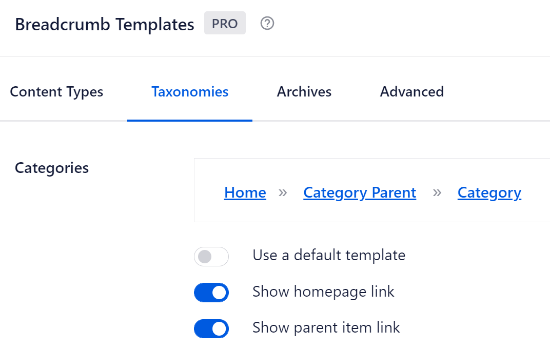
If you disable the ‘Use a default template’ option, then you’ll see that the ‘Show parent item link’ is enabled. This way, you can easily show the primary category for any product on your website.
For example, let’s say you are running an online shoe store and one of the products is in both the Sneakers and Trainers categories.
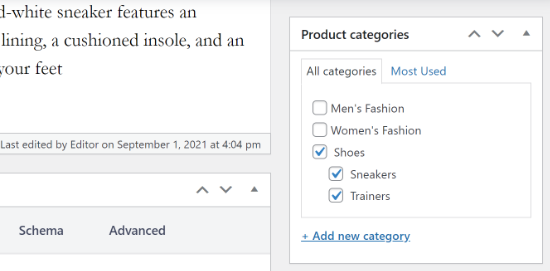
AIOSEO will automatically pick the first category.
Then, it will display that in the breadcrumb navigational menu.

Option 2: Use WooCommerce Breadcrumbs Plugin (Free and Simple)
Another way to enable breadcrumbs in WooCommerce is by using the WooCommerce Breadcrumbs plugin.
It’s a free WordPress plugin that allows you to add breadcrumbs to your online store. The plugin is easy to use but lacks the customization features that you will find in AIOSEO.
First, you’ll need to install and activate the WooCommerce Breadcrumbs plugin. For more details, you can refer to our tutorial on how to install a WordPress plugin.
Once the plugin is active, you can head over to Settings » WC Breadcrumbs from your WordPress admin area. After that, go ahead and click the checkbox for ‘Enable breadcrumbs.’
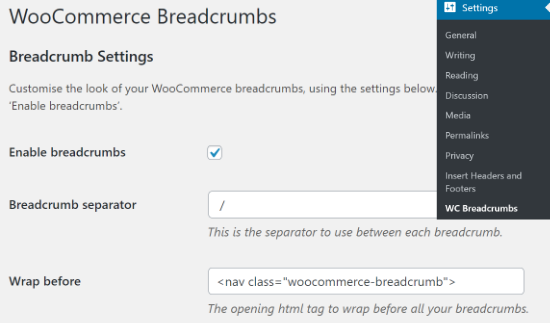
Next, you can change the appearance of the navigational links that will appear on your WooCommerce store.
The WooCommerce plugin lets you choose the breadcrumb separator symbol and HTML tags before and after your breadcrumbs.
Now, if you scroll down, then you’ll find more options for customization. For instance, you can change the text and URL for your homepage that will appear in the navigational links.
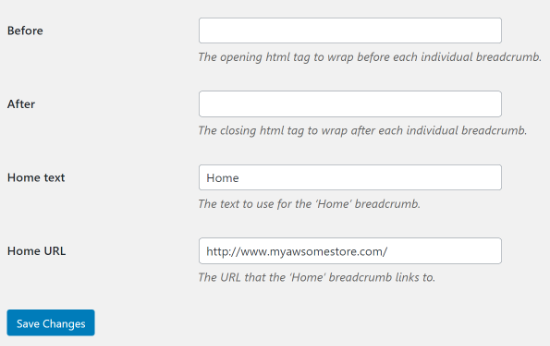
When you are done with the changes, don’t forget to click the ‘Save Changes’ button at the bottom.
More WooCommerce Tips You’ll Love
We hope that this article helped you learn how to add breadcrumbs in WooCommerce. You may also want to see some other guides related to WooCommerce:
- How to Make a Smart WooCommerce Product Search
- How to Filter WooCommerce Products (Step-by-Step Tutorial)
- How to Change the WooCommerce Shop Page Title (Quick & Easy)
- How to Enable Search by Product SKU in WooCommerce
- How to Add Product Tags, Attributes, and Categories to WooCommerce
- How to Find Product ID in WooCommerce (Beginner’s Guide)
- How to Add GTIN, ISBN & MPN Schema in WordPress
- How to Fix WooCommerce Product Search Not Working
If you liked this article, then please subscribe to our YouTube Channel for WordPress video tutorials. You can also find us on Twitter and Facebook.


Have a question or suggestion? Please leave a comment to start the discussion.