Do you believe that adding an animated background in WordPress is complicated? Think again.
We used to think the same, but after some experimentation, we’ve found out it’s actually not that bad.
We know how important it is to wow your visitors from the moment they land on your site. An animated background is a great WordPress design element for creating a memorable first impression without overwhelming your content.
But if you’re worried about slow loading times, complex coding, or expensive plugins, don’t worry. We’ve discovered a simple solution using particle.js, which is a lightweight JavaScript library that creates stunning animated backgrounds without compromising your site’s performance.
In this guide, we’ll show you exactly how to add beautiful particle animations to your WordPress site, whether you prefer using a plugin or a bit of code. Let’s make your website stand out!

Why Add an Animated Background in WordPress?
Customizing your website background might seem unimportant at first. But, after years of being in the WordPress and web design world, we’ve noticed that sites with thoughtfully designed animated backgrounds tend to keep visitors engaged longer.
An animated background can enhance your website’s visual appeal, making it more interactive and eye-catching to visitors. It gives the impression that your WordPress site uses a high-quality and innovative design.
Many websites also use animated effects when they want to celebrate a special occasion.
For example, you may see eCommerce stores adding animated snowflakes or falling Christmas trees on their web pages to create a festive atmosphere for the holiday season.

Some websites also use a preloader background animation.
With this, visitors can get the sense that the site is loading, making them more likely to wait patiently for the web page elements to appear. You can read our article on adding a preloader background animation for more information.
In this guide, we will show you how to add an animated background using particle.js. If you want to find out what that is, just continue to the next section.
What Is particle.js?
particle.js is a JavaScript library that lets you create stunning visual effects with particles, which are small, graphical, animated elements.
These particles can be customized by size, color, shape, and movement. They also respond to user interactions, such as mouse movements or clicks, to add an extra layer of engagement to your website.
Now that you know what particle.js is, let’s see how you can use it to add an animated background in WordPress. There are two methods for beginners, and you can navigate through this guide with the quick links below:
✨ Need help with WordPress website design? Don’t let your site’s potential go to waste. Our experts at WPBeginner Pro Services can redesign your website, optimize its performance, and generate high-converting content so that you can focus on growing your business.
Method 1: How to Add an Animated Background With a Page Builder (No Code)
The first method is to use SeedProd, which is the best WordPress page builder plugin on the market. It offers a built-in and highly customizable particle background feature.
With it, you can choose one of the particle animations that are already available or add a custom one yourself. It’s also possible to modify the number of particles, animation movements, and hover effects to suit your preferences.
For more information about SeedProd, you can check out our in-depth SeedProd review. We’ve covered everything, including the customization options, template and block choices, and third-party integrations.

In this guide, we will be using the premium version of SeedProd, as the particle background feature is available there.
To use SeedProd, you will need to install and activate the plugin first. You can find more details about this in our beginner’s guide on installing a WordPress plugin.
After that, simply copy-paste your license key to the plugin. Just go to your WordPress dashboard, navigate to SeedProd » Settings, and insert the license key in the appropriate field. Then, click ‘Verify Key.’

If you want to customize your theme first before adding a particle background in WordPress, then you can follow our guide on how to easily create a custom theme with SeedProd.
Now, you need to open the drag-and-drop builder for the page you want to insert the particle background into. If you have created a theme with SeedProd, then you should already have some pages added in WordPress for you.
Next, simply go to Pages » All Pages and hover your cursor over a page, like a homepage, about page, or something else. Then, choose the ‘Edit with SeedProd’ button.
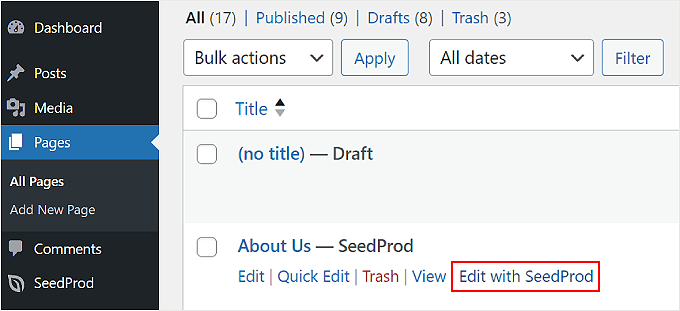
If this option does not appear on your end, don’t worry.
Just click the ‘Edit’ button instead, and in the block editor, click the ‘Edit with SeedProd’ button.
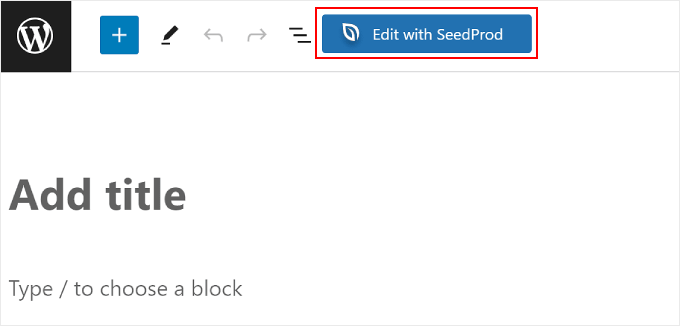
You should now be inside the page builder of SeedProd.
Just hover your cursor over the page section where you want to add the particle background in WordPress and select it. You will know that you’ve selected a section if a purple border and toolbar appear at the top of it.

Once you have clicked on a section, the Section sidebar on the left should show up.
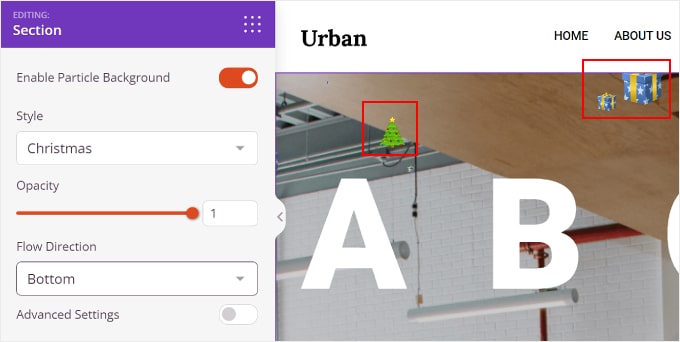
All you have to do now is switch to the ‘Advanced’ tab and toggle the ‘Enable Particle Background’ setting.
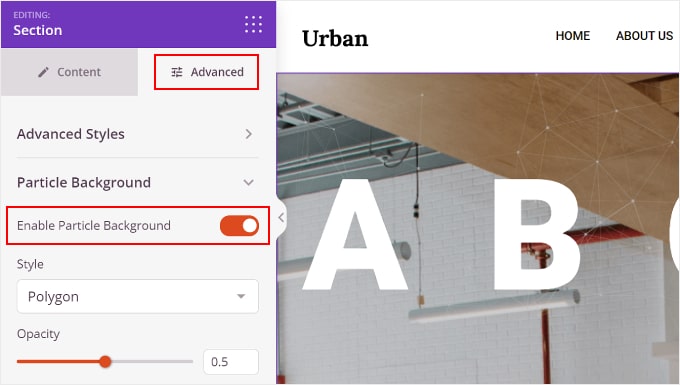
There are several Particle Background settings you can configure.
One is Style, where you can choose any of the available animation effects, which are Polygon, Space, Snow, Snowflakes, Christmas, Halloween, and Custom.
We will talk more about adding a custom particle background animation later in the article.
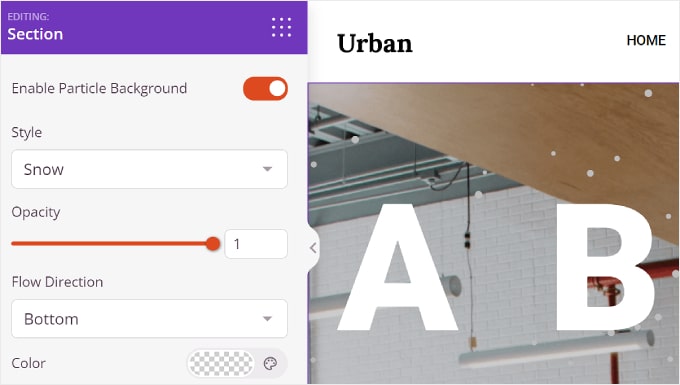
There is also Opacity, which controls how opaque the animation looks, and Flow Direction, which sets the direction that the particles should head toward.
For certain particle styles, you can customize their colors, too.
However, for Christmas and Halloween, there are no color settings, as the particles are images.
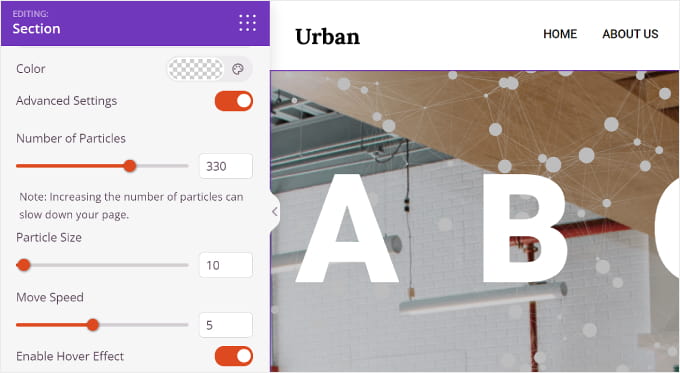
Below Color is ‘Advanced Settings.’ Enabling it lets you customize the Number of Particles, Particle Size, Move Speed, and Enable Hover Effect.
With the last feature, the particles will move according to the direction of your mouse. Note that this won’t work when you view your WordPress website in the page builder area or if the content within the section takes up the entire space of that section.
And that’s all you need to do.
Once you’ve finished customizing your WordPress particle background, you can click the ‘Save’ button at the top right corner to publish the changes. You can also choose the ‘Preview’ button to see what the particle background looks like.

Creating a Custom Particle Background for Your Website
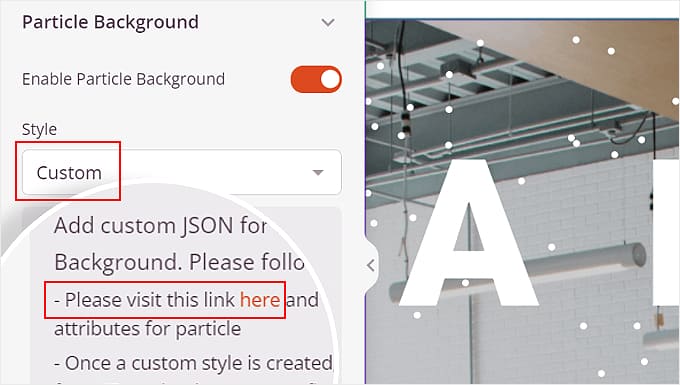
If the animated effects available don’t suit your needs, then you can also create a custom one. What you should do is select the ‘Custom’ style in the Particle Background settings.
After that, click the link in the line ‘Please visit the link here and choose required attributes for particle.’
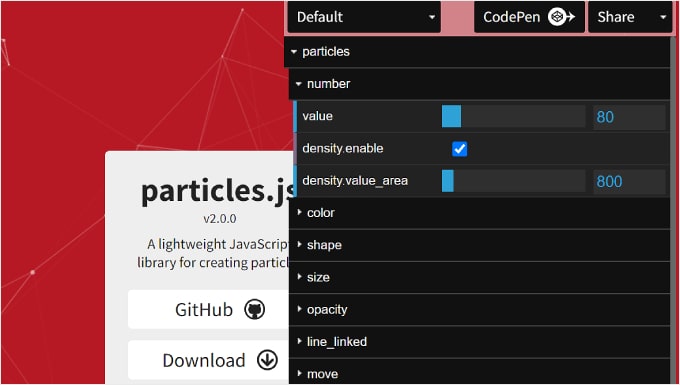
This link will lead you to Vincent Garreau’s website, which features a Javascript library for particle animations.
On this website, you can customize your desired particle design, its interactivity, and the background color.
Within the ‘particles’ setting, you can adjust the particle numbers, color, shape, size, opacity, lines that link the particles, and movement.
Below that is ‘interactivity.’
This is where you can adjust how the particles behave when you hover over them and click on them.
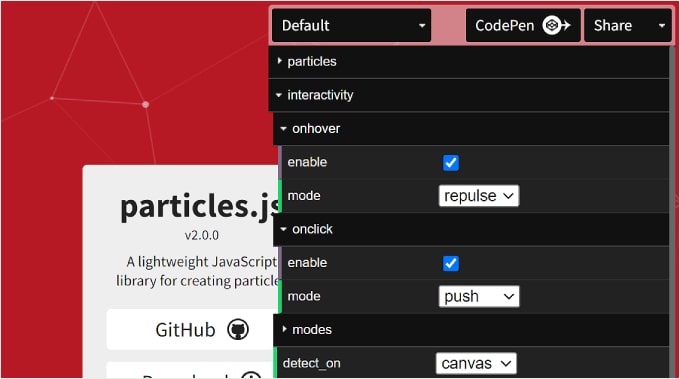
Finally, you have ‘page background (css).’ Here, you can change the background color of the particle animation and modify its size, position, and repetition.
If needed, you can upload a custom background image URL, too.
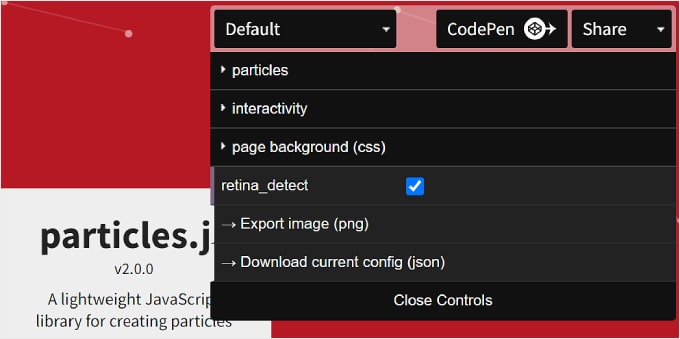
Once you are done, you can click the ‘Download current config (json)’ button at the bottom.
This will download the particle background’s JSON code file, which you need to open using a text editor app. Keep the text editor window open as you continue to the next steps.
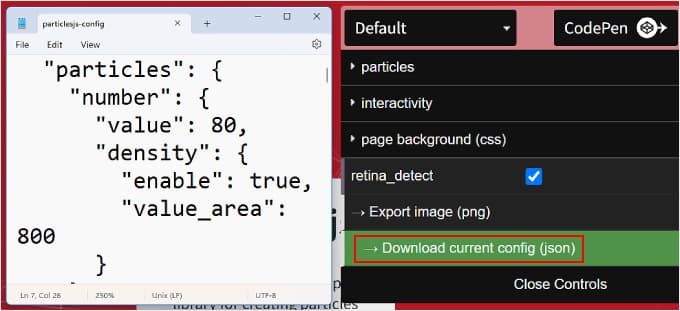
Now, let’s go back to the SeedProd page builder.
Navigate to the Particle Background menu within the Advanced settings again. Then, copy and paste the JSON code into the appropriate text box.
You should now see your particle background in the preview section.
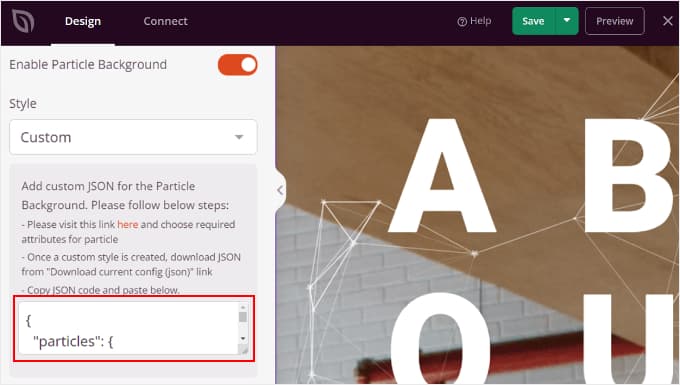
Click ‘Preview’ to see what the particle background looks like on the front end and ‘Save’ to finalize the changes.
Here’s an example of what the particle background may look like:

Method 2: How to Add an Animated Background With Code (Free)
If using a page builder to insert an animated background seems too much work, then you can also add it using code. Don’t worry if you’re not a coding expert, as we’ll use WPCode to make this process safe and straightforward.
You can use either the free or premium version of WPCode for this tutorial. While the free version works perfectly fine, the premium version includes helpful features like AI code generation and a testing mode.
You can read our WPCode review if you need more information.
First, go ahead and install the plugin on your WordPress admin.
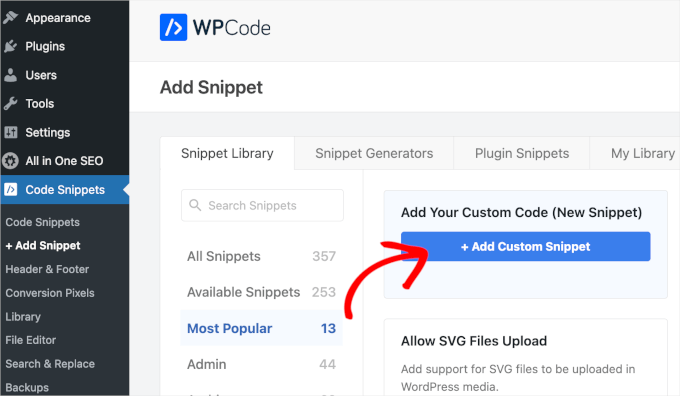
After activation, head to Code Snippets » + Add Snippet in your dashboard, then click on ‘Add Your Custom Code (New Snippet)’ followed by the ‘+ Add Custom Snippet’ button.
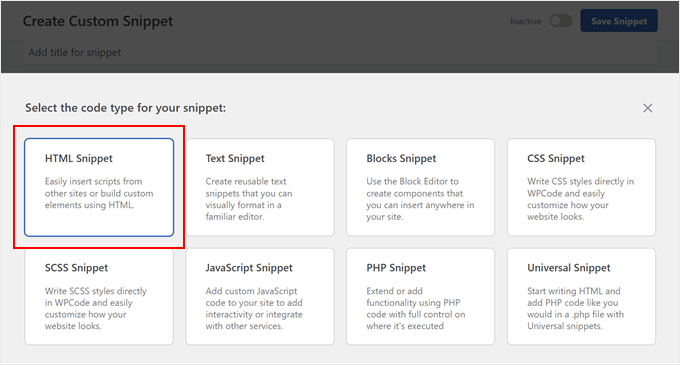
Now, you’ll need to select your snippet type.
Since we’ll be working with a combination of HTML, JavaScript, and CSS, you can choose ‘HTML Snippet’ from the options.
Now, give your snippet a name that’s easy to remember.
It can be something simple like ‘Particle.js Background.’
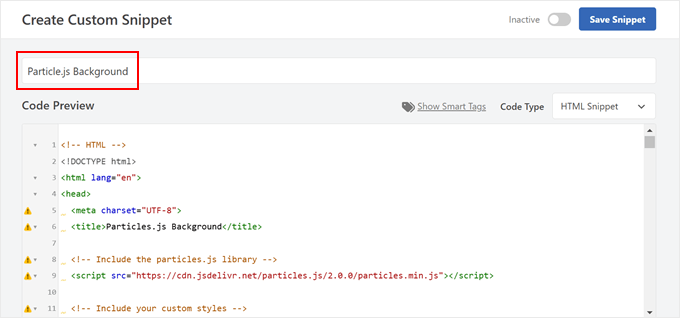
Now, go ahead and paste the code below.
This code was actually adapted from the same Vincent Garreau website that was featured in the first method, but we’re going to show you how to customize it further with just code:
<!-- HTML -->
<!DOCTYPE html>
<html lang="en">
<head>
  <meta charset="UTF-8">
  <title>Particles.js Background</title>

  <!-- Include the particles.js library -->
  <script src="https://cdn.jsdelivr.net/particles.js/2.0.0/particles.min.js"></script>

  <!-- Include your custom styles -->
  <style>
    /* Reset styles */
    body {
      margin: 0;
      font: normal 75% Arial, Helvetica, sans-serif;
    }
    canvas {
      display: block;
      vertical-align: bottom;
    }

    /* Particles.js container */
    #particles-js {
      position: fixed;
      top: 0;
      width: 100%;
      height: 100%;

      /* Background color; change this to any valid CSS color value */
      background-color: #b61924; /* <-- Customize background color here */

      /* Optional background image; add the URL inside the quotes */
      background-image: url(""); /* <-- Add background image URL here */

      background-repeat: no-repeat;
      background-size: cover;
      background-position: 50% 50%;
      z-index: -1; /* Ensure the particles are behind other content */
    }

    /* Optional stats styles */
    .count-particles {
      background: #000022;
      position: absolute;
      top: 48px;
      left: 0;
      width: 80px;
      color: #13E8E9;
      font-size: 0.8em;
      text-align: left;
      text-indent: 4px;
      line-height: 14px;
      padding-bottom: 2px;
      font-family: Helvetica, Arial, sans-serif;
      font-weight: bold;
      border-radius: 0 0 3px 3px;
      -webkit-user-select: none;
      margin-top: 5px;
      margin-left: 5px;
    }
    .js-count-particles {
      font-size: 1.1em;
    }
  </style>
</head>
<body>
  <!-- Particles.js container -->
  <div id="particles-js"></div>

  <!-- Optional Stats Display -->
  <div class="count-particles">
    <span class="js-count-particles">--</span> particles
  </div>

  <!-- Initialize particles.js -->
  <script>
    /* Customize the particles.js parameters below */
    particlesJS("particles-js", {
      "particles": {
        "number": {
          "value": 80, /* <-- Number of particles; adjust this value */
          "density": {
            "enable": true,
            "value_area": 800 /* <-- Particle density area */
          }
        },
        "color": {
          "value": "#ffffff" /* <-- Particle color; change to any valid CSS color */
        },
        "shape": {
          "type": "circle", /* <-- Particle shape: "circle", "edge", "triangle", etc. */
          "stroke": {
            "width": 0,
            "color": "#000000" /* <-- Stroke color of particles */
          },
          "polygon": {
            "nb_sides": 5 /* <-- Number of sides for polygon shape */
          },
          "image": {
            "src": "img/github.svg", /* <-- URL of custom image for particles */
            "width": 100,
            "height": 100
          }
        },
        "opacity": {
          "value": 0.5, /* <-- Opacity of particles */
          "random": false, /* <-- Whether opacity is random */
          "anim": {
            "enable": false,
            "speed": 1,
            "opacity_min": 0.1,
            "sync": false
          }
        },
        "size": {
          "value": 3, /* <-- Size of particles; adjust to change particle size */
          "random": true, /* <-- Whether particle size is random */
          "anim": {
            "enable": false,
            "speed": 40,
            "size_min": 0.1,
            "sync": false
          }
        },
        "line_linked": {
          "enable": true, /* <-- Enable lines between particles */
          "distance": 150, /* <-- Maximum distance for linking particles */
          "color": "#ffffff", /* <-- Color of the lines */
          "opacity": 0.4, /* <-- Opacity of the lines */
          "width": 1 /* <-- Width of the lines */
        },
        "move": {
          "enable": true, /* <-- Enable particle movement */
          "speed": 6, /* <-- Speed of particle movement */
          "direction": "none", /* <-- Direction of movement */
          "random": false, /* <-- Randomize movement direction */
          "straight": false, /* <-- Move in straight lines */
          "out_mode": "out", /* <-- Action when particles go out of canvas */
          "bounce": false, /* <-- Enable particles to bounce off edges */
          "attract": {
            "enable": false, /* <-- Attract particles toward mouse */
            "rotateX": 600,
            "rotateY": 1200
          }
        }
      },
      "interactivity": {
        "detect_on": "canvas", /* <-- Interaction events occur on "canvas" or "window" */
        "events": {
          "onhover": {
            "enable": true, /* <-- Enable interaction on hover */
            "mode": "repulse" /* <-- Interaction mode on hover: "grab", "bubble", "repulse" */
          },
          "onclick": {
            "enable": true, /* <-- Enable interaction on click */
            "mode": "push" /* <-- Interaction mode on click: "push", "remove", "bubble", "repulse" */
          },
          "resize": true /* <-- Enable reactivity to window resize */
        },
        "modes": {
          "grab": {
            "distance": 400, /* <-- Distance for grab mode */
            "line_linked": {
              "opacity": 1
            }
          },
          "bubble": {
            "distance": 400, /* <-- Distance for bubble mode */
            "size": 40, /* <-- Size of particles in bubble mode */
            "duration": 2, /* <-- Duration of bubble effect */
            "opacity": 8, /* <-- Opacity of particles in bubble mode */
            "speed": 3 /* <-- Speed of bubble effect */
          },
          "repulse": {
            "distance": 200, /* <-- Distance for repulse mode */
            "duration": 0.4 /* <-- Duration of repulse effect */
          },
          "push": {
            "particles_nb": 4 /* <-- Number of particles added on click */
          },
          "remove": {
            "particles_nb": 2 /* <-- Number of particles removed on click */
          }
        }
      },
      "retina_detect": true /* <-- Enable retina display support */
    });

    /* Optional: Variables for stats.js (if used) */
    var count_particles, stats, update;
  </script>
</body>
</html>
This code is pretty long, so let’s look at the parts you can customize.
To change the background color, modify the background-color property under #particles-js. Replace #b61924 with any valid CSS color value, such as #FF0000 for red or rgb(255,0,0) or even color names like red.
background-color: #b61924; /* <-- Customize background color here */
To add a background image, set the background-image property by adding the URL of your image inside the url("").
Make sure the background image’s path or URL is correct.
background-image: url("path/to/your/image.jpg"); /* <-- Add background image URL here */
To change the number of particles, adjust the "value" under "number".
Increasing the value adds more particles, while decreasing it reduces the number.
"number": {
  "value": 80, /* <-- Number of particles; adjust this value */
  // ...
}
To change the size of the particles, you can modify the "value" under "size".
A larger number increases the particle size, and vice versa.
"size": {
  "value": 3, /* <-- Size of particles; adjust to change particle size */
  "random": true, /* <-- Set to false for uniform size */
  // ...
}
To change the color of the particles, go ahead and replace the "value" in "color" with any valid CSS color value.
"color": {
  "value": "#ffffff" /* <-- Particle color; change to any valid CSS color */
},
To change the shape of the particles, you can modify the "type" under "shape".
You can use shapes like "circle", "edge", "triangle", "polygon", or even "star".
"shape": {
  "type": "circle", /* <-- Particle shape: "circle", "edge", "triangle", etc. */
  // ...
},
To change the properties of lines between particles, you can adjust the properties under "line_linked".
For instance, if you change "enable": true to "enable": false, then you won’t see any line connecting the particles.
"line_linked": {
  "enable": true, /* <-- Enable lines between particles */
  // ...
},
You can also change the line color, opacity, and width.
"line_linked": {
  "color": "#ffffff", /* <-- Line color */
  "opacity": 0.4, /* <-- Line opacity */
  "width": 1, /* <-- Line width */
  // ...
},
Don’t worry if you need to make changes later, as you can always modify the code even after activation.
After you’ve customized the code to your liking, it’s time to set up where and when your animated background appears.
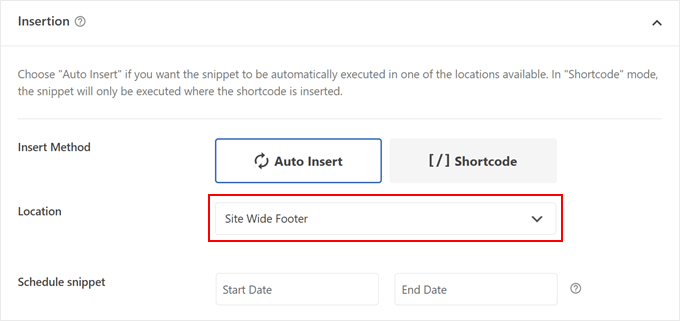
Scroll down to the Insertion section of your WPCode snippet. Make sure to select ‘Auto Insert’ as your Insert Method and choose ‘Site Wide Footer’ for the Location.
WPCode also offers a powerful feature called conditional logic, which is available in both free and premium versions. This feature lets you control exactly where your animated background appears on your website.
To use this feature, locate the ‘Smart Conditional Logic’ section and toggle ‘Enable Logic’ to on. You’ll see options to set specific conditions for displaying your background.
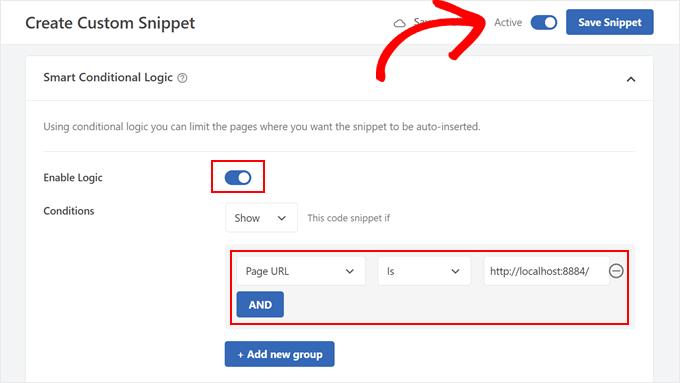
For example, if you want the animated background to appear only on your homepage, select ‘Page URL’ from the conditions dropdown, choose ‘Is,’ and enter your homepage URL.
You can add multiple condition groups by clicking the ‘+ Add new group’ button.
The final step is to activate your snippet. Look for the ‘Inactive’ toggle at the top of the page and click it to change it to ‘Active.’ Don’t forget to click ‘Save Snippet’ to preserve your changes.
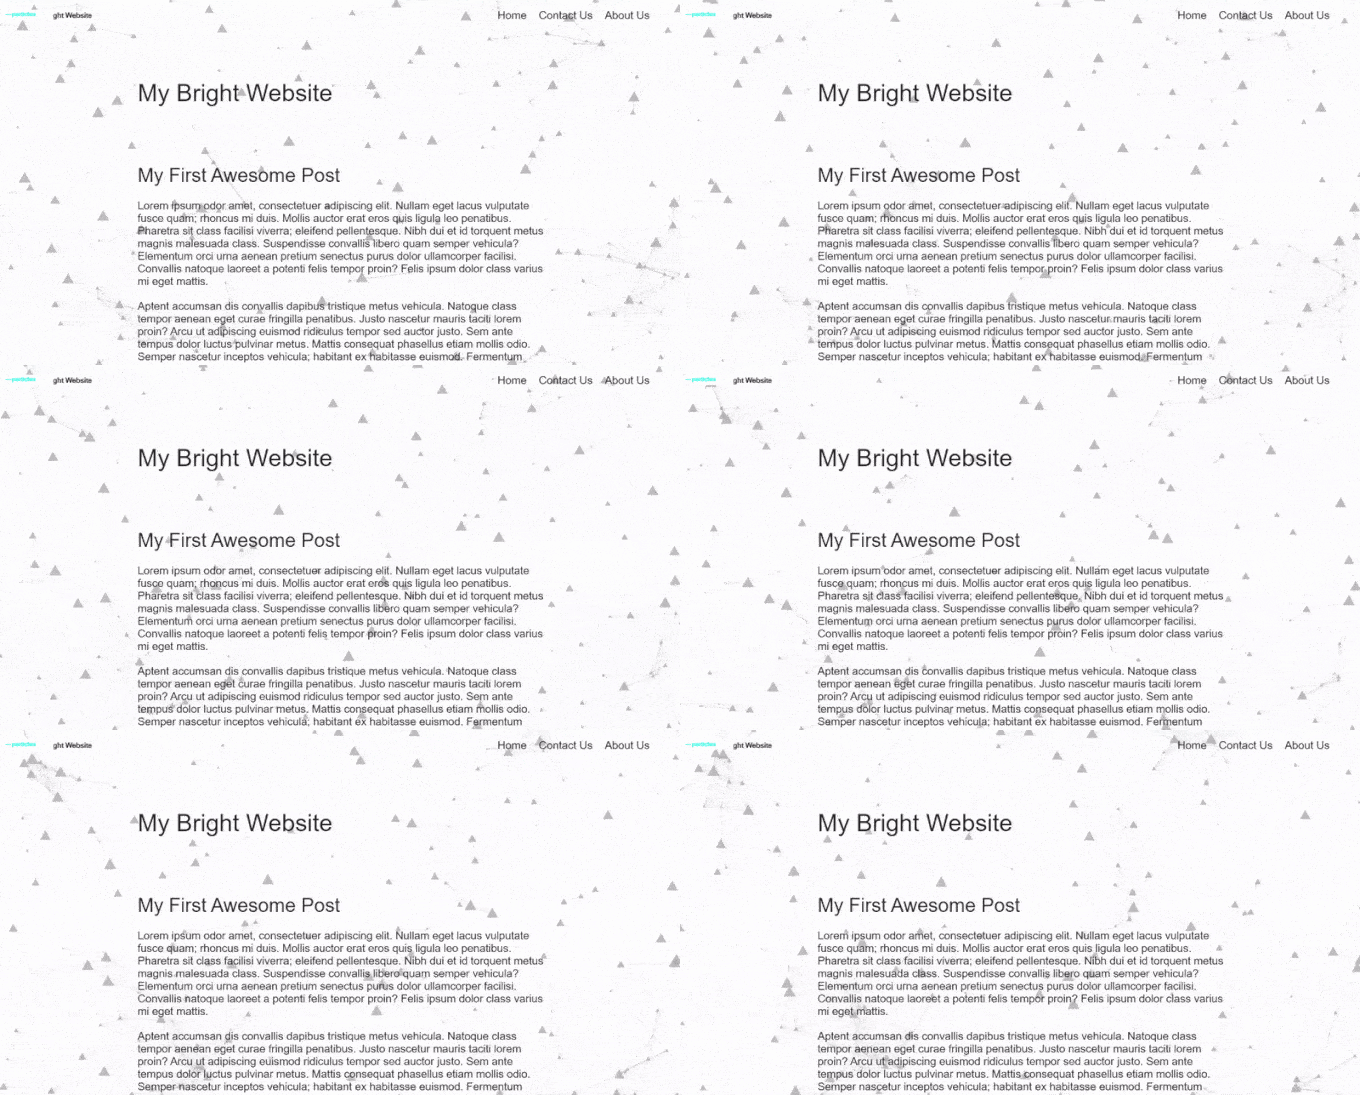
That’s all there is to it! Visit your website on mobile or desktop to see your new animated background in action. Here’s how it looks on our test site:
Do Animated Backgrounds Slow Down Websites?
If not done right, animated backgrounds can slow down your website. But there are ways to avoid this.
For particle backgrounds, the number of particles and how fast they move can affect how quickly your page loads. More particles and faster movement need more processing power, which can slow things down.
To fix this, you can try different settings for particle density and speed to find what works best for your website. During this process, you can run WordPress speed tests to see the effects.
It’s also a good idea to only use animated backgrounds on pages where they matter the most. You don’t need them everywhere, or they might get boring.
Lastly, to keep your website fast with a particle background, make sure to follow the best practices for website speed. You can learn more in our ultimate guide on making WordPress faster.
We hope this article has helped you learn how to add an animated particle background in WordPress. You may also want to check out our guide on how to get website design feedback in WordPress and our expert pick of the best WordPress theme builders.
If you liked this article, then please subscribe to our YouTube Channel for WordPress video tutorials. You can also find us on Twitter and Facebook.


Carlos Rangel
Nice article. I wonder if is possible to achieve this effect using some code like vanilla JavaScript and maybe some CSS styles. This as become my favorite WordPress blog
WPBeginner Support
While possible, it would require coding knowledge and would not be a beginner task which is why we do not currently recommend it.
Admin