Adding Amazon ads to your WordPress site is a smart way to earn extra income. They’re straightforward to set up and often have a faster approval process than other ad networks.
During our 16+ years of experience in blogging and affiliate marketing, we’ve noticed that displaying Amazon ads effectively can be a challenge. Not all methods are the same – some take longer to set up, while others might not deliver the results you’re hoping for.
After researching and testing, we’ve found 3 simple methods for adding Amazon ads to your site. You can use native display ads for seamless integration, affiliate links to highlight specific products, or popup ads to grab people’s attention.
In this article, we’ll walk you through each method step by step so you can start monetizing your site with Amazon ads.
What Are Amazon Ads?
Amazon ads are display ads from the Amazon network that works similarly to Google AdSense and other ad platforms. However, these ads show products from Amazon.
You can place Amazon display ads throughout your content or at the end of your posts to encourage clicks. These native ads will display relevant products based on the content of your page and the visitor’s search history.
There are three main types of Amazon native ads you can add to your WordPress site:
- Recommendation ads show products based on the page content and the user’s search history.
- Search ads allow visitors to search for Amazon products directly from your website.
- Custom ads let you showcase your favorite products to your readers.
The best part? The setup is straightforward. Once you add the code to your site, the ads will automatically appear across your pages. This makes it easy to start earning more money with minimal effort.
Why Add Amazon Ads to WordPress?
Amazon ads have a much faster approval process, which means you can quickly start earning money with display ads and affiliate marketing.
Display advertising is one of the most popular ways that WordPress blogs earn money.
However, a lot of advertising networks have strict approval processes, and it can take a while to get your site approved, especially if you are new.
Amazon associates ads can shortcut this waiting period. If you get approved by other networks in the future, then you can add these alongside your existing Amazon ads.
Depending on the type of site you have, these ads can convert pretty well, too.
How to Add Amazon Ads to Your WordPress Site
There are a handful of ways you can add Amazon ads to your WordPress website.
However, before you can add Amazon ads to your site, you will need to join Amazon.
Head over to the Amazon Associates program website and click the ‘Sign Up’ button.

Next, you will be asked to log in to your existing Amazon account using the email and password associated with that account.
If you don’t have an Amazon account, then go ahead and create one now.
After you have logged in to your account, you will need to add additional account information and answer questions about your website. Simply follow the instructions to complete your profile.
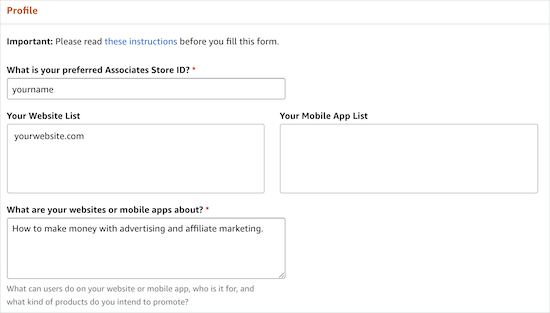
Once you have finished, your application will be reviewed by Amazon. The approval process is pretty fast and much more accessible than other networks like Google AdSense.
Create Your Amazon Ads Code
Before you can add Amazon ads to WordPress, you will need to create your Amazon ad code.
To do this, open up the Amazon Associates ad editor. Then, navigate to Product Linking » Native Shopping Ads.
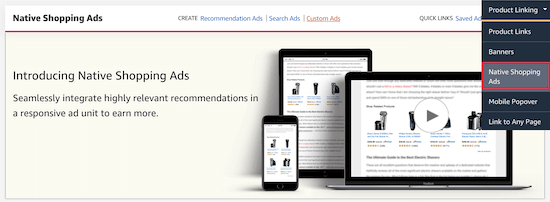
After that, just click on ‘Recommendation Ads’.
You can also create ‘Custom Ads’ or ‘Search Ads,’ but for this tutorial, we will focus on recommended product ads.
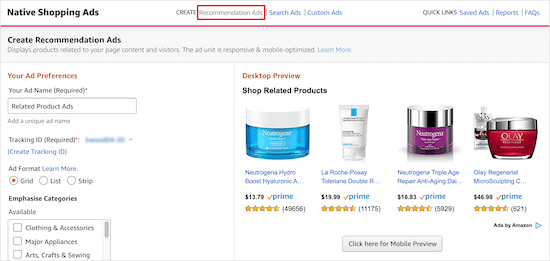
Here, you will name your ad, choose your ad format, and select the product categories that products will display from.
You can also set a keyword fallback.
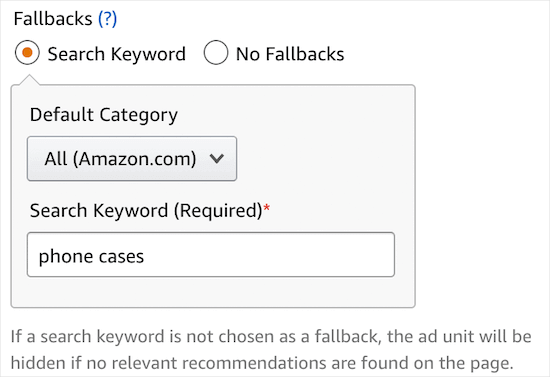
If there are no relevant products to display, then Amazon will pull a product related to that keyword.
You can also preview your ad on both desktop and mobile.
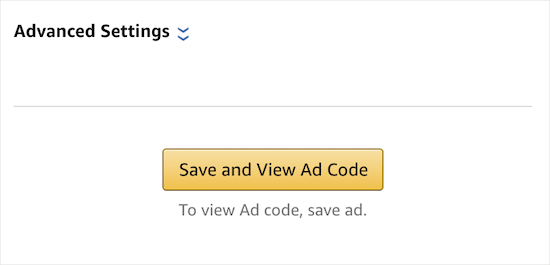
After you make your changes, make sure to click ‘Save and View Ad Code.’
Then, you will need to copy the ad code and paste it into a text editor. You will need this code later to embed your ads into WordPress.

Now, you are ready to add Amazon ads to your WordPress site. You can use the links below to jump to the method that you want to use:
Method 1: Add Amazon Native Display Ads in WordPress
Adding Amazon display ads to WordPress is pretty simple. Plus, you will have a variety of different display options and ad types to choose from.
For example, let’s say you are writing an article about how to improve your business. You could include Amazon Native ads at the end of your post that feature books about business strategies.
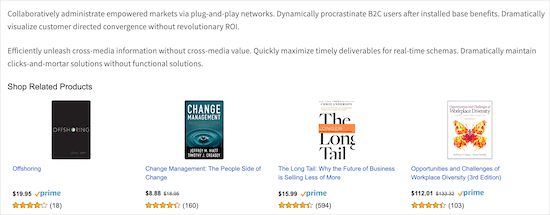
The easiest way to add Amazon Ads is by using a WordPress plugin.
We recommend using the WP Advanced Ads plugin. It’s easy to use and lets you quickly embed multiple ad types into your website, including Amazon ads.
First, you need to install and activate the plugin. For more details, see our guide on how to install a WordPress plugin.
Once the plugin is installed and activated, you will have a new menu item called ‘Advanced Ads.’ From here, navigate to Advanced Ads » Ads and click ‘New Ad.’

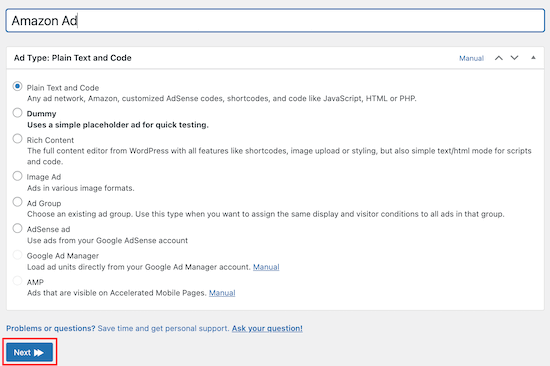
After that, you will need to select the ad type.
Go ahead and add your title and select ‘Plain Text and Code’ as the ad type. Once that’s done, click the ‘Next’ button.
After that, paste the Amazon ad code that you created earlier.
Then, you need to click the ‘Next’ button.
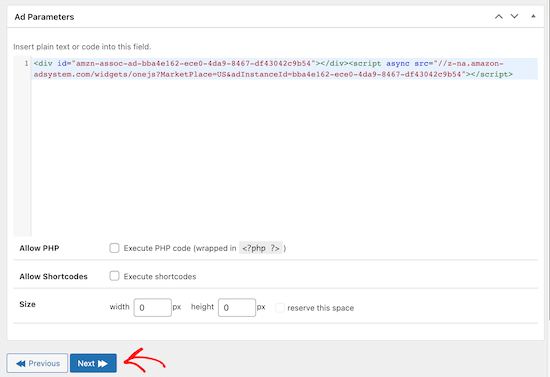
On the next screen, you can choose to hide the ad from some users and pages. However, we will leave the default settings. After that, click ‘Next’.
Now, we are going to choose where our Amazon ads will be displayed. You have multiple options to choose from, including before, after, and within your content. You also have the option to display Amazon ads in your sidebar.
We are going to select ‘After Content.’ However, you can choose the option that works best for your site.
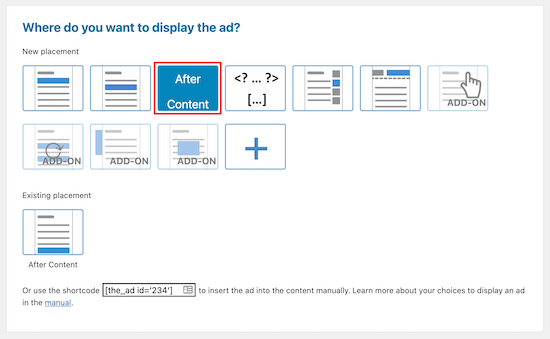
Once you select your display option, your ad will now be visible on the front end of your site.
Method 2: Add Amazon Affiliate Links in WordPress
Do you want to create an Amazon affiliate site? Affiliate websites operate a little differently than sites monetized by display ads alone.
With affiliate marketing, you will earn a commission whenever a visitor clicks on your link and purchases a product.
Adding Amazon affiliate links to your site is easy with the help of the right plugin. We recommend using Pretty Links or ThirstyAffiliates.
These are two of the best affiliate marketing plugins for WordPress. In fact, we use ThirstyAffiliates for the WPBeginner sites, and many of our partner brands do too.
The first thing you’ll need to do is install and activate the plugin. We are going to use Pretty Links. However, you can choose ThirstyAffiliates as well. For more details, see our guide on how to install a WordPress plugin.
Note: For more information on both tools, you can check out our Pretty Links review and ThirstyAffiliate review as well. Alternatively, you can read our comparison article on Pretty Links vs ThirstyAffiliates.
Upon activation, you will have a new menu item labeled Pretty Links in your WordPress dashboard.
Before you create an affiliate link in Pretty Links, you will need to go to your Amazon Associates dashboard and create an affiliate link. Once you are in your dashboard, simply navigate to Product Linking » Product links.
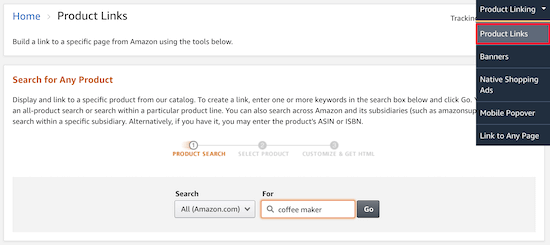
Here, you can search for the product that you want to create a link for.
Once you have found the product, click ‘Get Link.’

Next, you will need to copy the link code.
To do this, click the ‘Text Only’ navigation item, then click the ‘Short Link’ radio button.
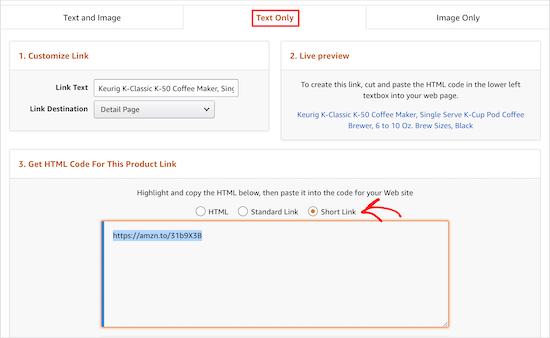
This will bring up the affiliate link you need to copy.
Now, go back to your WordPress dashboard and navigate to Pretty Links » Add New.
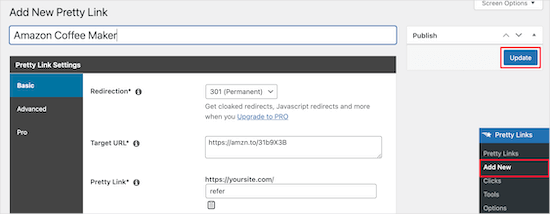
Next, you will need to name your link, add your target URL, and create your link.
Your target URL is the link you copied from your Amazon Associates account. The ‘Pretty Link’ is the shortened URL you want to use instead.
Also, make sure to choose a 301 redirect. After you have made your changes, click ‘Update’ to save the link.
Now, you can add your affiliate link to your content.
Open up a WordPress page or post. In the post editor, highlight the text you want to link and copy your affiliate link from above.
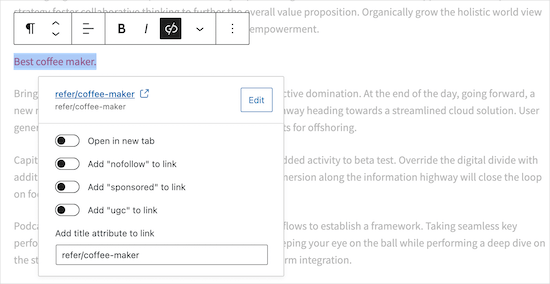
Now, when your readers click the link, they will be taken to the product in the Amazon store. If they purchase the product, then you will receive a commission.
To learn more about affiliate marketing, see our ultimate affiliate marketing guide for beginners.
Method 3: Add Amazon Popup Ads in WordPress
Another unique way to add Amazon ads to your site is with a popup. You will have complete control over when and how the popup displays on your website.
You can even personalize the popups based on user behavior, their location, the page they are viewing, and more.
The easiest way to add Amazon popup ads is by using OptinMonster. It’s one of the best WordPress lead-generation plugins on the market, and it allows you to add all kinds of popups to your WordPress site easily.
We use it on our site to offer special deals using lightboxes, slide-in popups, header banners, and more. So, we’re confident in recommending this tool. For more information, please see our complete OptinMonster review.
First, you will need to install and activate the OptinMonster plugin on your WordPress site. If you need help, then please see our guide on how to install a WordPress plugin.
The plugin acts as a connecter between your WordPress website and the OptinMonster software.
Once you have activated and installed the plugin, click on the ‘OptinMonster’ menu item in your WordPress admin bar.
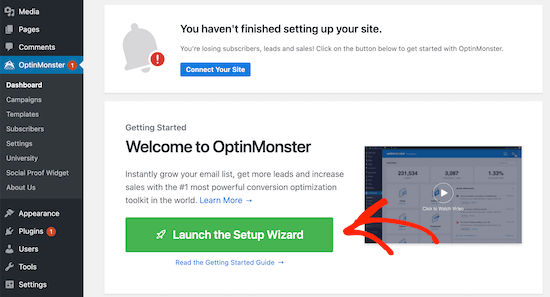
After that, you will need to connect your site to OptinMonster by clicking the ‘Launch the Setup Wizard’ button.
Here, you can connect to an existing account or claim your free account.
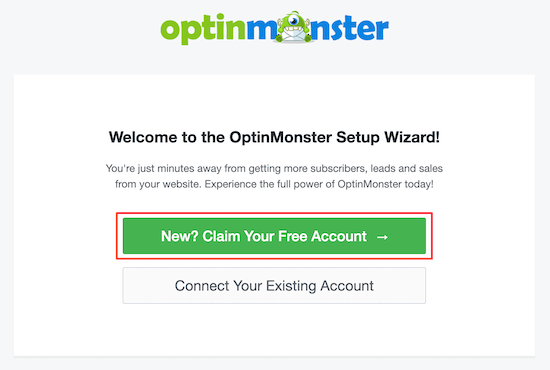
After you have finished going through the setup wizard, your WordPress site will be connected to OptinMosnter.
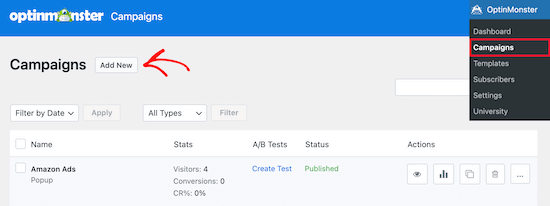
To start creating a popup ad, navigate to OptinMonster » Campaigns. Then, click ‘Add New’ to create a new campaign.
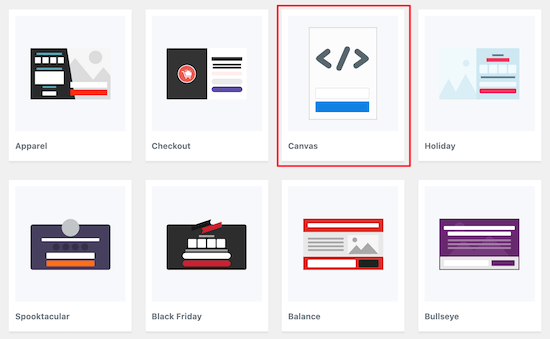
After that, you need to select the ‘Popup’ campaign type.
Next, choose the campaign template. We will select the ‘Canvas’ template since this gives us a blank template to add our Amazon ad code.
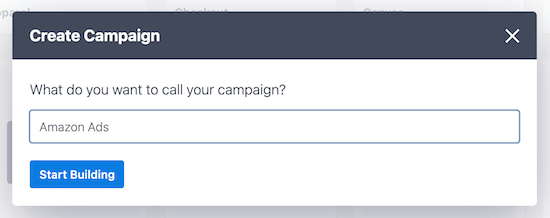
Then, just enter the name of your campaign name and click ’Start Building’.
The name of your campaign won’t appear in your design, but it is for your reference.
This will open up the OptinMonster app, where you can customize the appearance of your popup.
You won’t be making that many visual changes. Instead, you will copy and paste the Amazon ad code you generated earlier.
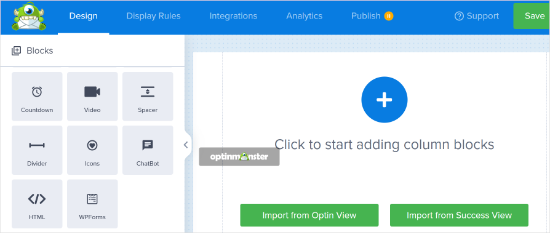
First, click on ‘Blocks,’ then select the ‘HTML’ block and drag it over.
In the ‘Editing HTML Element’ box, paste your Amazon ad code. It will automatically appear in the editor.
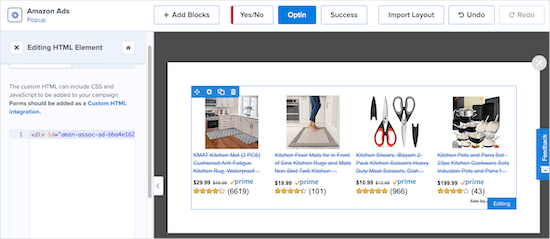
You can further customize your popup by adding new blocks, headings, text, and more.
Once you are satisfied with your popup, make sure to click ‘Save,’ then click on the ‘Display Rules’ tab.
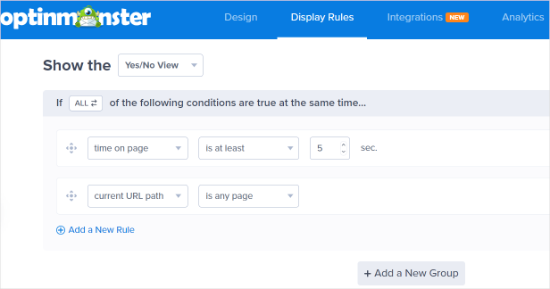
This is where we will set up your popup display options.
The default setting is for the popup to display when a visitor has been on the page for at least 5 seconds. However, you can adjust this if you want the period to be shorter or longer. After that, simply click ‘Next Step’.
You can leave the default options on the next screen. Feel free to add animation or sound effects if you’d like. Once you are done, click ‘Next Step’.
On the ‘Summary’ page, you can double-check that your display settings are correct.
After that, go to the ‘Publish’ tab and switch the ‘Publish Status’ from Draft to Publish.
Then, simply click ‘Save’ and exit the screen.
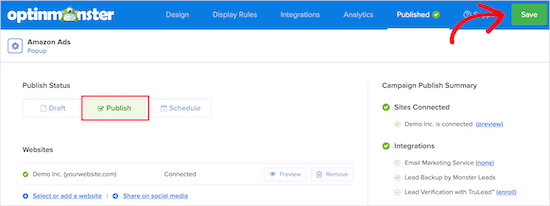
Your Amazon ad popup will now be live on your site and display for visitors after the time period you set earlier.
The best part about OptinMonster is that it’s one of the few WordPress popup plugins that gives you complete control over personalization. Their display rules are extremely powerful, and you can use them to display multiple Amazon ads targeted toward different sections of your website.
Bonus Tip: Increase Your Ad Impressions
Now that you’ve learned how to display Amazon ads, let’s take it to the next level and explore how to improve your ad impressions. One effective way to maximize your existing placements is by using ad refresh.
Ad refresh allows you to rotate multiple ads in the same spot without reloading the page. This means your visitors see fresh ads as they browse, increasing the number of impressions without adding more ad spaces.

It’s a subtle yet impactful way to boost your revenue while maintaining a clean and user-friendly site design.
When paired with Amazon ads, ad refresh can help you showcase more products and increase the chances of clicks and conversions. Over time, it also provides valuable insights into which ads perform best so you can focus on the ones that generate the most income.
For more information, check out our guide on increasing ad impressions with ad refresh.
We hope this article helped you add Amazon ads to WordPress. You may also want to see our expert picks for the best WordPress ad management plugins and solutions or our guide on how to add affiliate disclosure for each blog post automatically.
If you liked this article, then please subscribe to our YouTube Channel for WordPress video tutorials. You can also find us on Twitter and Facebook.


Jiří Vaněk
From the point of view of making money and some monetization of the site, which of the ads do you think is more beneficial? Ads by Amazon or Ads by Google?
WPBeginner Support
There is no always right answer for that, it depends on the content and preference of the site owner and audience.
Admin
Jiří Vaněk
Thank you for your response. Currently, I have and use Google Ads, but they aren’t very effective for monetization. Since I have many users from the USA, I will try switching from Google Ads to Amazon and attempt to conduct my own research to see which option is better. Thank you for your time.
kae
Thanks for the information. Why doesn’t Wordpress allow you to copy and paste ad code into the theme editor or blog pages anymore?
WPBeginner Support
While you can still do that using HTML blocks, we recommend these other methods as they allow for easier management of the code on your site
Admin
Maria
Thank you so much for this post! I have been using Amazon affiliate links but now I think i will try the Amazon ads as well.
Thanks again!
WPBeginner Support
Glad our guide was helpful
Admin