A wishlist is a great way to enhance your WooCommerce store by letting customers save their favorite products for future purchases. It also makes it easy for visitors to share their favorite items with friends and family as part of their wedding registry or another gift registry.
This feature not only improves the user experience but also encourages repeat visits, which can ultimately lead to more sales.
Whether you are selling physical products, digital goods, or services, adding a wishlist can be a valuable tool to increase conversions.
In this article, we’ll show you how to easily add a wishlist for WooCommerce stores.

What Are Wishlists and Why Add Them in WooCommerce?
A wishlist lets your customers and guests save their favorite products on a list. It helps them remember which popular products they want to buy in the future, so they can quickly find them later on your WooCommerce store.
Plus, customers can share their wishlists with their friends and family. This helps build brand awareness and increases traffic to your online store so you can boost sales.
Another benefit is that you get to see which products people add the most to their wishlists. To increase sales, you can then run promotional offers and discounts on popular wishlist products.
That said, let’s see how you can easily add a wishlist to the WooCommerce store.
Adding a Wishlist to Your WooCommerce Store
The best way of adding a wishlist to your WooCommerce store is by using a WordPress plugin like YITH WooCommerce Wishlist.
It’s a freemium plugin that has a free version and lets your visitors save their favorite products to a wishlist and share them with their friends and family.
First, you’ll need to install and activate the YITH WooCommerce Wishlist plugin. For more details, see our guide on how to install a WordPress plugin.
Upon activation, you can head over to YITH » Wishlist from your WordPress dashboard and click on the ‘Add to wishlist options’ tab to configure the plugin.
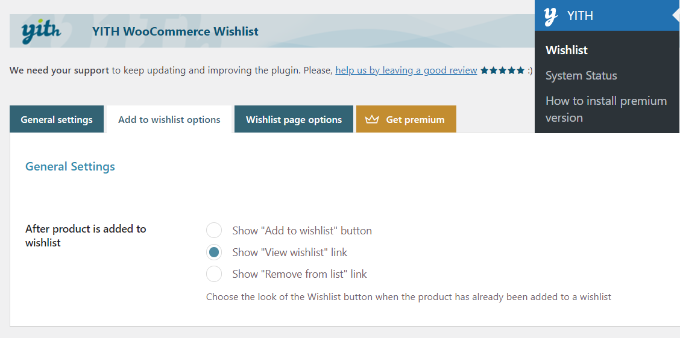
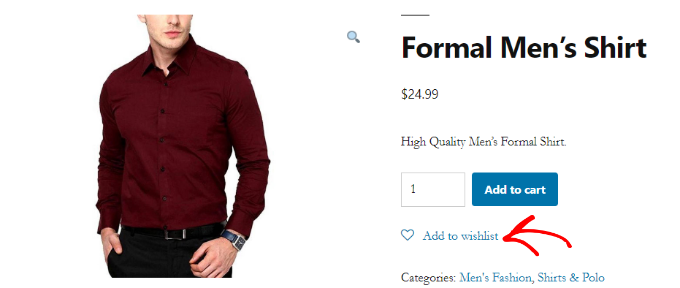
The plugin will automatically add an ‘Add to wishlist’ link to each product that shoppers can click on to save items.
In the settings, you can select which link to show after a user adds a product to the wishlist. For instance, you can still display the ‘Add to wishlist’ button, or you can change the link to show the ‘View wishlist’ or ‘Remove from list’ options instead.
Next, you’ll see the Loop settings and Product page settings. You can choose where you’d like the ‘Add to wishlist’ button to appear on the product page.
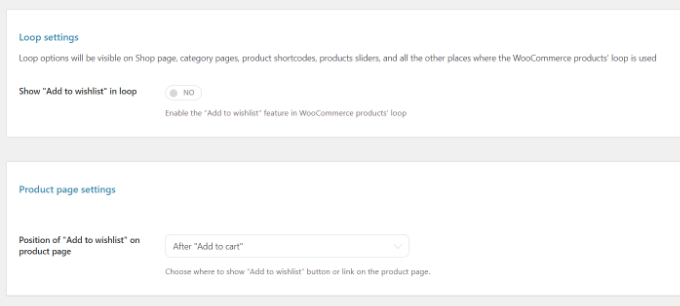
By default, it will be shown after the add to cart button. However, you can choose a different position by clicking the dropdown menu in front of the Position of “Add to wishlist” on the product page option.
After that, simply scroll down to customize the text for your wishlist and edit the color and style of the add to wishlist button.
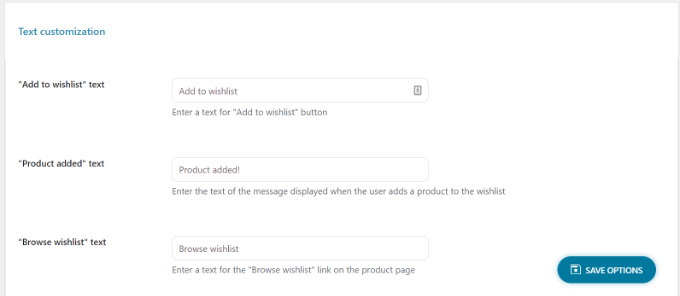
Don’t forget to click the ‘Save Options’ button at the bottom of the page when you’re done.
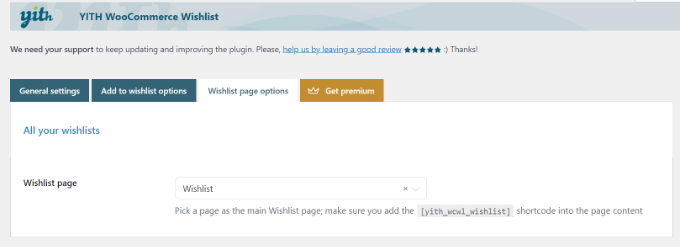
Next, you can head to the ‘Wishlist page options’ tab.
The plugin will create a new page for wishlists on your WooCommerce store. If you prefer, you can select a different page from the Wishlist page dropdown menu instead or show wishlists on any page using the [yith_wcwl_wishlist] shortcode.
Next, you can now scroll down and select which details to show in the wishlist table in the WordPress admin.
For example, there are options to display product variations, the date on which the product was added to the wishlist, the price, and more.
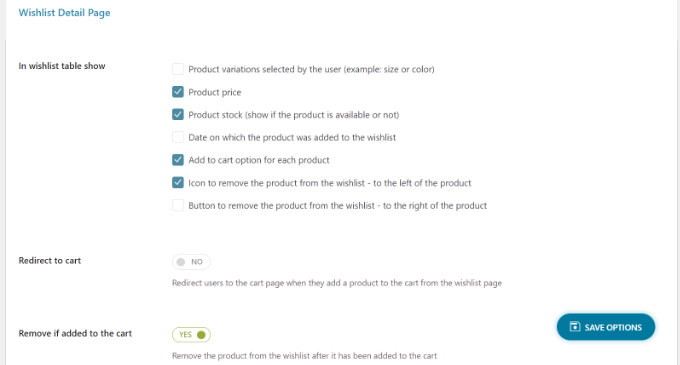
You can even select social media channels on which people can share their wishlists, add custom text when the list is shared on social media, and more.
The plugin also offers settings to change the text and edit the style and color of the sharing button, social media channel buttons, and more.
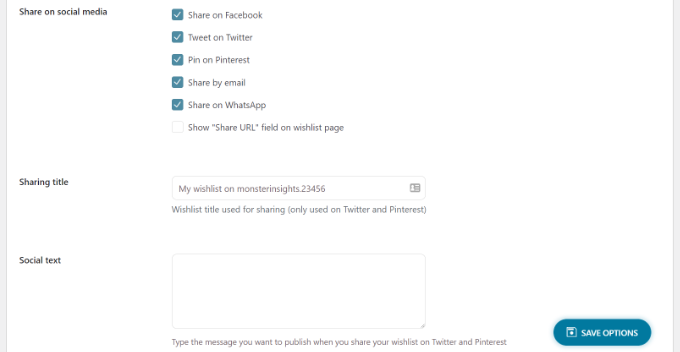
When you’ve customized the wishlist page settings, don’t forget to click the ‘Save Options’ button to store your changes.
You can now visit your WooCommerce store and see the Add to Wishlist icon and option on the product page under the Add to Cart button.
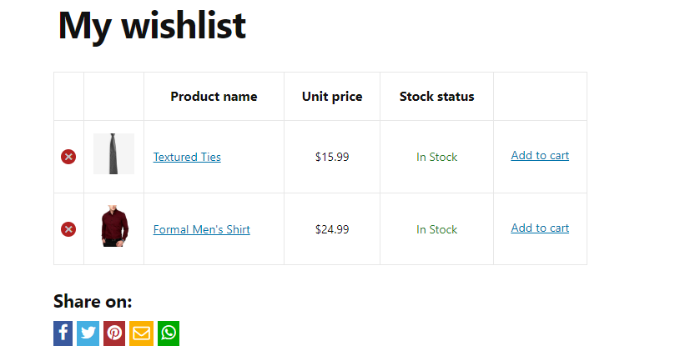
When a user clicks the Add to Wishlist link, they can browse their wishlist and remove items or add to cart products from the list.
Besides that, the plugin also shows options to share the wishlist on social media platforms like Facebook, Twitter, and Pinterest or send the list via email and WhatsApp.
Going Beyond Wishlists to Grow WooCommerce Sales
Now that you have added the wishlist feature to your eCommerce website, you may want to optimize it to boost sales and conversions further.
We recommend using the FunnelKit plugin (formerly WooFunnels) to optimize your WooCommerce checkout, add one-click upsells, and other marketing automation features.

For details, see our guide on how to create high converting funnels in WooCommerce.
Aside from that, here are five other plugins that can help grow your WooCommerce store:
- Advanced Coupons for WooCommerce – helps you add smart coupons to offer free shipping discounts above a certain $ amount, buy one get one free offers, and more.
- WooCommerce Gift Cards – lets you sell gift cards for your WooCommerce store. This is a great addition to the wishlist to boost revenue.
- PushEngage – helps you stay connected with visitors after they leave your website. This technology is used by many smart eCommerce retailers like 1800-flowers, Harrys and Davids, and others to boost sales.
- Uncanny Automator – helps you automate your routine workflows to save you time. Simply the best task automation plugin for WooCommerce store owners.
- WP Mail SMTP – ensures that your WooCommerce emails actually get delivered to your user’s inbox. This is an absolute must-have tool for all WordPress sites. See more details in our guide on how to fix WordPress not sending email issue.
We hope this article helped you learn how to add a wishlist to your WooCommerce store. You may also want to see our expert pick of the best WooCommerce plugins to grow your store, and the best WooCommerce hosting companies that scale with your WordPress website growth.
If you liked this article, then please subscribe to our YouTube Channel for WordPress video tutorials. You can also find us on Twitter and Facebook.


Have a question or suggestion? Please leave a comment to start the discussion.