Adding a verified logo to your outgoing emails confirms that they actually come from you. They work similarly to social checkmarks and can make your business more credible.
At WPBeginner, we understand that building trust with your users takes time and a lot of work. We do that by keeping our website secure and easy to use, providing accurate and helpful content, and communicating clearly and promptly with our readers.
Sending verified emails is another way to build trust. Spam and phishing attacks are common, so many users are concerned about being scammed. Displaying a verified logo can give your customers and readers peace of mind, resulting in a higher open rate for your emails.
In this article, we will show you how to add a verified logo to your business email, helping you to boost your credibility and improve your email engagement.
In this article, we will guide you through the process of adding a verified logo to your business emails, helping you boost trust and improve your email engagement.

Why Should You Add a Verified Logo to Your Business Email?
Email is an important part of any business, especially one you are running from a WordPress website. You want to make sure that your emails are delivered and actually read by your users and customers.
The problem is that your users will receive many emails each day from spammers and scammers. They may wonder if your emails are safe and avoid clicking on them.
You need a way to give them peace of mind. Wouldn’t it be good if there was a way to show readers and customers that your emails were actually sent by your business?
That’s where verified logos come in.

BIMI is a new email standard that stands for ‘Brand Indicators for Message Identification’. It verifies that emails are actually from the business claiming to send them. Your brand logo will be displayed next to genuine email messages to let your customers know that they are safe.
The location and appearance of your brand logo will depend on the email client being used, and some email providers still don’t display a verified logo at all. However, the BIMI standard is being supported by more and more email clients, especially on mobile devices.

However, getting a verified logo set up is complex. Like a jigsaw puzzle, there are a lot of steps that need to be completed, and it’s going to take some time.
This article will take you through the process step by step. Keep in mind that some of the steps are quite technical, and you might like to reach out to an IT or legal professional for help.
With that being said, let’s take a look at how to add a verified logo to your business email. Here are the steps we will cover:
- Step 1: Creating a Professional Business Email Address
- Step 2: Setting Up DMARC to Authenticate Genuine Emails
- Step 3: Creating a Brand Logo for Your Business
- Step 4: Trademarking Your Brand Logo so It's Legally Yours
- Step 5: Uploading Your Brand Logo to Your Website
- Step 6: Applying for a Verified Mark Certificate (VMC)
- Enabling a BIMI Verified Logo for Your Business Emails
- Verifying That BIMI Is Set Up Correctly
- Expert Guides on WordPress Email
Step 1: Creating a Professional Business Email Address
Are you still using a generic Yahoo, Gmail, or Hotmail email address for your business? Customers often don’t trust emails coming from a generic email account.
A custom domain email address looks more professional and gives credibility to your business. Make sure you get one that uses the same domain as your website.
For example, if your website’s address is miamiflorist.com, then your email address should look like john@miamiflorist.com.
If you don’t already have a business email address that uses your website’s domain, then you can set one up in five minutes using our guide on how to create a free business email address.
Or, if you prefer using the Google or Microsoft email web app, then see our guides on how to set up a professional address with Gmail and Google Workspace or Outlook (Office365).
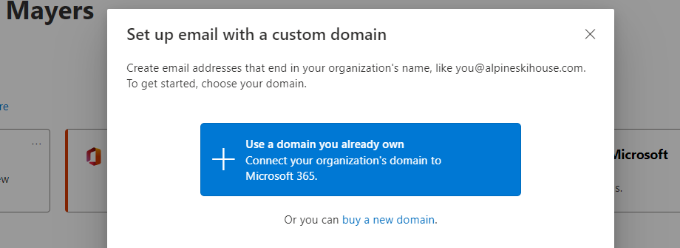
Once you have a new email address, you may need to change the mail exchange (MX) records on your website. MX records tell internet servers where to send emails to and from your website’s domain name.
You will need to find the details of your new MX records from your email provider and then follow our guide on how to change MX records for your WordPress site.
Then, finally, you may wish to use your new email address to receive notification emails from WordPress. To do that, simply follow our guide on how to change the WordPress admin email.
Step 2: Setting Up DMARC to Authenticate Genuine Emails
Now that you have a custom email address using your domain name, you can set up DMARC (Domain-based Message Authentication, Reporting, and Conformance) for your domain.
Email authentication allows email servers to tell the difference between your genuine email messages and fake emails from scammers using your address. It improves email security by protecting your users and customers against phishing attacks and also prevents your emails from being marked as spam.
Tip: If you are not sure whether your domain is already using DMARC, you can check using a checker like MXToolbox. This is important since you should only have one DMARC record.
BIMI requires email messages to be authenticated by DMARC before a verified business logo is displayed on your emails. This will make sure that the logo is only displayed on emails that actually come from you.
Then, all suspicious emails are either rejected or quarantined.
You set up DMARC by adding a new DNS record to your domain. The code that you will add depends on the needs of your business, and you can learn more on the DMARC website.
If you want email servers to reject all suspicious emails, the DNS record will look like this:
v=DMARC1; p=reject; pct=100; rua=mailto:john@miamiflorist.com
Or, if you want suspicious emails to be quarantined, the code will be similar to this:
v=DMARC1; p=quarantine; pct=100; rua=mailto:john@miamiflorist.com
Depending on your needs, the DNS record may contain some additional code.
Just make sure to change the return email address to your own business address. This address will be used to send you DMARC reports about scam emails that have been rejected or quarantined.
The exact method you use to add the DNS record will depend on the domain name registrar you are using. If you are using Bluehost, then you will need to log in and click on ‘Domains’.
This will list your domain names. You should click the ‘Settings’ button next to the right one.
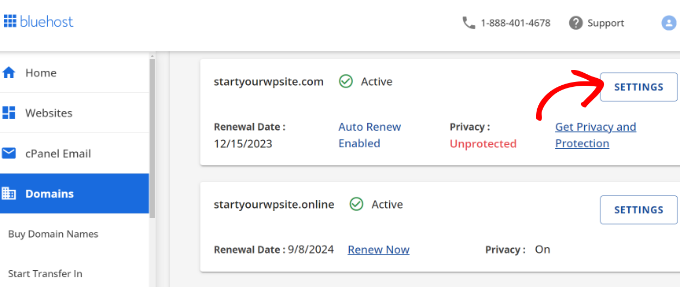
This will show you the different domain settings in Bluehost.
You need to scroll down and expand the ‘Advanced Tools’ option.
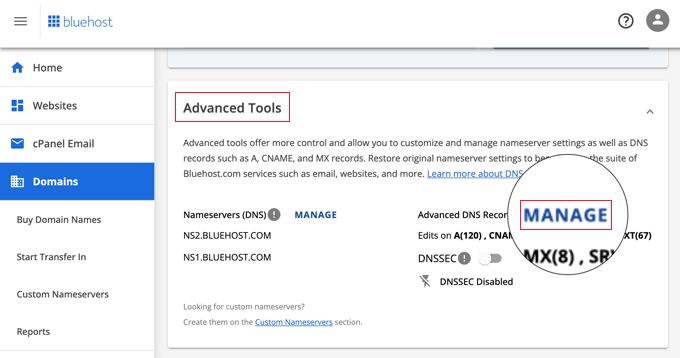
Here, you’ll find the Bluehost nameservers for your domain and other records. To add and manage DNS records, you need to click the ‘Manage’ button.
Bluehost will warn you that only advanced users should change the DNS records. Simply click the ‘Continue’ button.
You should now see a list of your DNS records. You can create a new record by clicking the ‘+Add Record’ button.
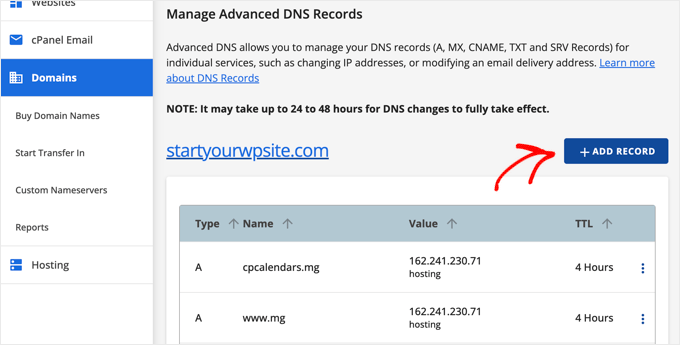
Now, you can add the DMARC record.
Make sure that you select the TXT type from the first drop-down menu. Next, you should select ‘Other Host’ in the ‘Refers to’ field. This will display an additional field where you can type ‘_dmarc’.
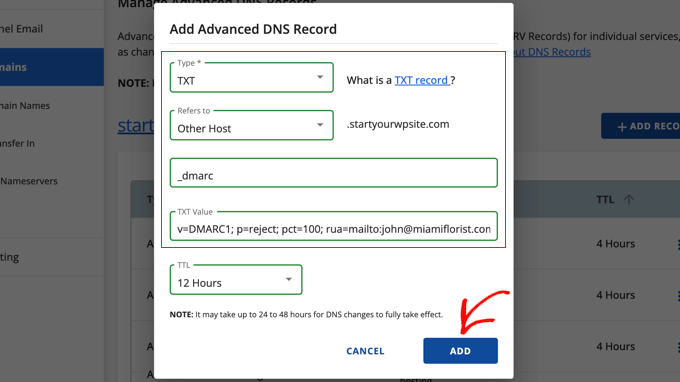
Now, you can paste the DMARC code you chose above into the ‘TXT Value’ field. You can leave the TTL setting with the default value.
Once you click the ‘Add’ button, your DNS settings will be updated. However, as with any DNS change, you will need to wait up to 48 hours for the new setting to take effect.
Step 3: Creating a Brand Logo for Your Business
You can think of a logo as the profile picture for your business. It helps your customers identify and associate your business with a visual identity. You will be using the logo on your website, social media accounts, email newsletter, and business cards.
If you don’t already have a brand logo for your business, then the first step is to create one, purchase one, or hire someone to make one for you.
For BIMI, this will need to be in the Scalable Vector Graphics (SVG) format. This is a vector image format that will make sure that your logo looks good in any display size.
Creating a Business Logo
You can create a logo yourself using web design software or a free logo maker.
Just make sure that the app can save your logo in the SVG format, such as Adobe Illustrator, Affinity Designer, Inkscape, or Sketch.
Your BIMI email logo should also follow these guidelines to be compatible with different email services:
- Be centered so it can be displayed in a square, square with rounded corners, or circle
- Have a solid background, not a transparent one
- Be saved as an SVG file
- Be as small as possible and under 32 KB
Hiring a Professional Graphic Designer to Create a Logo
If you are not a graphic designer, then you might find it difficult to create a logo that looks good. Instead, you can hire a professional designer to create your business logo.
To learn some of the best places to get a custom WordPress logo within your budget, see our guide on the best places to get a custom logo.
Make sure you let the designer know that you need an SVG image that complies with BIMI’s general guidelines, as listed above.
Making Your Logo BIMI Compliant
The BIMI Group now requires your SVG logo to be in a specific format called SVG P/S (SVG Tiny Portable/Secure). However, this format is very new, and there are currently no graphics tools that can save in this format.
That means you must change the logo file to make it BIMI-compliant. You can do that using code by following directions on the official BIMI website.
Alternatively, you can use an SVG conversion tool that can modify the file for you.
Step 4: Trademarking Your Brand Logo so It’s Legally Yours
The next step is to trademark your logo. This is required because BIMI uses Verified Mark Certificates (VMC) to verify brand logo ownership. A VMC is currently only available for logos that are registered trademarks.
This will make sure that no one else can use your trademark as a verified logo, which will protect your users from scammers.
Note: To check if your business already has a trademarked logo, you can search the Brand Database run by the World Intellectual Property Organization (WIPO) to find it.
Your brand logo will need to be registered as a trademark with an intellectual property office recognized by VMC issuers. They currently include:
- United States Patent and Trademark Office
- Canadian Intellectual Property Office
- European Union Intellectual Property Office
- UK Intellectual Property Office
- Deutsches Patent- und Markenamt
- Japan Trademark Office
- Spanish Patent and Trademark Office O.A.
- IP Australia
- Intellectual Property India
- Korean Intellectual Property Office
- Brazilian Instituto Nacional da Propriedade Industrial
- French Institut National de la Propriete Industrielle
- Benelux Office for Intellectual Property
- Denmark Ministry of Culture
- Swedish Intellectual Property Office
- Swiss Federal Institute of Intellectual Property
- Intellectual Property Office of New Zealand
Filing a trademark application is a legal process that needs to be handled carefully. It may take some time, so make sure you get started as soon as possible.
We recommend hiring a lawyer to help you apply for the trademark. You can also use online legal service providers like CorpNet, which provides legal services to small businesses and individuals at a low cost.
Learn more in our guide on how to trademark and copyright your blog’s name and logo.
Step 5: Uploading Your Brand Logo to Your Website
Now, you need to upload your business logo to the website with the same domain as your email address.
For example, if your email address is john@miamiflorist.com, then you need to upload it to the website at miamiflorist.com.
Uploading the Logo File to Your Media Library
Many users will find it simpler to upload the logo file to the WordPress media library.
However, because SVG images contain code, WordPress does not allow you to upload them by default. This is to protect your site in case you got the file from an unreliable source.
You will need to follow our guide on how to add SVG image files in WordPress. We cover several methods, but the easiest is using a snippet from the WPCode pre-made library.
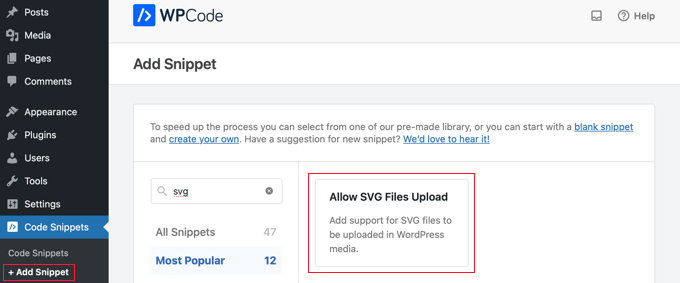
After that, you should navigate to Media » Library.
You can upload your logo using drag and drop or by clicking the ‘Add New’ button at the top of the screen.

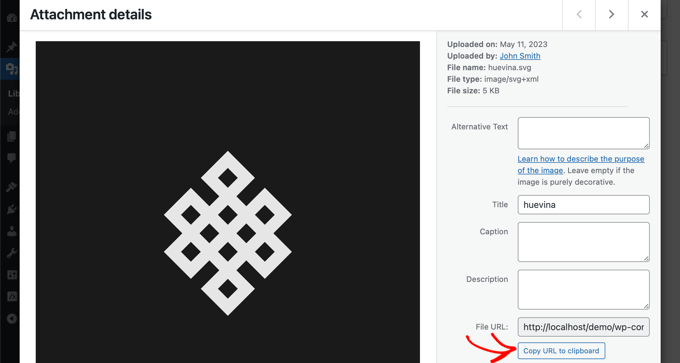
Once the image has been uploaded, you need to click it to open your logo’s attachment page.
Here, you will find a button where you can copy the logo’s URL to the clipboard. You should keep a copy of this in a safe place because you will need the URL later in this tutorial.
Uploading the Logo File Using FTP
If you are a more advanced user, then you can use FTP to upload the file to your website.
After that, you need to right-click the file and copy the logo’s URL to the clipboard. You should paste this in a safe place because you will need it later in this tutorial.

Step 6: Applying for a Verified Mark Certificate (VMC)
The next step is to apply for a VMC (Verified Mark Certificate). It verifies that your organization is the legal owner of your brand logo.
To do this, you will need to contact a BIMI-qualified certification authority. At this time, there are only two: DigiCert and Entrust Datacard.
The application process will require you to submit the SVG file of your brand logo that you created earlier.
When your VMC application is approved, the certification authority will send you an entity certificate Privacy Enhanced Mail (PEM) file.
You need to upload this file to your website using FTP.
After that, you need to copy the file’s URL to the clipboard and store it in a safe place with the logo’s URL that you copied earlier. You will need both of these URLs in the next step.

Note: Your PEM file will need to have a URL starting with ‘https’. See our beginner’s guide on how to properly move WordPress from HTTP to HTTPS for details.
Congratulations! You have now put all the pieces in place to turn on Brand Indicators for Message Identification (BIMI) for your domain. That’s what you will do next.
Step 7: Enabling a BIMI Verified Logo for Your Business Emails
To turn on BIMI, you will need to add another TXT record to your DNS settings, just like when you set up the DMARC record earlier.
The record will include the URLs to your logo and VMC certificate like this:
v=BIMI1; l=https://URLTOLOGO/logo.svg; a=https://URLTOCERTIFICATE/vmc.pem
Make sure you replace the logo and certificate URLs with the URLs you saved earlier.
Alternatively, you can generate the code you need using the official BIMI Generator Tool.
You need to navigate back to the DNS settings for your domain as you did in Step 2 of this tutorial. Then you should add a new TXT record like this:
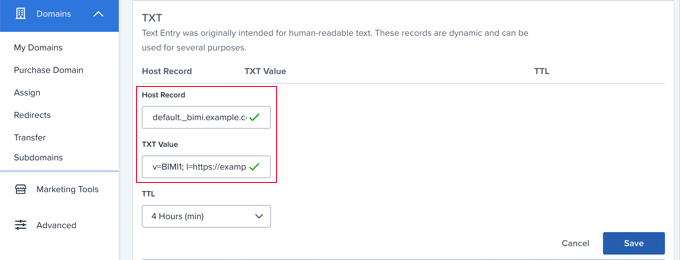
The Host Record field needs to be ‘default_.bimi’ followed by a period and your domain name, such as default_.bimi.example.com.
In the Text Value field, you should paste the code you generated above. You can leave the TTL field with the default value.
After that, you will need to click the ‘Save’ button. It may take up to 48 hours for the new record to propagate around the internet.
Now, your users will see a verified logo next to your business emails. Well done!
Step 8: Verifying That BIMI Is Set Up Correctly
After all the work you just did to create a verified logo for your business emails, it’s a good idea to make sure everything is working properly.
The best way to do that is to visit the official BIMI LookUp & Generator Tool. Simply type in your domain name to get a report that checks your compliance with BIMI standards.
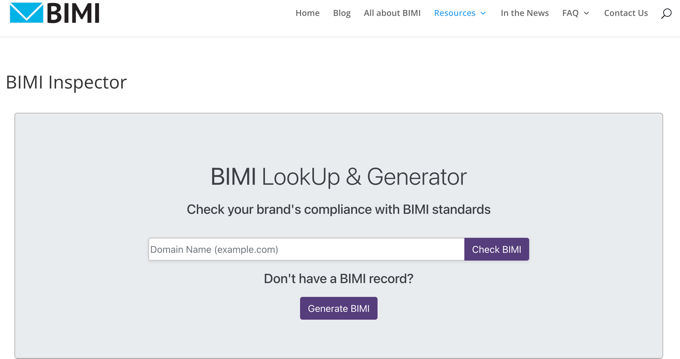
The report will show you whether your DMARC record is according to BIMI specifications. It will also show the contents of your BIMI DNS record, a preview of your verified logo, and whether your VMC certificate is BIMI-compliant.
If any problems are found, then the report will give you more details on what is wrong and how you can fix it.
Expert Guides on WordPress Email
Now that you know how to add a verified logo to your business email, you may like to see some other guides related to WordPress email:
- How to Properly Configure Your WordPress Email Settings
- How to Change Sender Name in Outgoing WordPress Email
- How to Change the WordPress Admin Email
- How to Create a Free Business Email Address (in 5 Minutes)
- How to Setup a Professional Email Address With Gmail and Workspace
- How to Get a Free Email Domain
- How to Set Up WP Mail SMTP with Any Host (Ultimate Guide)
- Best SMTP Service Providers with High Email Deliverability
- How to Send Automated Emails in WordPress
- How to Preview and Test Your WooCommerce Emails (The Easy Way)
We hope this tutorial helped you learn how to add a verified logo to your business email. You may also want to see our guide on the right way to create an email newsletter or our expert picks for the best email marketing services for small business.
If you liked this article, then please subscribe to our YouTube Channel for WordPress video tutorials. You can also find us on Twitter and Facebook.


Jiří Vaněk
It’s a great article, but as a smaller blogger whose website revenue is mostly based on user donations, the sum of around 2000 seems really extreme. I don’t even make that much from blogging in a year. However, in time, if the website grows and becomes successful and profitable, this option might seem realistic. In any case, thanks to your article, I now have a clear idea of the potential costs.
Dennis Muthomi
I’m only a small blogger so unfortunately the $2,000+ trademark costs are too prohibitive for me right now.
But, thanks for laying out clear instructions. I am bookmaking this article so that when my brand grows in the future, I would know how to add that checkmark.
Ralph
This guide was great up to the point of trademarking brand logo. Sadly in my country this costs several thousands and I can’t afford that as a small blogger. That verified logo would really help get more trust. Not like anyone is trying to mimic me but overall it would be better.
This step stops me, but who knows, maybe in the future when my personal brand will be bigger and bring more money I will do it. At least I know where to come for instructions.
Jiří Vaněk
We’re all the same. It didn’t occur to me until I read this article that I would have to trademark my logo. In the Czech Republic, one picture costs approx. 2000 Euros. That’s a lot of money for a blogger. The instructions are great, but the financial conditions for private websites are absolutely desperate in EU countries.