When you’re running a WooCommerce store, even small details can influence whether someone decides to buy. One of those is the product description, which can make a big difference in how quickly shoppers understand what you’re selling.
Many store owners struggle with this because WooCommerce doesn’t make the role of short descriptions immediately obvious. Yet these summaries appear in key places, such as category pages, product grids, and search results, where visitors quickly scan before deciding what to click.
We’ve worked with enough WooCommerce stores to see how much clearer, more concise descriptions can improve engagement and help customers choose faster.
In this guide, we’ll show you how to add and optimize short product descriptions in WooCommerce, so your products stand out and your store feels easier to shop.
Why Add a Short Product Description in WooCommerce?
Similar to a post excerpt, short product descriptions can make shoppers want to learn more about a product.
Most WooCommerce WordPress themes show the description directly beneath the price on individual product pages.
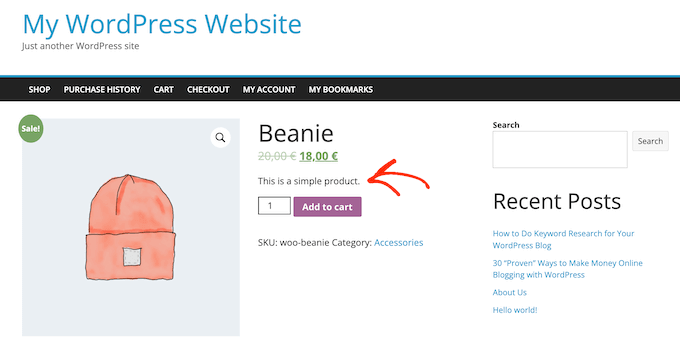
Since it’s one of the first things shoppers will see, this description is perfect for sharing important product details such as its size or the material it’s made from.
This can help shoppers quickly decide whether they want to learn more about the product by scrolling to its full description or checking out its product image gallery. In other words, an engaging description can act as a sales pitch for the rest of a product page.
With that in mind, let’s see how you can add a short product description in WooCommerce.
- How to Add a Short Product Description in WooCommerce
- How to Show Short Product Descriptions on Your Main Store Page
- How to Show Short Descriptions in a Custom WooCommerce Theme (Advanced)
- Bonus: How to Customize More WooCommerce Pages
- Frequently Asked Questions About Adding Product Descriptions
How to Add a Short Product Description in WooCommerce
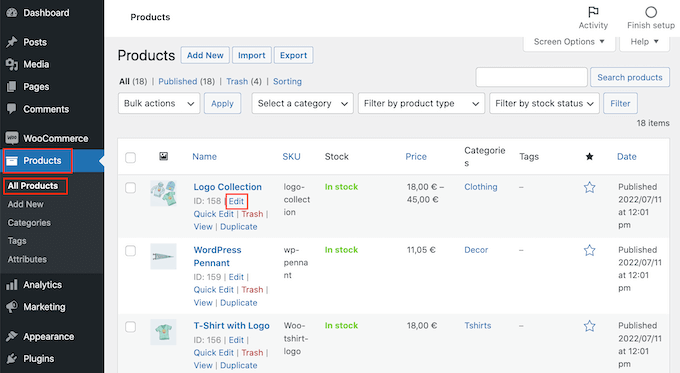
To create a short description, go to Products » All Products in your WordPress dashboard.
Then, find the product where you want to add a short description and click on its ‘Edit’ link.
Once you’ve done that, scroll to the ‘Product short description’ box.
You can now type a description into the text area.
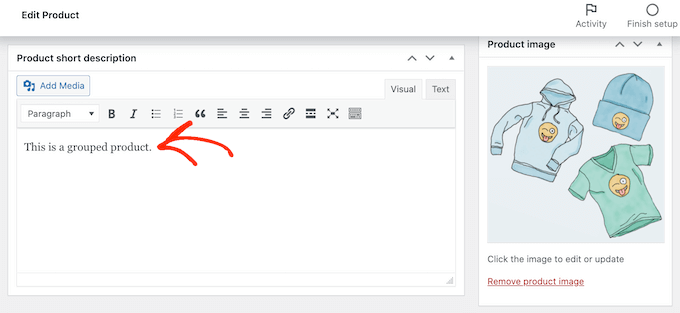
When you’re happy with the information you’ve entered, simply update or publish the product page as normal.
Now, if you visit the product page on your online marketplace, you’ll see the short description towards the top of the screen.
Most themes will show this description directly beneath the product’s price and the ‘Add to cart’ button. You may see something different depending on your WordPress theme, but usually, it appears towards the top of the page.
🎁 Bonus Tip: Typing each description by hand is fine for a few products, but it can be very time-consuming for stores with a large inventory.
To speed up this process, you can use an AI-powered plugin like StoreAgent. It automatically generates unique short descriptions from your product details, saving you a ton of time and helping you write more effective copy.
For details, see our guide on how to use AI to autogenerate WooCommerce product descriptions.
How to Show Short Product Descriptions on Your Main Store Page
By default, most WooCommerce themes display a short description only on individual product pages.
Typically, they don’t show the description on the product category pages or the main store page, as you can see in the following image.
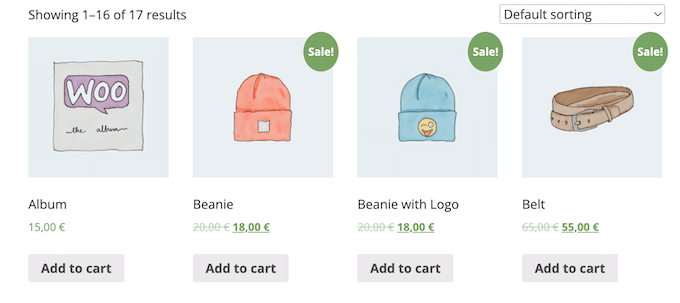
However, sometimes you may want to show this information on the main store and category pages. This can help customers spot products they want to learn more about by visiting the full product page.
To show the short description on the main store page and product category pages, you’ll need to add some code to your website.
The best way to add custom code in WordPress is by using WPCode. It is the best code snippets plugin and allows you to add custom CSS, PHP, and more to your online store.
We have thoroughly tested the tool and have found it to be the safest way to add code. To learn more, see our WPCode review.
Step 1: Install and Activate WPCode
First, you will need to install and activate the free WPCode plugin. For more information, see our step-by-step guide on how to install a WordPress plugin.
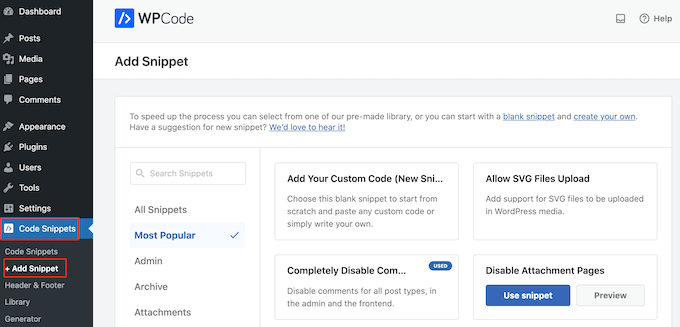
Once the plugin is activated, go to Code Snippets » Add Snippet.
Step 2: Create a New Custom Snippet
Here, you will see all the pre-made snippets you can add to your site. This includes a snippet that allows you to completely disable comments, upload file types that WordPress doesn’t usually support, disable attachment pages, and much more.
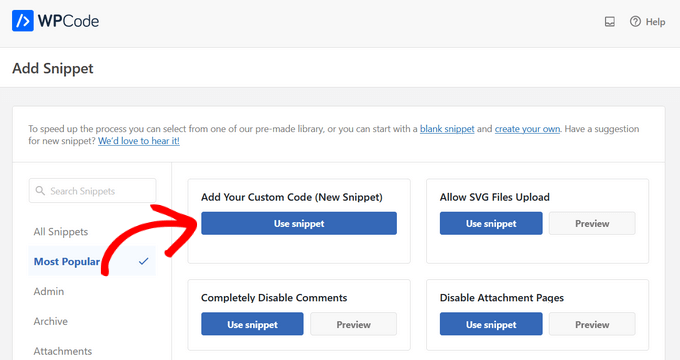
On the next screen, you need to hover your mouse over the ‘Add Your Custom Code (New Snippet)’ option and click the ‘Use Snippet’ button when it appears.
Step 3: Add the PHP Code Snippet
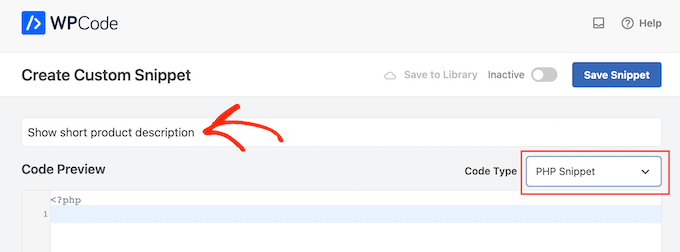
Here, type in a title for the code snippet. This is just for your reference, so you can use anything you want.
Then, open the ‘Code Type’ dropdown and choose ‘PHP Snippet.’
With that done, simply paste the following into the code editor:
add_action( 'woocommerce_after_shop_loop_item', 'woo_show_excerpt_shop_page', 5 );
function woo_show_excerpt_shop_page() {
	global $product;

	echo $product->post->post_excerpt;
}
Step 4: Activate and Save the Snippet
After that, click on the ‘Inactive’ slider so that it shows ‘Active.’
Then just click the ‘Save Snippet’ or ‘Update’ button to make the code snippet live.
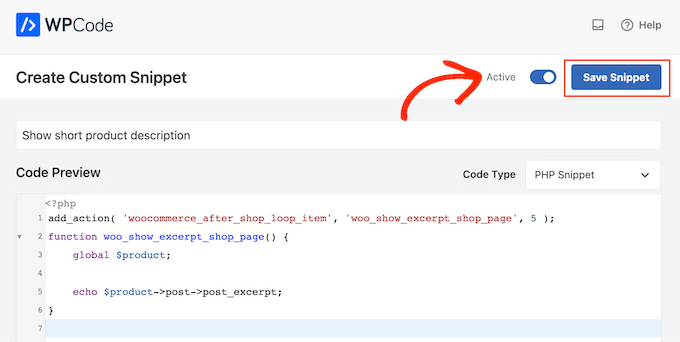
Now, the main store and product category pages will show the short descriptions for your different products.
Most WooCommerce themes will display this information between the product’s price and the ‘Add to cart’ button. You can see this in the following image.
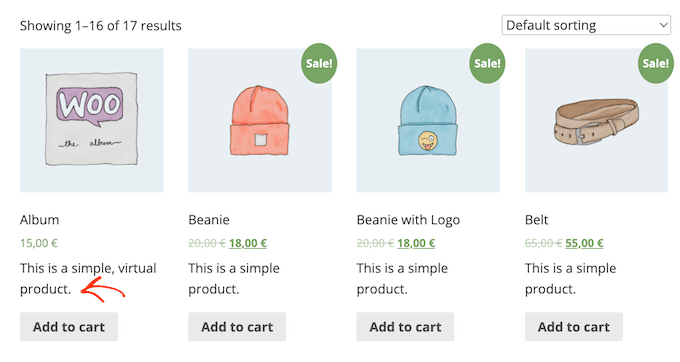
Just be aware that having too many words on your store and product category pages can make your site look cluttered and confusing.
If you don’t like the way a particular short product description looks, then you can always change it by following the same process described above.
How to Show Short Descriptions in a Custom WooCommerce Theme (Advanced)
If you are unhappy with how the description looks on your product page, then you can use a page builder plugin to create a custom WordPress theme for your online store.
SeedProd is the best landing page builder and theme builder for WordPress and allows you to build your own WooCommerce theme without having to write a single line of code. In this way, you can control exactly where the short product description appears on your product pages.
Several of our partner brands have used it to design their entire websites, and they loved it. To learn more, see our SeedProd review.
In this section, we’ll show you how to create a completely custom Single Product layout for your WooCommerce store.
You will need to repeat this process and create a unique layout for every page of your online store. For example, you’ll use SeedProd to create a design for your store’s homepage and archive page.
This gives you complete control over your entire store’s layout. This makes it a powerful and flexible option for anyone who is looking to design a totally custom WooCommerce store.
Step 1: Install and Activate SeedProd
After you install the WordPress plugin and activate it, SeedProd will ask for your license key.
Note: The free version of SeedProd is available on WordPress.org, but we will be using the Pro version of the plugin because it comes with the theme builder and ready-made WooCommerce blocks. These blocks include a ‘Short Description’ block.

You can find this information under your account on the SeedProd website and in the purchase confirmation email that you got when you bought SeedProd.
Step 2: Create a New Single Product Template
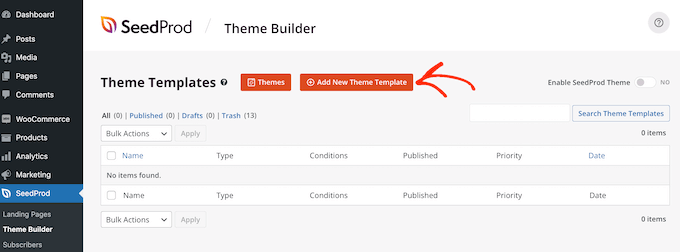
After typing in your key, go to SeedProd » Theme Builder. Here, you will click on the ‘Add New Theme Template’ button.
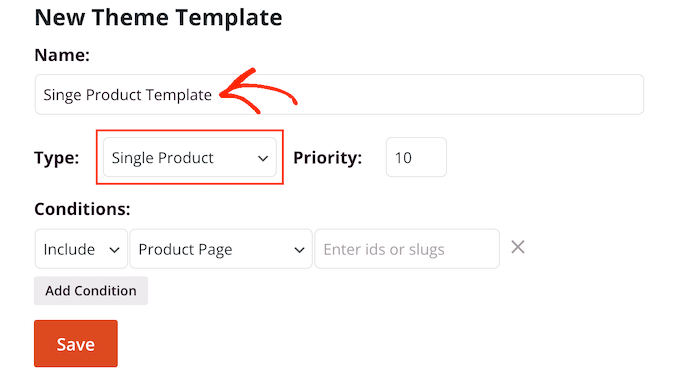
In the popup that appears, type in a name for your product page design into the ‘Name’ field, open the ‘Type’ dropdown, and click on ‘Single Product.’
Once you’ve done that, click on the ‘Save’ button.
Step 3: Design Your Custom Product Page
You will now see the SeedProd drag-and-drop page builder. To the right, you’ll see a live preview of the product page, which is blank by default.
To the left is a menu showing all the different blocks and sections that you can add to the custom WooCommerce product page.
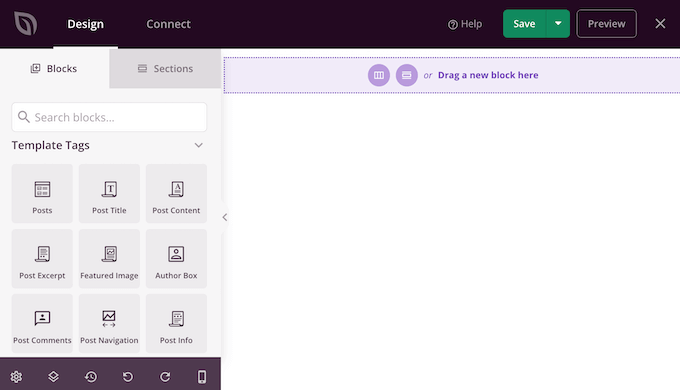
SeedProd comes with lots of ready-made blocks, including some special WooCommerce blocks. For example, you can use the ‘Products Related’ block to display the most popular products in WooCommerce.
You can build a completely custom product page within minutes using these ready-made WooCommerce blocks.
Since we’re using a blank template, you’ll need to add all the WooCommerce product page elements yourself. This includes elements such as the ‘Product Featured Image’ and ‘Product Title,’ as well as the ‘Short Description.’
You can also use SeedProd blocks like spacers, columns, and dividers to give your WooCommerce page a nice structure and organized layout.
To get started, find WooCommerce Template Tags in the left-hand menu and choose a block to add. You can then simply drag the block onto the page layout.
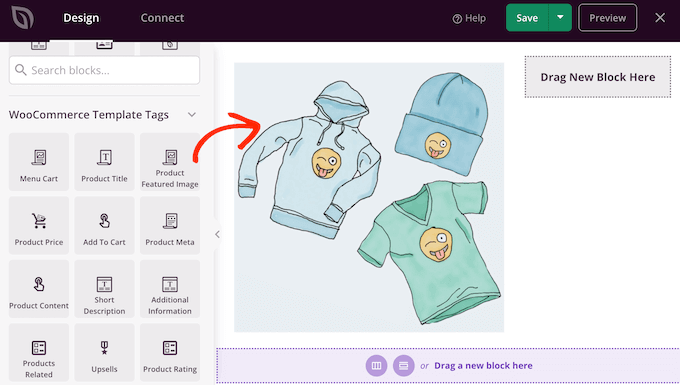
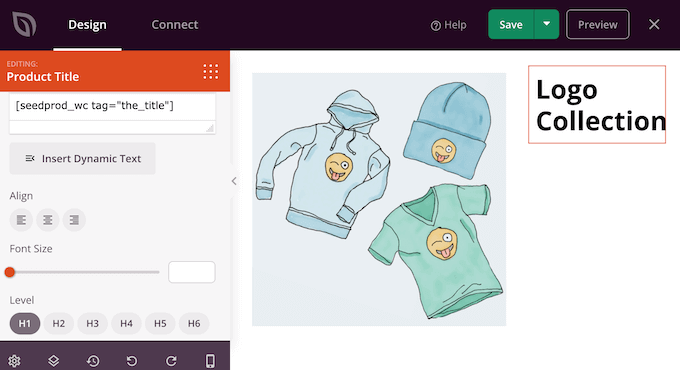
To make changes to a block, simply click to select it in the SeedProd preview. The left-hand menu will then show all the settings you can use to customize that block.
For example, if you click on a ‘Product Title’ block, then you’ll be able to change the font size, the text alignment, and more.
To add a short description to your design, simply find the ‘Short Description’ block in the left-hand menu.
Then, simply drag and drop this block onto your design.
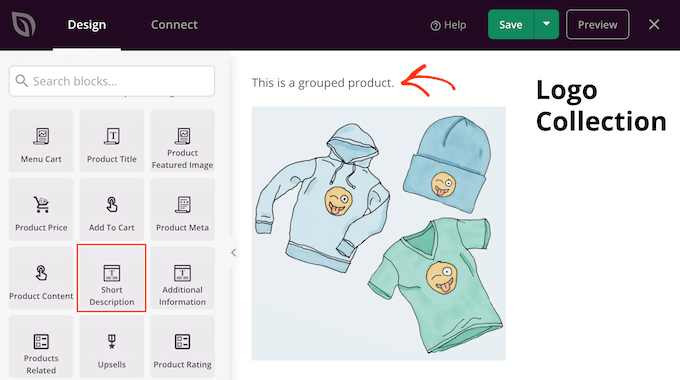
As you’re building the product page, you can move blocks around your layout by dragging and dropping them. This makes it easy to create a WooCommerce product page with a totally custom layout in SeedProd.
Step 4: Save and Publish Your Template
When you’re happy with your WooCommerce product page’s design, you can click on the ‘Save’ button in the upper-right corner.
Finally, click the ‘Publish’ button to save your changes.
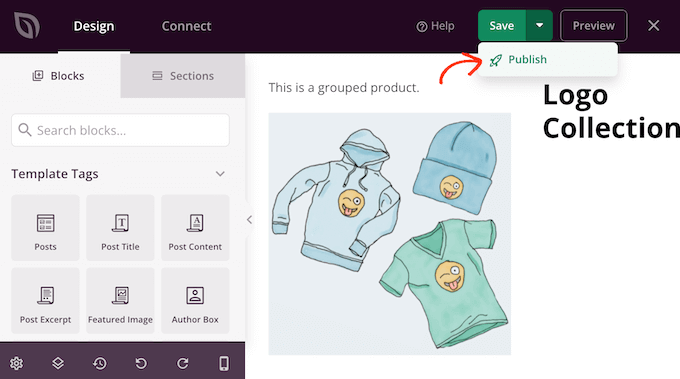
You’ve now created a completely custom product page for your online store.
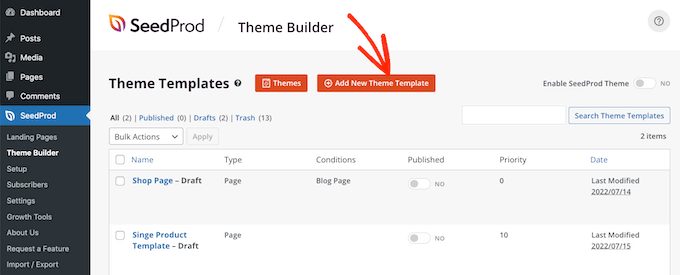
You can now create a template for all the different WooCommerce pages by following the same process described above. If you’re unsure what design to create next, then simply click on the Add New Theme Template button.
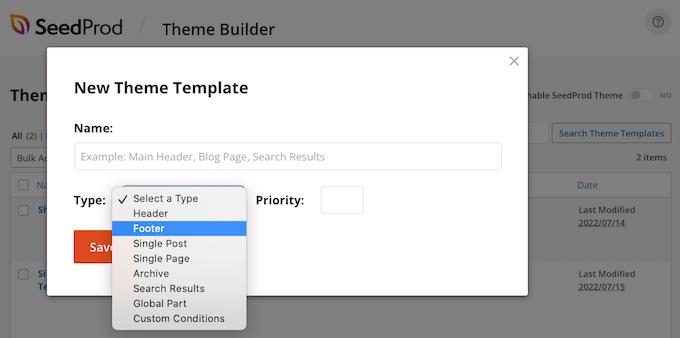
Then, click on the ‘Type’ dropdown menu.
You will now see a list of all the different templates that you need to create such as header, footer, and single post.
After editing all your WooCommerce pages, you’re ready to make your custom theme live.
Simply head over to SeedProd » Theme Builder, and then click on the ‘Enable SeedProd’ slider to turn it from ‘no’ (grey) to ‘yes’ (green).

Bonus: How to Customize More WooCommerce Pages
When you’re happy with how the product pages look, you may want to redesign other core WooCommerce shop pages. This can improve the shopping experience, which can reduce cart abandonment rates and get you more sales.
Research shows that nearly 7 out of 10 customers will abandon their cart and never come back. With that in mind, your cart page should do everything possible to secure the sale, but the default WooCommerce cart page isn’t optimized for sales.
For step-by-step instructions on building a high-converting cart page using SeedProd, please see our guide on how to create a custom WooCommerce cart page.
After that, you may want to optimize the last part of the checkout process by creating a custom WooCommerce checkout page that includes social media links, customer reviews, unique branding, and more.
Frequently Asked Questions About Adding Product Descriptions
Here are some questions our readers have asked before adding short descriptions for products on their WooCommerce stores:
How do you write a good product description?
To write a good short product description, focus on the main benefit for the customer. Use bullet points to highlight key features, keep your sentences short, and use persuasive language that encourages a shopper to learn more.
What is a product short description?
A product short description in WooCommerce is a brief summary that appears near the top of a product page, usually next to the product image and ‘Add to Cart’ button. Its goal is to quickly provide essential details and capture a buyer’s interest.
How do I add a product in WooCommerce?
To add a simple product, go to Products » Add New in your WordPress dashboard. Then, fill out the product title, add your main description, set the price in the ‘Product data’ section, and fill in the ‘Product short description’ box.
We hope this article helped you learn how to add a short product description in WooCommerce. You can also go through our beginner’s guide to the best WooCommerce plugins for your store and our ultimate guide on speeding up WooCommerce performance.
If you liked this article, then please subscribe to our YouTube Channel for WordPress video tutorials. You can also find us on Twitter and Facebook.


Jiří Vaněk
I’m constantly discovering new things in WooCommerce, and this excerpt feature for products is great as a quick way to provide information, including highlighting discounts if needed. It can really attract people. I’m excited that I’ve found something new that can make the online store more flexible.
Mrteesurez
This is nice to show simple product description to users along side products, but after adding the code, where will I add the description word to show, where do I type it ?
WPBeginner Support
When you edit the product you should see the option to edit the description there.
Admin
michael
Why is my short description showing up under buy button, when using functions code?
I want it to show up above the buy button.
WPBeginner Support
That would be due to how your theme is styled, you would either need to edit your theme’s code or for a simpler method use the second method from this guide
Admin