In our experience, one of the main reasons customers abandon their carts on eCommerce sites is being surprised about shipping costs. It’s important to let your customers know how much they will pay upfront.
It’s easy to allow your visitors to calculate the cost of shipping on your website. Using a shipping calculator, customers can accurately estimate the total cost of a product they’ll have to pay with delivery.
Making a shipping cost calculator readily available helps keep your business transparent and builds trust with potential customers.
Over the years, we have observed that websites that are transparent about their shipping costs and include shipping calculators tend to be more successful than stores that only reveal the cost on the checkout page.
In this article, we will show you how to easily add a shipping calculator to your WordPress site.

What is a Shipping Calculator & Why Use It?
A shipping calculator helps estimate the total cost of shipping automatically. It shows delivery charges and other relevant fees to customers, so they don’t have to figure out shipping rates and expenses manually.
Different factors come into play when calculating shipping costs. Some of these include the price of the product, destination, origin of a shipment, weight, dimensions, type of shipping service, and other variables during the calculation.
Manually calculating shipping costs can be time-consuming if there are multiple orders on your online store. Plus, the manual calculation would also lead to mistakes, which can impact customer satisfaction.
Using a shipping calculator plugin for your WordPress or WooCommerce site will save you a lot of time and automate the process.
Customers can simply select their location and see what the product will actually cost after delivery. This helps strengthen your relationship with your customers and builds trust.
That said, let’s see how you can easily add a shipping calculator to your WordPress site. We’ll also show a way of adding it to your WooCommerce store.
You can click the links below to jump ahead to your preferred section:
Adding a Shipping Calculator to WooCommerce
The best way to add a shipping calculator in WooCommerce is by using the Product page shipping calculator for WooCommerce plugin. It is a free plugin that allows customers to calculate the cost of shipping before adding a product to the cart.
First, you’ll need to download and install the Product page shipping calculator for the WooCommerce plugin. If you need help, then please see our guide on how to install a WordPress plugin.
Note: If you don’t already have a shop set up, you can follow our guide where we break down what you’ll need to set up and launch a WooCommerce store.
Upon activation, you can go to WooCommerce » Shipping Calculator to configure the plugin.
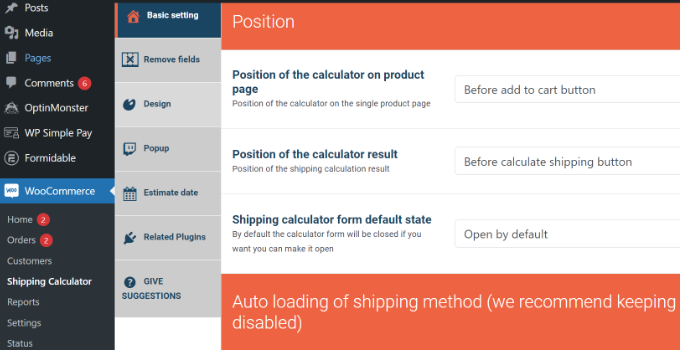
The plugin works out of the box, and you can use default settings to get started. However, there are options to edit them and customize your shipping calculator.
It’s important to note that the plugin will use the information from the shipping zone settings in WooCommerce when calculating shipping fees.
Setting Up Shipping Zones in WooCommerce
If you haven’t set up shipping zones, then you will need to go to WooCommerce » Settings from your WordPress dashboard and switch to the ‘Shipping’ tab.
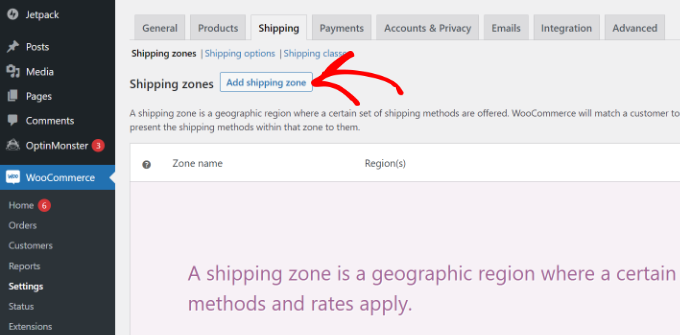
Under the Shipping zones section, simply click the ‘Add shipping zone’ button.
Next, you’ll need to enter a zone name and select regions from the dropdown menu. You can add multiple countries or cities under a single zone.
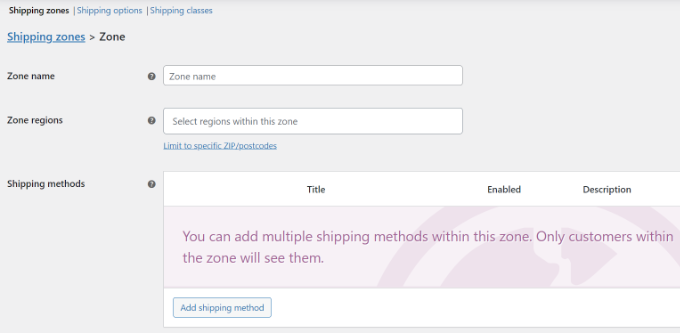
After that, you can click the ‘Add shipping method’ button.
A popup window will now open.
WooCommerce offers 3 shipping methods to choose from. You can select a ‘Flat rate’ and then enter an amount that will be charged for shipping. Or you can choose ‘Free shipping‘ and ‘Local pickup’ options.
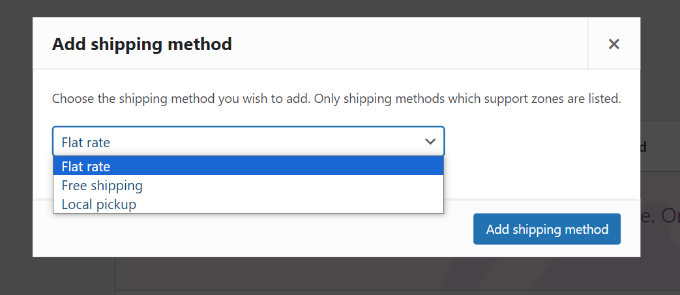
When you’re done, simply click the ‘Add shipping method’ button.
You can add multiple shipping methods for the zone and set up conditions when they apply.
Next, you’ll need to click the ‘Edit’ option under your shipping methods.
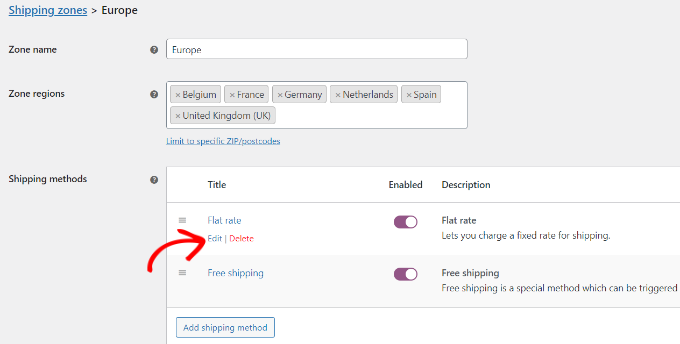
After that, a small window will open where you can change the method’s title, select whether you’d like the shipping method to be taxable, and enter a cost.
For costs, you can enter a flat rate that will be charged when a customer adds a product to a cart. There is also an option to multiply the shipping cost by the quantity.
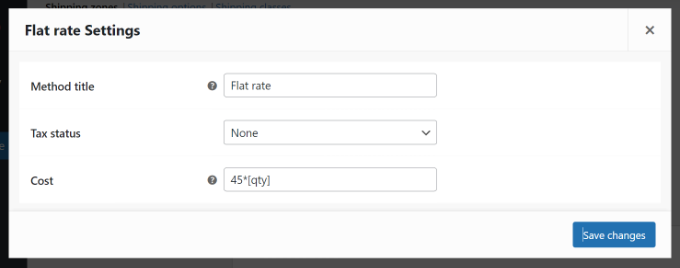
Once you’re done, click the ‘Save changes’ button.
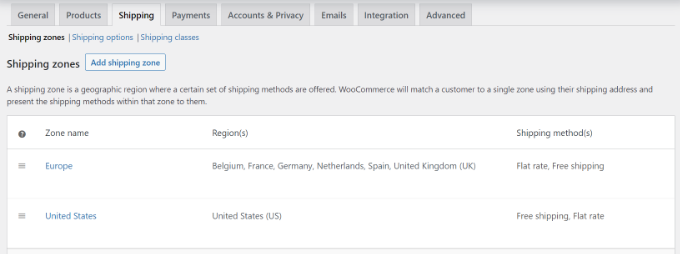
You can now head back to the shipping zone section to view your zones, regions, and shipping methods.
Edit Shipping Calculator Settings
After setting up shipping zones, you can head back to WooCommerce » Shipping Calculator to change the settings of the Product page shipping calculator for the WooCommerce plugin.
In the Basic setting tab, you can edit the position of the calculator on the product page and the position of the calculator results.
If you scroll down, you’ll see more settings. The plugin lets you edit the messages used in the plugin, auto-load the shipping method, and more.
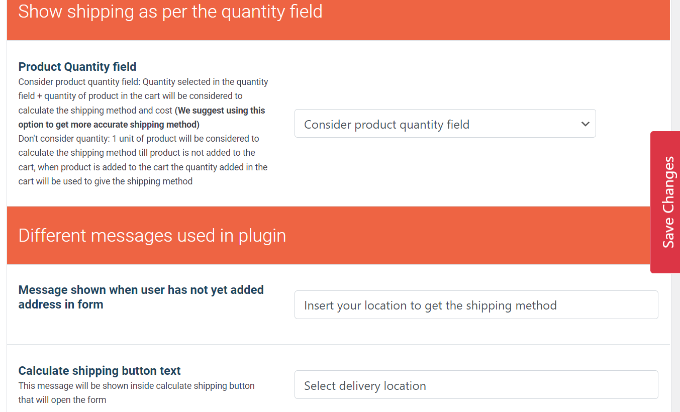
When you’re done, simply click the ‘Save Changes’ button on the side or at the bottom of the page.
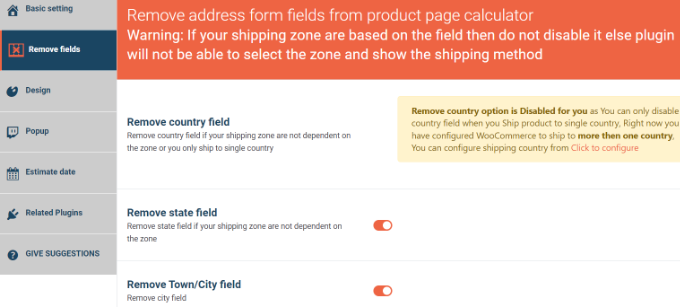
Next, you can switch to the ‘Remove fields’ tab. Here, you’ll see options to remove any field from the shipping calculator.
For instance, the plugin will show country, state, town/city, and postcode/zip fields by default. You can disable any of the fields that don’t match your shipping zones.
After that, head to the ‘Design’ tab. The plugin gives you multiple options to edit the appearance of the shipping calculator.
For example, you can change the background and text colors to show shipping methods, or you can choose the colors for the buttons that appear in the calculator.
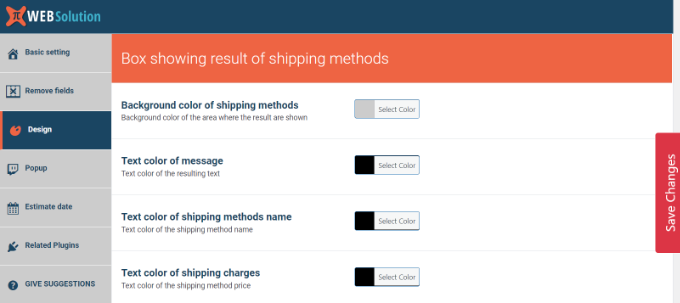
Don’t forget to click the ‘Save Changes’ button to store your settings.
Next, you can visit your WooCommerce store to see the shipping calculator in action.
In the screenshot below, customers will first need to select a delivery location and click the ‘Update Address’ button.
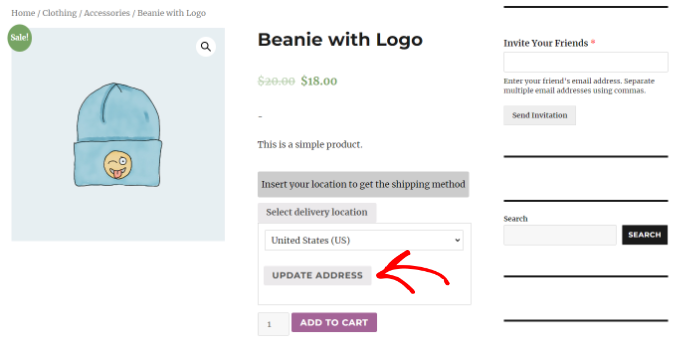
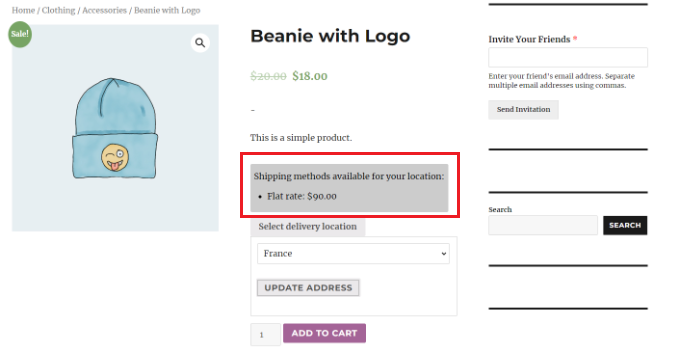
Once that’s done, the plugin will automatically calculate the shipping cost that you set up in the shipping zone section and will add it to the total cost.
This way, customers will know the shipping charges they’ll have to pay in addition to the cost of the product.
Adding a Simple Shipping Calculator to a WordPress Site
If you don’t have a WooCommerce store and want to add a generic shipping calculator to your WordPress site, then you can use WPForms.
It is the best WordPress calculator plugin that lets you create all kinds of forms with just a few clicks. For instance, you can add a contact form, calculators, surveys, and registration forms using the plugin.
First, you’ll need to install and activate the WPForms plugin. For details, see our tutorial on how to install a WordPress plugin.
Note: WPForms has a free version. However, you will need the pro plan to unlock the Calculations addon.
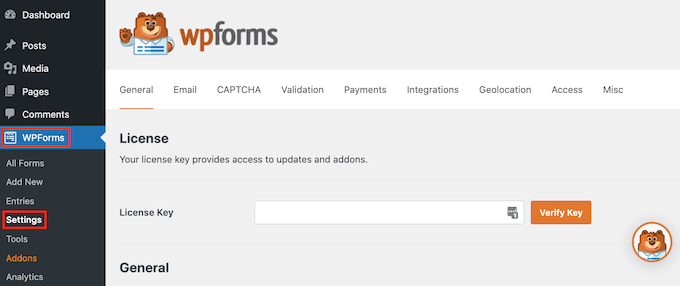
Upon activation, visit the WPForms » Settings page from the WordPress dashboard to enter your license key. You can find this information in your account on the WPForms website.
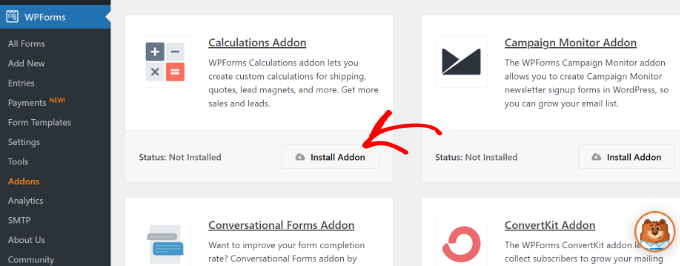
After that, head over to the WPForms » Addons page and locate the ‘Calculations Addon.’
Then, just click the ‘Install Addon’ button to activate it on your site.
Next, go to the WPForms » Add New page from the WordPress admin sidebar.
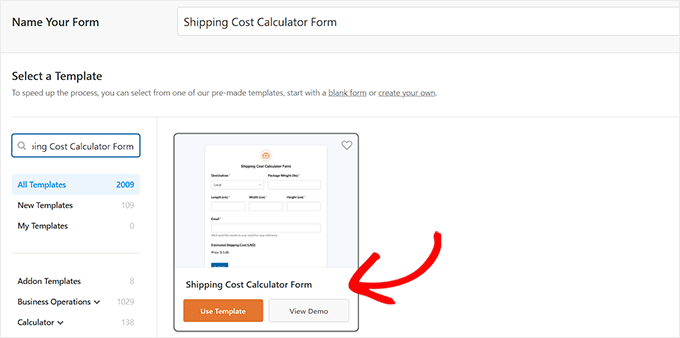
Here, you can start by typing a name for the calculator form that you are about to create.
After that, you need to locate the ‘Shipping Cost Calculator Form’ template. Then, click on ‘Use Template.’
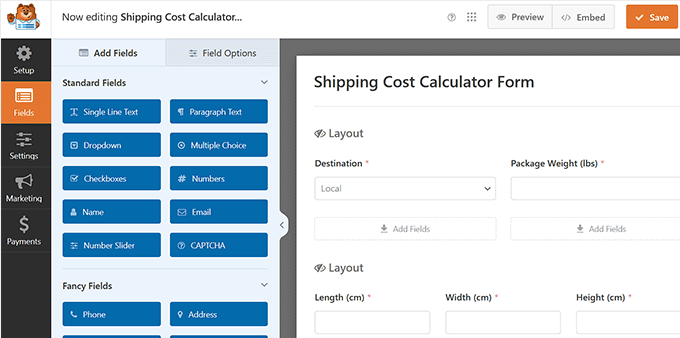
Once you do that, the drag-and-drop builder will be launched on your screen. Here, you will notice a form preview on the right and form fields on the left.
Now, you can click different fields to edit their settings according to your liking. To learn more, see our beginner’s guide on how to add a custom calculator in WordPress.
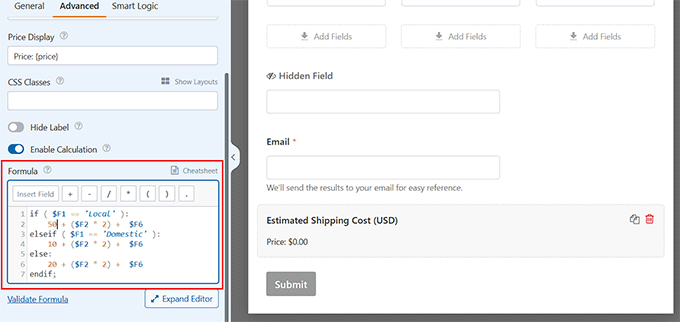
Then, scroll down to the ‘Estimated Shipping Cost’ field and open its settings in the left column. Next, switch to the ‘Advanced’ tab to check the calculation formula used in the form.
You can also change the shipping cost from here. However, you will need to use the ‘Cheatsheet’ link at the top to understand and implement the arithmetic rules.
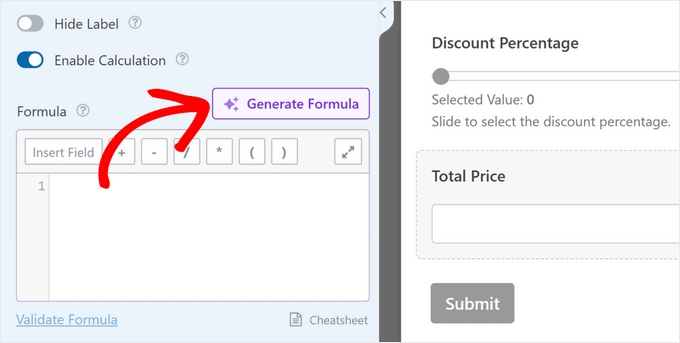
New: Not a math whiz? Don’t worry, WPForms’ AI Calculations feature makes creating shipping calculations as easy as having a conversation.
In the ‘Advanced’ tab of your shipping calculation field, look for the ‘Generate Formula’ button next to the formula box. When you click it, an AI assistant chat window will open.
From here, you can simply describe the type of calculation you need in everyday language.
For example, you can write something like: “Calculate the shipping based on the total price of items. Set base shipping at $15 for orders up to $50 and reduce shipping by $3 for every $25 spent above $50.”
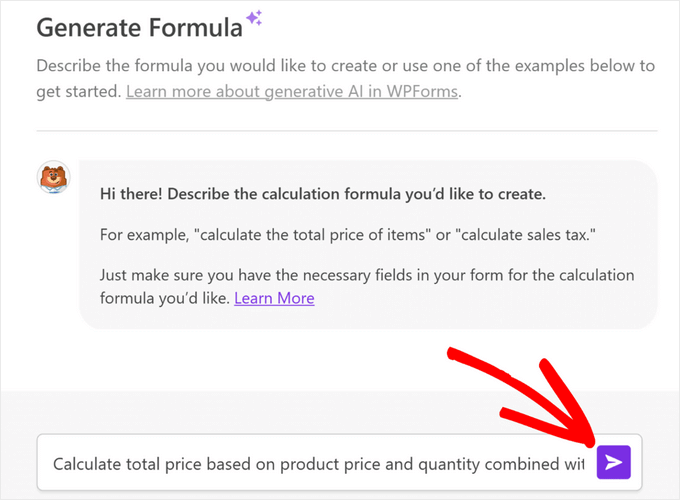
After hitting enter, the AI will instantly create the appropriate formula, properly formatted and ready to use.
Once you are done, just click the ‘Save’ button at the top to store your settings.
Next, visit the page where you want to add your simple shipping cost calculator form. Here, click the ‘Add Block’ button at the top left corner and add the WPForms block.
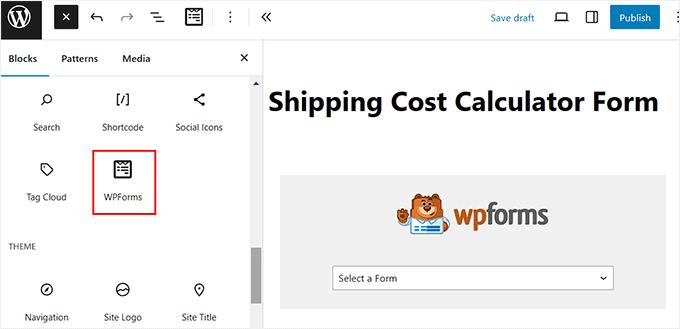
Then, choose the form you just created from the dropdown menu. Finally, click the ‘Update’ or ‘Publish’ button to store your settings.
You can now visit your website to see the form in action.
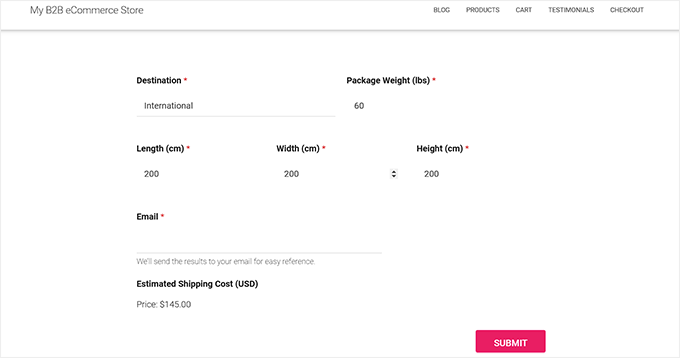
Adding an Advanced Shipping Calculator to WordPress Site
If you want to add a more complex shipping calculator to your WordPress site, then we recommend Formidable Forms.
It is a popular contact form plugin for WordPress that lets you create advanced and complex forms like calculators, directories, and web applications.
For this tutorial, we will use the Formidable Forms Pro plan, which includes pricing fields and more customization options.
First, you’ll need to install and activate the Formidable Forms Lite and Formidable Forms Pro plugins. The Lite plugin is free to use, and the premium plugin adds more advanced features to it.
For details, please see our guide on how to install a WordPress plugin.
Upon activation, you’ll need to go to Formidable » Global Settings from the WordPress dashboard. From here, you can click the ‘Click to enter a license key manually’ link.
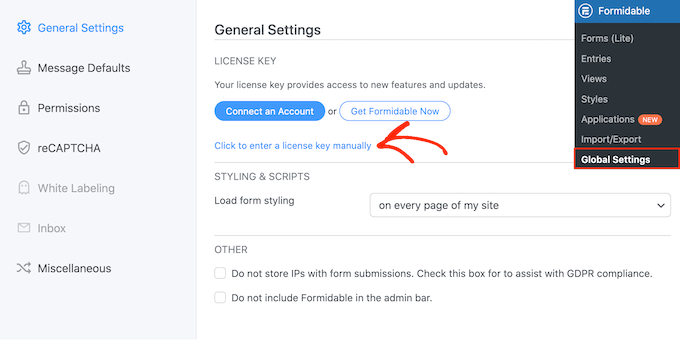
Next, you’ll need to enter the license key and click the ‘Save License’ button.
You can find the license key in your Formidable Forms account area.

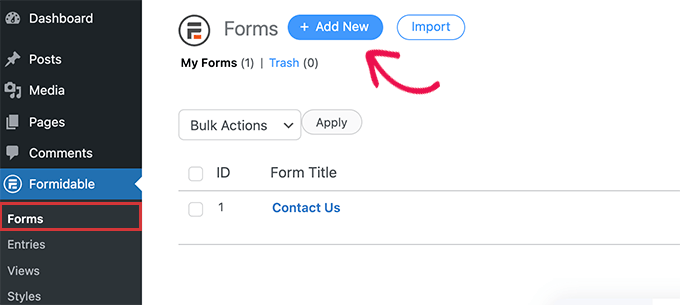
After that, you must go to Formidable » Forms to add a new form.
Simply click the ‘+ Add New’ button at the top.
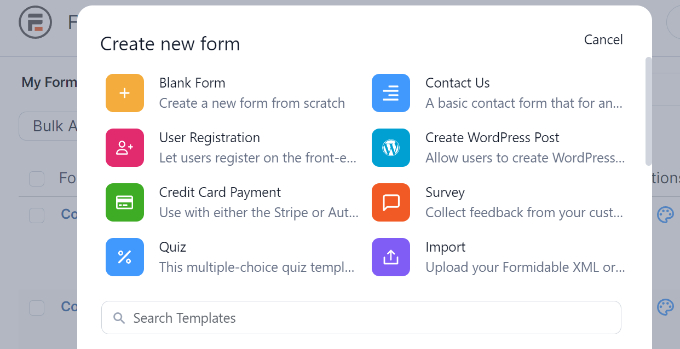
Next, Formidable Forms will show different templates to choose from. You can choose from multiple categories, like business operations, calculator, conversational forms, and more.
Formidable Forms doesn’t offer a pre-built template for a shipping calculator. However, you can create one using a blank form template.
Go ahead and select the ‘Blank Form’ template.
On the next screen, you’ll need to enter a name for your form.
There is also an option to insert the template into an application. However, for this tutorial, we will leave this on the default setting.
After entering the form name, click the ‘Create’ button.
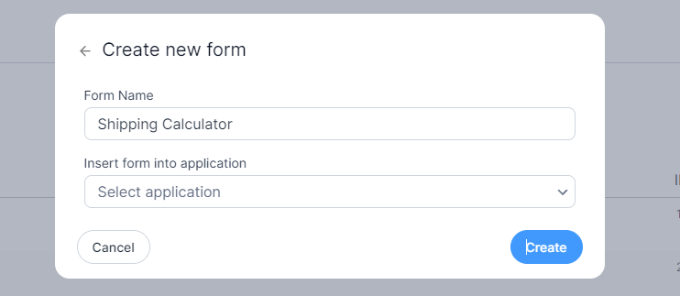
Next, you’ll see the drag-and-drop form builder.
You can simply drag any form field from the menu on the left and drop it on the template.

For instance, you can add form fields like name, email, phone number, and more to the template.
To create a shipping calculator, just scroll to the Pricing Fields section on the left and add a ‘Product’ form field.
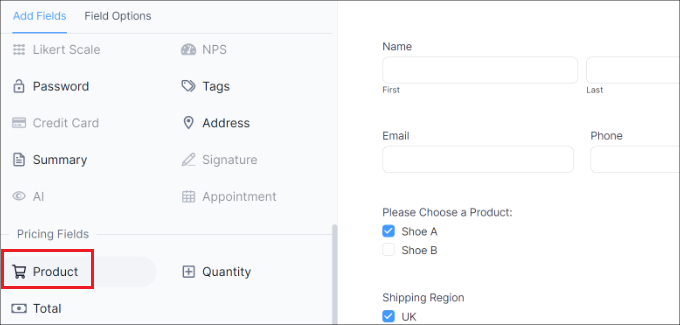
Next, you can select the product form field and further customize it.
For instance, we changed the field label and product type. Formidable Forms also lets you show products as checkboxes, dropdowns, radio buttons, single products, or user-defined.
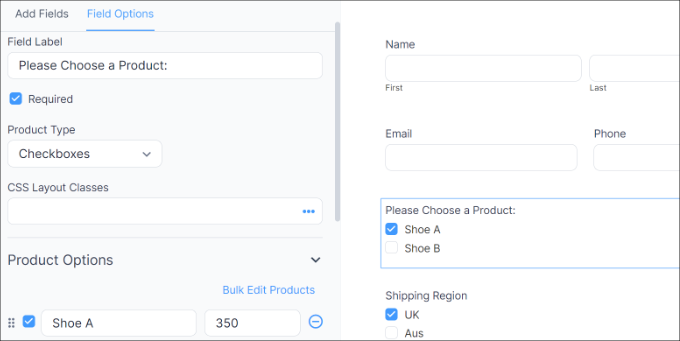
In addition, you can add your products and their prices under the Product Options menu on the left.
Now that you’ve added your products, the next step is to add your shipping regions and charges. To do that, you can again add a Product form field under the Pricing Fields section in the menu on the left.
After that, you’ll need to edit its label and product type, and then enter each region individually and its shipping cost.
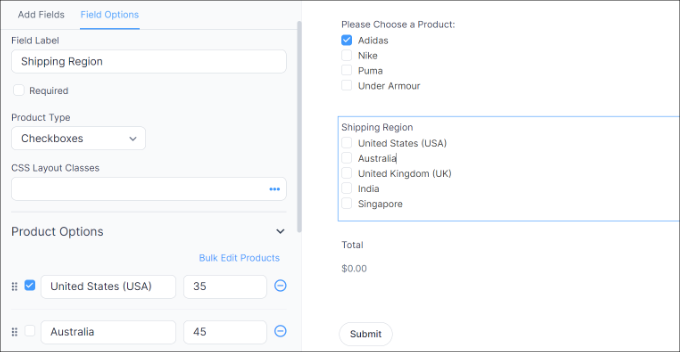
In the screenshot above, we changed the label to Shipping Regions and changed the Product Types to Checkboxes. From here, we added different shipping zones and their cost under the Product Options section.
Once this is done, you’ll need to show a total for your shipping calculator. To do that, simply add the Total form field under the Pricing Fields section to the template.
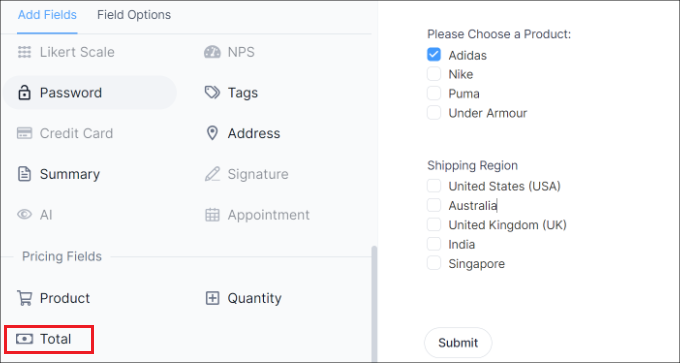
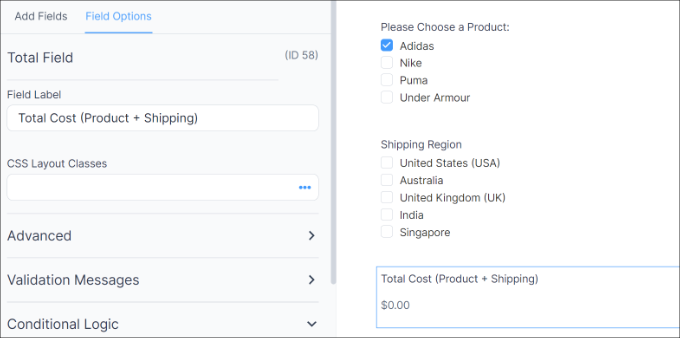
Next, you can select the Total form field and edit its label, add a description, and more.
Formidable Forms also lets you add conditional logic to the form fields and show them based on user responses.
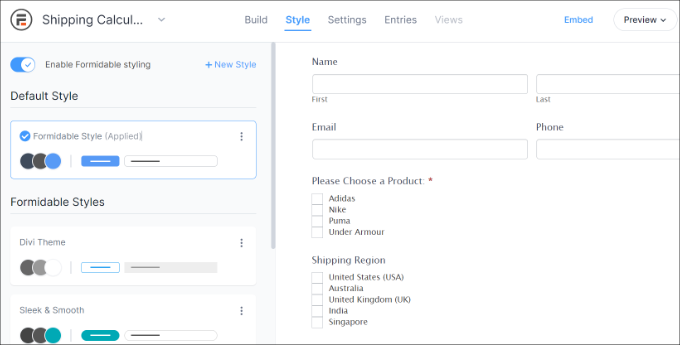
After that, you can switch to the ‘Style’ tab from the top.
Formidable Forms offers pre-built styles for your form. Simply select one or create a new style. For this tutorial, we will use the default Formidable Style.
Next, you can also change form settings in Formidable Forms.
Simply switch to the ‘Settings’ tab at the top. Here, you’ll find general settings for changing the form title, adding a description, and more.
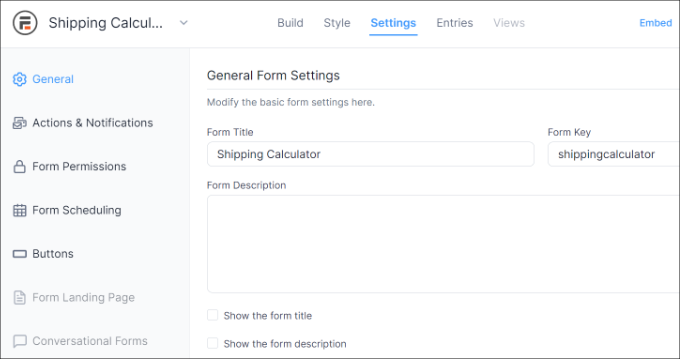
There are also options for actions and notifications, form permissions, and scheduling your shipping calculator form.
After you’ve configured the settings, save your changes. You’re now ready to embed your calculator anywhere on your site.
To start, you can click the ‘Embed’ button in the form builder at the top. This will give you multiple options, like add the form to an existing page, create a new page, or insert manually.
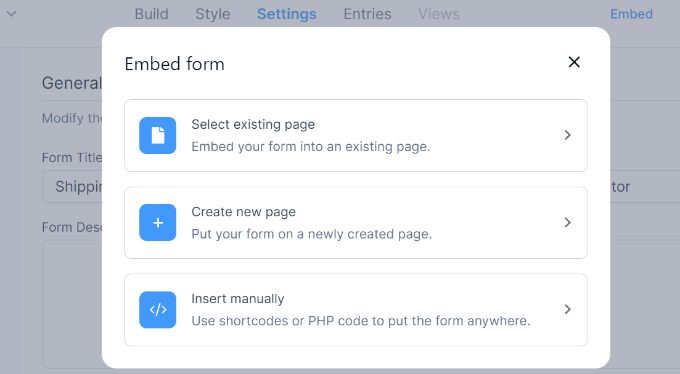
For the sake of this tutorial, we will choose the ‘Create new page’ option.
Next, you can enter a name for your new page and click the ‘Create page’ button.

From here, you’ll see a preview of the shipping calculator form in the WordPress content editor.
Go ahead and publish your page and visit your site to see the shipping calculator in action.
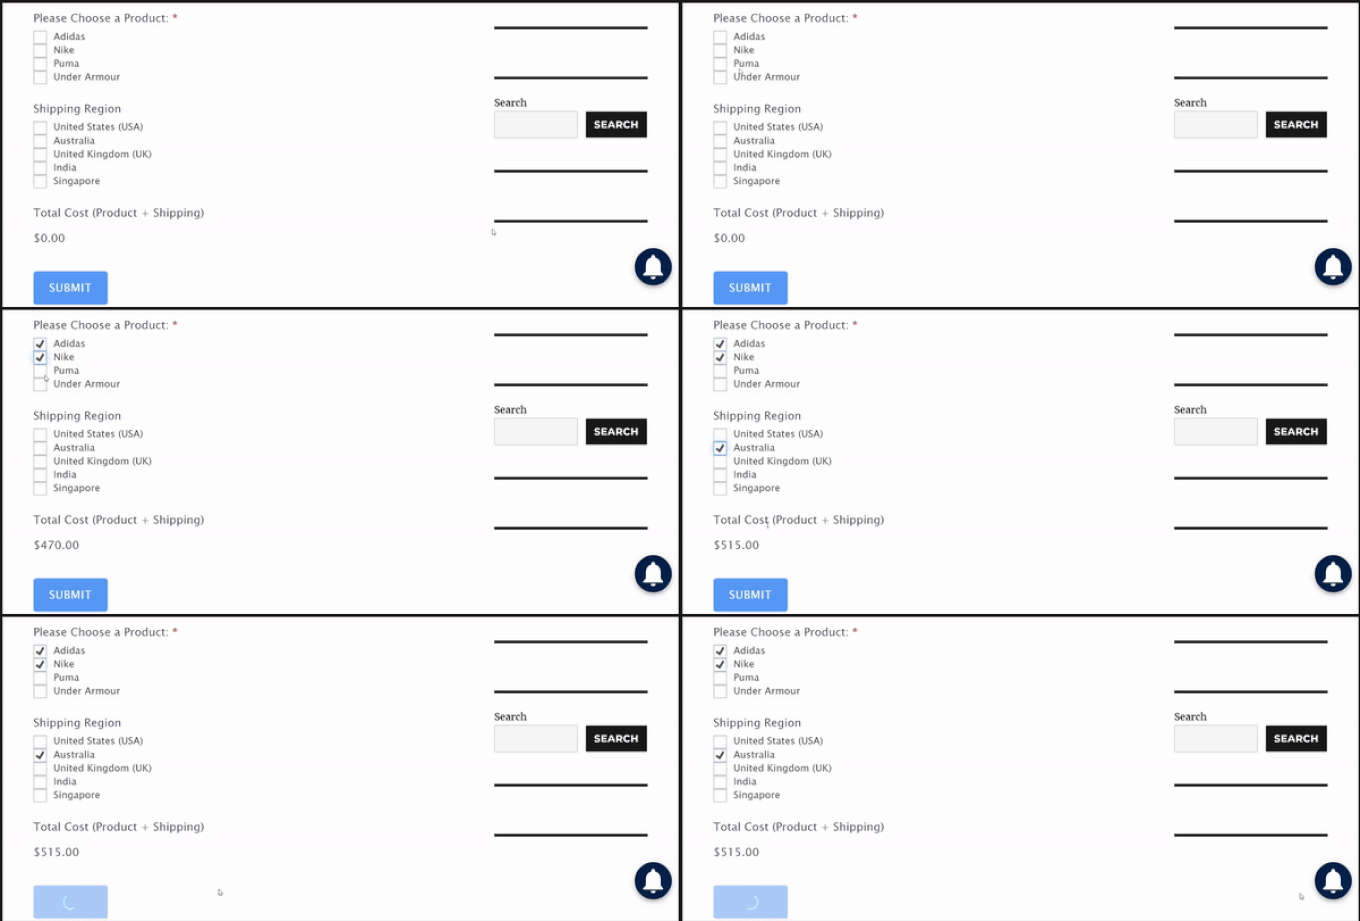
We hope this article helped you learn how to add a shipping calculator to your WordPress site. You may also want to see our guide on how to show product recommendations in WordPress and the best WooCommerce plugins.
If you liked this article, then please subscribe to our YouTube Channel for WordPress video tutorials. You can also find us on Twitter and Facebook.


Dennis Muthomi
I’ve seen firsthand how unexpected shipping costs can lead to cart abandonment.
Glad you included the tip about setting up shipping zones in WooCommerce – it’s a feature I hadn’t fully utilized before.
Thanks WPBeginner for this guide!
Jiří Vaněk
In the store, we have the shipping cost clearly stated and specified. However, it’s not the most attractive way to convey price information, especially nowadays. A shipping cost calculator is a much more elegant and professionally looking solution. I will definitely try this approach to replace the old-fashioned text format.
Ralph
This is interesting guide!
My wife has home design blog and plan to sell self made furniture. We thought we would just write shipping cost as a plain text, but this is way better.
WPBeginner Support
Glad we could share how to add this
Admin