
Do you want to add a favicon to your WordPress blog?
A favicon or site icon is a small image that appears in your web browser tab next to the website title. While it may seem like a trivial element, a well-designed favicon can help your blog stand out in a crowded online space.
In this article, we will show you how to add a favicon to your WordPress blog. This way, you can make a memorable impression on your visitors.

Why Should You Add a Favicon to Your WordPress Blog?
A favicon is essential to add to your WordPress blog because it helps users identify your website quickly and strengthen your brand identity. From that small icon, site visitors can easily recognize your blog.
Here’s what a favicon looks like in a web browser:

Another purpose of a WordPress favicon is to improve user experience. When multiple tabs are open, users can look at the favicons to know which website they are on and switch to the one they want.
If users add a shortcut icon or bookmark to your blog on their mobile devices, then the favicon will appear as an app icon on their home screen. This makes it easy for them to access your website with just a simple tap.
Favicons can also help with WordPress search engine optimization (SEO). If you pay attention to the pages in the search results, they usually feature the site’s favicon before the page’s meta title. This can make your website look legitimate and trustworthy.
How to Create a Favicon for Your WordPress Blog
First, let’s learn how to create a good favicon for your blog.
The ideal WordPress favicon size is a square image of up to 512 pixels in both width and height. The favicon image format can be ICO, JPEG, PNG, or GIF.
SVG is also a common format for favicons, but they’re not acceptable by WordPress by default. That said, you can configure WordPress to allow adding SVG files.
If you run a business blog, then you can use your brand logo as your favicon icon. If you don’t have one yet, check out our beginner’s guide on how to create a logo for your website.
If you have a logo ready but want to make the background transparent, then you can use Photoshop or a free image editing tool with an automatic background remover. Make sure the file format is PNG to keep the transparency in the favicon.
Another option you can use is a free favicon generator like Favicon.io. This tool lets you customize a favicon from scratch and download the files in PNG and ICO format.
That being said, let’s look at how to easily add a favicon to your WordPress blog. We will cover 4 methods, and you can click the links below to skip to the method you want to use:
Method 1: Adding a Favicon Using the WordPress Customizer
This is the easiest method to change a favicon in WordPress. All you need to do is upload your favicon image to the WordPress Customizer, and the rest will be taken care of for you.
The first step is to access the WordPress Customizer. If you use a classic theme, then you can navigate to Appearance » Customize to do this.

If you are using a block theme and can’t find the Customizer, then check out our guide on how to fix the missing Theme Customizer in WordPress admin.
Next, click on the ‘Site Identity’ tab in the left sidebar.
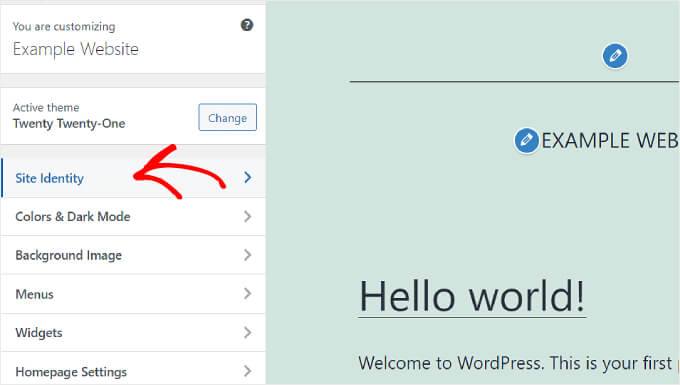
Here, you will see options to customize your Site Logo, Site Title, Tagline, and Site Icon.
If you want to add a site’s favicon, then you will need to scroll down to the ‘Site Icon’ section and click ‘Select site icon’.
The WordPress Media Library will now appear. You can either select an existing image or upload a new custom favicon from your computer.
In this example, we will use WPBeginner’s logo as the WordPress site icon.
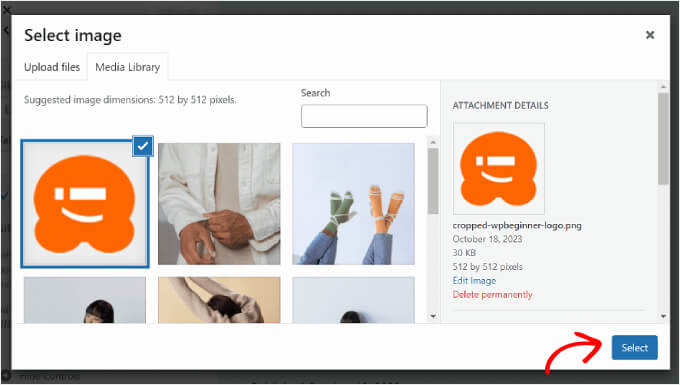
After choosing an image, click the ‘Select’ button in the bottom right corner of the window.
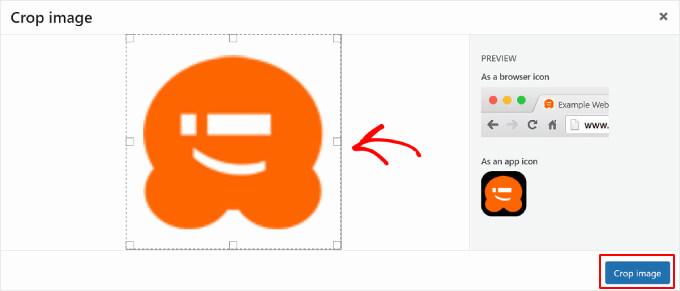
If the favicon is bigger than the recommended size, then WordPress will allow you to crop it. If it matches the recommended size exactly, then you can just leave it as it is.
Once the image looks good, just click ‘Crop image’.
After that, you will be returned to the WordPress Customizer. Here, all you need to do is click the ‘Publish’ button in the left sidebar to finish your favicon setup.
That’s it! Now that you’ve uploaded your favicon, you can visit your WordPress website to see if the image is already live.
Method 2: Adding a Favicon Using the WordPress Full Site Editor
If you are using a block theme and want to add your brand logo as both a part of your website header and a site icon, then this method is for you.
For this, you need to go to Appearance » Editor from the WordPress admin panel.

On this page, you will find several menus to customize your website, including Navigation and Styles.
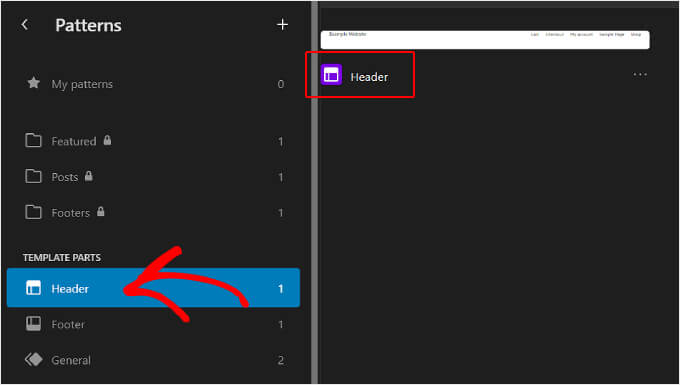
For this tutorial, you will need to click on ‘Patterns’ to access your website header block pattern.

Upon scrolling down, you will see several template parts: Header, Footer, and General.
Just click on the ‘Header’ template to add your favicon there.
Next, you will see a pencil button next to the Header text.
Click on it so that you can edit the pattern and insert your WordPress favicon.

You are now inside the WordPress full-site editing experience.
Now, click the add block ‘+’ button and search for the Site Logo block. This is where you will add the image that will become your WordPress favicon.
Feel free to drag and drop the block to where you want it in your header. In this example, we’ve placed it next to the website title.
The next thing you will do is click the upload icon in the Site Logo block.
As with the previous method, you can choose an existing image or upload a new one from the WordPress Media Library.
After that, you need to navigate to the Block settings sidebar on the right side of the page. Just turn on the ‘Use as site icon’ setting to add the logo as a favicon.
Finally, you can hit the ‘Save’ button in the top right corner of the page to publish your favicon.
You will see a warning that the change will affect the entire website. Make sure the ‘Icon’ box is ticked, and click ‘Save’ again.
Now that you’ve gone through all the steps, you can open your website to confirm that the change was successful.
Method 3: Adding a Favicon Using a WordPress Favicon Plugin
If you prefer using a WordPress favicon plugin, then you can follow this method to use the free Favicon by RealFaviconGenerator plugin.
First, you need to install and activate the plugin. For more details, follow our guide on how to install a WordPress plugin.
Once activated, go to Appearance » Favicon in your WordPress dashboard.
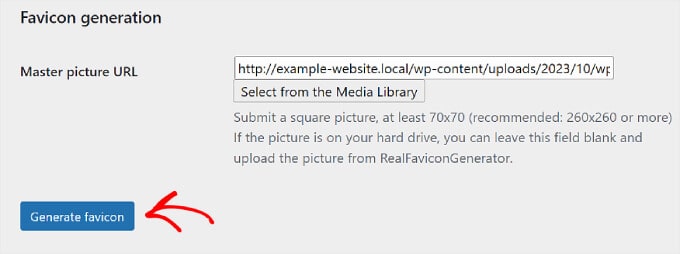
After that, click the ‘Select from the Media Library’ button to upload a new image or use an existing one.

Note that you will need to use a square picture. The plugin recommends making the site icon size at least 260 pixels in both width and height but no smaller than 70 pixels.
Once you’ve chosen an image, simply hit the ‘Generate favicon’ button.
After this, the plugin will lead you to the RealFaviconGenerator website to edit the favicon.
You can customize various settings, like the background color and how it looks on Google search results pages (SERPs), iOS, Android, macOS Safari, Chrome, and Windows Metro.

In the ‘Favicon Generator Options’ section, you can check the box if your website was using a favicon before. If yes, simply enter a number in the second field to indicate the favicon version you are using.
This way, users who have visited your site before will see the new favicon instead of the old one.
Once everything looks good, all you need to do is click the ‘Generate your Favicons and HTML code’ button to add the favicon to your WordPress site.

Your favicon should now be live. Make sure to keep the WordPress favicon plugin active so that the favicon is always enabled.
Method 4: Adding a Favicon Manually to Your WordPress Blog
Last but not least, you can add a WordPress favicon to your blog by manually editing your theme’s code files.
This is helpful if your Theme Customizer doesn’t have the ‘Site Identity’ section or if you use a block theme and want a different favicon image from your site logo.
The easiest and safest way to edit your theme’s code files is with the WPCode plugin.
WPCode is the best code snippets plugin for beginners. With over 100 ready-made snippets and secure error handling, it allows you to safely insert custom code without breaking your website.
Plus, the great thing about WPCode is that if you update your theme, then you won’t lose your code modifications, including your favicon.
For this guide, you can use the free version of WPCode. However, with the Pro subscription, you get access to features like smart conditional logic and third-party integrations to manage your code more efficiently.
To start, you need to install and activate WPCode. For more information, you can see our step-by-step guide on how to install a WordPress plugin.
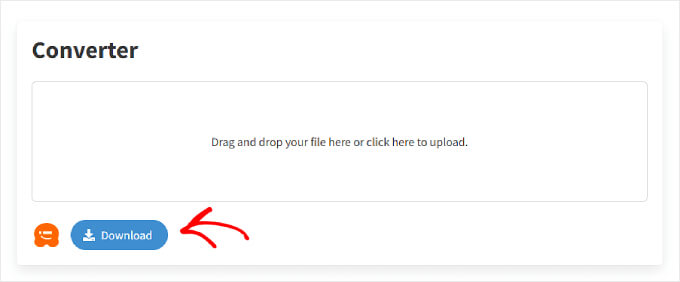
The next thing you need to do is prepare your favicon files. For this, you can use a free favicon generator like Favicon.io.
On the website, you can click ‘Image’ to convert an image file into a zip file and HTML code. Alternatively, you can use the Emoji or Text option to create a favicon using the emojis and fonts available.

On the next page, you can upload your image. Then, click ‘Download’ to save the favicon zip file, which contains your favicon.png and favicon.ico files.
Make sure to keep this web page open as you go through the next steps.
Now, you need to upload the favicon zip file to your site’s root directory. For this, you can use your WordPress hosting‘s file manager.
Alternatively, you can do this through an FTP client like FileZilla. For more details, check out our beginner’s guide on how to use FTP to upload files to WordPress.
Once you have opened your website files via the file manager or FTP, navigate to the root directory.
The WordPress root directory is usually a folder named ‘public’ or ‘public_html’, and it contains essential WordPress folders like wp-content and wp-admin.

At this point, you can extract and upload all the favicon file content you previously downloaded into the root directory.
If you are using File Manager, then you can click the ‘Upload’ button near the top.

Then, a new tab will appear, asking you to upload the files.
On this page, you can click the ‘Select File’ button and choose all the favicon files.

Now, simply wait for the files to be successfully uploaded.
Once done, you can go back to the file manager tab. You should now see all your favicon files in the root directory, like in the screenshot below:

Now, let’s go back to the WordPress admin panel.
In the left sidebar, navigate to Code Snippets » Header & Footer.

After that, return to the Favicon.io tab from earlier.
Then, you need to copy the HTML code from there. It should have 4 link rel tags in the code.

Next, you have to go back to WordPress and paste the code into the ‘Header’ section of the WPCode page. This will add the code to your website’s header.php file.
In the code, insert your website’s full URL in quotation marks next to all the href attributes, like in the example below. Remember to add http:// or https:// if your site uses an SSL certificate.
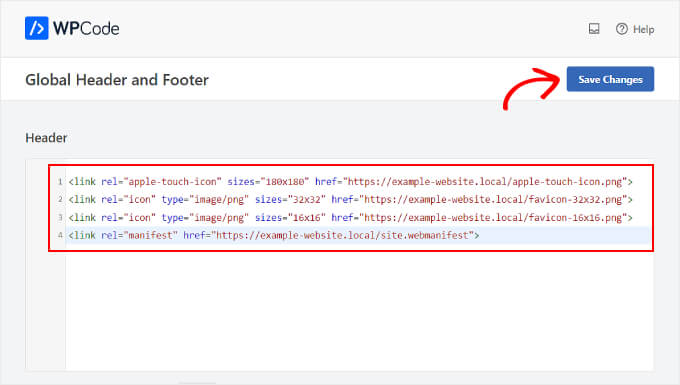
Finally, click the ‘Save Changes’ button in the top right corner.
And that’s it! Don’t forget to visit your website to see if the favicon change was successful.
Why Is My WordPress Favicon Not Showing?
One reason why your WordPress favicon may not be showing is due to the browser cache. This means your browser is still displaying the old version of your site.
To solve this issue, you need to clear the cache. If you need help, then you can follow our guide on how to clear the cache in your browser.
It’s also possible that you’re using a CDN service that still stores the old version of your site. In that case, you need to purge the CDN cache to update your website content.
You can open your website in Incognito mode or a private browsing window to check if your WordPress site icon has been uploaded.
If the favicon installation was unsuccessful, then you can try re-uploading the image with a different file name to resolve the issue.
Your WordPress site icon feature may also not be working because of a mixed content error. To solve this problem, check out our guide on how to fix WordPress mixed content errors.
In some cases, you may also discover that your website is displaying your hosting provider’s favicon instead of your own. If this happens, then contacting their support team can help resolve the issue.
We recommend choosing a reputable WordPress hosting service with excellent customer support to address problems like this effectively. You can check out our list of the best WordPress hosting providers to find the best option for your website.
Finally, you may want to check if your WordPress theme has a specific tool for uploading a favicon. This can explain why the methods above do not work for you.
We hope that this article helped you add a favicon to your WordPress site. You may also want to see our guide on best free logo makers to help you look like a pro or our expert picks of the must-have WordPress plugins to grow your website.
If you liked this article, then please subscribe to our YouTube Channel for WordPress video tutorials. You can also find us on Twitter and Facebook.


 in 2024")

Syed Balkhi
Hey WPBeginner readers,
Did you know you can win exciting prizes by commenting on WPBeginner?
Every month, our top blog commenters will win HUGE rewards, including premium WordPress plugin licenses and cash prizes.
You can get more details about the contest from here.
Start sharing your thoughts below to stand a chance to win!
Jason
Why does it need to be 512 pixels for an icon? I’m hoping it’s converted somewhere inside WordPress, once and done, and not on every load. 512×512 is crazy for something that would very rarely be bigger than 32X32, unless I am missing something?
John Krawczyk
Article not useful. Everyone tells you to make a path to your favicon & that’s it.
However do you include http: www http do you specify .ico .png?
Nobody says anything in detail.
WPBeginner Support
Hi John,
Yes you need to include full URL like this:
https://www.wpbeginner.com/favicon.pngAdmin
Joe
Using WP4.7 and the Site Icon functionality works, but it just seems off to me. The result is 4 links in the section:
But it creates 10 different versions of the site icon image in addition to the original at sizes of 32×32, 100×100, 150×150, 180×180, 192×192, 250×250, 270×270, 300×300, 360×360, 500×310.
Why so many cropped images if only 4 linked to?
Also, I submit an icon image sized 512×512 as recommended, but the 500×310 version is always cropped so the top and bottom of the icon is cut off. Is there any way around this and/or is it a big deal?
What browser support does this WP Site Icon cover (mostly in respect to how far back in IE)?
Thanks!
Marieke
In Whatsapp, the image which appears left to a link address if you send a link: is that the same icon? Because I don’t see it there.
Sunil
Marieke, It’s featured image, you upload to a particular post.
Cos
The ICO Format plugin for Adobe Photoshop does not allow images more than 256 pixels high or wide. So how do you create one that’s 512px???
Marieke
It doesn’t need to be made an .ico. Just a plain .png or .lpg will do when you work in WordPress.
Salim Ahmed
Informative instruction. Now i following your tips and tricks. Thanks for sharing it.
Taimoor Ahmed
Kindly tell me any website or a software from where I can make an effective favicon for my site in a quick time????
Kirstie
Thank you for another simple to follow tutorial. I’m a true beginner and y’all do a great job explaining things in a way I can understand.
WPBeginner Support
Thanks, glad you find our tutorials helpful.
Admin
Nelson
thanks good tut easy and works
c
the add logo in some themes isn’t for favicon its for the header logo
ccstacyline
how come my side identity menu doesn’t have the service for site icon? I am so frustrated… can you help ?
John Davis Frain
Are the instructions you give here theme-specific? I’m using the Delicacy theme, and it doesn’t give me that option to alter Site Identity and insert a Favicon.
WPBeginner Support
No it is not theme specific. Make sure you are using the latest version of your theme.
Admin
Mad Dog Malcs
Hi There, I also don’t see the site identity tab, I am using the sketch theme, how do I update a theme?
Thanks in advance, Malcs
shashi
i may go to theme custimztion..there u see the option of uploading the favicon icon easliy…
Antonios
You might not see the word “favicon” probably site icon. If you see a scrow bar you might have to scrow all the way down to see the select image box.
a
You can add favicon by WordPress’ “Costumize” editor, which can be found in every wordpress site.
Alan
I upload a PNG file that is exactly 512×512 pixels, WordPress saves it, and then I end up with a cropped image in my media library. Super annoying! WordPress 4.4.
Alan
I should add that the new, cropped image is exactly the same dimensions as the original I uploaded, but now I have two in my library (albeit one has been processed twice, and has actually increased two kilobytes in file size!).
Katherine Johnston
I have gone through the directory, exactly as you described, but my Site Identity tab only has “Site Title”, “Tagline”, and a checkbox for displaying header text. How can I fix that? Or do I have to go the FTP route?
Thanks for the help!
Rahul Thakur
thank you so much, very simple way love it.
Liz
Excellent instructions, took me about 32 seconds to do it. Fabulous! Thank you
Erin
Thanks! This was very helpful.
Marie Bock
Wow! That was so easy with the newer version of WordPress.
Matt
Super-easy! Thanks for that – I just need to go away and design a better logo now
Viscoun
Doesn’t work. When I got to Customize > Site Identity, the site icon option doesn’t show up – it only says “Site Title” and “Tagline”.
david
what version of wordpress are you using?
Harshpreet
Hi same is the problem I am facing and I am using the website of wordpress on my laptop for building up my blog!
Gina
I’m having the same problem. I’m using wordpress directly online, I haven’t downloaded anything. No “site icon” option at all.
WPBeginner Support
Please see our guide on the difference between self hosted WordPress.org vs free WordPress.com blog.
Admin
Lourika
It took me forever to figure it out!!!!
In the top left corner, click on MY SITES
Go to WP Admin
Then click on SETTINGS
and you will be able to change the icon (picture) on the right hand side……
Megan
Yay! It worked perfectly and the instructions were super easy to follow. Thank you so much!
Malcolm Ruthven
I added a 512×512 pixel jog image via Site Identity / Site Icon. The image appears just fine there. But the image does not appear as a favicon in any browser (Firefox, IE, or Chrome).
Shawna Marie
I’ve done all the steps. The image shoes in the customiser but not on the site on any platform…iphone or on my iMac in any of the browsers. Is there a specific file type?
WPBeginner Support
Site icon feature supports PNG, JPEG, and GIF image files.
Admin
Mike Crutcher
This doesn’t work on my site. I’ve got the icon the correct size, but it’s not showing up. Perhaps it’s because of my custom URL?
Maria
Is this option to alter Site Identity and add the Favicon theme-specific? I don’t have that in my self-hosted site.
Dave
Thanks! Worked great.
Arsh
Thank you !
Nikki
I am so glad to have stumbled upon your article. I had quit trying to figure out how to upload my favicon in the past because it felt impossible. But recently, I felt the need to take another stab at it. You made it so easy! I can’t recall it being this easy to upload before.
Thank you!
Nikki
Ruby Dawnbrooke
Hello!
I have a question, recently, I’ve used the plugin All in One Favicon. I uploaded my picture but it doesn’t show up if I’m not logged into WordPress, it just keeps on showing the HostGator favicon (regular), can anyone help?
bg
Here’s a stupid question: Why do they make it so complicated? This should be something that you can do in a couple clicks, like adding an image to a blog post.
WPBeginner Support
Actually, there is a feature currently in testing which will allow users to add favicon from theme customizer.
Admin
dzaken
thankyou so much, easer way to make it. love it
Bert Rinkel
I have a logo which I want to use. Is that possible? It is not in a square format at this point, but can be. How do I do that? Can I “create” one in iPhoto (on a Mac)? Where would I do that in iPhoto, and how? I have one on my dashboard now. Can I drag that somewhere? How do I save it as a PNG file? Where do I do that?
This is a nice general site to understand what a favicon is, but not on how to do it.
Mike
Hi Bert, I’m still feeling my way around this process myself but I am ok up to the point you are trying to reach. Creating your own or editing an existing logo to make it fit can be done in a program like Photoshop. Remember to go to New file, and set the size to 16×16 pixels. Import your image to this and reduce it to fit. If you don’t have Photoshop or any other image editing software you can go to where the instructions are easy to follow. I’m sure it doesn’t necessarily have to be a PNG file. But it does have to be an .icon which the Favicon site will convert for you from the original .jpeg you uploaded. Because I have Photoshop when I clicked on the Edit button in iPhoto it automatically opened Photoshop. See what it does when you do it on your system. It may open an alternative editing method. Hope that helps. I know what it’s like as a beginner.
chukwubueze
Thanks man.. your site has been useful to me and also your videos on youtube. am still working on my site.. you can have a look.
vinayak
Can i add Meta description and meta keyword for my site using this plugin.
4ryan
what is this apple touch icon???
4ryan
thanks this is what i am looking for, but how can i add site logo. wordpress.com has option to add site logo but i cannot find it in self hosted wordpress cms
ConnieKirkpatrick
Thank you, this kept it simple and gives me a way to use this. Now, question: This will show a favicon for every page correct? What if I want a different one for each page?
Apoorva
I managed to add the favicon without the background image. But when I move to another tab on the browser, the background image shows up. For example- if you look up the favicon is perfect. But, when you are on another tab, you will the white background show up. Any advice would be highly appreciated! Thank you!
mohammad raheem
Simply add this line in your header.php at any where before tag.
and upload favicon.ico to root folder of your website. Root folder where your wp installed, do not upload favicon.ico to sub folders. Refresh your browser one or two times your ico will appear on tab.
Daniel Lobo
This definitley fixed the problem, and changed the favicon on all pages, EXCEPT the home page! Why could that be?? Help please! And thank you!
Manuel Echeverry
great! I will do it
joe
dis noob didnt use the transparency
Emma Lock
Thank you so much for making this so easy to follow!
Monu Saifi
Thanks for give the tops to add favicon icon on my blog.
Thanks again
Richard
Is there a way to install the all in one favicon plugin via my /wp-admin/ page via my browser? I’ve built everything straight through the browser, no ftp at all.
shashi
i may go to theme custimztion..there u see the option of uploading the favicon icon easliy…
Lluisrd
Great¡¡¡, Just editing only one line of (header.php) I have a favicon.
But I prefer 128×128 favicons…. like Google
TNXS
Kayode
Thanks so much… I tried the insert header and footer but it didn’t work but when I tried the “All in one Favicon”, it worked.. Thanks a lot..
Joel Mwakasege
Wow thank you, this one was a life savior. My blog was just on default to WordPress Icon.
Rahul
What,s the difference?
I mean why to mess with FTP,if a simple plugin is available and serving the same purpose?
Editorial Staff
Because the task is so simple, it can be by avoiding a plugin. But again personal preference.
Admin
Kelvin Hanratty
Is there any reason why is HAS to be 16×16, because high resolution or, dare I say it, “Retina” screens are at a higher pixel density?
The reason I mention it, as I’ve used a site to convert a picture into a favicon and it gave me multiple sizes as options: 16, 32, 64 pixels. Does WordPress not cater for this?
Excuse my ignorance, I’m pretty new to WordPress!
Kelvin.
Kelvin Hanratty
Sorry, misread the post below about bluehost. Oops!
Praveen Prasad
Without uploading Plugins one can simply apply a Favicon to a Site.
Simple Steps :-
1) Hosting CPanel —> File Manager –>
2) Search for the default image in the Theme folder.
Ex- genesis/images/ favicon.ico
Upload your .ico file to the same folder and remember the name of the default file.
(here favicon.ico)
I don’t think that remembering a simple filename is annoying.
Then delete this file and rename the new image file with the previous file name.
It Works
David
Yes, this how I did that in bluehost. I’ve just overwrite the favicon.ico that was there with my image uploaded. The only thing is that the original was set at 16×16 and I had to add a similar 16×16. It didn’t take a 32×32 though but it’s fine, it worked easily.