Adding a button to the main navigation menu allows you to make your site’s call to action stand out, driving more traffic to your most important pages. It’s also an easy way to add the same button to every page and post.
We have seen how WPForms, one of our partner brands, added a “Get WPForms” button directly in the WordPress header. This simple addition has helped increase conversions and boost sales.
By placing the button in a highly visible spot, WPForms made it easier for visitors to take action, resulting in better engagement and more leads.
In this article, we will show you how to easily add a button to your WordPress header menu.
Why Add a Button in WordPress Header Menu?
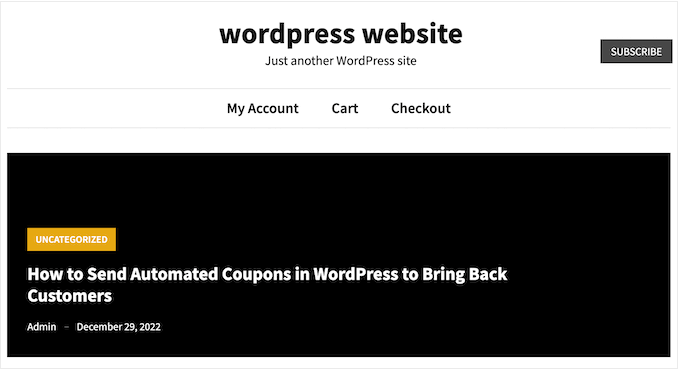
WordPress navigation menus are typically plain text links, where everything looks the same and nothing really stands out.
However, some links are more important than others. For example, you may want to add a link to an online order form or your WordPress membership site’s registration page.
By default, these important links look just like the rest of the header menu.
You can make these links more eye-catching by turning them into buttons. This can get you more clicks and conversions.
By default, you can add buttons in WordPress posts and pages using the Buttons block, but you can’t add them to navigation menus.
That being said, let’s see how you can add a button to your WordPress header menu.
Adding a Button in Your WordPress Header Menu
To start, you need to add the link that you want to turn into a button.
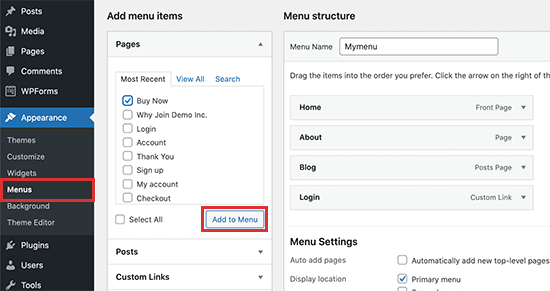
Simply go to the Appearance » Menus page in your WordPress dashboard and add the link to your navigation menu. For detailed instructions, please see our guide on how to add a navigation menu in WordPress.
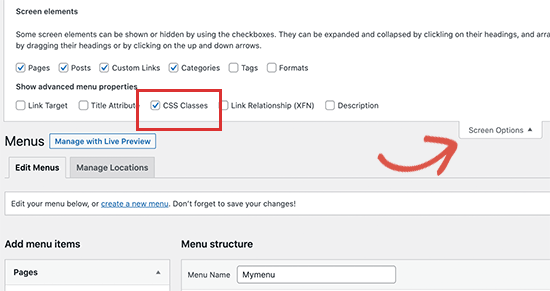
After that, you must click on the Screen Options button at the top of the screen.
This will reveal a panel with lots of new options. Simply check the box next to ‘CSS Classes.’
Now, click to expand the menu item that you want to turn into a button.
You’ll notice a new CSS class option where you can type in a class name. You can call the CSS class anything you want, but in this guide, we will use menu-button.
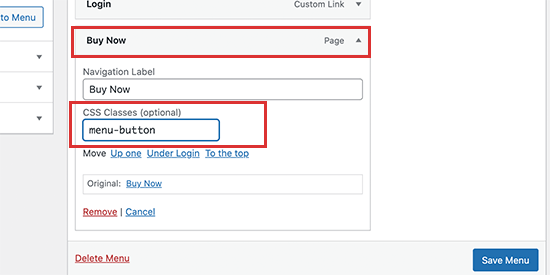
After typing in a name, click on the ‘Save Menu’ button to store your changes.
Now you’ve added a custom CSS class to the menu item. You can change how it looks using custom CSS code. You can either add this code via the built-in WordPress customizer or by using a code snippets plugin.
Add a Button in Your WordPress Header Menu Using WPCode (Recommended)
The best way to add custom code to WordPress is by using WPCode. It is the best code snippets plugin that allows you to add custom CSS, PHP, HTML, and more.
Since you are not editing the theme files directly, you can avoid many common WordPress errors. You can also update your theme or switch to a completely different theme without losing your custom code.
If you want to remove the button at any point, then you can turn it off with a single click.
First, you will need to install and activate the free WPCode plugin. For more information, see our step-by-step guide on how to install a WordPress plugin.
Once the plugin is activated, visit the Code Snippets » + Add Snippet page from the WordPress dashboard.
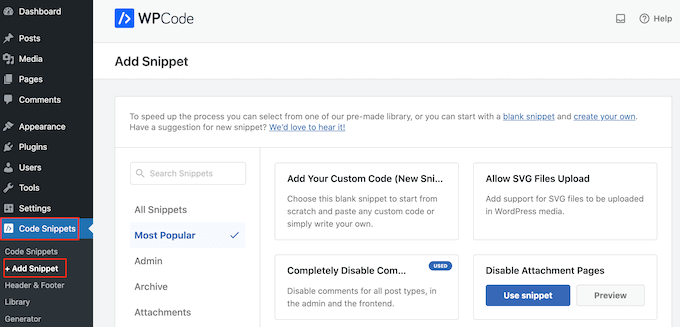
Here, you will see all the ready-made WPCode snippets you can add to your site. These include a snippet that allows you to completely disable comments, upload file types that WordPress doesn’t usually support, disable attachment pages, and much more.
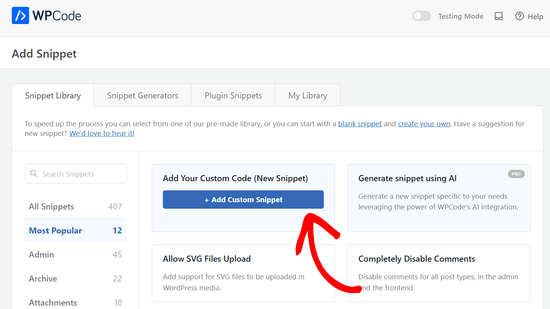
Now, just hover your mouse over the ‘Add Your Custom Code (New Snippet)’ option and click the ‘+ Add Custom Snippet’ button when it appears.
Next, you need to select ‘CSS Snippet’ as the code type from the list of options that pop up on the screen.
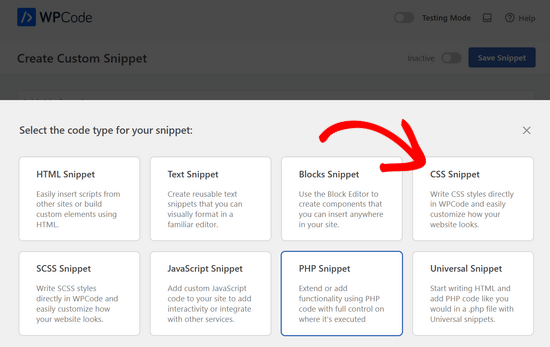
On the following screen, you need to type in a title for the code snippet.
The name is just for your reference, so you can use anything you want.
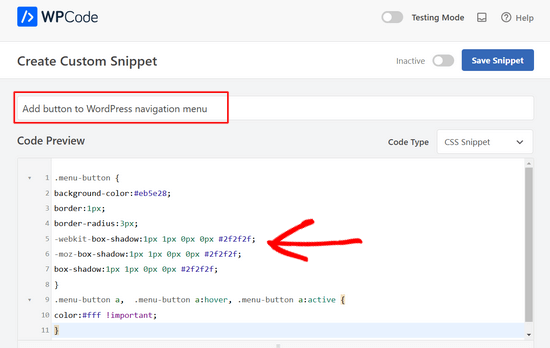
With that done, you are ready to paste a CSS code snippet into the ‘Code Preview’ box:
.menu-button {
background-color:#eb5e28;
border:1px;
border-radius:3px;
-webkit-box-shadow:1px 1px 0px 0px #2f2f2f;
-moz-box-shadow:1px 1px 0px 0px #2f2f2f;
box-shadow:1px 1px 0px 0px #2f2f2f;
}
.menu-button a,  .menu-button a:hover, .menu-button a:active {
color:#fff !important;
}
When adding the code snippet above, make sure you replace menu-button with the name of your CSS class.
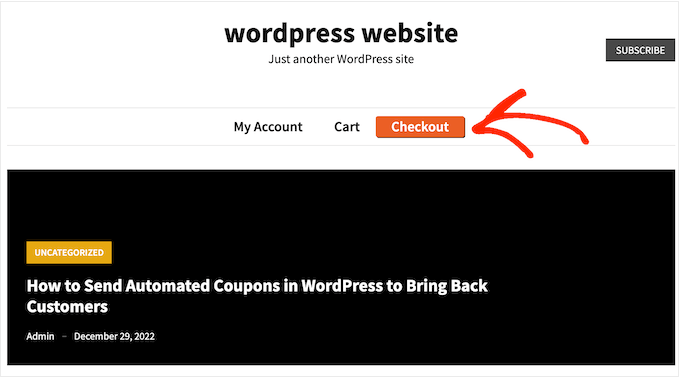
The above cope snippet creates an orange button with a shadow effect, as you can see in the following image.
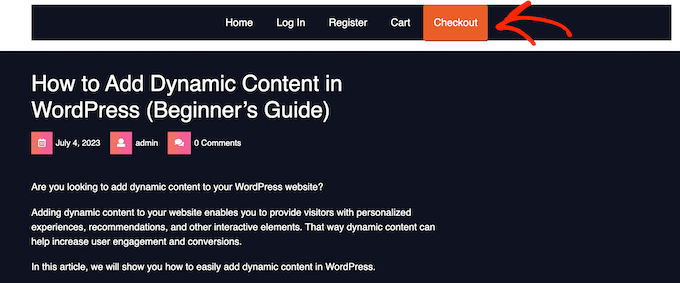
Feel free to play around with the CSS snippet to see what different effects you can create. For example, you can change the background color, link text color, add a border, and more.
If you want to use a different color, then you will need to know that color’s hex code. If you are not sure what codes to use, then you can use a resource such as Color Hex.
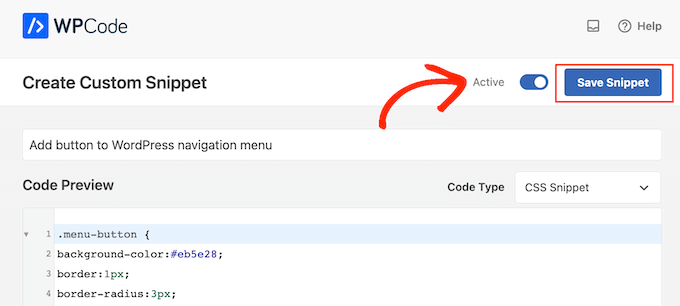
When you are happy with the code, click on the ‘Inactive’ toggle so it changes to ‘Active’, and then click on the ‘Save Snippet’ button.
Now, if you visit your WordPress website, you’ll see the new header menu button in action.
Add a Button in Your WordPress Header Menu Using the Customizer
If you don’t want to use a plugin, then you can add code using the built-in customizer.
Simply go to Appearance » Customize, and you’ll see a preview of your site on the right, plus a bunch of theme settings in the left-hand column.
To start, click on the ‘Additional CSS’ option.
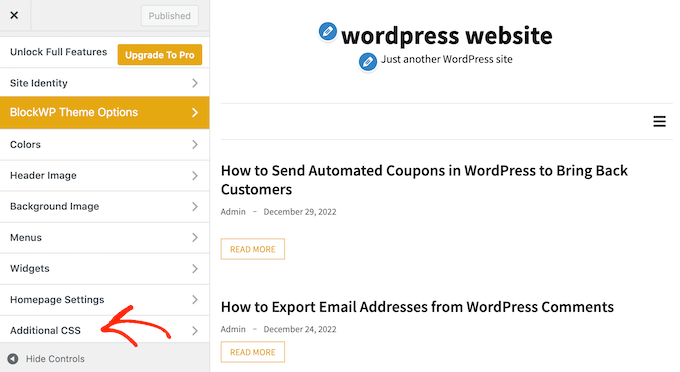
You will now see a box where you can add custom CSS code.
Once again, you can use the code snippet above as a starting point.
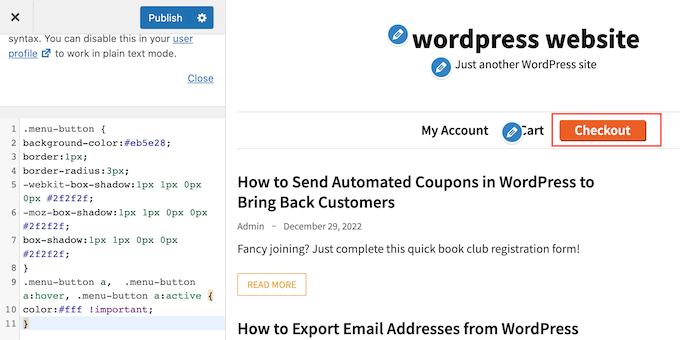
When you are happy with how the button looks, click on ‘Publish’ to make your changes live.
Video Tutorial
If you are more of a visual learner, please check out our video tutorial on how to add a button in your WordPress header menu:
Bonus: Add a Click to Call Button in the WordPress Header
If you have a small business site, then you may also want to add a click-to-call button in your navigation menu. This will make it easier for visitors to contact you and can even boost your search engine rankings by making your site more SEO-friendly.
To add this button, visit the Appearance » Menus page from the WordPress dashboard and expand the ‘Custom Links’ tab on the right.
Here, add your VOIP phone number in the URL and add a label for it. After that, click the ‘Add to Menu’ button.
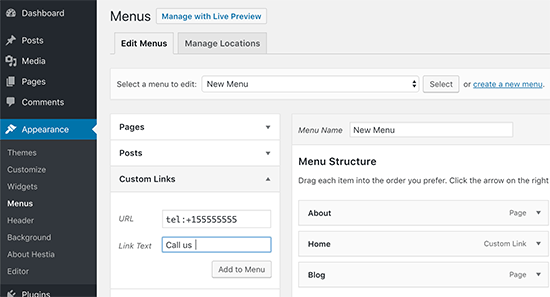
Once the click-to-call button has been added to your list of navigation links, don’t forget to click the ‘Save Menu’ button to store your settings.
For detailed instructions, you may like to see our tutorial on how to add a click to call button in WordPress.
We hope this article helped you learn how to add a button to your WordPress header menu. You can also go through our guide on how to create a sticky floating navigation menu in WordPress and our tutorial on how to add conditional logic to menus in WordPress.
If you liked this article, then please subscribe to our YouTube Channel for WordPress video tutorials. You can also find us on Twitter and Facebook.


Jiří Vaněk
Nicely done! I usually tried to solve this with a plugin, but I had no idea that WordPress could handle it natively. I have to admit, this method is also simpler than some plugins. I wanted to highlight the contact information in the header with a button, and it worked perfectly. Thanks for the tutorial!
Ali Hayder Hayder Sultan
Hi there! Thanks a lot!
Also, I want to ask if is it possible to make this button visible on a mobile phones. like other menus shown when we click on menu but this one remains there? I saw a website like this but I’m not sure. I’m using WP oceans
WPBeginner Support
IT should be visible unless your theme uses a different menu on mobile devices. You can see what the mobile version looks like using our guide below!
https://www.wpbeginner.com/beginners-guide/how-to-preview-the-mobile-layout-of-your-site/
Admin
Nicole Hassell
This was helpful and created a button but it overwrites the link in my custom link….any idea how to stop that?
WPBeginner Support
None of the CSS should touch the link in your menu item, we would recommend ensuring that the link was not changed in your meu settings and that you don’t have a plugin that could be changing your link.
Admin
Sergio
Thaks for this useful guide!
when I customize the button with CSS, the background occupies the entire height of the header. How can i modify this to fit more closely to the text? (remove excess background)
Thanks a lot
WPBeginner Support
That would require editing your theme and what to edit would depend on the specific theme you are using.
Admin
Bonny C.
What a timesaver! Thanks a bunch!!
WPBeginner Support
You’re welcome, glad our guide was helpful!
Admin
Sawyer Smith
Hi, Implemented the css into my menu and it turned out great after some time troubleshooting. However, when my cursor hovers over the button, a wide white rectangle covers the text when cursor is hovering. How can I fix this so that nothing like this occurs during hover? Thanks.
WPBeginner Support
It likely is due to your theme’s default hover colors. If you are using the CSS from our article then you would want to add CSS code like the following:
.menu-button:hover {
background-color:#eb5e28;
}
Admin
Nicole
This is very helpful, thank you! I’m wondering if you can tell me how to change the color of the text on the sub-menu (dropdown from the button) only?
Thank you!
WPBeginner Support
As each theme is different you would want to check with your theme’s support and they may have a recommendation, otherwise, you could use our guide on inspect element below for how to select the sub-menu for changing the text color.
https://www.wpbeginner.com/wp-tutorials/basics-of-inspect-element-with-your-wordpress-site/
Admin
Megan
When I follow all of these steps the button doesn’t appear at all.. it just does nothing. Any idea why this might be? I copied and pasted the exact code from here!
WPBeginner Support
Your specific theme may have CSS that would overwrite this code, if you check with your theme’s support they should be able to assist.
Admin
Gabriela
how do you resize the button? I see it stays inline with the text
jj
Great help thanks!
Is it possible to make the button something that links to another external site using the CSS?
Dorothy
I really appreciate this! For the longest time, I wasn’t sure how to go about this. I was able to create a button in the nav with no problems following this. Thanks!!
Stephanie
Thank you so much for this tutorial! I’m not a techie kind of person, and at first it didn’t work, because I was in my primary navigation menu, went to secondary and did the steps and voila! Added a little bling to my site!
WPBeginner Support
Glad our guide was able to help
Admin