If you have added multiple bloggers to your site, then a blog post checklist can help ensure everyone writes in the same style and remembers all the important details. ✔
At WPBeginner, we use a blog post checklist ourselves, and it has helped us maintain consistency across our content and ensure that every post meets our quality standards. 🌟
We’ve found it especially useful as our team has grown, making sure every writer follows the same process.
If you want to do the same, then follow our step-by-step guide on how to add a blog post checklist to the WordPress editor.
Why Add a Blog Post Checklist to the WordPress Editor?
A blog post checklist shows a list of tasks you need to do before publishing your post. Once you’ve finished writing, you’ll want to edit, proofread, add categories and tags, optimize the post for search engines, and more.
Some WordPress plugins, such as All in One SEO (AIOSEO), use checklists to help site owners with search engine optimization by prompting them to include primary keywords in their SEO titles, meta descriptions, URLs, subheadings, and the body of the blog posts.
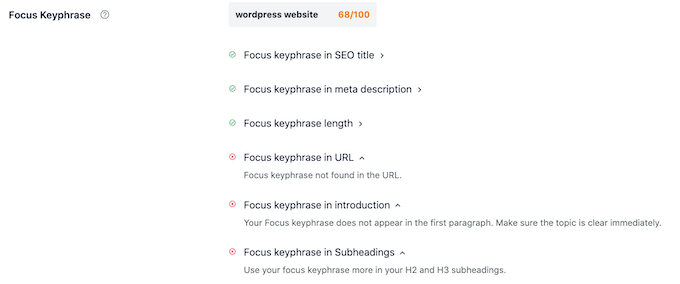
Pre-publish checklists typically monitor your post as you are writing and then check off each task as you finish it. This makes it easy to see what you’ve done well and what you still need to work on.
Checklists are also handy for multi-author WordPress blogs as they can ensure a consistent quality standard for your content and speed up their content creation.
With that in mind, let’s see how you can add a blog post checklist to improve your WordPress website‘s editorial workflow.
How to Add a WordPress Blog Post Checklist to the Block Editor
The easiest way to add a blog post checklist function to the WordPress editor is by using PublishPress Checklists.
This WordPress checklist plugin adds a checklist to the right-hand menu of the page or post editor.
Note: If you have a multi-author blog, then we recommend purchasing the PublishPress suite to improve your editorial workflow.
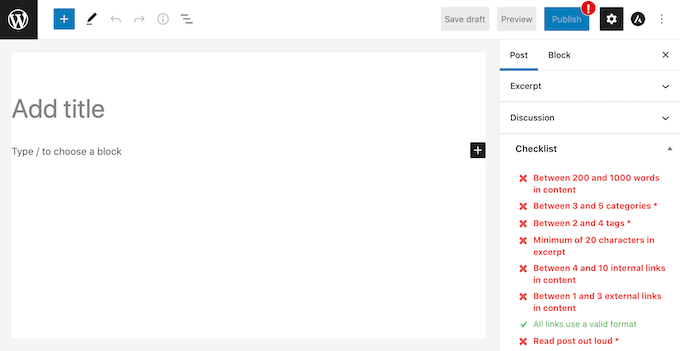
PublishPress has a list of default tasks that you can add to your article writing checklist. It also lets you create custom checklist tasks for your WordPress blog.
First, you’ll need to install and activate the plugin. If you need more instructions, then please see our guide on how to install a WordPress plugin.
Upon activation, head over to Checklists » Settings in the WordPress dashboard.
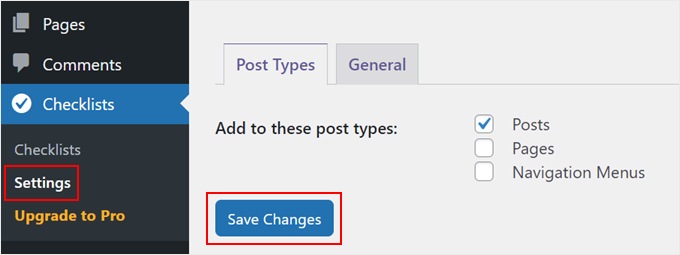
Here, you can choose where WordPress will show your checklist. To add a blog checklist to the Gutenberg editor, you’ll want to check the ‘Posts’ checkbox.
Once you’ve done that, just click on the ‘Save Changes’ button.
You can then build your checklist by going to Checklists » Checklists.
Here, you’ll see all of the default tasks that you can add to your blog post checklist. PublishPress is able to detect when these tasks are completed and check them off for you.
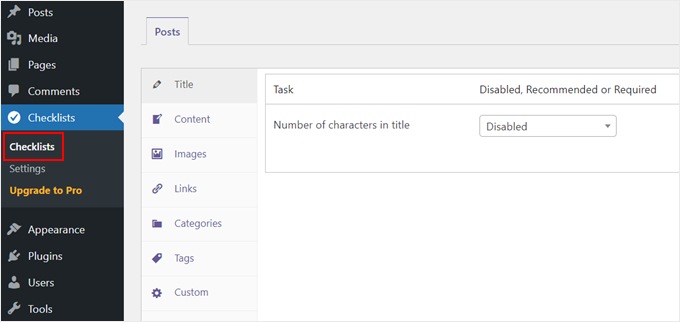
All these tasks are disabled by default and categorized by title, content, images, links, categories, tags, and custom.
To add a task to your blog post checklist, simply open the ‘Disabled, Recommended or Required’ dropdown menu.

You can now choose between ‘Required’ or ‘Recommended.’
If you click on ‘Required,’ then authors won’t be able to publish their WordPress posts without checking off the task first.
If the user clicks on the ‘Publish’ button without completing all ‘Required’ tasks, then WordPress will show a ‘Please complete the following tasks before publishing’ message.

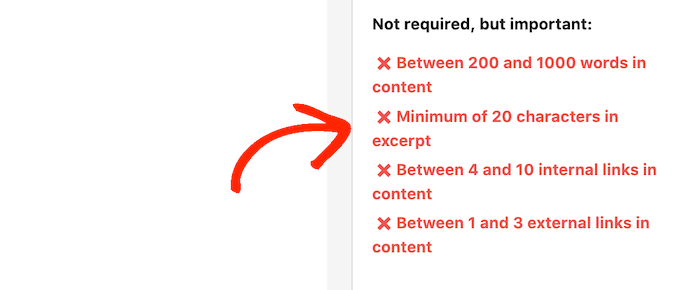
If you choose ‘Recommended’ instead, then the editor will show a message encouraging authors to complete any outstanding ‘Recommended’ tasks before publishing.
However, authors will be able to publish their posts without completing these tasks.
After choosing between ‘Recommended’ and ‘Required,’ you can move on to ‘Who can ignore the task?’
Here, you can let certain user roles publish a post without completing the task, even if that task is ‘Required.’ For example, you may trust your site’s admins or editors to skip this task if they think it’s for the best.
To add a user role to your ‘ignore’ list, click on the ‘Who can ignore the task?’ box.
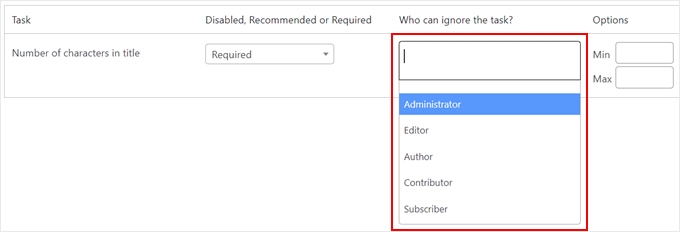
This opens a dropdown showing all of the different user roles on your site.
You can now simply click on a role to add those users to your ‘ignore’ list.

For some tasks, you may need to set a maximum and minimum value. For example, you can set a minimum number of categories that authors must add to a post. To learn more, please see our guide on how to add categories and subcategories in WordPress.
If the task has a ‘Min’ and ‘Max’ section, then you can type in the numbers you want to use.
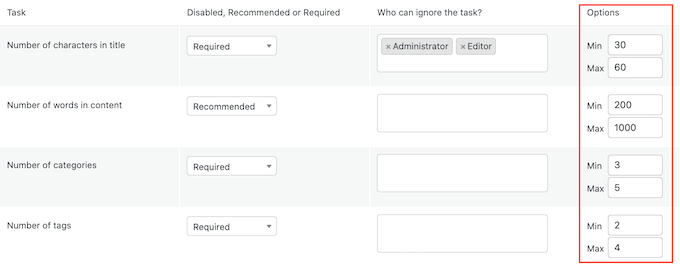
To add more tasks to your checklist, simply repeat the process described above.
You can also add custom tasks to your blog post checklist.
The drawback is that PublishPress can’t check whether the author has completed custom tasks. This means the author will need to do this check manually.
For more information about custom tasks you may want to add, please see our guide on how to optimize your blog posts for SEO like a pro.
To create a custom task, simply scroll to the very bottom of your screen and then click on ‘Add custom task.’

This adds a new task ready for you to customize.
To start, type the task’s name into the ‘Enter name of custom task’ field. This text will be shown in your publishing checklist, so make sure it lets authors know exactly what they need to do.

You can now make this task ‘Recommended’ or ‘Required’ and give some users the option to ignore this task by following the process described above.
For custom tasks, you can specify the users who can mark this task as complete. For example, you might use custom tasks to create a special ‘Editing’ checklist for users who have the Editor role.

To do this, click on the ‘Which roles can mark this task as complete’ box. This opens a dropdown where you can click to select any of your user roles.
Once you’ve added all the tasks to your checklist, simply click on the ‘Save Changes’ button. Now, you can visit the WordPress editor to see your blog post checklist live.
What Type of Tasks Can You Add to a Pre-Publish Blog Post Checklist?
Every WordPress site will have a different set of checklist items in their editor. But if you need some inspiration, here’s what you can add to your pre-publishing checklist:
- Use a grammar checker, a plagiarism checker, and an AI detector to maintain your content quality.
- Add a featured image.
- Add alt text to images.
- Add call-to-action buttons throughout the content where necessary.
- Include internal links.
- If there are external links, mark them as nofollow to preserve your link authority.
- Make sure the formatting looks good on the front end.
- Insert meta titles and meta descriptions for Google and social media.
Expert Tips and Tricks to Customize Your WordPress Editor
Adding a blog post checklist is just one way to improve your WordPress editor experience. Here are some more expert tips and tricks to help you customize and improve your editing workflow:
- How to Add Collaboration in WordPress Block Editor (Google-Doc Style)
- How to Replace ‘Add Title’ Placeholder Text in WordPress
- How to Hide Blocks from Specific Users in WordPress Editor
- How to Customize the Background Color of the WordPress Block Editor
- How to Disable the Fullscreen Editor in WordPress
- How to Use the Distraction-Free Fullscreen Editor in WordPress
We hope this article helped you learn how to add a blog checklist to the WordPress editor. You may also want to check out our expert picks of the best Gutenberg block plugins for WordPress and our guide on how to undo changes in WordPress with post revisions.
If you liked this article, then please subscribe to our YouTube Channel for WordPress video tutorials. You can also find us on Twitter and Facebook.


Jiří Vaněk
I’m currently finishing up a website for multiple authors and came across this article. I was also thinking about how to set up rules and ensure they’re followed effectively. There’s a big difference between rules established by agreement and having those rules enforced with the help of this plugin. It’s truly a perfect solution for my needs. Once again, a brilliant article from WPBeginner and its fantastic team.