Many churches today face the challenge of reaching their community beyond the church walls. Whether it’s serving elderly members who can’t attend in person, connecting with young families who’ve moved away, or expanding their ministry’s reach, churches need a simple way to share their message online.
WordPress makes it surprisingly easy to offer online sermons. Our team has built multiple church websites and helped religious organizations expand their digital presence, so we can tell you that you don’t need technical expertise or a big budget to get started.
In this step-by-step guide, we’ll show you the easiest ways to add sermon streaming to your church’s WordPress website. You’ll learn which tools work best, how to set them up quickly, and simple tips to ensure your online services run smoothly.
Why Record and Upload Sermons?
For any church website, having essential info like your location, service times, and a way to get in touch is a must-have. But when it comes to putting sermons or even entire services online, a lot of churches worry that it’s going to be a huge hassle, taking up too much time or costing too much money.
We totally get that this is a common concern, but from what we’ve seen, it can actually be much more affordable and easier than you might think.
There are plenty of reasons why putting your sermons online makes sense:
- Reaching new visitors: Lots of people like to check things out online before they visit in person. We’ve seen churches use online sermons as a really effective way to connect with folks who are looking for a new church.
- Keeping sick or elderly members connected: Church members who miss services due to illness or age can stay connected by listening online. We’ve helped many congregations set this up, and it’s been a fantastic way to keep everyone feeling included.
- Helping parents with young children: Let’s be honest, sometimes parents with little ones have to miss parts of the service. Offering sermons online lets them catch up on what they missed when things are a bit calmer.
- A chance to re-listen and reflect: Even for those present during the service, providing sermons online gives members the chance to listen again and reflect more deeply on the message.
- Increased website traffic: Websites that update their content more frequently tend to appear higher in search results. This means that regularly putting up new sermons can result in more people discovering your church website.
And the best part? It doesn’t have to break the bank or require endless hours from volunteers. We’ve worked with lots of smaller churches who’ve successfully built their websites and started uploading sermons without spending a ton of money.
In this guide, we’ll show you how to record sermons even if you’re on a tight budget. For those who have a bit more to spend, we’ll also share recommendations for professional equipment and services you may want to invest in.
We’ll also give you some ideas for those who have a bit more to spend and want more professional solutions.
Here’s a quick rundown of what we’ll cover in this article, so you can easily jump to the section you need:
Step 1: Set Up Your Church Website
If you already have a WordPress website set up then you can skip to step 2, which focuses on choosing your recording equipment.
If you’re just starting out and need to get a WordPress site set up, you can check out this helpful video tutorial or read our super easy step-by-step guide to creating a WordPress website.
When it comes to hosting your new website, we highly recommend using Bluehost.
They’re giving our awesome WPBeginner readers a free domain name and a big discount on web hosting. Basically, you can get started for $1.99 per month.
You might also want to see our roundup of the best WordPress themes for churches so you can customize how your site looks.
Once your website is set up, the next step is ensuring you have the equipment you need to record your sermons.
💡 Already feeling like there’s a lot to learn? Don’t worry, our WPBeginner Website Design Services are here to make things easy.
Our team of experts can build a user-friendly website specifically for sharing your sermons online. Whether you need an easy way to upload recordings, manage your sermon library, or even set up online giving and volunteer sign-ups, we’ve got you sorted.
Let us handle the website design so you can focus on what’s most important: sharing your message and serving your community.
Step 2: Get the Right Recording Equipment
The equipment you need will depend on how you want to record: are you capturing the live sermon during church, or recording separately?
If you want to record live sermons, you may already have everything you need.
If your church already uses a soundboard and has a laptop available for recording, you might just need a simple cable. Something like this 3.5mm to XLR Cable will let you connect the soundboard to your laptop.
Once you’re connected, you’ll need software to actually record. A popular (and free!) option is Audacity. We’ll talk more about how to use it in the next step.
If you don’t have a soundboard for your church, then you could use a portable recorder like this Handheld Digital Audio Recorder. You can easily set this on your podium so you don’t have to hold it the whole time.
You might also want to record sermons privately by yourself instead of recording the live sermon, or even record additional teaching for deeper study.
In that case, you’ll need a good microphone. You might be tempted to just use your laptop’s built-in microphone, but we don’t recommend it. The sound quality usually isn’t great, and it can make it hard for people to understand your message.
Instead, we recommend investing in one of these three mics that are popular for podcasting:

- Samson C01U (USB) – This entry-level microphone is a solid and affordable starting point.
- Røde Podmic (USB) – This USB microphone is a step up in quality, and still easy to use.
- Heil PR-40 (XLR connection, not USB) – This is what the pros use for really top-notch sound. Keep in mind you’ll also need to buy an audio mixer to use this one.
At WPBeginner, we also use the Rode Podcaster kit that comes with a mic arm and shock mount. It’s a great all-in-one solution.
To really hear what you’re recording and edit your audio effectively, a good pair of headphones is essential. We recommend something like the Sony MDR7506.
How do you record a sermon video?
If you want to take things a step further and record video sermons, you’ll need a video camera.
If you’re starting with a very limited budget, you can actually record great video on your smartphone. Just make sure to use a tripod to keep it steady.

The GripTight GorillaPod Stand PRO is a good option because its flexible legs can attach to almost anything.
For churches with a modest budget, the SlingStudio HD Video Production Unit is a fantastic tool. It lets you use multiple cameras to create a professional-looking videos. You can switch between different video feeds in real-time using an iPad or laptop. You can even use camcorders, DSLR cameras, or smartphones as your camera sources.
Once you’ve got your equipment sorted, you’re ready to start recording and sharing your sermons.
Step 3: Record Your Sermon
We highly recommend using the Audacity app to record your sermons. Why? Because it’s completely free, just like WordPress, and super powerful. You can use it to record your sermons and even clean up the audio by reducing noise and improving the sound quality.
After you install Audacity, you’ll need to open the program and click the ‘File’ menu to start a new project. Then, click on the record button to start recording your sermon.
Messed up a line? No sweat! Just keep going. You can easily edit out any mistakes after you’re finished recording.

Want to add some music at the beginning or end of your sermon? Go to File » Import and select the music file you want to use.
Since Audacity is a powerful tool, you may want to check out these Audacity tutorials to learn more about all its features.
After you’ve recorded your sermon, you can export it. We recommend the MP3 format because it keeps the file size small while still sounding great.
Once you’ve saved the file, you’re ready to upload it to your website.
Step 4: Upload Your Sermon Recording
Both audio and video recordings can create really big files. While you might be able to get away with hosting your audio files directly on your website for a little while, you’ll likely run into storage space issues before you know it.
To keep your website running fast and smoothly, it’s best to avoid uploading audio or video files directly to your WordPress site.
That’s why so many churches use a separate sermon hosting service. We recommend using PodBean for your audio recordings as they offer unlimited podcast hosting plans with unmetered bandwidth. However, you can check out our list of the best podcast hosting services for other options.

For video files, we recommend you get started on YouTube. It is easy to use, super-fast, and free. It’s also the world’s second-largest search engine, which means more people might stumble upon your sermons.
Once you’ve recorded your sermons and uploaded them to a hosting service, it’s time to add them to your website so your members and visitors can easily find them.
To start, you’ll need to install the Sermon Manager for WordPress plugin. For more details, see our step-by-step guide on installing a WordPress plugin.
With that done, it’s time to add your first sermon by going to Sermons » Add New.
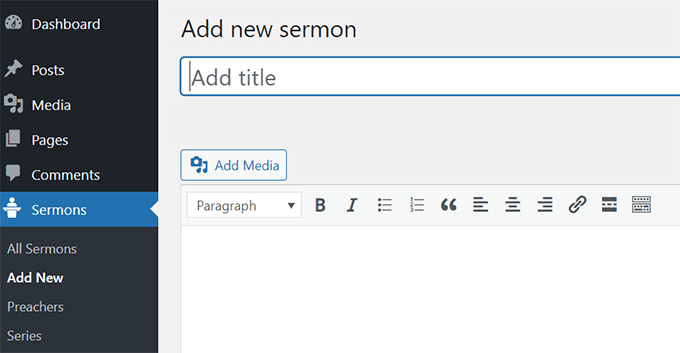
Here, give your sermon a clear and descriptive title. Then, write a short description about what the sermon is about.
Next, scroll down to the Sermon Details section. Here, you can add basic details about the sermon.
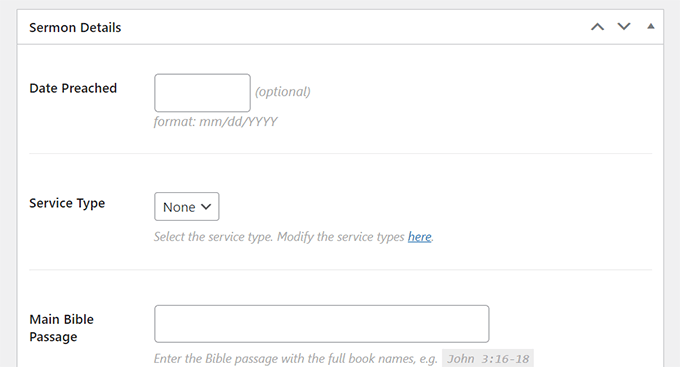
Many of these fields are optional, so feel free to skip any that aren’t relevant. However, try to fill out as many as possible, as it will help search engines understand what your sermon is about so they can include it in relevant search results.
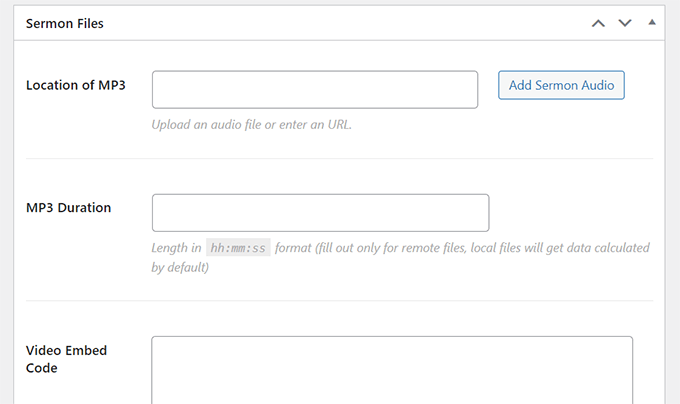
The next set of fields is where you’ll paste the links to the audio and video files that you uploaded to your hosting service, like PodBean or YouTube. There’s also a place where you can add sermon notes if you’d like to attach a PDF.
On the right-hand side, you’ll find options to add meta information like the preacher’s name and the sermon series.
Once you’ve added all the information, click the Publish button. And that’s it! If you’re using pretty permalinks, your first sermon will now be available at:https://yourdomain.com/sermons/
Submit your Podcast to Apple’s iTunes and Google Play.
Here’s a fantastic extra feature of the Sermon Manager plugin: it lets you easily submit your feed to podcasts. This makes it easier for your members to subscribe and receive notifications on their phones every time you publish a new sermon.
To get started, go to Sermons » Settings and click on the ‘Podcast’ tab.
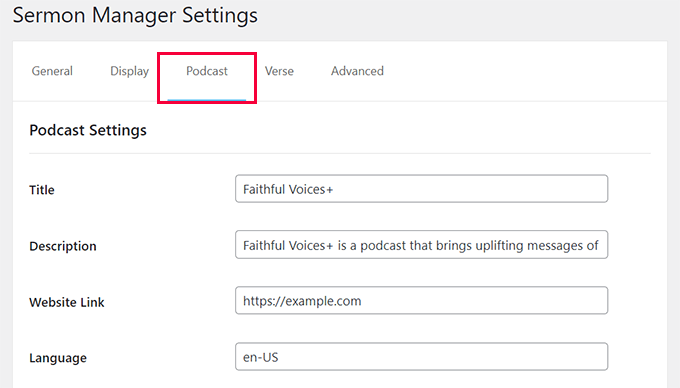
The developers of the Sermon Manager plugin have made this section really easy to understand. You’ll see clear fields to fill in, and they even provide helpful suggestions in light gray text.
Go through each field and fill in the information so it matches your church.
Once you’ve filled everything out, click the ‘Save’ button at the bottom of the page.
After the page reloads, you’ll see a link for a feed validator. Click on this link to make sure you’ve entered all the information correctly and that your podcast feed is working properly.
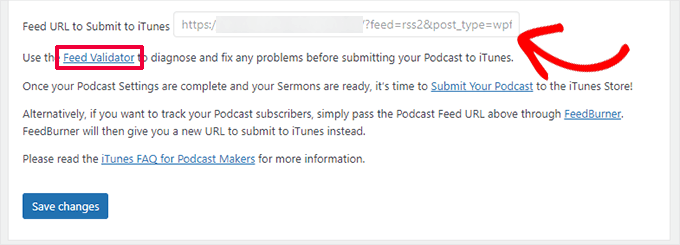
Once your feed is validated (meaning it’s all good!), copy the link to your podcast feed. You’ll then use this link to submit your podcast to popular platforms like Apple Podcasts and Google Play Podcasts. This will make your sermons available to a wider audience.
How Do I Live Stream Sermons?
More and more churches are asking us how to live stream sermons, so you might want to consider that as well.
We think the best approach is to live stream your sermons in addition to making them available on your own website. If you only live stream and don’t record your sermons, you’ll miss out on all the benefits we talked about earlier, like making it easy for members to catch up on past messages and growing your website traffic.
That said, live-streaming sermons can be a good way to reach new audiences, especially on social media.
Two of the best platforms are YouTube and Facebook. Facebook can be a good option, especially since many of your members are likely already on Facebook and connected to your church’s page.
But Facebook Live isn’t always reliable. We’ve heard reports of churches having issues with their livestream crashing in the middle of the service, which can be frustrating.
To get a smoother and more reliable live streaming experience, you might want to look into using a dedicated broadcasting service. Restream allows you to broadcast your service simultaneously on your website, YouTube, Facebook page, Facebook group, and other services.
For a less stressful experience, you can also record your sermons or services ahead of time and then schedule them to go live at the right time. This gives you more control over the final product.
If you’re planning to live stream your sermon using your smartphone, definitely use a tripod. This will help keep the video stable and look much more professional.
Once your live stream is over, you can easily add the video to your website by following our tutorial above. This way, people who missed the live stream can still watch it later.
Schedule and Display Church Services on Your Website
Want to make sure everyone in your congregation knows about your upcoming services, no matter whether they’re happening at the church or online? Displaying and sharing your events is key! We’ve seen firsthand how making your church events easy to find on your website really helps people to get involved.
We recommend using Sugar Calendar to display events on your church website. It allows you to easily schedule events and display them anywhere on your site.
Here’s just some of the reasons why we love Sugar Calendar:
- Display events directly on your website, allowing your congregation to see all upcoming services, Bible studies, sermons, and other events. They can even add these events to their own calendars with a single click, so they never miss an important gathering.
- Easily add recurring events like weekly sermons or prayer meetings so you don’t have to re-enter details every time.
- Provide detailed event descriptions including important information such as topics, speakers, and links to live streams. This makes it super easy for people to join your online services.
- Integrate with Google Maps to offer directions to your church or event location. This helps attendees find their way to in-person gatherings without any hassle.
Want to learn more? Then check out our detailed Sugar Calendar review.
There’s a free version of Sugar Calendar that lets you create a calendar and promote one-off events. However, we recommend upgrading to the paid version as it lets you set up recurring events, which is perfect for weekly sermons, regular prayer meetings and other ongoing events.
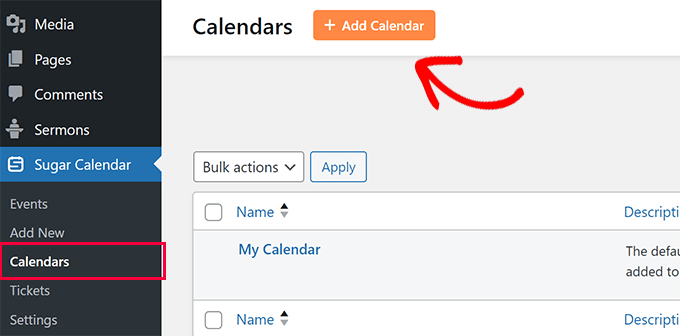
To get started, you’ll need to install and activate the Sugar Calendar plugin. Upon activation, go to the Sugar Calendar » Calendars page and click ‘+ Add Calendar’ at the top.
Next, you need to provide a title for your calendar. This could be anything that clearly represents the events you’ll be adding to it, such as Sunday Services or Youth Group Events.
Below that, you can provide a slug for the calendar’s SEO-friendly URL.
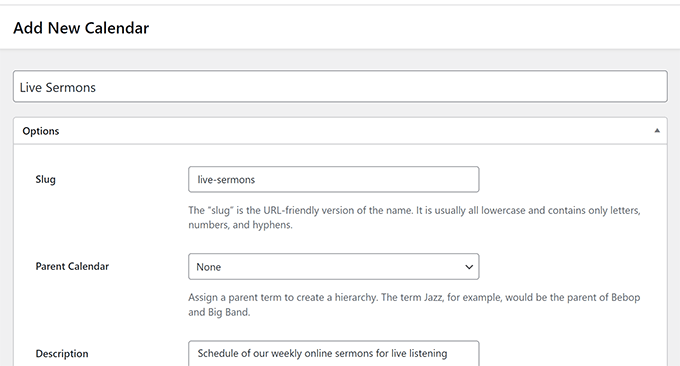
After that, you can add a short description for your calendar and choose a color.
When you’re happy with the information you’ve entered, click the ‘Add New Calendar’ button to save your changes.
Now you have a calendar, go to Sugar Calendar » Add New to create your first event.
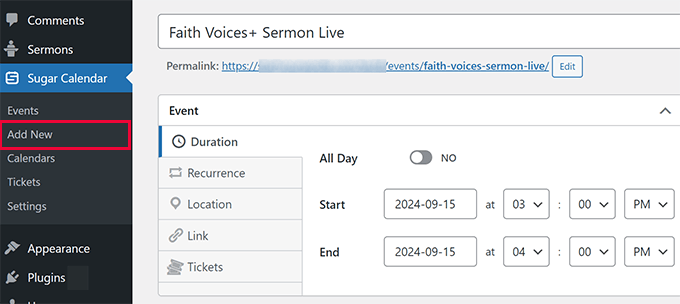
You need to provide a title for your event and set the date and time.
If the event happens regularly, switch to the ‘Recurrence’ tab and tell Sugar Calendar how often it repeats.
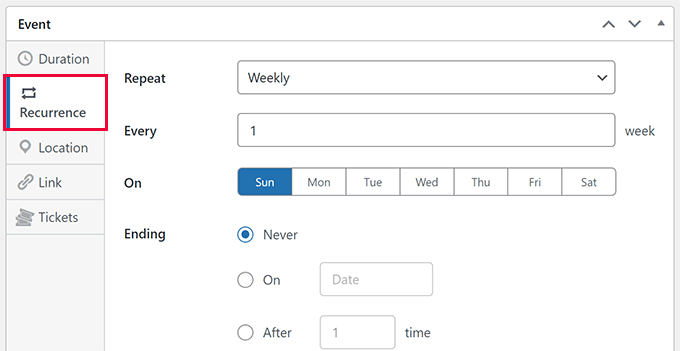
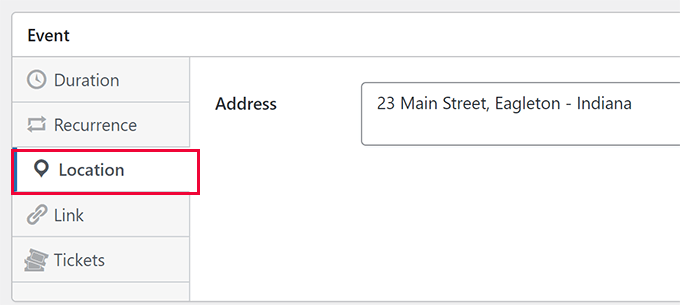
If the event is an in-person gathering, then you can switch to the ‘Location’ tab and enter the address.
If it’s an online event, then just leave the address field blank.
Next, switch to the ‘Link’ tab and add the link to the event page on your website.
Alternatively, you can link to the streaming platform you’re using, such as Restream, Facebook Live, or YouTube Live.
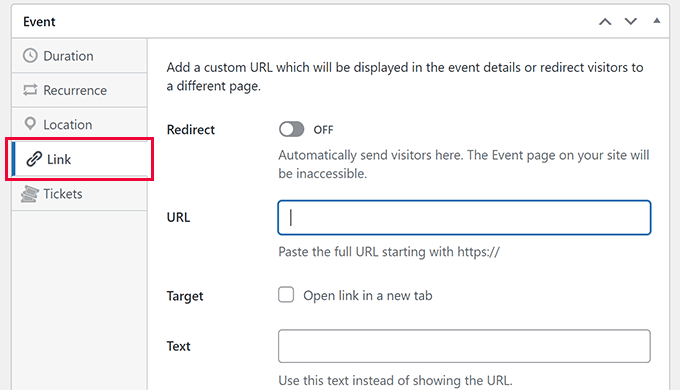
You can also add a general link here if you want to redirect users to a specific page.
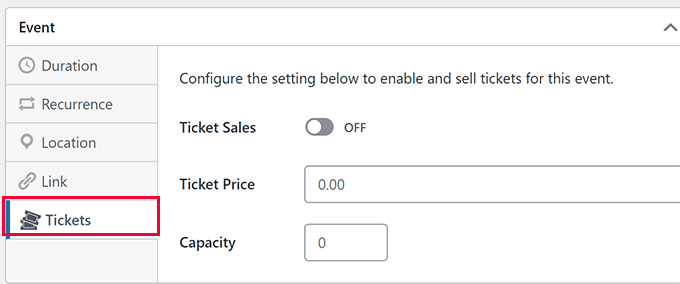
If you’re selling tickets for the event, you can add those details in the ‘Tickets’ tab. For example, you might sell tickets to raise funds for a local charity.
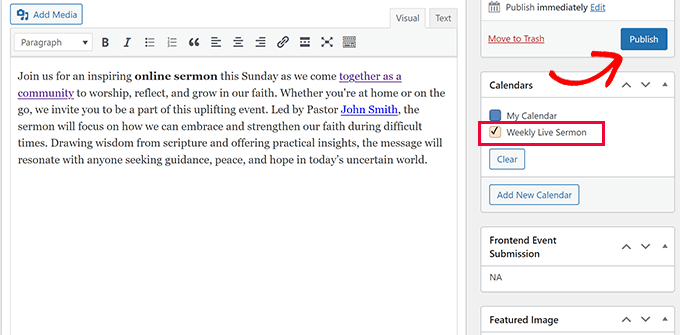
After configuring event settings, you can add all the important information about the event. You can add as much information as you like, including links, images, and rich text, to make it more engaging and helpful.
Finally, select the calendar where you want to add the event, and then click ‘Publish’ to make your event live.
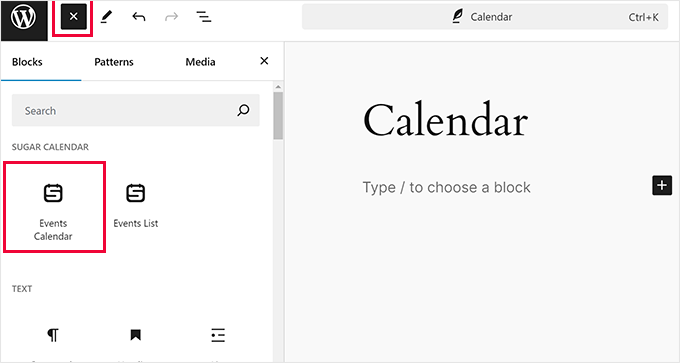
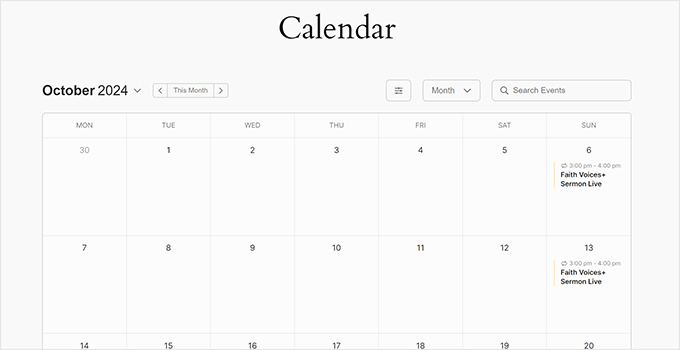
To display church events on your website, simply edit the post or page where you want to display the calendar.
While editing the page, click the ‘+’ icon to add a new block and search for the ‘Events Calendar’ block. You can then add this block to the page or post.
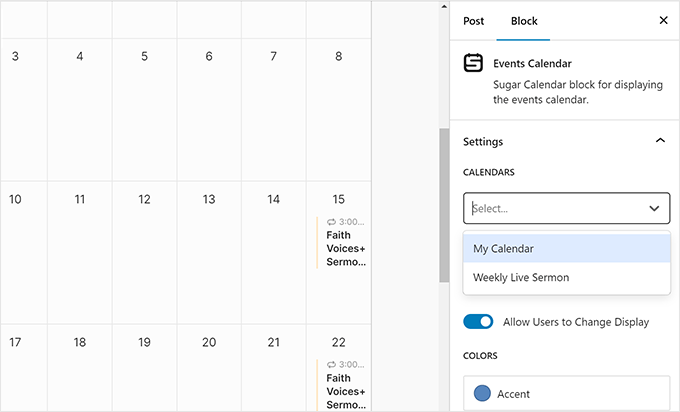
Sugar Calendar will show a live preview of your calendars and events right in the editor.
If you have multiple calendars, then you can choose to display events from a specific calendar.
Once you’re happy with how everything is set up, click the ‘Save’ or ‘Publish’ button to make the calendar live.
That’s it! Now you can visit your website and see your church events calendar live, making it super easy for everyone to stay informed and connected.
Bonus Resources:
Looking for more ways to enhance your online presence and connect with your community? Here are some resources that other churches, religious organizations, and non-profit websites have found really useful:
- Best Church Website Builders (Easy for Beginners)
- Best Church WordPress Themes for Your Church
- How to Create Peer-to-Peer Fundraising in WordPress (Step by Step)
- Ultimate Guide to Creating a WordPress Membership Site
- How to Create Your Own Private Community with WordPress
We hope this article helped you learn how to record sermons. You may also want to check out our guide on how to accept online donations or how to sell event tickets in WordPress.
If you liked this article, then please subscribe to our YouTube Channel for WordPress video tutorials. You can also find us on Twitter and Facebook.


Dennis Muthomi
As a volunteer at my church I found the equipment recommendations super useful. We recently set up a similar setup with Audacity and PodBean and it’s made a big difference in reaching our congregation especially those who can’t make it in person. One other tip we’ve found is that creating short sermon snippets for social media has increased engagement and driven traffic to our full sermons online.
David
This was a great tutorial, we did this for our church a couple of years ago!
WPBeginner Support
Thank you, we hope our article can be helpful for those looking to do the same
Admin
Mikail
Pastors will appreciate this Tutorial a lot
WPBeginner Support
Glad you feel our guide will be helpful
Admin