Your WordPress website may be hiding user data that can be used to improve its performance and achieve your goals. For example, this information may help you optimize your site, personalize your content, and boost user engagement.
We find that many site owners are unaware of the valuable insights they can gain from this data, which can help in making informed decisions.
This article will walk you through simple hacks to uncover hidden WordPress user data. Following these tips will let you unlock valuable information and make the most of your WordPress website.

Why Look For Hidden WordPress User Data?
If you run a small business website, then knowing your customers is essential for making smart business growth decisions.
Finding hidden WordPress user data helps you make data-driven decisions to offer a better customer experience and improve your sales funnels.
For instance, if you have a WordPress registration form, then you may want to know the user’s geographic location, which page or platform they came from, their IP address, and more.
Similarly, if you run an online store, then you may want to track customers to see which products they added to the cart but didn’t buy at the checkout. You can then follow up with an email to nudge them into making a purchase.
There are many other scenarios where you can easily find hidden user data and use it to grow your business.
That being said, let’s take a look at some of the hacks that you can use to locate the hidden WordPress user data.
Here is a quick list of hacks we will cover in this guide.
- Unlock User Data Tracking with MonsterInsights
- Enable Demographics and Interest Tracking in Google Analytics
- Track GeoLocation in WordPress Lead Forms
- Find User IP Address in WordPress Forms
- Track Logged in User Data in WordPress Forms
- Track Form Page or Post in WordPress
- Track User Journey in WordPress Sign-Up Forms
- Find Partially Filled WordPress Form Data
- Track Outgoing WordPress Email Log
- Track User Journey on Membership Sites
- Bonus Tips: Taking User Insights Further
1. Unlock User Data Tracking with MonsterInsights
MonsterInsights is the best Google Analytics plugin for WordPress. It allows you to see where your users are coming from, which pages they view, and how they use your website.
Simply put, it helps you see the stats that matter.
First, you need to install and activate the MonsterInsights plugin. For more details, see our step-by-step guide on how to install a WordPress plugin.
Then, you can see our guide on how to install Google Analytics in WordPress.
After setting up MonsterInsights, you can view important website traffic data by visiting the Insights » Reports page.
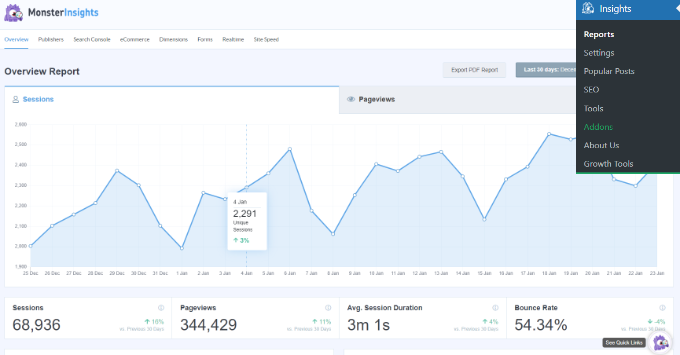
By default, MonsterInsights helps you unlock a wealth of information about your users and how they interact with your website.
It is also the best tool for conversion tracking in WordPress. You can use it to track conversions on your eCommerce platform, monitor form submissions on your website, track categories, authors, ads, and more.
For more details, see our complete conversion tracking guide for WordPress users.
2. Enable Demographics and Interest Tracking in Google Analytics
MonsterInsights also allows you to easily track user demographics and interest information for retargeting campaigns.
Note: Demographics and interest-based tracking are subject to privacy and cookie laws in different regions. For example, sites with visitors from Europe need to comply with the GDPR. Please check your target region’s laws and requirements before using this feature.
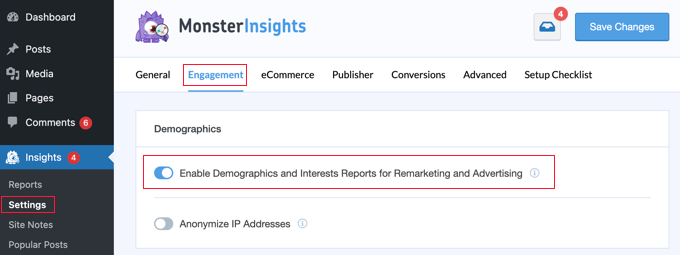
First, you need to visit the Insights » Settings page in WordPress admin. From here, you need to switch to the Engagement tab and turn on the ‘Demographics and Interest Reports’ option.
Next, you need to visit your Google Analytics account dashboard.
Once there, you should click on the Admin gear in the lower left corner.
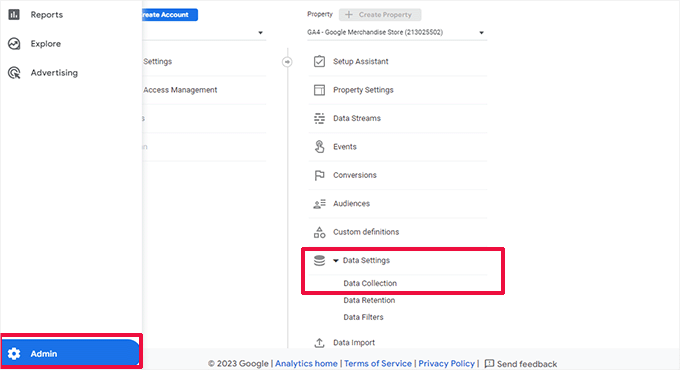
Next, under the property column, click on Data Settings » Data Collection menu.
This will slide open the Data Collection page. From here, you need to turn on the ‘Google signals data collection’ option.
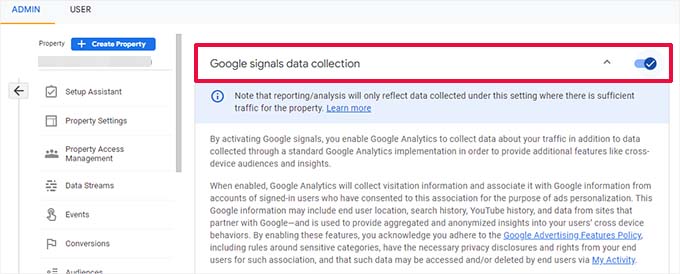
Google Analytics will now start collecting demographic data for your website visitors.
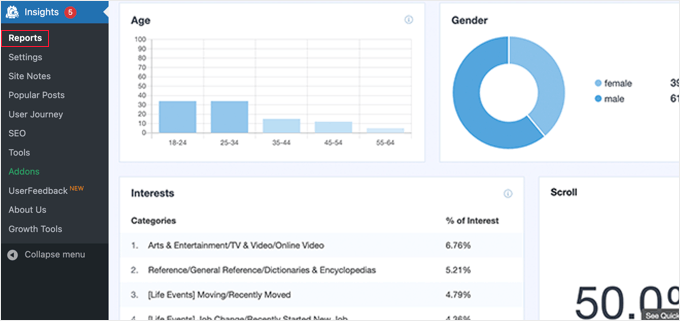
After that, you can view this data inside your WordPress dashboard by visiting the Insights » Reports page and switching to the ‘Publisher’ tab. Scroll down to the bottom and you will see Age, Gender, and Interests reports.
3. Track Geolocation in WordPress Lead Forms
Geolocation data allows you to see a user’s geographic region when they submit a form. This enables you to offer a personalized user experience, target users in that particular region, and make other important decisions.
To track Geolocation data, you need to use the WPForms plugin. It is the best WordPress form builder plugin and lets you create any type of WordPress form using a simple drag-and-drop tool.
First, you need to install and activate the WPForms plugin. For more details, see our step-by-step guide on how to install a WordPress plugin.
Note: You will need at least the Pro plan of the plugin to access GeoLocation data.
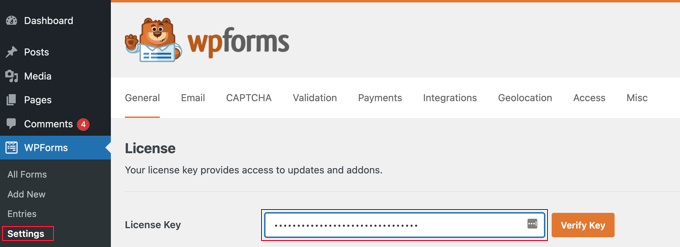
Upon activation, you need to visit the WPForms » Settings page to enter your license key. You can find this information in your account on the WPForms website.
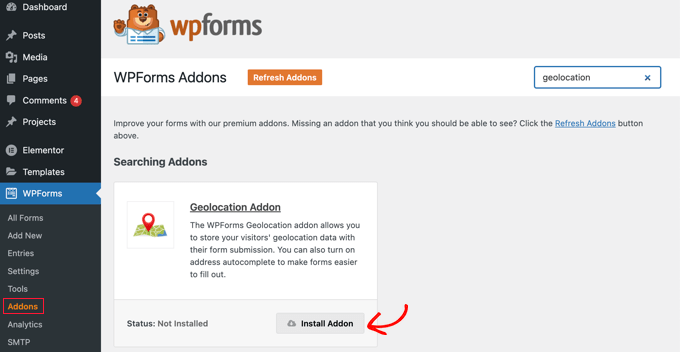
Next, you need to visit the WPForms » Addons page.
From here, you need to locate the GeoLocation Addon and then click on the ‘Install Addon’ button to activate it.
WPForms will install and activate the addon for you.
You can now go ahead and create your first form by visiting the WPForms » Add New page. You’ll be asked to provide a name for your form and choose a form template.
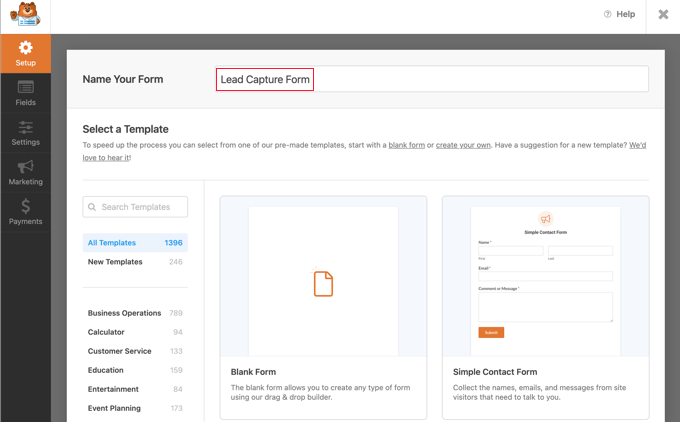
WPForms comes with over 1300+ templates, including contact forms, request quote forms, newsletter signup forms, and more. A template is just a pre-built form that makes it easier to create new forms more quickly.
Choosing your template will launch the WPForms’ form builder interface. On the right, you’ll see pre-loaded form fields based on the template you choose. You can add new fields from the column on your left side.
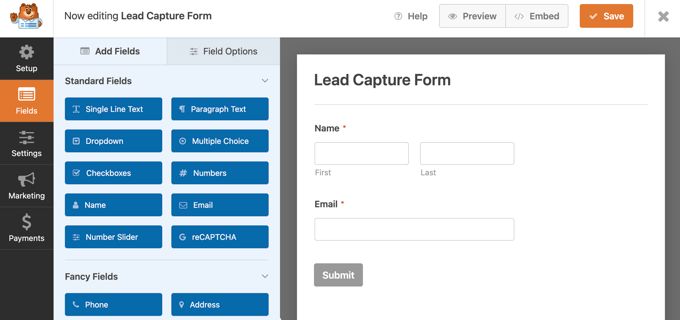
You can simply edit fields by clicking on them and move fields using drag-and-drop. Once you are done, you can click on the ‘Save’ button at the top to publish your form.
Next, you need to add the form to your website. WPForms makes it super easy to add your forms anywhere on your website.
Simply edit the post or page where you want to add the form and click on the (+) add new block button. Locate the WPForms block and add it to your post.
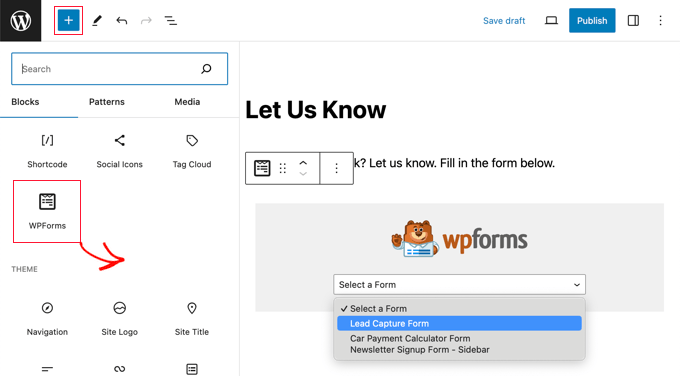
From block settings, simply select the form you created earlier. You can now save your post or page and view your form in action.
For more details, see our guide on how to add a contact form in WordPress.
Once you have added a form to your website, you can view form entries by visiting the WPForms » Entries page and clicking on your form name to view entries.
On the Entries page, click on the ‘View’ link next to any entry to view its details.
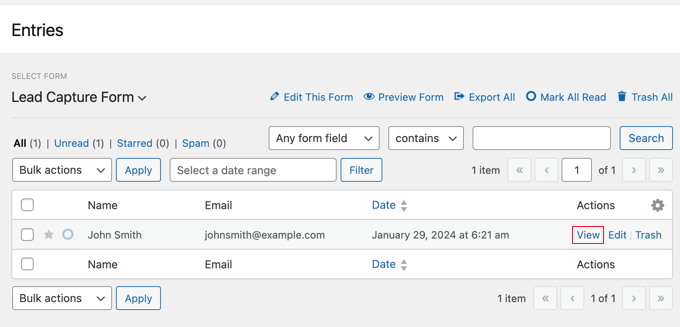
This will display the entry details page.
You will see a box with the user’s geographic location marked on the map.
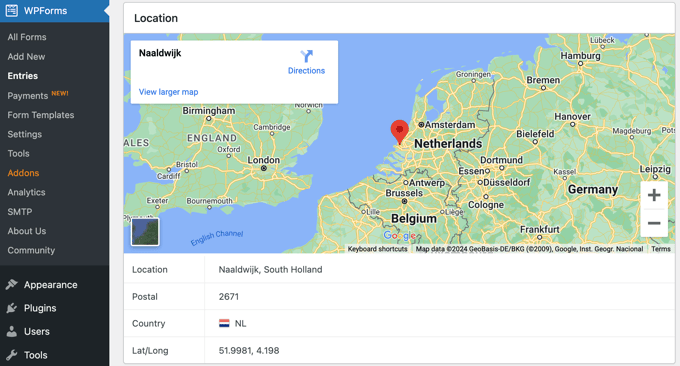
You can see our ultimate guide to geolocation targeting in WordPress for more information.
4. Find User IP Address in WordPress Forms
Another important user data point is the IP address. Each user visiting your website has a unique IP address assigned to them by their internet service provider.
You can use IP address information to match data to a real user, prevent spam, block suspicious activities, and more.
WPForms comes with a hidden field feature that allows you to add information to WordPress forms and store it when a user hits the submit button.
Simply, create a new form or edit an existing form and then add the ‘Hidden Field’ to your form.
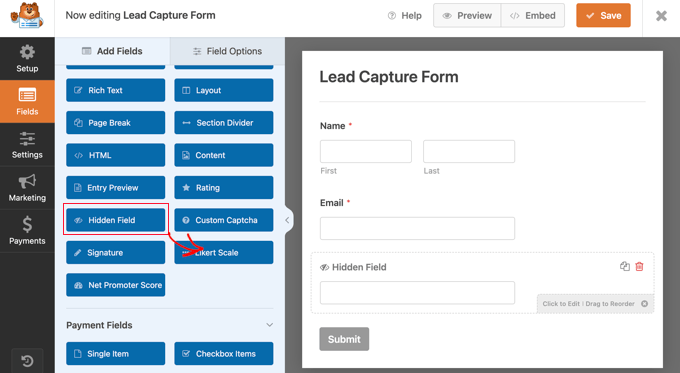
Next, you need to click on the Hidden Field in the form preview to edit it.
After that, you need to switch to the Advanced tab and click on the ‘Show Smart Tags’ option next to the Default value setting.
Smart tags allow you to embed data as the default value for form fields. You need to select ‘User IP Address’ here and then save your changes.
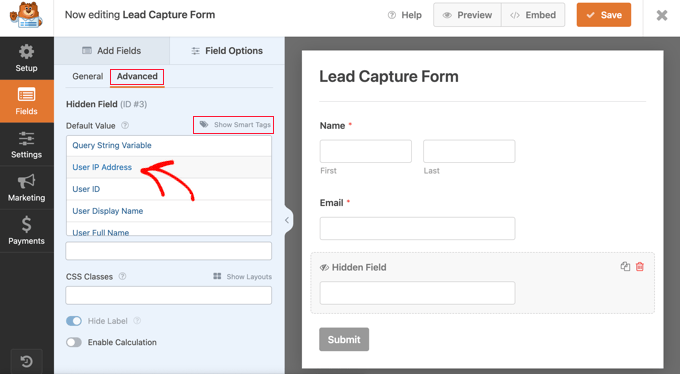
You can now save and add your form to a post or page. From now on, whenever a user submits this form, it will automatically store their IP address as the Hidden Field, and you can view it in your form entries.
There are a few other places you can view the IP addresses of your WordPress visitors. For example, you can also see them in the IP logs of your WordPress hosting provider, in your WordPress firewall plugin, and in several other plugins as well.
5. Track Logged in User Data in WordPress Forms
Another common scenario is when you want to associate a form entry with existing users on your website. This comes in handy if you are running a survey on a membership website.
Another example could be a form on an eCommerce store like a request a quote form.
The Smart Tags feature in WPForms allows you to automatically add logged-in user data to your form. This includes the user ID, user name, business email address, and more.
This data can also be helpful in streamlining your customer support workflows so that your team has user insights without asking the user to fill out the same information every time.
You can use the hidden fields feature in WPForms to associate any user data with a hidden field.
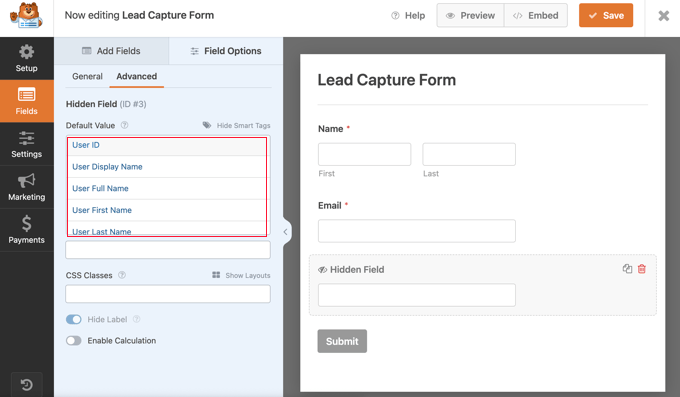
You can now save and add your form to a post or page. When a user submits this form, it will automatically store selected logged-in user data as hidden fields, and you can view it in your form entries.
6. Track Form Page or Post in WordPress
Many business owners have multiple landing pages for different campaigns, products, and services.
WPForms allows you to use the same form on different pages and still easily track which post or page brought you a lead or signup.
Simply add a hidden field to your form and select from the ‘Embedded Post/Page’ values. You can add the post or page name, URL, or ID.
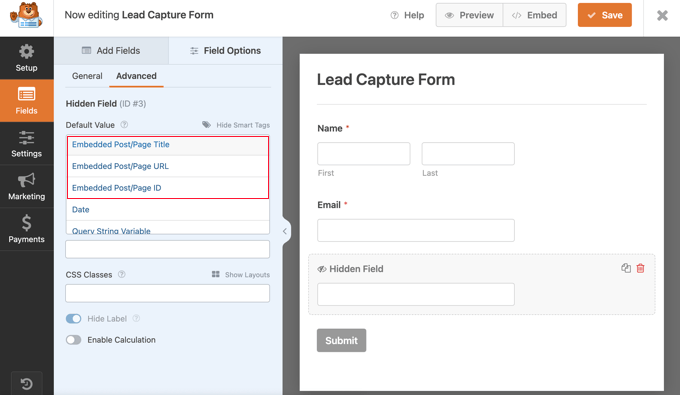
Now you can see which page or post generated a form submission while still being able to use the same form on multiple pages.
However, this does not tell you the steps the user took to reach that page, which brings us to our next hack.
7. Track User Journey in WordPress Sign-Up Forms
Wouldn’t it be nice if you could see the steps users take on your website before they actually fill out a form?
Once you find out what compels users to fill out forms on your website, then you can replicate this journey to generate more leads and grow your business.
WPForms makes it super-easy to track this user data with their User Journey Addon. Simply go to the WPForms » Addons page and install and activate the User Journey Addon.
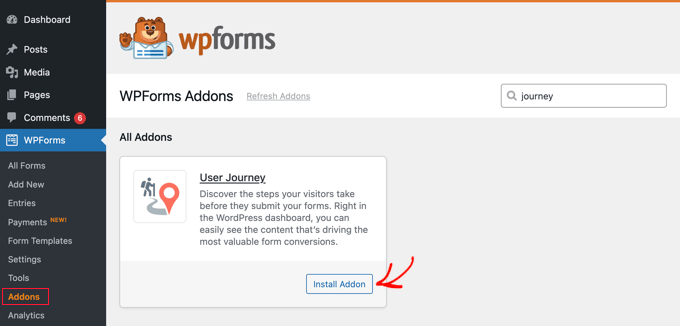
After activating the addon, WPForms will start tracking the user journey for your forms.
You can view it by visiting the Entries page and viewing a form submission.
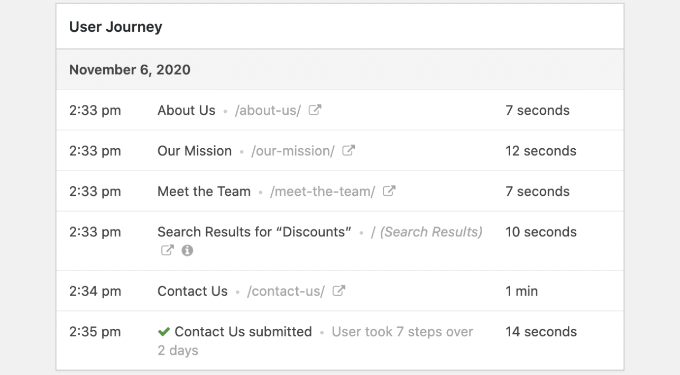
For more details, see our guide on how to track the user journey for your WordPress forms.
8. Find Partially Filled WordPress Form Data
A lot of folks who visit your website may not fill in a form on your site. Others might start filling it in but decide not to submit it.
This causes you to lose leads and potentially sales.
Wouldn’t it be great if you could reach out to those users and see what prevented them from signing up or filling out a form?
WPForms allows you to track those entries with their Form Abandonment addon. Simply go to the WPForms » Addons page and install the Form Abandonment Addon.
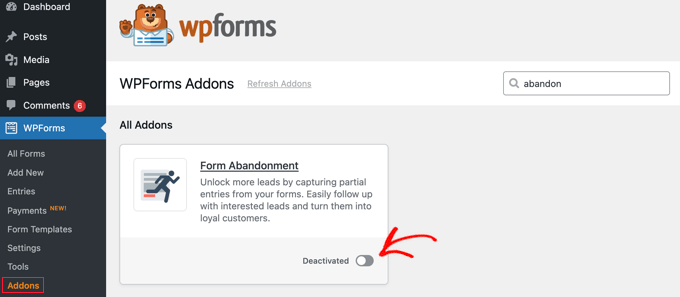
You need to install or activate the addon. After that, you can create a new form or edit an existing form on your website.
On the form builder screen, switch to the Settings tab from the left column and then select the ‘Form Abandonment’ option.

From here, you can turn on the form abandonment feature for this particular form. Once that’s done, you can save your form and exit the builder interface.
You can now add this form to a post or page and it will start collecting abandoned form data.
You can view the form entries page and you’ll notice ‘Abandoned’ status next to the entries that were partially filled but not submitted. You can click on the ‘View’ link to see the data that was captured.
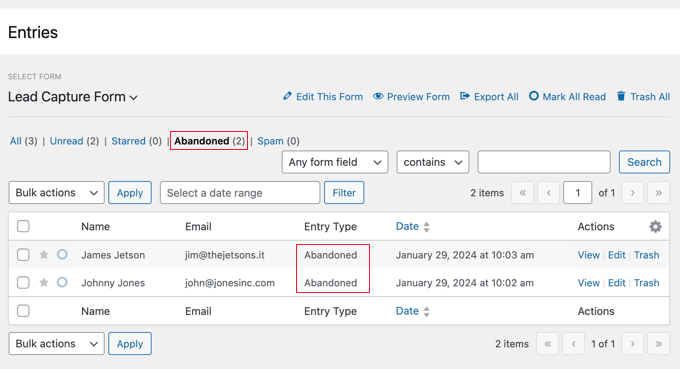
For more details, see our guide on how to track and reduce form abandonment in WordPress.
9. Track Outgoing WordPress Email Log
Your WordPress website needs to send email notifications for different things, such as when a new user signs up, a user requests a password reset, a customer places a new order, and more.
Wouldn’t it be nice to have a record of emails sent by your WordPress site? This can help you track user activity and may unlock hidden WordPress data that you didn’t have access to.
For this, you will need the WP Mail SMTP plugin. It is the best WordPress SMTP plugin that allows you to use any SMTP service to improve the deliverability of your WordPress emails.
For more details, see our guide on how to install and set up WP Mail SMTP in WordPress.
Once you have set up the plugin you can turn on the email logs functionality by visiting the WP Mail SMTP » Settings page and switching to the ‘Email Log’ tab.
Then, simply tick the box next to ‘Enable Log’ and click the ‘Save Settings’ button.
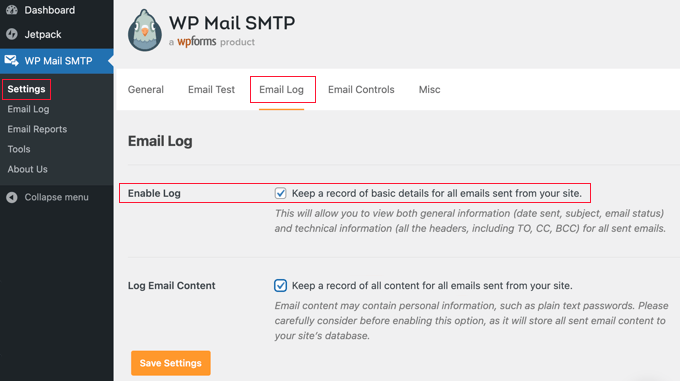
To view the emails, you can simply go to the WP Mail SMTP » Email Log page.
You’ll see a list of emails the plugin has logged since you enabled the logs.
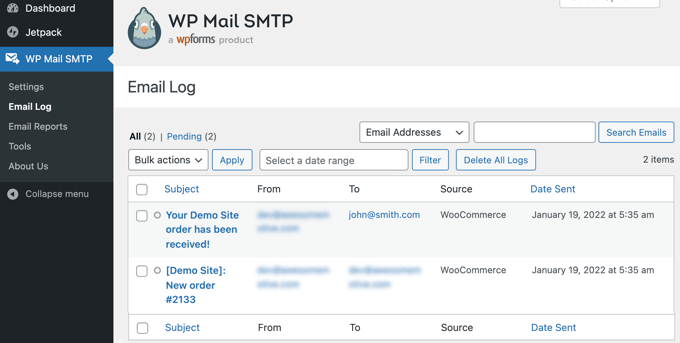
You can click on any email to view the email details and data you choose to keep depending on your settings.
For more information, see our article on how to set up WordPress email logs.
10. Track User Journey on Membership Sites
You can also discover the steps visitors take on your membership website before they decide to purchase a membership. This information can help you improve user engagement and increase conversions.
MonsterInsights offers a User Journey addon that makes it simple to track the path your visitors take to making a purchase. You can install the addon by visiting the Insights » Addons page from your WordPress admin panel.
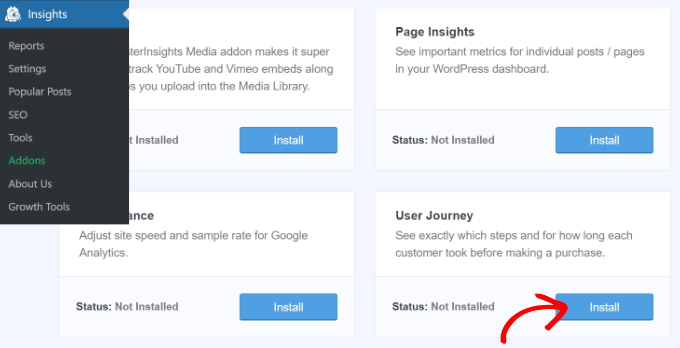
The addon is activated automatically and starts to track your customers’ journeys right away. This information will be recorded for you whenever a visitor purchases a membership on your site.
If you are using the MemberPress membership plugin, then you can view this information by navigating to MemberPress » Transactions. here, you need to click on a transaction. When you scroll to the bottom of the page you will find the journey that the customer took before making the purchase.
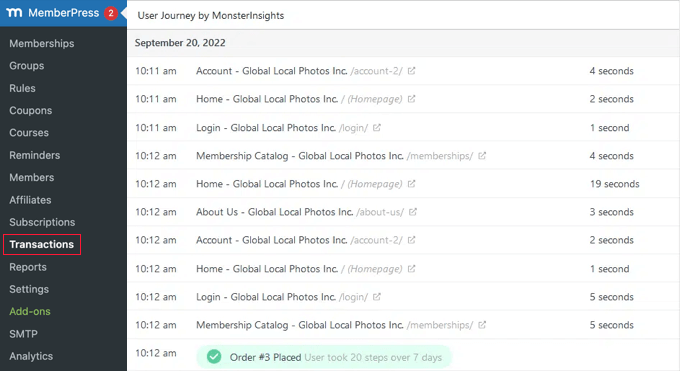
You will find detailed instructions on how to install the addon in our guide on how to track the customer journey using MemberPress, as well as hints on how to use customer journey information to optimize your website.
Bonus Tips: Taking User Insights Further
The above methods are just scratching the surface. For membership sites, online stores, and other user-driven websites, the possibilities are endless.
For example, you can use the dynamic field population feature that comes with many form solutions to add helpful insights to streamline your workflow.
This feature can automatically capture all sorts of information about a user and save it in the form, including information in their social media profiles and public databases, as well as information they entered in previous form submissions.
You can also use Smart Tags and APIs in solutions like OptinMonster to show personalized content to different users.
If you are using smart email marketing software like Drip, or push notification software like PushEngage, then these tools also come with automated segmentation features using hidden user data.
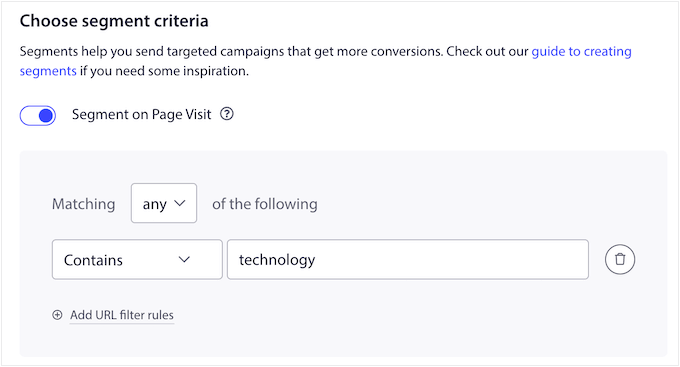
For example, you can automatically create user segments based on specific pages that your users visit and start drip automation push messages.
Lastly, you can connect various WordPress plugins and allow them to talk to each other by using Uncanny Automator. For example, you can automatically add someone to your email list when they fill in a form or connect an online form with your WooCommerce store.
This will help you further streamline your workflows by utilizing hidden user insights.
For more details, see our guide on how to create automated workflows in WordPress with Uncanny Automator.
We hope this article provided you with some useful hacks to find hidden WordPress user data on your website. You may also want to see our guide on how to track and reduce form abandonment in WordPress or our expert pick of the best WordPress conditional logic plugins.
If you liked this article, then please subscribe to our YouTube Channel for WordPress video tutorials. You can also find us on Twitter and Facebook.


Dennis Muthomi
I found this article really eye-opening! I had no clue that I can do this in WordPress.
This is why I love reading WPBeginner’s guides related to WordPress, you guys are the best!
The WPForms geolocation addon sounds particularly useful – there were quite a few things in this post I wasn’t aware of.
thanks for these gems mate
WPBeginner Support
Glad our guide was helpful!
Admin
Jiří Vaněk
Thank you for your time with WPForms. I had no idea that I could track the user’s journey like this. I have paid WPForm and I have a contact form in it. I’m going to wonder about this setup.
Linden Thorp
This is great! Very helpful and well-deigned article. Thank you.
WPBeginner Support
Glad you found our tips helpful
Admin
Mohammed Yousuf Jamal
I never knew these things. Great stuff mate!!
WPBeginner Support
Glad you found our recommendations helpful
Admin