Organizing your WordPress content is easy with categories and tags. But through years of building WordPress sites, we’ve learned that the default categories and tags aren’t always enough to create the perfect content structure.
That’s where custom taxonomies come in. With custom taxonomies, you can create your own ways to sort and group content.
We’ve used them to organize everything from recipe ingredients to real estate listings, and they provide incredible control and flexibility over how your posts, products, or any other content are categorized.
In this guide, we’ll walk you through how to create custom taxonomies in WordPress, whether you use a plugin or prefer to do it manually.
What is a WordPress Taxonomy?
A WordPress taxonomy is a way to organize groups of posts and custom post types.
By default, WordPress comes with 2 taxonomies called categories and tags. You can use them to organize your blog posts.
However, if you use a custom post type, then categories and tags may not look suitable for all content.
For instance, you can create a custom post type called ‘Books’ and sort it using a custom taxonomy called ‘Topics.’ Then, you can add topic terms like ‘Adventure,’ ‘Romance,’ ‘Horror,’ and other book topics you want.
This would allow you and your readers to easily sort and filter books by each topic.
Taxonomies can also be hierarchical, meaning that you can have main or parent topics like ‘Fiction’ and ‘Nonfiction.’ Then, you’d have subtopics, or children, under each category.
For example, the parent category ‘Fiction’ could have ‘Adventure,’ ‘Romance,’ and ‘Horror’ as children.
Now that you know what a custom taxonomy is, let’s learn how to create custom taxonomies in WordPress.
While creating custom taxonomies is powerful, there’s a lot to cover. To help you set this up properly, we have created an easy table of contents below:
Ready? Let’s get started!
Creating Custom Taxonomies With A Plugin (The Easy Way)
The first thing you need to do is install and activate the Custom Post Type UI plugin. For details, see our guide on how to install a WordPress plugin.
In this tutorial, we’ve already created a custom post type and called it ‘Books.’ So make sure you have a custom post type created before you begin creating your taxonomies.
Next, let’s head over to CPT UI » Add/Edit Taxonomies in the WordPress admin area to create your first taxonomy.
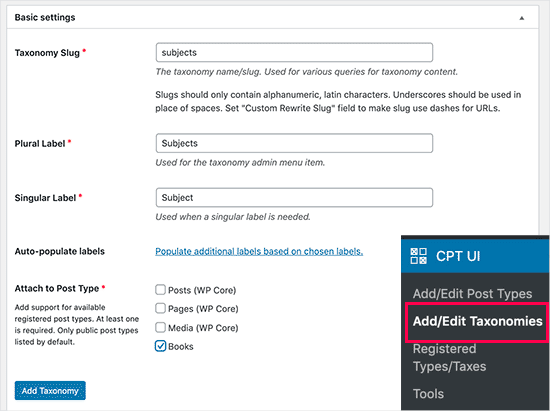
On this screen, you will need to do the following:
- Create your taxonomy slug (this will go in your URL)
- Create the plural label
- Create the singular label
- Auto-populate labels
Your first step is to create a slug for the taxonomy to use in the URL and in WordPress search queries. Do note that a slug can only contain letters and numbers, and it will automatically be converted to lowercase letters.
Next, you will fill in the plural and singular names for your custom taxonomy.
From there, you have the option to click on the link ‘Populate additional labels based on chosen labels.’ If you do this, then the plugin will auto-fill in the rest of the label fields for you.
Now, you can scroll down to the ‘Additional Labels’ section.
In this area, you can provide a description of your post type.
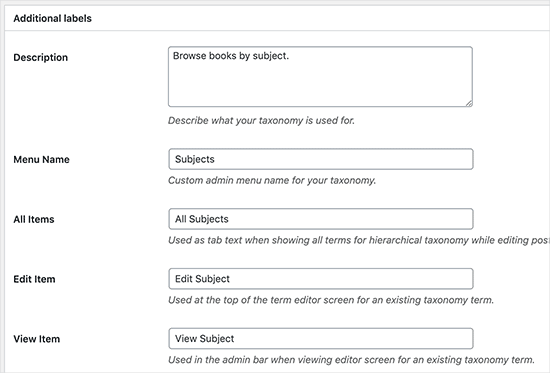
These labels are used in your WordPress dashboard when you edit and manage content for that particular custom taxonomy.
Next up, we have the settings option. In this area, you can set up different attributes for each taxonomy you create. Each option has a description detailing what it does.
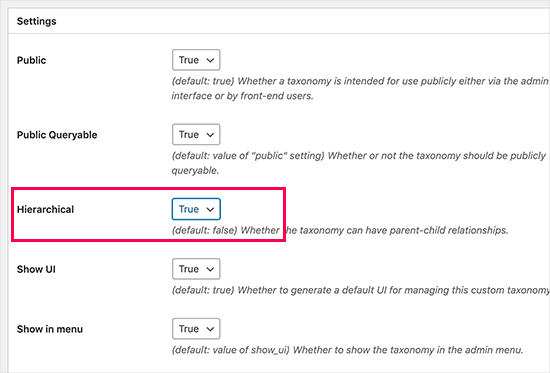
In the screenshot above, you’ll see we chose to make this taxonomy hierarchical.
This means our taxonomy ‘Subjects’ can have sub-topics. For instance, a subject called ‘Fiction’ can have sub-topics like ‘Fantasy,’ ‘Thriller,’ ‘Mystery,’ and more.
There are many other settings further down your screen in your WordPress dashboard, but you can leave them as-is for this tutorial.
You can now click on the ‘Add Taxonomy’ button at the bottom to save your custom taxonomy.
After that, you can edit the post type associated with this taxonomy in the WordPress content editor to start using it.
Creating Custom Taxonomies Manually (with Code)
This method requires you to add code to your WordPress website. If you have not done it before, then we recommend reading our guide on how to easily add code snippets in WordPress.
We don’t recommend directly editing your WordPress files because any tiny mistake can break your entire site. That’s why we recommend that everyone use WPCode, the easiest and safest code snippet plugin available.
To begin, you will need to install and activate the free WPCode plugin. For detailed instructions, see our step-by-step guide on how to install a WordPress plugin.
1. Creating a Hierarchical Taxonomy
Let’s start with a hierarchical taxonomy that works like categories and can have parent and child terms.
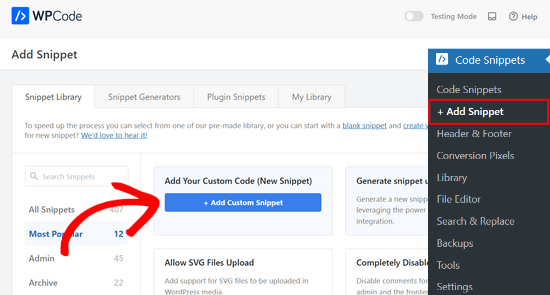
Once you’ve installed and activated WPCode, you can navigate to Code Snippets » + Add Snippet in your WordPress dashboard.
From here, you can hover your mouse over ‘Add Your Custom Code (New Snippet)’ and click the ‘+ Add Custom Snippet’ button.
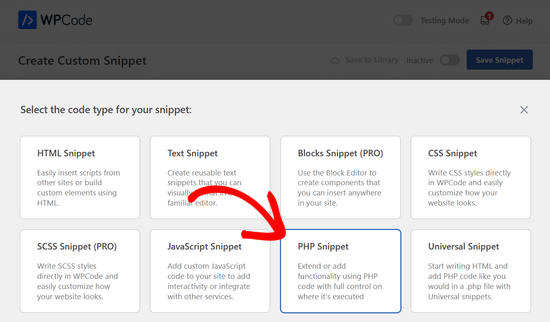
Then, you need to select a code type from the list of options that appear on the screen.
For this tutorial, choose ‘PHP Snippet.’
Next, you will be taken to the ‘Create Custom Snippet’ page.
Start by entering a name your new code snippet, which can be anything to help you remember what the code is for.
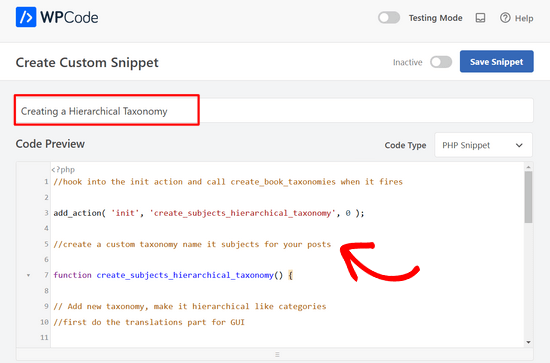
After that, simply paste the following code into the ‘Code Preview’ area:
//hook into the init action and call create_book_taxonomies when it fires

add_action( 'init', 'create_subjects_hierarchical_taxonomy', 0 );

//create a custom taxonomy name it subjects for your posts

function create_subjects_hierarchical_taxonomy() {

// Add new taxonomy, make it hierarchical like categories
//first do the translations part for GUI

  $labels = array(
    'name' => _x( 'Subjects', 'taxonomy general name' ),
    'singular_name' => _x( 'Subject', 'taxonomy singular name' ),
    'search_items' =>  __( 'Search Subjects' ),
    'all_items' => __( 'All Subjects' ),
    'parent_item' => __( 'Parent Subject' ),
    'parent_item_colon' => __( 'Parent Subject:' ),
    'edit_item' => __( 'Edit Subject' ),
    'update_item' => __( 'Update Subject' ),
    'add_new_item' => __( 'Add New Subject' ),
    'new_item_name' => __( 'New Subject Name' ),
    'menu_name' => __( 'Subjects' ),
  );

// Now register the taxonomy
  register_taxonomy('subjects',array('books'), array(
    'hierarchical' => true,
    'labels' => $labels,
    'show_ui' => true,
    'show_in_rest' => true,
    'show_admin_column' => true,
    'query_var' => true,
    'rewrite' => array( 'slug' => 'subject' ),
  ));

}
Don’t forget to replace the taxonomy name and labels in the snippet with your own taxonomy labels. You will also notice that this taxonomy is associated with the Books post type. You’ll need to change that to whatever post type you want to use it with.
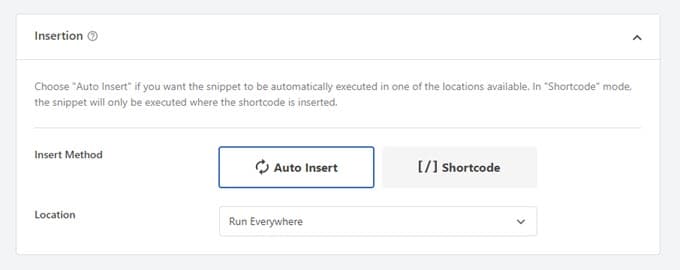
Next, you’ll want to scroll down and be sure that ‘Auto Insert’ and ‘Run Everywhere’ are selected in the Insertion box.
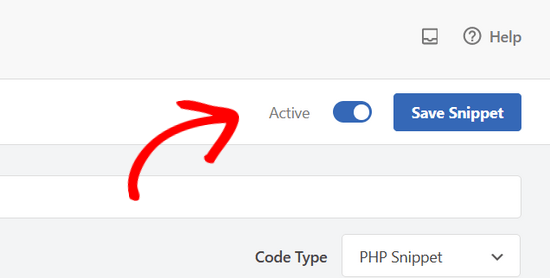
Now, you can scroll back up to the top of the page and toggle the switch from ‘Inactive’ to ‘Active.’
Lastly, go ahead and click the ‘Save Snippet’ button to push your changes live.
2. Creating a Non-hierarchical Taxonomy
To create a non-hierarchical custom taxonomy like tags, you will use WPCode and follow the exact same steps as above.
Only, you will use this code instead:
//hook into the init action and call create_topics_nonhierarchical_taxonomy when it fires

add_action( 'init', 'create_topics_nonhierarchical_taxonomy', 0 );

function create_topics_nonhierarchical_taxonomy() {

// Labels part for the GUI

  $labels = array(
    'name' => _x( 'Topics', 'taxonomy general name' ),
    'singular_name' => _x( 'Topic', 'taxonomy singular name' ),
    'search_items' =>  __( 'Search Topics' ),
    'popular_items' => __( 'Popular Topics' ),
    'all_items' => __( 'All Topics' ),
    'parent_item' => null,
    'parent_item_colon' => null,
    'edit_item' => __( 'Edit Topic' ),
    'update_item' => __( 'Update Topic' ),
    'add_new_item' => __( 'Add New Topic' ),
    'new_item_name' => __( 'New Topic Name' ),
    'separate_items_with_commas' => __( 'Separate topics with commas' ),
    'add_or_remove_items' => __( 'Add or remove topics' ),
    'choose_from_most_used' => __( 'Choose from the most used topics' ),
    'menu_name' => __( 'Topics' ),
  );

// Now register the non-hierarchical taxonomy like tag

  register_taxonomy('topics','books',array(
    'hierarchical' => false,
    'labels' => $labels,
    'show_ui' => true,
    'show_in_rest' => true,
    'show_admin_column' => true,
    'update_count_callback' => '_update_post_term_count',
    'query_var' => true,
    'rewrite' => array( 'slug' => 'topic' ),
  ));
}
Notice the difference between the 2 code snippets. Under the register_taxonomy() function, the value for the hierarchical argument is set to true for the category-like taxonomy and false for tags-like taxonomies.
Also, in the labels array for non-hierarchical taxonomies, we have added null for the parent_item and parent_item_colon arguments, which means that nothing will be shown in the UI to create a parent item or taxonomy that can have sub-topics.
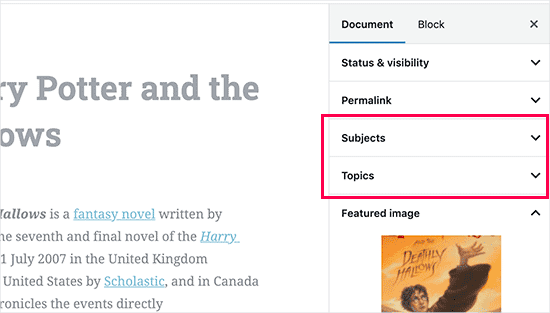
Again, be sure to edit the code to include your own custom taxonomy labels.
Displaying Custom Taxonomies
Now that we have created custom taxonomies and have added a few terms, your WordPress theme will still not display them.
To display them, you’ll need to add code to your WordPress theme or child theme. Specifically, this code must be added to template files where you want to display the terms.
You can manually add this snippet to your theme files, such as single.php, content.php, archive.php, or index.php. To figure out which file you need to edit, you can see our guide to WordPress template hierarchy for step-by-step instructions.
However, if not done correctly, this can break your site, so we once again recommend using the free WPCode plugin.
You will need to add the following code where you want to display the terms:
<?php the_terms( $post->ID, 'topics', 'Topics: ', ', ', ' ' ); ?>
Then, you can simply follow the steps above to paste the snippet into WPCode.
But under Insertion, you want to click the dropdown next to ‘Location’ and select where you want to display the taxonomy, such as before the post, after it, or even between paragraphs.
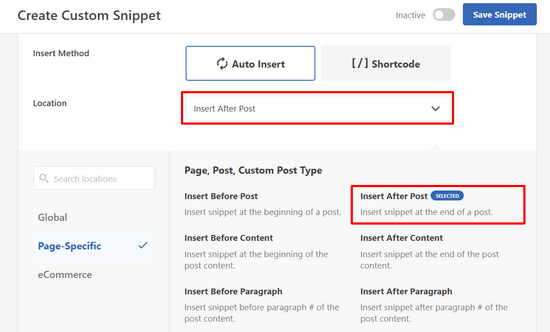
For this tutorial, we will select ‘Insert After Post.’
You can see in the image below how it will appear on your live site.

Adding Taxonomies For Custom Posts
Now that you know how to create custom taxonomies, let’s put them to use with an example.
We’re going to create a taxonomy and call it ‘Non-fiction.’ Since we have a custom post type named ‘Books,’ it’s similar to how you’d create a regular blog post.
In your WordPress dashboard, you can navigate to Books » Subjects to add a term or subject.
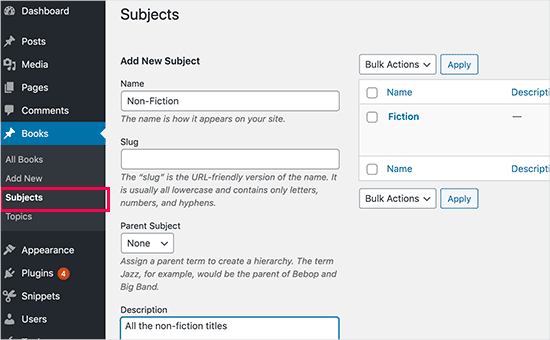
On this screen, you’ll see 4 areas:
- Name
- Slug
- Parent
- Description
In the name field, you’ll write out the term you want to add. You can skip the slug part and provide a description for this particular term.
Lastly, click the ‘Add New Subject’ button to create your new taxonomy.
Your newly added term should then appear in the right column.
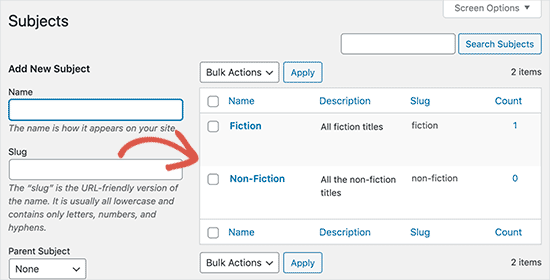
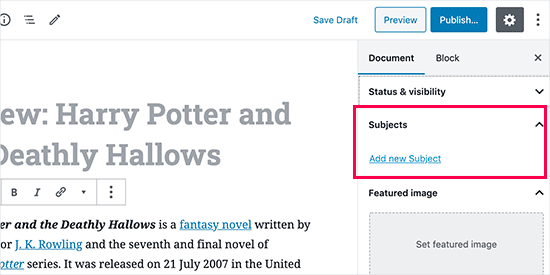
Now, you have a new term that you can use in your blog posts. You can also add terms directly while editing or writing content under that particular post type.
Simply go to Books » Add New to create a post.
In the post editor, you’ll find the option to select or create new terms from the right column.
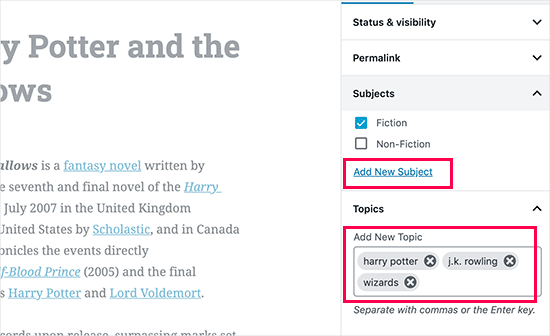
After adding terms, you can go ahead and publish that content.
All your posts filed under that term will be accessible on your website using their own URL. For instance, posts filed under the ‘Fiction’ subject would appear at the following URL:
https://example.com/subject/fiction/

Adding Custom Taxonomies to the Navigation Menu
Now that you have created custom taxonomies, you may want to display them in your website’s navigation menu.
You’ll want to head over to Appearance » Menus and select the terms you wish to add under your custom taxonomy tab that appears on the left side of the screen.
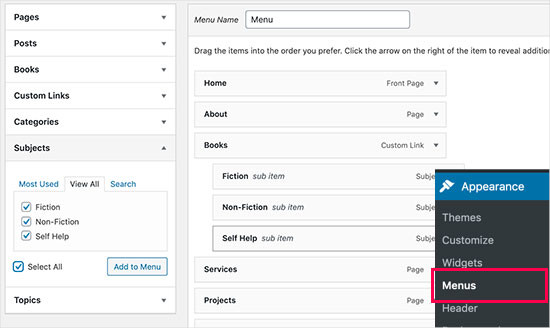
Don’t forget to click on the ‘Save Menu’ button to save your settings.
You can now visit your website to see your menu in action.

For more details, you can refer to our step-by-step guide on how to create a dropdown menu in WordPress.
Video Tutorial
If you prefer to watch and learn how to create custom taxonomies, check out our video tutorial:
Bonus: Take WordPress Taxonomies Further
Custom taxonomies allow you to do tons of things. For instance, you can show them in a sidebar widget or add image icons for each term.
You can also for custom taxonomies and allow users to subscribe to individual terms. That way, your readers will only receive updates about the specific content that matters to them.
If you want to customize the layout of your custom taxonomy pages, then you can check out SeedProd. It’s the best drag-and-drop WordPress page builder and theme builder that allows you to create custom layouts without any coding.
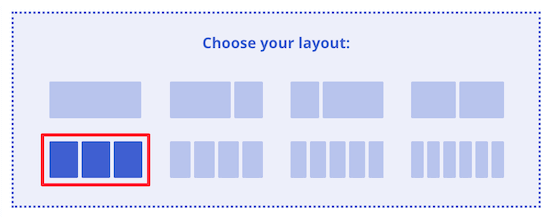
To learn more, you can check out our article on how to create a custom page in WordPress.
We hope this article helped you learn how to create custom taxonomies in WordPress. You may also want to see our guides on how to add taxonomy images (category icons) in WordPress and how to properly change, move, and delete WordPress categories.
If you liked this article, then please subscribe to our YouTube Channel for WordPress video tutorials. You can also find us on Twitter and Facebook.


Konstantin
Great plugin! You really help to solve my problem!!!
Jiří Vaněk
Thank you for the clear instructions. I would like to make my own taxonomy for tutorials on the site. This tutorial is great and clear, thanks.
WPBeginner Support
Glad it was helpful
Admin
Kira
Hello.
I don’t understand this part:
ID, ‘topics’, ‘Topics: ‘, ‘, ‘, ‘ ‘ ); ?>
I mean, should I paste exactly that part into my loop-single.php?
I’m using a taxonomy called “writer”
WPBeginner Support
It would depend on where you want to display the terms, normally it would be added to the single.php.
Admin
Wolfgang
Hi,
I used your article to create a CPT with a hierarchical and a non-hierarchical taxonomy attached to it. I created a few entries and it all seems to be working fine. Both taxonomies display fine in their respective archive pages. One thing I noticed though when I tried to add the taxonomies to the menu was that the non-hierarchical taxonomy was available in the “Add menu item” column but the hierarchical taxonomy was NOT.
Is that an expected behavior? If not what could be going wrong?
Thanks
WPBeginner Support
The most common issues you could check would be that you have published content in the taxonomy and you may want to test adding a different content type to test if it is an issue with the taxonomy or something else.
Admin
mb
what does this line do
‘menu_name’ => __( ‘Subjects’ ),
is this in order to add taxonomies to the menu
aditya
hii i try everything but i taxonomy not showing in product. please help me.
WPBeginner Support
You would want to check under your preferences to ensure it is not hidden for your user.
Admin
Gina Wilson
This tutorial and specifically the part of how to display the custom taxonomy was a lifesaver! I’m very much a beginner and this was very helpful in understanding where I went wrong in my coding.
Thank you!!!
WPBeginner Support
Glad our guide was helpful
Admin
fengquanli
this is very confident with the custom post ui, thanks very much ,it’s very useful for get them.
WPBeginner Support
Glad our guide was helpful
Admin
Bruno Oliveira
Awesome tutorial! i have one question. how do i use my new taxonomy slug as permalink like category (/%category%/%year%/%monthnum%/%day%/%postname%/)
I want something like /%custom_taxonomy%/%year%/%monthnum%/%day%/%postname%/
i keep getting 404 error
WPBeginner Support
That is not something WordPress would allow by default and would require some custom coding to set up.
Admin
vikas
i tried the plugin method , it sucessfully created a new category in custom post type but it is not showing on my posts like tags and other categoties. can you help me with that?
WPBeginner Support
You would want to reach out to the support for your specific theme for customizing the display to include your taxonomy.
Admin
Richard
I am creating a podcast network where I have multiple podcasts on a single site with episodes under each individual podcast. Would something like this work for that? I really don’t want to go the multi site route.
WPBeginner Support
You can certainly use this should you want or another option would be to create a custom post type depending on your preference.
Admin
Maria
Hello is possible add the custom taxonomies to a custom product type?
I create a custom product call drinks and i have several taxonomies like country, material and etc
I want when the user click in drinks then only apperas those taxonomies, is this posiible?
WPBeginner Support
You should be able to using the plugin method.
Admin
Parveen Kaushik
Hi,
Thanks for this article, I am getting 404 page after using this code, can you help me
WPBeginner Support
If you haven’t done so yet, resave your permalinks for the most common solution
Admin
Mike Smith
this code works great on my site for work. Can you tell me how to add the custom taxonomy into the site’s rss feed?
WPBeginner Support
It would depend on what you are looking for, for a starting point you would want to take a look at our article below:
https://www.wpbeginner.com/wp-tutorials/how-to-make-a-separate-rss-feed-for-each-custom-post-type-in-wordpress/
Admin
angela
thank you for taking the time to post this, this was the first site that actually explained this and it made sense, haha. im a happy camper now
WPBeginner Support
You’re welcome, glad our guide could help simplify the process
Admin
Jem
How to show custom taxonomy (checkbox list) in Post editor page like category and tag?
WPBeginner Support
It would depend on which method you used to create the custom taxonomy, if you’re using the plugin you would want to reach out to the plugin’s support to make sure they have show_in_rest set to true for seeing it in the block editor.
Admin
Jem
No, I am not using any plugin. I have just copy paste your snippet. Its create new taxonomy. But it is not display in post editor page like category, tags display on rightside panel.
Can you please guide me how can I show custom taxonomy in post editor page?
WPBeginner Support
In the register_taxonomy array, you would want to first try adding a new line with the code below:
‘show_in_rest’ => true,
Jim Gersetich
The first half of this post is completely useless. the Simple Taxonomy plugin doesn’t work with the current WordPress version, and it hasn’t been updated in four years.
Please try to find another plugin and change that section to go with the new one.
WPBeginner Support
Thank you for letting us know, we’ll certainly take a look at updating this article.
Admin