When you first start using WordPress, the admin area feels clean and simple. Everything is neatly arranged, and finding what you need is easy.
But as you install plugins, tweak settings, and grow your site, the dashboard evolves with you. New menus appear, widgets start stacking up, and suddenly, the tools you rely on every day are buried under extra options.
The good news is that with a few smart adjustments, you can keep everything streamlined and organized, making daily tasks easier and more efficient.
At the same time, security is just as important as usability. A well-organized dashboard helps you work faster, but a secure admin area keeps your site safe.
In this guide, we’ll share our best tips to improve and protect the WordPress admin area so it works for you—not against you.
Here is a quick overview of the tips we’ll share in this article:
- Why Improve the WordPress Admin Area?
- Customizing and Enhancing the WordPress Admin Area
- Change the Admin Color Scheme
- Create Custom Admin Color Schemes
- Set a Default Admin Color Scheme for All Users
- Use Admin Themes and Plugins
- Hide Unnecessary Items from the Admin Area
- Add Custom Links to the WordPress Toolbar
- Limit Dashboard Access in WordPress
- Explore the Secret Options Page in WordPress Admin
- Change the Admin Footer Text
- Add a Featured Image Column in the Admin Area
- Show or Hide WordPress Dashboard Widgets
- Add a Help Section in the WordPress Admin Area
- Remove WordPress.org Links from the Toolbar
- Securing the WordPress Admin Area
- Conclusion
Why Improve the WordPress Admin Area?
Let’s be honest. We all feel that the admin area in WordPress can get very messy over time as you install new plugins and tools and work on your website.
What starts as a clean intuitive interface soon has several menus, dashboard widgets, notifications, and other distracting elements.
It’s like working at a desk that started clean but is now buried under papers, coffee mugs, and sticky notes. You know everything is there somewhere. But digging through the clutter slows you down.
And it’s not just about efficiency. We have seen client sites with unused plugins, too many menus, and suspicious user accounts putting their data at risk.
The good news? You don’t need to overhaul everything to see a difference. With a few smart tweaks, you can take back control.
In the next sections, we’ll show you the best ways to customize and secure the WordPress admin area. These tips will help you work faster and keep your site safer.
Why Trust us?
Hi 👋, we are the editorial team at WPBeginner, the largest independent WordPress resource site. We have been teaching users how to make websites using WordPress since 2009. See our editorial process or take a look at our team.
Customizing and Enhancing the WordPress Admin Area
A well-organized admin area makes managing your website easier. The right tweaks can help you work faster, reduce distractions, and create a space that feels more like your own.
WordPress is flexible, and you can change how the dashboard looks and functions without touching code. Let’s start with something simple—customizing the admin color scheme.
1. Change the Admin Color Scheme
The default WordPress admin colors work fine, but they may not be the best fit for you. Some users prefer a darker look, while others like high-contrast colors that improve visibility.
WordPress includes a few built-in color schemes that let you personalize the dashboard. You can switch to a different one in just a few clicks.
How to Change the Admin Color Scheme
To change the admin color scheme, go to Users » Profile from the WordPress dashboard. You’ll see a section called Admin Color Scheme with several options.
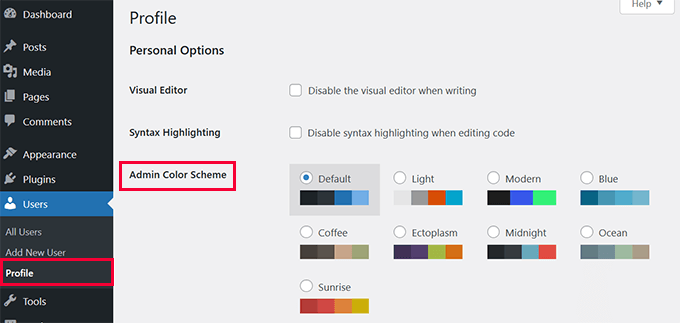
Click on any color scheme to preview it. Once you find one you like, scroll down and click Update Profile to save your changes.
If you manage multiple users, each person can choose their own color scheme. This is useful for teams that want a more personalized experience.
For more detailed instructions, take a look at our article on changing the admin color scheme in WordPress easily.
2. Create Custom Admin Color Schemes
The default WordPress admin color schemes are useful, but they may not match your branding or personal preference. If you want a unique look, you can create a custom admin color scheme.
Custom color schemes help make the WordPress dashboard feel more familiar. Whether you prefer a softer theme for better readability or a bold color palette to match your website, you have full control over the design.
How to Create a Custom Admin Color Scheme
The easiest way to generate a custom admin color scheme is by using WP Admin Colors. This free tool allows you to select colors for different elements of the WordPress dashboard and generates the necessary code.
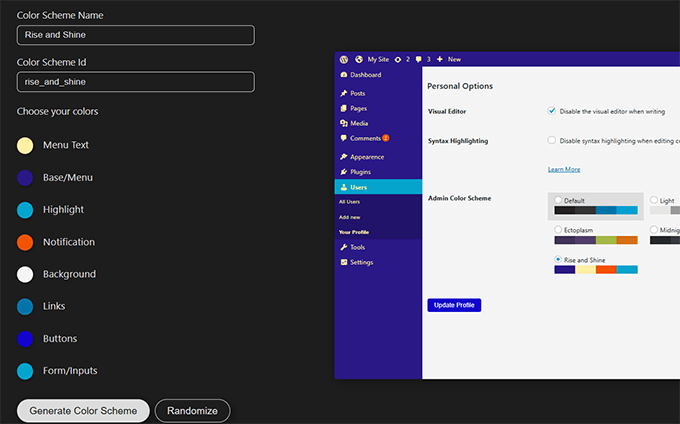
To get started, choose your preferred colors. Once you’re happy with the design, click the ‘Generate Color Scheme’ button, and the tool will generate custom code for you to add to your site.
Adding the Custom Admin Color Scheme to WordPress
Instead of editing theme files, the safest way to add custom code is by using the WPCode plugin.
💡Tip: WPCode also has a free version that will work for this tutorial. However, we recommend upgrading to the paid version to unlock extra features. See our WPCode review to learn more.
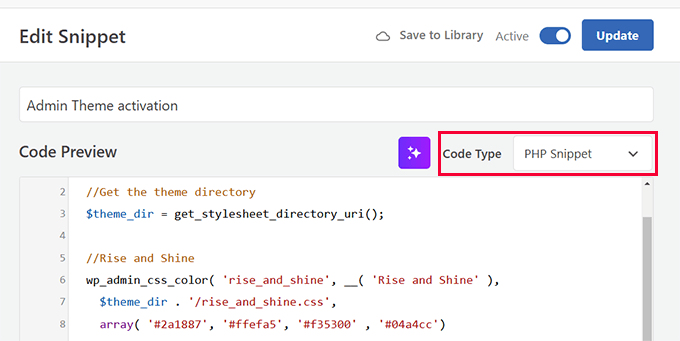
First, install and activate the WPCode plugin. Then, go to Code Snippets » Add Snippet and click on ‘Add Your Custom Code’.
Paste the PHP code by copying it from the WP Admin Colors website, and then select PHP as your code type.
Next, you need to add the CSS file to your website.
Switch back to the WP Admin Colors website and click the ‘Download’ button. This will download the CSS file to your computer.
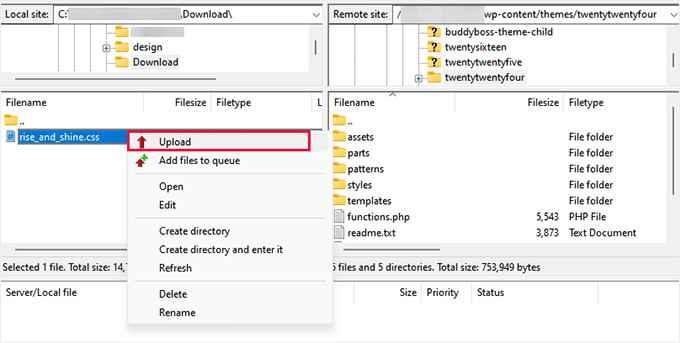
Next, connect to your website using an FTP client or the File Manager app in your hosting account control panel.
Once connected, you need to go to your current WordPress theme folder by navigating to the /wp-content/themes/your_theme_folder/ and uploading the file you downloaded earlier.
Finally, go to the Users » Profile page.
There, you will find your newly created custom admin color scheme. Select to choose it and then click the ‘Update Profile’ button to save your changes.
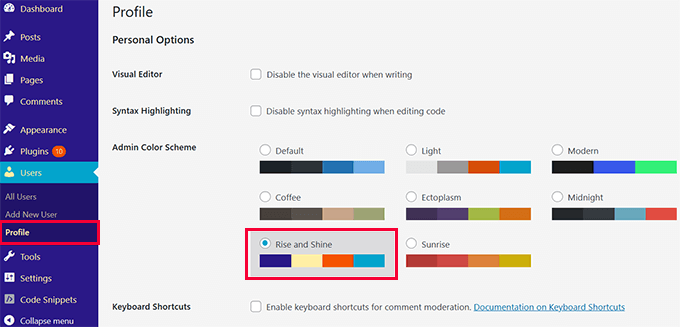
Once activated, your new admin color scheme will be applied to the WordPress dashboard.
For more detailed instructions, see our tutorial on creating custom WordPress admin color schemes.
Related: Learn how to apply CSS for specific user roles in WordPress.
3. Set a Default Admin Color Scheme for All Users
When multiple people manage a WordPress site, the admin area can start to feel inconsistent. Let’s say one user prefers a dark theme, another sticks with the default, and someone else chooses a high-contrast scheme. It’s a small detail, but it can make the dashboard feel disconnected.
If you want a more uniform experience—whether for branding, accessibility, or personal preference—you can set a default admin color scheme for all users.
How to Set a Default Admin Color Scheme
The easiest way to apply a default admin color scheme for all users is by using the Default Admin Color Scheme plugin.
First, you need to install and activate the plugin.
Then, go to Settings » General in your WordPress dashboard. Scroll down to the Admin Color Scheme option and choose the color scheme you want to use for all users.
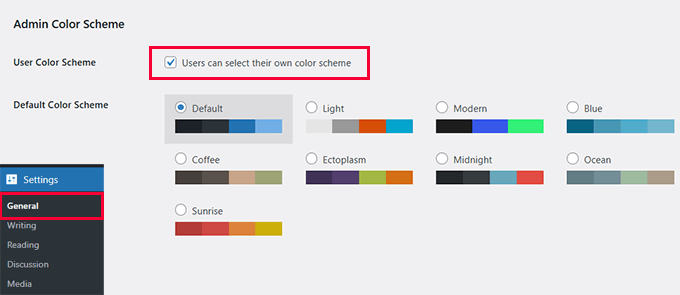
You can also prevent users from changing the color scheme. Simply uncheck the option ‘Users can select their own color scheme.’
This is especially useful for businesses, membership sites, and client projects where you want to maintain a consistent look and feel across the admin area.
4. Use Admin Themes and Plugins
The default WordPress admin interface is functional, but it doesn’t always fit every workflow. Whether you want a custom login experience, a streamlined dashboard, or a fully white-labeled backend, the right plugins can help.
Here are some of the best plugins to improve and customize the WordPress admin area:
- WPForms – This lets you create custom login and registration forms. You can even build forms where users submit blog posts and upload images. This means they won’t need to access the admin area directly.
- SeedProd – Allows you to design custom WordPress login pages. You can also set up maintenance and coming soon pages to control access while working on your site.
- WP Adminify – Provides advanced admin customization and white-labeling options, helping you create a cleaner, branded experience for clients or team members.
- WP Frontend Admin – Lets you display WordPress admin pages on the frontend, making it easier to manage content without entering the traditional admin dashboard.
Each of these plugins allows you to customize the WordPress admin area, limit access to the admin pages, and provide a consistent user experience.
For more options, check out our full list of WordPress admin dashboard plugins.
5. Hide Unnecessary Items from the Admin Area
As your WordPress site grows, the admin menu can start to feel crowded. Plugins add new menu items, themes introduce extra settings, and before you know it, the dashboard is packed with options you rarely use.
A cleaner admin area helps you find what you need faster. By removing or reorganizing unnecessary menu items, you can create a more streamlined experience.
How to Customize the Admin Menu
The easiest way to manage the WordPress admin menu is with the Admin Menu Editor plugin. This tool allows you to rearrange, rename, or hide menu items with a simple drag-and-drop interface.
To get started, install and activate the plugin.
Then, go to Settings » Menu Editor. From here, you can drag menu items to rearrange them, rename confusing labels, and even hide options you don’t need.
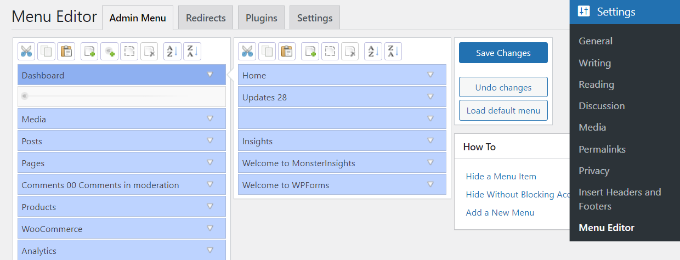
If you’re managing a multi-user site, you can also restrict access to certain menus based on user roles.
This is especially useful for client websites or membership sites where you want to limit admin access.
Hiding unnecessary menu items makes WordPress feel more organized and less overwhelming. This plugin gives you full control, whether you want to simplify your workflow or create a custom experience for your users.
For a step-by-step tutorial, check out our guide on how to hide unnecessary items from WordPress admin.
6. Add Custom Links to the WordPress Toolbar
The WordPress toolbar (admin bar) provides quick access to important links, but it’s not always customized to fit your workflow. If you frequently visit specific pages, settings, or external tools, adding custom links to the toolbar can save you time.
Instead of clicking through multiple menus, you can create shortcuts that take you directly to the pages you use the most.
How to Add Custom Links to the WordPress Toolbar
The easiest way to add custom links is by using WPCode. This method allows you to add a toolbar shortcut without modifying theme files.
First, install and activate the WPCode plugin. Then, you need to go to Code Snippets » Add Snippet and click on ‘Add Your Custom Code’.
Select ‘PHP Snippet’ as the code type, and paste the following code:
function custom_toolbar_link($wp_admin_bar) {
	$args = array(
		'id' => 'wpbeginner',
		'title' => 'WPBeginner',
		'href' => 'https://www.wpbeginner.com',
		'meta' => array(
			'class' => 'wpbeginner',
			'title' => 'Visit WPBeginner website'
			)
	);
	$wp_admin_bar->add_node($args);
}
add_action('admin_bar_menu', 'custom_toolbar_link', 999);
Just click ‘Save’ and activate the snippet.
Once enabled, a new WPBeginner link will appear in your WordPress toolbar, giving you instant access to the WPBeginner website.
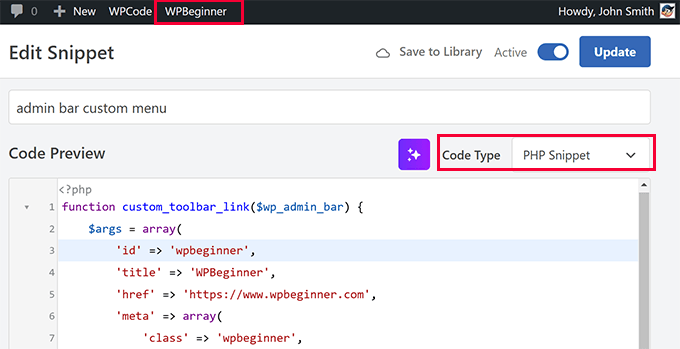
You can customize the code to add your own links. Simply change the 'title' and 'href' values to point to the page or website you want quick access to.
Adding custom toolbar links is a great way to speed up your workflow, especially if you frequently access specific settings or external tools.
For details, see our tutorial on adding custom shortcut links to the WordPress admin bar.
Related: Learn how to add or change WordPress admin icons.
7. Limit Dashboard Access in WordPress
Not every user needs access to the WordPress admin area. By default, all registered users can log in, but most of them never need to see the dashboard.
Restricting access can improve security and keep the backend clean if you’re running a membership site, an online store, or a multi-author blog.
Limiting dashboard access ensures that only administrators and editors can make changes while other users interact with the site from the front end.
How to Restrict Dashboard Access
The easiest way to limit admin access is by using the Remove Dashboard Access plugin.
After installing and activating the plugin, go to Settings » Dashboard Access. From here, you can choose which user roles have access to the dashboard. You can allow only administrators or include editors and authors as needed.
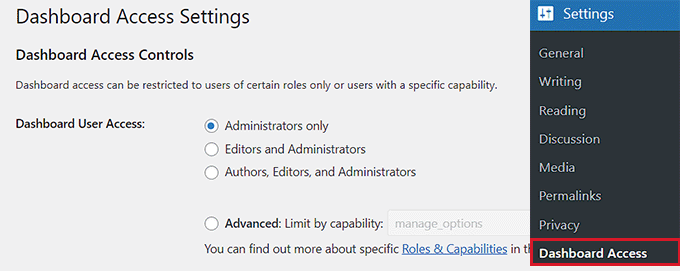
You can also redirect restricted users to a specific page, such as a custom login page or their profile page.
For even more control, you can create custom user roles with limited permissions using a plugin like Members.
By restricting dashboard access, you reduce security risks and keep the backend cleaner for those who actually need it.
For a step-by-step guide, check out our tutorial on how to limit dashboard access in WordPress.
8. Explore the Secret Options Page in WordPress Admin
WordPress has a hidden settings page that isn’t visible in the admin menu. It’s called the ‘All Settings’ page, and it allows you to view and edit a long list of site-wide options.
This page can be accessed by visiting:
https://yourwebsite.com/wp-admin/options.php
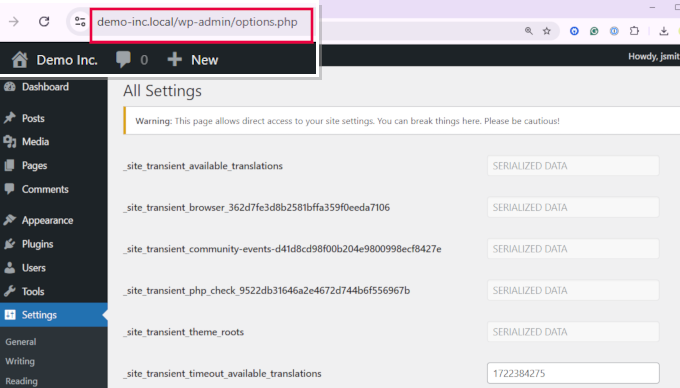
However, even though this page exists, it’s not meant to be used directly. The settings listed here are stored in your database, and changing them without knowing what they do can break your site.
What Can You Do with the Secret Options Page?
Most of the settings on this page are controlled through the normal WordPress admin panel. However, some advanced options—like tweaking the default image sizes or adjusting how post revisions work—can be changed here.
If you’re an advanced user or developer, you can use this page to troubleshoot settings that aren’t available elsewhere.
For more details, see our article on the hidden options panel in WordPress.
9. Change the Admin Footer Text
By default, the WordPress admin dashboard displays a small footer message: “Thank you for creating with WordPress” on the left and a version number on the right.
While this message is harmless, customizing it can be useful—especially if you manage multiple sites or work with clients.
Replacing the default text with your own branding, important links, or even a helpful reminder can make the admin area feel more personalized.
How to Change the Admin Footer Text
The easiest way to modify the admin footer is by adding a small code snippet using the WPCode plugin.
First, install and activate WPCode. Then, go to Code Snippets » Add Snippet and click ‘Add Your Custom Code’.
You need to select ‘PHP Snippet’ as the code type and paste the following code:
function custom_admin_footer() {
    echo 'Powered by YourBrand - Need help? <a href="https://yourwebsite.com">Visit Support</a>';
}
add_filter('admin_footer_text', 'custom_admin_footer');
Click ‘Save’ and activate the snippet.
Your custom message will now appear in the admin dashboard instead of the default WordPress footer text.
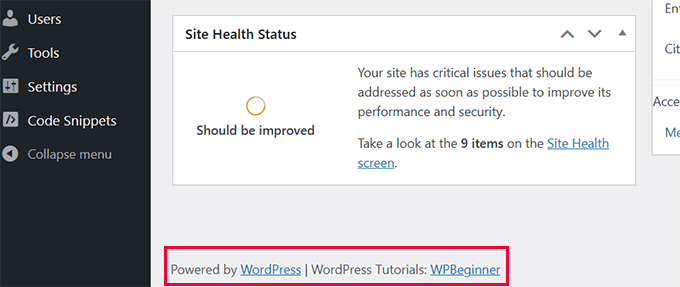
This is especially useful for client websites where you want to add branding, a support link, or a friendly reminder about site maintenance.
10. Add a Featured Image Column in the Admin Area
Featured images help visually distinguish content, but WordPress doesn’t show them in the post list by default.
You have to edit a post to see if it has a featured image and which image you have used. By adding a featured image column, you can quickly see that information on the posts list.
How to Add a Featured Image Column
First, install and activate the Add Featured Image Column plugin. Once activated, the plugin automatically adds a featured image column to your Posts and Pages screens in the WordPress admin.
You don’t need to configure any settings—the column appears by default, displaying the featured images of your posts. If a post doesn’t have a featured image, the column will show an empty space.
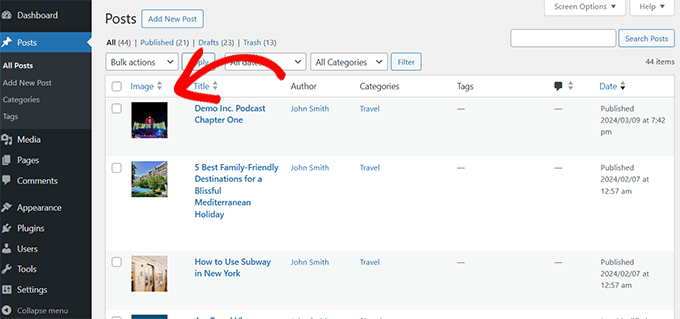
By adding this column, you can quickly identify posts without featured images, ensure visual consistency, and easily locate content based on its thumbnail rather than just the title.
For more ways to add a featured image column, check out our tutorial on how to add a featured image column to your WordPress admin panel.
11. Show or Hide WordPress Dashboard Widgets
When you log into your WordPress dashboard, you’ll see several widgets by default, such as Site Health, Activity, and Quick Draft. While some of these widgets provide useful information, others might be unnecessary for your workflow.
If you prefer a cleaner interface, you can easily hide unwanted widgets using the built-in Screen Options feature. This method works without installing any plugins or adding custom code.
How to Hide Dashboard Widgets Using Screen Options
Go to your WordPress dashboard and click the ‘Screen Options’ button at the top-right corner of the page.

You can now uncheck the boxes next to the widgets you want to hide.
The changes take effect immediately, and the hidden widgets will no longer appear in your dashboard.
While the Screen Options method works for individual users, it doesn’t allow you to remove widgets for all users or restrict access based on roles.
If you need more advanced customization, check out our tutorial on how to disable unwanted widgets in WordPress.
12. Add a Help Section in the WordPress Admin Area
Managing a WordPress site often involves multiple users—whether it’s a team, clients, or contributors. Not everyone is familiar with how things work, and answering the same questions repeatedly can become time-consuming.
Adding a dedicated help section inside the WordPress admin area allows you to provide instructions, best practices, and troubleshooting steps right where users need them.
How to Add a Help Section in WordPress
The easiest way to add a help section is by using the WP Help plugin.
First, you need to install and activate WP Help.
Once activated, go to Dashboard » Publishing Help. From here, you can create custom documentation pages just like regular WordPress posts.
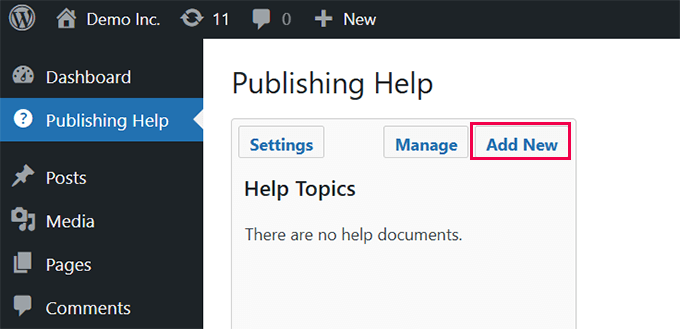
For details, see our guide on adding a help/resource section in the WordPress admin area.
Adding Public Help or Support Pages in WordPress
If you want to create a public knowledge base or help center that visitors can access, then you can use the Heroic KB plugin instead.
Heroic KB allows you to set up a professional documentation section where users can find answers without needing to contact support. It includes features like article search, categories, and user feedback.
For a step-by-step guide, check out our tutorial on how to add documentation in WordPress.
13. Remove WordPress.org Links from the Toolbar
The WordPress admin toolbar includes a default WordPress logo in the top-left corner. When you hover over it, it displays links to WordPress.org, documentation, and support forums.
While this is useful for some users, others may prefer a cleaner interface—especially when managing client sites.
How to Remove WordPress.org Links from the Toolbar
The easiest way to remove these links without modifying theme files is by using WPCode.
First, install and activate the WPCode plugin. Then, go to Code Snippets » Add Snippet and click ‘Add Your Custom Code’.
Select ‘PHP Snippet’ as the code type and paste the following code:
function remove_wp_logo_from_admin_bar($wp_admin_bar) {
    $wp_admin_bar->remove_node('wp-logo');
}
add_action('admin_bar_menu', 'remove_wp_logo_from_admin_bar', 999);
Click ‘Save’ and activate the snippet. The WordPress logo and its dropdown menu will be removed from the admin toolbar.
This is especially useful for agencies and developers who want to provide a more customized dashboard experience for clients.
Securing the WordPress Admin Area
Customizing the WordPress admin area makes it more efficient, but security is just as important. A well-organized dashboard is great, but if your site isn’t protected, all that effort could be undone instantly.
We recommend checking out our full guide on how to protect the WordPress admin area.
We talk about 14 methods for securing WordPress admin, covering everything from password-protecting the admin directory through to limiting login attempts and setting up two-factor authentication.
Conclusion
A well-organized workspace makes every task easier, and the same is true for your WordPress admin area.
Throughout this guide, we’ve explored ways to make the dashboard cleaner, navigation faster, and security stronger. Maybe you’ve already found a few tweaks to try, or perhaps you’re planning a full admin overhaul.
Every small improvement adds up. A fresh color scheme can make your dashboard easier on the eyes, removing clutter can speed up your workflow, and extra security measures can give you peace of mind.
Once you’ve made these changes, WordPress feels more like home—tailored to how you work best.
We hope these plugins and tips helped you improve your WordPress admin area. You may also want to check out our guide on how to fix the missing theme file editor in WordPress admin or how to fix broken CSS in the WordPress admin dashboard.
If you liked this article, then please subscribe to our YouTube Channel for WordPress video tutorials. You can also find us on Twitter and Facebook.


Piet
I would like to make 2 suggestions for your code snippets:
1. internationalise your code
2. use a unique prefix for functions