By default, WordPress shows previous and next post links at the bottom of each post to help with navigation.
Adding thumbnails to these links can make a big difference to your WordPress blog’s user experience. This simple change can catch your reader’s eye and keep them on your site longer.
In this guide, we’ll show you step by step how to add thumbnails to previous and next post links in WordPress – no coding skills required! 🚀

Why Display Thumbnails With the Previous and Next Post Links?
Your WordPress blog offers some helpful features to help visitors find new content and navigate your site. These features include:
- navigation menus
- a search bar, and
- a post archives widget.
Another helpful navigation feature is found at the bottom of each WordPress blog post. There, you will find links to your site’s previous and next posts.
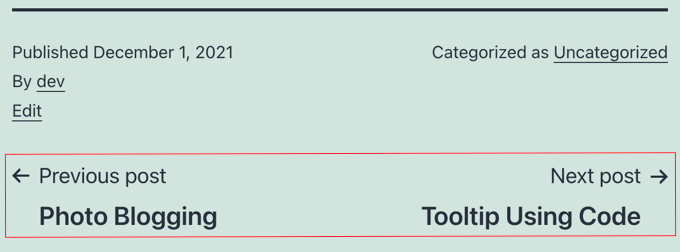
These links build user engagement because when visitors finish reading one blog post, they might look for something else to read. However, if you add thumbnails, the links will look more interactive.
It’s also a great way to bring attention to your best-performing or popular blog posts.
For example, you may have pillar content that is already driving a ton of traffic and converting those readers into email subscribers. Adding thumbnails with post links would only help you build your email list and grow your small business.
With that in mind, we’ll show you how to add thumbnails to the previous and next post links in WordPress. Here’s all the topics we’ll cover in this article:
Let’s get started!
Using Thumbnails with Previous and Next Post Links in WordPress
To add thumbnails to your previous and next post links, you’ll have to add code to your WordPress theme’s files. If you haven’t done this before, then see our guide on how to copy and paste code in WordPress.
Adding Code Using WPCode
The first step is to add the following code snippet using WPCode, the best code snippets plugin. It allows you to add code without breaking your site and comes with plenty of ready-made templates, so you don’t have to write code from scratch.
💡 We use WPCode to create and manage custom code snippets. It has worked incredibly well for us. You can check out our complete WPCode review to explore its features!
To get started, you’ll need to install and activate the WPCode plugin. If you need help, you can check out our article on how to install a WordPress plugin.
From there, go to the Code Snippets » + Add Snippet page. Then click on ‘Add New.’
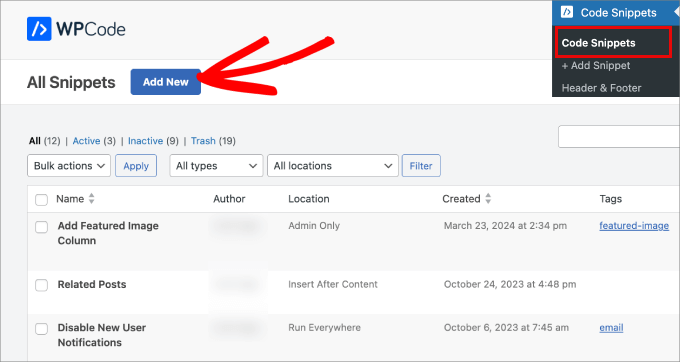
You’ll be taken to a code snippet library, where you can choose from a wide variety of pre-made templates.
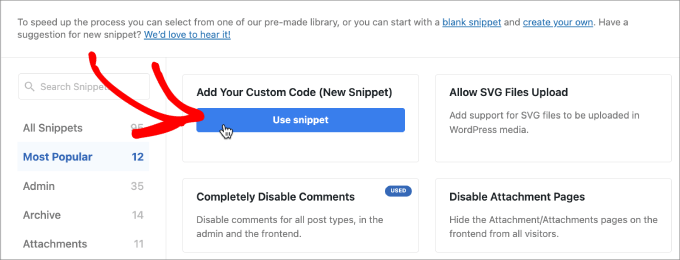
However, to add thumbnails to the previous and next post links, we’ll upload a string of custom code. So, let’s click on ‘Use Snippet’ under ‘Add Your Custom Code.’
✋ You can use the WPCode free version to add a custom snippet, but upgrading to WPCode Pro gives you access to the full code revision history and scheduling features.
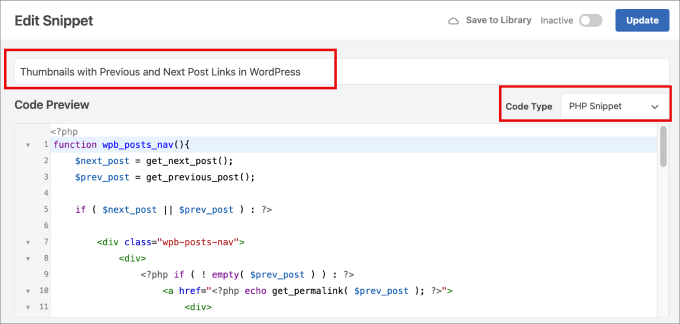
The next step is to give the code snippet a name so that you can refer back to it later.
Then, simply copy the following code into the WPCode text editor. Make sure to select ‘PHP Snippet’ as the ‘Code Type.’
function wpb_posts_nav(){
    $next_post = get_next_post();
    $prev_post = get_previous_post();

    if ( $next_post || $prev_post ) : ?>

        <div class="wpb-posts-nav">
            <div>
                <?php if ( ! empty( $prev_post ) ) : ?>
                    <a href="<?php echo get_permalink( $prev_post ); ?>">
                        <div>
                            <div class="wpb-posts-nav__thumbnail wpb-posts-nav__prev">
                                <?php echo get_the_post_thumbnail( $prev_post, [ 100, 100 ] ); ?>
                            </div>
                        </div>
                        <div>
                            <strong>
                                <svg viewBox="0 0 24 24" width="24" height="24"><path d="M13.775,18.707,8.482,13.414a2,2,0,0,1,0-2.828l5.293-5.293,1.414,1.414L9.9,12l5.293,5.293Z"/></svg>
                                <?php _e( 'Previous article', 'textdomain' ) ?>
                            </strong>
                            <h4><?php echo get_the_title( $prev_post ); ?></h4>
                        </div>
                    </a>
                <?php endif; ?>
            </div>
            <div>
                <?php if ( ! empty( $next_post ) ) : ?>
                    <a href="<?php echo get_permalink( $next_post ); ?>">
                        <div>
                            <strong>
                                <?php _e( 'Next article', 'textdomain' ) ?>
                                <svg viewBox="0 0 24 24" width="24" height="24"><path d="M10.811,18.707,9.4,17.293,14.689,12,9.4,6.707l1.415-1.414L16.1,10.586a2,2,0,0,1,0,2.828Z"/></svg>
                            </strong>
                            <h4><?php echo get_the_title( $next_post ); ?></h4>
                        </div>
                        <div>
                            <div class="wpb-posts-nav__thumbnail wpb-posts-nav__next">
                                <?php echo get_the_post_thumbnail( $next_post, [ 100, 100 ] ); ?>
                            </div>
                        </div>
                    </a>
                <?php endif; ?>
            </div>
        </div> <!-- .wpb-posts-nav -->

    <?php endif;
}
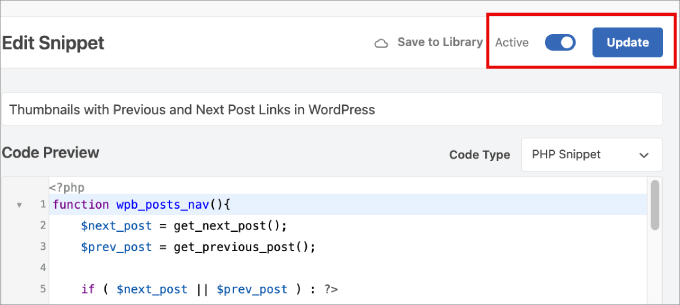
Once you’ve entered the snippet, you can toggle the button from ‘Inactive’ to ‘Active.’
It should look like this.
This will enable the code to work.
Then, you can simply click the ‘Update’ button.
Now, we’ll need to go back to Code Snippets » +Add Snippet page.
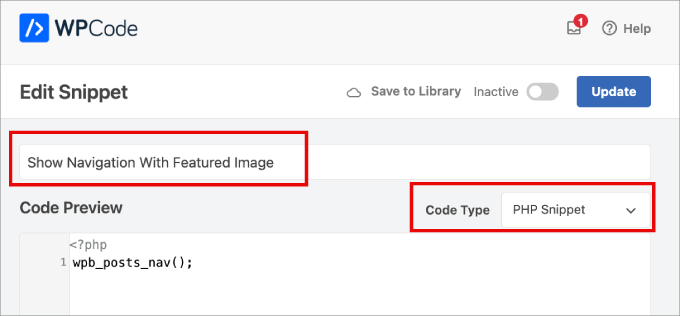
Again, under the ‘Add Your Custom Code’ option, you’ll select ‘Use Snippet’ and name it so you can refer back to it later.

Then, you can copy the following code and paste it into the WPCode text editor. Make sure to select ‘PHP Snippet’ from the ‘Code Type’ dropdown, too.
wpb_posts_nav();
This code tells WordPress where to show the navigation with the featured image.
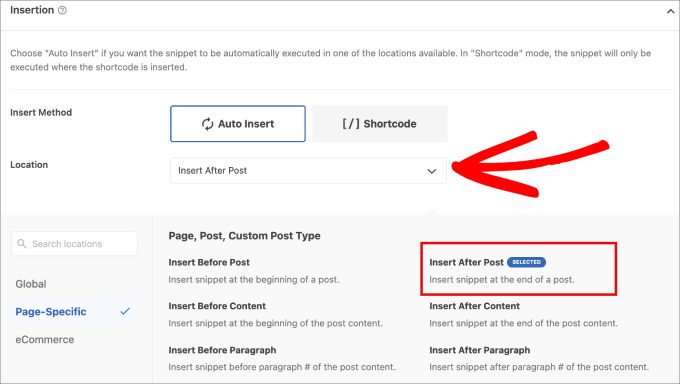
Now, you’ll want to scroll down to the ‘Insertion’ section and click on the dropdown next to ‘Location.’
From here, go to ‘Page-Specific’ and choose ‘Insert After Post.’ That way, the thumbnails will appear properly next to the links.
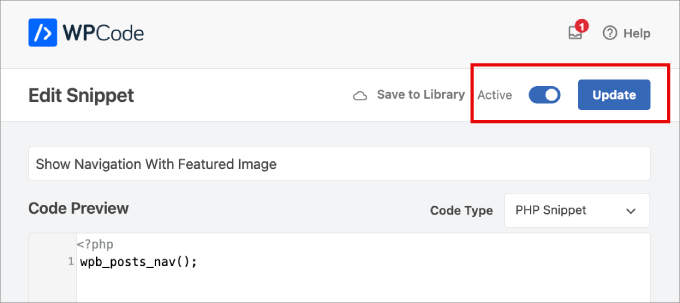
Finally, you can toggle on the ‘Active’ and click ‘Update.’
After saving your changes, you can use this function in the template where you want to show previous and next post links with thumbnails.
And that’s it – you’ve added and configured your previous and next post thumbnails!
Now, when you view a post on your website, you will see that the previous and next links at the bottom of the post now have thumbnails.
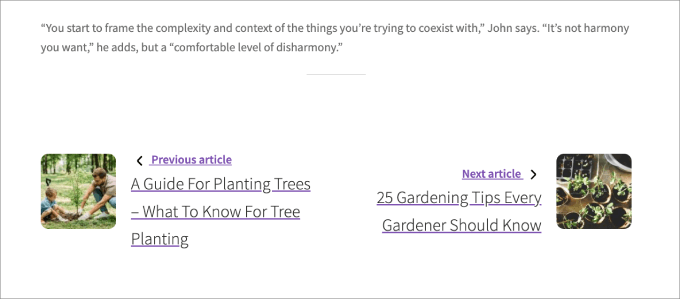
Note: If one of the linked posts does not already have a featured image, then you will not see a thumbnail. To learn how to add thumbnails to a post, you can see our guide on how to add featured images or post thumbnails in WordPress.
Alternative: Displaying Popular Posts with Thumbnails
Another way to engage your readers after they read a post is to display a list of popular posts after each article. This will allow your readers to see your best content rather than just the previous and next published articles.
Your popular posts contain your most successful content. Displaying them to your visitors will build trust, improve social proof, and ensure that your visitors stay on your website longer.
When you check the first method in our guide on how to display posts by views in WordPress, you’ll learn how easy it is to add popular posts using the MonsterInsights plugin.
📈 At WPBeginner, we use MonsterInsights to keep a close eye on our website’s performance. You can see our full MonsterInsights review and see why it’s our go-to tool for making data-driven decisions!
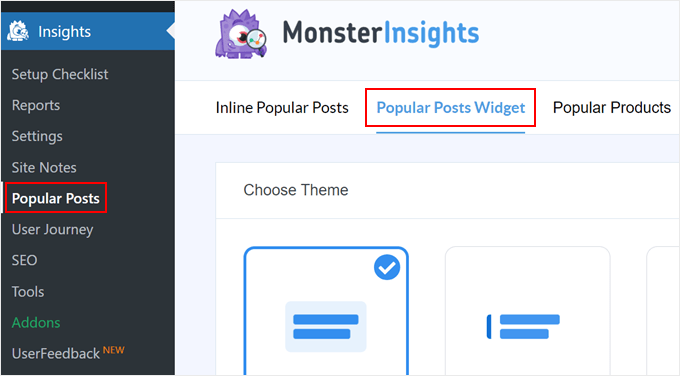
MonsterInsights’ Popular Posts Widget offers a wide range of attractive themes and a lot of customization options.
Or you can see our guide on how to add custom after-post widgets in WordPress, where you can learn how to add various types of content to the end of each blog post.
We hope this tutorial helped you learn how to use thumbnails with previous and next post links in WordPress. Next, you may also want to learn how to crop and edit post thumbnails or see our guide on how to add featured video thumbnails in WordPress.
If you liked this article, then please subscribe to our YouTube Channel for WordPress video tutorials. You can also find us on Twitter and Facebook.


Atesz
Hello,
thnak you for this code. I would like to add the post navigation in the middle of my page as a block. So I tried to create a shortcode calling the wpb_posts_nav funtion:
add_shortcode( ‘custom-post-nav’, ‘wpb_posts_nav’ );
but if I use the shortcode [custom-post-nav] in the block editor, I cannot publish the post and I get the following: “Updating failed. The response is not a valid JSON response”
The post nav still appears but only If I paste the code at the end of the page and then they go to wrong place (to the top).
Do you know where is the problem?
Thank you in advance!
WPBeginner Support
For your JSON response error, we would recommend going through our troubleshooting guide below!
https://www.wpbeginner.com/wp-tutorials/how-to-fix-the-invalid-json-error-in-wordpress-beginners-guide/
Admin
Sekh Sahajahan
Hello sir have you any solution to remove the 3 line navigation bar from menu bar because it automatically added.
Markus Martin
Hi Syed. Does this still work especally with the new version of wordpress?
patricia
Hello! How would I do, if i want to use this for custom post type? thanks
MarykeVanRensburg
I got it to work. It seems the } in this “<?php } ?>” was the problem. I removed it and it works. Now just to figure out how to only show next and previous in same category. Thanks
bowetech
HOw would i set it up so that it will actually get the next post from its current category ?
Japh
Nice and simple solution, I really like it. Great answer for your Facebook asker
Wordpress Themes Labs
nice guide
MarykeVanRensburg
Can you tell me how to only show previous and next in the same category? Thanks for this code. I’m going to try it.
wpbeginner
@MarykeVanRensburg I think the TRUE variable there means in category browsing.
MarykeVanRensburg
@wpbeginner I used the code, but it doesn’t work in an Artisteer created theme. The code in my theme is as follows:
‘next_link’ => theme_get_previous_post_link(‘« %link’), ‘prev_link’ => theme_get_next_post_link(‘%link »’),
and I need to change it to show a thumbnail and only a certain category. Thanks.
wpbeginner
@MarykeVanRensburg AFter the link area just add ,true
our code above will do only category browsing. Unfortunately we do not provide support for specific frameworks.
Sugeng Santoso
I love this.
Dragon Blogger
Really cool, I do think using thumbnails with latest/next post may be overkill if you already use it with “related posts” there is limited real estate which is especially true for the growing trend of mobile browsing.
wpbeginner
@Dragon Blogger That is only if you are assuming that the site has related posts. Some may not. We are using it on our List25 site which is relatively new site, so related articles is not very helpful at the time. That is why we are using single post navigation.
Dragon Blogger
@wpbeginner @Dragon Blogger
Dragon Blogger
@wpbeginner your are right and make a good point about newer sites without enough content to do images for related content.