Are you worried about losing your customizations when updating the theme of your WordPress website?
One of the best things about WordPress is how easy it is to customize. But unfortunately, there’s a high chance you’ll lose some of your changes when you update your theme.
We’ve seen it happen many times, where WordPress users have poured their heart and soul into customizing their websites, only to see those changes disappear after a routine theme update. Luckily, we can help you avoid this problem and keep your customizations safe.
In this article, we will show you how to easily update a WordPress theme without losing customization.
How Theme Updates Work in WordPress
WordPress comes with a powerful system to install updates for not just WordPress itself, but for plugins and themes as well.
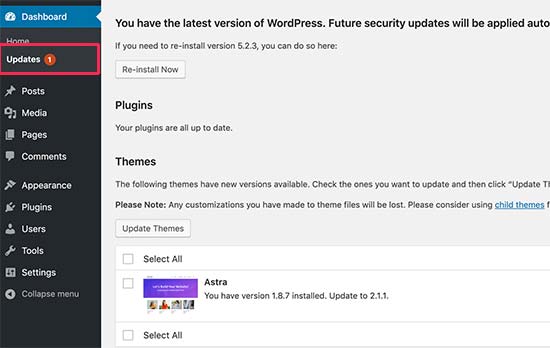
Your WordPress website regularly checks for updates and display them under Dashboard » Updates page.
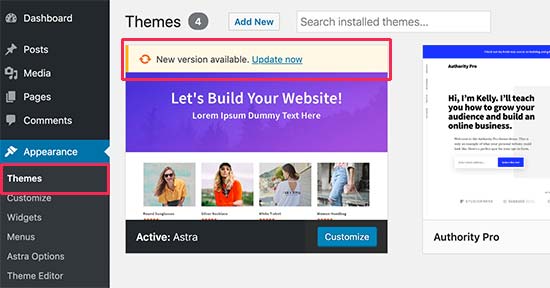
When a theme update becomes available, you’ll also see a notification on the Appearance » Themes page.
Updates are really important for the security and performance of your WordPress website. Aside from security and bug fixes, theme developers can also introduce new features with these updates.
You can simply click on the ‘Update now’ button to install the new version.
WordPress will then download the theme package, unzip it, and replace the old files with the newer version.
This will overwrite all old theme files on your website. If you manually added custom code to your WordPress theme files, then you’ll lose those changes.
That being said, let’s take a look at which theme changes are safe and which customizations will be erased.
Which Customizations Can You Lose During Theme Update?
There are multiple ways you can customize a WordPress theme. Some of these theme customizations are safe because your changes are stored in the WordPress database itself.
Customizations You Won’t Lose During a Theme Update
You won’t lose any changes made through the built-in WordPress theme customizer which you can access by visiting Appearance » Customize page.

The theme customizer allows you to modify your WordPress theme and store all changes in the WordPress database. You can change the header image, colors, layout, custom CSS, and more.
Your WordPress widgets and navigation menus are also not affected by the theme updates.
Popular WordPress themes like Astra and Ocean WP now come with companion plugins. These plugins are used to add extra features to your theme. Any theme changes made using these companion plugins are also not affected by a theme update.
If you customize your WordPress layout using a WordPress page builder like SeedProd, Divi, or Beaver Builder, then those changes will not be impacted.
Any other features that you have added to your website using a plugin are also safe. For example, your WordPress contact forms, Google Analytics, email newsletter popups, and more.
Customizations You Will Lose During a Theme Update
What you will lose is any changes made directly to your theme’s files.
For example, you may have added code to your theme’s functions.php file or added CSS styling to your theme’s stylesheet file (style.css). These changes will be lost because the files will be overwritten when your theme is updated.
The same thing will happen if you have made changes to any of your theme’s templates, such as index.php, header.php, and footer.php. These files will also be overwritten and you will lose your changes.
However, if you added code to your WordPress site using a code snippets plugin, you would not lose these customizations.
That’s why we always recommend WPCode. It lets you easily add custom code directly from your WordPress dashboard. These code snippets run as if they were in your theme files, but make your customizations future-proof.

WPCode also makes it easy to manage all of your custom code from one central screen. So, you never have to worry about losing a snippet or making a mistake.
You can get started with the free version of WPCode to future-proof your website customizations. For more details, see this guide on how to easily add custom code in WordPress.
Now that we know which changes will be erased, let’s talk about how to preserve them during a theme update.
Method 1: Using a Code Snippets Plugin to Preserve Customizations (Recommended)
If you added custom code to your WordPress theme files, the easiest way to save it is by moving it to the WPCode plugin before updating your theme.
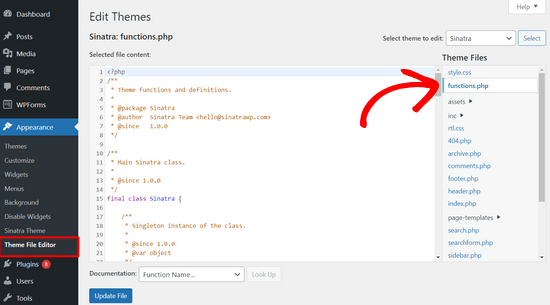
To get started, go to Appearance » Theme File Editor from the WordPress dashboard.
Then, navigate to the sidebar in the right-hand column and click on the functions.php file to open it in the editor.
From here, you need to locate where you’ve previously added your custom code, which is often at the end of the file. Once you’ve found your custom code, copy and paste it into a plain text editor on your computer such as Notepad.
Next, you need to install and activate the free WPCode plugin. If you need help, see our tutorial on how to install a WordPress plugin.
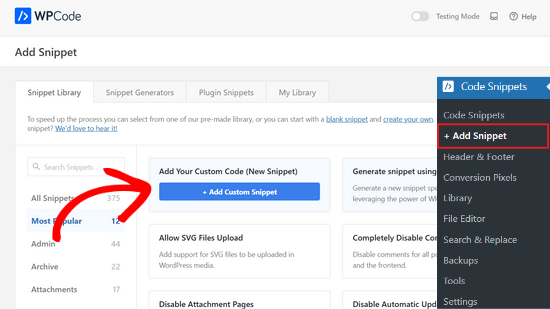
Once the plugin is activated, head to Code Snippets » Add Snippet from the WordPress dashboard. Then, hover your mouse over the ‘Add Your Custom Code (New Snippet)’ option and click the ‘Add Custom Snippet’ button.
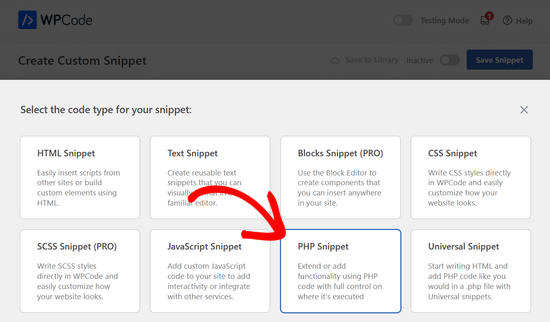
After that, select ‘PHP Snipept’ as the code type from the list of options that appear on the screen.
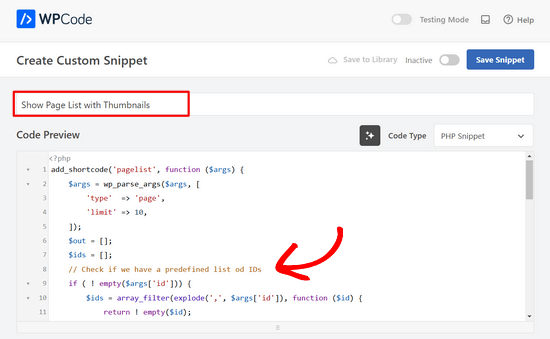
Now, copy one of the code snippets that you saved to your computer in the previous step and paste it into the Code Preview box.
You can also add a title for your snippet at the top of the page to help you remember what the code is for.
After that, simply toggle the switch at the top of the page from ‘Inactive’ to ‘Active’ and click the ‘Save Snippet’ button.
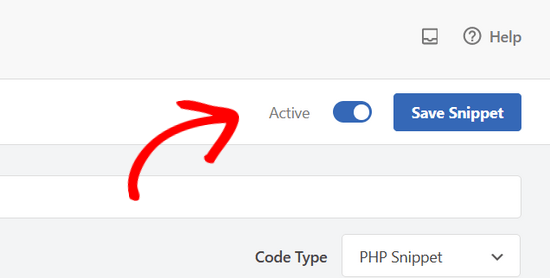
The plugin will now automatically load the code on your WordPress site.
Note: You need to repeat this process for each of your custom code snippets.
You can also follow similar steps to move any customizations from the header.php file and footer.php file into the WPCode plugin. For step by step instructions, see our guide on how to add header and footer code in WordPress.
Once you’ve added all of your code snippets into WPCode, they are future-proof and you can safely update your theme without losing your customizations.
Method 2: Creating a Child Theme to Preserve Customizations
A child theme is a WordPress theme that inherits the functionality, features, and style of another WordPress theme, the parent theme. You can then customize the child theme without making any changes to the parent theme.
Because your changes are stored in the child theme, you can safely update the parent theme without losing your customizations. In this tutorial, we’ll create a child theme and then move all of your customizations over to it.
You can create the child theme using a plugin or using code. Head over to our beginner’s guide on how to create a WordPress child theme and create one now. The theme you need to update should be the parent theme.
Don’t activate the child theme yet. We’ll do that at the end of this tutorial.
If you use the code method of creating a child theme, then you should create it in a folder on your computer. If you use the plugin method, then you will have to download the child theme folder to your computer in the next section.
Downloading Theme Folders to Your Computer
The first thing you need to do is connect to your WordPress hosting account using an FTP client.
Once connected, go to the /wp-content/themes/ folder and download your theme folder to your computer.
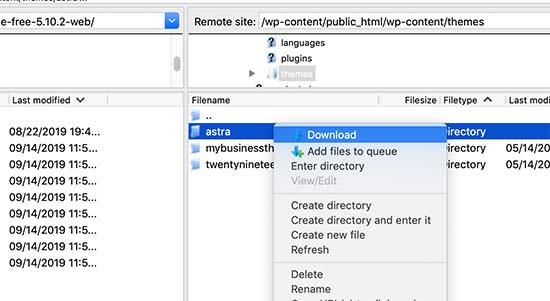
This folder will be the backup of your theme and customizations. Later we’ll copy your customizations from this folder into the child theme folder.
If you created a child theme using the plugin method in the previous section, then you should download its folder to your computer in the same way.
Now we need to download the update to your theme. You should visit your theme’s website and download the latest version to your computer. After that, you’ll need to locate the theme’s zip file and extract it.
You should now have three theme folders on your computer: the new updated version of your theme, the old customized version of your theme, and the child theme you just created.
Copying Customizations to the Child Theme
Next, we need to identify all of the changes you made to your theme so we can copy them over to the child theme. The easiest way to do this is by comparing your old and new theme files.
You’ll need to use file comparison software to see the difference between the new and old version of each file. We recommend Windows users use WinMerge, Mac users use Kaleidoscope, and Linux users use Meld.
Open your file comparison software and then drag the updated version of your theme in the left panel, and the old customized version in the left. The software will highlight any files that have been changed or added.
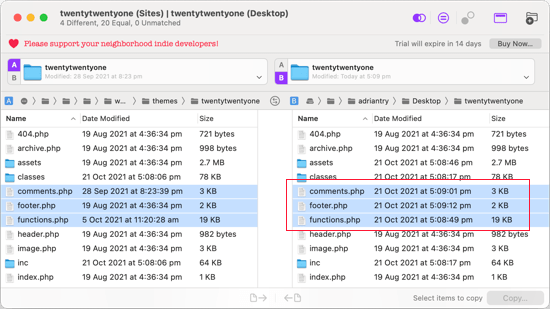
With the exception of functions.php and style.css, you should copy the highlighted files in the right pane into your child theme folder.
Your child theme already has its own functions.php and style.css files so we need to deal with them differently. You’ll need to copy any changes you have made to those files, and paste them at the bottom of your child theme’s files.
First, open the updated and old versions of your functions.php file in your comparison software. You need to copy the highlighted text from the customized version and copy it to the clipboard.
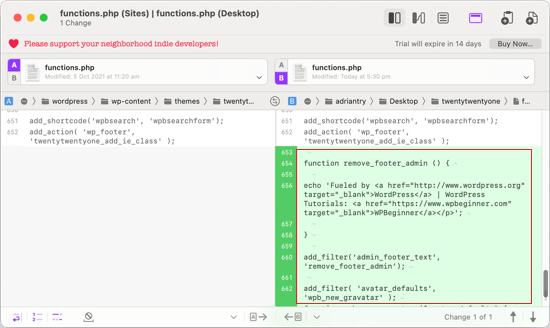
Next, you should paste the text at the bottom of your child theme’s functions.php file. Make sure you save the file after you have done this.
If your theme’s style.css file has been changed, then you will need to repeat the process with that file.
Uploading the Updated Theme and Child Theme Folders
After copying your changes to the child theme, you are now ready to upload the updated theme and child theme to your website.
Simply connect to your website using the FTP client and go to the /wp-content/themes/ folder. After that, you should select the updated theme folder and child theme folder and upload them to your website.
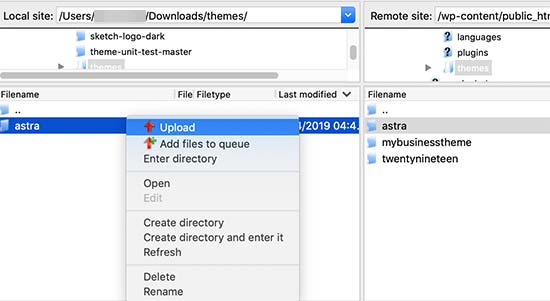
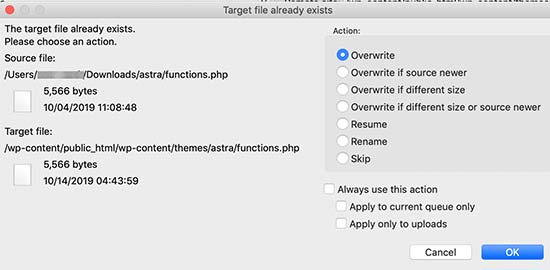
Your FTP client will warn you that the files with the same name already exist. You need to choose ‘Overwrite’ to make sure that your old theme files are replaced by the updated versions.
Importing Your Theme Customizer Settings
We mentioned at the beginning of this article that any customizations made with the WordPress theme customizer are not stored in your theme, and so they have not yet been added to the child theme.
We’ll have to add them now. We’ll use a plugin to export the theme customizer settings from the parent theme and then import them into the child theme.
The first thing you need to do is install and activate the Customizer Export/Import plugin on both sites where you want to export/import. For more details, see our step by step guide on how to install a WordPress plugin.
Next, we need to export the parent theme’s customizer settings. With the parent theme still active, you need to visit the Themes » Customize page.
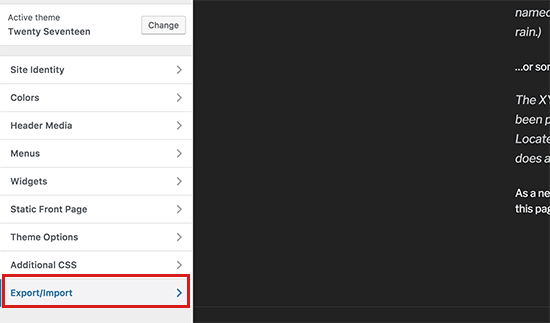
You then need to click on the Export/Import panel to view its settings and then click on the Export button.
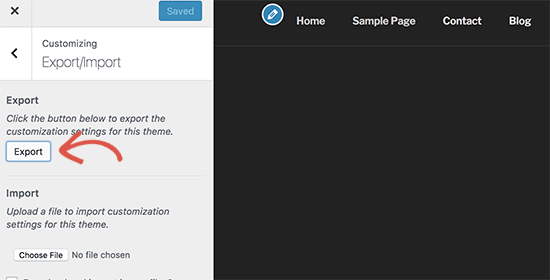
The plugin will now export your customizer settings and send them to your computer in a .dat file.
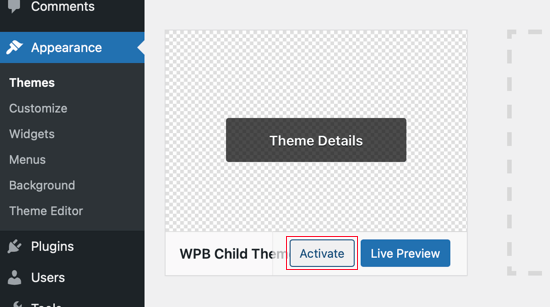
Next, you should activate your child theme. Simply navigate to Appearance » Themes and then click the ‘Activate’ button underneath the child theme.
After that, you need to return to Appearance » Customize page and click on the Export/Import panel.
You should click on the ‘Choose file’ button to select the file you exported earlier. You also need to check the box next to ‘Download and import image files?’ option to import header and other image files.
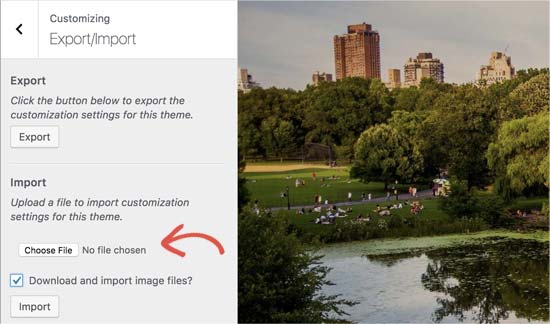
Next, you should click on the ‘Import’ button to start uploading. The plugin will now import the customizer settings from your export file.
Once it is finished, you can preview your changes in the customizer and then click on the ‘Save & Publish’ button to make those changes live.
You have now moved all of your customizations to the child theme. In the future, you will be able to update the parent theme without needing to go through these steps again.
We hope this article helped you update your WordPress theme without losing customization. If you come across any issues, then check out our guide on the most common WordPress errors and how to fix them. You may also want to check out our list of best theme builders for WordPress websites.
If you liked this article, then please subscribe to our YouTube Channel for WordPress video tutorials. You can also find us on Twitter and Facebook.


Olaf
The best solution is always prevention. I used to rely heavily on child themes, but eventually, I decided that I didn’t want to keep manually inserting code into PHP files. Moreover, when changing the design to a different theme, the child theme was of no use to me. That’s why I learned to insert snippets into the website using WPCode. In my opinion, it’s the best solution. It’s exactly the kind of solution that survives theme changes and remains functional because WPCode simply inserts the snippets into the new design. Elegant and simple.