Sometimes, you might want to remove the author’s name from a WordPress blog post. This could be because your posts are team efforts, or you’re writing for someone else and need to stay anonymous.
At WPBeginner, we run a multi-author blog, so we get it. Many of our posts are team efforts, with different people doing research, writing, and editing. Showing just one name doesn’t tell the whole story.
The tricky part is that WordPress makes you pick an author for each post, and there’s no easy way to hide the name. But don’t worry – we’ve found some solutions.
In this article, we’ll show you how to remove the author name from your WordPress blog posts.
Why Would You Want to Remove the Author Name?
WordPress adds metadata to every post, such as the publication date, categories and tags, custom taxonomies, and the author name. This can give readers useful information about a post and help them find related content.
However, there are times when you may want to hide the author name.
For example, if multiple staff members collaborate on a post, then it may be unfair to credit a single author. If you run a multi-author WordPress blog, then removing the author name can also make your website seem more consistent.
With that said, let’s see how you can remove the author name in WordPress. Simply use the quick links to jump straight to the method you want to use:
Method 1: Hide Author Name With WPCode (Recommended)
The easiest way to hide the author name is by adding custom code to WordPress.
Often, you will find guides with instructions to add custom code to your site’s functions.php file. However, this isn’t recommended, as any mistakes in the code can cause common WordPress errors or even break your site completely.
That’s where WPCode comes in.
This free plugin makes it easy to add custom CSS, PHP, HTML, and more to WordPress without putting your site at risk.
To start, you will need to install and activate WPCode. For more information, you can see our step-by-step guide on how to install a WordPress plugin.
Before we start, you will need to know the class that controls how the author name is displayed in your WordPress theme. To get this information, open any page or post that includes the author name.
Then, right-click or Control-click on the screen and select ‘Inspect.’
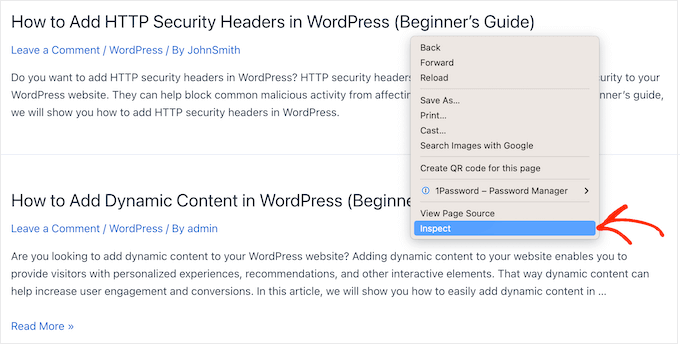
This opens a new panel showing all the code that makes up your WordPress website.
In the panel, go ahead and click on the arrow icon.

You can now hover your mouse over the author name.
This highlights a section of code in the right-hand panel, which is where you will need to look for the author code. This can vary depending on your WordPress theme, but look for any div class or li class that has the word ‘author.’
When you find the right class, make a note of it somewhere safe, as you’ll need it in the next step.
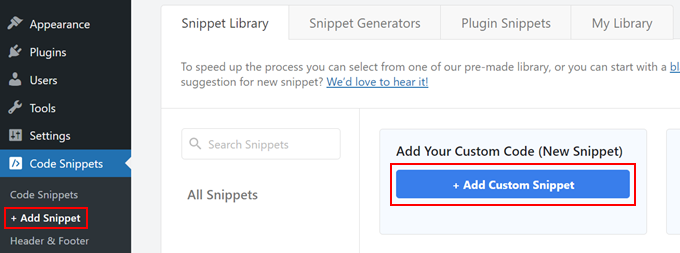
With that done, you are ready to hide the author name using custom CSS, so go to Code Snippets » + Add New.
Then, hover over the ‘Add Your Custom Code (New Snippet)’ option in the code snippets library and click the ‘Use snippet’ button.
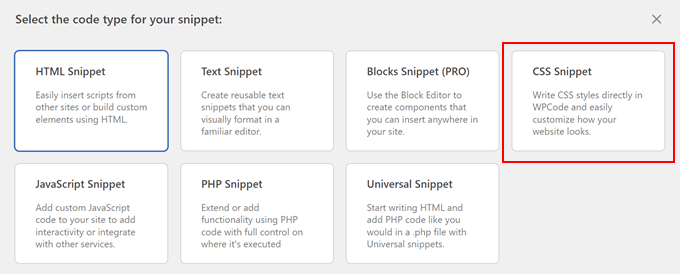
Now, choose a code type.
We’re going to add a CSS code snippet, so go ahead and select ‘CSS Code.’
After that, type in a title for the custom code snippet.
This is just for your reference, so you can use anything you want.
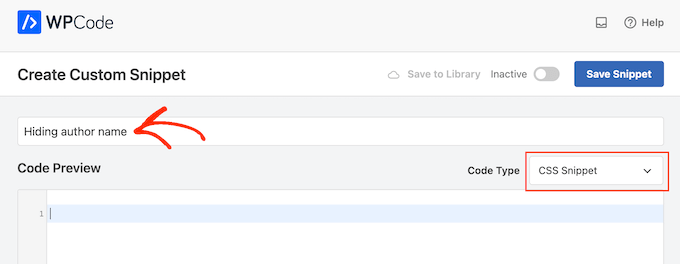
You can now add the following CSS code snippet to the code editor, making sure to replace li.meta-author with the class you got in the previous step:
li.meta-author {
display:none;
}
Just be aware you may need to add li. or .div to the class name, depending on how the WordPress theme displays the author name.
When you are ready to make the code live, scroll to the top of the screen and click on the ‘Inactive’ toggle so it changes to ‘Active’.
Finally, simply click on ‘Save Snippet’ to make the snippet live.
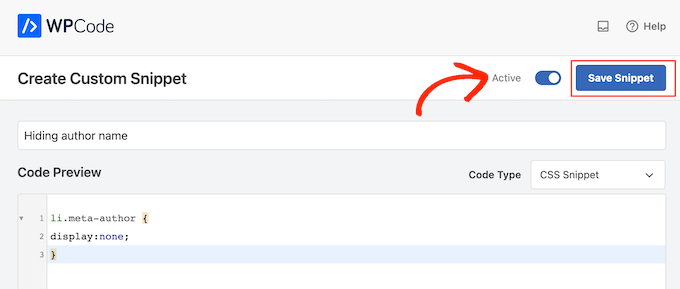
Now, the author name will no longer appear on your WordPress blog posts.
This method hides the author name on the front end, but it doesn’t disable the author archive pages.
These pages list all the posts written by a particular author and typically have a URL such as www.example.com/author/authorname.
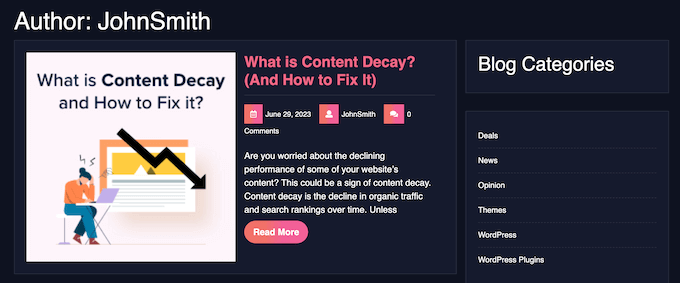
Search engines can still find these pages and may include them in the search results. For that reason, we recommend disabling the author archives using the All in One SEO plugin.
After activating the plugin, simply go to All in One SEO » Search Appearance and then click the ‘Archives’ tab.
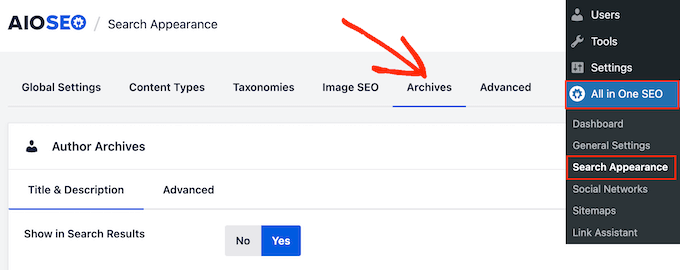
Under ‘Author Archives,’ find the ‘Show in Search Results’ setting.
You can now click on ‘No.’

After that, click on ‘Save Changes’ to store your settings. Now, the author archive pages will no longer appear in search results, so you shouldn’t get any traffic to those pages.
For more information on how to improve your WordPress SEO, please see our guide on how to set up All in One SEO for WordPress correctly.
Method 2: Hide Author Name by Editing WordPress Meta Data (Block Themes)
If you are using one of the newer block-enabled WordPress themes, then you can remove the author name from the ‘Post Meta’ pattern.
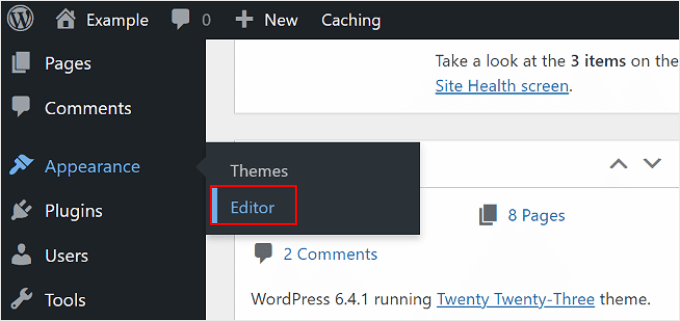
To get started, head over to Appearance » Editor in the WordPress dashboard.
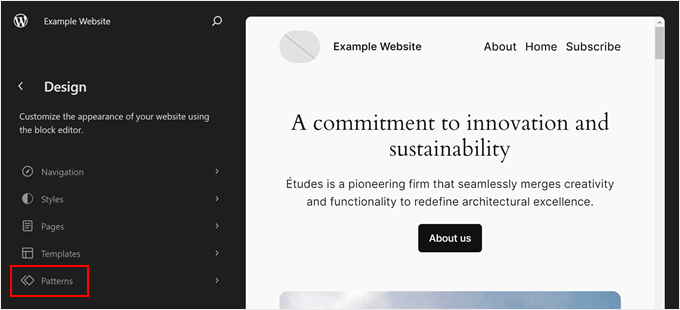
You will now see several menus to customize your block theme.
Here, go ahead and select ‘Patterns.’
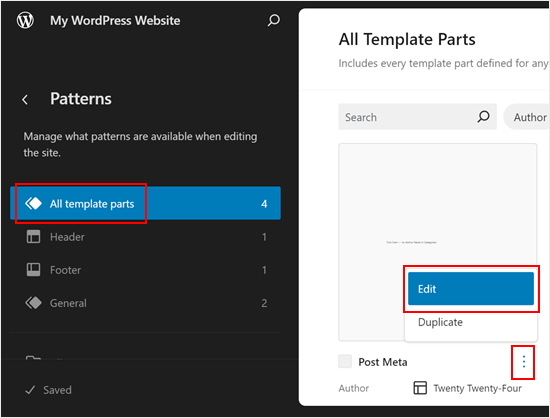
Now, navigate to ‘All template parts.’
Here, select the ‘Post Meta’ block, click on the three-dot-menu, and choose ‘Edit.’
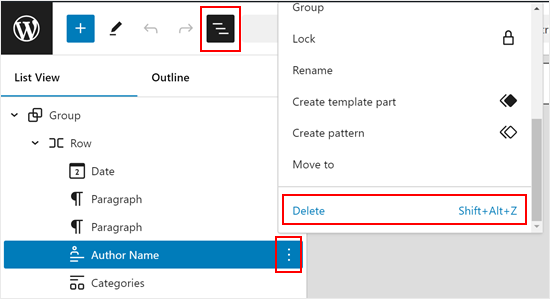
You should now be inside the full-site editor.
Here, simply select the ‘Author’ block and delete it. If your interface is too small, just click on the ‘List View’ button at the top left corner, select the ‘Author’ block, click on the three-dot menu, and choose ‘Delete.’
Don’t forget to make some necessary adjustments in the post meta template part.
For example, you may want to remove words like ‘by’ if the author name was written as ‘[Publishing date] – by [Author name].’

To make your changes live, click on the ‘Save’ button.
Now, if you visit any page or post with the Post Meta pattern, you’ll see the author name has disappeared.
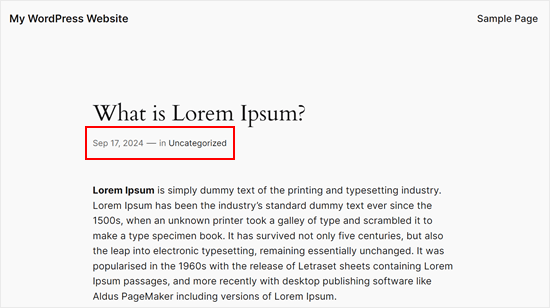
Method 3: Replace Author Name With a Generic Author Name (Workaround)
Another method is to create a generic author name and use it for all your posts. This method does not hide the author name, but it may be a good option for smaller blogs that need a quick workaround.
That being said, let’s get started.
First, you need to add a new author to your WordPress website and give it a generic username such as ‘editorialteam.’
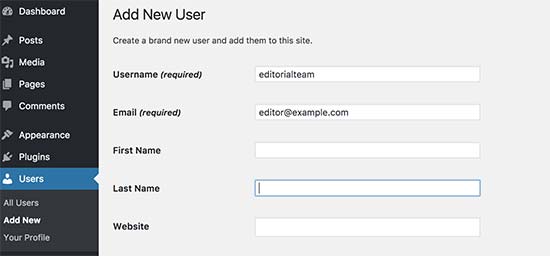
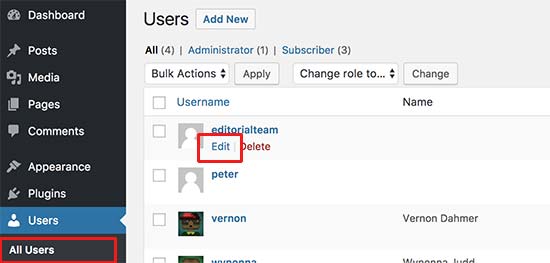
Next, go to the Users » All Users page.
Here, hover over the username you just created and click on the ‘Edit’ link when it appears.
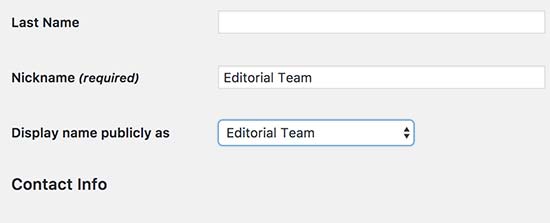
On the user profile screen, scroll to the ‘Nickname’ option and type in the name you want to show to visitors, such as Editorial Team.
After that, click on the dropdown menu next to ‘Display name publicly as’ and select the nickname you just entered.
You can also add a generic bio and even create a gravatar for the user account.
When you are happy with how the account is set up, click on ‘Update’ to save your changes.
Now, you need to add this new author to all the posts you’ve already published. The easiest method is to go to Posts » All Posts and click on the screen options menu at the top.
Here, find ‘Number of items per page…’ and type in a high number so you can see all your posts on a single screen. For example, in the following image, we are using ‘999.’
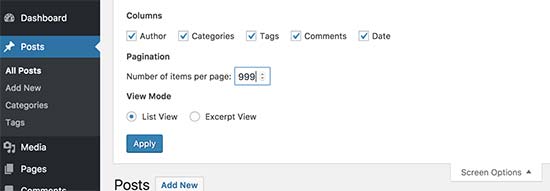
With that done, click on ‘Apply’, and WordPress will show all your posts on a single screen.
To edit all these posts at once, open the dropdown menu that shows ‘Bulk Actions’ by default and then select ‘Edit.’
Now, click on ‘Apply.’
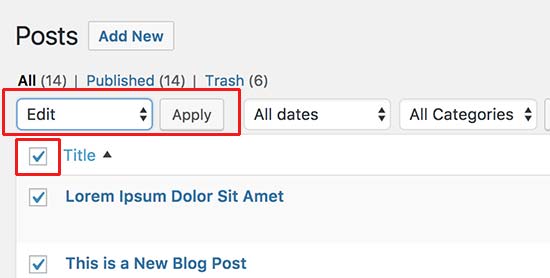
WordPress will now show the bulk editing options for all these posts.
Simply open the ‘Author’ dropdown and choose the generic account you just created.
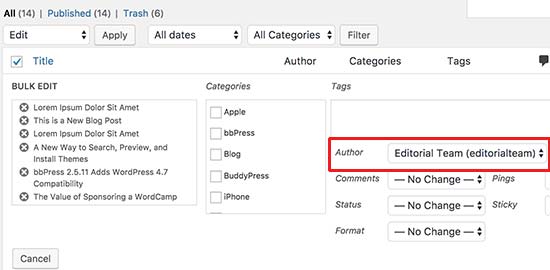
When you are ready to make this change live, click on the Update button. WordPress will now update all the posts to show the new author name.
Learn More Ways to Run a Multi-Author WordPress Blog
Check out these guides to manage your blog posts and authors more effectively:
- How to Prevent Duplicate Post Titles in WordPress
- How To Efficiently Manage Post Series in WordPress
- How to Display Popular Posts by Views in WordPress
- How to Display Most Commented Posts in WordPress
We hope this article helped you learn how to remove author name from WordPress posts. You may also want to see our guide on how to bulk add posts and pages in WordPress and our expert picks of the best related posts plugins for WordPress.
If you liked this article, then please subscribe to our YouTube Channel for WordPress video tutorials. You can also find us on Twitter and Facebook.


Jiří Vaněk
I have a blog as a sole author and on my own domain. That’s why I thought it was unnecessary to display the author’s name. I used your procedure with the CSS code and it works perfectly. Thanks, you saved me another plugin space. This solution works perfectly with minimal demands on the website’s performance.
WPBeginner Support
Glad you found our code helpful
Admin
Jay
We went with method #2 … perfect. However, do you know if there is a way to remove the other names from the author select dropdown list when editing or adding a post. We want only our genergic author to be listed as an option. Thanks!
WPBeginner Support
We do not have a recommended method for forcing the author to be assigned at the moment.
Admin
Steve Foerster
Thank you, this was helpful.
WPBeginner Support
Glad our guide was helpful
Admin
Chris
Wouldn’t copying and pasting the folder and file into your child theme, and then deleting or commenting out this snippet, be the best solution?
Versus recommending editing the parent theme files directly.
WPBeginner Support
If possible, that would be a good option but not all themes can be easily added into a child theme like that without issues.
Admin
Debbie
This was super helpful and I used the second method successfully. Thanks!
WPBeginner Support
Glad our guide was helpful
Admin
Mark Toney
I took all the steps outlined – but when I got to the BULK edit – it would not show the new name of Editorial Team in the dropdown. I logged out and back in again and it still does not allow that name. Any ideas on why or a fix?
WPBeginner Support
You would want to check the role permissions for the user you created that they would be able to have posts on your site for a likely culprit
Admin
daveF
One thing to be aware of with the second method – when you bulk update the posts with the new ‘author’, the “last updated’ date is changed to the current date. If your theme displays the “last updated” metadata, it will appear that all your post happened on the same day. I did this on a church blog that was only a week old and had only a few posts, so it was not a big deal. If you have hundreds of existing posts over a long period of time, it might be a big deal to you. I wish that had been pointed out in the article. It makes perfect sense in retrospect, but I didn’t think about it until the deed was done. Maybe this comment will help someone else contemplating making this change.
WPBeginner Support
Thank you for sharing this, we’ll look into clarifying that in the future with this article
Admin
praveen
How to change a label name in a wordpress theme? For example am working on a education theme , and on the top of the course the author label is show as “Teacher”. I want to change the label as “Instructor”. Please help.
WPBeginner Support
It would depend on what added that label. If it was added by your theme you would need to reach out to the theme’s support for example
Admin
Otte
It’s better to add CSS in the theme
WPBeginner Support
Not always, hiding the text with CSS means it’s not visible to most users but site crawlers can still find the author name
Admin
Kees
Thank you very much. Very helpfull, very clear
WPBeginner Support
You’re welcome
Admin
Angelo
I’ve been able to edit the author url from the homepage to the author page by going to seo by yoast under “search appearance”. Thank you God bless you!
WPBeginner Support
You’re welcome, thanks for sharing where you were able to edit the url.
Admin
suraj
thanks 3rd one works for me (:
WPBeginner Support
Glad our article could help
Admin
Milan
The plugin Show Hide Author is no longer available for download.
WPBeginner Support
Thank you for letting us know, we will certainly look into alternatives
Admin
Melissa
Is there a reason you didn’t include the display: none; option for custom css?
WPBeginner Support
That would only hide the name until someone inspected the page at which point the name would be simple to find
Admin
Michelle
Thank you! This solution was very easy to implement and worked perfectly.
Glen Appleton
And then there’s the CSS method, which you covered partially in the first (plugin) method. Use the same element inspector to find the CSS class (byline in Twenty Seventeen theme), and use the CSS selector to set the display to “none”. For example:
article.type-post .byline {
display: none;
}
NOTE: This only removes it from the rendered page, and not the page source. You should create a separate editor account for posting articles on your site, and make sure that account doesn’t have admin privileges.
Hope this helps.
Ngoc Anh
Hi, How can I hide the author description below the post? Please help me! thanks a lot
joe
just another security flaw in outdated wordpress. every post shows my login admin name. why someone wont update wordpress to fix the known issues hackers use to hack it just boggles my mind.
WPBeginner Support
Hi Joe,
Please see our guide on how to add or change your full name in WordPress. By adding a full name and selecting it to display publicly you would be able to stop WordPress form showing the username you use for login.
Admin
Ireneusz
Hi,
I used Show Hide Author plugin, but not working. I removed author, but left “by”. I cannot remove “by” in theme FitWP in posts. There’s no class “byline” in code.
I try put by in field Regular expressions, but not working.
Please help me.
Kevin
You can try method 1 and use this code instead, that worked for me
Code:
.single-post .author.vcard {
display: none;
}