Running a busy WordPress site means constantly publishing new content. But how do you make sure your loyal readers don’t miss your latest posts?
We’ve found that highlighting new content for returning visitors is one of the most effective ways to increase engagement and keep readers coming back for more.
Whether you publish daily blog posts or weekly updates, making new content stand out helps your regular visitors quickly spot what’s fresh on your site. This simple feature can significantly improve your readers’ experience and boost your content’s visibility.
In this guide, we’ll show you several ways to highlight new posts for returning visitors in WordPress.

Why Highlight New Posts on Your WordPress Site?
Highlighting new posts on your WordPress site helps returning visitors easily discover your new content. This way, they won’t miss out on any fresh information or updates you’ve added to your blog.
Labeling new posts improves the user experience on your WordPress website. When a returning visitor reaches your website, they can easily spot which posts they haven’t read yet, saving them a lot of time and increasing your pageviews.
A good user experience on your site not only helps attracting returning visitors but also helps with WordPress SEO. When your site is easy to use, it improves your search engine rankings and increases the likelihood of visitors finding your content.
With that in mind, let’s see how you can highlight new posts for returning visitors in WordPress.
We will show you two methods: one with a WordPress plugin and the other with code. You can jump to a specific method using the quick links below:
✨ Want to add eye-catching features to your WordPress site without dealing with code or plugins? Let our expert WordPress designers at WPBeginner Pro Services handle the customization while you focus on creating great content.
Method 1: Highlight New WordPress Posts With a WordPress Plugin
This first method uses the Mark New Posts plugin. We recommend it for beginner bloggers because it’s very simple. This plugin will add a label to show which blog posts in WordPress that your site visitors haven’t seen yet.
Firstly, you need to install and activate the Mark New Posts plugin. If you need guidance, see our step-by-step guide on how to install WordPress plugins.
After that, go to Settings » Mark New Posts from the WordPress admin area. You will now see the plugin’s settings page.
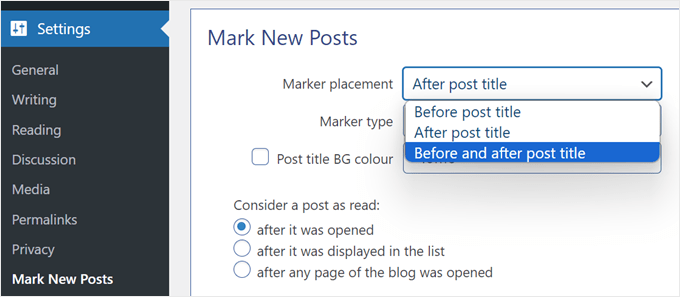
What you want to do now is select where to display the ‘New’ label. You can select After post title, Before post title, or Before and after post title.
We find that adding the label after the post title will look like a notification and grab users’ attention the most, so that’s what we’ve chosen.
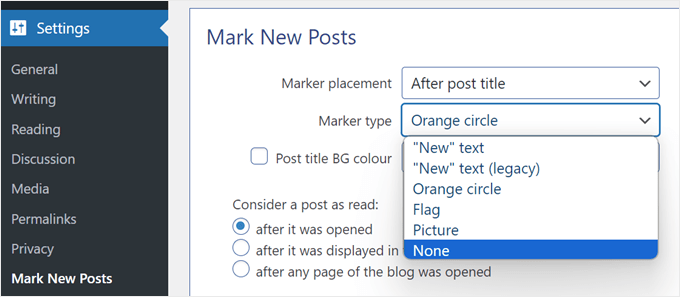
Next, you need to choose what the marker looks like in the Marker type setting. The options include “New” text, “New” text legacy, Orange circle, Flag, Picture, or None.
Be sure to explore each option to see which one looks best with your website design.
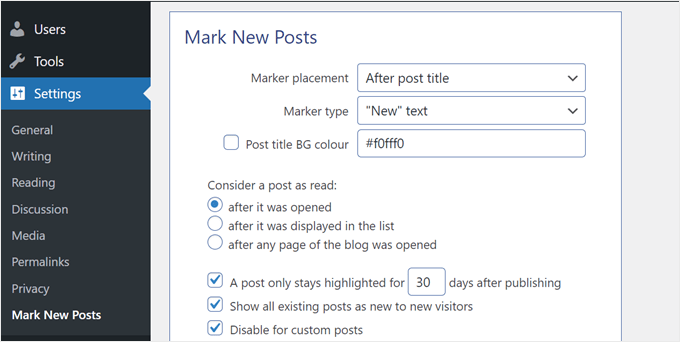
Another setting you can configure is the background color for the new post’s title. If you enable this, then when a reader visits a new post, they will see that the post title section has a background color. We didn’t find this setting necessary, so we disabled it.
In the ‘Consider a post as read’ setting, you can choose when to turn off the new post label: after it was opened, after it was displayed in the list, or after any web page of the blog was opened.
We suggest going with ‘after it was opened.’ This means that if a visitor hasn’t read several posts and opens one, then the new post label for the other articles won’t disappear.
Next, you can select how many days the post should stay highlighted as new, show all existing posts as new to new visitors, and disable the new label for custom post types.
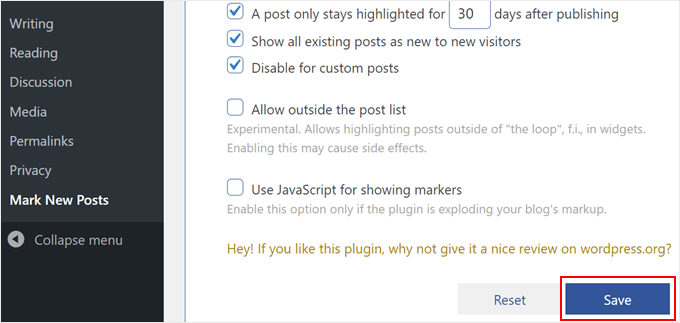
The last two settings are pretty advanced.
One is to ‘Allow outside the post list,’ which means you can highlight posts outside of the loop, like in widget-ready sidebar areas. Be cautious about enabling this setting, as it may create unwanted WordPress errors.
The other is ‘Use JavaScript for showing markers’, which is only recommended if the plugin is not compatible with the theme or other plugins being used on your blog. In most cases, you will want to keep this setting disabled.
Once you are done configuring the plugin settings, just click ‘Save.’
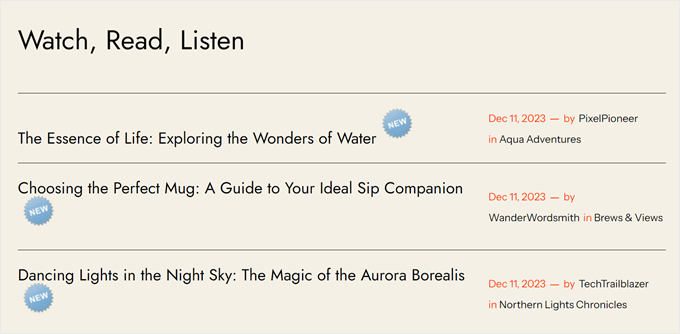
And that’s it! Go ahead and visit your website in incognito mode to see if the new labels for recent posts are live.
Here’s what it looks like on our demo website:
Method 2: Highlight New Posts by Adding Custom Code
Are you unhappy with the new post label options given by the previous plugin? If so, then you can highlight new posts using custom code instead.
For beginners, this method may seem intimidating. But don’t worry because we will use the WPCode plugin to safely insert code snippets in WordPress without breaking your website.
WPCode also makes it easy to manage multiple custom code snippets, which will be handy in our case since we will be using more than one.

Note: While there is a free version of WPCode, we will use WPCode Pro because it allows you to insert the code snippets into the proper locations for this tutorial.
The first thing you need to do is install WPCode in WordPress. For setup instructions, go ahead and check out our article on how to install a WordPress plugin.
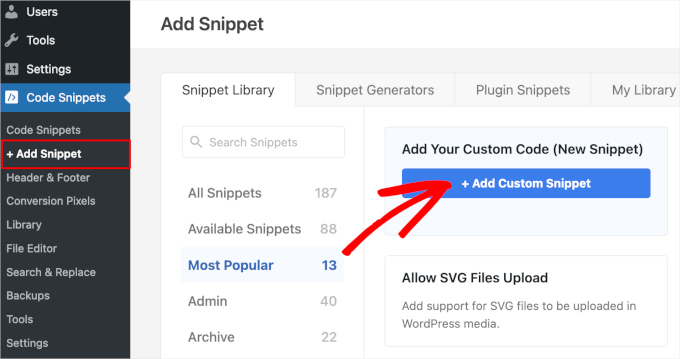
Once the plugin is activated, go to Code Snippets » + Add Snippet from your WordPress dashboard.
From there, find ‘Add Your Custom Code (New Snippet)’ and click the ‘+ Add Custom Snippet’ button underneath it.
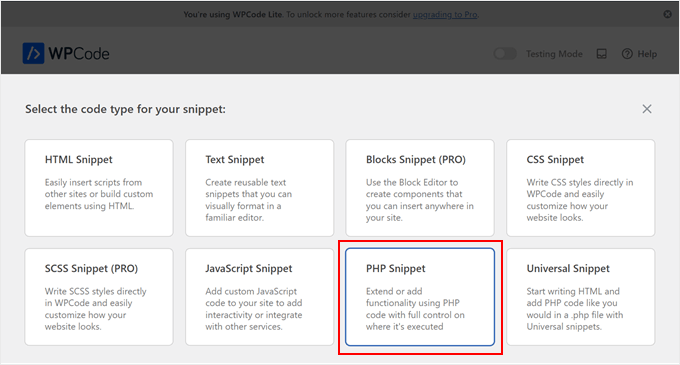
Then, select ‘PHP Snippet’ as the code type from the list of options that appear on the screen.
Now, let’s add a title to your code snippet so that it’s easier to find it later on if needed.
For this, you can name it something like ‘WordPress Last Visit Title Modifier.’
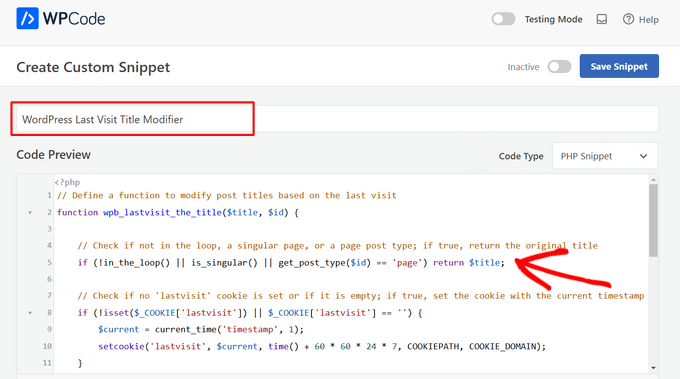
After that, you can copy and paste the code snippet below:
// Define a function to modify post titles based on the last visit
function wpb_lastvisit_the_title($title, $id) {

    // Check if not in the loop, a singular page, or a page post type; if true, return the original title
    if (!in_the_loop() || is_singular() || get_post_type($id) == 'page') return $title;

    // Check if no 'lastvisit' cookie is set or if it is empty; if true, set the cookie with the current timestamp
    if (!isset($_COOKIE['lastvisit']) || $_COOKIE['lastvisit'] == '') {
        $current = current_time('timestamp', 1);
        setcookie('lastvisit', $current, time() + 60 * 60 * 24 * 7, COOKIEPATH, COOKIE_DOMAIN);
    }

    // Retrieve the 'lastvisit' cookie value
    $lastvisit = $_COOKIE['lastvisit'];

    // Get the publish date of the post (in Unix timestamp format)
    $publish_date = get_post_time('U', true, $id);

    // If the post was published after the last visit, append a new span to the title
    if ($publish_date > $lastvisit) $title .= '<span class="new-article">New</span>';

    // Return the modified or original title
    return $title;
}

// Add a filter to apply the 'wpb_lastvisit_the_title' function to 'the_title' hook with priority 10 and 2 parameters
add_filter('the_title', 'wpb_lastvisit_the_title', 10, 2);
What this snippet does is modify WordPress post titles based on a user’s last visit.
It checks if the page is a blog post or not, and if not, then it will display the original title as is. But if it is a blog post, then the title will be modified.
Then, the snippet ensures the lastvisit cookie exists. If it doesn’t, then the code creates it and sets it to the current time. The function then compares this lastvisit time with the post’s publish date and adds a ‘New’ label to the title if the post is newer than the last visit.
Once you have inserted the code snippet, just scroll down and select ‘Auto Insert’ for the Insert Method.
Other than that, make sure to choose ‘Frontend only’ for the Location. This means the code will only run on the part of your WordPress blog that visitors interact with and not in your admin panel or other places.
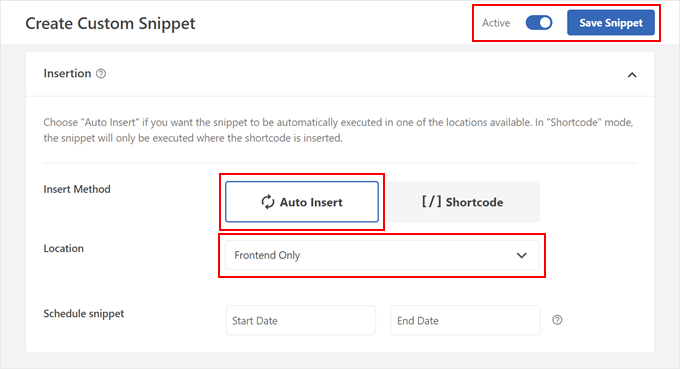
With that done, you can make the code ‘Active’ and click ‘Save Snippet.’
Now, repeat the step to add a new custom code snippet. This time, the code will style the ‘New’ label that is added to recent post titles based on the last visit of a user.
So, you can name it something like ‘Post Title New Label Style’ and the Code Type should be ‘CSS Snippet.’
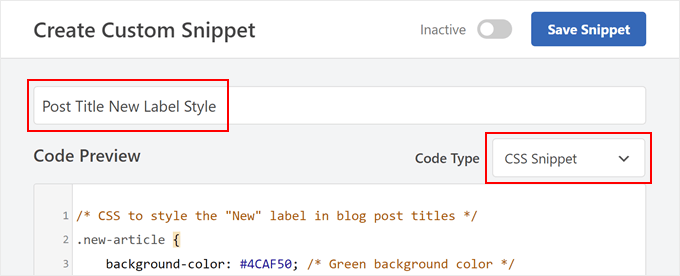
You can then copy and paste the following lines of code into the Code Preview box:
/* CSS to style the "New" label in blog post titles */
.new-article {
    background-color: #4CAF50; /* Green background color */
    color: #ffffff; /* White text color */
    padding: 2px 5px; /* Padding around the label */
    margin-left: 5px; /* Adjust the margin to your preference */
    border-radius: 3px; /* Rounded corners for the label */
    font-size: 12px; /* Adjust the font size to your preference */
}
This code snippet essentially customizes the ‘New’ post label using a custom background color, text color, padding, margin, border radius, and font size.
Feel free to adjust these elements to your preferences as you go along. Just make sure to use hex color codes or RGB values for the background and text colors.
In the Insertion section, select ‘Site Wide Header’ as the Location. After that, make the code ‘Active’ and click ‘Save Snippet.’
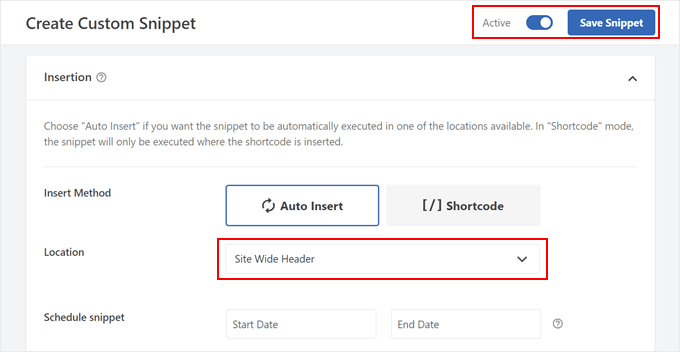
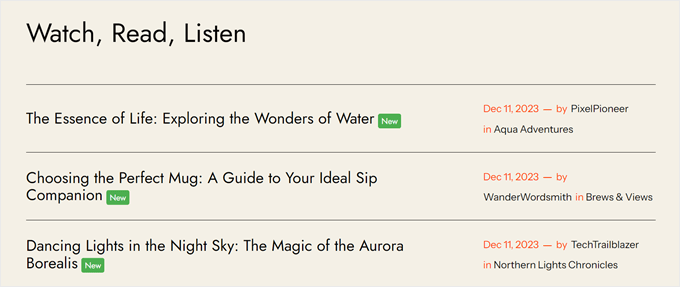
And that’s it! To see if the code works, you can publish a new blog post and view the post in mobile or desktop in incognito mode.
If the code is successful, then you should see a ‘New’ label next to your recent post titles.
Learn More Ways to Optimize Your WordPress Blog
Besides highlighting featured posts for returning website visitors, there are other ways you can improve your blog and get people to stay on your site longer.
For example, you could display posts related to the one that the visitor is currently reading. This way, you can keep them engaged by presenting content that aligns with their interests.
Or, you could create a sticky floating footer bar to capture email addresses or promote special offers. This bar remains visible as visitors scroll down the page. You can use it to provide a constant reminder to subscribe or take advantage of your offer, increasing conversion rates.
You may also want to add a font resizer for accessibility purposes. This allows visitors to adjust the font size on your website to their preference, making it easier for them to read your content.
If you have lots of blog content, you may want to create custom pages that display blog posts if they have a specific custom field.
Let’s say you have a custom field for ‘Recipe Difficulty.’ You could create a page that displays all blog posts tagged with ‘Recipe’ and that also has the custom field value of ‘Easy.’ This way, visitors looking for easy recipes can find them all in one place.
Here are other tips you can check out to further optimize your WordPress blog:
- How to Display Relative Dates in WordPress
- How to Build a Custom Scrollbar in WordPress
- How to Display Post Excerpts in WordPress Themes
- Ways to Create a Mobile Friendly-WordPress Site (Expert Tips)
- How to Highlight Text in WordPress (Beginner’s Guide)
- How to Add a Reading Progress Bar in WordPress Posts
We hope this article helped you learn how to highlight new posts for returning visitors in WordPress. You may also want to check out our expert picks of the best WordPress drag-and-drop page builder plugins and our complete guide to the most effective WordPress website design elements.
If you liked this article, then please subscribe to our YouTube Channel for WordPress video tutorials. You can also find us on Twitter and Facebook.


Moinuddin Waheed
Thank you wpbeginner for this article.
This will definitely help with good user experience and will help users get new and updated content.
This will incentivise them to be returning customer.
keramzyt
Is any way to set this cookie and functionality to different subpages on website?
Peter
Hi
I use WP for a static website and show posts in a sidebar using the Recent Posts widget.
I would like visitors to the site to be able to see new posts by highlighting them in some way in the sidebar e.g. showing “New” against the title of the post.
Is there any plugin that will support this? The Mark New Posts widget only shows that the item is new once you have opened the post from the sidebar.
Many thanks
Peter
محمود
it didn’t work in my site…
please help.
S
Forgot to mention, as mentioned above, most websites have more than one theme per post/page, so this may not work in that instance. Have a wonderful day.
S
Thank you for all your help. However, this needs to be in a short video and explained in slow detail. This is complicated and for developers that are used to coding, not for the average joe building a website. I always appreciate your emails so much
WPBeginner Support
Please use the first method which uses a plugin.
Admin
simpson
Hello
this tutorial not works for me can u help me?
sam
Hi
This is awesome but doesn’t work for me on wordpress multisite
Thanks
Sam
This does not work for multisite network. Can you please advise. I appreciate your help by adding a tutorial for multisite.
Thanks
mthcsn
Great stuff! Thanks!
Although, I think the cookie is expiring rather fast. I think it was meant to be ‘time()+(60*60*24*7)’ so it expires after a week. Otherwise, it expires only after slightly less than 3 hours.
Danny van Kooten
Great idea – I turned this into a quick plugin so it’s even easier to integrate. It’s available from the WP.org repository: http://wordpress.org/plugins/highlight-new-posts/
Suggestions are very welcome.
simpson
pls update plugin
Dennis Does Cricket
Can you please show pics of what the intended outcome is?