Have you noticed how text looks when visitors highlight it on your website? We sometimes have to update the text selection color on the websites we work on to match the brand colors, and many users have asked how to do this.
The good news is, that it’s easier than you might think to customize this often-overlooked design element. Whether you want to match your brand colors or improve readability, changing the text selection color can enhance your website’s user experience.
In this guide, we’ll show you exactly how to change the default text selection color in WordPress.

Why Change the Default Text Selection Color in WordPress?
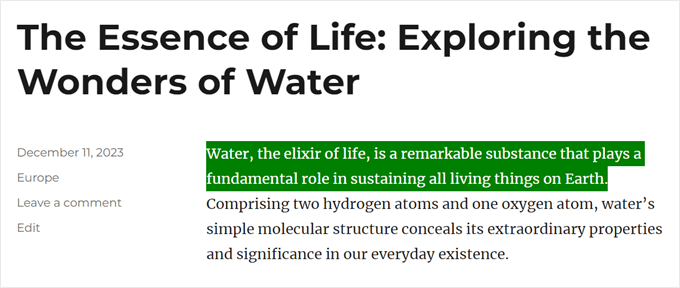
Text selection color refers to the font color in WordPress that shows up when you highlight a piece of text within a content. Like this:
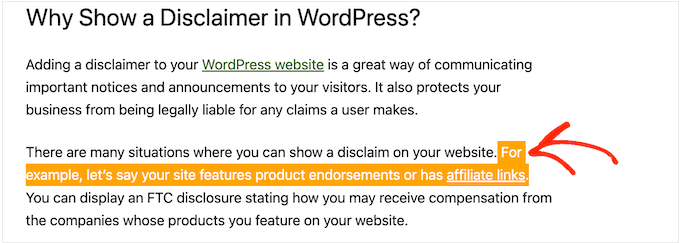
In some cases, you may want to change this color because it doesn’t look well with your WordPress website design. Color scheme plays an important role in making your site look good and keeping a consistent brand experience.
If you run a WordPress blog, then you may also want to change the default text selection color if you think it doesn’t stand out enough from the rest of the content, making it hard to read.
With that being said, let’s see how you can change the font color for text selection in WordPress. Simply use the links below to jump to the method you want to use:
Method 1: Using Code to Change Text Selection Color (Works With All Themes)
Some WordPress themes offer a built-in feature to change the text selection color, but not all of them do. That’s why we recommend using custom CSS code as the method is much more universal.
Often, you will find CSS code snippets in WordPress tutorials with instructions to add them to your theme’s functions.php file.
The biggest problem is that even a tiny mistake in the code snippet can completely break your WordPress site. Not to mention, you will lose all your custom code when you update the WordPress theme.
That’s where WPCode comes in. This code snippets plugin makes it easy to add custom code to WordPress without causing any errors or making your site inaccessible.

The first thing you need to do is install and activate the free WPCode plugin. For more details, see our step-by-step guide on how to install a WordPress plugin.
Upon activation, head to Code Snippets » Add Snippet in your WordPress admin dashboard.
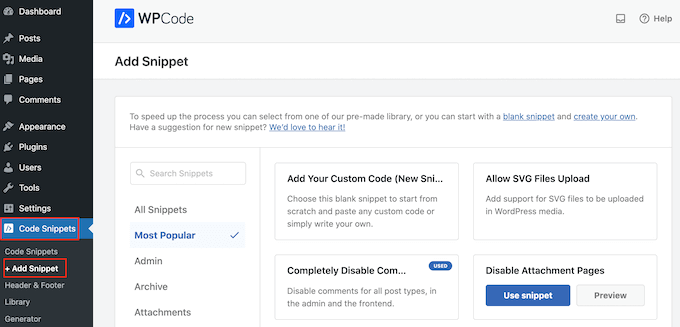
Here, simply hover your mouse over ‘Add Your Custom Code (New Snippet)’.
When it appears, click on the ‘+ Add Custom Snippet’ button.

To start, type in a title for the custom code snippet. This can be anything that helps you identify the snippet in the WordPress dashboard later, like ‘Change text selection color.’
After that, you need to open the ‘Code Type’ dropdown and select ‘CSS Snippet’.
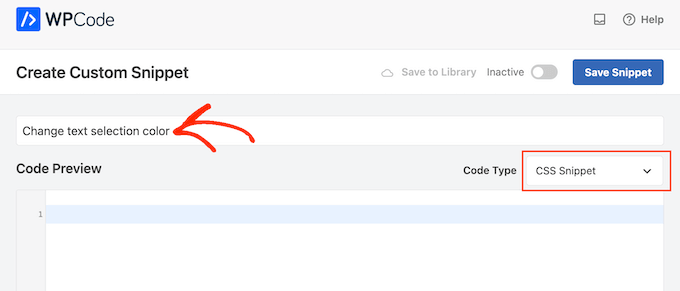
You can then add the following CSS into the Code Preview box:
/* Customizing text selection for Firefox */
::-moz-selection {
    /* Background color when text is selected in Firefox */
    background-color: #008000; /* Green color */
    /* Text color when text is selected in Firefox */
    color: #fff;
}

/* Customizing text selection for other browsers */
::selection {
    /* Background color when text is selected in other browsers */
    background-color: #008000; /* Green color */
    /* Text color when text is selected in other browsers */
    color: #fff;
}
Notice that we added two styles. The ::moz-selection CSS selector works with the Firefox browser, and the ::selection CSS selector works with other popular browsers like Google Chrome, Safari, IE9+, and Opera.
In the above example, the # hex code will change the link color to green, so you will need to change background-color: #008000 to the color you want to use for the highlighted text.
If you are not sure what hex code to use, then you can explore different colors and get their codes on the HTML Color Codes website.
When you are happy with how your code looks, just click on the ‘Inactive’ toggle to show ‘Active’ instead.
Then, click on ‘Save Snippet’ to make the CSS snippet live.
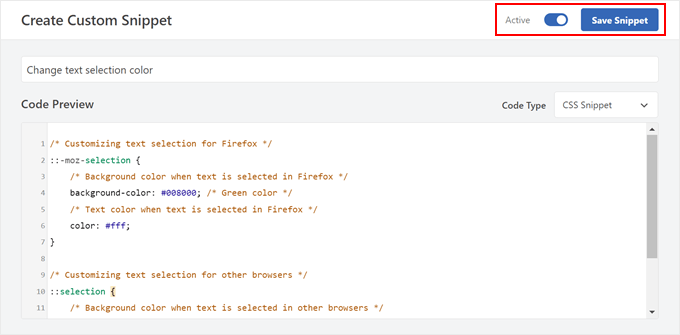
You can now visit your website to see the changes in action.
This is how it looked on our demo website.
Method 2: Using the WordPress Theme Settings (Varies by the Classic Theme)
Some WordPress themes allow you to change the settings for your typography and fonts, including the selected text color. To check whether this is the case for your theme, you need to go to Appearance » Customize.
Note: This method is not applicable for block themes.

Here, look for any settings labeled ‘Colors’.
If you see a ‘General’, ‘Global’, or similar tab, then this often contains the theme’s color settings.
For example, if you are using the Astra WordPress theme, then you will need to select the ‘Global’ tab.

After that, click ‘Colors’ to see all the different colors that make up this WordPress theme.
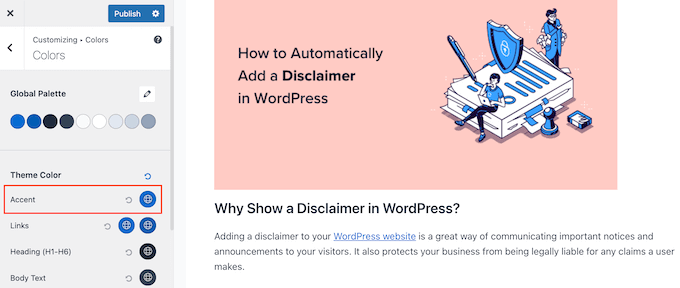
Next, you must click on ‘Accent’.
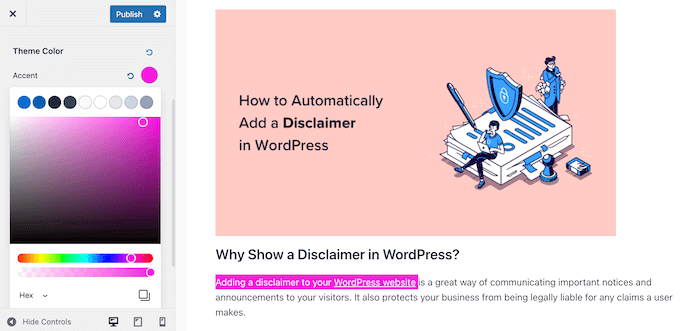
This opens a color picker where you can choose a new text selection color.
You can now watch the font color change as the live preview will update automatically. So, you can try different settings to see what looks the best for your WordPress website.
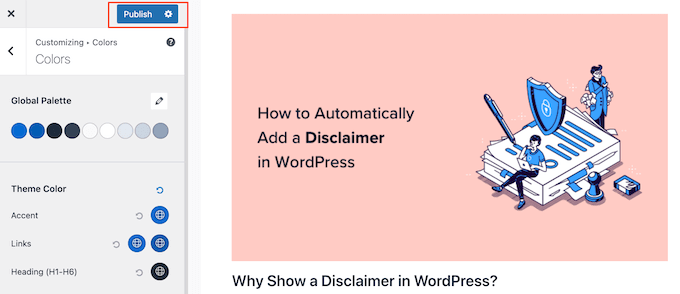
When you are happy with your changes, just click ‘Publish’ to make them live.
After that, you will see the new text selection color live on your WordPress blog or website.
Even if you don’t see any color settings in the WordPress theme customizer, it’s still worth checking your theme’s documentation to see if there is a way to change the default text selection color.
You can even reach out to the theme’s developer for help. For more information, please see our guide on how to properly ask for WordPress support and get it.
Discover More WordPress Typography Tips and Tricks
Do you want to customize the fonts in your WordPress website, but don’t know how? Check out these guides to get you started:
- Best WordPress Typography Plugins to Improve Your Design
- How to Easily Change the Font Size in WordPress
- What is a Web Safe Font + Best Web Safe Fonts (Beginner’s Guide)
- How to Easily Add Icon Fonts in Your WordPress Theme
- How to Add Drop Caps in WordPress Posts
We hope this tutorial helped you learn how to change the default text selection color in WordPress. You may also want to see our guide on the best drag-and-drop page builders for WordPress and how to sell fonts online with WordPress.
If you liked this article, then please subscribe to our YouTube Channel for WordPress video tutorials. You can also find us on Twitter and Facebook.


Jiří Vaněk
Recently, I used your article to change the color of the header in the Chrome browser on mobile devices. This is another small detail that can greatly personalize a website. I know these are just minor tweaks, but I love how, thanks to your guides, I can gradually perfect all these little details. Because, in my opinion, the beauty is in the details. Thank you for the great tutorial and the snippet that made it really easy.
Michael
Thank you so much for your post ! Clear and useful.
WPBeginner Support
Glad you found our content helpful
Admin
Lynne Clay
Is there a way to change just my posts titles color without having to change the coding? I don’t understand anything about coding and don’t want to mess with that anyway.
WPBeginner Support
While it requires coding, if you wanted customizations without needing to understand the code you could look into a plugin such as CSS Hero which we have reviewed here:
https://www.wpbeginner.com/plugins/css-hero-review-wordpress-design-customization-made-easy/
Admin
Samar Jamil
Thanks for this awesome post.
WPBeginner Support
You’re welcome
Admin
KrishnaChaitanya
Thank you very much, your service was excellent. Lot to learn from you.
WPBeginner Support
Glad our tutorial was helpful
Admin
Adrian Wallis
Thanks, it worked great for me in a Twenty Fourteen Child. Hopefully that is the last of the default green gone from template
Michele
I tried this but it didn’t work… I’m using Thesis, does that make a difference?
Editorial Staff
Not that we know of because it is a basic CSS change. The only thing we can think of is that thesis is overriding your styles maybe?
Admin
Marvin
Hello there,
I just copied your code in my Genesis eleven40 child theme but it is not working.
Thank You
Editorial Staff
It should work just fine unless eleven40 has it’s own styles pre-defined. In which case you would need to override them by adding an !important value in yours.
Admin
Lauren
Oh my gosh. I have been searching tirelessly all over the internet for the solution to this problem, but to no avail. But this response to Marvin’s question solved it! So simple. Thanks so much!!!!!
David Abramson
Cool trick. I am working on a website in Genesis and like my tech support guy says, “it’s as easy as drinking a glass of water”
Thanks!
-David
Brad Dalton
Chris Coyier posted this on css-tricks.com back in 2009 http://css-tricks.com/snippets/css/change-text-selection-color/
Editorial Staff
Ah well, didn’t know about it until we saw it on Brian’s site.
Admin
Keith Davis
Yes I saw it on Brian Gardner’s site.
Never knew you could change the selection colours until I read his article.
Not sure if I would ever use it, but nice to know it can be done.
Josh McCarty
This is one of those simple things that many people probably won’t notice, but it’s a nice “extra” to add to a website. I first saw it in HTML5 Boilerplate and use it frequently on sites that I build.
bungeshea
You actually can combine them, like this:
::selection,
::-moz-selection {
background-color: #ff6200;
color: #fff;
}
Editorial Staff
We saw this tutorial on Brian’s site. He suggests that combining them will not work (not sure which environment it was not working). But we’d stick with what we know works.
Admin
Clean Digital
Nice post. Just updated our site with a nice red background! Cheers!
Gautam Doddamani
genesis has a nice text selection color. your site’s is orange which is cool
p.s. speaking about site appearances, yoast.com got an upgrade too, he is also now using the genesis framework kudos to that!
Editorial Staff
Yup, Genesis is a very good framework to build your site on.
Admin