Have you ever spotted websites with uniquely styled first and last menu items? That’s not by chance – it’s clever CSS at work. This technique can highlight important links, like your contact page or a special offer.
Many of our readers have tried adding custom classes to their menu items, only to find that when they rearrange their menu, the styling breaks. The items tagged as ‘first’ and ‘last’ are no longer in those positions, leaving the menu looking inconsistent.
That’s why this guide will show you how to add a .first and .last class that will stick to your menu items, even if you shuffle things around later. We’ll cover two methods: a filter for classic themes and CSS selectors for all themes, including block themes.
Why Style the First and Last Navigation Items Differently?
Sometimes, you may need to add custom styling to the first and last items in a navigation menu. This can make important links stand out, such as the link to your site’s contact form or WooCommerce cart page.
In this case, you could simply add a custom CSS class to the first and last menu items. However, if you change the menu’s order at any point, then this might completely break the custom styling.
For this reason, we recommend using filters instead.
In this guide, we will show you how to style the first and last items of your navigation menu, so you can rearrange the menu without breaking the custom styling. Simply use the quick links below to jump straight to the method you want to use:
Pro Tip: Do you want to highlight any menu item on your website? Check out our guide on how to highlight a menu item in WordPress for more information.
Method 1: Adding First and Last Class Using a Filter (Recommended)
Note: This method only works with a classic WordPress theme. If you are using a block theme, then go to Method 2.
The easiest way to style your navigation menu items is to add a filter to your theme.
Often you will find code snippets in WordPress tutorials with instructions to add them to your theme’s functions.php file.
The biggest problem is that even a tiny mistake in the custom code snippet can break your WordPress site and make it inaccessible. Not to mention, if you update your WordPress theme, then you will lose all your customizations.
That’s where WPCode comes in.
This free plugin makes it easy to add custom CSS, PHP, HTML, and more to WordPress without putting your site at risk.
The first thing you need to do is install and activate the free WPCode plugin. For more details, see our step-by-step guide on how to install a WordPress plugin.
Upon activation, head over to Code Snippets » Add Snippet.
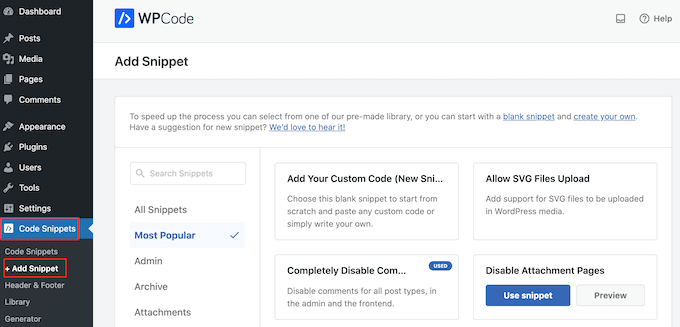
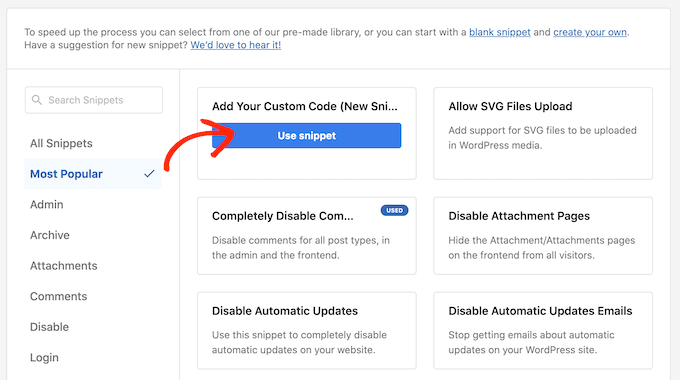
Here, simply hover your mouse over ‘Add Your Custom Code.’
When it appears, click on ‘Use snippet.’
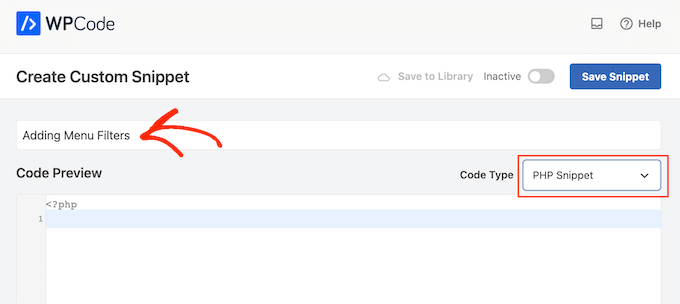
To start, type in a title for the custom code snippet. This can be anything that helps you identify the snippet in the WordPress dashboard.
After that, open the ‘Code Type’ dropdown and select ‘PHP Snippet.’
You can then add the following PHP to the code box:
function wpb_first_and_last_menu_class($items) {
    $items[1]->classes[] = 'first';
    $items[count($items)]->classes[] = 'last';
    return $items;
}
add_filter('wp_nav_menu_objects', 'wpb_first_and_last_menu_class');
After that, you are ready to scroll to the top of the screen and click on the ‘Inactive’ toggle so that it changes to ‘Active.’
Finally, click on ‘Save Snippet’ to make the PHP snippet live.
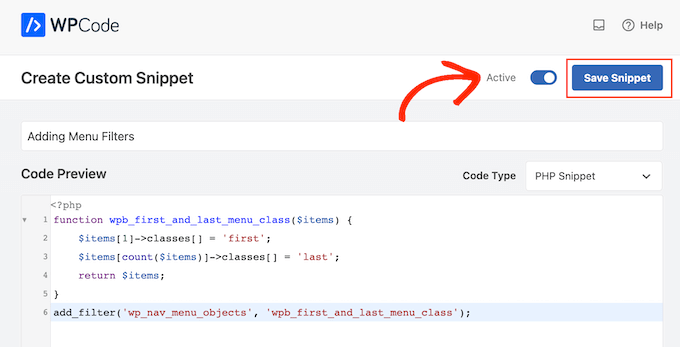
This creates .first and .last CSS classes for your first and last menu items. You can now use these classes to apply unique styling to these items on your custom navigation menu.
To do this, you will need to add a second snippet to your WordPress website. To start, create a new custom code snippet by following the same process described above.
After that, type in a title for the custom code snippet.
Then, open the ‘Code Type’ dropdown, but this time select ‘CSS Snippet.’
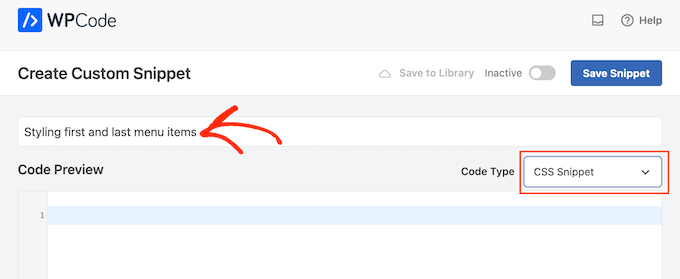
For this guide, we will simply bold the first and last menu items by adding the following CSS formatting to the code box:
.first a {font-weight: bold;}

.last a {font-weight: bold;}
With that done, click on the ‘Inactive’ toggle so that it changes to ‘Active.’
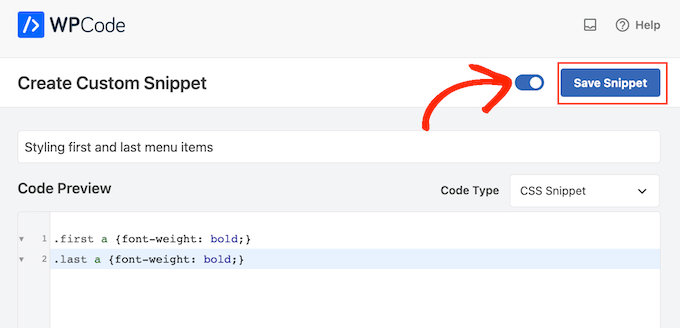
Finally, click on ‘Save Snippet’ to make the CSS snippet live.
Now, if you visit your website, you will see the newly styled menu live.

Method 2: Styling First and Last Items Using CSS Selectors (Works With All Themes)
If you don’t want to use a code snippet plugin, then you can style the first and last menu items using CSS selectors. However, this method may not work with some older browsers, such as Internet Explorer.
With that in mind, it’s a good idea to test your WordPress website in different browsers.
To follow this method, you will need to add code to your theme’s style sheet or the ‘Additional CSS’ section of the WordPress Theme Customizer.
If you haven’t done this before, then see our guide on how to easily add custom CSS to your WordPress site.
The first step is editing your theme’s style.css file or heading over to Appearance » Customize and then clicking on ‘Additional CSS’.
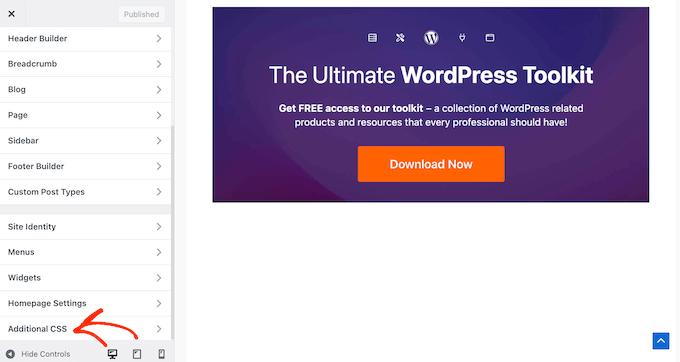
After that, go ahead and add the following code snippet to your site:
ul#yourmenuid > li:first-child { }
ul#yourmenuid > li:last-child { }
Note that you will need to replace ‘yourmenuid’ with your navigation menu’s ID.
The selectors’ first-child’ and ‘last-child’ select the first and last child of its parent, which are the first and last items in the navigation menu.
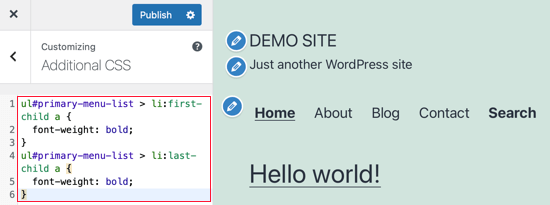
For example, we used this code to bold the first and last navigation menu items on our WordPress blog:
ul#primary-menu-list > li:first-child a {
    font-weight: bold;
}
ul#primary-menu-list > li:last-child a {
    font-weight: bold;
}
If you use a WordPress block theme, then the Theme Customizer will be missing on your WordPress admin. You need to enter this URL on your browser to access the Theme Customizer:
https://yourdomainname.com/wp-admin/customize.php
Make sure to replace the domain with your website’s domain name.
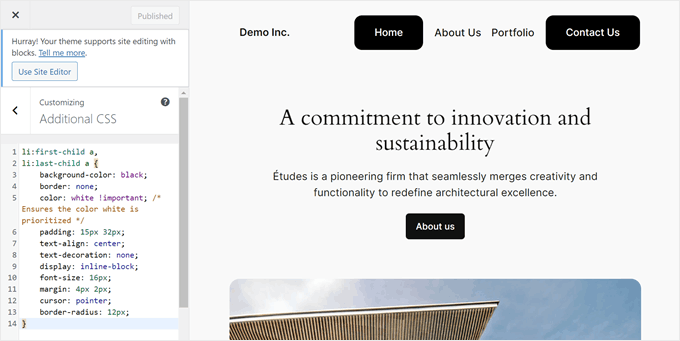
After that, open the ‘Additional CSS’ tab like before and insert the following code. Notice how the code looks slightly different as you don’t need to add your menu ID.
li:first-child a,
li:last-child a {
    background-color: black;
    border: none;
    color: white !important; /* Ensures the color white is prioritized */
    padding: 15px 32px;
    text-align: center;
    text-decoration: none;
    display: inline-block;
    font-size: 16px;
    margin: 4px 2px;
    cursor: pointer;
    border-radius: 12px;
}
Feel free to customize the code to your needs. In the example below, we turned the first and last links into buttons.
Here is what it looks like:
We hope this tutorial helped you learn how to add the .first and .last classes to WordPress navigation menus. You may also want to see our article on how to create a vertical navigation menu in WordPress and our beginner’s guide on creating a dropdown menu on a WordPress site.
If you liked this article, then please subscribe to our YouTube Channel for WordPress video tutorials. You can also find us on Twitter and Facebook.


Ahmed Mahdi
i’ve changed the code slightly to work with child menus too:
function wpb_first_and_last_menu_class($items) {
foreach($items as $k => $v){
$parent[$v->menu_item_parent][] = $v;
}
foreach($parent as $k => $v){
$v[0]->classes[] = ‘first’;
$v[count($v)-1]->classes[] = ‘last’;
}
return $items;
}
add_filter(‘wp_nav_menu_objects’, ‘wpb_first_and_last_menu_class’);
Trevor Simonton
exactly what i needed. thank you!
Georgios Panagiotakopoulos
Thanks! This works great!
Munkhbayar
Thanks for code. Works for me.
mad_doc
Thank you for idea & help!
Charles
Thanks for this nice code…
What about child menu first and last item?
It applied only for parent manu.
Do you have any idea about child last item?
jordi
Anyone have any tip about use add_filter(”); for wp_nav_menu using STARKERS? JS and CSS are fine to do that, it is just frustrating to don’t be able to fix it from the back…
can’t make it works
thanks to share anyway!!
Jake
This does not work reliably if you have nested menus.
Editorial Staff
Hmm, will look into a fix for this.
Admin
Olivier
It works when the menu item is the last, or the last child of a last menu item.
It does not work when the menu item is a last child of a menu item that is not the last.
Olivier
Together with some other additions to functions.php that i’ve tried, this code fails to tag a menu item as first or last menu item when they are in a submenu. A fix for this would be great!
Elliott Richmond
Nice! Would usually use CSS but this is a good tip
Mattia
Great! This is particularly interesting because I have to class more than 2 menu items…
Now I got it!
Thanks
karen
Thanks for this! Forgive me if I missed it – but – is there an example of the menu to see the difference in the nav created by this class? Thank you again!
Editorial Staff
The site we designed for our client is not live yet. But the main reason was that we wanted to have a border left to the first menu item. All other items had border right element with a specific padding and margin. We used the last class to remove the margin right and the border right because there was no need for it. It was hitting the wrap container. Hope you can visualize it.
Admin
Ivo Minchev
I’ve tried this at the site http://aurorachalet-switzerland.com/ and I cannot see the effect. I’m using the “Twenty Eleven” theme for this site. Where is the problem?
Ivo Minchev
Pobably because of the #yourmenuid tag. I tried some ID’s but none of them worked.
Editorial Staff
This should work as long as you specify the correct id tags.
Admin
Editorial Staff
Don’t think that you are using the wp_nav_menu. From the looks of it, it seems that your site is using the fall_back menu by listing all pages. Can you confirm that you have gone into Appearance > Menu and created a menu there. Then specified that menu as a primary location??
Admin