We’ve worked on a lot of WordPress sites over the years, and one customization trick we always come back to is adding the page slug to the body class. It’s such a simple thing, but it makes a world of difference when it comes to design flexibility.
Adding a page slug in the WordPress theme lets you do all the customizations you want without any complications. You can easily change the colors, fonts, and other items on individual pages without affecting the rest of your site.
In this article, we’ll show you how to add a page slug in the body class of your WordPress themes.
Why Add a Page Slug in Body Class in Your Theme?
If you’re looking to customize specific pages on your site and want to correctly identify the page, then adding a page slug in the body class of your theme is really useful.
By default, your WordPress site will only show the post ID classes, which can be tricky when it comes to recognizing the correct page. A page slug shows the URL of your blog post, making it easier to customize the page.
Besides that, you can perform different customizations to your pages using a page slug body class. For example, you can change the font and colors of a particular post or highlight a call to action button on a specific landing page.
That being said, let’s look at how you can add the page slug in the body class of your WordPress theme.
Adding a Page Slug in Your WordPress Theme
To help you add the URL of your page in the body class of your WordPress theme, you can enter the following code in your theme’s functions.php file.
function add_slug_body_class( $classes ) {
global $post;
if ( isset( $post ) ) {
$classes[] = $post->post_type . '-' . $post->post_name;
}
return $classes;
}
add_filter( 'body_class', 'add_slug_body_class' );
You can access your theme’s functions.php files by going to the WordPress Theme Editor (Code Editor). However, directly editing the theme files is very risky.
That is because any mistake while adding the code can break your site and block you from logging into your WordPress dashboard.
A much simpler way to add the code to the body class of your theme is by using a WordPress plugin like WPCode.

With WPCode, you can easily add code to your site within minutes and without any errors. Plus, it also ensures that your code doesn’t get removed if you update or change your theme in the future.
It also comes with a library of expert-made code snippets that you can install in 1-click. So, you don’t need any coding skills to make advanced WordPress customizations.
First, you’ll need to install and activate the free WPCode plugin on your site. For step-by-step instructions, you can refer to our guide on how to install a WordPress plugin.
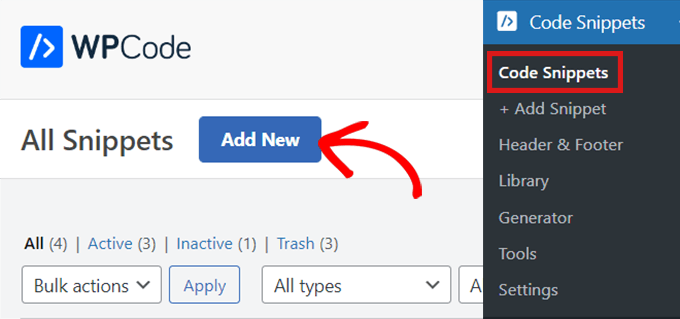
Once the plugin is activated, a new menu item called ‘Code Snippets’ will be added to your WordPress admin bar. Clicking on it will bring you to the page where you will manage all of your code snippets.
To add your first custom code snippet, click on the ‘Add New’ button.
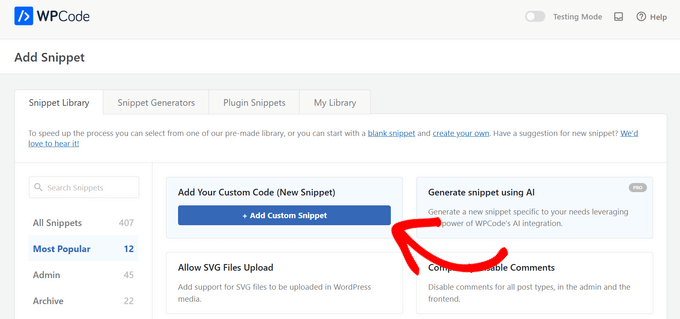
This will bring up the ‘Add Snippet’ page, where you can choose a code snippet from the pre-made library or add your custom code.
To add your custom code, navigate to the ‘Add Your Custom Code (New Snippet)’ option and click on the ‘+ Add Custom Snippet’ button.
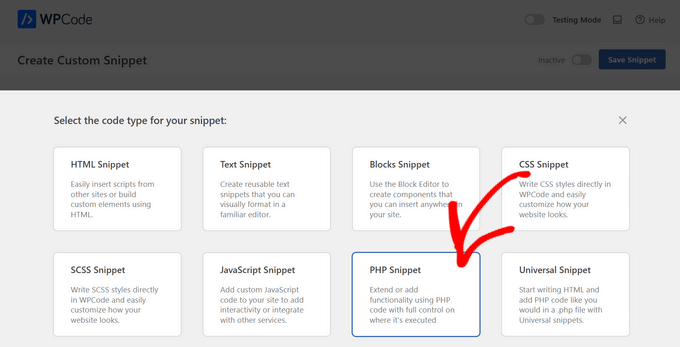
Then, you need to select a code type from the list of options that appear on the screen. For this tutorial, choose ‘PHP Snippet.’
Now, give a title for your code snippet, which is only for your reference and can be anything to help you identify the code.
After that, simply copy and paste the code from above into the ‘Code Preview’ box.
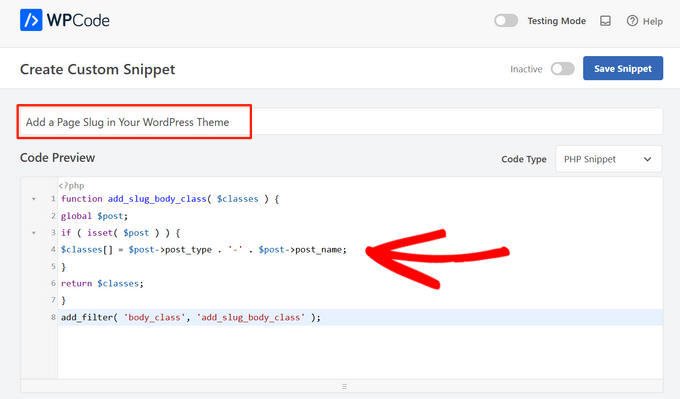
Next, scroll down to the ‘Insertion’ section. Here, you can choose the ‘Auto Insert’ method to automatically insert and execute the code in a specific WordPress location like the admin, frontend, and more.
If you’re unsure, keep the default ‘Run Everywhere’ option.
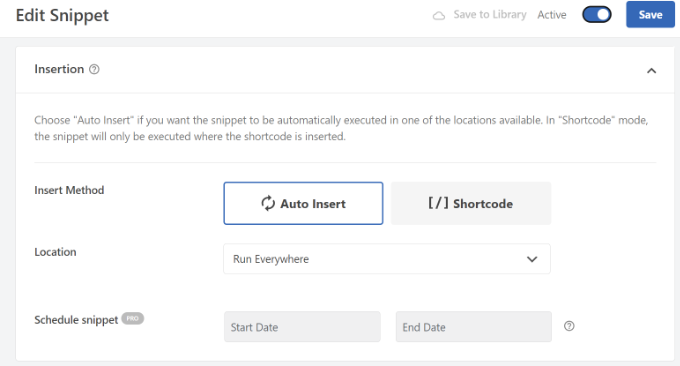
Or, you can choose the ‘Shortcode’ method. With this method, the snippet is not automatically inserted. You’ll get a shortcode that you can manually insert anywhere on your site.
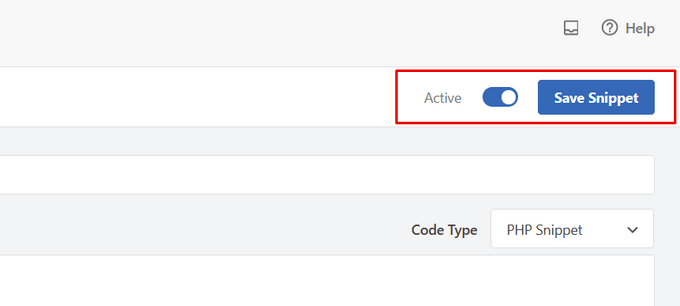
When you’re ready, toggle the switch from ‘Inactive’ to ‘Active’ and click the ‘Save Snippet’ button in the top-right corner.
For more details, you can refer to our guide on how to add custom code in WordPress.
You will now start seeing a new body class being outputted like this: page-{slug}. Use that class to override your default styles and customize elements for specific pages.
For example, let’s say you wanted to style your sidebar widgets, but only on a page that has the slug “education.” In that case, you could add CSS like this:
#sidebar .widgets{background: #fff; color: #000;}
.page-education #sidebar .widgets{background: #000; color: #fff;}
For more details, you can see our guide on how to add custom CSS to WordPress.
We hope this article helped you learn how to add a page slug in the body class of your WordPress theme. You may also want to look at our guide on WordPress body class and how to choose the best design software.
If you liked this article, then please subscribe to our YouTube Channel for WordPress video tutorials. You can also find us on Twitter and Facebook.


David
Thanks! Simple and effective.
WPBeginner Support
You’re welcome!
Admin
jeba
Thanks. Its working
WPBeginner Support
Glad our method worked for you
Admin
Bradley
Many thanks! Literally copied & pasted this code into my functions.php. Worked perfectly.
Alds
How about using global $wp_query instead of $post? I’ve noticed that $post gets overwritten if you’ve run a wp_query before the functions.php gets executed.
Pete
This needs a conditional statement to only apply it to single.php, not archive.php etc.
Chris
How can I put the post-id in the body class?
Aaron McGraw
Awesome! Just what I needed. Thank you so much!
Daneil
Thank you for putting it out there, simple bit of code, but useful and allows you to write more human friendly css files, rather than classes based on ID. Cheers
Austin
Thank you so much for this! I found out the hard way that page-id can change given different circumstances. This allows me to style individual pages without as much worry.
Kevin
Many thanks for this. Had some problems initially due to the position of code in my stylesheet CSS but once moved to the bottom worked great. Just wish this was standard for WP as others have said and that i had known about this a long time ago
Tom McGinnis
This code works quite well. I was finding, however, that search results would end up with the body class including the slug from the first item listed. Sometimes the first item would have styles that would override the styles for the search results page. Strange, huh!
I figured out that if you put !is_search() inside the if statement, then this problem is eliminated. If anybody else runs into this problem, the fix is simple.
Did you use &&?
When you put in !is_search() –How did you write the code?
Murhaf Sousli
This’s exactly what I’m looking for, I pasted the code in function.php, but unfortunately there is no class added to body! any ideas?
Asaf
I have the exactly same issue
Ahir Hemant
Hello, it working for me. send me your link so i can check.
Thank you
WPBeginner Staff
It is bundled with WordPress. However the front-end of your site is handled by themes that’s why it is left for theme authors to decide whether or not to use it.
MJ
Awesome! I wish this functionality was bundled with WP though
Miluette
Thank you sooo much. Just what I needed.
Suat
It’s great way for editing css.
Thank you
Weerayut Teja
You save my work time.
Thanks Syed
Mike
Thanks for this. I just used it to create a quick plugin to add the slug and ancestor slugs to the body class. Anyone interested can get that here: https://github.com/bigmikestudios/bms-bodyclass-slug
Todd M.
This is a great snippet for all WordPress devs. Comes as standard in my theme setup now.
Gaurav Ramesh
Thanks for this. Such small tips and tricks help a lot to beginners like me.
Randy Caruso
Thanks for this – been stuck hacking myself to bits with the page-id and suffering the consequences.