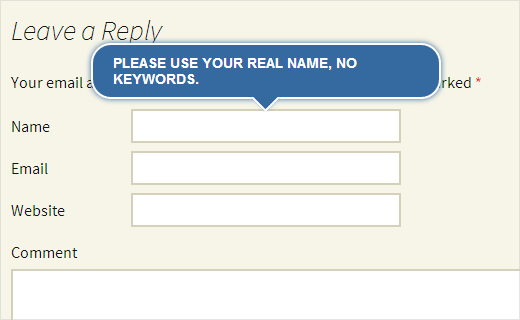
Comments allow users to engage with the content on your website. That’s why we believe that it is important to style your comments layout and comment form, so it is user-friendly as well as good looking. Recently, a user asked us how they can add jQuery tooltips to WordPress comment form. We thought others might find this useful as well. In this tutorial, we will show you how to add jQuery tooltips in WordPress comment form.

Why Add jQuery Tooltips?
Tooltips appear when a user takes their mouse to an item, usually providing them description about that particular item. In this tutorial, we will be adding jQuery tooltips to show tips like, Please use your real name in comment form fields.
By adding jQuery tooltips, you can enhance user experience, and it will look nicer.
How to Add jQuery Tooltips
First thing, you need to do is create a folder on your desktop and name it wpb-comment-tooltips. Inside this folder, you need to create these three files:
- wpb-comment-tooltips.php
- wpb-tooltip.css
- wpb-tooltip.js
Use a plain text editor like Notepad to create these files. Once you have created the files, you need to open wpb-comment-tooltip.php in text editor. Copy and paste this code in the file:
<?php
/**
Plugin Name: WPBeginner's Comment Form Tool Tips
Description: A jQuery powered comment form tool tips plugin based on a tutorial by WPBeginner
Version: 1.0
Author: WPBeginner
Author URI: https://www.wpbeginner.com
License: GPL2
*/

// Only load our scripts and style when a comment form is displayed

add_action( 'comment_form_before', 'wpb_comment_tooltips' );

function wpb_comment_tooltips() {
wp_enqueue_script('wpb-tooltip-jquery', plugins_url('/wpb-tooltip.js', __FILE__ ), array('jquery-ui-tooltip'), '', true);
wp_enqueue_style('wpb-tooltip-css', plugins_url('/wpb-tooltip.css', __FILE__), false, null);
}

// Modify comment form fields and add title attribute to form input fields

function alter_comment_form_fields($fields){
    $fields['email'] =  '<p class="comment-form-email"><label for="email">' . __( 'Email', 'twentythirteen' ) . '</label> ' .
      ( $req ? '<span class="required">*</span>' : '' ) .
      '<input id="email" title="Your email is safe with us, see our privacy policy." name="email" type="text" value="' . esc_attr(  $commenter['comment_author_email'] ) .
      '" size="30"' . $aria_req . ' /></p>';
    $fields['url'] = '<p class="comment-form-url"><label for="url">' .
      __( 'Website', 'twentythirteen' ) . '</label>' .
      '<input id="url" name="url" title="Your website or any social media profile URL" type="text" value="' . esc_attr( $commenter['comment_author_url'] ) .
      '" size="30" /></p>';
	  $fields['author'] = '<p class="comment-form-author">' .
      '<label for="author">' . __( 'Name', 'twentythirteen' ) . '</label> ' .
      ( $req ? '<span class="required">*</span>' : '' ) .
      '<input id="author" title="Please use your real name, no keywords." name="author" type="text" value="' . esc_attr( $commenter['comment_author'] ) .
      '" size="30"' . $aria_req . ' /></p>';
    return $fields;
}
add_filter('comment_form_default_fields','alter_comment_form_fields');
?>
In the above code, we first created a plugin header, given this plugin a name and description. After that we load our JavaScript and CSS file (see our guide on how to add JavaScript and Styles in WordPress).
We also make sure that these files are only loaded when a comment form is displayed. After that we modified the default comment form and added the title attribute in input fields. This title attribute contains the message we want to be displayed in the tooltip. For example, in the author field we have used:
title="Please use your real name, no keywords."
Now that you have created the plugin file, it is time to add a little jQuery. Open wpb-tooltip.js file and add this code inside it:
(function($) {
$( "#commentform" ).tooltip({ position: {
	my: "center bottom-10",
        at: "center top",
        using: function( position, feedback ) {
          $( this ).css( position );
          $( "<div>" )
            .addClass( "arrow" )
            .addClass( feedback.vertical )
            .addClass( feedback.horizontal )
            .appendTo( this );
        } } });
})(jQuery);
In this code, #commentform is the selector where jQuery will display tooltips and .tooltip is the content part where we have defined the position for tooltips.
Now the final step is to add a little CSS in wpb-tooltip.css file. Simply copy and paste this code:
.ui-tooltip, .arrow:after {
    background: #356aa0;
    border: 2px solid white;
  }
  .ui-tooltip {
    padding: 10px 20px;
    color: white;
    border-radius: 20px;
    font: bold 14px "Helvetica Neue", Sans-Serif;
    text-transform: uppercase;
    box-shadow: 0 0 7px #356aa0;
	max-width:350px;
  }
  .arrow {
    width: 70px;
    height: 16px;
    overflow: hidden;
    position: absolute;
    left: 50%;
    margin-left: -35px;
    bottom: -16px;
  }
  .arrow.top {
    top: -16px;
    bottom: auto;
  }
  .arrow.left {
    left: 20%;
  }
  .arrow:after {
    content: "";
    position: absolute;
    left: 20px;
    top: -20px;
    width: 25px;
    height: 25px;
    box-shadow: 6px 5px 9px -9px #356aa0;
    -webkit-transform: rotate(45deg);
    -moz-transform: rotate(45deg);
    -ms-transform: rotate(45deg);
    -o-transform: rotate(45deg);
    tranform: rotate(45deg);
  }
  .arrow.top:after {
    bottom: -20px;
    top: auto;
  }
Feel free to modify this CSS file to meet your needs.
That’s all. Now you have successfully created a plugin that adds jQuery tooltips in your WordPress comment form. All you need to do is upload wpb-comment-tooltips folder from your desktop to /wp-content/plugins/ directory on your web server using an FTP client like Filezilla. Once you have uploaded the plugin, go to Plugins page in WordPress admin area and activate the plugin.
We hope this tutorial helped you learn how to add jQuery tooltips in the WordPress comment form. We encourage you to modify this code and try adding tooltips to other places. For example, check out how we added tooltip testimonials to our site. For feedback and questions, please leave a comment below.


Alexander Thornton
This tutorial is really helpful! Adding jQuery tooltips to the WordPress comment form is a great way to improve user experience. I appreciate the encouragement to experiment with the code—looking forward to trying it out in different areas!
WPBeginner Support
Glad our guide was helpful and we hope you have fun experimenting!
Admin
Milan Soni
yeah its working…… nice tuts for beginner….
Huzaima Khan
Everything is done according to the instructions but there is no output, why?
Jitendra
This can be achieved very easily if the theme is built on Boostrap. This article would people who are not using themes built on bootstrap.