At WPBeginner, we have helped countless readers customize their WordPress sites to improve the user experience, boost branding, and drive conversions. And we have seen that when done right, a one-of-a-kind navigation menu can help increase engagement and keep people on your site longer.
The problem is that all WordPress themes have set locations where you can display a navigation menu, so changing this can be tricky. This is especially true if you’re a beginner because modifying theme files is a delicate process.
When you’re using a block theme, you can do this with the Full Site Editor. But, in our experience, there are better options that will work for all types of themes.
For instance, if you want advanced customizations, you can use a powerful page builder like SeedProd. Or, if you’re looking for a simple way to use custom code, WPCode is by far the best choice.
In this article, we will show you how to add a custom navigation menu to any area of your WordPress theme. We’ll walk you through 3 different options so you can choose the tutorial that is right for your needs.
Why Add Custom Navigation Menus in WordPress Themes?
A navigation menu is a list of links pointing to important areas of your website. They make it easy for visitors to find interesting content, which can increase pageviews and reduce the bounce rate in WordPress.
The exact location of your menu will vary based on your WordPress theme. Most themes have several options, so you can create different menus and show them in different locations.
To see where you can display menus in your current WordPress theme, simply head over to Appearance » Menus and then take a look at the ‘Display location’ section.
The following image shows the locations that are supported by the Astra WordPress theme.
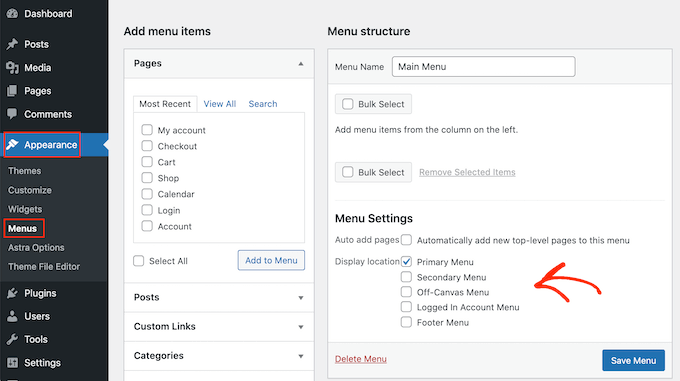
Sometimes, you may want to show a menu in an area that isn’t listed as a ‘Display location’ in your theme.
With that in mind, let’s take a look at how to add a custom navigation menu to any area of your WordPress theme. Simply use the quick links below to jump to the method you prefer:
Method 1: Using the Full Site Editor (Block-Based Themes Only)
If you are using a block theme such as ThemeIsle Hestia Pro, then you can add a custom navigation menu using Full Site Editing (FSE) and the block editor.
For more details, you can see our article on the best WordPress full-site editing themes.
This method doesn’t work with every theme, and it doesn’t let you customize every part of the menu. If you want to add a completely custom menu to any WordPress theme, then we recommend using a page builder plugin instead.
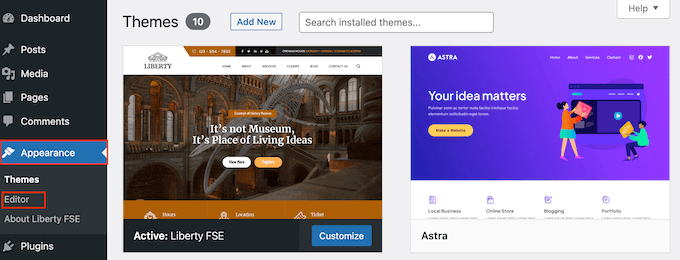
If you are using a block-based theme, then head over to Appearance » Editor.
By default, the full site editor shows your theme’s home template, but you can add a navigation menu to any area.
To see all the available options, just select either ‘Templates,’ ‘Patterns,’ or ‘Pages.’
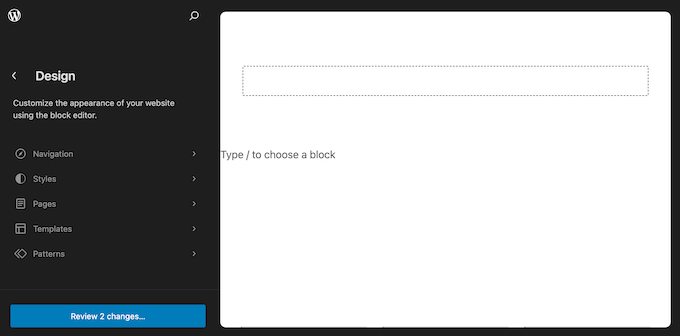
You can now click on the template, template part, or page where you want to add a custom navigation menu.
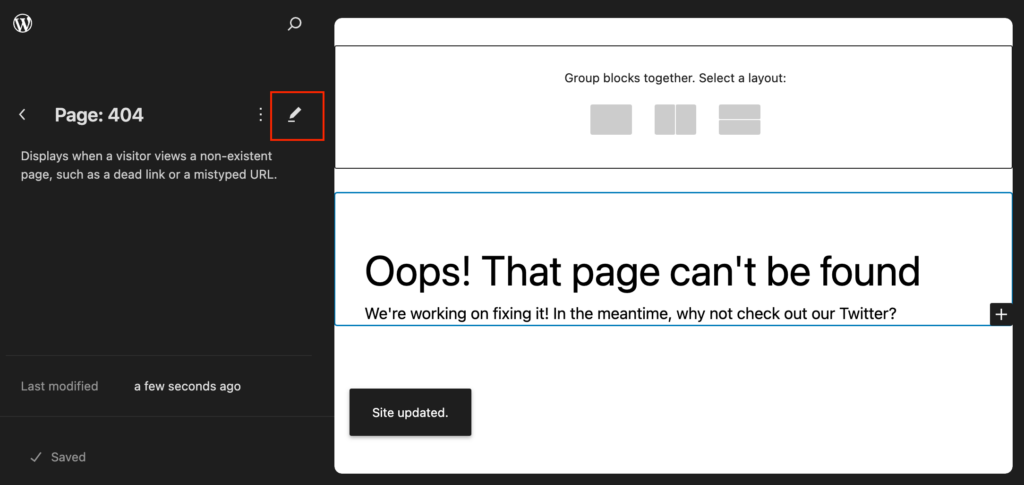
WordPress will now show a preview of the design. To edit this template, click on the small pencil icon.
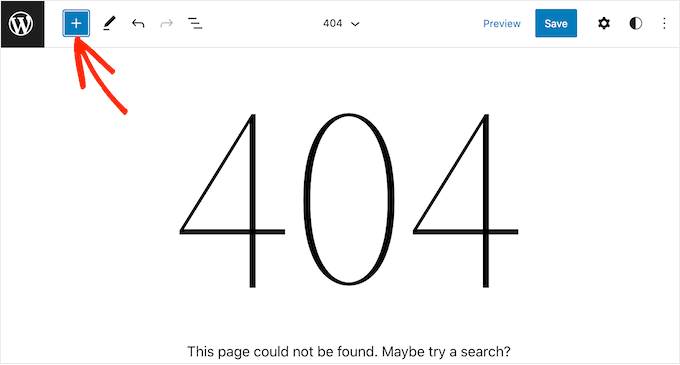
The next step is adding a Navigation block to the area where you want to show your menu.
In the top-left corner, click on the blue ‘+’ button.
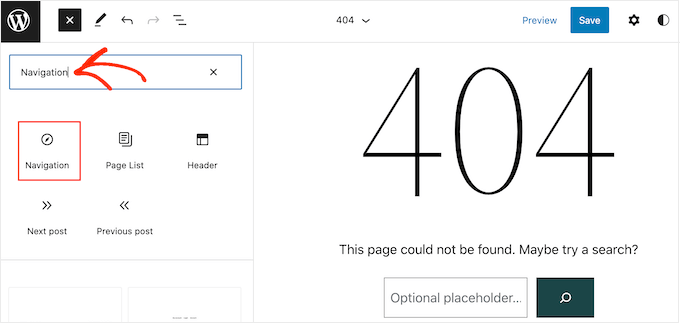
Now, go ahead and type ‘Navigation’ into the search bar.
When the ‘Navigation’ block appears, simply drag and drop it onto your layout.
Next, click to select the Navigation block.
If you’ve already created the menu that you want to display, then click to select the Navigation block. In the right-hand menu, click the three-dotted icon next to ‘Menu.’
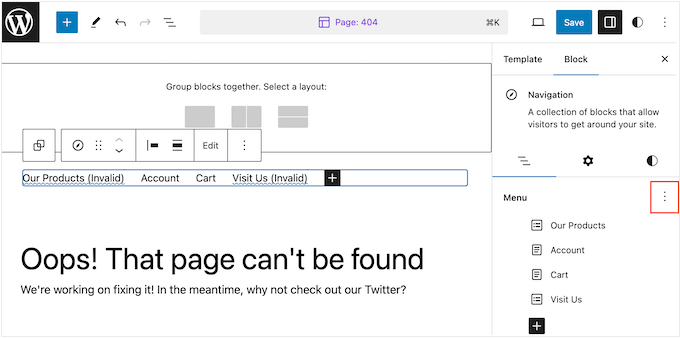
You can then choose a menu from the dropdown.
Another option is to build a menu inside the full-site editor by adding pages, posts, custom links, and more. To add items to the new menu, just click on the ‘+’ icon.
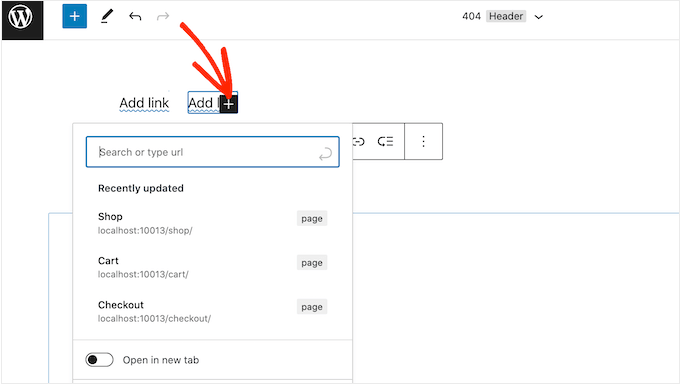
This opens a popup where you add any post or page and decide whether these links should open in a new tab.
You can also add a search bar to the WordPress menu, add social media icons, and more. In the popup, simply type in the block you want to add to the menu and select the right option when it appears.
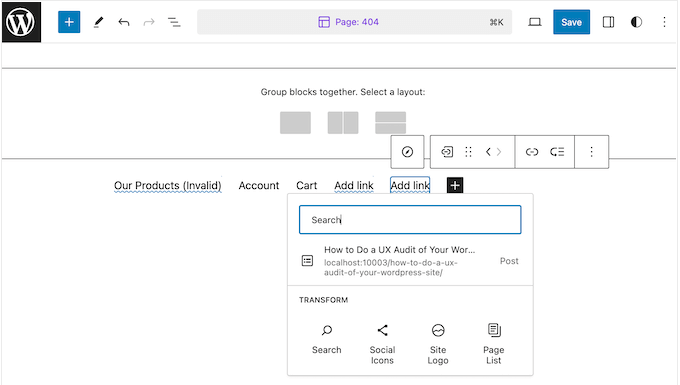
You can then configure this block using the settings in the mini toolbar and the right-hand menu. Simply repeat these steps to add more items to the menu.
When you’re happy with how the menu looks, simply click on the ‘Save’ button.
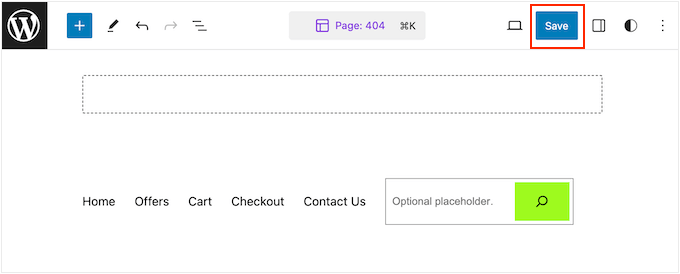
Your site will now be using the new template, and visitors can interact with your custom navigation menu.
Method 2: Using a Page Builder Plugin (Works With All Themes)
The full site editor allows you to add menus to block-based themes. However, if you want to add an advanced, fully customizable menu to any WordPress theme, then you’ll need a page builder plugin.
SeedProd is the best WordPress page builder plugin on the market that allows you to customize every part of your navigation menu.
We have extensive experience using this tool to build custom navigation menus, landing pages, and much more. For more details, check out our complete SeedProd review.
When it comes to pages, SeedProd comes with over 350 professionally-designed templates that you can use as your starting point. After choosing a template, you can add a custom navigation menu to your site using SeedProd’s ready-made Nav Menu block.
First, you need to install and activate the SeedProd plugin. For more details, see our step-by-step guide on how to install a WordPress plugin.
Note: There’s also a free version of SeedProd that allows you to create custom navigation menus without writing code. However, in this guide, we’ll be using SeedProd Pro since it has the Nav Menu block, plus extra templates and advanced features.
After activating the plugin, SeedProd will ask for your license key.

You can find this information in your account on the SeedProd website. After entering the key, click on the ‘Verify Key’ button.
Once you’ve done that, go to SeedProd » Landing Pages and click on the ‘Add New Landing Page’ button.
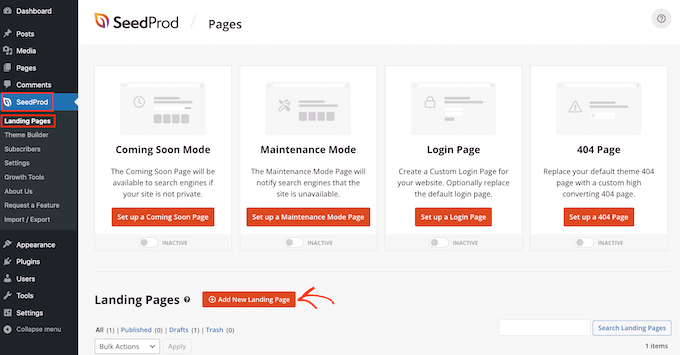
You can now choose a template for your custom page.
To help you find the right design, all of SeedProd’s templates are organized into different campaign types, such as coming soon and lead squeeze campaigns. You can even use SeedProd’s templates to improve your 404 page.
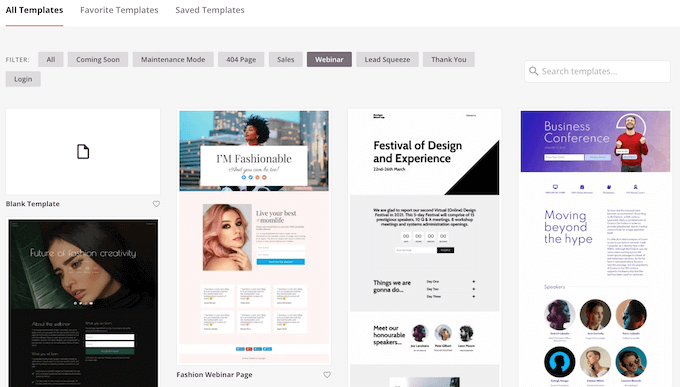
To take a closer look at any design, simply hover your mouse over that template and then click on the magnifying glass icon.
When you find a design you want to use, click on ‘Choose This Template.’

We’re using the ‘Black Friday Sales Page’ template in all our images, but you can use any template you want.
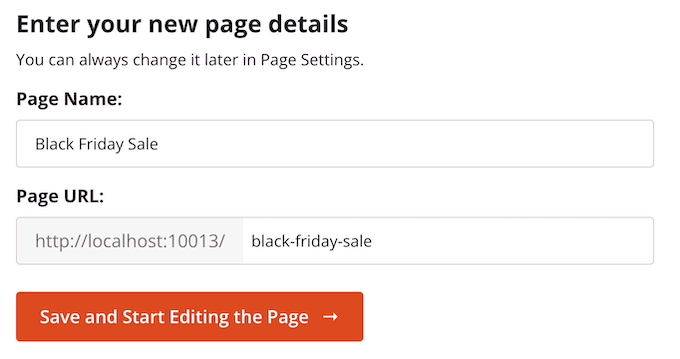
After choosing a template, type in a name for that custom page. SeedProd will automatically create a URL based on the page’s title, but you can change this URL to anything you want.
For example, you might add relevant keywords to help search engines understand what the page is about. This can improve your WordPress SEO and help the search engine show the page to people who are looking for content just like yours.
After entering this information, click on the ‘Save and Start Editing the Page’ button.
Most templates already contain some blocks, which are the core components of all SeedProd page layouts.
To customize a block, just click to select it in the page editor.
The left-hand toolbar will now show all the settings for that block. For example, in the image below, we’re changing the text inside a ‘Headline’ block.
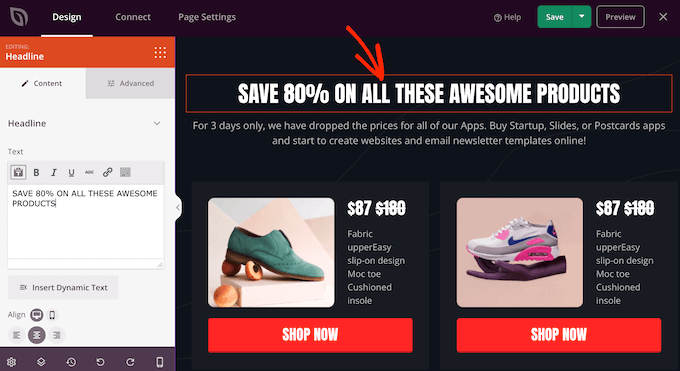
You can format the text, change its alignment, add links, and more using the settings in the left-hand menu.
If you select the ‘Advanced’ tab, then you’ll get access to even more settings. For example, you can make the block really stand out by adding box shadows and CSS animations.
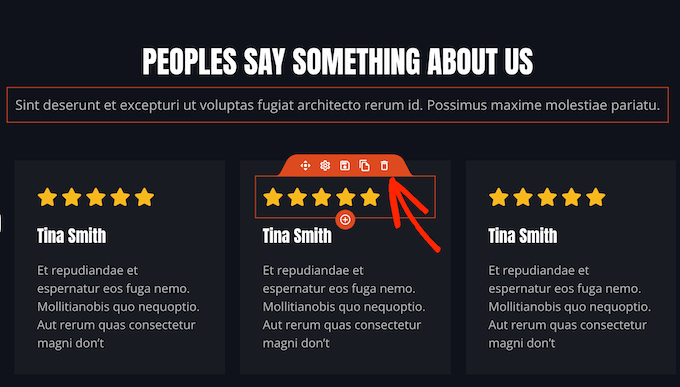
To add new blocks to your design, simply find any block in the left-hand menu and then drag it onto the page. If you want to delete a block, then click to select that block and then use the trash can icon.
Since we want to create a custom navigation menu, drag a ‘Nav Menu’ block onto the page.
This creates a navigation menu with a single default ‘About’ item.
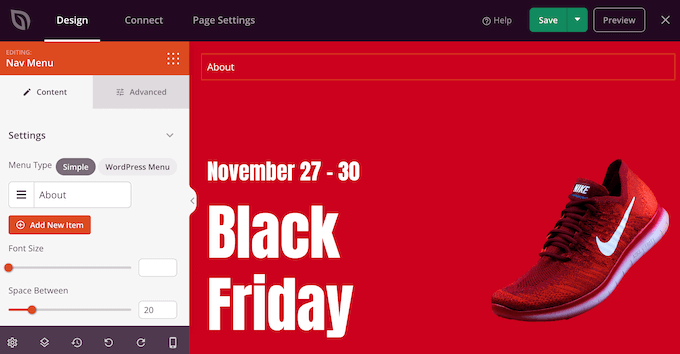
You can now either build a new menu inside the SeedProd editor or choose a menu you’ve already created in the WordPress dashboard.
To show a menu you’ve previously created, go ahead and click on the ‘WordPress Menu’ button. You can now open the ‘Menus’ dropdown and choose any option from the list.
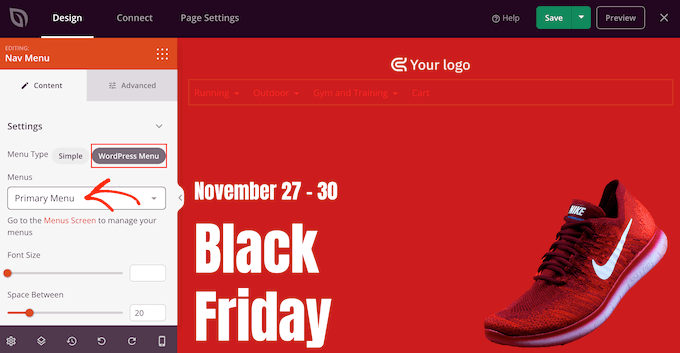
After that, you can change the font size, text alignment, and more using the settings in the left-hand menu.
If you want to build a new menu inside SeedProd instead, then select the ‘Simple’ button.
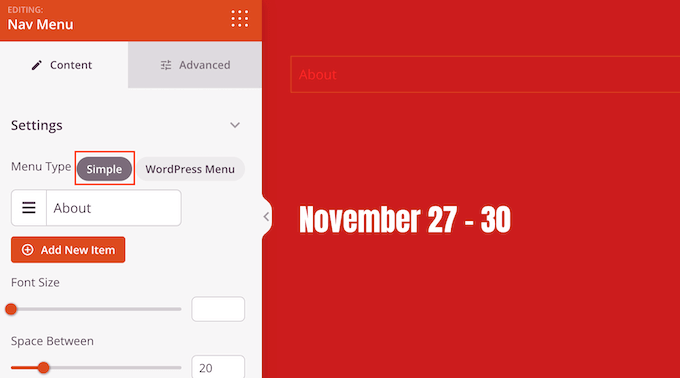
Then, click to expand the ‘About’ item that SeedProd creates by default.
This opens some controls where you can change the text and add the URL that the menu item will link to.

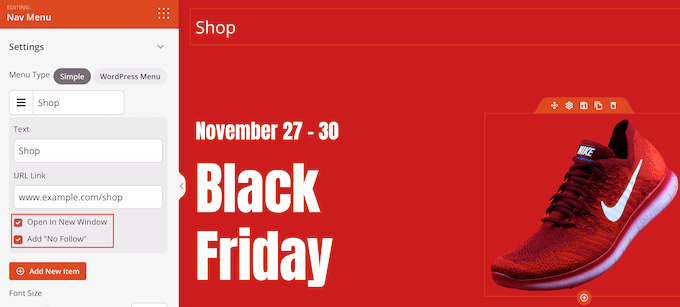
By default, the link will be ‘dofollow’ and open in the same browser window. You can change these settings using the checkboxes in the ‘URL Link’ section.
In the following image, we are creating a ‘nofollow’ link that will open in a new window. For more on this topic, please see our beginner’s guide to nofollow links.
To add more items to the menu, simply click on the ‘Add New Item’ button.
You can then customize each of these items by following the same process described above.
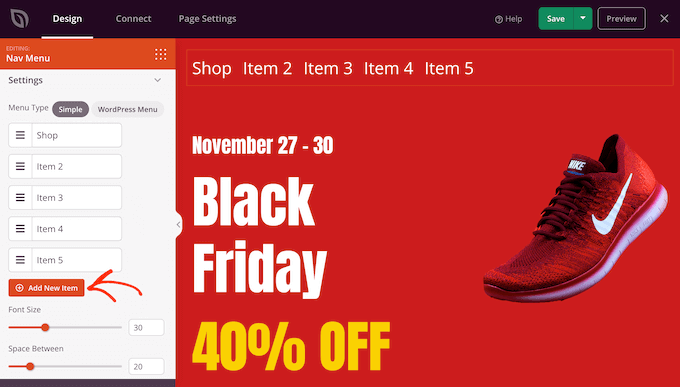
The left-hand menu also has settings that change the font size and text alignment.
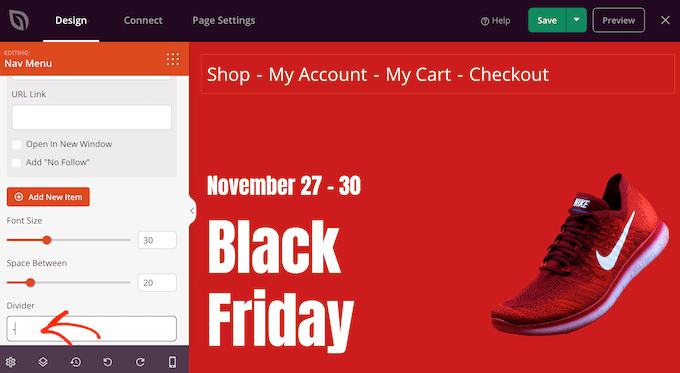
You can even create a divider, which will appear between each item in the menu.
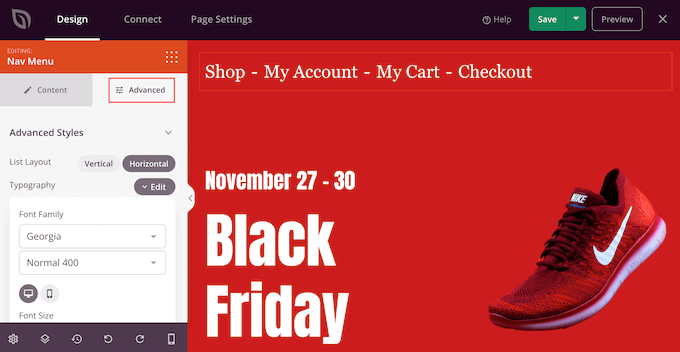
After that, go ahead and switch to the ‘Advanced’ tab. Here, you can change the menu’s colors, spacing, typography, and other advanced options.
As you make changes, the live preview will update automatically, so you can try different settings to see what looks good in your design.
By default, SeedProd shows the same menu on mobile and desktop devices. However, mobile devices typically have much smaller screens compared to desktop computers.
With that in mind, you may want to create a separate menu to show on mobile devices. For example, you might use a vertical layout so mobile users don’t need to scroll sideways. You may also want to show fewer links on smartphone and tablet devices.
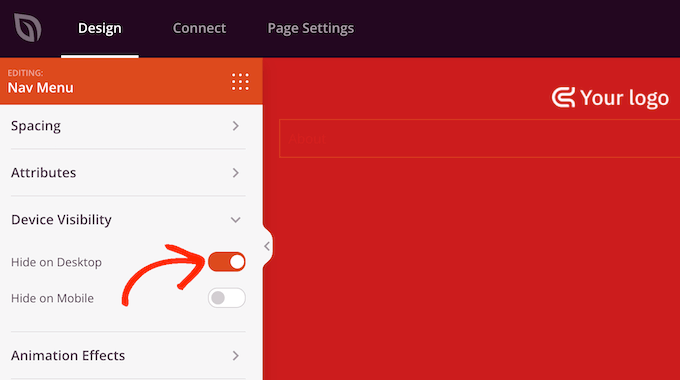
To create a mobile-ready menu, just design the menu following the same process described above. Then, select the ‘Advanced’ tab and click to expand the ‘Device Visibility’ section.
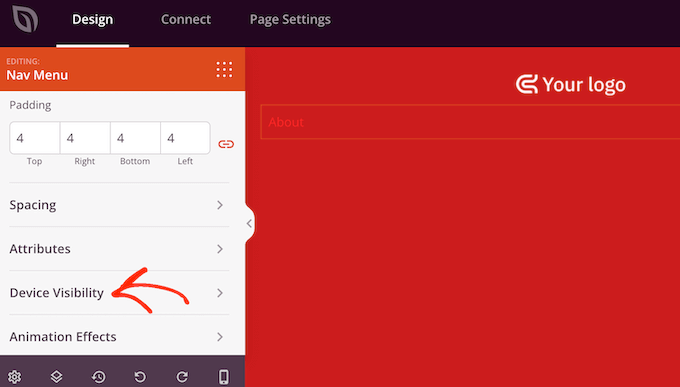
You can now toggle on the ‘Hide on Desktop’ slider.
Now, SeedProd will only show this menu to mobile users.
When you are happy with how your custom menu looks, it’s time to publish it.
Simply click the dropdown arrow next to ‘Save’ and then select ‘Publish.’
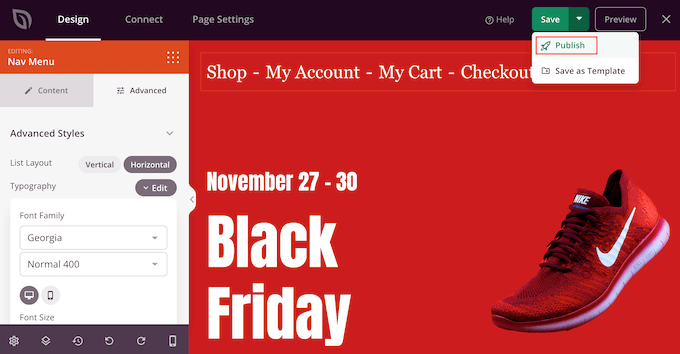
Now, if you visit your WordPress blog, you’ll see the custom navigation menu in action.
Method 3: Create a Custom Navigation Menu in WordPress Using Code (Advanced)
If you don’t want to set up a page builder plugin, then you can add a custom navigation menu using code. You’ll often find guides with instructions on how to add custom code snippets to your theme’s functions.php file.
However, we don’t recommend this method, as even a small mistake in your code could cause a number of common WordPress errors or even break your site completely. You’ll also lose the custom code when you update your WordPress theme.
That’s why we recommend using WPCode. It is the easiest and safest way to add custom code in WordPress without having to edit any core WordPress files.
Note: There are tons of different ways that you can use WPCode to safely customize your WordPress site. It has a built-in code snippets library and supports all the most important WordPress languages, including PHP, JavaScript, CSS, and HTML. For more information about the plugin, check out our complete WPCode review.
The first thing you need to do is install and activate the free WPCode plugin. For more details, see our step-by-step guide on how to install a WordPress plugin.
Upon activation, go to Code Snippets » Add Snippet in your WordPress dashboard.
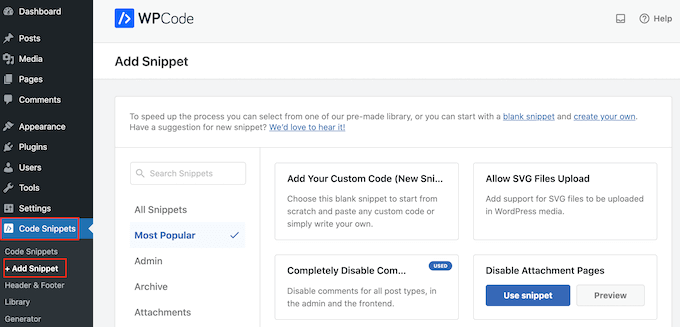
Here, you’ll see all the ready-made snippets that you can add to your site. These include a snippet that allows you to completely disable comments, upload file types that WordPress doesn’t usually support, disable attachment pages, and much more.
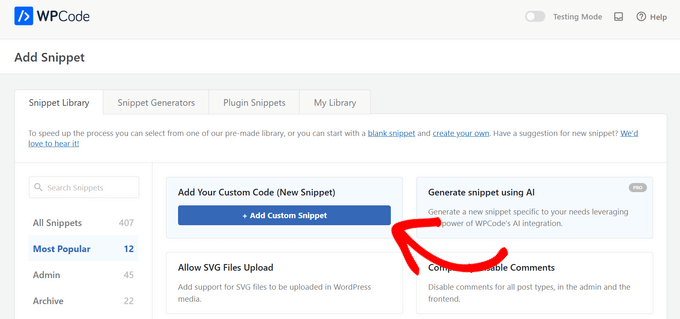
To create your own snippet, hover your mouse over ‘Add Your Custom Code (New Snippet)’ and then click the ‘+ Add Custom Snippet’ button.
Next, you need to choose a code type from the list of options that appear on the screen. For this tutorial, select ‘PHP Snippet’ as the code type.
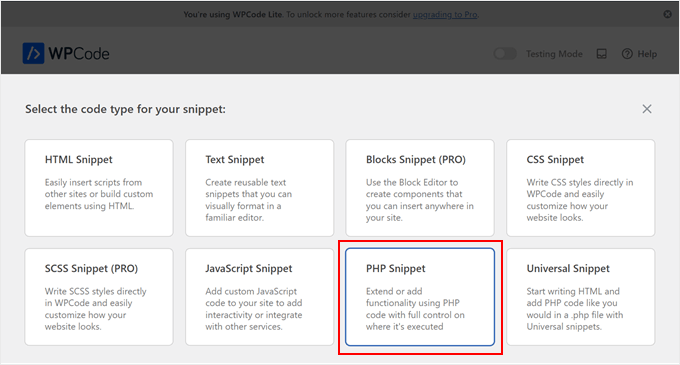
You’ll now be directed to the Create Custom Snippet page.
To start, enter a title for the custom code snippet. This can be anything that helps you identify the snippet in your WordPress dashboard.
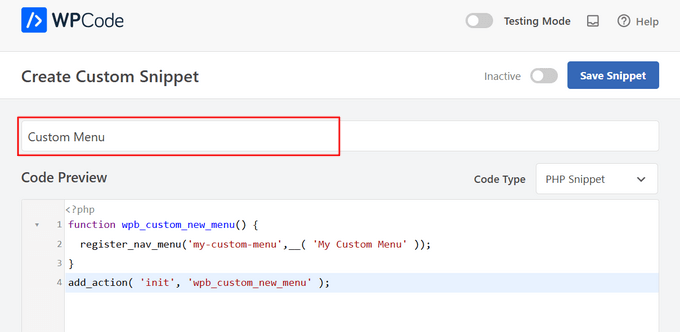
Once you’ve done that, simply paste the following snippet into the code editor:
function wpb_custom_new_menu() {
  register_nav_menu('my-custom-menu',__( 'My Custom Menu' ));
}
add_action( 'init', 'wpb_custom_new_menu' );
This will add a new menu location to your theme called ‘My Custom Menu.’ To use a different name, simply tweak the code snippet.
If you want to add more than one custom navigation menu to your theme, then simply add an extra line to the code snippet.
For example, here, we are adding two new menu locations to our theme, called ‘My Custom Menu’ and ‘Extra Menu:’
function wpb_custom_new_menu() {
  register_nav_menus(
    array(
      'my-custom-menu' => __( 'My Custom Menu' ),
      'extra-menu' => __( 'Extra Menu' )
    )
  );
}
add_action( 'init', 'wpb_custom_new_menu' );
After that, scroll to the ‘Insertion’ options. If it isn’t already selected, then choose the ‘Auto Insert’ method so that WPCode adds the snippet across your entire site.
Then, open the ‘Location’ dropdown and click on ‘Run Everywhere.’
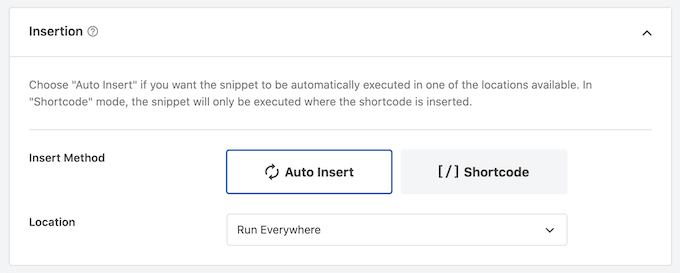
Now, you’re ready to scroll to the top of the screen and click on the ‘Inactive’ toggle so it changes to ‘Active.’
Finally, go ahead and click on ‘Save’ to make this snippet live.
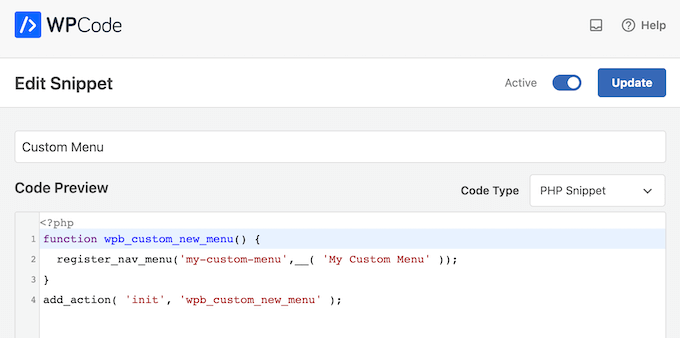
After that, go to Appearance » Menus and look at the ‘Display location’ area.
You should now see a new ‘My Custom Menu’ option.
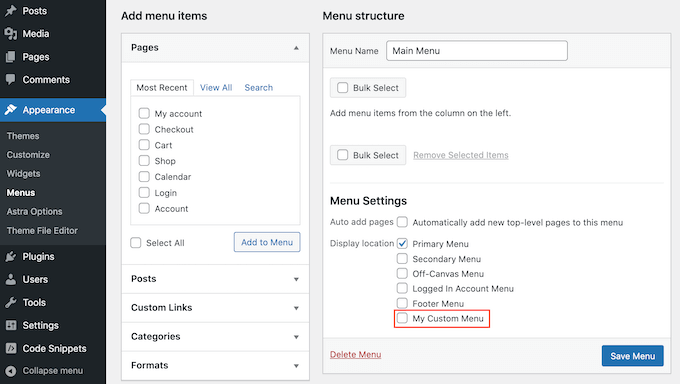
You can now go ahead and add some menu items to the new location. For more information, please see our step-by-step guide on how to add navigation menus for beginners.
When you are happy with your menu, the next step is adding it to your WordPress theme.
Most websites show the navigation menu directly under the header section. This means the menu is one of the first things visitors see, along with the site logo or title.
You can add the custom navigation menu to any location by adding some code to your theme’s template file.
In your WordPress dashboard, go to Appearance » Theme File Editor.
In the right-hand menu, choose the template where you want to add the menu. For example, if you want to show the custom navigation menu in your website’s header, then you’ll typically select the header.php file.
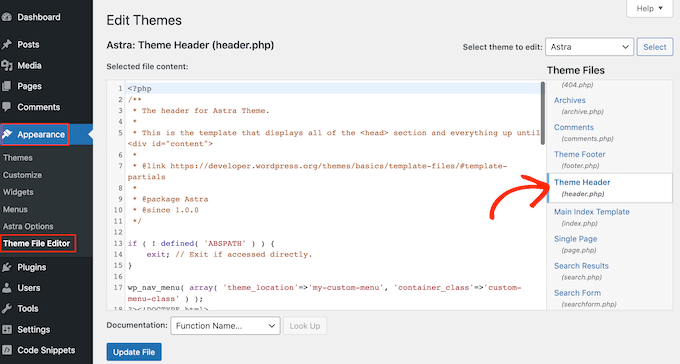
For help finding the right template file, please see our guide on how to find which files to edit in your WordPress theme.
After selecting the file, you’ll need to add a wp_nav_menu function and specify the name of your custom menu.
For example, in the following code snippet, we are adding ‘My Custom Menu’ to the theme’s header:
wp_nav_menu( array( 'theme_location'=>'my-custom-menu', 'container_class'=>'custom-menu-class' ) );
After adding the code, click on the ‘Update File’ button to save your changes.
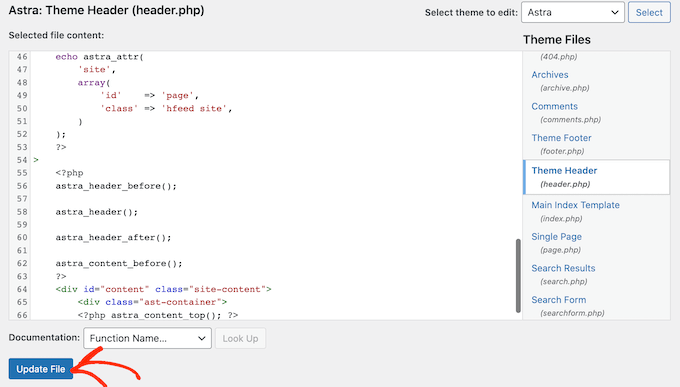
Now, if you visit your site, then you’ll see the custom menu in action.
By default, your menu will appear as a plain bulleted list.
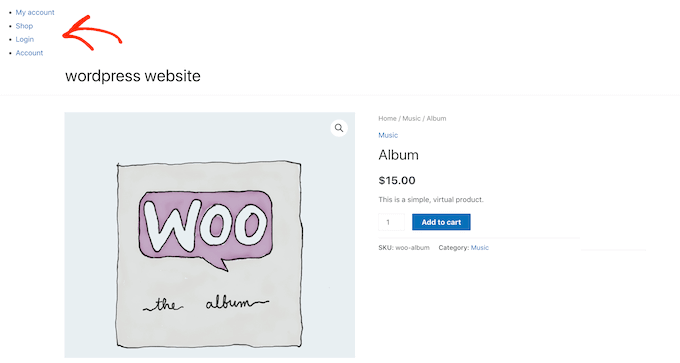
You can style the custom navigation menu to better match your WordPress theme or company branding by adding custom CSS code to your site.
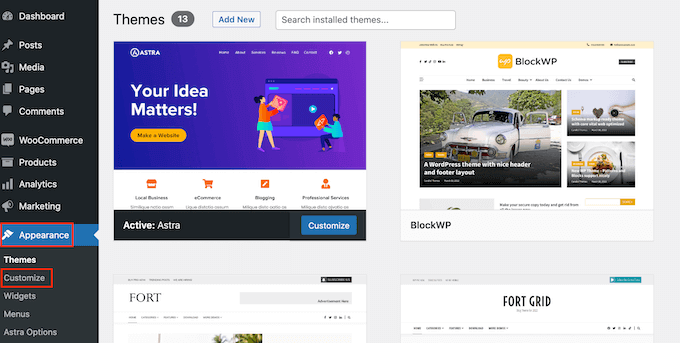
To do this, go to Appearance » Customize.
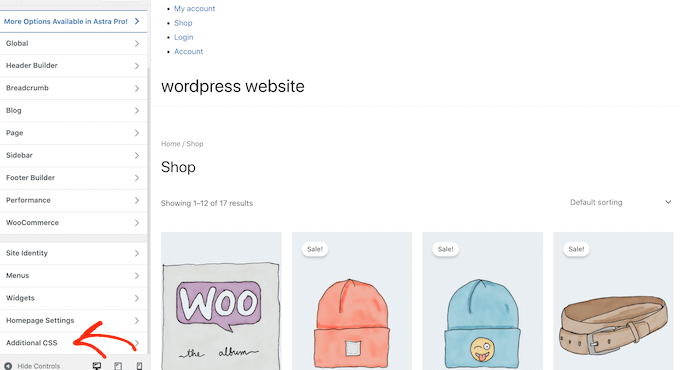
In the WordPress theme customizer, click on ‘Additional CSS.’
This opens a small code editor where you can type in some CSS.
You can now style your menu using the CSS class that you added to your theme template. In our example, this is .custom_menu_class.
In the following code, we are adding margins and padding, setting the text color to black, and arranging the menu items in a horizontal layout:
div.custom-menu-class ul {
    margin:20px 0px 20px 0px;
    list-style-type: none;
    list-style: none;
    list-style-image: none;
    text-align:right;
	display:inline-block;
}
div.custom-menu-class li {
    padding: 0px 20px 0px 0px;
    display: inline-block;
}

div.custom-menu-class a {
    color:#000;
}
The WordPress customizer will update automatically.
It will now show how the menu will look with the new style.
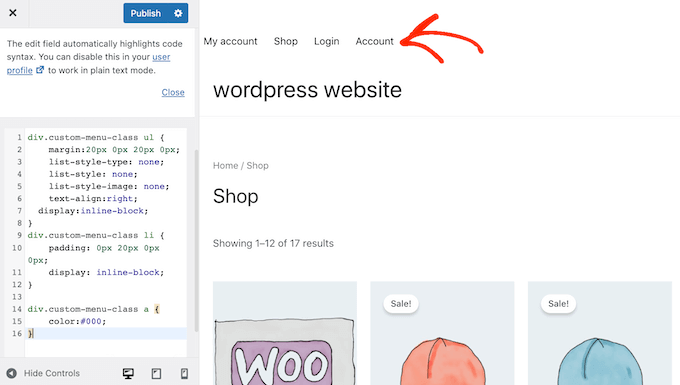
If you are happy with how the menu looks, then click on ‘Publish’ to make your changes live.
For more information, please see our guide on how to style WordPress navigation menus.
Expert Guides: Do More With WordPress Navigation Menus
With WordPress, you can create all kinds of helpful and engaging menus. With that in mind, here are some expert guides to help you get even more out of your navigation menus:
- How to Add Image Icons With Navigation Menus in WordPress
- How to Add Conditional Logic to Menus in WordPress (Step by Step)
- How to Add Menu Descriptions in Your WordPress Themes
- How to Add a Fullscreen Responsive Menu in WordPress
- How to Add a Mega Menu on Your WordPress Site (Step by Step)
We hope this ultimate guide helped you learn how to add a custom navigation menu in WordPress. You may also want to see our guides on how to add a button in your WordPress header menu or how to highlight a menu item in WordPress.
If you liked this article, then please subscribe to our YouTube Channel for WordPress video tutorials. You can also find us on Twitter and Facebook.


Jiří Vaněk
I always wanted to avoid the plugin first for things like this. That’s why I always appreciate it when you also offer the option of using WP Code and snippets. I always try them on a test site first and this one works great. I then save your snippets in my own code store, which I can always return to if necessary. Thanks.
WPBeginner Support
Glad to hear you found our code snippets helpful!
Admin
Mike
Thanks for show the code, I have an issue, my new new always shows same content as main menu after I applied:
wp_nav_menu( array( ‘theme_location’=>’too-right-menu’, ‘container_class’=>’top-right-class’ ) );
Please help.
WPBeginner Support
You may be using the same name as a different menu that your theme has active. If you have not done so already, please try a different location name.
Admin
Shubham Kumar
How can create that menu sticky, I use the first method ie. to paste the code in theme’s header.php, now I would like to sticky that element if the user scrolls to from that menu location.
Amit Singh
I created two menus. One in left of logo and other in right. Now I want to add sub menu. I m just dragging menus under parent but it’s not working. Do you have any article explain how we can add custom submenu
WPBeginner Support
Not at the moment but we will certainly take that into consideration for future articles.
Admin
Mohit
Keep doing the great work
WPBeginner Support
Glad you continue to enjoy our content
Admin
Saurabh
my menu is not display in header. it display below the page title
WPBeginner Support
You may need to modify where the code is inserted in the template but if you reach out to your current theme’s support they should be able to let you know where the header is added in their theme.
Admin
ian
hello
why can’t i see the menus page of my website?
the layout of the tutorials look absolutely nothing like my screen
thanks
WPBeginner Support
Is your site a WordPress.com site? https://www.wpbeginner.com/beginners-guide/self-hosted-wordpress-org-vs-free-wordpress-com-infograph/
Admin
krishna
hello
i want to add my own html for header
how can i do that ?
Mukeshwar Singh
Hey, I am using Magazine Pro and There is no option of Custom Menu in Widgets Area!! I Used your code to create a Custom Menu but I need help because there is no option of Custom Menu in the Widget area because of Which I cannot Drag and drop that into the footer area… Please help me
Elle
Hey! I completed the tutorial and I’ve been able to add the menu to my desired location on my site. I’ve styled it and everything. PROBLEM: The menu appears on page refresh for a moment I can even click it! However, it quickly disappears behind my header. It’s not clickable after it disappears. My brain’s exploding trying to figure this one out!!
Furqan
Hi
First I create the add menu with a name my custom menu and its perfectly fine and proper fetch and then I changed its name to footer menu after changed its name custom navigation not fetch what the reason
Himanshu
Just one ques : what should I do with the existing navbar of WordPress . How to delete it.
karima
Hi, Friend of mine has a problem, well several, she has the horizontal header nav bar but also a vertical one next to it which is obscuring the page content , it appears when you start to scroll on the home page but is fixed on all the content pages.. can someone look please and advise, also there is an error notice we can´t find how to get rid of, any help please appreciated.
sudhakar
how to remove default slider any theme and how to add our new slider model in homepage