Want to make your website easier to navigate? Adding a smooth scroll-to-top effect helps visitors quickly jump back to the top – perfect for long pages!
If you’re worried it might be tricky to set up, we’re here to tell you that you don’t need to be. 🙌
We tested it ourselves and found that you can add it to WordPress in just a few steps using jQuery or a free plugin.
In this guide, I’ll walk you through how to add a smooth scroll-to-top effect in WordPress, step by step. Let’s dive in!
What Is Smooth Scroll, and When Should You Use It?
Unless the site has a sticky header menu, users who scroll to the bottom of a long WordPress post or page have to manually swipe or scroll their way back to the top to navigate the site.
That can be a real annoyance, and often, users will simply hit the back button and leave. That’s why you need a button to quickly send users to the top of the post or page.
Typically, you can add this functionality as a simple text link without using jQuery, like this:
<a href="#" title="Back to top">^Top</a>
That will send users to the top by scrolling up the entire page in milliseconds. It works, but the effect can be jarring, kind of like when you hit a bump in the road.
💡 A smooth scroll is the opposite of that. It will slide the user back to the top with a visually pleasing effect. Using elements like this can drastically improve the user experience on your site.
With that in mind, we’ll share two methods to add a smooth scroll-to-top effect on your WordPress site using a plugin and jQuery. Feel free to use the quick links below to jump to your preferred method:
Without further ado, let’s start with the first method.
Adding a Smooth Scroll-to-Top Effect Using a WordPress Plugin
This method is recommended for beginners since it allows you to add a scroll-to-top effect to a WordPress website without touching a single line of code.
The first thing you’ll need to do is install and activate the WPFront Scroll Top plugin. If you need help, then please see our guide on how to install a WordPress plugin.
Upon activation, you can go to Settings » Scroll Top from your WordPress dashboard. Here, you can configure the plugin and customize the smooth scroll effect.
From here, the first thing you’ll need to do is click the ‘Enabled’ checkbox to activate the scroll-to-top button on your site. Next, you’ll see options to edit the scroll offset, button size, opacity, fade duration, scroll duration, and more.
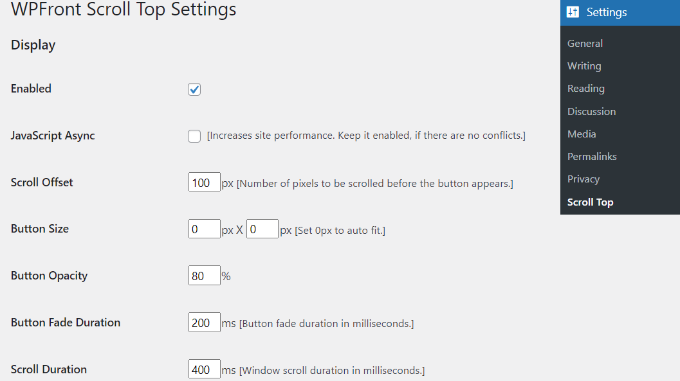
If you scroll down, you’ll find more options, such as editing the auto-hide time and enabling the option to hide the button on small devices or the wp-admin screen.
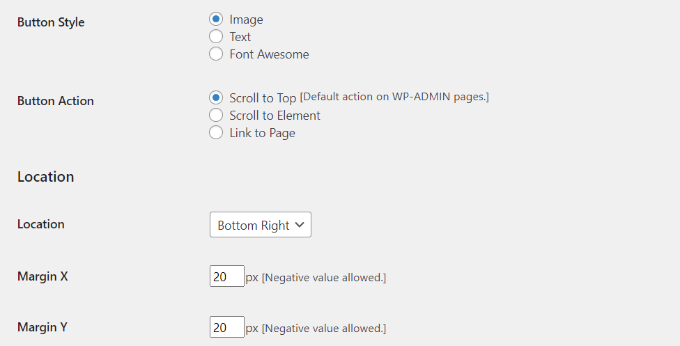
You can also edit what the button does when you click it. By default, it will scroll to the top of the page, but you can change it to scroll to a particular element in the post or even link to a page.
Additionally, you can adjust the button’s location. While it typically appears in the bottom right corner of the screen, you have the option to move it to any other corner.
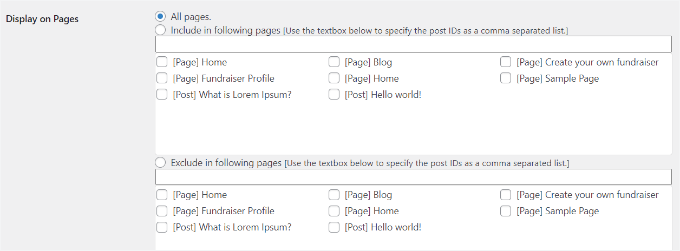
The WPFront Scroll Top plugin offers filters to show the scroll-to-top button only on selected pages.
Normally, it will appear on all the pages on your WordPress blog. However, you can navigate to the ‘Display on Pages’ section and choose where you’d like to display the scrolling to the top effect.
The plugin also offers pre-built button designs. You should easily be able to find a design that matches your site.
If you can’t find a pre-built image button that works for you, then there is an option to upload a custom image from the WordPress media library.
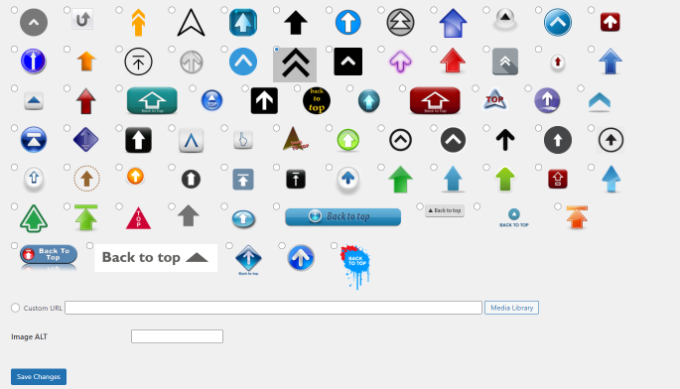
When you’re done, simply click the ‘Save Changes’ button.
You can now visit your website to see the scroll-to-top button in action.

Adding Smooth Scroll to Top Effect with jQuery in WordPress
Before we start, note that this method is not recommended for beginners. It’s suitable for people who are comfortable editing themes because it includes adding code to your website.
To add the smooth scroll-top effect, we will use jQuery, some CSS, and a single line of HTML code in your WordPress theme.
First, let’s open a text editor like Notepad and create a file. Go ahead and save it as smoothscroll.js.
Next, you will need to copy and paste this code into the file:
jQuery(document).ready(function($){
	$(window).scroll(function(){
        if ($(this).scrollTop() < 200) {
			$('#smoothup') .fadeOut();
        } else {
			$('#smoothup') .fadeIn();
        }
    });
	$('#smoothup').on('click', function(){
		$('html, body').animate({scrollTop:0}, 'fast');
		return false;
		});
});
This code is the jQuery script that will add a smooth scroll effect to a button that takes users to the top of the page.
After that, you can save the file and upload it to the /js/ folder in your WordPress theme directory.
For more details, please see our guide on how to use FTP to upload files to WordPress.
If your theme does not have a /js/ directory, then you can create one and upload smoothscroll.js to it.
You can also see our guide on the WordPress files and directory structure for more information.
The next thing you need to do is to load the smoothscroll.js file in your theme.
To do that, we’ll enqueue the script in WordPress by simply copying and pasting this code into your theme’s functions.php file.
However, we don’t recommend directly editing the theme files because the slightest mistake can break your site. Instead, you can use a plugin like WPCode and follow our tutorial on adding custom code snippets in WordPress:
wp_enqueue_script( 'smoothup', get_template_directory_uri() . '/js/smoothscroll.js', array( 'jquery' ), '', true );
💡 Note: We use WPCode on our sites to create and manage custom snippets. Be sure to check out our full WPCode review to explore its features!
The above code tells WordPress to load our script and the jQuery library since our plugin depends on them.
Now that we have added jQuery, let’s add an actual link to our WordPress site that takes users back to the top.
To do this, simply paste this HTML anywhere in your theme’s footer.php file using WPCode.
<a href="#top" id="smoothup" title="Back to top"></a>
If you need help, then please see our tutorial on how to add header and footer code in WordPress
You may have noticed that the HTML code includes a link but no anchor text. That’s because we will use an image icon with an up arrow to display a back-to-top button.
In this example, we are using a 40x40px icon. Simply add the custom CSS below to your theme’s stylesheet.
In this code, we are using an image icon as the button’s background image and setting it in a fixed position. We have also added a little CSS animation, which rotates the button when a user hovers their mouse over it:
#smoothup {
height: 40px;
width: 40px;
position:fixed;
bottom:50px;
right:100px;
text-indent:-9999px;
display:none;
background: url("https://www.example.com/wp-content/uploads/2013/07/top_icon.png");
-webkit-transition-duration: 0.4s;
-moz-transition-duration: 0.4s; transition-duration: 0.4s;
}

#smoothup:hover {
-webkit-transform: rotate(360deg) }
background: url('') no-repeat;
}
In the CSS above, make sure that you replace https://www.example.com/wp-content/uploads/2013/07/top_icon.png with the image URL you want to use.
You can upload your own image icon using the WordPress media uploader, copy the image URL, and then paste it into the code.
And that’s basically it!
🚨 Worried you might break your site while modifying your theme? When you get WPBeginner’s WordPress Website Design service, our team of professionals can safely transform your site into a visually stunning and user-friendly experience. Don’t let theme modifications stress you out, contact our WordPress Website Design service today!
Further Reading: More Resources Around WordPress Themes
Want to dive deeper into WordPress themes? 🎨
Whether you’re looking for the best themes, customization tips, or a better understanding of theme frameworks, these resources will help you get the most out of your WordPress site:
- Most Popular and Best WordPress Themes
- What Is a WordPress Theme Framework and What Are the Best Theme Frameworks?
- How to Customize Your WordPress Theme
- How to Use WordPress Theme Customizer Like a Pro
- A Complete Beginner’s Guide to WordPress Full Site Editing
- What Happens When You Switch Your WordPress Theme?
We hope this article helped you add a smooth scroll-to-top effect on your site using jQuery. You may also want to see our expert list of things you MUST DO before changing WordPress themes and our guide on how to find which files to edit in a WordPress theme.
If you liked this article, then please subscribe to our YouTube Channel for WordPress video tutorials. You can also find us on Twitter and Facebook.


Olaf
This small icon is great for desktop solutions, where users have to scroll a lot to get back to the top. It’s a nice detail, and I personally like it. On mobile devices, the purpose is somewhat lost, as quick swiping is available, and sometimes the button just gets in the way. The plugin mentioned in the article is one of the few in the WordPress repository that works truly everywhere and as it should. I recommend it and occasionally use it myself. However, based on my experience, I suggest disabling it specifically on mobile devices.
Dennis Muthomi
One tip I’d LOVE to add is to consider matching the button’s color scheme to your website’s theme for a more cohesive look.
This tiny detail can make a big difference in the overall user experience.
Mrteesurez
I see implementing a scroll to top feature is beneficial for websites especially sites that post very long contents, users might need to see the beginning of the post or to get back to top so this functionality will indeed add more improve users experience. I see most website including WPbeginner not using it but why ?
Is there any benefit in not using it maybe for more user retention or what ?
You can include pros and cons of it in this post in a later update.
WPBeginner Support
We will look into the possibility for the future, for now we do not have it as personal preference. As someone goes through a tutorial they normally want to see the previous step by scrolling manually and not the start of the article
Admin
Mrteesurez
Well, possibly, but to me, the use case is more than just seeing the previous step in articles. This article highlighted that “Unless the site has a sticky header menu, users who scroll to the bottom of a long WordPress post or page have to manually swipe or scroll their way back to the top to navigate the site. That can be a real annoyance, and often, users will simply hit the back button and leave. That’s why you need a button to quickly send users to the top” I just want to point out that the use case mentioned in the article are beneficial and justify use it. Thanks.
Jiří Vaněk
Previously, I didn’t have a ‘back to top’ button on the page, but as my articles became longer and longer, I didn’t want users to spend several seconds scrolling. I started using this exact plugin, and it’s fantastic. It significantly enhances user comfort, even though at first glance it might seem unnecessary. It isn’t.
Asha
Thank you very much! This is very clearly explained. Helpful.
Marco
The Jquery method didn’t work for me using a Twenty-seventeen child theme. Oh well. The hyperlink version did work perfectly, thankfully, and it’s good enough for me.
Marco
One question…could one reason why this is not working for me (the jquery method) be because my WordPress installation is in a subfolder? It’s the only reason I can think of.
Taffeltrast
Would love this, but it break the footer.php. The footer simply does not load.
When i try ad it to footer.php i get “There is a syntax error on line 14. etc etc”, and when i try upload it anyway, the footer does not load.
oliver
thanks a lot, simple and effective.
my two cents, if you allready have a custom.js file in your theme you can simply add the jquery function in this file instead of creating a new file and enqueue again.
Personnally i prefer to have all my small scripts in one file.
Stuart
Child Theme Designed by Blank |
<?php }
add_action('wp_head', 'my_favicon');
What am I doing wrong ? This is my funtions.php new to wp_enqueue_scripts.
Stuart
Twenty Fifteen-Child Theme made a Js folder added all the wp_enqueue_script but no dice not sure what went wrong. I want to use less plugins as possible they seem to slow WordPress sites down. Added A favicon perfect wp_enqueue_script kind of new to me. Any help?
Donald
Hi, does this still work? The icon appears (if I temporarily change the CSS to display:block), the script shows up as loaded in the Firefoxe developers’ toolbox console. However I get the following error message for line 1:
‘SyntaxError: missing ; before statement’
I’ve copied the script as above:
01 jQuery(document).ready(function($){
02 $(window).scroll(function(){
03 if ($(this).scrollTop() < 200) {
04 $('#smoothup') .fadeOut();
05 } else {
06 $('#smoothup') .fadeIn();
07 }
08 });
09 $('#smoothup').on('click', function(){
10 $('html, body').animate({scrollTop:0}, 'fast');
11 return false;
12 });
13 });
Can anyone see what the problem might be?
Donald
Josh Patterson
Is there any way to make this fade out before it gets to the bottom of the page?
jaybob
Hi, its working fine. Thank you for the tutorial but i only have just one problem, the image appears to quick. can i do something to appear later / a little bit down, after scrolling?
Aaron
This is a very clean way to pull this off. By far my favorite I’ve found.
Quick question… I have put it in my footer.php file… How can I get it to stop sticking at a certain point? For example, I have a footer that is 575px tall and I don’t want the icon going into that area. Basically stop the fixed position at say, 600px from the bottom of the page.
Ulv
Would this solution add the smoothscroll.js file to the portion of the html file or…?
emanuele
Hi,
is possible to add smooth scroll in menu for scroll page?…i have create a one page template and i want to scroll it by menu…thank you
StefsterNYC
If I understand you correctly you want to add it to the main menu nav? Correct? Simply use the same selector name but change the css completely. So that the image won’t appear.
Make sense?
Paul
Thanks à lot for this tip ! However I’ve got a problem. When I reduce the size of the screen, my arrow go away while I want it in a specific place.
Is there a way to fix that ?
Thanks
Paul
Paul
I found a solution for my problem. I just had to change my css to :
#smoothup {
top: 572px;
left: auto;
margin-left: -68px;
}
Mushir
Thank you man! works like magic.. you really made my day!
Steven Wolock
Thanks for this! It works great.
Question: Is that closed bracket correct after -webkit-transform: rotate(360deg)?
etech0
I set this up on my site, but I don’t see the icon! How can I find out why it’s not working?
Thanks!
WPBeginner Support
There could be any possible reasons. First make sure you have uploaded the image, then check that the background: url has the correct URL and that it leads to your image. Lastly check that jquery and your .js file is loaded. Lastly, try tweaking CSS values for display, position, and text-indent.
Admin
etech0
I figured it out – I had to change the 40px height and width to conform with my image.
Thanks for a great tutorial!
Alexander Gruzov
Thanks!