Have you ever wanted to make parts of your WordPress site look different for each category? It’s a great way to make your website more user-friendly and show content that fits each topic better.
We do this at WPBeginner, too! You might not notice it right away, but our sidebars change depending on which page you’re on.
By changing your headers, footers, or sidebars for different categories, you can make your site more interesting for visitors. You could show ads that fit the topic, highlight useful resources, or just make things look different to match the content.
In this guide, we’ll show you three ways to add custom headers, footers, or sidebars for each category in WordPress.

Why Add a Custom Header, Footer, or Sidebar for Each Category?
Customizing your WordPress site’s layout for different categories can really improve your visitors’ experience. By tailoring headers, footers, or sidebars to specific topics, you can provide more relevant information to your readers.
Custom sidebars can also make navigation easier by offering category-specific links and resources. Other than that, you might want to display targeted ads, relevant social media feeds, or related posts on that topic.
These customizations can increase engagement and keep visitors on your site longer.
At WPBeginner, our sidebars look different depending on the page or post you’re on. The sidebar on our homepage is much simpler, featuring only our social links and free guides.
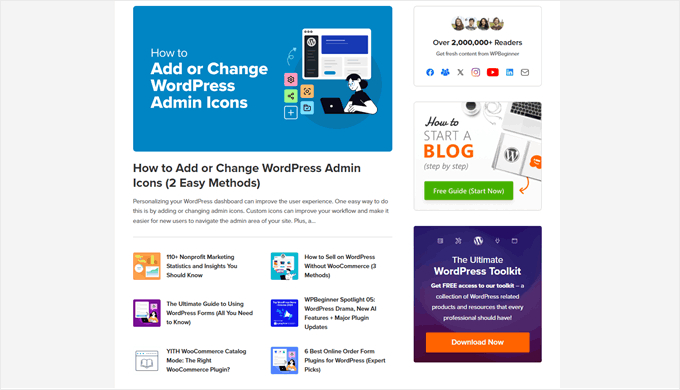
But if you visit our blog posts, you will also see a featured plugin, a search bar, our latest posts, deals and coupons, and more.
The featured plugin you see will also differ depending on the post you’re on.

With that being said, let’s take a look at how to easily add a custom header, footer, or sidebar for each category in your WordPress blog.
We will cover three methods, and you can use the quick links below to navigate to a specific one if it interests you more than the others:
💡 Need a custom website fast? WPBeginner’s team of WordPress experts can help.
With our WordPress Website Design Service, we can redesign your current site or build a brand-new one for you, all at an affordable price. We’ll take care of everything from design and maintenance to speed optimization.
Method 1: Create a Custom Theme With a Custom Header, Footer, or Sidebar (Recommended)
Our most recommended method to add a custom header, footer, or sidebar for each category is to create a custom theme with a WordPress theme builder. This approach offers the most flexibility and control over your site’s design.
Plus, lots of themes, especially classic ones, don’t offer the feature to add custom elements by default. This limitation often forces users to edit theme files directly, which can be risky and complex for beginners. We’ll show you how to do this in method 3.
That being said, this method is not recommended if you are happy with your current theme and don’t want to change it. That’s because following this method will require you to change your theme.
For this purpose, we recommend using SeedProd. It’s one of the best landing page and theme builders we’ve tried.
We use it frequently for our own custom pages and partner websites. Plus, SeedProd comes with over 350 templates, making it easy to create professional-looking designs quickly.
You can learn more about the plugin in our SeedProd review.
To use SeedProd’s theme builder feature, you’ll need the premium version. However, feel free to start with the free version to get a feel for the plugin.
Step 1: Install and Set Up SeedProd
To get started, install the SeedProd plugin on your WordPress site. If you need help, check out our guide on how to install a WordPress plugin.
After installation, enter your SeedProd license key and click ‘Verify key’ to activate the plugin.

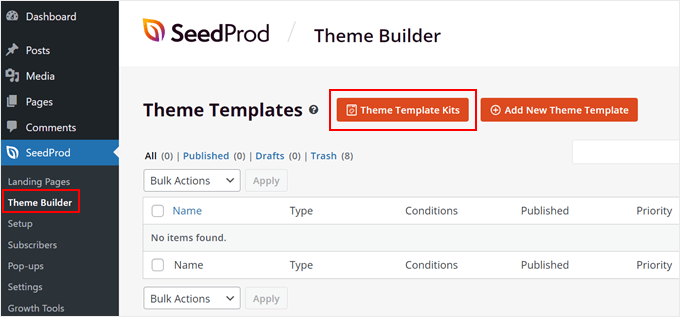
Next, navigate to SeedProd » Theme Builder in your WordPress dashboard.
Click on the ‘Theme Template Kits’ button to explore available designs.
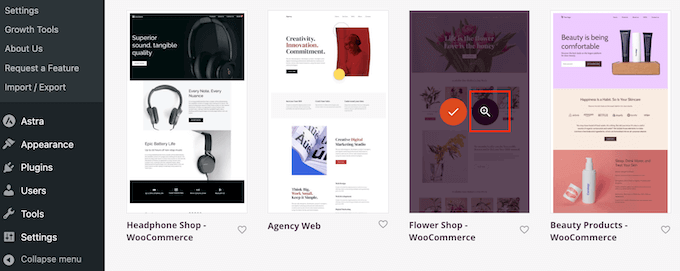
Here, you’ll see a variety of theme template kits.
Feel free to preview any kit by hovering over it and clicking the magnifying glass icon.
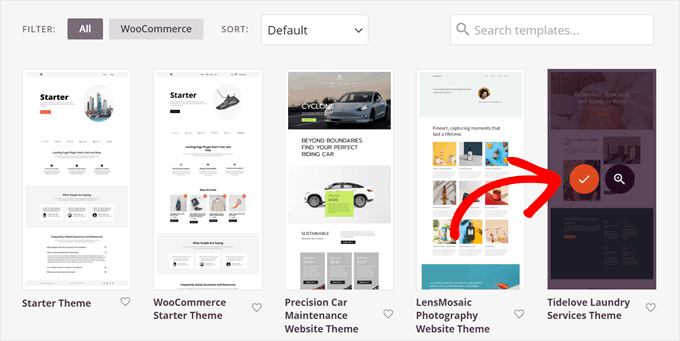
If you plan to create a different custom sidebar for each category, then we recommend choosing a theme kit with a sidebar page template.
Additionally, we recommend choosing a theme kit that includes pages that fit your website needs. For example, the Tidelove Laundry Services Theme comes with a Services page, making it perfect for service-based businesses.

Once you’ve decided on a kit, just hover your cursor over it.
Then, click on the orange checkmark icon when it appears.
Now, wait for a few moments for SeedProd to set up your theme.
After that’s done, you should be redirected to the ‘Theme Builder’ settings page again, where you will see that SeedProd has created several theme templates for your WordPress website.
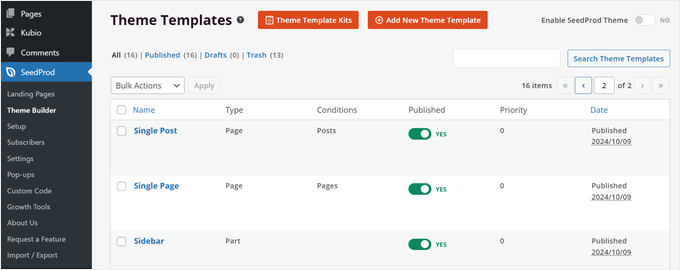
Step 2: Duplicate Your Existing Category Archives Template and Header/Footer/Sidebar Template
You can now start editing your theme templates.
First, you will have to duplicate your ‘Archives, Search Results’ template, which is used for blog post category pages. You’ll need to create a copy of this and then configure the conditions so that the page is only displayed when the visitor is viewing a specific blog post category page.
To do this, hover over your ‘Archives, Search Results’ template and click ‘Duplicate.’
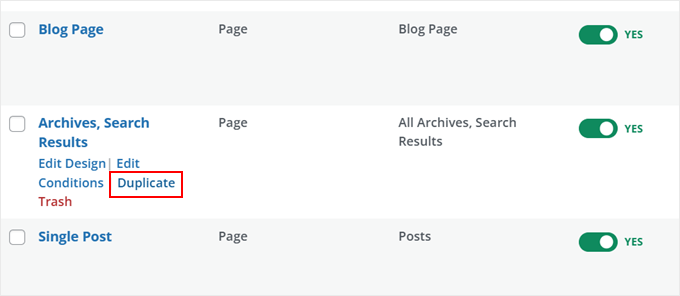
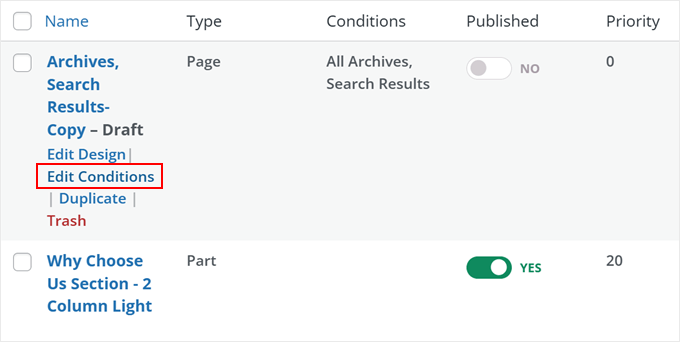
You should now see a new ‘Archives, Search Results- Copy’ template.
Go ahead and click ‘Edit Conditions.’
A popup will now appear. First, replace the name so that it’s easier to identify it later on. We recommend including the name of the blog post category this template will be used for.
This can be something like ‘Category Archives – [category name].’ Our category page is called ‘Theme,’ so we’ll name ours ‘Category Archives – Theme.’
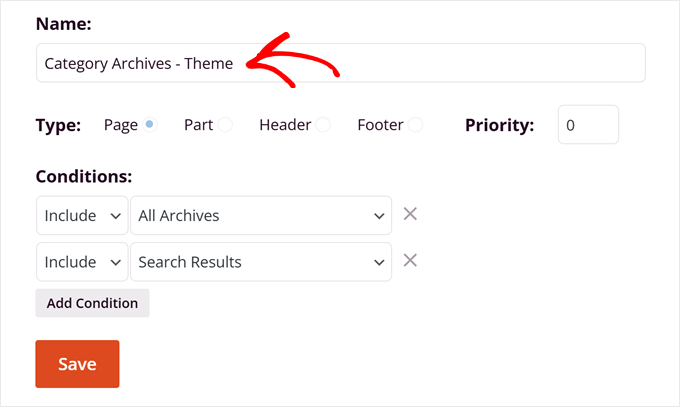
For the ‘Conditions,’ make sure to delete the current options by clicking on the ‘X’ button next to both of them
Then, click ‘Add Condition.’
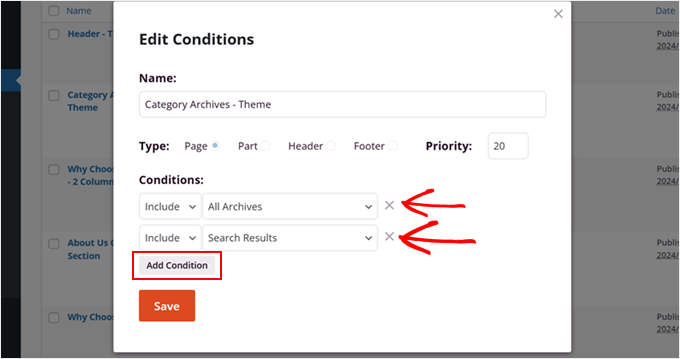
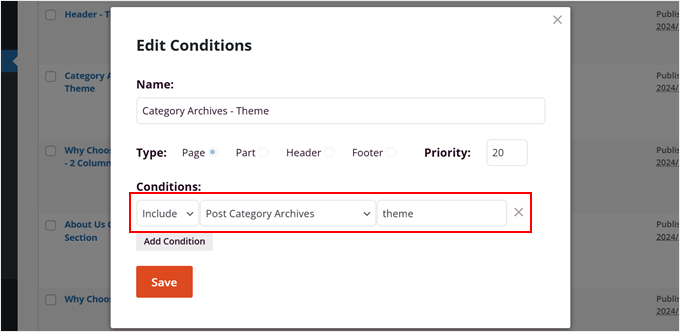
Now, make sure to choose ‘Include’ and ‘Post Category Archives’ for the new condition.
Then, enter the slug of the category, which you can find by going to Posts » Categories.
You can read our glossary post on WordPress categories if you need pointers.
Once done, just click ‘Save.’
Now, let’s create a custom header, footer, or sidebar template for your new blog post category page.
To demonstrate, we will create a custom header. You can do this by looking for your ‘Header’ template part, hovering over it, and clicking ‘Duplicate.’
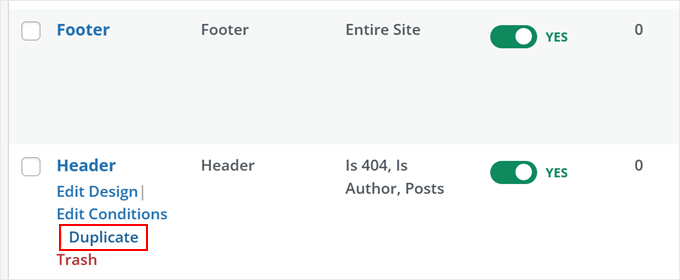
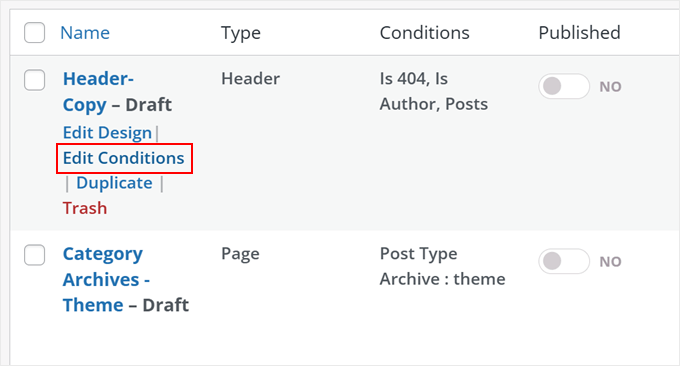
You should now see ‘Header- Copy’ in your list of templates.
At this stage, you can hover over it and click ‘Edit Conditions.’
Now, make sure to rename this header template so that it’s easier to identify.
Again, we recommend adding your blog post category name here so that you can easily differentiate it from other headers for other category pages.
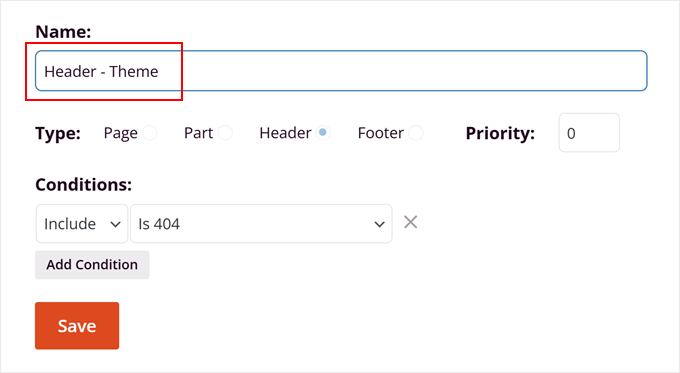
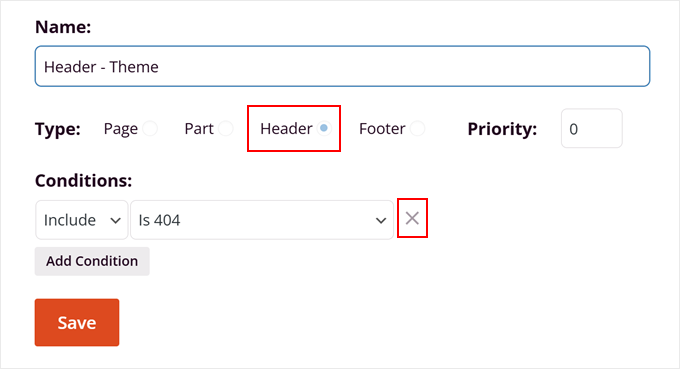
Also, make sure the ‘Type’ is ‘Header’ and remove all of the existing conditions by clicking on the ‘X’ button next to them.
Once you are done, click ‘Save.’
Step 3: Customize Your Custom Header/Footer/Sidebar
With the previous steps done, you’re ready to start customizing your header, footer, or sidebar section.
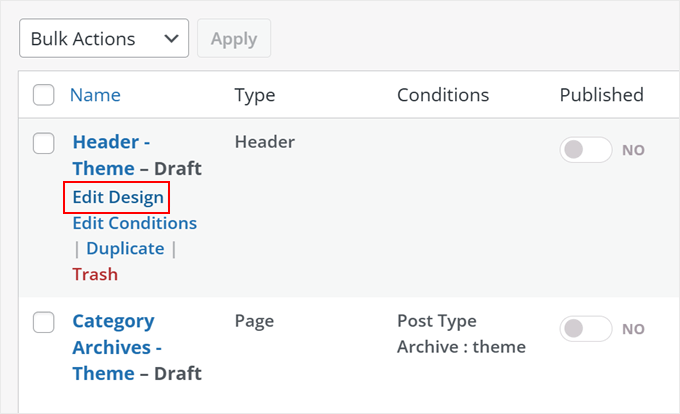
Since we created a header earlier, we’ll go ahead and edit that right away. All you need to do is hover over the header, footer, or sidebar template part and click ‘Edit Design.’
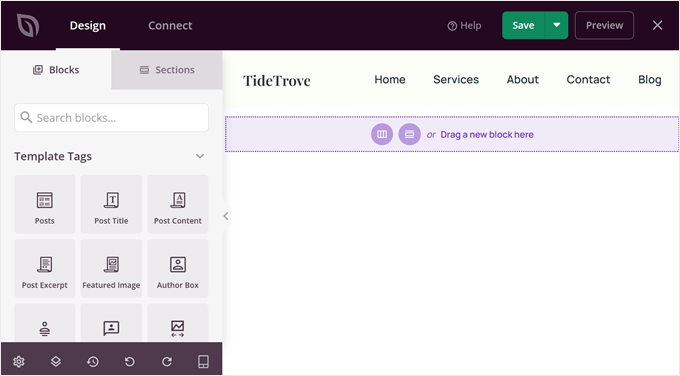
You should now be in SeedProd’s drag-and-drop editor.
As you can see, there is a live preview of your template and a menu on the left-hand side. You can add blocks or premade sections and customize them.
You can do lots of cool things here.
For example, you can look for the ‘Search Form’ block and add it next to your navigation menu in the header.
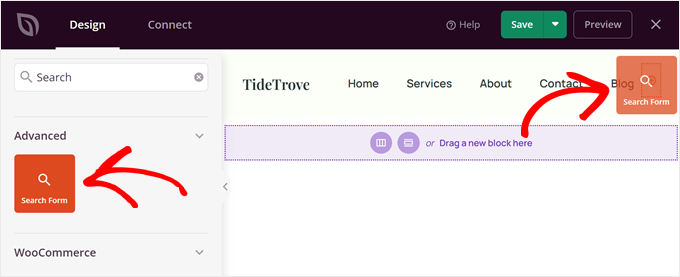
You can also add a custom shape divider to your header to add a fun, transitional element from the top of your site to the rest of the content.
Feel free to read our tutorial on how to add a custom shape divider in WordPress to learn more about this.

Here are other tutorials you can check out to get some ideas on what to do with your header, footer, or sidebar:
- WordPress Sidebar Tricks to Get Maximum Results
- How to Edit the Footer in WordPress
- How to Add Rotating Testimonials in WordPress
- How to Display Recent Posts in WordPress
- How to Add Dynamic Content in WordPress (Beginner’s Guide)
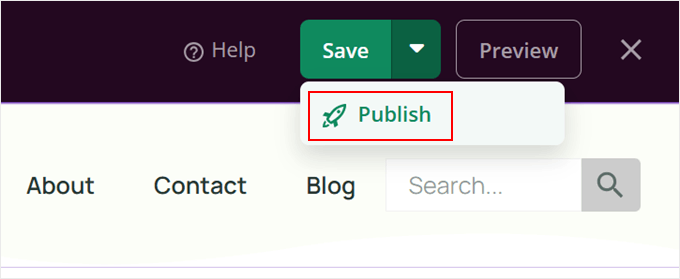
Once you’re happy with how the header, footer, or sidebar looks, just click the down arrow next to the ‘Save’ button. Then, select ‘Publish.’
Step 4: Add Your Custom Header/Footer/Sidebar to Your Blog Category Archives Template
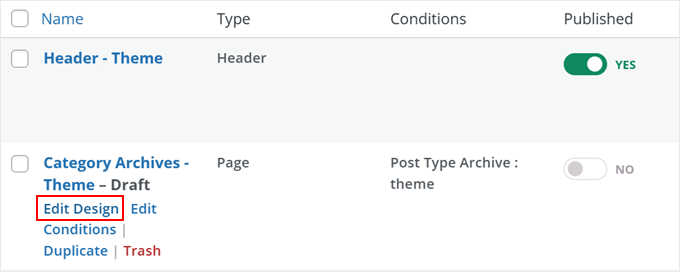
For the next step, go back to your WordPress admin and navigate to SeedProd » Theme Builder. Then, hover over the blog category template you duplicated from earlier and click ‘Edit Design.’
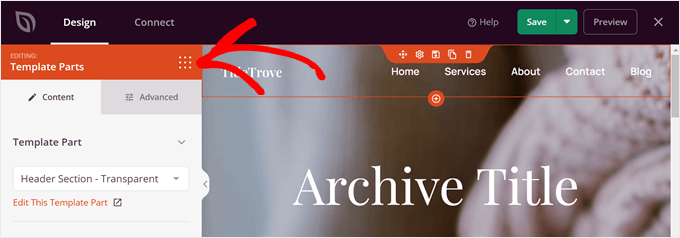
You should now be in the SeedProd drag-and-drop editor. As you can see, this template still uses the same header, footer, or sidebar as the rest of your website.
To replace it, hover over the header, footer, or sidebar and click on it. You’ll know you’re on the right track if the left side panel changes to ‘Editing: Template Parts.’
Now, in the ‘Template Part’ dropdown menu, choose the header, footer, or sidebar template you duplicated and customized earlier.
Like so:

If your header, footer, or sidebar doesn’t look right, don’t worry. Just click ‘Edit This Template Part,’ and a new tab will open, where you can make changes in the SeedProd editor.
Since the font on our header is too dark, we decided to change the font color and remove the shape divider to make the links more readable.

And that’s it. Feel free to continue customizing your category archives page to your liking.
For example, you can add a large image at the top, insert feature boxes with icons to promote your products or services, add an animated background, and more.
Once done, just click the down arrow next to the ‘Save’ button again and select ‘Publish.’

Feel free to repeat steps 2 to 4 to create different headers, footers, or sidebars for each blog category page.
Then, go back to SeedProd » Theme Builder and toggle on the ‘Enable SeedProd Theme’ button until it says ‘YES.’ Doing this will deactivate your previous theme and activate your SeedProd one.

And that’s it!
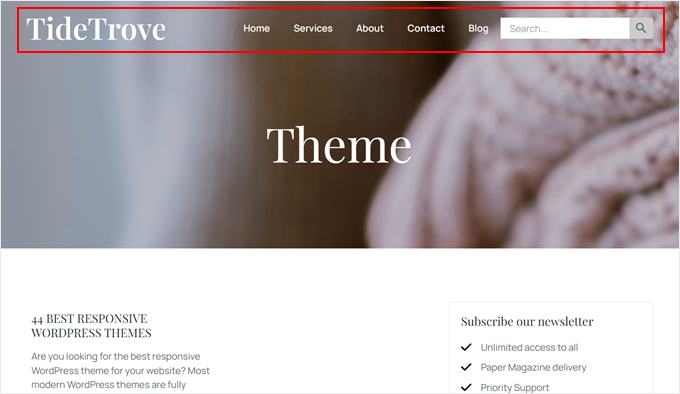
Here’s what our custom header looks like in the end:
Note: Not a fan of SeedProd? We also recommend using Thrive Architect, another powerful yet easy-to-use page builder. You can learn more about the tool in our Thrive Architect review.
Method 2: Use Full-Site Editor to Create Custom Header, Footer, or Sidebar (Block Themes)
If you’re using a block theme like Twenty Twenty-Four or Hestia, you can create custom sidebars, headers, or footers using the full-site editor. This method works the same way for all block themes, making it easy to add custom elements to specific blog post category pages.
Step 1: Create a Custom Header, Footer, or Sidebar Template Part
To begin, go to Appearance » Editor in your WordPress dashboard.
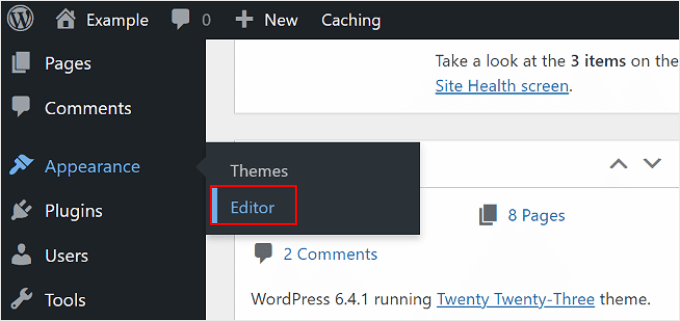
You’ll see various options to customize your block theme.
Click ‘Patterns’ in your left-hand menu to start.

This is where you can see all the reusable template parts of your pages, like headers, footers, sidebars, and so on.
For this tutorial, we’ll give you an example of creating a custom footer with the full-site editor. But, keep in mind that this method will work for any template part, including headers and sidebars.
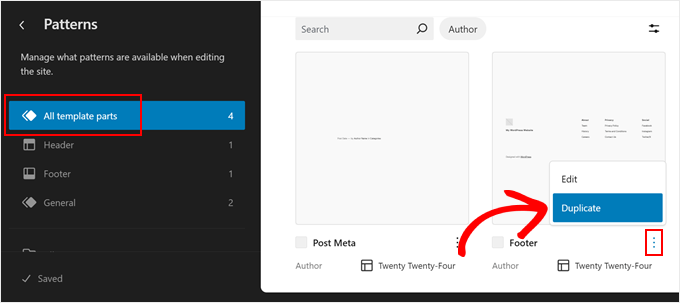
First, click ‘All template parts.’ Then, find the ‘Footer’ part and click on the three-dot menu. Select ‘Duplicate’ to copy the template part.
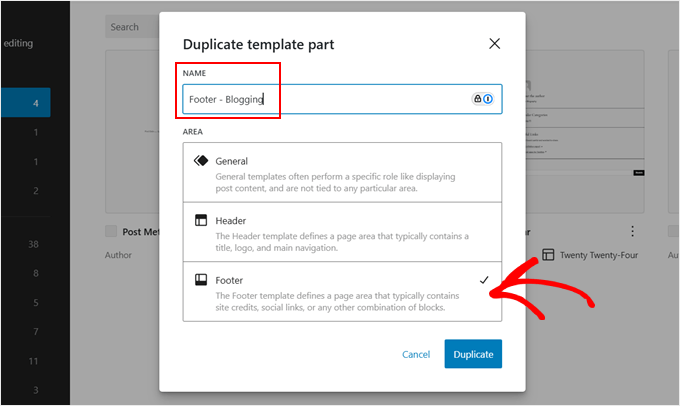
A new popup will appear. Here, rename ‘Footer (Copy)’ to something else that can make the template part easy to identify.
We recommend including the category name where this footer will appear later, so something like ‘Footer – [category name].’
Also, make sure ‘Footer’ is selected in the ‘Area’ section. Then, click ‘Duplicate.’
Your new footer should now be on the list of template parts.
Go ahead and click on it to start editing it.
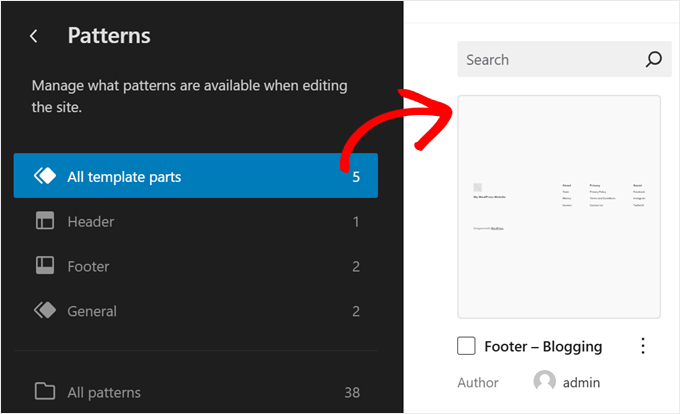
Now, in the full-site editor, you can start customizing your header, footer, or sidebar however you like.
In our opinion, the regular footer template already has all the things you need in a typical footer. But to make it different from other category pages, we’re going to add a call-to-action button that invites visitors to download a free blogging guide.
We’ll add the call-to-action right above the regular footer section to avoid messing up the regular footer elements.
To customize your footer in a similar way, click on the ‘List View’ button in the top left corner and select the ‘Group’ that nests all the footer elements together. Then, click on the three-dot menu, and select ‘Add before.’
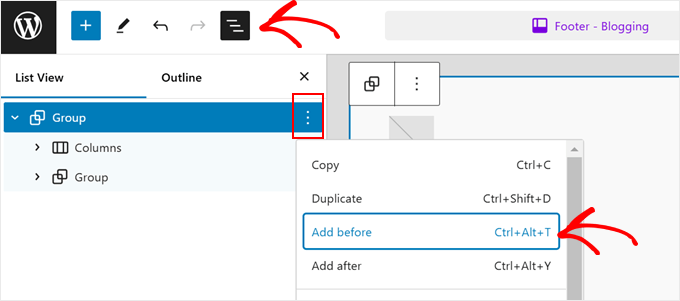
Now, click on the black ‘+’ button to add a block or a pattern.
We’ve decided to navigate to the ‘Patterns’ tab here and select ‘Centered call to action’ to speed up the process.
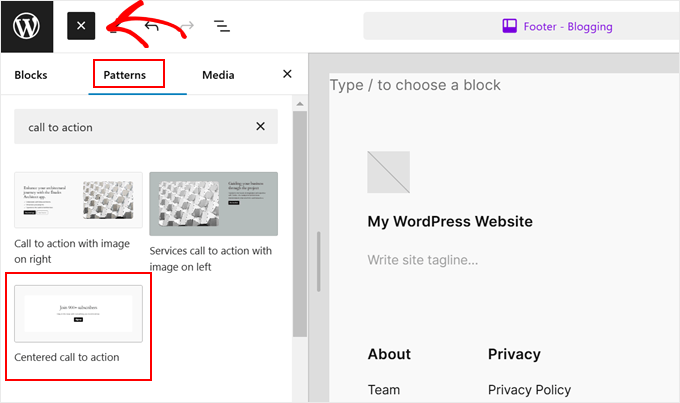
Now, all you need to do is replace the heading, text, and button that is in the pattern to suit your needs. You can edit everything as you normally would in the Gutenberg editor.
If you need help, you can read our beginner’s guide to WordPress full-site editing.
Once you are done, just click ‘Save.’
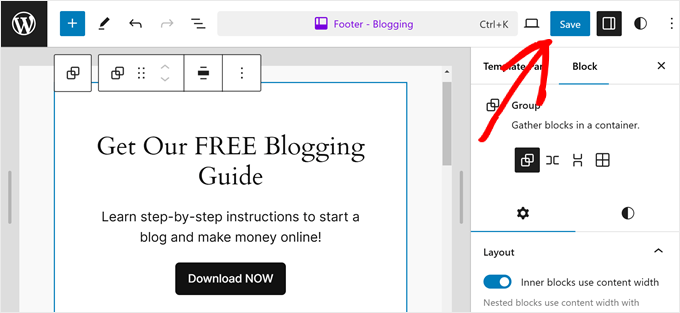
At this stage, you can go ahead and repeat this step to create multiple headers, footers, or sidebars for each of your category pages.
Step 2: Create Custom Templates for All Category Pages
Now, we’ll create a custom template for each blog category page. This is necessary because, currently, all your categories likely use the same archives template. By creating individual templates, we can add different headers, footers, or sidebars to different categories.
To start, go back to the main menu of the full-site editor and click on ‘Templates.’
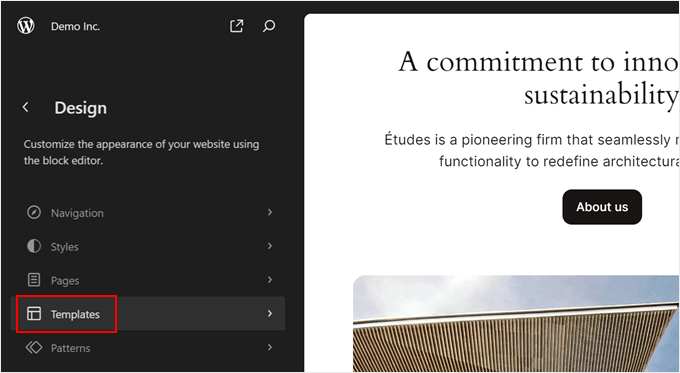
The default template for category archive pages is usually called ‘All Archives.’ This template is used for various archive types, including categories, tags, custom taxonomies, and custom post types.
To create a new template for a category archive page, click ‘Add New Template’ in the top-right corner.
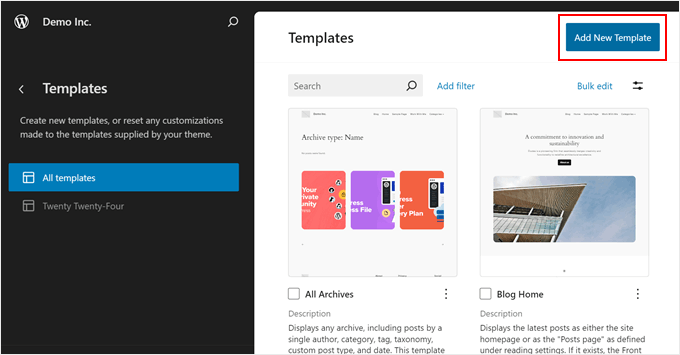
A popup window will show up.
Here, select ‘Category Archives.’
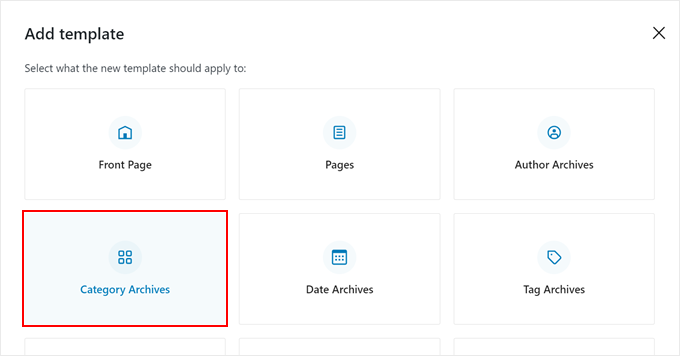
Next, choose whether to create a custom template for all categories or a specific one.
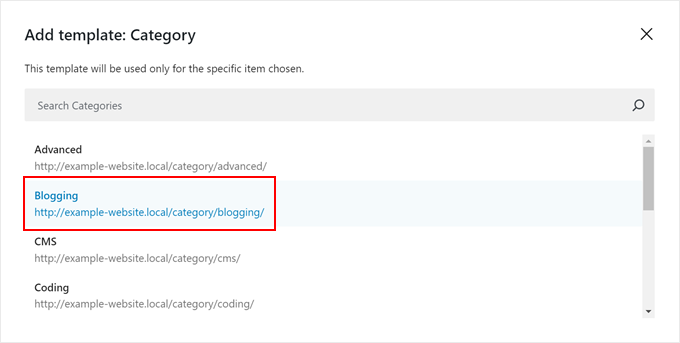
Since we want to create custom headers, footers, or sidebars for each category page, we will select ‘Category For a specific item.’

Now, choose the category you want to create a template for.
In this example, we’ll select the ‘Blogging’ category.
Next, the full-site editor will open, and a popup will ask you to choose a block pattern for the category archive page.
You can either select a pattern or skip this step to start from scratch. If you prefer to start fresh, our guide on styling individual categories in WordPress provides detailed instructions.
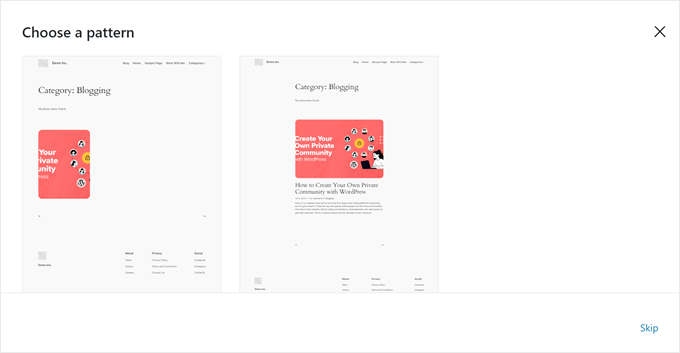
Continue customizing your category page until you’re happy with how it looks.
Step 3: Add Your Custom Header/Footer/Sidebar to Your Category Page Template
Once you are finished customizing the appearance of your category page, you will need to add your custom header, footer, or sidebar.
To do this, you can click on the ‘List View’ button in the top left corner.
Then, select the header, footer, or sidebar template part, click on the three-dot menu, and choose ‘Replace.’
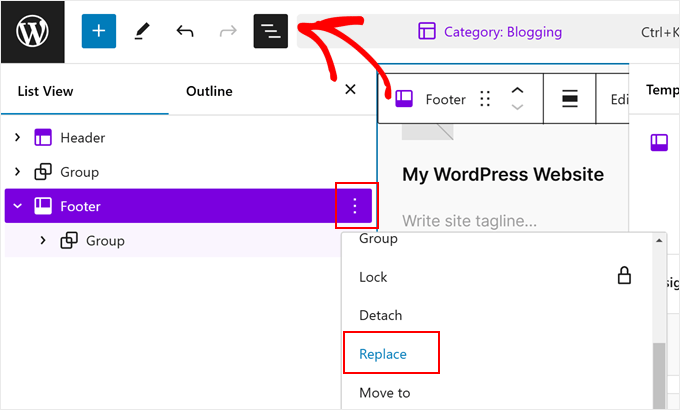
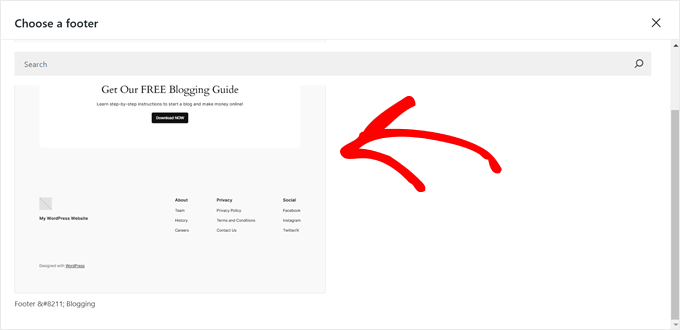
You should now see the custom template part you just created.
Simply click on it to use it.
After all that is done, just hit the ‘Save’ button at the top.
Here’s what our custom footer for the blogging category page looks like:
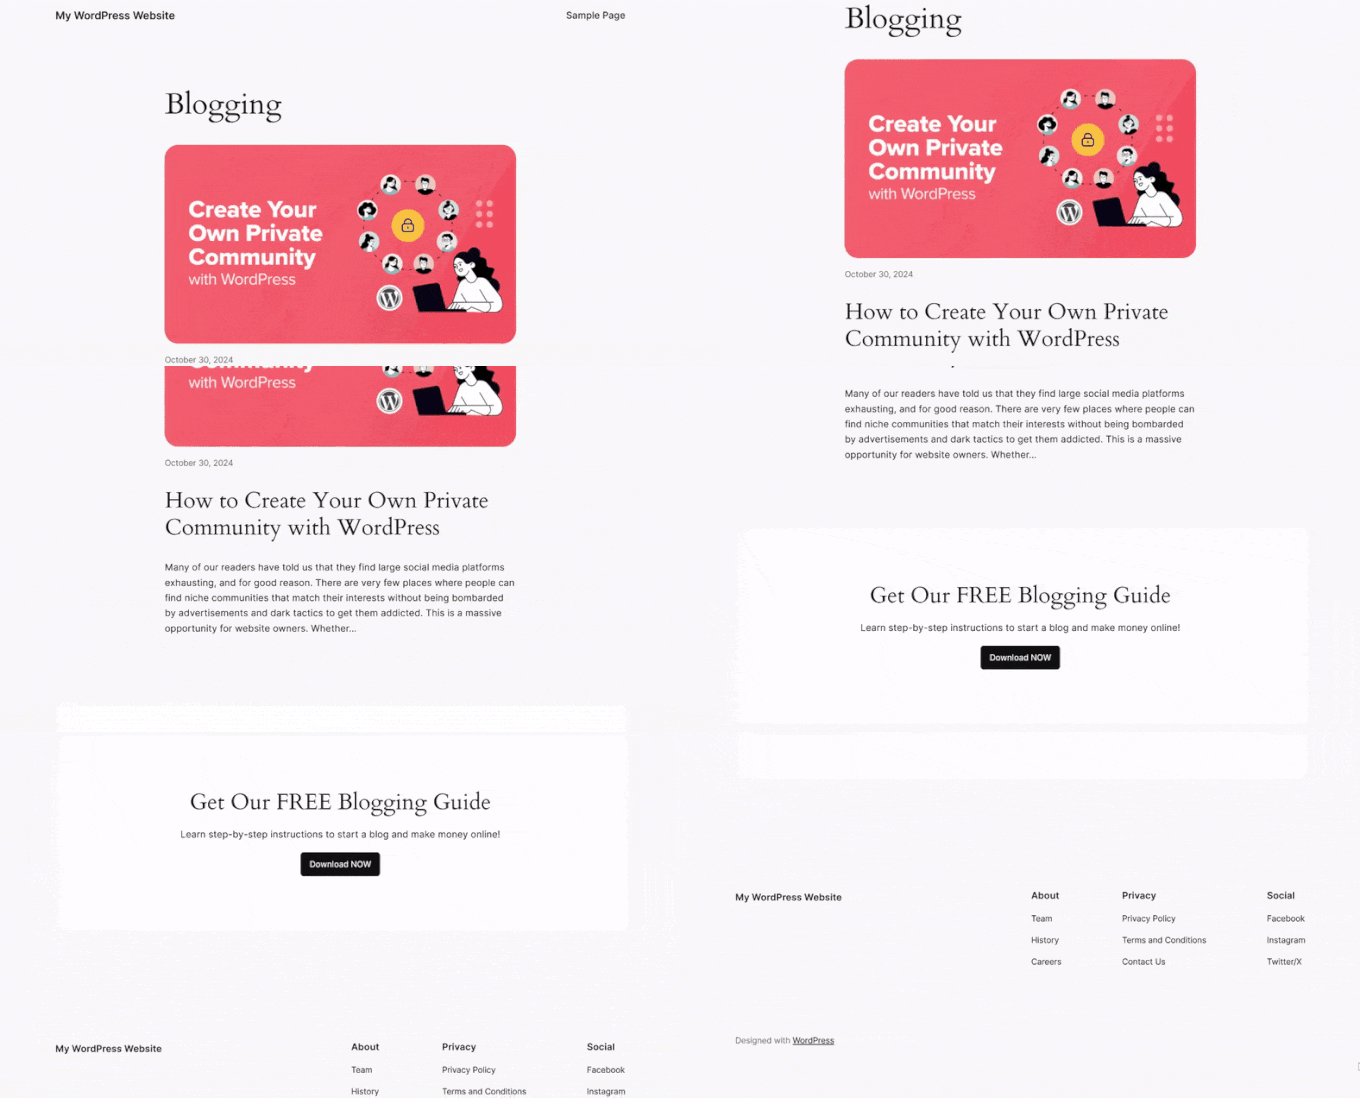
You can then repeat these steps to create different pages for all of your blog post categories.
Method 3: Create New Header, Footer, or Sidebar Theme Files (Advanced Method for Classic Themes)
This method is the most advanced and it is only meant for people using classic themes.
It’s more challenging to create custom headers, footers, or sidebars for category pages in classic themes compared to block themes, as each classic theme works differently.
So, before you proceed with this method, we recommend reaching out to your WordPress theme developer. They might have an easier, code-free way to create custom elements for your specific theme.
You will also need to create a WordPress child theme before making any changes. A child theme allows you to modify your site’s appearance while preserving the ability to update the parent theme safely.
If you’re not confident in your coding skills, consider moving your live WordPress site to a local environment first or using a staging site. This allows you to test changes without affecting your live site.
The basic steps for this method are:
- Duplicate your theme’s
header.php,footer.php, orsidebar.phpfile for each category page. - Rename these files to
header-categoryname.php,footer-categoryname.php, orsidebar-categoryname.phpto indicate which category they belong to. - Edit the newly duplicated files to differentiate them from the default header, footer, or sidebar.
- Modify the code in the
archives.phptemplate (typically used for category archives) to call your new files when appropriate. Otherwise, it will default to the standard files.
Let’s walk through an example of creating a custom sidebar for the Twenty Sixteen theme, specifically for the ‘WordPress Core’ blog category.
First, open your website files via FTP or your web hosting provider’s file manager. For this tutorial, we will use the Bluehost file manager, but the steps should be similar regardless of your host.
If you are a Bluehost user, you can go to your dashboard and navigate to the ‘Websites’ tab. Then, find the site you’re working on and click ‘Settings.’
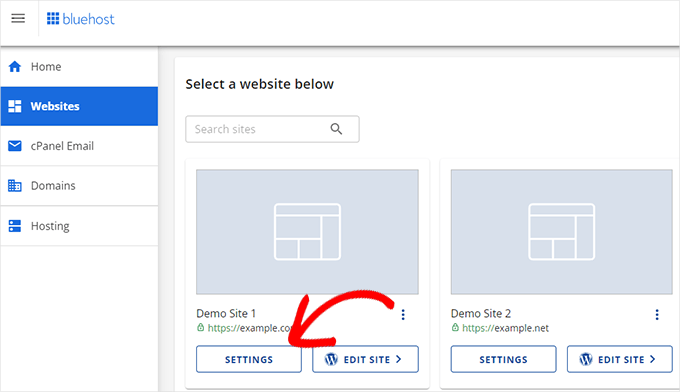
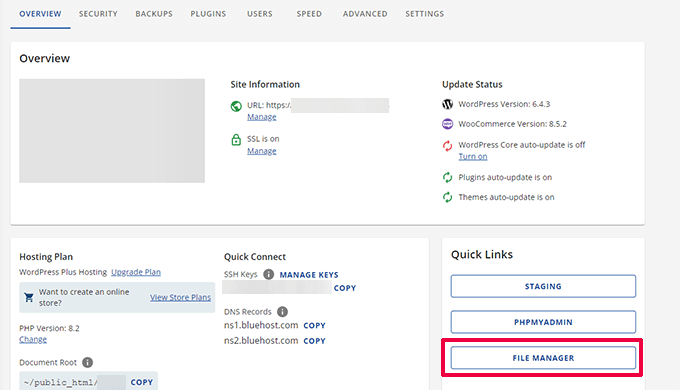
You will now see a bunch of settings for configuring your website.
Find the ‘Quick Links’ section and select ‘File Manager.’
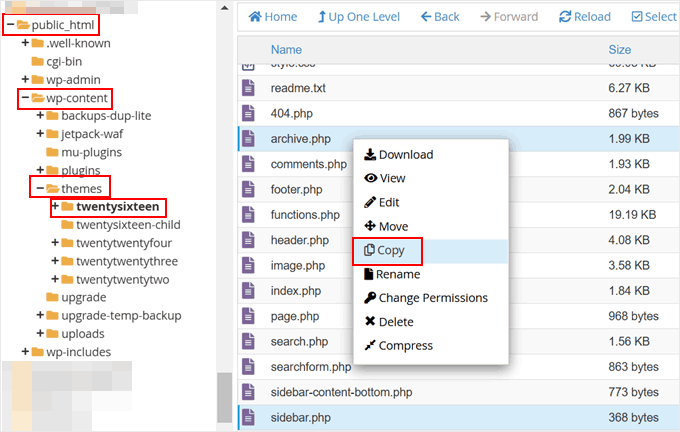
Once you’re in the file manager, go to your site’s public_html folder. Then, go to wp-content » themes and locate your parent theme’s folder.
After that, select both your archive.php and sidebar.php files. Your selected files should be clearly highlighted (ours are shown in blue below). Next, right-click on them and choose ‘Copy.’
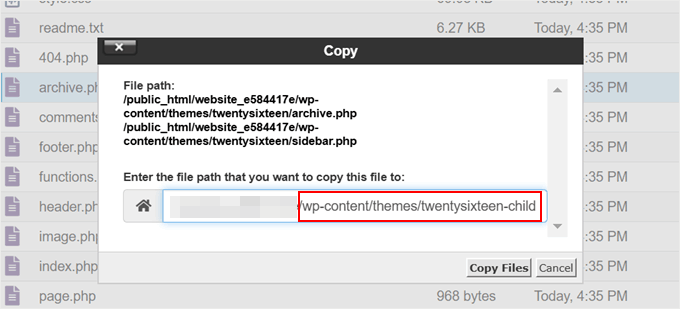
Then, enter the file path that you want to copy these files to.
In this case, it’s your child theme’s folder, so for us, the file path ends with ‘/wp-content/themes/twentysixteen-child.’
Now, open your child theme’s folder.
When you’re there, right-click on the sidebar.php file and click ‘Rename.’
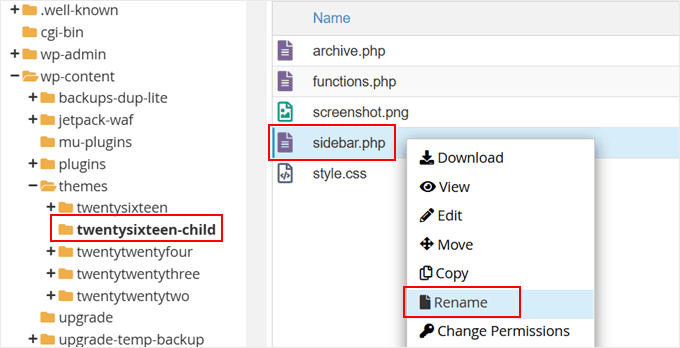
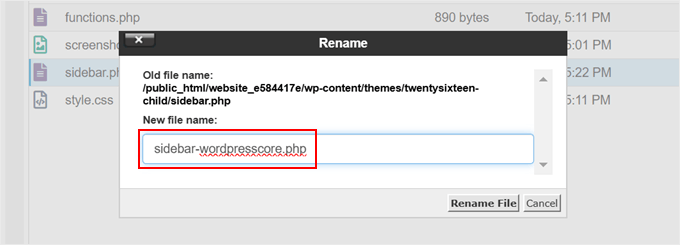
Now, rename ‘sidebar.php‘ to ‘sidebar-categoryname.php.’
Replace ‘categoryname’ with the title of your blog post category. Then, click ‘Rename File.’
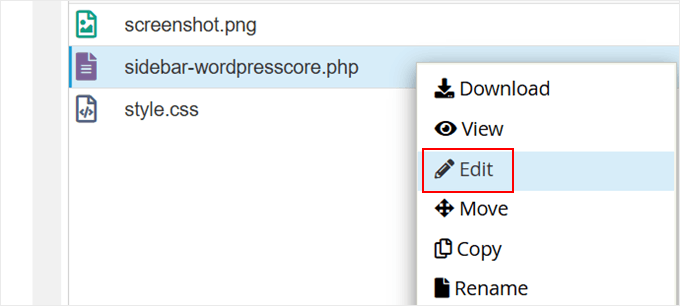
Once done, right-click on the ‘sidebar-categoryname.php‘ file.
Then, choose ‘Edit.’
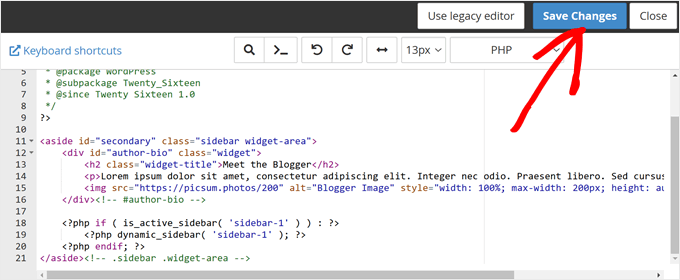
Now, you can go ahead and customize the code in this file.
Here’s what the original code looks like at the moment:
<?php
/**
 * The template for the sidebar containing the main widget area
 *
 * @package WordPress
 * @subpackage Twenty_Sixteen
 * @since Twenty Sixteen 1.0
 */
?>

<?php if ( is_active_sidebar( 'sidebar-1' ) ) : ?>
	<aside id="secondary" class="sidebar widget-area">
		<?php dynamic_sidebar( 'sidebar-1' ); ?>
	</aside><!-- .sidebar .widget-area -->
<?php endif; ?>
Here’s an example code snippet that you can use to replace the current file:
<?php
/**
 * The template for the sidebar containing the main widget area
 *
 * @package WordPress
 * @subpackage Twenty_Sixteen
 * @since Twenty Sixteen 1.0
 */
?>

<aside id="secondary" class="sidebar widget-area">
    <div id="author-bio" class="widget">
        <h2 class="widget-title">Meet the Blogger</h2>
        <p>Lorem ipsum dolor sit amet, consectetur adipiscing elit. Integer nec odio. Praesent libero. Sed cursus ante dapibus diam.</p>
        <img src="https://picsum.photos/200" alt="Blogger Image" style="width: 100%; max-width: 200px; height: auto;" />
    </div><!-- #author-bio -->

    <?php if ( is_active_sidebar( 'sidebar-1' ) ) : ?>
        <?php dynamic_sidebar( 'sidebar-1' ); ?>
    <?php endif; ?>
</aside><!-- .sidebar .widget-area -->
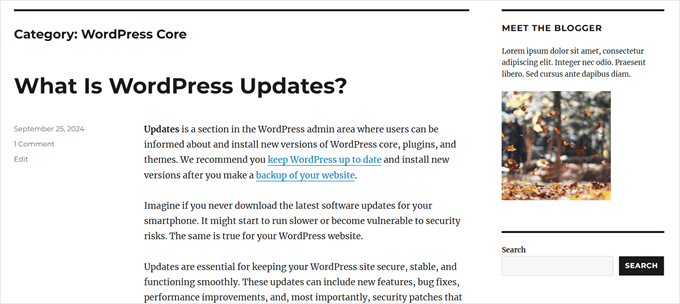
This code will simply display an author profile section right above the usual display of sidebar widgets. Feel free to edit the ‘Meet the Blogger’ text, the ‘lorem ipsum’ text placeholder, and the image URL to your needs.
If you’re new to coding with WordPress, we recommend using an AI assistant like OpenAI to help you out. You can copy the code inside the file and use a prompt like ‘Please edit this code snippet and add a new element that shows the latest published posts of this blog.’
Once you’ve edited the file, just click ‘Save Changes.’
Next, go back to your child theme folder in the file manager and right-click on your ‘archive.php‘ file.
Then, choose ‘Edit.’
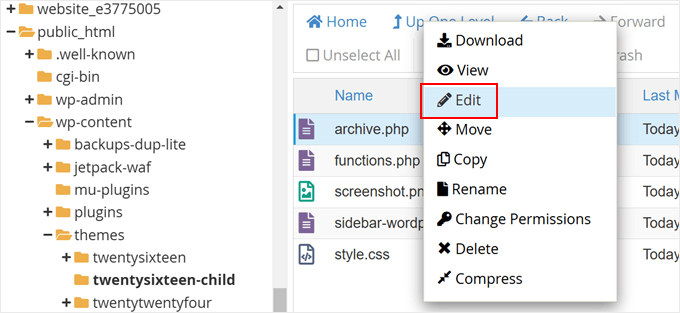
Here, we need to make the archive.php file use the new sidebar file we just duplicated and edited.
To do this, find the line that says <?php get_sidebar(); ?>:
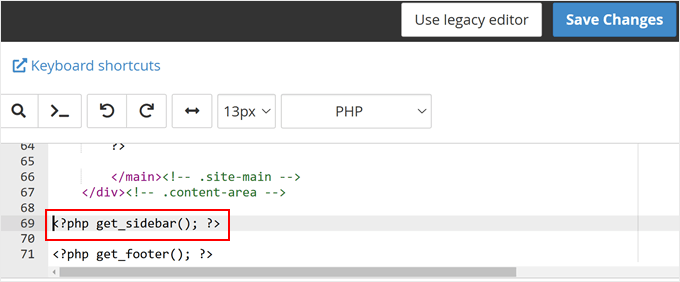
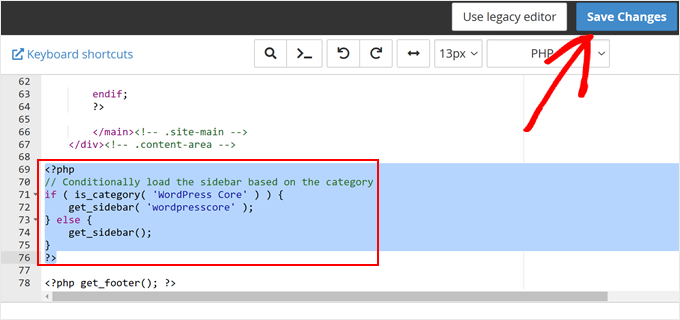
Once you’ve found it, replace that line with the following code snippet:
<?php
// Conditionally load the sidebar based on the category
if ( is_category( 'WordPress Core' ) ) {
    get_sidebar( 'wordpresscore' );
} else {
    get_sidebar();
}
?>
This code will essentially load the sidebar-wordpresscore.php file if the visitor is viewing the WordPress Core blog category page. Otherwise, it will just display the default sidebar file.
If you have created multiple sidebar-categoryname.php files, then your code will look like this:
<?php
// Conditionally load the sidebar based on the category
if ( is_category( 'WordPress Core' ) ) {
    get_sidebar( 'wordpresscore' );
} elseif ( is_category( 'Blogging' ) ) {
    get_sidebar( 'blogging' );
} elseif ( is_category( 'Theme' ) ) {
    get_sidebar( 'theme' );
} else {
    get_sidebar();
}
?>
Regardless of the code you use, make sure to replace the category names accordingly.
Once you’re done, just click ‘Save Changes.’
Now, go ahead and view the category page you edited to see if the changes have been implemented.
Here’s what the sidebar looks like on our demo website:
We hope this tutorial helped you learn how to easily add a custom header, footer, or sidebar for each category in WordPress. You may also want to check out our expert picks of the best Canva alternatives to create website graphics and our guide on how to redesign a WordPress website.
If you liked this article, then please subscribe to our YouTube Channel for WordPress video tutorials. You can also find us on Twitter and Facebook.


Moinuddin Waheed
Showing different sidebars for different categories is very good idea in terms of creating good user experience.
I use seedprod for this and having ability to utilise conditions and include the category based on that condition is very helpful feature.
This gives complete control over how the website will look like and what all the things we can include in the sidebars to make it more appealing and aesthetic.
Mrteesurez
Thanks for this guide, please is there a way to remove the “Category” heading in the Wordpress archive category page. Either to remove or to replace with another custom word ?
WPBeginner Support
It sounds like you either have a plugin that is adding breadcrumbs or your theme has breadcrumbs enabled in it’s settings for the most common reason you see that. Depending on which you should have an option to disable it for your archive pages.
Admin
Dave B
I’ve tried to implement a different footer on the static home page with the following code, but it doesn’t work….
Can you help please?
}
Johann
Hi all,
This is a great trick, but one of my client asked if we can can adapt this to WooCommerce?
I tried but unsuccessful…
Can you tell me how would you implement this to WooCommerce archive-product.php template?
Gabrielle
Hi, what can i do if i want to have custom headers, sidebars and footers to be saved in subfolders, like:
sidebar-cars in folder sidebars/sidebar-cars.php
John
But how do I do this for each category?
Ivan Jaquez
Hello and thanks for this great article. What about each category linking to an external url and not just the homepage? For example: Dog training category’s header linked to an external site. Thanks in advanced
Carol Dunlop
You must have been reading my mind! I just spoke with a client who wants a different footer on one certain page and this looks like it is going to work perfectly. Thanks for the awesome info.
Stuart Mackey
Thanks! I use categories for my business Site to denote the major “service categories” of video production I offer to my clients. This should allow me to have an intro describing the type of video and its function; marketing, testimonial, etc.
hamed.oveysi
I want a custom header for several category pages. Your code works with one category. How to do it?
David
what if i just want a different sidebar than the home page, in other words all categories would have the same sidebar but the home page would have a different sidebar, also how would I be able to edit the different sidebars in the widgets panel?
thanks for this post btw easiest one I found so far.
Editorial Staff
If you just want a different sidebar on the homepage, use the conditional tag if is_home or is_frontpage (depending on how you are creating a custom homepage), and then include a different sidebar file.
Admin
Mike
On a related note – you can create a custom sidebar for each individual page or post using the Graceful Sidebar Plugin. To use this you simply edit your post as normal and specify the sidebar widget title and content in the custom edit fields provided by this plugin.
DaveK
WPBeginner does it again! I was looking for ages for a solution to add a different sidebar to different categories, and this worked a treat. Thanks
Ljuboja
Does this trick do the same with pages?
Tnx !
Editorial Staff
For pages, you just use the custom page templates.
Admin
dains
Actually, a custom page template is a great place to implement this solution. A built-in WP function to tell it to use a custom header, sidebar or footer? Sign me up.
Since you’re using conditional tags for this solution (is_category), you should be able to use the ones for pages (http://codex.wordpress.org/Conditional_Tags#A_PAGE_Page) in a custom page template. I am planning a custom front page assigned via the admin section, so I’ll be trying it out with is_front_page instead of is_category.
Great
sven
hi, thanks for a a great tutorial, this is just what i was looking for. i now have a custom sidebar for one of my categories, and as I kept the dynamic sidebar code I thought I would be able to add widgets to it. It however does not show up in the widget editor. how do i get it so I can add widgets to my category specific sidebar?
Editorial Staff
Follow this tutorial.
Admin
shravan
Thank you so much for this post. This really bailed me out of big trouble. I looked for plugins to do this job for me but couldn’t find any. I was so glad to find the solution on this post.
Now I can create different headers for different categories.
Thanks again and keep up the good work.
Delighted Programer
ohhh this is what i have been looking for!!! Have been trying to figure out how to display a section with advertisements related to categories in wordpress and here it is!!!
thank you HEAPS!
Wellwisher007
improve the spelling of programer to programmer
wrerm
I recently purchased a WP Book and designed a wesbsite using WP and this is very useful. Thanks!
Jason Pelker
Is there a way to change the sidebar/header on a single post, depending on the post’s category?
Editorial Staff
Yes it is possible. You will have to use this tutorial about creating custom single post templates in WordPress.
Admin