Yakın zamanda okuyucularımızdan biri bize Mailchimp'i WordPress ile nasıl kullanabileceklerini sordu.
Mailchimp en popüler e-posta pazarlama hizmetlerinden biridir ve WordPress web sitenizle kolayca kullanılabilir. Ancak çoğu insan bunu nasıl yapacağını ve Mailchimp'ten en iyi şekilde nasıl yararlanacağını bilmiyor.
WPBeginner olarak, kullanıcıların web sitelerinde farklı e-posta pazarlama hizmetleri kurmalarına yardımcı olma konusunda 16 yılı aşkın deneyime sahibiz.
Bu kılavuzda, Mailchimp'i WordPress'e nasıl kolayca entegre edeceğinizi ve e-posta listenizi oluşturmaya nasıl başlayacağınızı göstereceğiz.
Here is a quick overview of the topics we will cover in this guide:
- Neden Bir E-posta Listesi Oluşturulur?
- WordPress Sitenizle Neden Mailchimp Kullanmalısınız?
- Mailchimp ile Başlangıç
- WordPress'e Mailchimp E-posta Kayıt Formları Ekleme
- OptinMonster Kullanarak Güzel Kayıt Formları Ekleme
- WPForms ile Özel Bir Mailchimp Kayıt Formu Oluşturma
- WordPress ve Mailchimp'te Her Şeyi Otomatikleştirin
- Mailchimp E-posta Listenizi Hızla Büyütmek İçin Bonus İpuçları
Neden Bir E-posta Listesi Oluşturulur?
Web sitenizi terk eden kullanıcıların %70'inden fazlası, onları e-posta listenize abone etmeyi başaramazsanız muhtemelen bir daha asla geri gelmeyecektir.
E-posta özel, kişisel ve internetteki en doğrudan iletişim biçimidir. Birçok insan sosyal medya akışlarından daha çok gelen kutularını kontrol eder.
Ayrıca, kullanıcı bir işlem yapmadığı sürece bir e-posta gelen kutusunda kalır. Sosyal medyada, mesajınız yakında sonsuz bir zaman çizelgesinde kaybolacaktır.
E-posta pazarlamasının işinizi nasıl büyütebileceği hakkında daha fazla bilgi için, e-posta listenizi neden hemen oluşturmaya başlamanız gerektiğine dair rehberimize bakın.
WordPress Sitenizle Neden Mailchimp Kullanmalısınız?
Mailchimp, en popüler e-posta pazarlama hizmetlerinden biridir. Neden mi? Çünkü 1.000 adede kadar e-postayı ayda en fazla 500 aboneye gönderebileceğiniz ücretsiz bir plan sunuyorlar.
Şimdi, aboneleriniz 500'ü aştığında veya daha fazla e-posta göndermeniz gerektiğinde, oldukça pahalı olabilen ücretli bir plana ihtiyacınız olacak.
E-posta pazarlamasının yanı sıra, Mailchimp çevrimiçi işinizi büyütmenize yardımcı olabilecek temel otomasyon araçları da sunar.
Ancak Mailchimp mükemmel olmaktan uzaktır. Artık piyasadaki en kolay veya en uygun maliyetli e-posta pazarlama hizmeti değiller.
Mailchimp alternatifleri gibi Constant Contact, Drip ve HubSpot, kullanımı daha kolay gelişmiş pazarlama otomasyon araçları sunar.
Brevo (eski adıyla Sendinblue) ve Kit (eski adıyla ConvertKit) gibi diğer şirketler de, daha fazla aboneye daha fazla e-posta göndermenize olanak tanıyan sonsuza dek ücretsiz planlar sunmaktadır.
Bunu söyledikten sonra, işinizi büyütmek ve e-posta listenizi oluşturmaya başlamak için Mailchimp'i WordPress ile nasıl kullanacağınızı görelim.
Mailchimp ile Başlangıç
To connect Mailchimp to your WordPress site, the first thing you will need is a Mailchimp account.
Başlamak için Mailchimp web sitesini ziyaret edin ve sağ üstteki 'Ücretsiz Kaydol' düğmesine tıklayın.
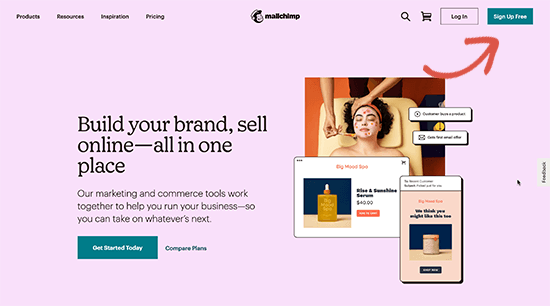
E-posta adresinizi doldurun, hesabınız için bir kullanıcı adı ve şifre oluşturun ve hesap kurulumunu tamamlamak için ekrandaki talimatları izlemeye devam edin.
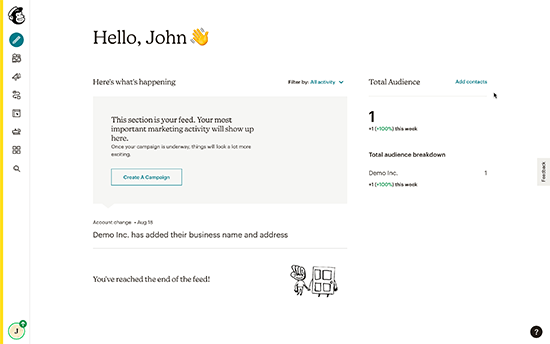
Hesabınızı oluşturduktan sonra, Mailchimp kontrol panelinize ulaşacaksınız, bu da şöyle görünür:
WordPress'e Mailchimp E-posta Kayıt Formları Ekleme
Mailchimp, WordPress web sitenize yerleştirebileceğiniz yerleşik abonelik formlarıyla birlikte gelir.
Araç çubuğundaki Oluştur düğmesine tıklayın ve ardından Kayıt Formu » Gömülü Form seçeneğini belirleyin.
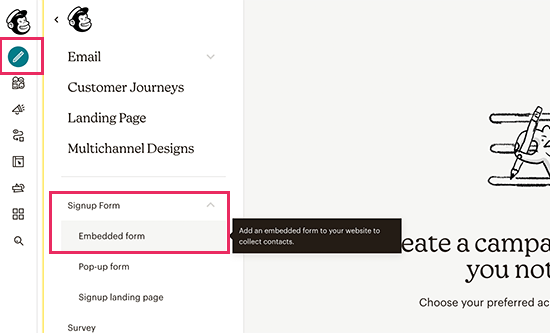
Bu sizi form yapılandırma sayfasına götürecektir.
Buradan, hangi form alanlarının görüntüleneceğini seçebilir ve kayıt formunuz için diğer seçenekleri belirleyebilirsiniz.
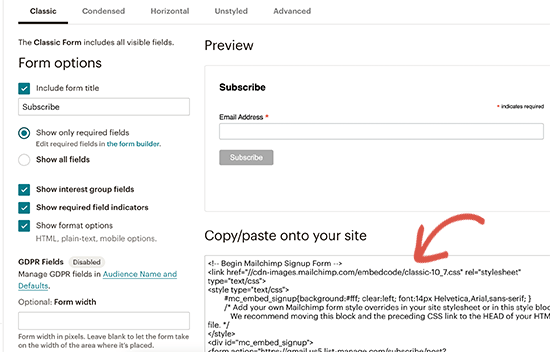
Formdan memnun kaldığınızda, ekrandaki yerleştirme kodunu kopyalamanız gerekir.
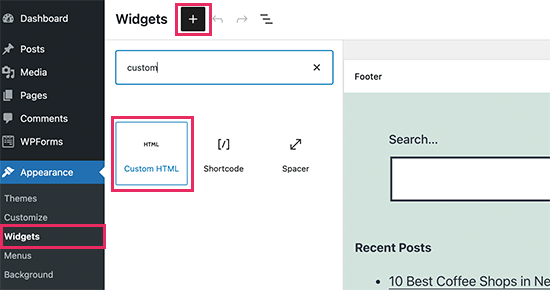
Ardından, WordPress web sitenizin yönetici alanına geçmeniz ve Görünüm » Widget'lar sayfasına gitmeniz gerekir. Buradan, Özel HTML widget bloğunu widget alanınıza eklemeniz gerekir.
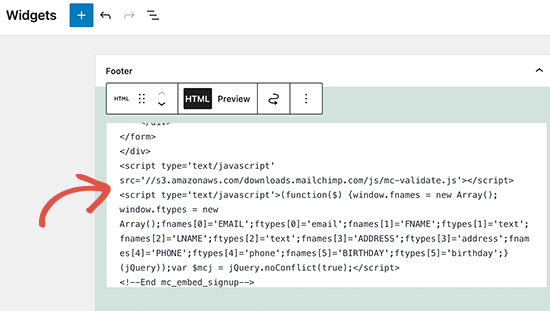
Widget ayarlarının içinde, Mailchimp web sitesinden kopyaladığınız kodu yapıştırmanız gerekir.
Widget ayarlarınızı kaydetmek için ‘Güncelle’ düğmesine tıklamayı unutmayın.
Bir blok teması kullanıyorsanız, bir widget alanına erişiminiz olmayacaktır. Ancak, tam site düzenleyicisini kullanarak Mailchimp formunu web sitenize ekleyebilirsiniz. Daha fazla ayrıntı için, tam site düzenlemesine ilişkin kapsamlı rehberimize bakın.
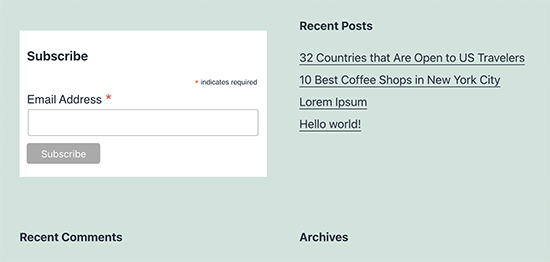
Artık Mailchimp kayıt formunuzu çalışırken görmek için web sitenizi ziyaret edebilirsiniz.
Demo web sitemizde görünümü bu şekildedir.
Gömme kodunu HTML bloğunu kullanarak gönderilere veya sayfalara da ekleyebilirsiniz. Daha fazla ayrıntı için WordPress'te HTML düzenleme hakkındaki kılavuzumuza bakın.
OptinMonster Kullanarak Güzel Kayıt Formları Ekleme
Mailchimp, temel e-posta kayıt formları oluşturmanıza olanak tanır. Ancak, bu formların özelleştirilmesi zordur ve birçok hedefleme ve kişiselleştirme seçeneğiyle gelmezler.
İşte OptinMonster burada devreye giriyor. Pazardaki en iyi dönüşüm optimizasyonu ve potansiyel müşteri oluşturma yazılımıdır ve web sitesi ziyaretçilerini kolayca abonelere dönüştürmenize yardımcı olur.
OptinMonster, Mailchimp hesabınızla entegre olur ve düzinelerce güzel şablon ve güçlü bir kampanya oluşturucu ile birlikte gelir.
Ayrıca, hedefleme ve görüntüleme kuralları inanılmazdır, bu da kayıt formlarınızı doğru zamanda görüntülemenizi sağlar. Örneğin, sitenizden ayrılmak üzere olan kullanıcılara bir açılır pencere gösterebilir, belirli bölgelerdeki kullanıcılara farklı bir kampanya gösterebilir ve daha fazlasını yapabilirsiniz.
Öncelikle, bir OptinMonster hesabına kaydolmanız gerekir.
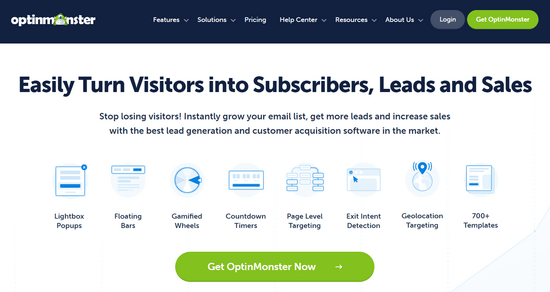
Bundan sonra, WordPress web sitenize OptinMonster eklentisini yüklemeniz ve etkinleştirmeniz gerekir. Daha fazla ayrıntı için, bir WordPress eklentisinin nasıl kurulacağına dair adım adım kılavuzumuza bakın.
Bu eklenti, WordPress ve OptinMonster hesabınız arasında bir bağlayıcı görevi görür.
Etkinleştirdikten sonra, OptinMonster » Ayarlar sayfasını ziyaret etmeniz gerekir. Buradan, OptinMonster'ı web sitenize entegre etmek için 'Mevcut hesaba bağlan' düğmesine tıklamanız yeterlidir.
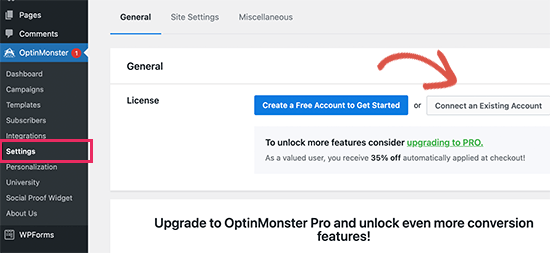
Artık ilk Mailchimp bülten kayıt formunuzu oluşturmaya hazırsınız.
Başlamak için OptinMonster » Kampanyalar sayfasına gidin ve üstteki 'Yeni Ekle' düğmesine tıklayın.
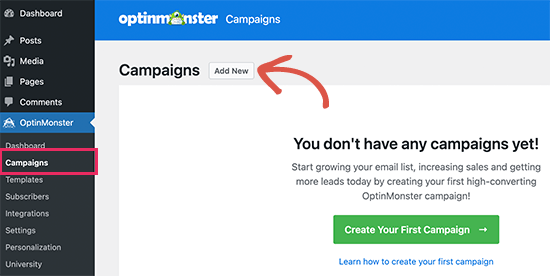
Ardından, OptinMonster sizden Şablonlar veya Oyun Kitapları'ndan birini seçmenizi isteyecektir.
Şablonlar, kendi kampanyalarınızı tasarladığınız kampanyalardır. Oyun Kitapları, dünyanın önde gelen kuruluşları tarafından yürütülen başarılı kampanyalardan ilham alan tasarımları kullanmanıza olanak tanır.
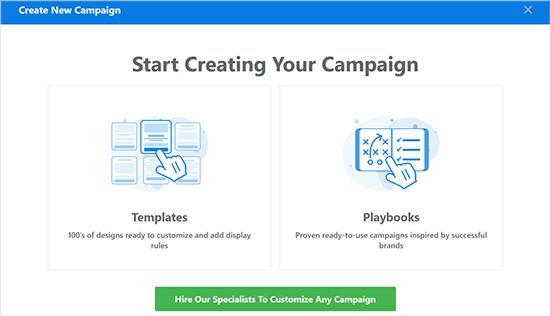
Bu eğitim için şablonlarla devam edeceğiz.
OptinMonster, lightbox açılır pencereleri, kayan çubuklar, satır içi kampanyalar, kaydırarak açılanlar, tam ekran ve oyunlaştırılmış çarkıfelek açılır pencereleri dahil olmak üzere çeşitli kampanya türleri oluşturmanıza olanak tanır.
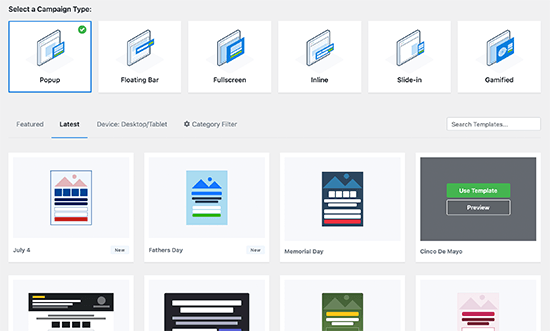
Bunun altında, kampanyanız için bir şablon seçmeniz gerekir. Seçebileceğiniz birkaç güzel tasarım var ve bunları istediğiniz kadar değiştirebilirsiniz.
Şablonu seçtikten sonra, kampanyanız için bir ad girmeniz ve kampanya oluşturucuyu başlatmanız gerekecek.
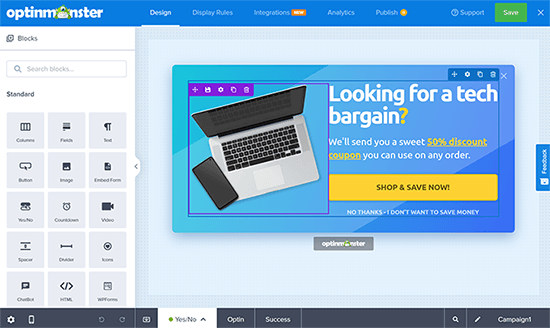
OptinMonster, herhangi bir öğeyi düzenlemek için basitçe işaretleyip tıklayabileceğiniz sezgisel bir sürükle-bırak arayüzüne sahiptir. Kendi resimlerinizi, metninizi, düğmelerinizi ve daha fazlasını eklemek için blok adı verilen yeni tasarım öğeleri de ekleyebilirsiniz.
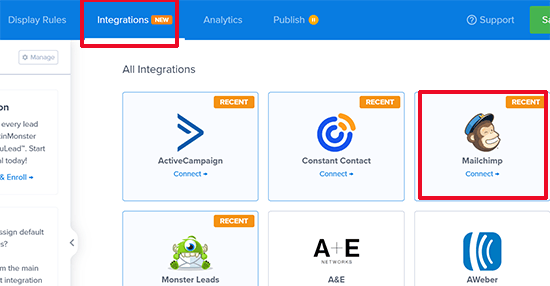
Kampanya tasarımından memnun kaldığınızda, bunu Mailchimp hesabınıza bağlayın. Entegrasyonlar sekmesine geçmeniz ve Mailchimp entegrasyonu altında 'Bağlan'a tıklamanız yeterlidir.
Ardından, bu bağlantı için bir ad seçmelisiniz.
Bundan sonra Mailchimp API anahtarınızı girmeniz gerekir.
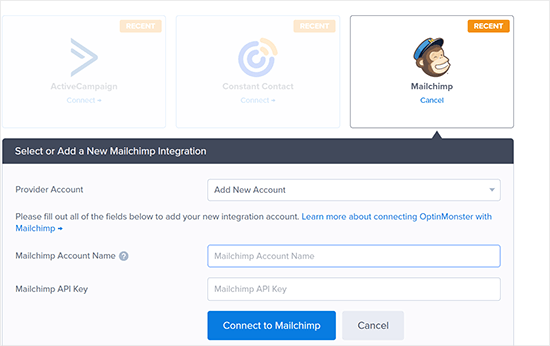
Mailchimp API anahtarınızı Mailchimp web sitesindeki hesabınızdan oluşturabilir veya bulabilirsiniz.
Mailchimp kontrol panelinizden, ekranın sol altındaki profil simgenize tıklamanız yeterlidir. Ardından üst menüden Ekstralar » API anahtarları'na tıklayın.
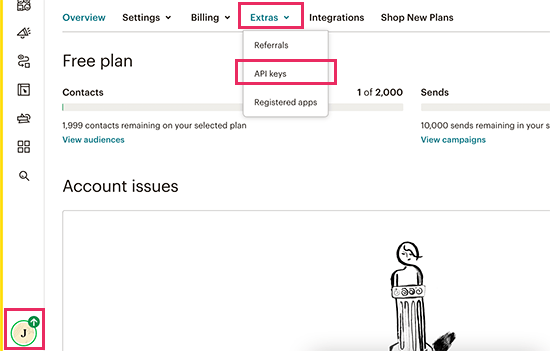
OptinMonster oluşturucusuna API anahtarlarınızı girdikten sonra, 'Mailchimp'e Bağlan' düğmesine tıklayın.
Ardından, Mailchimp hesabınızı ve e-posta listenizi seçmeniz gerekir.
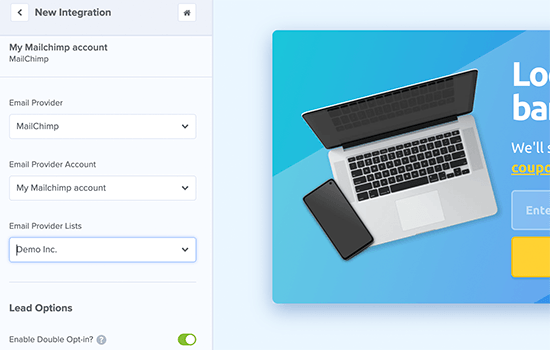
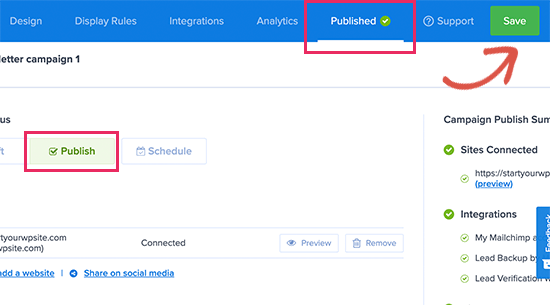
OptinMonster kampanyalarınızı artık kaydedebilir ve yayınlayabilirsiniz.
Ardından, form oluşturucuyu kapatın.
Bu sizi WordPress web sitenizdeki kampanya çıktı sayfasına getirecektir.
Buradan, kampanyayı nerede görüntülemek ve yayınlamak istediğinizi seçmeniz gerekir.
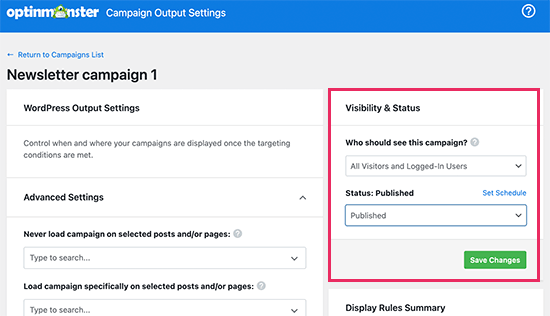
Artık e-posta bülteni formunuzu çalışırken görmek için web sitenizi ziyaret edebilirsiniz.
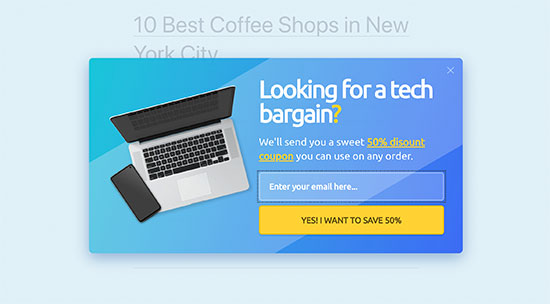
Demo sitemizde görünümü bu şekilde.
WPForms ile Özel Bir Mailchimp Kayıt Formu Oluşturma
WPForms, piyasadaki en iyi WordPress form oluşturucu eklentisidir. E-posta listesi kayıt formları dahil olmak üzere her türlü formu kolayca oluşturmanıza olanak tanır.
WPForms aynı zamanda en iyi Mailchimp eklentilerinden biridir. Form girişlerinizi e-posta listenize kaydetmeniz için Mailchimp hesabınızla entegre olur.
Öncelikle WPForms eklentisini kurmanız ve etkinleştirmeniz gerekir. Daha fazla ayrıntı için, bir WordPress eklentisinin nasıl kurulacağına dair adım adım kılavuzumuza bakın: bir WordPress eklentisinin nasıl kurulacağına dair adım adım kılavuz.
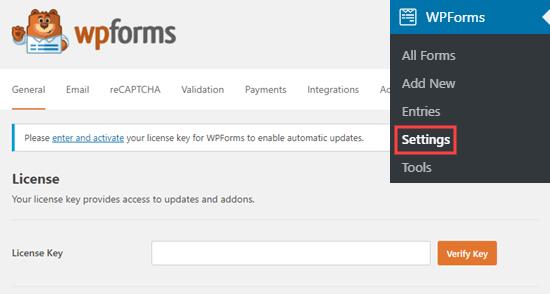
Etkinleştirdikten sonra, lisans anahtarınızı girmek için WPForms » Ayarlar sayfasını ziyaret etmeniz gerekir. Lisans anahtarınızı WPForms web sitesindeki hesabınızda bulabilirsiniz.
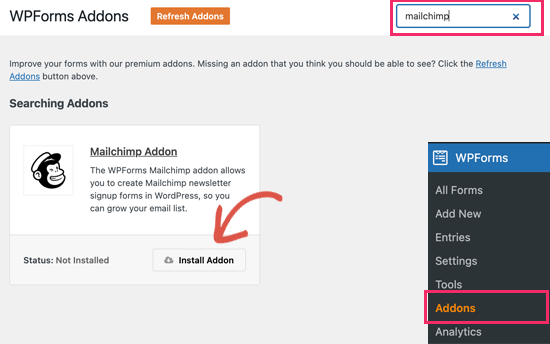
Ardından, WPForms » Eklentiler sayfasını ziyaret etmeniz gerekir.
Buradan Mailchimp eklentisini kurabilirsiniz.
Şimdi ilk bülten kayıt formunuzu oluşturmaya hazırsınız.
Yalnızca WPForms » Yeni Ekle sayfasına gidin, formunuz için bir başlık girin ve ardından Bülten Kayıt Formu şablonunu seçin.
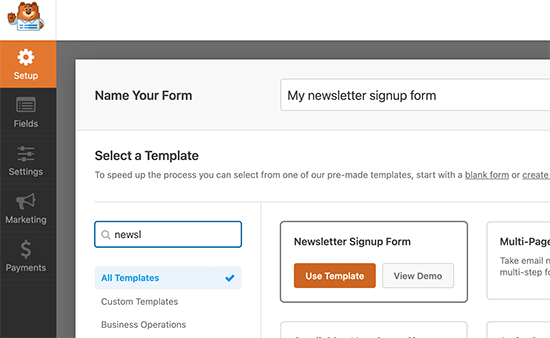
Bu, e-posta listesi kayıt formunuz için gerekli tüm alanlarla birlikte form oluşturucuyu başlatacaktır.
Formdaki alanları, üzerlerine tıklayarak kolayca düzenleyebilir veya kaldırabilirsiniz.
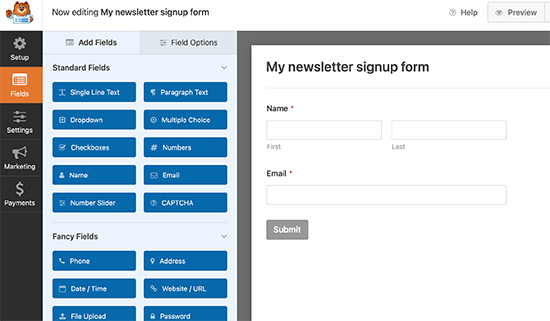
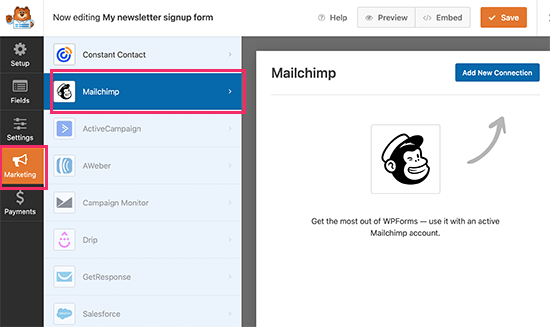
Formdan memnun kaldığınızda, 'Pazarlama' sekmesine geçin ve Mailchimp bölümüne tıklayın.
Buradan, ‘Yeni Bağlantı Ekle’ düğmesine tıklamanız gerekir.
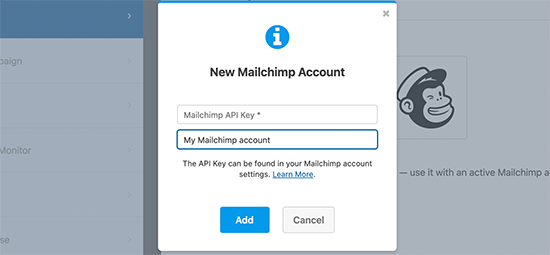
Ardından, bağlantıya bir ad vermeniz ve Mailchimp hesap API anahtarınızı girmeniz istenecektir.
API anahtarını Mailchimp web sitesindeki hesabınızda bulabilirsiniz.
Ardından, Mailchimp hesabınızı ve hedef kitlenizi seçmeniz gerekir.
Ardından hangi form alanının e-posta alanına karşılık geldiğini seçebilirsiniz.
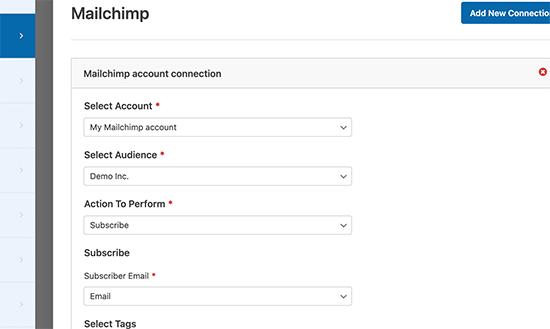
Artık form ayarlarınızı kaydedebilir ve form oluşturucudan çıkabilirsiniz.
WPForms, formunuzu web sitenizin herhangi bir yerine eklemenizi çok kolaylaştırır.
Formu sitenizin kenar çubuğunda görüntülemek istiyorsanız, Görünüm » Widget'lar sayfasına gidip WPForms widget bloğunu kenar çubuğunuza veya herhangi bir widget alanına ekleyebilirsiniz.
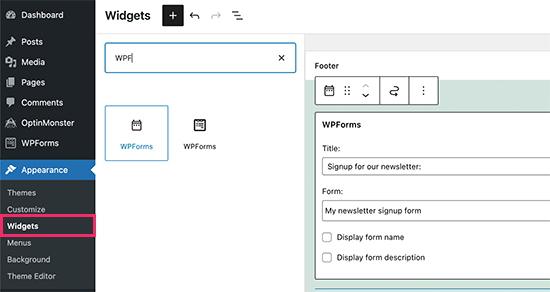
Widget ayarlarınızı kaydetmek için ‘Güncelle’ düğmesine tıklamayı unutmayın.
Benzer şekilde, eğer bülten kayıt formunu bir yazıya veya sayfaya eklemek isterseniz, o zaman yazıyı veya sayfayı düzenleyip WPForms bloğunu ekleyebilirsiniz.
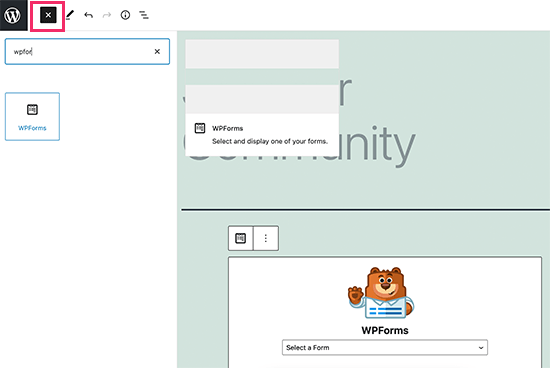
Gönderinizi veya sayfanızı güncellemek için değişiklikleri yayınlamayı veya kaydetmeyi unutmayın.
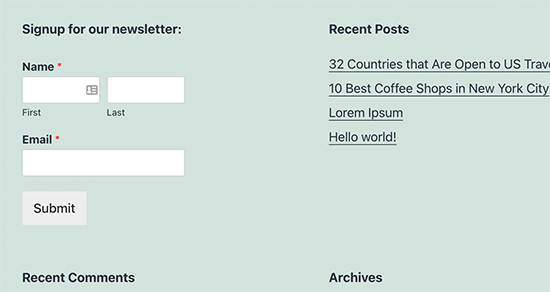
Artık Mailchimp özel bülten kayıt formunuzu çalışırken görmek için web sitenizi ziyaret edebilirsiniz.
WordPress ve Mailchimp'te Her Şeyi Otomatikleştirin
E-posta, özellikle kişiselleştirilmiş ve zamanında olduğunda son derece güçlüdür. Doğru araçlarla, her aboneye hedeflenmiş, yüksek dönüşüm sağlayan e-posta otomasyonları kolayca oluşturabilirsiniz.
Örneğin, müşterilerinizin daha önce satın aldığı ürünleri sergilemek veya web sitenizde yeni bir makale yayınladığınızda kullanıcılara otomatik olarak bir e-posta göndermek için otomatik bir e-posta gönderebilirsiniz.
İşte burada Uncanny Automator'a ihtiyacınız var. WordPress otomasyon eklentisidir ve WordPress siteniz için otomatik iş akışları oluşturmanıza olanak tanır.
Uncanny Automator, Zapier aracılığıyla tüm üst düzey WordPress eklentileri, e-ticaret platformları, üyelik eklentileri ve 3000'den fazla uygulama ile çalışır. Ayrıca Mailchimp ile de bağlantı kurar, bu da sadece birkaç tıklamayla daha akıllı e-posta kampanyaları oluşturabileceğiniz anlamına gelir.
Yapmanız gereken ilk şey, Uncanny Automator eklentisini kurmak ve etkinleştirmektir. Daha fazla ayrıntı için, bir WordPress eklentisinin nasıl kurulacağına dair adım adım kılavuzumuza bakın.
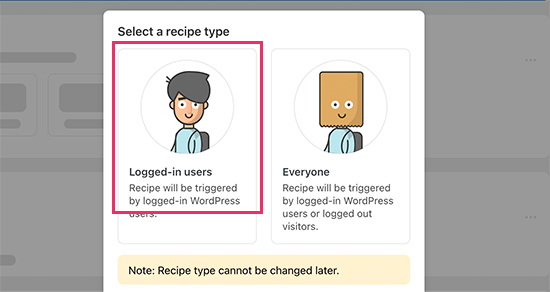
Etkinleştirdikten sonra, ilk tarifinizi oluşturmak için Automator » Yeni Ekle sayfasını ziyaret etmeniz gerekir. Hangi tür tarif oluşturmak istediğiniz sorulacaktır.
Bu eğitim için, yeni bir gönderi yayınladığımızda abonelere otomatik bir e-posta göndereceğiz. Başlamak için 'Giriş yapmış kullanıcılar' seçeneğini seçin.
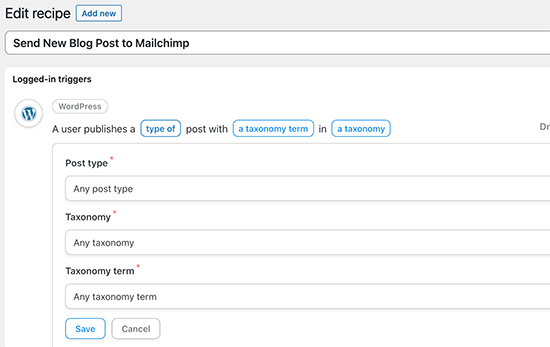
Ardından, eylemi tetikleyecek entegrasyonunuz olarak WordPress'i seçmeniz gerekir.
Tetikleyici için bir kullanıcının gönderi yayınladığı zamanı seçebilirsiniz.
Sonra tetiklenecek eylemi seçtiğiniz eylem kısmı geliyor.
Sadece web sitenize bağlamak için Mailchimp simgesine tıklayın.
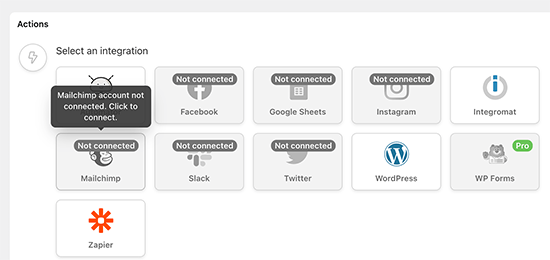
Bu, üzerinde ekrandaki talimatları izlemeniz gereken bir açılır pencere getirecektir.
Bağlandıktan sonra Mailchimp hesabınızda hangi işlemi gerçekleştirmek istediğinizi seçebileceksiniz.
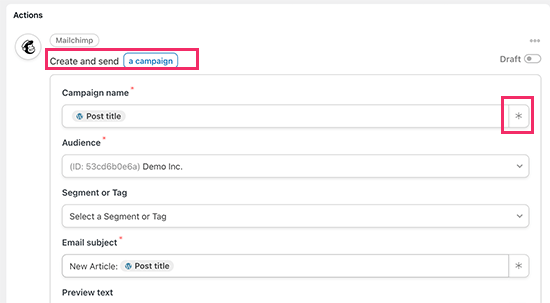
Örneğin, burada, kitlemize blog gönderisinin başlığını ve özel bir mesajı içeren yeni bir e-posta gönderecek şekilde ayarladık.
İşiniz bittiğinde, tarifi Taslak'tan Canlı'ya geçirebilirsiniz.
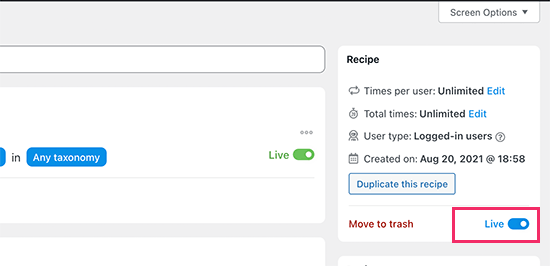
Bundan böyle, web sitenizde yeni bir makale yayınladığınızda, Mailchimp abonelerinize otomatik olarak bir e-posta gönderecektir.
Uncanny Automator, Mailchimp ve WordPress'i bağlamak için güçlü bir araçtır. Pazarlamanızı otomatikleştirmenize ve satışları ve dönüşümleri artırmanıza olanak tanır.
Mailchimp E-posta Listenizi Hızla Büyütmek İçin Bonus İpuçları
E-posta listenizi web sitesi ziyaretçilerinize tanıtmıyorsanız, potansiyel aboneleri, müşterileri ve satışları kaybediyorsunuz demektir.
Aşağıda, Mailchimp bülteninizi daha hızlı büyütmenize yardımcı olacak en iyi kanıtlanmış ipuçlarından bazıları yer almaktadır.
1. Birden Fazla Kayıt Formu
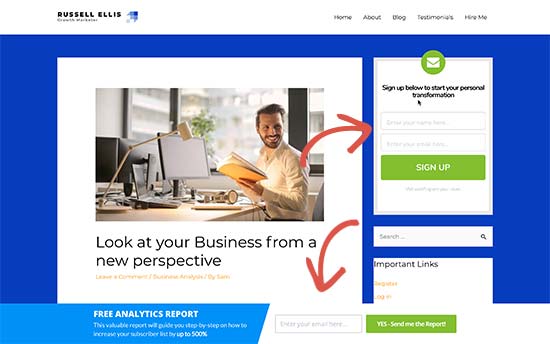
Kenar çubuğuna yalnızca bir kayıt formu eklemeyin. Bunun yerine, kullanıcılara birden fazla e-posta abonelik formuyla kaydolma fırsatı verin.
WordPress'te bir web sitesi banner'ı oluşturma hakkında öğreticimizi görüntüleyin.
2. Aboneleri Kazanmak İçin Oyunlaştırmayı Kullanın
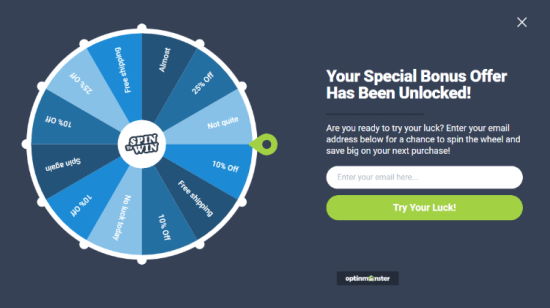
Oyunlaştırma, e-posta formlarınıza eğlenceli bir etkileşim getirir. Karşılığında bir şey kazanma şansları varsa, insanlar e-posta adreslerini girme olasılıkları daha yüksektir.
WordPress ve WooCommerce'de Kazanmak İçin Döndür Seçenekleri Ekleme başlıklı eğitimimize göz atın.
3. Create Lead Magnets
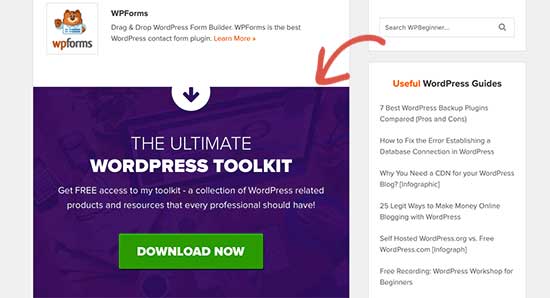
Kurşun mıknatısları, e-posta listenize kaydolmaları karşılığında kullanıcılara sunabileceğiniz teşviklerdir. Örneğin, onlara bir e-kitap, bir örnek bölüm, bir indirim kodu ve daha fazlasını gönderebilirsiniz.
WordPress'te bir dosyayı indirmek için e-posta adresi gerektirme konusunda öğreticimizde daha fazla bilgi edinin: bir dosyayı indirmek için e-posta adresi gerektirme.
4. Use Targeted Campaigns and Personalization
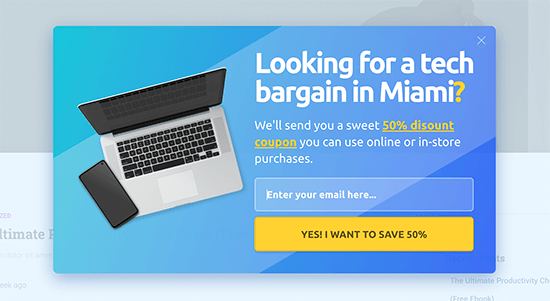
E-posta kayıt formlarınız, doğru kullanıcılara doğru zamanda gösterildiğinde daha fazla abone kazanacaktır.
Örneğin, sosyal medyadan gelen ziyaretçilere bir karşılama mesajı gösterebilir veya sepetlerini terk etmek üzere olan alışveriş yapanlara bir indirim teklifi gösterebilirsiniz.
Ayrıntılı talimatlar için, WordPress'te kullanıcılara kişiselleştirilmiş içerik gösterme kılavuzumuza bakın.
5. Dönüşümlerinizi İzleyin
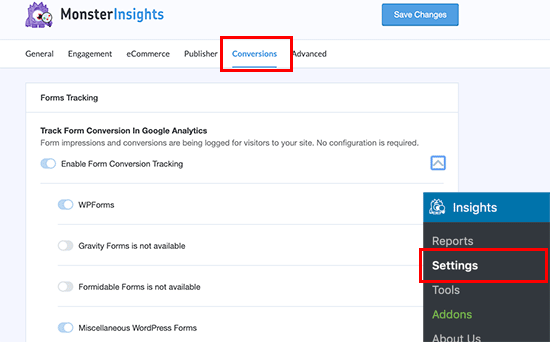
Hangi formların size daha fazla abone kazandırdığını bilmek ister misiniz? Bunun için, piyasadaki en iyi Google Analytics eklentisi olan MonsterInsights'a ihtiyacınız olacak.
MonsterInsights, e-posta listenizi büyütmede hangi formların daha etkili olduğunu anlamanıza yardımcı olur. Daha fazla bilgi için, bir profesyonel gibi WordPress'te dönüşümleri nasıl izleyeceğinize dair kapsamlı kılavuzumuza bakın.
Bu konu hakkında daha fazla bilgi için, daha fazla uygulanabilir ipucu içeren e-posta listenizi hızla büyütme rehberimize bakın.
Umarım bu makale, e-posta listenizi oluşturmak için Mailchimp'i WordPress ile nasıl kullanacağınızı öğrenmenize yardımcı olmuştur. Ayrıca, WordPress'te Mailchimp abonelik formu oluşturma veya en iyi Mailchimp alternatifleri hakkındaki rehberimize de göz atmak isteyebilirsiniz.
Bu makaleyi beğendiyseniz, lütfen WordPress video eğitimleri için YouTube Kanalımıza abone olun. Bizi ayrıca Twitter ve Facebook'ta da bulabilirsiniz.


Li
Aniden, e-posta kampanyamdaki yalnızca öne çıkan fotoğrafım görünüyor. Makalelerimdeki diğer fotoğraflar yok. Bu bir WordPress veya mailchimp sorunu mu olur? İki şekilde de yardım bulamıyorum.
WPBeginner Desteği
Öncelikle MailChimp'in sorun giderme önerilerini gözden geçirmek isteyeceksiniz, böylece sorunun kendilerinden kaynaklanmadığından emin olabilirsiniz.
Yönetici
Jiří Vaněk
Mailchimp'i doğru bir şekilde kurmak, her şeyi anlayıp bülteni kurana kadar benim için oldukça zordu. Rehber için teşekkürler.
WPBeginner Desteği
You’re welcome
Yönetici
Maria G
Kullanıcıların e-postalarını yazmak zorunda kalmadan bülten tercihlerini güncellemelerine izin vermek için yerleştirilmiş bir form kullanmanın bir yolu var mı? Wordpress'e giriş yapmışlarsa, MailChimp formunun e-posta adresleriyle önceden doldurulmuş olmasının ve tek yapmaları gereken abone olmak istedikleri bültenleri seçip göndermek mi?
WPBeginner Desteği
Mevcut entegrasyon seçenekleri için MailChimp ile görüşmek isteyebilirsiniz.
Yönetici
Michael
Bir kar amacı gütmeyen kuruluşun web sitesinden aylık MailChimp bültenlerini erişilebilir kılmak istiyorum, böylece aboneler geçmiş bültenlere erişebilir.
Sağlayabileceğiniz herhangi bir yardım için teşekkür ederim.
WPBeginner Desteği
MailChimp ile iletişime geçmeniz gerekecek ve mevcut araçları konusunda size yardımcı olabilmeliler.
Yönetici
Poornima M
WordPress web siteme blog aboneliği için Mail Chimp'ten gömülü bir form eklemeye çalışıyorum ancak form kodunu WordPress'e nereye yapıştıracağımı göremiyorum. Bu makalede belirtilen Metin kutusu doğru yer gibi görünmüyor.
WPBeginner Desteği
Artık özel bir HTML widget'ı kullanabilmelisiniz ancak bunun dışında sitenize yerleştirme yöntemi değişmedi.
Yönetici
Chloé
Merhaba,
Alan adım olmadan Mailchimp kullanmam mümkün mü?
Örneğin: myblog(.)wordpress(.)com
WPBeginner Desteği
WordPress.com şu anda MailChimp kullanmanıza izin veriyor.
Yönetici
Tolu
Yardımcı makaleleriniz için teşekkürler. Benim sorunum, abonelerimi yeni gönderiler hakkında otomatik olarak güncelleyen bir bülten oluşturmak. Mailchimp kullanarak otomatik bir e-postaya en son blog yazılarını nasıl yerleştirebilirim?
WPBeginner Desteği
It would depend on the newsletter tool you are using but there should be the option to set up an RSS campaign for what you’re wanting
Yönetici
Oca
Bu eğitimle gerçekten zorlanıyorum. “WordPress'e MailChimp E-posta Kayıt Formları Ekleme” bölümü bulabileceğim hiçbir şeye benzemiyor. Hiçbir yerde “listeler sayfası” diye bir şey yok.
WPBeginner Desteği
MailChimp listeleri ve diğer bazı güncellemeleri hedef kitle olarak değiştirdi, mümkün olduğunda bu makaleyi güncellediğimizden emin olacağız.
Yönetici
P V Chowdary
E-posta abonelik listesini blogumla entegre etmekte zorlanıyordum.
Bu rehber baştan sona tamamlamama yardımcı oldu.
Teşekkürler
Colleen Wildenhaus
Bu bilgi güncel mi? Şu anda mailchimp'teyim ve bu gönderiyi takip etmeye çalışıyorum ve aynı bilgileri görmüyorum. Teşekkür ederim.
Shakir
Mailchimp'in wordpress bölümünde oluşturulan MailChimp formları hakkında ne düşünüyorsunuz, o formu kullandım ama e-postayı alamıyorum
Eric S Brister
Thanks! I was finally able to hook this up and design a welcome letter! Your information was very easy to understand, and setting it up with a cinch! I’ve been avoiding this because I thought it would be hard but this was simple thank you so much for the help!
Seth
Hiçbir yerde bir widget seçeneği görmüyorum. Sadece Özelleştir, Menüler, Üstbilgi, Arka Plan, Tema SSS ve Düzenleyici var. Bunu nasıl çalıştırabileceğime dair herhangi bir fikriniz var mı?
Shelley
Bir MailChimp Kayıt Formu widget'ı var. Neden bir metin widget'ı kullanmayı öneriyorsunuz?
MailChimp Kayıt Formum çalışmıyor, bunun yerine metin widget'ını mı önerirsiniz?
edward
merhaba, rss beslemem yalnızca bir gönderi gönderiyor. Bir günün tüm gönderilerini tek bir e-postada nasıl gönderebilirim?
Greg
Merhaba,
Rowling temasıyla wordpress.com üzerinde bir blog çalıştırıyorum.
Bu kılavuzu izleyerek Mailchimp kullanarak bülten kaydı eklemeye çalıştım, ancak kopyalanan Mailchimp'in standart (ayrıca superslim veya çıplak) kayıt formu kodunu Wordpress.com Kenar Çubuğu metin widget'ına yapıştırdığımda – kodun yarısı metin olarak görünüyor. Ayrıca, abone düğmesi çalışmıyor ve doldurulması gereken alanlar görünmüyor (sadece 'başlıkları/açıklamaları').
Önceki yorumlara baktım ancak çözümlerin hiçbiri işe yaramıyor gibi görünüyor.
YARDIM!
Vivian
Başlangıçta ben de aynı sorunu yaşadım. Sonra MailChimp'in standart metnini 'Görsel' kutusu yerine 'metin' kutusuna yapıştırdığımı fark ettim. Bu benim için basit bir çözüm - sadece 'metin'e tıklayın ve içeriği görsel yerine metne yapıştırın.
Amir
Amazing Article. This is probably my favorite site on the internet, right behind Google. I’m doing so much with Wordpress and I admire how much hard work you put into it. Thanks a lot brother
Terminally Pretty
Yalnızca wordpress iş planım varsa eklenti yükleyebilir miyim? Kişisel bir planım var ve mailchimp tarafından sağlanan kodu blog kenar çubuğumdaki bir metin widget'ına yapıştırdığımda, e-posta abone formu yerine kod metni gibi görünüyor. Neden böyle olduğunu bilmiyorum, lütfen bana yardım edin.
WPBeginner Desteği
Merhaba,
Eğer WordPress.com'dan bahsediyorsanız, eklenti yüklemek için bir Business Plan'a ihtiyacınız olacaktır. Kendi kendine barındırılan WordPress.org web sitesi için, ihtiyacınız olan herhangi bir eklentiyi yükleyebilirsiniz. Ayrıntılar için WordPress.com vs WordPress.org karşılaştırmamıza bakın.
Yönetici
Nat
Mailchimp ile blog güncellemeleri için ilk e-posta kampanyamı oluşturdum. Bir test güncellemesi gönderdim ve harika görünüyor. Ancak, hala eski otomatik blog güncellemelerini alıyorum ve bunları nasıl sileceğimi bilmiyorum, bu yüzden artık her yeni blog olduğunda insanlar aynı gönderi hakkında 2 güncelleme e-postası alıyor. Eski blog kimliğini nasıl silebilirim? Bunun için mail chimp dışında bir şeyim kurulu değil ve silebileceğim başka bir blog güncellemesi kampanyası göremiyorum. Lütfen yardım edin.
WPBeginner Desteği
Merhaba Nat,
Lütfen MailChimp ayarlarınızı kontrol edin veya destekleriyle iletişime geçin.
Yönetici
yashwanth
Merhaba, RSS düğmesini bulamıyorum, bunun yerine otomatik düğmem var. Bu seçenekle nasıl çalışacağımı bilmek istiyorum.
Tosin Oluwalowo
Yayınladığım anda abonelere e-posta göndermesini nasıl sağlayabilirim?
Francesco
Gönderi için teşekkürler!!
Hızlı bir soru..
Son 3 gönderimi dinamik olarak alan bir bülten oluşturmak mümkün mü? Yoksa her seferinde manuel olarak mı eklemeliyim?
Bu, “Newsletter” eklentisinin yerel olarak sahip olduğu ve gerçekten kullanışlı bir özelliktir.
Every helps is really appreciated
Francesco
Vana
Tam da ihtiyacım olan şey!
Çok teşekkür ederim! En iyisisin.
Will
Harika bir makale. Yardıma ihtiyacım var! Bloguma mailchimp abone formu yükledim. Çift onay için onay e-postasının gönderildiğine dair bildirim alıyorum. Ancak bağlantıyı almıyorum ve mailchimp listesine hiçbir e-posta eklenmiyor. Çok sinir bozucu! Herhangi bir yardım takdir edilecektir. Birçok yardım forumunda bir sorun gibi görünüyor.
Shelley
Sitemde ikisi de mail chimp'e bağlı iki farklı kayıt formu var. Bazı aboneler mail chimp e-posta listesine, bazıları ise wordpress'e gidiyor. Bunun neden olduğuna dair bir fikriniz var mı?
Mackenzie Waters
Tam olarak ihtiyacım olan şeydi ve süreci bu kadar kolay bir şekilde bana anlattı! Teşekkür ederim!
Chris
FeedBurner'dan geçişle ilgili tek endişem, birisi RSS gönderilerinden abonelikten çıkarsa ancak yine de bülteni almak isterse (veya tam tersi), bunu karşılamanın bir yolu olmamasıdır (bildiğim kadarıyla).
Okuyucularımın hangi içeriği alacakları üzerinde kontrol sahibi olmalarını isterim ancak tamamen yalnızca “yukarıdakilerin hepsi”ne bağlı kalmamalarını isterim.
MartinR
Çok Teşekkürler! Ücretsiz bir MailChimp hesabı oluşturmak, kendi barındırdığım WordPress sitemdeki gönderiler için bir Kayıt formu oluşturmak ve abonelere en son gönderimi e-postayla gönderecek bir "kampanya" başlatmak için bu talimatları izledim. Tam olarak aradığım şey buydu. Tekrar teşekkürler, harika makale!
Pazar
Tüm talimatları izledim, ancak devam edebilmem için bir kuruluşa özel bir e-posta hesabı kaydettirmem ve ödeme yapmam isteniyor. Nerede eksik yaptım?
James Clewlow
Tüm talimatları doğru bir şekilde uyguladım ancak bağlantıyı kenar çubuğundaki metin widget'ına kopyalayıp yapıştırdığımda web sitemde devasa bir bağlantı olarak görünüyor.
Lütfen yardım edin!
MartinR
yukarıdaki yazımda yazdım:
…Yapıştırılan bağlantının/bloğun başına “” ve sonuna “” eklemek için “Kod” düğmesi, KAYDET, ardından baştaki ve sondaki “” etiketlerini kaldırın, tekrar KAYDET…
Ancak 1. yanıtta yazdığım "kod" etiketleri gerçek HTML olarak yorumlandı - boşluklar olmadan kod etiketlerini görürdünüz - umarım bu mantıklıdır...
MartinR
Bu düzenleyici, yazmaya çalıştığım şeyleri gerçek kod etiketleri olarak yorumlamaya devam ediyor, bu yüzden sadece şunu söyleyeceğim:
İlk yanıttaki adımları izlerseniz – benim yaptığım, yapıştırılan bağlantıyı çevrelemek için bir başlangıç ve bitiş kod etiketi eklemekti – Kod düğmesi aracılığıyla, KAYDET, sonra onları kaldırdım, tekrar KAYDET, her şey yolundaydı.
Camille
Merhaba, bu talimatları izledim ve bu sabah e-postayı aldım ancak en son blog yazım içinde değil. Sadece şablon var ama en son blog yazılarını e-postaya çekeceğini düşünmüştüm. Bu konuda bana yardımcı olabilecek bir kaynağınız olup olmadığını merak ediyorum. Mailchimp'in web sitesinde bununla ilgili bir şey yok gibi görünüyor. Teşekkürler!
John E.
Merhaba ve harika bir makale için teşekkürler. Şu anda Mailpoet kullanıyorum ama Mailchimp'e geçmeyi düşünüyorum. RSS kampanya özelliğini kullanmak istiyorum, ancak zaman zaman güncellediğim ve RSS akışında yeni görünmeyen kalıcı makaleleri de dahil etmek istiyorum. Mailchimp ile bunu yapmanın bir yolu var mı? Ya da en azından onları manuel olarak bir şablona mı bırakmalıyım? Şimdiden çok teşekkürler
Dylan
Bunun için çok teşekkür ederim! Tam olarak ihtiyacım olan şeydi!
WPBeginner Desteği
Merhaba Dylan,
Faydalı bulduğuna sevindim. Ayrıca WordPress video eğitimleri için YouTube Kanalımızı da kontrol etmelisiniz.
Yönetici
Stephanie O
Mailchimp kayıt kodunu Wordpress 'metin' widget'ına yapıştırdıktan sonra, metnin yarısı görünüyor ve form metin olarak görünüyor, yani hiçbir şeye tıklayamazsınız ve e-posta adresinizi/adınızı gireceğiniz alan görünmez!
Textbook temasına sahip bir wordpress.com web sitem var.
Andrew Gilbert
Aynı sorun bende de var! Bunun çalışması için premium bir hesabım olması gerekiyor mu?
Ella
Merhaba,
Kayıt kodunu yapıştırdığınızda, bunun bir kısmı sayfanızın stiliyle çakışabilecek formun stilini belirler, bu sadece bu kısmı atlamak/silmek kolaydır:
#mc_embed_signup{background:#fff; clear:left; font:14px Helvetica,Arial,sans-serif; }
/* Kendi Mailchimp form stil geçersiz kılmalarınızı kendi site stil sayfanıza veya bu stil bloğuna ekleyin.
Bu bloğu ve önceki CSS bağlantısını HTML dosyanızın BAŞLIĞINA taşımanızı öneririz. */
Umarım yardımcı olur,
Ella
Nik Cree
MailChimp'e özet yerine tam gönderiyi göndermek için herhangi bir eklenti veya yöntem biliyor musunuz? Okuma Ayarları'nda 'Özet' yerine 'Tam Metin' seçeneğini işaretledim, ancak MailChimp'e hala özet gidiyor. Tam Gönderiyi almak için herhangi bir fikriniz var mı?
Stef J
Bu konuda bir cevap veya çözüm bulabildiniz mi? Ben de aynı sorunla mücadele ediyorum.
Nik Cree
Yes – it is a setting inside the MailChimp newsletter builder.
portia lambert
Form kodumu kopyalayıp widget kenar çubuğuna vb. yapıştırdım ve web sitemde görünmüyor. Lütfen yardım edin!
Gerald
abonemin abone olmadan önce bana paypal ile ödeme yapmasını istiyorum
mailchimp ile bunu başarabilir miyim?
WPBeginner Desteği
Varsayılan MailChimp formlarında ödeme seçeneği yoktur. Stripe ve PayPal gibi ödeme seçenekleri sunan ve MailChimp'i de destekleyen WPForms'a göz atmalısınız.
Yönetici
Jim Farthing
Mailchimp ve WP'yi aynı sayfaya getirmeye çalışıyorum, tabiri caizse. İnsanların sorunsuz bir şekilde mailchimp aracılığıyla güncellemelerime kaydolmaları için bir form ayarlayabilirim. İnsanların forumuma sorunsuz bir şekilde kaydolmalarını sağlayabilirim.
İnsanların siteme kaydolması ve aynı anda mailchimp'e eklenmesi, büyük sorun. Bunu bir türlü halledemedim.
Ziyaretçilerimin forumlarıma erişmek için bir form ve posta listeme kaydolmak için bir form olmak üzere iki form doldurmak zorunda kalmamaları için tek bir form kullanmak istiyorum.
Neyi kaçırıyorum? Mailchimp for wp eklentisini başarıyla kurmayı denedim, ultimate membership pro kullanıyorum ve mailchimp bilgilerini oraya doldurdum ancak başarılı olamadım.
Bu noktada saçlarımı yoluyorum, bu yüzden herhangi bir öneri çok takdir edilecektir.
Jim
Sancheo
I have that exact problem as well! Just so need to get this sorted already :/ May we find our answers soon
MPdev
I am having this issue as well. Have you already checked out the Mailchimp site?
Anu
Bu eğitim için çok teşekkürler. Mailchimp konusunda acemiyim ve bu çok yardımcı oldu.
Marisa Moon
Bu RSS Beslemesi kavramına yeniyim, ancak kurduktan sonra yeni bir gönderi yayınlandığında wordpress sitesinin abonelerime hala e-posta gönderip göndermeyeceğini merak etmeye başladım. Abonelerimin aynı gönderi için iki e-posta almasını istemiyorum. Mail Chimp'i kullanabilmem için wordpress gönderi e-postalarını devre dışı bırakmanın bir yolu var mı?
Diğer bir sorum mail chimp kampanya tasarımı ile ilgili. RSS Başlığı ve Öğeleri'ni ekledikten sonra, gönderinin oldukça kısa bir açıklaması ve özetiyle karşı karşıyayım. Gönderi fotoğraflı olmasını istiyorsam, her seferinde belirli blog gönderisinden bir fotoğraf ekleyerek kampanyayı güncellemem mi gerekiyor? Blog gönderilerimde çok fazla fotoğraf kullanıyorum, bu yüzden bu RSS kampanyası fotoğraf içeriği olmadan yetersiz kalacaktır. Ancak, içeriği tekrar eklemem gerekiyorsa bu otomatik gönderme özelliğinin ne anlamı var.
Her neyse, bilgiler için teşekkürler. Cevapları, özellikle ilk soruyla ilgili olanları bulmayı umuyorum.
Jordan White
Marisa,
Wordpress'in o otomatik “yeni gönderi” e-postalarını göndermesini nasıl durduracağını bulabildin mi? Aynı sorun bende de var. Artık mailchimp'im olduğuna göre, abonelerimin çok fazla e-posta almasını istemiyorum.
LM
Harika bir makale ve yeni blogumu kurduğum için sitenizi çooook seviyorum. MailChimp'e kaydolmayı planlıyorum. Ve OptinMonster'ı tavsiye ettiğinizi bilmeme rağmen, Mailchimp'in de Wordpress için bir kayıt eklentisi olduğunu gördüm. Bu konuda bir düşünceniz var mı? Şu anda başka bir şeye para ödemek istemediğim bir aşamadayım ve OptimMonster'ın aylık bir ücreti var. Bunu bir yükseltme fırsatı olarak görüyorum.
Marisa Moon
Farklılıkların çoğunu hatırlamıyorum ama sonuç olarak ücretsiz bir wordpress eklentisi olan PopUp Ally'yi kullandım. Mailchimp'in sunduğundan daha fazla özelliğe sahip olduğunu ve optin monster'dan daha az özelliğe sahip olmasına rağmen ücretsiz olduğunu buldum. Umarım bu yardımcı olur! Bence bizim gibi günde binlerce ziyaretçisi olmayan yeni blog yazarları, henüz hazır olmadıkça oradaki "canavar" eklentileri hakkında endişelenmemelidir.
Andrea
Thank you so much! I’m looking for a free pop-up plugin too, so I’ll try the one you suggested first
Marcel
İyi bir öğretici. Ancak bir sorunum var:
Çift onay seçeneği etkin durumda ancak e-postadaki onay bağlantısına tıkladığımda abonelik doğrudan onaylanmıyor, kullanıcının insan olduğunu kanıtlaması gerekiyor. Bunu nasıl devre dışı bırakabilirim?
Çok Teşekkürler.
Marisa Moon
Aynı sorunu yaşadım. Mailchimp'e göre bunu değiştirebileceğinizi veya devre dışı bırakabileceğinizi sanmıyorum. Onaylayamadıklarından şikayet eden iki aboneye yazdığım şey şuydu: Aboneliği çeşitli tarayıcılarda, dizüstü bilgisayarlarda ve mobil cihazlarda kendim denedikten sonra, sorunun gerçekten mobil cihaz kullanıldığında olduğunu fark ettim. Abone olurken sorun yaşadığınızda mobil cihaz mı kullanıyordunuz? Eklediğim ekran görüntüsünde, "robot" testini düzenleyemediğimi gösteriyor, bu yüzden onunla mahsur kaldım. Ancak eklediğim diğer resim, sorunu aşmanın birkaç yolunu açıklamanıza yardımcı olmak içindir. Bir robot olmadığınızı kanıtlamak için resimleri seçmeniz istendiğinde, resimler bulanık olabilir, zaten tıkladıktan sonra tekrar görünebilirler ve yeni resimler göründüğünde bile fotoğrafları tıklamaya devam etmeniz gerekir. Ardından, yeniden görünen tüm fotoğrafları tıkladıktan sonra (fotoğrafımın üstünde ve altında açıklandığı gibi görebilirsiniz), "doğrula"yı tıklarsınız. Ancak fotoğrafların tamamlanmasına izin vermeden önce "doğrula"yı tıklarsanız, tekrar denemeniz gerekecektir. Fotoğrafları tamamen atlamak isterseniz, "Doğrula"nın solundaki küçük kulaklık simgesine tıklayabilirsiniz ve sayı dizilerini konuşan insanları dinleyebileceğiniz ve yazıp göndermeniz gereken bir ekrana yönlendirilirsiniz. Belki daha kolaydır!
Tracy
Her zamanki gibi harika bir eğitim!
Mailchimp kullanmaya başlıyorum ancak şu anda yeni blog yazıların Jetpack tarafından otomatik olarak gönderiliyor olması beni biraz endişelendirdi. Çoğaltmayı önlemek için bunu devre dışı bırakmam gerekir mi?
Constance Sohodski
Bu harika bir eğitim, ancak cevaplamadığı bir sorum var. Hesabımı oluşturma sürecindeyim. MailChimp beni gmail hesabı kullanmamam konusunda uyarıyor ve nedenini anlıyorum. Ancak, wordpress sitemle ilişkili bir e-posta hesabı kurmayı başaramıyorum. Yardımcı olabilecek var mı?
April G
Merhaba. Bir haber bülteni yazmak için Mailchimp kullanıyorum ve metin içinde bir web sitesine bağlantı yerleştirmeyi araştırdım. Ancak metne tıkladığımda kodumdaki web sitesine gitmiyor. Sorunun ne olabileceğini biliyor musunuz?
Angela Dvorak
Merhaba!
Bu makaleyi RSS e-posta kampanyamı kurmak için başarıyla kullandım, ancak sonra çalışmayı bıraktı. Besleme URL'si bozuk görünüyordu. Bir RSS doğrulayıcısı kullanarak doğruladım ve çalışıyor, ancak Mail Chimp hala geçerli olmadığını söylüyor. Bunun neden olabileceğine dair herhangi bir fikriniz var mı? Yazım hatalarını ve sözdizimini kontrol ettim ve sorunun kaynağını bulamıyorum.
WPBeginner Desteği
Bu soruna neyin neden olabileceğinden emin değiliz. Tüm eklentilerinizi devre dışı bırakmayı ve varsayılan bir temaya geçmeyi deneyin. Ardından RSS'inizi MailChimp'e eklemeyi deneyin. Sorun çözülürse, bu web sitenizdeki bir eklentinin veya temanın soruna neden olduğu anlamına gelir. Alternatif olarak, MailChimp desteğiyle de iletişime geçebilir ve ne dediklerini görebilirsiniz.
Yönetici
Saeful
Eğitim için teşekkürler
özellikle benim gibi yeni başlayan bir blog yazarı için çok faydalı oldu
selamlar
WPBeginner Desteği
Merhaba Saeful, faydalı bulduğuna sevindim. Daha fazla WordPress ipucu ve öğreticisi için bizi Facebook'ta takip etmeyi unutma.
Yönetici
Melinda
Gömülü formu ayarlama talimatlarını izliyorum ancak yapıştırmak için herhangi bir bağlantı alamıyorum... öğreticide gösterildiği gibi birkaç kez denedim. Bu kodu WP sitemde kullanmak için ne görmem gerekiyor?
Pat Mingarelli
MailChimp'ten kısmi bir gönderi ve öne çıkan görseli gösteren bir RSS e-postası göndermenin bir yolu var mı?
Teşekkürler!
Pat M
Florine
Merhaba, Kate Armstrong ile aynı sorunu yaşıyorum ve önerilen çözümler işe yaramadı. Farklı bir form (slim/naked) kullanmayı ve JavaScript'i devre dışı bırakmayı denedim, ancak hala yalnızca düz metin veya kod görünüyor, abone ol butonu yok. Sorunun ne olabileceği ve nasıl çözülebileceği hakkında bir fikriniz var mı?
Teşekkürler!
Kamran
Beyefendi, talimatlarınıza göre yapılandırdım ancak gönderi posta kutusunda görünmüyor, yalnızca facebook, twitter simgeleri gösteriliyor ancak Gönderi görünmüyor, lütfen sorunun ne olduğunu bildirin.