Jetpack abonelerinizi başka bir e-posta sağlayıcısına geçirmek mi istiyorsunuz?
Blog açmaya yeni başlayanların çoğu Jetpack e-posta aboneliği özelliğini kullanır. Ancak blog büyüdükçe, e-posta listelerini yönetmek ve abonelere otomatik e-posta kampanyaları göndermek için daha güçlü bir e-posta pazarlama platformuna ihtiyacınız olacaktır.
Bu makalede, bir Jetpack aboneliğinden Constant Contact, AWeber, Drip ve Mailchimp gibi diğer e-posta hizmetlerine nasıl kolayca geçiş yapacağınızı göstereceğiz.
Neden Jetpack’ten Diğer E-posta Hizmetlerine Geçmelisiniz?
E-posta ile pazarlama en uygun maliyetli pazarlama stratejilerinden biridir ve müşterilerinizle doğrudan iletişim kurmanızı sağlar.
Abonelerinizi ve sonuç olarak işinizi istikrarlı bir şekilde büyütmek için ilk günden itibaren bir e-posta listesi oluşturmaya başlamak önemlidir.
Jetpack ile WordPress web sitenize kolayca abonelikler ekleyebilirsiniz. Bu, sitenizde yeni içerik yayınladığınızda abonelerinizin bilgilendirilmesini sağlar.
Ancak, yalnızca bültene özel içerik göndermek, otomatik yanıtlayıcı eklemek veya hedefli e-posta kampanyaları göndermek istiyorsanız, daha güçlü bir şeye ihtiyacınız olacaktır.
WordPress blogunuzda e-posta listenizi oluşturmak için gerçek bir e-posta pazarlama hizmeti sağlayıcısına ihtiyacınız olacak.
Constant Contact, AWeber, Drip gibi popüler e-posta pazarlama platformlarına veya bu en iyi e-posta pazarlama hizmetlerinden herhangi birine geçmenizi öneririz.
Bunlar, pazarlamayı otomatikleştirmek, satış hunileri oluşturmak ve kişiselleştirmeyi kullanmak için çok çeşitli araçlar sunan en güçlü e-posta pazarlama platformlarından bazılarıdır.
Bununla birlikte, Jetpack’ten diğer e-posta hizmetlerine nasıl kolayca geçebileceğinizi görelim.
Jetpack Abonelerini Diğer E-posta Hizmetlerine Taşıma
Başlangıç olarak, Jetpack aboneliklerinden başka bir e-posta pazarlama platformuna geçmek için e-posta abonelerinizin bir listesine ihtiyacınız olacak.
İlk olarak, WordPress yönetici panosundan Jetpack ” Ayarlar sayfasına gidin.
Buradan, en üstteki ‘Tartışma’ sekmesine geçin.
Bundan sonra, ‘Abonelikler’ bölümüne gidin ve ‘E-posta Abonelerinizi Görüntüleyin’ bağlantısına tıklayın.
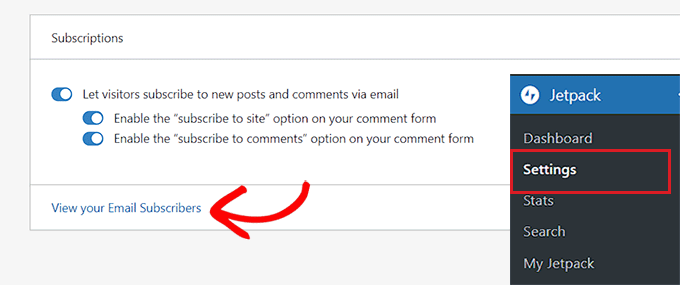
Bu sizi ‘Kullanıcılar’ sayfasına götürecek ve burada ‘Aboneler’ sekmesine geçmeniz gerekecektir.
Abone listeniz açıldığında, sağ köşedeki üç noktalı menüye tıklayın ve açılır menüden ‘E-posta abonelerini CSV olarak indir’i seçin.
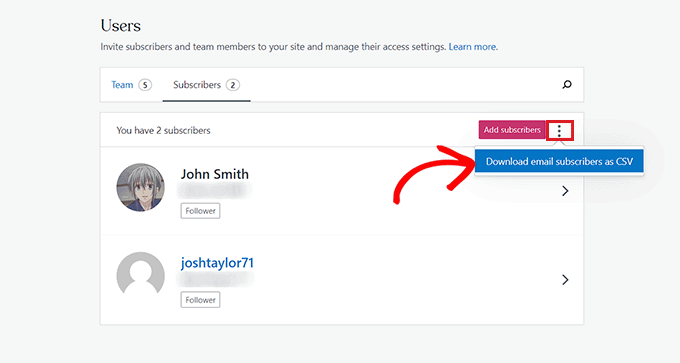
Jetpack şimdi abonelerinizin listesini hazırlayacak ve tarayıcınız bunu bir CSV dosyası olarak indirecektir.
Artık e-posta aboneleriniz olduğuna göre, bunları istediğiniz herhangi bir e-posta pazarlama hizmetine aktarabilirsiniz.
Yöntem 1: Jetpack’ten Constant Contact’a Geçiş Yapın (Önerilen)
Constant Contact e-posta hizmetine geçmek istiyorsanız, bu yöntem tam size göre.
Constant Contact ‘ı öneriyoruz çünkü yeni başlayanlar için son derece uygun ve müşterilere toplu e-posta gönderme, e-posta listelerini yönetme ve etkili e-posta pazarlama kampanyaları yürütme konusunda uzman.
Constant Contact premium bir hizmettir ve fiyatları aylık 9,99$’dan başlar. Ancak WPBeginner kullanıcıları Constant Contact kupon kodumuzu kullanarak ek %20 indirim kazanabilirler!
Öncelikle, Constant Contact web sitesini ziyaret etmeniz ve bir hesap açmanız gerekecektir.
Daha fazla ayrıntı için Constant Contact’ı WordPress’e bağlama kılavuzumuza göz atmak isteyebilirsiniz.
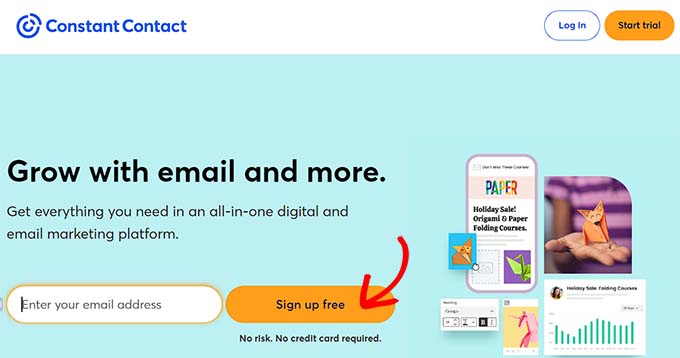
Bir hesap oluşturduktan sonra, hesap kontrol panelinize ulaşacaksınız.
Buradan, en üstteki ‘Kişiler’ sekmesine geçin ve ardından ‘Kişi Ekle’ düğmesine tıklayın.
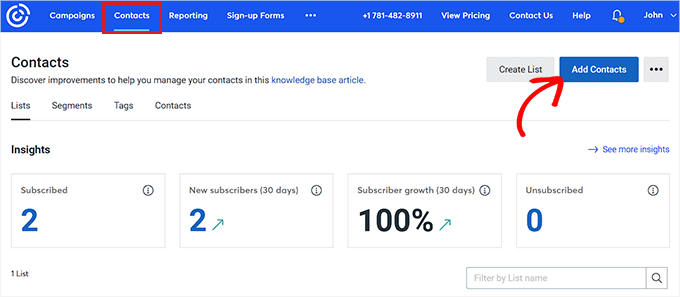
Bu, ekranda bir kişi listesini içe aktarmak için kullanılabilecek yöntemlerin bir listesini görüntüleyen bir açılır pencere açacaktır.
‘Dosyadan yükle’ seçeneğine tıklamanız yeterlidir.
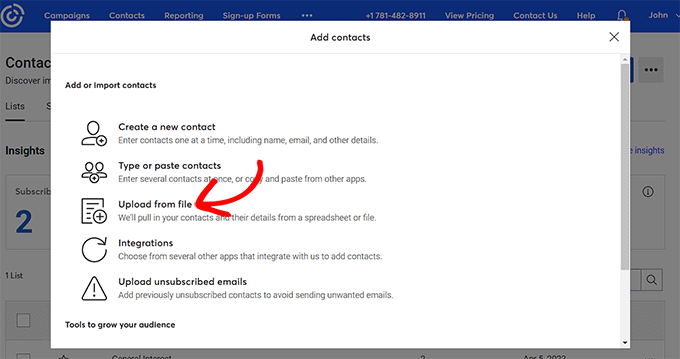
Ardından, bilgisayarınızdan bir dosya yüklemeniz istenecektir. Daha önce indirdiğiniz Jetpack e-posta aboneleri CSV dosyasını seçin.
Bundan sonra, işlem boyunca ilerlemek için ‘Devam’ düğmesine tıklayın.
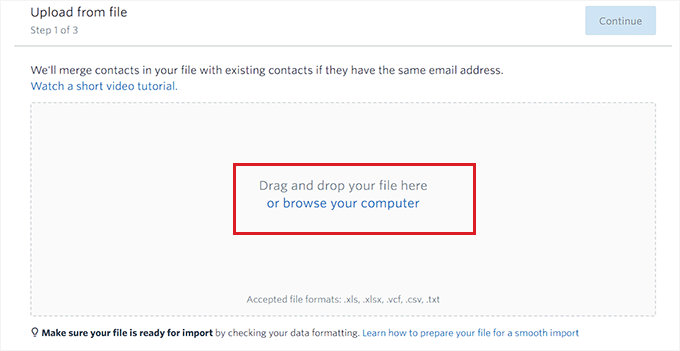
Bir sonraki adımda, CSV dosyası sütunları için başlıklar seçmeniz gerekecektir.
Örneğin, CSV dosyasında e-posta abonelerinizin adlarını içeren bir sütununuz varsa, açılır menüden ‘İlk Ad’ alanını seçmeniz gerekir.
İşiniz bittiğinde, üstteki ‘Devam Et’ düğmesine tıklayın.
Şimdi ‘E-posta Onayı’ seçeneğinin altındaki kutuyu işaretlemeniz gereken son adıma yönlendirileceksiniz.
Son olarak, e-posta abonelerinizin CSV dosyasını içe aktarmak için ‘Yükle’ düğmesine tıklayın.
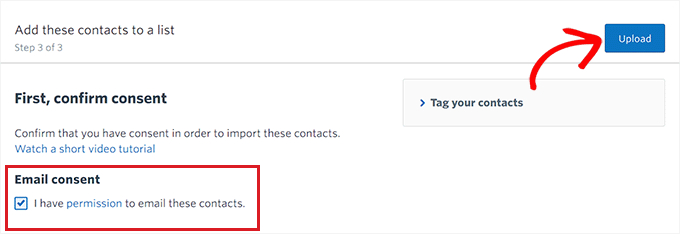
Jetpack’ten Constant Contact e-posta pazarlama platformuna başarıyla geçiş yaptınız.
E-posta göndermek için bu platformun nasıl kullanılacağı hakkında daha fazla bilgi edinmek için e-posta bülteninin nasıl başlatılacağına ilişkin makalemizi okuyabilirsiniz.
Yöntem 2: Jetpack’ten AWeber’a Geçiş Yapın
Jetpack’ten AWeber‘a geçmek istiyorsanız bu yöntem tam size göre.
AWeber en eski ve en popüler e-posta pazarlama hizmeti sağlayıcılarından biridir. AMP e-postaları, blog yazarları için otomatik RSS’den e-postaya ve etiket tabanlı abone segmentasyonu dahil olmak üzere çok çeşitli araçlar sunarlar.
AWeber ayrıca 500 aboneye kadar sınırlı bir ücretsiz plan sunar. Bundan sonra, fiyatlandırma ayda 12,50 $ ‘dan başlar. Daha fazla ayrıntı için AWeber incelememize bakın.
Öncelikle AWeber web sitesini ziyaret etmeniz ve bir hesap için kaydolmanız gerekecektir. Daha fazla ayrıntı için lütfen AWeber’ı WordPress’e bağlama kılavuzumuza bakın.
Hesabınızı etkinleştirdikten sonra AWeber kontrol panelinize yönlendirileceksiniz.
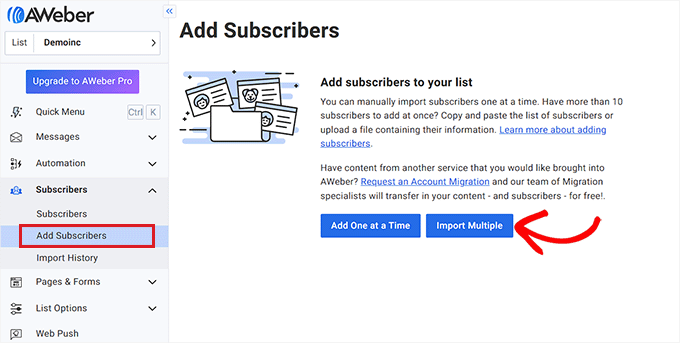
Devam edin ve sol sütundan Aboneler ” Abone Ekle sayfasını ziyaret edin. Bundan sonra, ‘Çoklu İçe Aktar’ düğmesine tıklayın.
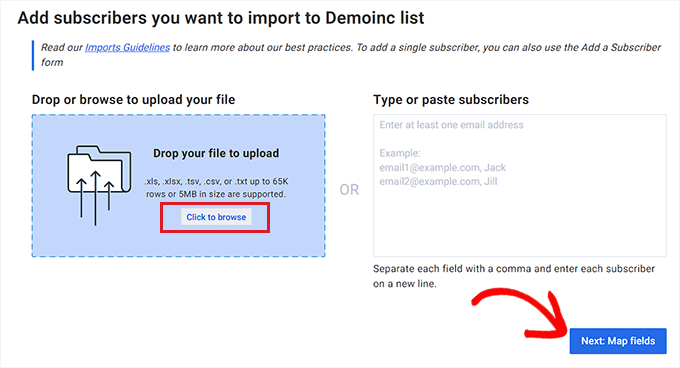
Şimdi ‘Aboneleri İçe Aktar’ ekranını göreceksiniz.
Buradan, bilgisayarınızdan bir dosya yüklemek için ‘Göz atmak için tıklayın’ düğmesine tıklamanız gerekir. Devam edin ve daha önce indirdiğiniz Jetpack CSV dosyasını yükleyin.
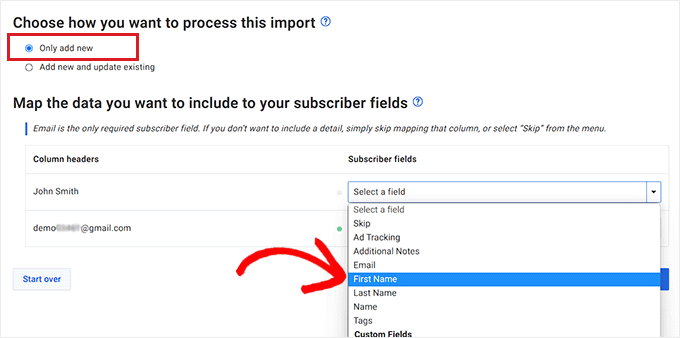
Bundan sonra, içe aktarma işlemini nasıl yapacağınız sorulacaktır. ‘Yalnızca yeni ekle’ seçeneğini işaretlemeniz yeterlidir.
Bunu yaptıktan sonra, sütun başlıkları için abone alanlarını seçmeniz gerekecektir.
Örneğin, CSV dosyasında abone adlarını içeren bir sütun varsa, bu sütun için başlık olarak ‘İlk Ad’ seçeneğini seçmelisiniz.
İşiniz bittiğinde, devam etmek için ‘İleri: Devam etmek için ‘Alanları eşle’ düğmesine tıklayın.
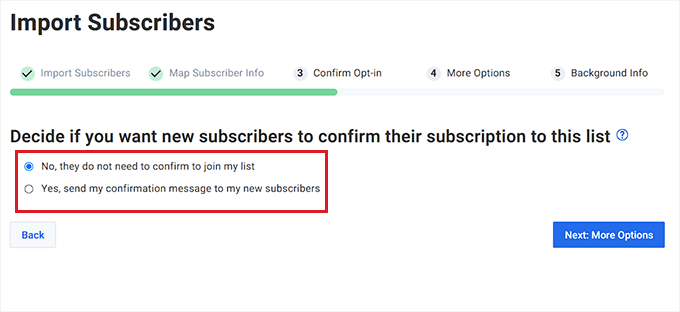
Bir sonraki adımda, kullanıcıların listeye aboneliklerini onaylamalarını isteyip istemediğinize karar vermelisiniz.
Örneğin, ‘Evet’ seçeneğini seçerseniz, CSV dosyanızdaki tüm abonelere içe aktarma tamamlandıktan sonra e-posta gönderilecektir. Daha sonra kullanıcıların listenizde aktif aboneler haline gelmeleri için e-postadaki onay bağlantısına tıklamaları gerekecektir.
Ancak, ‘Hayır’ kutusunu işaretlerseniz, kullanıcılar onay e-postaları almayacaktır.
Seçiminizi yaptıktan sonra ‘İleri: Daha Fazla Seçenek’ düğmesine tıklayın.
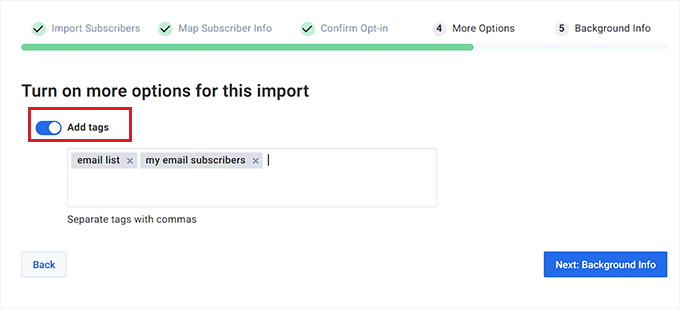
Bundan sonra, üçüncü adıma yönlendirileceksiniz. Buradan, e-posta listenize ayrı etiketler eklemek için ‘Etiket Ekle’ anahtarını değiştirebilirsiniz.
Herhangi bir etiket eklemek istemiyorsanız bir sonraki adıma da geçebilirsiniz. Devam etmek için ‘İleri: Devam etmek için ‘Arka Plan Bilgisi’ düğmesine tıklayın.
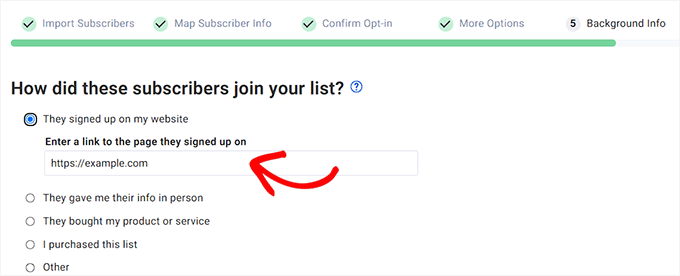
Bir sonraki sayfada, abonelerin listenize nasıl kaydolduğunu belirtmeniz istenecektir. Seçeneklerden birini seçin ve gerektiğinde daha fazla ayrıntı sağlayın.
Örneğin, ‘Web sitemden kaydoldular’ seçeneğini seçerseniz, web sitenizin URL’sini de sağlamanız gerekecektir.
Ardından, aboneleri başka bir e-posta sağlayıcısından içe aktarıp aktarmadığınız sorulacaktır. ‘Evet, başka bir sağlayıcıdan geliyorlar’ seçeneğini işaretleyin ve ardından e-posta hizmeti olarak Jetpack yazın.
Son olarak, CSV dosyanızı yüklemek için ‘İçe Aktarımınızı Gönderin’ düğmesine tıklayın.
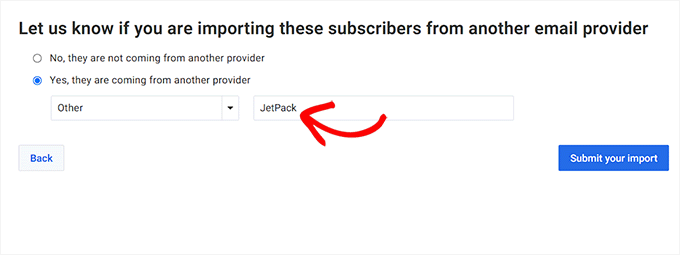
Artık e-posta abonelerinizi Jetpack’ten AWeber’a başarıyla aktardınız.
Yöntem 3: Jetpack’ten Drip’e Geçiş Yapın
Drip, e-ticaret, blog yazarları ve dijital pazarlamacılar için güçlü bir e-posta pazarlama platformudur. Çevrimiçi bir mağazanız varsa, en iyi e-ticaret e-posta pazarlama özelliklerini sunduğu için Drip’e geçmenizi öneririz.
Öncelikle, Drip web sitesini ziyaret etmeniz ve bir hesap oluşturmak için ‘Oturum aç’ düğmesine tıklamanız gerekir.
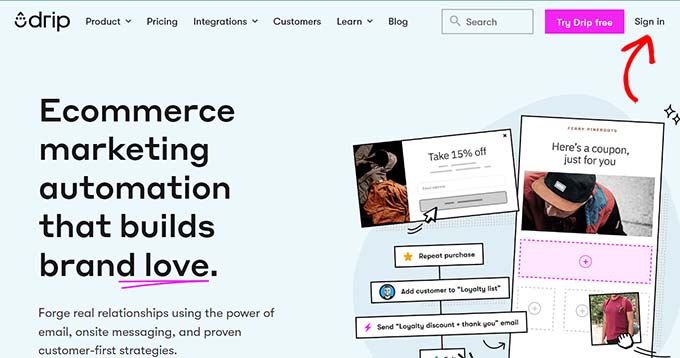
Bir hesaba kaydolmak için adımları izleyin. Hesabınız etkinleştirildikten sonra Drip kontrol panelinize yönlendirileceksiniz.
Oraya gittiğinizde, sol kenar çubuğundan Kişiler ” Aktif sayfasına gidin.
Ardından, sayfanın sağ üst köşesindeki ‘+ Kişi Ekle’ düğmesine tıklayın.
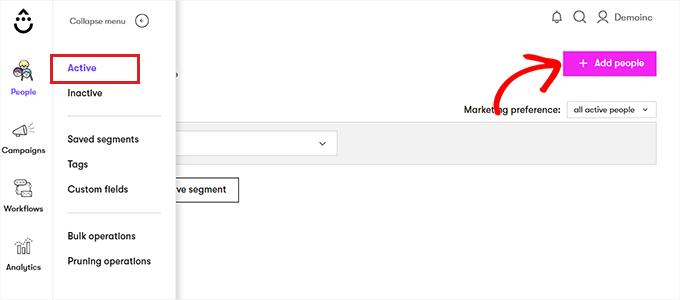
Şimdi ekranınızda yeni bir bilgi istemi belirecektir.
‘Kişi listesi yükle’ seçeneğinin altındaki ‘Başla’ düğmesine tıklayın.
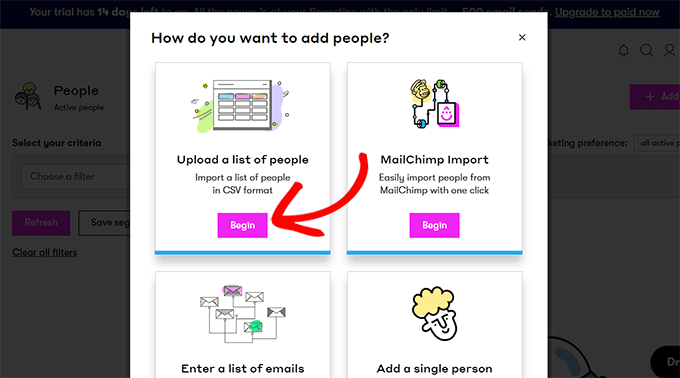
Bu sizi CSV dosyasını sürükleyebileceğiniz veya yükleyebileceğiniz yeni bir sayfaya götürecektir.
Basitçe ‘Yükle veya csv’yi buraya sürükleyin’ düğmesine tıklayın ve Jetpack CSV dosyasını içe aktarın.
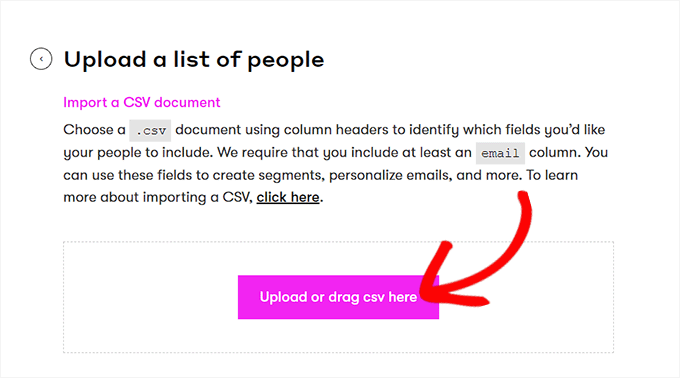
Şimdi, otomatik olarak bir sonraki adıma yönlendirileceksiniz.
Burada açılır menüden CSV dosyaları sütun adlarını seçmeniz gerekir. Ardından, devam etmek için ‘İleri’ düğmesine tıklayın.
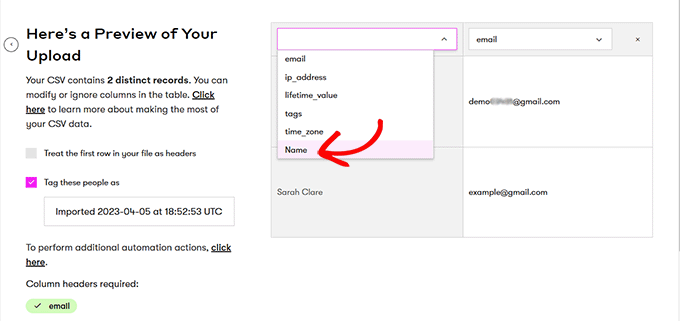
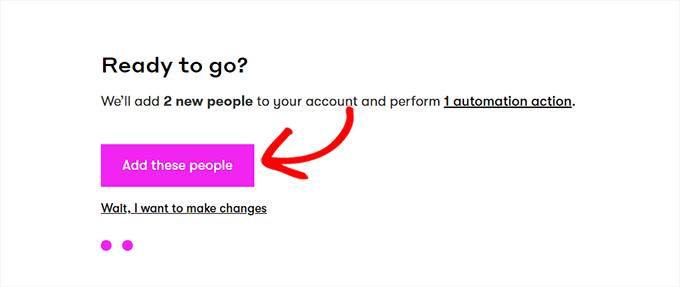
Bu sizi “Gitmeye hazır mısınız?” sayfasına götürecek ve burada “Bu kişileri ekle” düğmesine tıklamanız gerekecektir.
E-posta aboneleriniz artık Jetpack’ten Drip’e aktarılacaktır.
Yöntem 4: Jetpack’ten Mailchimp’e Geçiş Yapın
Jetpack’ten Mailchimp‘e geçmek istiyorsanız bu yöntem tam size göre.
Not: Diğer üç e-posta pazarlama sağlayıcısını kullanmanızı öneririz çünkü Mailchimp yıllar içinde kalitesini düşürürken daha pahalı hale gelmiştir. Daha fazla ayrıntı için, en iyi Mailchimp alternatifleri vitrinimizi görmek isteyebilirsiniz.
Öncelikle Mailchimp web sitesini ziyaret etmeniz ve bir hesap oluşturmanız gerekir.
Daha fazla talimat için lütfen WordPress’te Mailchimp kullanma kılavuzumuza bakın.
Hesap etkinleştirildikten sonra Mailchimp kontrol panelinize yönlendirileceksiniz.
Oraya gittiğinizde, sol sütundan Kitle ” Tüm Kişiler sayfasına gidin.
Ardından, ‘Kişi Ekle’ açılır menüsünden ‘Kişileri İçe Aktar’ seçeneğini seçin.
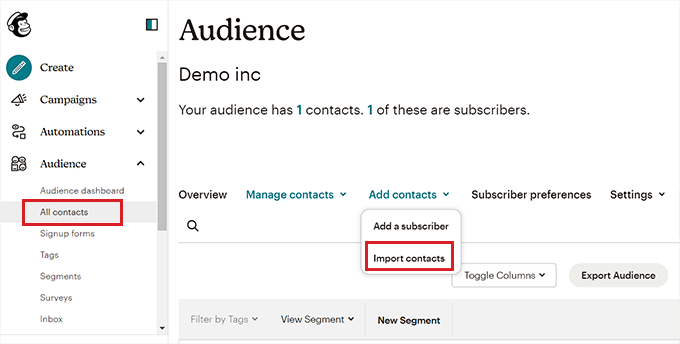
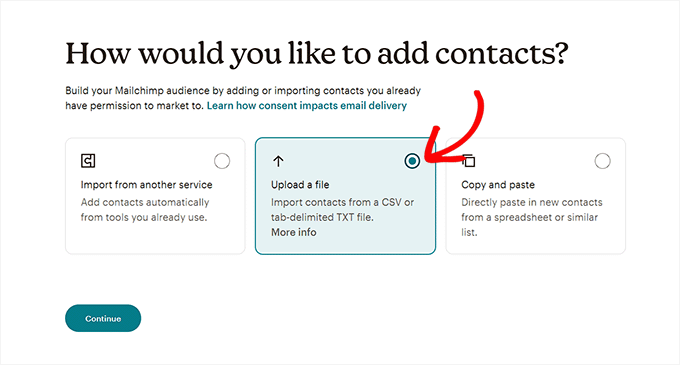
Bu sizi yeni bir sayfaya götürecek ve burada size içe aktarma yöntemlerinin bir listesi gösterilecektir.
Sadece ‘Dosya yükle’ seçeneğini seçin ve ‘Devam’ düğmesine tıklayın.
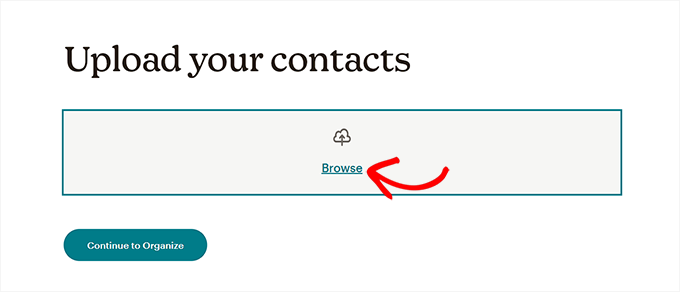
Daha sonra ‘Kişilerinizi yükleyin’ sayfasını göreceksiniz. Jetpack CSV dosyasını yüklemek için ‘Gözat’ düğmesine tıklamanız yeterlidir.
Ardından, devam edin ve ‘Düzenlemeye Devam Et’ düğmesine tıklayın.
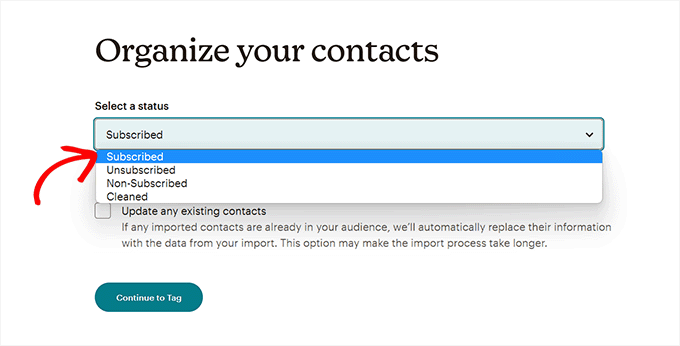
Şimdi içe aktardığınız kişiler için bir durum seçmeniz istenecektir. E-posta abonelerinin bir listesini içe aktaracağınız için, açılır menüden ‘Abone’ seçeneğini seçmeniz gerekir.
İşiniz bittiğinde, ‘Etiketlemeye Devam Et’ düğmesine tıklayın.
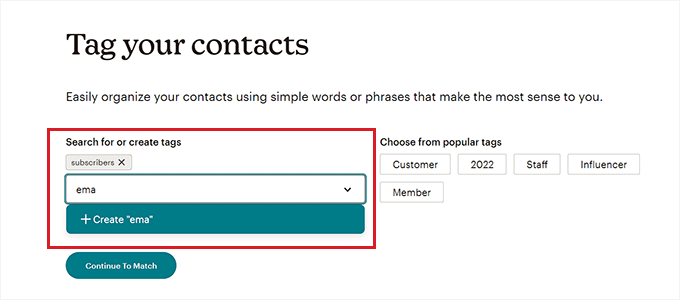
‘Kişilerinizi Etiketleyin’ sayfasında, popüler etiketlerden bazılarını seçebilir veya kendi etiketlerinizi oluşturabilirsiniz.
Bundan sonra, ilerlemek için ‘Eşleşmeye Devam Et’ düğmesine tıklayın.
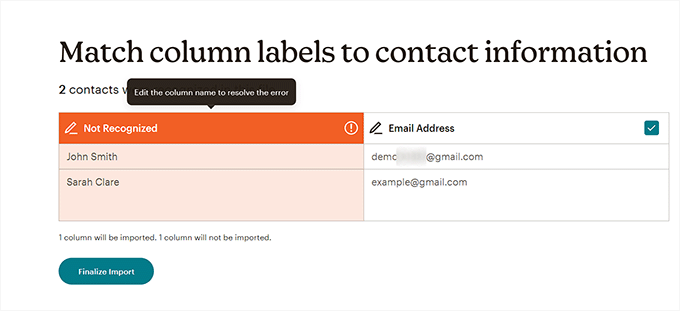
Bir sonraki adımda, sütun etiketlerini CSV dosyanızdaki iletişim bilgileriyle eşleştirmeniz gerekecektir.
Örneğin, içe aktardığınız CSV’de tüm abonelerin e-posta adreslerini içeren bir sütun varsa, sütun etiketi olarak ‘E-posta Adresi’ni seçmelisiniz.
Farklı sütunlara uygun etiketleri sağladıktan sonra, ‘İçe Aktarmayı Sonlandır’ düğmesine tıklayın.
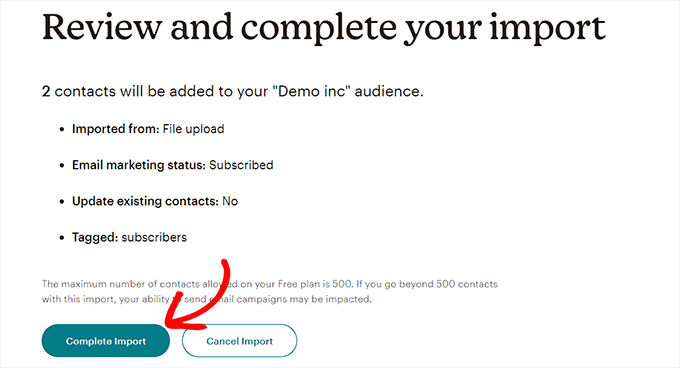
Bu sizi ‘İçe aktarımınızı gözden geçirin ve tamamlayın’ sayfasına götürecektir.
Son olarak, abonelerinizi Jetpack’ten Mailchimp’e aktarmak için ‘İçe Aktarmayı Tamamla’ düğmesine tıklayın.
Umarız bu makale Jetpack aboneliklerinden Mailchimp ve diğer e-posta hizmetlerine nasıl geçiş yapacağınızı öğrenmenize yardımcı olmuştur. Ayrıca WordPress’te nasıl e-posta listesi oluşturulacağına dair eğitimimize ve trafiğinizi artırmak için en iyi web anlık bildirim yazılımı karşılaştırmamıza da göz atmak isteyebilirsiniz.
If you liked this article, then please subscribe to our YouTube Channel for WordPress video tutorials. You can also find us on Twitter and Facebook.


Diane
This is exactly what I was looking for. Thank you for a clear and informative tutorial!
anon
If you disable Jetpack, how do you get Mailchimp or any other service to send emails when you post a new blog entry?
Also, Jetpack is using WordPress.com’s servers, not your own PHP email function on your site, so wouldn’t it be a trusted sender as well? Is there any data comparison to show send rates?
Thanks
joelle
This was very helpful and very easy to follow. Thank you!
Michelle
Thank you for this info. I recently enabled Jetpack’s subscribe to comments and subscribe to blog feature. I wanted to keep all my subscribers in one place. I was able to export them as you said to MailChimp and then delete them from WordPress to prevent duplicate notifications of blog posts. Thanks again.
Keri
Question, how in the world did you delete the subscribers from Jetpack? We just switched over from Jetpack to MailChimp but can’t find how to delete them from Jetpack. Now, they are getting all our posts twice!
Kieran Thomas
Good question. I’ve just had a look and it appears you can turn it off as follows:
1) login to your blog admin
2) go to jetpack > settings
3) click on the “discussions” tab
4) scroll down to the “subscriptions” setting and turn off “Allow users to subscribe to your posts and comments and receive notifications via email”
Caveat: I haven’t tested this, but that seems to be the setting you will want to disable
Mathukutty P. V
My blog is one year old. Only less than 10 subscribers in Jetpack. Yesterday created MailChimp account. Found that footer of their e-mails showing physical address because that is compulsory. Is it necessary to show the physical address for personal small blogs which do not have much revenue or not selling any product, but sharing only posts? I had also tried SumoMe free which has free and easy forms, welcome mat, hello bar and other features. They also do not ask or show the physical address, mobile numbers on e-mails. As a small beginner personal blog which one you select?
Carol
Jetpack subscriber list is NOT on Site Stats.
P,ease updat .
Jose Cervantes
It’s kind of hard to find now and this post does need updating, but to find it now go to WP.com jetpack, then go to stats > insights > followers (at the bottom) then there will be a button to download the data in CSV format.
AZ
What are you suppose to do with the blog only followers who cannot be converted over to mailchimp?
WPBeginner Support
You can write a post asking your blog subscribers to signup with MailChimp. It may work and you may get a few blog only subscribers into your email list.
Admin
Sudipta Kumar Maiti
After switch from jetpack to mail chimp what will happen the blog follwers as only the email follwers are import from jetpack, are the blog follwers continue to get my new post as they get earlier during jetpack. Or I have to keep jetpack and mail chimp both
Rodwell Smith
Thank you for answering my contemplation. I do have one other concern with the difference between JetPack and MailChimp.
JetPack notifies subscribers of new blogs and posts. MailChimp sends email promotions. Would I substitute JetPack subscription forms with MailChimp signup forms and achieve the two functions?
WPBeginner Support
If you just want to send posts to readers JetPack does that. But if you want to use your mailing list as your own, then MailChimp is the way to go.
Admin
Jerome Short
Will I have to post my blog in WordPress and then redo it all in MailChimp to send out to people? Is there a MailChimp plugin that would take care of that?
Thanks,
Jerome
ashley
How do you deactivate email subscribers for jetpack after?
Keri
I just moved my subscriptions over to Mail Chimp but will subscribers get two emails-one automatic when my post goes up and another when I send out the email from Mail Chimp alerting subscribers to a new post? How do I get the automatic email turned off. I don’t want to uninstall Jetpack but I do want to use Mail Chimp to deliver emails.
WPBeginner Support
You can turn off subscriptions module in JetPack. MailChimp will not send automatic emails unless you set it to do so.
Admin
Ria
I’m quite new in blogging and almost all questions that I have, mostly I get in this site. It’s very helpful and easy explained:) thank you!
did you have experience in adding MailChimp for wordpress plugin’s sign-up checkbox to jetpack comments form?:)
WPBeginner Support
Thanks, we are glad you find WPBeginner helpful. No we have not tried adding MailChimp for WordPress plugin’s signup checkbox into JetPack comments.
Admin
Lehel Matyus
your sidebar has a subcscription field and just below it you have the categories people can subscribe to. thats awesome! how did you do that? are you using jetpack for that?
WPBeginner Support
No, we use MailChimp. We have described how we do it in our tutorial how to allow users to subscribe to categories in WordPress.
Admin
Jayne
The problem is that the link to download the file takes you to a WP account that is different than the wp account I use for my website. It’s another Dashboard that has nothing there. It says you have to logged into your WP account which looks like a WP hosted site. My site is self-hosted.
Lore
The same thing happens to me. Any solutions?
Regrds,
Daniel
Hi
If I deactivate the Jetpack subscribe module would’ve this also impact post comments. Also does Mailchimp allow sigh up to posts of a selected category.
Daniel
H
If I deactivate the Jetpack subscribe module would’ve this also impact post comments. Also does Mailchimp allow sigh up to posts of a selected category.
Kristine
Does our subscriber from jetpack need to confirm their email again?
If yes, that’s really a disadvantage
ESist
This is a nice post. However, I don’t have the “site stats” sub-item for Jetpack. Maybe you could tell us which settings are required for it ?
Mark Szymanski
Hey great post. I’m looking for away to kind of have both. One place for visitors to subscribe that will sync to WP and Mailchimp. The thought is WP is great to easily shoot new posts to subscribers, while keeping MC for very specific one-offs. Any ideas?
Ron Killian
Thanks for the post. I do have to say though, one of the reason I like jetpack is that wordpress does all the mailing. My thoughts are that they should have good deliverable because they are such a trusted source. No? Also seems like emails would have a better chance of making it into the inbox and not end up in the trash folder, or promotions tab.
One other thing, I am pretty sure Aweber won’t let you import subscribers. Correct me if I am wrong.
WPBeginner Staff
You can deactivate JetPack subscriptions module. Before doing that you would want to inform your users that they should optin to join your new mailing list.
Wade Smith
How do I then deactivate jet packs emailing of the now exported group ?