Contact Form 7'yi WordPress sitenize muhtemelen ücretsiz olması ve yaygın olarak desteklenmesi nedeniyle yüklediniz.
Ancak, varsayılan formların canlı sitenizde oldukça sade göründüğünü fark etmiş olabilirsiniz. Bu temel gri stil, sitenizin geri kalanıyla uyumsuz olabilir ve genel tasarımın daha az cilalı görünmesine neden olabilir.
Contact Form 7'de görsel bir düzenleyici veya yerleşik stil seçenekleri bulunmadığından, kodla rahat değilseniz değişiklik yapmak biraz çaba gerektirir.
İyi haber şu ki, bunu düzeltmek için geliştirici olmanıza gerek yok. Sadece birkaç CSS ayarıyla, formlarınızı temiz, modern ve tamamen markanıza uygun hale getirebilirsiniz.
Bu başlangıç dostu rehberimizde, gelişmiş kodlama veya tasarım becerileri gerektirmeden Contact Form 7'yi adım adım nasıl özelleştireceğinizi anlatacağız. 🙌
İletişim Formu 7 Formlarınızı Neden Stilize Etmelisiniz?
Contact Form 7 formlarınızı stilize etmek, sitenizin daha profesyonel görünmesini sağlar, okunabilirliği artırır ve formlarınızın markanızla eşleşmesine yardımcı olur. Tüm bunlar güveni ve form dönüşümlerini artırabilir.
Başlamadan önce, Contact Form 7, WordPress için en popüler iletişim formu eklentilerinden biridir. Kullanımı ücretsizdir ve kısa kod kullanarak bir WordPress formu eklemenize olanak tanır.
Dezavantajı, Contact Form 7'nin tasarım ve özelleştirme özellikleri açısından oldukça sınırlı olmasıdır. Ayrıca, eklenti formlarınızın stilini değiştirmek için yerleşik seçenekler sunmaz.
Bu durum, iletişim formunuzun tasarımını web sitesi temanızla eşleştirmeyi veya formunuzu öne çıkarmak için yazı tipi ve arka plan rengi gibi temel ayrıntıları değiştirmeyi zorlaştırır.
📦 İçeriden İpucu: Daha gelişmiş özelliklere sahip, daha özelleştirilebilir formlar istiyorsanız, WPForms'u öneririz. Sürükle bırak form oluşturucu, yapay zeka araçları, 2.000'den fazla önceden oluşturulmuş form şablonu ve çok sayıda özelleştirme seçeneği ile birlikte gelir.
Aslında tüm formlarımız için WPForms kullanıyoruz – WPBeginner iletişim formundan yıllık okuyucu anketlerimize ve site taşıma isteği formuna kadar. Bu form oluşturucuyu neden şiddetle tavsiye ettiğimizi görmek için detaylı WPForms incelememize göz atın.
Bütçeniz kısıtlıysa, WPForms'un ücretsiz sürümü mevcuttur. 60'tan fazla şablon, koşullu mantık, Stripe ödemeleri ve daha fazlasını içerir.
Contact Form 7 vs WPForms karşılaştırmamız var, göz atabilirsiniz!
Bununla birlikte, şimdi WordPress'te bir İletişim Formu 7 formunu nasıl stilize edeceğimize bakacağız. Aşağıdaki bölümlerde şunları ele alacağız:
- İletişim Formu 7 ile Başlangıç
- Method 1: Styling Contact Form 7 Forms Using Custom CSS
- Yöntem 2: CSS Hero ile İletişim Formu 7 Formlarını Stilize Etme
- Bonus İpucu 💡: WordPress Formlarını Kod Kullanmadan Stil Edinmenin Bir Yolu
- SSS: WordPress'te İletişim Formu 7'yi Stilize Etme
- WordPress Form Özelleştirmesi İçin Ek Kaynaklar
Başlayalım!
İletişim Formu 7 ile Başlangıç
Öncelikle, web sitenize İletişim Formu 7 eklentisini yükleyip etkinleştirmeniz gerekecek.
Bunu yapmak için WordPress yönetici alanınızda Eklentiler » Yeni Eklenti Ekle bölümüne gidelim.
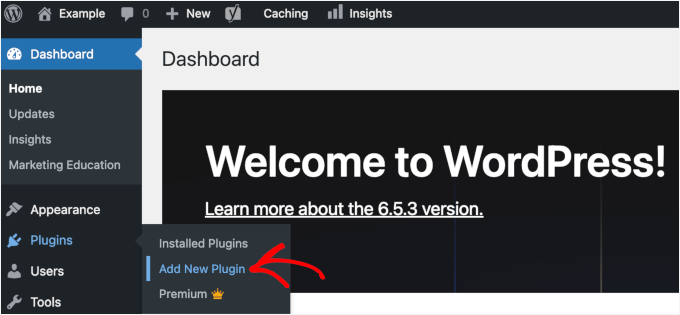
Bu, WordPress eklenti dizininden bir eklenti seçebileceğiniz sayfayı açacaktır.
Eklentiyi hızlıca bulmak için arama özelliğini kullanın. Ardından, arama sonucundaki 'Şimdi Yükle' düğmesine tıklayabilirsiniz.

WordPress sitenizde etkinleştirmek için 'Etkinleştir' düğmesine tıklamayı unutmayın. Yardıma ihtiyacınız olursa, lütfen bir WordPress eklentisinin nasıl kurulacağına dair rehberimize bakın.
Etkinleştirdikten sonra, WordPress kontrol panelinizden İletişim » Yeni Ekle bölümüne gidebilirsiniz.
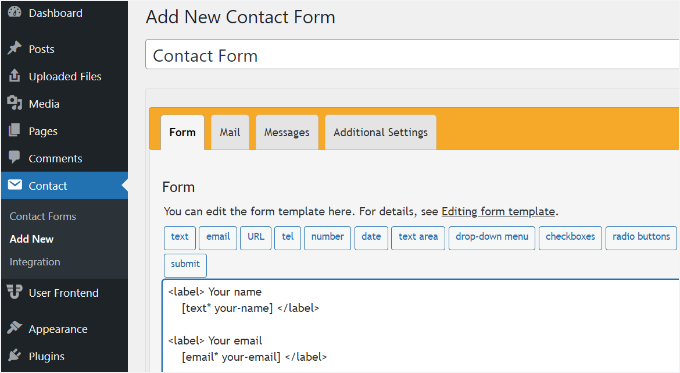
Artık web siteniz için form ayarlarını düzenleyebilir ve formunuz için bir başlık girerek başlayabilirsiniz.
Eklenti, ad, e-posta adresi, konu ve mesaj için varsayılan alanları otomatik olarak ekleyecektir. Ayrıca, istediğiniz yere sürükleyip bırakarak daha fazla alan ekleyebilirsiniz.
İşiniz bittiğinde, 'Kaydet' düğmesine tıklamayı ve kısa kodu kopyalamayı unutmayın.
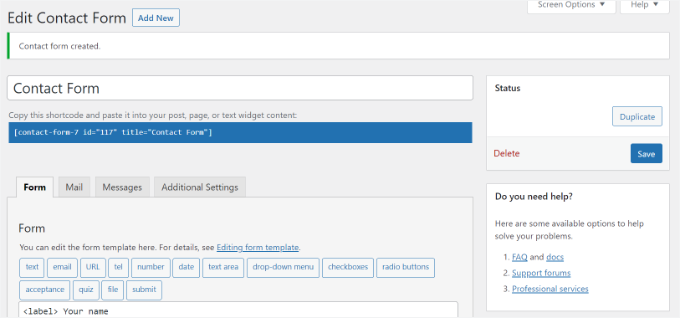
Yapılacak bir sonraki şey, formu blog yazınıza veya sayfanıza gömmenizdir.
Bunu yapmak için basitçe bir gönderiyi düzenleyin veya yenisini ekleyin.
WordPress düzenleyicisinde bulunduktan sonra, üstteki '+' işaretine tıklayın ve ardından bir Kısa Kod bloğu ekleyin.

Bundan sonra, İletişim Formu 7 formunuzun kısa kodunu kısa kod bloğuna girmeniz yeterlidir. Şöyle görünecektir:
[contact-form-7 id="117" title="Contact Form"]
Şimdi, gönderinizi veya sayfanızı yayınlayarak iletişim formunu çalışırken görün.
Bu eğitimde varsayılan iletişim formunu kullandık ve bir WordPress sayfasına ekledik. İletişim formu test sitemizde böyle görünüyordu.
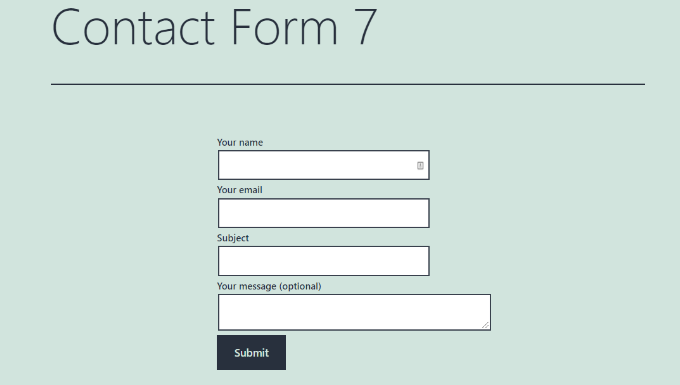
Artık WordPress'te İletişim Formu 7 formunuzu özelleştirmeye hazırsınız.
Yöntem 1: Özel CSS Kullanarak İletişim Formu 7 Formlarını Stilize Etme
Contact Form 7'nin yerleşik stil seçenekleri olmadığından, formlarınızı stilize etmek için CSS kullanmanız gerekecektir.
İletişim Formu 7, form öğelerine standart CSS sınıfları ve kimlikleri ekler. Biraz CSS biliyorsanız, tasarımı özelleştirmeyi kolaylaştırır.
Her İletişim Formu 7 formu, formunuzu stilize etmek için hedefleyebileceğiniz .wpcf7 CSS sınıfını kullanır.
Bu örnekte, giriş alanlarımızda Lora adlı özel yazı tipini kullanacağız ve formun arka plan rengini değiştireceğiz:
div.wpcf7 {
background-color: #fbefde;
border: 1px solid #f28f27;
padding:20px;
}
.wpcf7 input[type="text"],
.wpcf7 input[type="email"],
.wpcf7 textarea {
background:#725f4c;
color:#FFF;
font-family:lora, sans-serif;
font-style:italic;
}
.wpcf7 input[type="submit"],
.wpcf7 input[type="button"] {
background-color:#725f4c;
width:100%;
text-align:center;
text-transform:uppercase;
}
WordPress kontrol panelinizde Görünüm » Özelleştir » Ek CSS bölümüne giderek bu CSS'i kolayca ekleyebilirsiniz. Daha fazla yardıma ihtiyacınız olursa, WordPress sitesine özel CSS ekleme hakkındaki rehberimize başvurun.
Bu CSS'yi uyguladıktan sonra iletişim formumuz böyle görünüyordu.
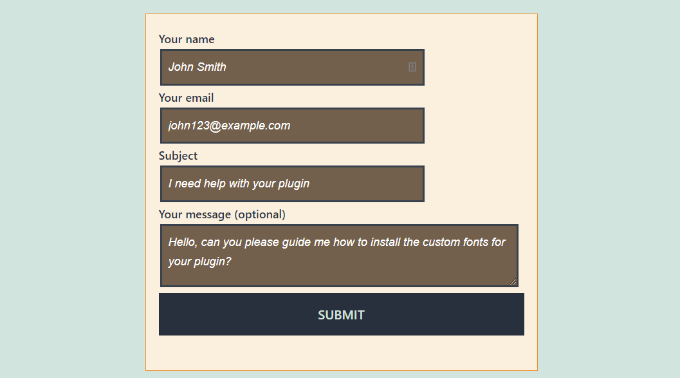
Birden Fazla Contact Form 7 Formunu Stilize Etme
Birden fazla iletişim formu kullanıyorsanız ve bunları farklı şekilde biçimlendirmek istiyorsanız, Contact Form 7'nin her form için oluşturduğu benzersiz kimliği hedefleyebilirsiniz.
Yukarıda kullandığımız CSS'in dezavantajı, web sitenizdeki tüm Contact Form 7 formlarına uygulanacak olmasıdır.
Başlamak için, formu içeren sayfayı açın. Ardından, formdaki ilk alana sağ tıklayın ve ‘İncele‘ seçeneğini seçin.
Kod karmaşık görünse de endişelenmeyin; yalnızca belirli bir satırı bulmanız yeterlidir.
Tarayıcı ekranı bölünecek ve sayfanın kaynak kodunu göreceksiniz. Kaynak kodunda, form kodunun başlangıç satırını bulmanız gerekir.
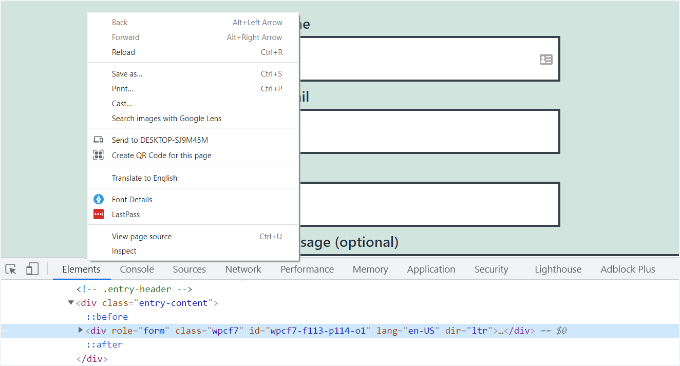
Yukarıdaki ekran görüntüsünde görebileceğiniz gibi, iletişim formu kodumuz şu satırla başlar:
<div role="form" class="wpcf7" id="wpcf7-f113-p114-o1" lang="en-US" dir="ltr">
ID özniteliği, Contact Form 7 tarafından bu belirli form için oluşturulan benzersiz bir tanımlayıcıdır. Form kimliği ile bu formun eklendiği gönderi kimliğinin birleşimidir.
Bu kimliği, yalnızca bu belirli iletişim formunu biçimlendirmek için CSS'imizde kullanacağız. Aşağıdaki kodda, standart .wpcf7'yi benzersiz kimliğinizle (örneğin, #wpcf7-f113-p114-o1) değiştirin.
div#wpcf7-f113-p114-o1{
background-color: #fbefde;
border: 1px solid #f28f27;
padding:20px;
}
#wpcf7-f113-p114-o1 input[type="text"],
#wpcf7-f113-p114-o1 input[type="email"],
#wpcf7-f113-p114-o1 textarea {
background:#725f4c;
color:#FFF;
font-family:lora, "Open Sans", sans-serif;
font-style:italic;
}
#wpcf7-f113-p114-o1 input[type="submit"],
#wpcf7-f113-p114-o1 input[type="button"] {
background-color:#725f4c;
width:100%;
text-align:center;
text-transform:uppercase;
}
CSS'nin çalışması için kendi sitenizde oluşturulan kimliği kullanmanız gerektiğini unutmayın.
Artık özelleştirmek istediğiniz her form için bu işlemi tekrarlayabilir, kimliği o belirli form için oluşturulanla değiştirebilirsiniz.
Yöntem 2: CSS Hero ile İletişim Formu 7 Formlarını Stilize Etme
Contact Form 7 formlarının stilini değiştirmenin daha kolay bir yolu CSS Hero kullanmaktır. Herhangi bir CSS yazmadan formlarınızı düzenlemenizi sağlar.
Bu eklentiyi test ettik ve iyi olup olmadığını gördük. Hakkındaki her şeyi eksiksiz CSS Hero incelememizde görün.
CSS Hero premium bir eklenti olduğundan, öncelikle web sitelerinde bir CSS Hero hesabı oluşturmanız gerekir. 'Hemen Al' düğmesine tıklayın, bir plan seçin ve ödeme işlemini tamamlayın.
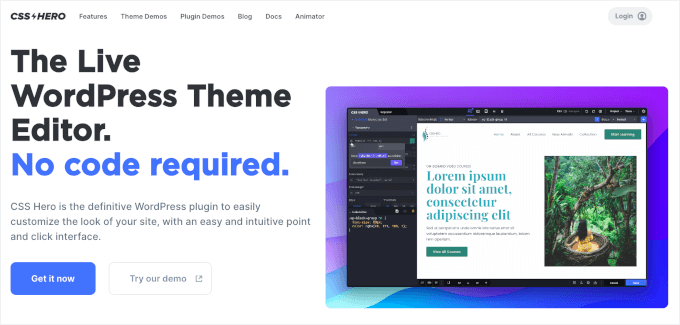
Bu işlem tamamlandığında, CSS Hero hesap kontrol panelinize ulaşacaksınız. Burada eklentinizin zip dosyasını ve lisans anahtarını bulabilirsiniz.
Artık CSS Hero eklentisini web sitenize kurabilir ve etkinleştirebilirsiniz. WordPress yönetici alanınızda, Eklentiler » Yeni Eklenti Ekle bölümüne gidin.

Ardından, dosya yükleyiciyi açmak için 'Eklenti Yükle' düğmesine tıklayabilirsiniz.
Bundan sonra, 'Dosya Seç'e tıklayın ve eklentinin .zip dosyasını seçin.

Yüklendikten sonra, 'Şimdi Yükle' düğmesine ve ardından göründüğünde 'Etkinleştir'e tıklayabilirsiniz. Ayrıntılar için, bir WordPress eklentisinin nasıl kurulacağına dair rehberimize bakın.
Etkinleştirildikten sonra, canlı web sitenizdeki formunuzu içeren sayfayı ziyaret edebilirsiniz. En üstteki yönetici araç çubuğunda ‘CSS Hero ile Özelleştir’ seçeneğini göreceksiniz.

CSS Hero, kod yazmadan CSS'yi düzenlemek için kolay, tıklanabilir bir arayüz sunar.
Eklentiyi kullanarak, formunuzdaki herhangi bir alana, başlığa ve diğer öğelere tıklayabilir ve arka plan rengini, yazı tipini, kenarlıklarını, aralığını ve çok daha fazlasını düzenleyebilirsiniz.
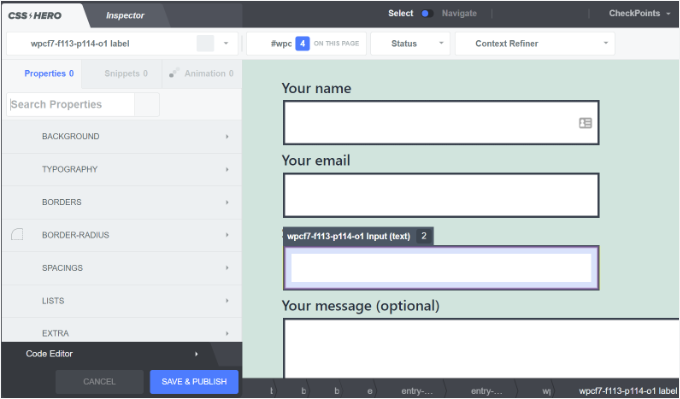
Formunuzu özelleştirdikten sonra, alt kısımdaki 'Kaydet & Yayınla' düğmesine tıklamanız yeterlidir.
Bonus İpucu 💡: WordPress Formlarını Kod Kullanmadan Stil Edinmenin Bir Yolu
Contact Form 7 ile CSS ile çalışmak size biraz fazla teknik geliyorsa, çok daha kolay, kodsuz bir çözüm var: WPForms.
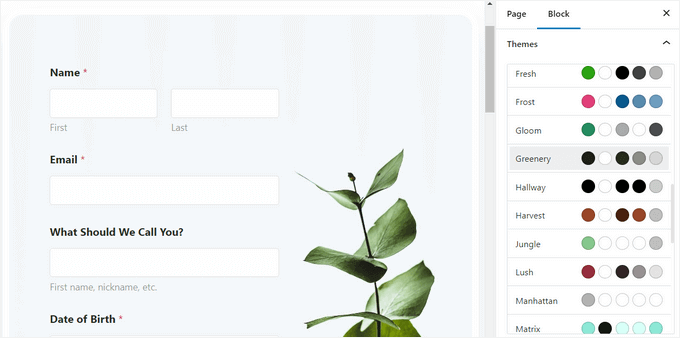
WPForms, piyasadaki en iyi form oluşturuculardan biridir. Görsel bir düzenleyici ve önceden tasarlanmış temalarla birlikte gelir, böylece kod yazmadan formlarınızı tamamen özelleştirebilirsiniz.
WPForms'ta bir formu stilize etmek ne kadar kolay, işte burada:
Formunuzu bir sayfaya ekledikten sonra, sağdaki blok ayarları panelini açın ve 'Temalar' bölümüne gidin.
Ardından, sitenizin tasarımına anında uyum sağlaması için 40'tan fazla güzel, önceden tasarlanmış temadan birini seçebilirsiniz.
Bunun ötesinde şunları yapabilirsiniz:
- Alan boyutunu, kenarlıklarını ve renklerini ayarla
- Etiket yazı tiplerini, alt etiketleri ve hata mesajlarını ince ayarla
- Gönder düğmesini markanıza uyacak şekilde stilize edin
Adım adım talimatlar için, WordPress formlarını nasıl özelleştireceğiniz ve stil vereceğiniz konusundaki kılavuzumuza bakabilirsiniz.
SSS: WordPress'te İletişim Formu 7'yi Stilize Etme
Contact Form 7'ye yeni başlıyorsanız veya tasarımını ince ayarlamak istiyorsanız, bu hızlı SSS'ler en yaygın stil sorularınızda size yardımcı olacaktır.
Contact Form 7 gönder düğmesini nasıl stilize ederim?
Contact Form 7 gönder düğmesini, varsayılan gönder sınıfı .wpcf7-submit'i hedefleyerek CSS ile stilize edebilirsiniz. Ardından özel stillerinizi Görünüm » Özelleştir » Ek CSS bölümüne ekleyin.
WordPress'te Contact Form 7 nasıl yapılandırılır?
Contact Form 7'yi yapılandırmak için formunuzu açabilir, 'Posta' sekmesine gidebilir, 'Kime' adresini (mesajların gönderileceği yer) ayarlayabilir ve posta etiketlerinin form alanlarınızla eşleştiğinden emin olabilirsiniz.
Contact Form 7 ücretsiz mi?
Evet, Contact Form 7 tamamen ücretsiz olarak resmi WordPress.org eklenti dizininden indirilebilir ve kullanılabilir. Çekirdek eklenti ücretsizdir, ancak bazı isteğe bağlı üçüncü taraf eklentileri veya entegrasyonları ücretli olabilir.
İletişim Formu 7 iyi mi?
Ücretsiz ve esnek bir form eklentisi istiyorsanız ve biraz daha teknik bir kurulumdan çekinmiyorsanız, Contact Form 7 işlevsel ve yaygın olarak kullanılan bir seçenektir.
Özel HTML ve CSS ile birleştirildiğinde güçlüdür, ancak görsel bir sürükle ve bırak oluşturucu sunmaz, bu nedenle stil ve düzen değişiklikleri genellikle kodu düzenlemeyi veya ek araçlar kullanmayı gerektirir.
Contact Form 7'yi düzenleme için Canva'ya yerleştirebilir miyim?
Hayır, Contact Form 7 bir WordPress eklentisi olduğu ve çalışması için bir WordPress ortamına ihtiyaç duyduğu için Contact Form 7 formunu Canva içinde düzenleyemezsiniz. Ancak, formunuzun görünümünü bir maket olarak Canva'da tasarlayabilir ve ardından bu tasarımı WordPress'te yeniden oluşturabilirsiniz.
WordPress Form Özelleştirmesi İçin Ek Kaynaklar
Umarım bu makale, WordPress'te Contact Form 7 formlarını nasıl stilize edeceğinizi öğrenmenize yardımcı olmuştur.
Ayrıca diğer faydalı rehberlerimize de göz atmak isteyebilirsiniz:
- WordPress Formlarına Resim Seçenekleri Nasıl Eklenir
- WordPress'te Adres Alanları İçin Otomatik Tamamlama Nasıl Eklenir
- WordPress'te Daha Etkileşimli Formlar Oluşturmak İçin İpuçları
- WordPress Formlarında Koşullu Mantık Kullanımı
- WordPress Formlarını Kullanma Kılavuzu
Bu makaleyi beğendiyseniz, lütfen WordPress video eğitimleri için YouTube Kanalımıza abone olun. Bizi ayrıca Twitter ve Facebook'ta da bulabilirsiniz.


Alejandro
Teşekkürler!
Talimatlarınız çok faydalı oldu.
Onları paylaşmak için zaman ayırdığınız için teşekkürler!
WPBeginner Desteği
Glad our guide was helpful
Yönetici
hmi
Merhaba beyefendi, alanların CSS kodunu nerede bulabilirim?
Teşekkürler
WPBeginner Desteği
Mevcut CSS'yi bulmak için incele öğesini kullanmanız gerekir:
https://www.wpbeginner.com/wp-tutorials/basics-of-inspect-element-with-your-wordpress-site/
Yönetici
Tony Tran
Gönder düğmesinin arka plan rengini css ile değiştiremiyorum... Lütfen yardım edin
WPBeginner Desteği
Yanlış nesneyi hedefliyor olabilirsiniz, buradaki makalemize göz atmak isteyebilirsiniz:
https://www.wpbeginner.com/wp-tutorials/basics-of-inspect-element-with-your-wordpress-site/
Yönetici
Deshave
Formu WordPress web sitesine yüklediğimden beri PDF'deki gönder düğmesi artık çalışmıyor.
WPBeginner Desteği
Önerdiğimiz PDF yerleştirme, içerik görüntülemek içindir. Form doldurmak için bir form eklentisi kullanmanızı öneririz.
Yönetici
zeeshan alam
Paylaştığınız için teşekkürler Beyefendi
WPBeginner Desteği
You’re welcome
Yönetici
Steve
Merhaba, "Gerekli alanlardan" bir veya birkaçını doldurmazsam bir mesaj eklemem mümkün mü? Çünkü sadece doldurmadığım "Gerekli alanlarda" "kırmızı oklar" alıyorum. Ek olarak, şöyle bir hata mesajı istiyorum:
“Bir veya daha fazla Zorunlu alan hatası var. Lütfen kontrol edin ve tekrar deneyin.”
Ancak bende yalnızca kırmızı oklar var ve sorun cep telefonlarında kırmızı oklar pencerede değil ve Müşteri bunları göremiyor.
WPBeginner Desteği
Şu anda mevcut olanlar için iletişim formu 7'nin desteğiyle iletişime geçmeniz gerekecektir.
Yönetici
FRED_VERSATILE
Merhaba,
Bu eğitim için teşekkürler.
Düğmedeki "gönder" etiketinin sağına özel bir resim eklemek istiyorum.
Web sitemdeki diğer düğmeler için bunu :before ile yaptım, ancak CSS'i yerleştirecek gönderi formundaki öğeyi bulamıyorum...
WPBeginner Desteği
Formunuza bağlı olarak neyi hedefleyeceğiniz değişecektir, incele öğesini kullanırsanız nesnenin kimliğini veya sınıfını görebilmelisiniz:
https://www.wpbeginner.com/wp-tutorials/basics-of-inspect-element-with-your-wordpress-site/
Başka bir seçenek olarak :before yerine :after da kullanabilirsiniz
Yönetici
Muhammad Tahir
BELİRLİ iletişim formunun yanıt metin rengini değiştirme
waqas
Eklenti olmadan contact form 7'ye bir zaman alanı ekleyebilir miyiz?
Mary Lou Hoffman
Acemiyim ama bunu çözmeye kararlıyım! Bu yüzden, lütfen – cevap verirseniz bana adım adım anlatın.
Web sitemde bir contact7 formum var. Etiketler (Adınız, E-postanız vb.) için yazı tipi beyaz bir arka plan üzerinde beyaz görünüyor.
Rengi nasıl değiştirebilirim – rengi değiştirmemi söylemek için nereye gitmeliyim?
Yukarıdaki cevaplarınızda bulunan kodlardan bazılarını kopyalayıp yapıştırmayı denedim, ancak sadece sayfamda göründüler, yazı tipini değiştirmediler.
Karu Price
Etiket alanını şu şekilde hedefleyebilirsiniz-
.wpcf7 form p label { color: white; background: black; font-family: sans-serif; }
Rita Accarpio
Merhaba!
Modal başlıklarla uğraşıyorum. Form arka planını daha koyu bir renge değiştirdim ama şimdi başlığın rengini değiştirmek istiyorum. Şu ana kadar denediğim tüm farklı seçeneklerle hiç değişmiyor gibi görünüyor.
Bunu yapmanın bir yolunu biliyor musun? Lütfen bana yardım et!
Teşekkürler!
Chris
Teşekkürler!
Abhijeet
Ad ve e-posta kutuları arasındaki boşluğu azaltmak istiyorum… bunu nasıl yapabilirim.
Naveen
Harika bir yazı için teşekkürler, çok yardımcı oldu.
Josh
Bu çok yardımcı oldu. Teşekkürler!
Joel Desrosiers
İletişim formumun koyu bir resim arka planı var, bu yüzden "adınız", "e-postanız" ve "mesajınız" beyaz olmalı. Bu öğeler için bir sınıf veya kimlik bulamıyorum, öğeleri incele ile denedim ama işe yarayan bir şey bulamadım. Bu sitedeki tek iletişim formu bu. Çocuk temamın stil sayfasında css kullanıyorum ve farklı seçenekleri denedim ama rengi değiştiremedim. Yardımcı olabilecek var mı?
Merriann Fu
Wordpress ve genel olarak Eklentiler konusunda oldukça yeniyim ancak bu Eklentiyi yükledim ve her şey doğru çalışıyor ancak kişinin mesajını görmek yerine, e-postanın gövdesinde sadece [your-message] görünüyor. Her şeyi yukarıdaki gibi ayarladım ve doğru yazdım, bu yüzden sorunun ne olduğundan emin değilim. Herhangi bir yardım çok takdir edilecektir! Teşekkürler!
Don Walley
Aynı sorun bende de var. WP'de formlara yeni başladım ama ben de takıldım. İşletme adı, adresi vb. ile birlikte kişisel iletişim bilgilerini ve seçimlerini yapmak için bir açılır menüyü ve tabii ki bir yorum alanını içeren bir Kayıt sayfası oluşturmaya çalışıyorum. Bunu defalarca test ettikten sonra sizinkiyle aynı sonucu alıyorum; yorum alanının içeriği.
İletişim 7 Dokümanlar sayfasında, varsayılan İletişim Formu dışında bir veya iki örnek olmasını dilerdim.
Miguel Ceballos
Contact Form 7'nin en popüler olduğunu sanmıyorum. Birçok tema ve wordpress kurulumuyla birlikte önceden yüklenmiş olarak gelir, bu yüzden bu kadar çok kullanıcıları var. Bu eklentide herhangi bir şeyi düzenlemek çok sinir bozucu.
Osama Ali Khan
Merhaba, eğer birisi şeffaf arka plana sahip bir iletişim formu istiyorsa veya şeffaf arka plana sahip büyük bir banner resmine iletişim formu 7 eklemek istiyorsa, bu kodu özel CSS'inize ekleyin.
.wpcf7 input[type=”text”],
.wpcf7 input[type=”email”],
.wpcf7 textarea
{
background-color: Şeffaf;
color: MAVİ;
width: 100%;
}
div.wpcf7 { color: white; margin: 0; padding: 0; }
Deborah
Hayatımı kurtardın. Saatlerdir bununla uğraşıyordum.
Diğerlerinin de faydalı bulabileceği bir noktaya değineceğim, kenar çubuğuma yerleştirdiğim bir iletişim formu 7'deki gönder düğmesini stilize etmeye çalışıyordum.
Bu, ilk sayfada işe yaradı ancak sonraki sayfalarda çalışmadı. Ancak daha sonra ikinci sayfadaki f2 kodunun 'o2' sonekine sahip olduğunu fark ettim ve bunu CSS'ime eklediğimde, bu sayfadaki stil de işe yaradı.
Tekrar teşekkürler.
WPBeginner Desteği
Glad you found it helpful.
Yönetici
Mikko
Harika bir yazı için teşekkürler, çok yardımcı oldu. Beni hala rahatsız eden bir şey var ve o da onay kutularını özelleştirmenin bir yolunu bulamamış olmam. Örneğin, her tarayıcıda çalışacak şekilde onay kutusu boyutunu değiştirmek mümkün mü?
Girdi yapısının değiştirilmediği ve onay kutularını taklit etmek için ek span'lar eklenemediği anlaşılıyor, doğru muyum?
Bana yardım edecek vaktiniz olursa sevinirim, teşekkürler.
Wendy
Aman Tanrım! Bu yazı için ne kadar minnettar olduğumu bilemezsin! TEŞEKKÜRLER!
Sadece Gönder düğmesinde kullanılan yazı tipini değiştirmek istedim. Saatlerce aradım ve çeşitli CSS kod varyasyonlarını denedim ve hiçbir şey işe yaramadı, ta ki kodunuzu bulana ve ona bir yazı tipi öğesi ekleyene kadar. Sorun çözüldü!
pranav shinde
contact-form-7/includes/css/styles.css (devre dışı) bu, css düzenleme dosyamın üzerinde görünüyor, bu yüzden değişikliklerin hiçbiri web sitesine uygulanmıyor, nasıl aktif hale getirebileceğim konusunda bana yardım edin
WPBeginner Desteği
Çekirdek eklenti dosyalarını düzenlememelisiniz. Bunun yerine CSS'inizi temanızın stil sayfasına eklemelisiniz.
Yönetici
pranav shinde
evet anladım o zaman bana nasıl yapabileceğimi söyler misin..lütfen bana detaylı yardım et
pranav shinde
Çok teşekkürler beyefendi çok yardımcı oldu kanalınıza abone olacağım
pranav shinde
yani bu kodu tema css dosyama kopyalamalıyım, doğru mu?
Monique
Merhaba,
Birisi mobil için iletişim formunu düzeltmeme yardım edebilir mi diye merak ediyorum. Formu görebiliyorum ancak çok geniş ve kesiliyor.
Teşekkür ederim.
puneet singh
bu çok yardımcı gerçek güzel öğretici
Jiniya
Web sitenizi çok faydalı buluyorum. Sadece bir öneri, web siteniz için yakında bir uygulama çıkarırsanız harika olur… uygulamalar e-postaları takip etmekten daha kullanışlıdır
WPBeginner Desteği
Kulağa iyi bir fikir gibi geliyor. Bu arada, WPBeginner'a mobil cihazınızdaki Feedly uygulaması aracılığıyla erişebilirsiniz.
Yönetici
Anee
WordPress'teki en üst düzey özellikler, stilinizi kolayca kendiniz oluşturabilirsiniz, WordPress'te sitenizi yönetmek için derinlemesine bilgiye gerek yok. Contact 7 formunda, HTML veya başka bir yerde zaten tasarladığınız kendi yapınızı kullanabilirsiniz.
Neil Murray
CSS ile çalışmak mevcut beceri seviyenizin biraz üzerindeyse, https://wordpress.org/plugins/contact-form-7-skins/ kullanmayı da düşünebilirsiniz.
Normal Contact Form 7 arayüzünde çalışan Contact Form 7 Skins, düzenli WordPress kullanıcılarının HTML ve CSS becerileri olmasa bile, uyumlu Şablonlar ve Stiller kullanarak profesyonel görünümlü Contact Form 7 formları oluşturmasını kolaylaştırır.
Sam
teşekkürler Neil
Andrew Wilkerson
Teşekkürler Neil, sanırım tam da ihtiyacım olan şey buydu. Heyecanlandım ve yükledim, sonra mevcut formumu sildim, bu yüzden tekrar çalışır hale getirmek için sitemin yedeğini geri yüklemem gerekti, zamanım olduğunda daha fazla inceleyeceğim, sanırım mevcut formumu içine kopyalamam veya sıfırdan yeni bir tane oluşturmam gerekecek. Eğitimleri izlemeye gidiyorum. Umarım hala kullanmak için en iyisi budur. Buradaki eski bir gönderi olduğunu biliyorum ama eklenti sayfasında yakın zamanda güncellendiği belirtiliyor.
Bhongo
Harika bir makale. Web sitemi stilize etmek için bunu kullanacağım.
Mark
Başka bir eklenti kullanmadığınız başka iyi bir makale.