
WordPress sitenizi yeni bir alan adına taşımak, dikkatli bir planlama gerektiren büyük bir adımdır. Alan adınızı değiştirmek SEO sıralamanızı etkileyebilir, bu nedenle süreci dikkatli bir şekilde ele almak çok önemlidir.
Alan adı değişikliği sürecini birçok kez başarıyla yönettik, bu nedenle potansiyel tuzakları ve bunlardan nasıl kaçınılacağını ilk elden biliyoruz.
Alan adı geçişi sırasında geçici SEO dalgalanmaları kaçınılmaz olsa da bu etkiyi azaltabilirsiniz. Doğru yaklaşımla, arama trafiğinizi ve sıralamalarınızı hızla geri kazanabilirsiniz.
Bu kılavuzda, WordPress’i SEO’yu kaybetmeden yeni bir alan adına taşımanın doğru yolunu göstereceğiz.
WordPress sitenizi yeni bir alan adına taşımak korkutucu olabilir, ancak öyle olmak zorunda değil. Sürecin her adımında size yol göstermek için buradayız.
WordPress sitenizi yeni bir alan adına taşımanın belirli bir adımına gitmek için aşağıdaki bağlantılardan herhangi birine tıklayabilirsiniz:
- What to Know Before You Change Domains
- Pre-Steps: What You Need to Get Started
- Step 1: Create a Duplicator Package of Your WordPress Site
- Step 2: Create a Database for Your New Domain Name
- Step 3: Unpack WordPress on Your New Domain Name
- Step 4: Set Up Permanent 301 Redirects
- Step 5: Notify Google About Your New Domain
- Notify Your Users About the New Domain Name
- Video Tutorial
Alan Adlarını Değiştirmeden Önce Bilmeniz Gerekenler
Başlamadan önce bilmeniz gereken birkaç şey var.
Yeni bir alan adına aktarma işlemi, Google ve diğer arama motorlarının değişikliklere uyum sağlaması gerekeceğinden arama motoru sıralamalarınızı geçici olarak etkileyecektir.
Ayrıca arama trafiğinizi de geçici olarak etkileyecektir. Lütfen bunun normal olduğunu ve yeni bir alan adına geçen tüm web sitelerinin başına geldiğini unutmayın.
Ancak bu kılavuzu takip ederek SEO etkisini önemli ölçüde azaltabilirsiniz. WordPress sitenizi yeni bir alan adına taşımanın, uygun 301 yönlendirmelerini ayarlamanın ve arama motorlarını bilgilendirmenin doğru yolunu göstereceğiz.
Lütfen bu kılavuzun bir WordPress sitesini yeni bir ana bilgisayara taşımak için olmadığını unutmayın. Bu yalnızca bir alan adını değiştirmek içindir. Süreç benzer olsa da, birkaç ekstra adım vardır. Bu ekstra adımlar SEO sıralamanızı ve trafiğinizi korumanıza yardımcı olacaktır.
Son olarak, eski web siteniz WordPress.com’daysa, bunun yerine WordPress. com’dan WordPress.org’a nasıl taşınacağına ilişkin kılavuzumuzdaki talimatları izlemeniz gerekir.
Ön Adımlar: Başlamak için İhtiyacınız Olanlar
Bu kılavuzda, WordPress web sitenizin oldsite.com’da kurulu olduğunu ve onu newsite.com’a taşımaya çalıştığınızı varsayıyoruz.
Ayrıca halihazırda bir WordPress hosting hesabınız olduğunu ve web hosting kontrol panelinize aşina olduğunuzu varsayıyoruz.
Ayrıca FileZilla gibi bir FTP istemcisini nasıl kullanacağınızı veya hosting hesabı kontrol panelinizde bulunan Dosya Yöneticisi uygulamasını kullanarak dosyaları nasıl düzenleyeceğinizi bilmeniz gerekir.
Bir web barındırma sağlayıcınız yoksa veya yeni bir sağlayıcıya geçmek istiyorsanız, Bluehost (küçük siteler için harika + ücretsiz alan adı ile birlikte gelir) ve SiteGround veya WP Engine (daha büyük siteler veya çevrimiçi mağazalar için harika) kullanmanızı öneririz.
Bunları yerine getirdiğinizde, süreci başlatmaya hazırsınız demektir!
Adım 1: WordPress Sitenizin Çoğaltıcı Paketini Oluşturun
Yapmanız gereken ilk şey WordPress sitenizin tam bir yedeğini oluşturmaktır.
Daha sonra bu yedeği web sitenizin bir kopyasını oluşturmak için kullanacaksınız, böylece eski alan adınızdan yenisine yönlendirmeleri düzgün bir şekilde ayarlayabilirsiniz.
Birçok WordPress yedekleme eklentisi mevcut olsa da, bu eğitim için Duplicator kullanacağız.
Duplicator en iyi WordPress yedekleme ve taşıma eklentisidir. Hem kendi işletmelerimiz hem de müşterilerimiz için sayısız web sitesini taşımak için kullandık. Çok büyük web siteleri için bile güvenilir bir şekilde çalıştığını gördük.
Not: Duplicator’ın bu geçiş için kullanabileceğiniz ücretsiz bir sürümü de mevcuttur. Ancak, otomatik bulut yedeklemeleri, tek tıklamayla web sitesi kurtarma, daha kolay geçişler ve daha fazlası gibi daha fazla özelliğin kilidini açmak için ücretli bir plana yükseltmenizi öneririz.
Eski alan adınıza Duplicator eklentisini yükleyip etkinleştirerek başlayalım. Daha fazla ayrıntı için, bir WordPress eklentisinin nasıl kurulacağına ilişkin adım adım kılavuzumuza bakın.
Eklenti etkinleştirildiğinde, WordPress yöneticinize bir Duplicator menü öğesi ekleyecektir. WordPress sitenizin yeni bir yedeğini veya kopyasını oluşturmak için Duplicator ” Yedekler sayfasına gitmeniz ve ardından ‘Yeni Oluştur’ düğmesine tıklamanız gerekir.
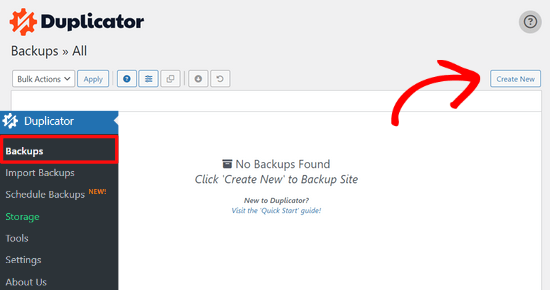
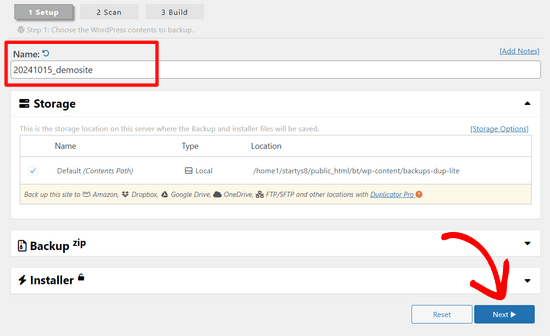
Duplicator şimdi arka sihirbazı başlatacak ve bu pakete otomatik olarak bir isim atayacaktır.
Devam etmek için ‘İleri’ düğmesine tıklayın.
Duplicator şimdi her şeyin yolunda olup olmadığını görmek için bazı testler yapacaktır. Eklenti bir sorun bulursa, talimatlar içeren bir uyarı göreceksiniz.
Tüm öğeler ‘İyi’ olarak işaretlenmişse, ‘Oluştur’ düğmesine tıklayın.

Eklenti şimdi web sitenizin dosyalarından bir çoğaltıcı paketi oluşturmaya başlayacaktır. Sitenizin büyüklüğüne bağlı olarak bu işlem birkaç dakika sürebilir.
Bitirdiğinizde, bir ‘İndir’ seçeneği göreceksiniz. Bu seçeneğe tıkladığınızda her iki dosyayı da indirme veya Yükleyici ve Arşivi (zip) ayrı ayrı indirme seçenekleri gösterilecektir.
Bilgisayarınıza indirmek için ‘Her İki Dosyayı da İndir’ seçeneğini seçin.

Arşiv dosyası, WordPress dosyalarınızın eksiksiz bir kopyasıdır. WordPress temalarınızı, kalıcı bağlantı ayarlarınızı, eklentilerinizi, yüklemelerinizi ve WordPress eklentileri tarafından oluşturulan diğer tüm dosyaları içerir.
Yükleyici betiği, arşiv dosyasını açarak WordPress geçişini otomatikleştirecek ve çalıştıracak bir PHP dosyasıdır.
Adım 2: Yeni Alan Adınız İçin Bir Veritabanı Oluşturun
WordPress sitenizi yeni alan adına taşımadan önce, WordPress’i yeni alan adınızda açmak için yeni bir SQL veritabanına ihtiyacınız olacaktır.
Zaten bir veritabanı oluşturduysanız, bu adımı atlayabilirsiniz.
Bir veritabanı oluşturmak için hosting hesabınızın cPanel kontrol panelini ziyaret etmeniz, ‘Veritabanları’ bölümüne gitmeniz ve ardından‘MySQL Veritabanları’ simgesine tıklamanız gerekir.
Bluehost’ta nasıl bulacağınızı göstereceğiz, ancak temel talimatlar aynıdır ve tüm barındırma sağlayıcıları için geçerli olmalıdır.
Bluehost hesap panonuza giriş yapın ve web sitenizin altındaki ‘Ayarlar’ düğmesine tıklayın.

Site ayarlarınızın altında, ‘Gelişmiş’ sekmesine geçmeniz gerekir.
cPanel bölümüne doğru biraz aşağı kaydırın ve ‘Yönet’e tıklayın.

Bu işlem cPanel kontrol panelini açacaktır.
Veritabanları bölümüne ilerleyin ve ‘MySQL Veritabanları’ seçeneğine tıklayın.

Not: Hosting kontrol paneliniz ekran görüntülerinden biraz farklı görünebilir. Ancak, yine de yeni bir veritabanı oluşturma seçeneği içeren bir Veritabanları bölümü bulabilmeniz gerekir.
Veritabanınız için bir ad girin ve ardından ‘Veritabanı Oluştur’ düğmesine tıklayın.

cPanel şimdi sizin için yeni bir veritabanı oluşturacaktır. Bundan sonra, MySQL Kullanıcıları bölümüne gitmeniz gerekiyor.
Ardından, yeni kullanıcınız için bir kullanıcı adı ve parola girin ve ‘Kullanıcı Oluştur’ düğmesine tıklayın. Kullanıcı adı ve şifreyi güvenli bir yere not ettiğinizden emin olun.

Yeni oluşturduğunuz kullanıcı hala veritabanı üzerinde çalışma iznine sahip değil. Bunu değiştirelim.
‘Veritabanına Kullanıcı Ekle’ bölümüne ilerleyin. İlk olarak, ‘Kullanıcı’ alanının yanındaki açılır menüden oluşturduğunuz veritabanı kullanıcısını seçin. Ardından yeni oluşturduğunuz veritabanını seçin ve ‘Ekle’ düğmesine tıklayın.

Ardından, kullanıcı için ayrıcalıklar seçmeniz istenecektir.
‘Tüm Ayrıcalıklar’ı seçin ve devam etmek için ‘Değişiklikleri Yap’ düğmesine tıklayın.

Veritabanınız artık hazırdır ve WordPress’i yeni alan adına taşımak için kullanılabilir.
Veritabanı adını, kullanıcı adını ve parolayı not ettiğinizden emin olun. Bu bilgilere bir sonraki adımda ihtiyacınız olacak.
3. Adım: WordPress’i Yeni Alan Adınızda Kullanıma Açın
Şimdi, daha önce indirdiğiniz Duplicator dosyalarını yeni alan adınıza yüklemeniz gerekir.
Duplicator paketi WordPress kurulumunuzu da içerir. Bu, yeni alan adınıza WordPress yüklemenize gerek olmadığı anlamına gelir.
İlk olarak, bir FTP istemcisi kullanarak alan adınıza bağlanın. Bağlandıktan sonra, web sitenizin kök dizininin tamamen boş olduğundan emin olun.
Bundan sonra, arşivi ve yükleyici dosyalarını kök dizine yükleyebilirsiniz. Bu genellikle public_html olarak adlandırılır.
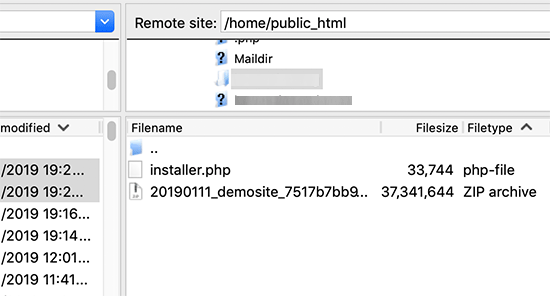
Her iki dosyanın da yüklenmesi tamamlandığında, artık WordPress’in paketini açmaya hazırsınız demektir.
Yeni bir tarayıcı sekmesi açın ve aşağıdaki URL’ye gidin:
http://example.com/installer.php
example.com adresini yeni alan adınızla değiştirmeyi unutmayın. Bu, Duplicator geçiş sihirbazını başlatacaktır.

Yükleyici arşiv dosyasını arayacak ve ardından ekranda sizin için seçenekleri otomatik olarak seçecektir.
Bir önceki adımda oluşturduğunuz veritabanının bilgilerini girmek için biraz aşağı kaydırın.

Bunun altında, Duplicator size otomatik olarak eski alan adınızın ve yeni alan adınızın URL’sini gösterecektir.
Her şey iyi görünüyorsa, devam etmek için ‘Doğrula’ düğmesine tıklayın.

Duplicator şimdi verdiğiniz bilgileri kullanarak veritabanına bağlanmaya çalışacaktır.
Başarılı olduğunda, size bir Doğrulama Geçidi gösterecektir. Aksi takdirde, nasıl düzelteceğinize dair ayrıntılar içeren bir uyarı gösterecektir.

Devam etmek için ‘İleri’ düğmesine tıklayın.
Duplicator şimdi WordPress web sitenizi içe aktarmaya başlayacaktır. Bittiğinde, Yönetici Girişi düğmesiyle birlikte bir başarı mesajı göreceksiniz.

Duplicator URL’leri otomatik olarak yeni alan adınıza güncelleyecektir. Şimdi sonraki adımları tamamlamak için ‘Yönetici Girişi’ düğmesine tıklayabilirsiniz.
Adım 4: Kalıcı 301 Yönlendirmelerini Ayarlayın
Bir sonraki adım, eski alan adınıza gelen kullanıcıları yeni alan adına yönlendirmektir. Bu, 301 yönlendirmeleri ayarlanarak yapılır.
301 yönlendirmeleri SEO ve kullanıcı deneyimi için çok önemlidir. Bunları eklemek, kullanıcıları ve arama motorlarını otomatik olarak yeni alan adınıza yönlendirmenizi sağlar.
Başka bir deyişle, birisi eski alan adınızdaki bir gönderiye veya sayfaya geldiğinde 404 hatası görmek yerine otomatik olarak yeni alan adınızdaki aynı gönderiye veya sayfaya yönlendirilir.
Yönlendirmelerinizi yerinde tutmak için eski WordPress yüklemenizi etkin tutmanız gerekir, böylece yeni oluşturduğunuz yüklemeye yönlendirmeye devam edebilir.
Yönlendirmeleri ayarlamanın iki yolu vardır. İlk yöntem kolaydır ve sadece birkaç tıklama alır. İkinci yöntem ise dosyaları manuel olarak düzenlemenizi gerektirir.
Yöntem 1: All in One SEO ile 301 Yönlendirmeleri Kurun
Bu yöntem için All in One SEO’ya (AIOSEO) ihtiyacınız olacak. Piyasadaki en iyi WordPress SEO eklentisidir ve WordPress web sitenizi SEO için kolayca optimize etmenizi sağlar.
Öncelikle eski alan adınıza All in One SEO eklentisini yüklemeniz ve etkinleştirmeniz gerekir. Daha fazla ayrıntı için, bir WordPress eklentisinin nasıl kurulacağına ilişkin adım adım kılavuzumuza bakın.
Not: Yönlendirme yöneticisi eklentisine erişmek için eklentinin en azından Pro sürümüne ihtiyacınız olacak. Arama motoru sıralamanızı ve trafiğinizi daha da artırmak için AIOSEO’yu yeni WordPress sitenize de kurabilirsiniz.
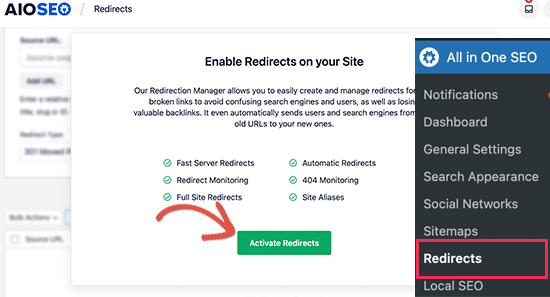
Eski alan adınızda etkinleştirme yaptıktan sonra, All in One SEO ” Yön lendirmeler sayfasını ziyaret etmeniz ve ‘Yönlendirmeleri Etkinleştir’ düğmesine tıklamanız gerekir.
Ardından, ‘Tam Site Yönlendirmesi’ sekmesine geçmeniz ve ‘Sitenin Yerini Değiştir’ geçişini açmanız gerekir.
Bundan sonra, ‘Etki alanına taşı’ seçeneğinin yanına yeni etki alanı adınızı girmeniz gerekir.
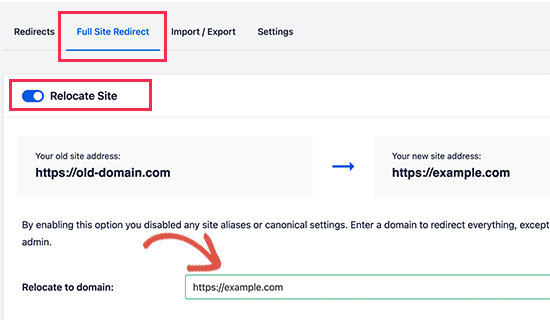
Ayarlarınızı kaydetmek için ‘Değişiklikleri Kaydet’ düğmesine tıklamayı unutmayın.
Yöntem 2: Yeni Etki Alanına Yönlendirmeleri Elle Ayarlama
Bu yöntem, eski alan adınızdaki WordPress .htaccess dosyasını düzenlemenizi gerektirir.
Öncelikle, FTP kullanarak eski sitenize bağlanmanız ve .htaccess dosyasını düzenlemeniz gerekir.
Bu, wp-includes veya wp-admin klasörünüzle aynı dizinde bulunacaktır. .htaccess dosyasını açın ve aşağıdaki kod satırlarını en üste yapıştırın:
1 2 3 | #Options +FollowSymLinksRewriteEngine onUnchanged: RewriteRule ^(.*)$ http://www.newsite.com/$1 [R=301,L] |
Yukarıdaki kodda newsite.com yerine yeni alan adınızı yazdığınızdan emin olun.
Bu değişiklikleri uyguladıktan sonra eski alan adınızı ziyaret edin. Sizi otomatik olarak yeni alan adına yönlendirmesi gerekir.
Olmazsa, yönlendirme düzgün ayarlanmamış demektir ve sunucunuz büyük olasılıkla yönlendirme kurallarını desteklemiyordur. RewriteEngine’i etkinleştirmek için web barındırma şirketinizdeki destek ekibiyle iletişime geçmeniz gerekir.
Adım 5: Google’ı Yeni Alan Adınız Hakkında Bilgilendirin
Artık WordPress’i yeni bir alan adına taşıdığınıza ve yönlendirmeleri ayarladığınıza göre, adres değişikliğinizi Google’a bildirmenin zamanı geldi. Bu, Google’ın yeni web sitesi alan adınızı hızlı bir şekilde bulmasına ve arama sonuçlarında göstermeye başlamasına yardımcı olacaktır.
Öncelikle, hem yeni hem de eski alan adlarınızın Google Search Console’a iki farklı özellik olarak eklendiğinden emin olmanız gerekir. Talimatlar için Google Search Console kılavuzumuzdaki 1. adıma bakın.
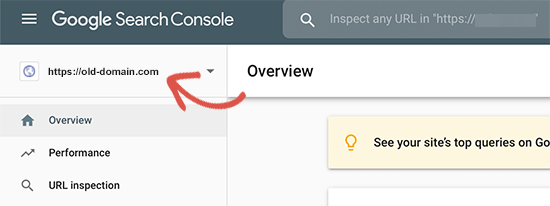
Ardından, Google Search Console hesap kontrol panelinizde eski alan adını etkin mülk olarak seçmeniz gerekir.
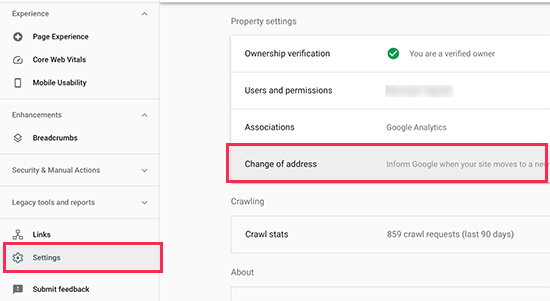
Bundan sonra, sol sütundan Ayarlar menüsüne tıklayın.
Şimdi, ‘Adres değişikliği’ aracına tıklayabilirsiniz.
Şimdi, Google’ı Güncelle bölümünden yeni alan adınızı seçmeniz gerekiyor.
Ardından, ‘Doğrula ve Güncelle’ düğmesine tıklamalısınız.
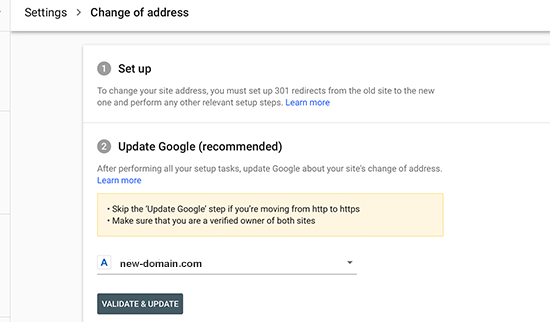
Hepsi bu kadar. Google şimdi eski alan adınızın yeni alan adına yönlendirildiğini doğrulayacak ve değişikliklerinizi kaydedecektir.
Bir sonraki ekranda, Google Search Console adres değişikliği talebinizi göndermeniz için size adım adım bir sihirbaz gösterecektir.
Kullanıcılarınızı Yeni Alan Adı Hakkında Bilgilendirme
301 yönlendirmeleri görevini yerine getirirken, geçiş hakkında kamuoyuna bir duyuru yapmak her zaman iyidir.
Bunu, yeni sitenizle ilgili bir blog yazısı yazarak ve bunu sosyal medya hesaplarınızda paylaşarak yapabilirsiniz.
E-posta bülteniniz veya anlık bildirim aboneleriniz varsa, onlara da bir duyuru göndermelisiniz.
Bu pek çok açıdan faydalı olabilir.
Her şeyden önce, kullanıcılarınızın yeni alan adını okuduktan sonra hatırlama olasılığı daha yüksektir.
İkinci olarak, kullanıcılarınızdan herhangi bir hata gördüklerinde size bildirmelerini isteyebilirsiniz. Sitenizi her tür tarayıcıda veya sistem ortamında tek başınıza test edemezsiniz, bu nedenle sitenize yeni bir çift gözün bakması her zaman yararlıdır.
Video Eğitimi
Bonus Kaynaklar
Aşağıdaki makaleler ve eğitimler, yeni bir alan adına geçtikten sonra SEO sıralamalarınızı takip etmenize ve yeniden kazanmanıza yardımcı olacaktır:
- Nihai WordPress SEO Geçişi Kontrol Listesi (Yeni Başlayanlar İçin)
- WordPress Blog Yazılarınızın Doğru Anahtar Kelimeler İçin Sıralanıp Sıralanmadığını Nasıl Kontrol Edebilirsiniz?
- WordPress Sitenize Gelen Web Sitesi Ziyaretçileri Nasıl Takip Edilir?
- Blog Yazılarınızı Bir Profesyonel Gibi SEO İçin Optimize Etmenin İpuçları (Kontrol Listesi)
Umarız bu eğitim WordPress sitenizi yeni bir alan adına taşımanıza yardımcı olmuştur. Ayrıca ücretsiz e-posta alan adı alma kılavuzumuzu görmek veya eksiksiz WordPress SEO kılavuzumuzdaki adımları takip etmek isteyebilirsiniz.
If you liked this article, then please subscribe to our YouTube Channel for WordPress video tutorials. You can also find us on Twitter and Facebook.


Greta Anderson
Wow This worked great! Thanks!
Elliott Bailey
This was exactly what I was after! Thanks ED
Vikram
The installer.PHP Setup is giving 503 Internal Error Or Mis configuration on clicking on next after giving database details in installer.PHP
Jon Wilson
Thanks, it worked perfectly, and my new site is up and running!
The UIs have changed a bit so the screen shots could be updated, but it’s easy enough to figure out. The deleting the database thing is a little scary and confusing. I created a new database and installed it there, which worked well. Otherwise it might have deleted my existing (now old) database and re-written it. I wanted to leave the whole old site intact until the new site was up and then do the 303 redirect. Google’s Search Console UI has also been updated, but that’s easy enough to figure out through a quick google search.
Aditya
It Means That We Should have a New Host For The New SIte to which we are moving ..can we do it with The same hosting on which the old site is
WPBeginner Support
You can change domain names on existing host by simply changing DNS and pointing the new domain to your existing WordPress install. However, you will still need to update URLs in WordPress, setup redirects, and inform search engines about the address change.
Admin
Aditya
My Duplicator Plugin Is Not Generating Installer.php and archive file , It shows some error .
what to do
Aditya
I Am On A Godaddy Economy Linux Hosting With Cpanel
Adick
Thanks for this post, it was very helpful!
Karan Bhagat
Ooops, I am sorry I forgot to ask something in my previous comment, do I need to add newsite.com to my webmaster and analytics separately or will it track the old one ?
Karan Bhagat
Now this is what I call as perfection, did it in less than 15 minutes, no issues, working properly yet and hope no problem arrives even in future as well.
A big thanks to WPBeginner team.
Katie Steckly
so did you have to set up analytics separately? I’m wondering about that as well
Brooke Browne
This is great, thank you! I’m happy to see the plugin you recommend is still alive and kicking, so many years after posting this.
One question I have is if I need to do anything different given my scenario. I have the live old domain, and I have a live dev site that is just simply not indexed. The dev site is the one I want to push to the new domain, so I figured I could skip updating the old domain altogether. It’s fine to just do this process with devwww.olddomain.com > newdomain.com, right?
I’m just the web designer and recently lost my developer, so this is all new to me, and scary. Thanks!
WPBeginner Support
Yes.
Admin
Jasmine
Hi, I want to transfer my blog post from 2 old different niche sites to 1 new authority site. The 2 old niche websites have always been in maintenance mode but register with GWMT.
With that being said, after I transfer my 20+ post total to the new site,
Do I have to still do 301 directs and notify Google of change of address even though it hasn’t been indexed?
Sugianto
Nice post. help me a lot. but now i got new problem after do redirect. i move my old site to new sub-domain name. Now i want to install new fresh wordpress to my old domain name but after instalation when i want to access wp login area, there still login to my new sub-domain site. how to fix that? please help
umukub
If i have oldsite as deindex search engine, then I make redirect to new site. Whats the new site will have impact deindex like old site ?
WPBeginner Support
If your old site was penalized by search engines, and your new site has the same content. Sooner or later your new site will be penalized and deindexed as well.
Admin
Badger
I’ve spent the past year as managing editor of a reasonably popular academic blog. I’m thinking of using duplicator to create a copy of the blog to be stored secretly on a subdomain of my own personal website. That way, I can show prospective employers a record of my editorial work. Do you anticipate this causing any problems for the actual blog as long as I tell search engines not to index the duplicate and don’t set up 301 redirects or notify google?
WPBeginner Support
You can do that but search engines may still crawl your website. To be extra cautious we would recommend you to password protect the entire subdomain with .htaccess. This way search engines will not be able to crawl it and you can send a link along with username and password to anyone.
Admin
Karan Bhagat
Hey,
I have a confusion. Suppose I own a site oldsite and I have migrated it to newsite by redirecting it and the oldsite domain name is about to expire, do I need to renew it every year along with the newsite.com ?
WPBeginner Support
You should keep old domain for at least six months.
Admin
Carmia
Thanks so much for this helpful tutorial! I have successfully moved my site to a new domain with your help.
Prince
Don’t use duplicator it’s not copying fonts. changing with times new roman
Andy
quick question do you know what happens to Facebook likes to individual posts if I change domains and make the 301 redirect for the old one.
Do they carry over as it is a 301 redirect or will the like count drop to zero?
WPBeginner Staff
Please see: How to update URLs when moving your WordPress site
Carol Faughnan
Hi i transferred a subdomain to the main domain and the home page is without the subdomain prefix but the rest of the pages still have the prefix in place. How do I remove it? And do I still need to redirect the URLs in webmaster?
WPBeginner Staff
6-12 months just to be on the safe side.
Mathieu
Thanks. Another question: you say that the search engine rankings will be temporary affected. How great is the loss in organic visits and how long does it last?
Mathieu
Thanks you for such a comprehensive and easy guide. One question: how long do you advise keeping the old domain/site after switching to the new domain?
Tauseef
I have a wordpress.org blog. Now I changed from .com to .org, I was getting anywhere from 4,000 to 400 traffic per day. After the change over I’m lucky to get 160 max and When I went from .com to .org the domain is the exact same one.
why would this be? My domain is still .com, I just changed from wordpress.com to wordpress.org
Alex Sol
Okay, I know this is an old article but I hope I can still get a reply
1. I am thinking of moving blog.old-domain,com to newdomain.com… So is duplicator going to change all links properly? For instance, if the old site had an article: blog.old-domain.com/this-is-article, will it be now created as newdomain.com/this-is-article ?
2. Once I redirect using 301, should I do anything with the content on the old site? Should I leave it or delete it? If I do leave it, I guess I have to keep renewing the old domain as well?
Thanks!
stew7645
Thanks, I found this guide extremely useful and well explained. Managed to move my site from one domain to another in about an hour
WPBeginner Staff
Yes, it is a good idea to submit your sitemap to Bing as well.
Christian Locke
great tutorial, major time saver. I notified Google of the changes through the webmaster tools and it was a breeze. Just want to ask, do you recommend also doing the same thing in Bing webmaster tools? I don’t really put much emphasis on Bing in general but if it would help somehow, I would do it. The process is more complicated and if it can be avoided that’s really what I want to hear but if it’s a good idea, I will take the time to do it. Thanks for offering us this tutorial and taking the time to reply to our questions!
Joe
This article was definitely not written for a beginner. I got stuck around here: “Make sure that the root directory, or the directory where you want to copy your website is completely empty. ” What is the root directory? Then I don’t know what credentials to use to log in anyway.
markyh2904
Sorry I’m late to the party but I’ve only just come across this post when looking how to move one of my WP sites
I have been penalised by G (penguin 3) on one of my music sites as I stupidly bought too many bad link packages from fiverr a few years ago and my domain is just considered spammy now.
Will this work if I want to swap my site content to a new domain BUT not 301 my old site to the new site? And if so,should I de-index my old site immediately after the transfer or before?
Thank you in advance
Hicham Alaoui
Hello,
I displaced my website “http://www.mywebsite.com” to “http://www.mywebsite.com/blog” and after a few months, I displaced posts as before and I deleted all content from /blog.
The problem is that Google still reference the same article as duplicate content, I do the redirection links manually, but there are more than 9000 links deemed not found, I will not finish!
I tried to solve this problem with the tool of Yoast “https://yoast.com/wp-content/permalink-helper.php,” but either it doesn’t work for me, or that I haven’t understand how.
Do you have a solution please?
Thank you.
Tom Durkin
I’ve not thought about looking for a plugin to handle this, will have to take a look!
John R. Meese
Glad to do it!
WPBeginner Staff
If your temporarily URL was public and you didn’t block search engines, then there is a chance that search engines may have crawled the URL. Sometimes a URL may not appear in search index but is still out there and can appear at any time. So you should setup a 301 redirect just to be safe.
On the other hand, if you are pretty sure that it was not crawled or indexed by search engines then you don’t need to set up 301 redirect.
As for step 2. please see our guide on how to use FTP to upload or edit WordPress files.
Chad
If I am just moving from a temporary URL to my permanent URL, should I still do a 301 redirect? Also, if I didnt submit the site to GWT’s yet, I assume I don’t have to change address in GWT’s, just submit to GWT’s after the domain transfer is done, correct? Lastly, in the middle of step 2 above, “Next you need to open your FTP and connect to your new site”….what dose this mean exactly? Open FTP and connect to what? Thanks anyone, pretty newbie here.
WPBeginner Staff
Did you take a look at our free blog setup service.
WPBeginner Staff
Beth, we have a tutorial on how to move a WordPress.com site to Self Hosted WordPress.org
As for your concern about Google Indexing a site that you don’t want to be indexed. You can add a robots.txt file to the root directory of that domain and instruct Google and all other bots not to crawl or index that site.
Beth Terry, CSP
Thank you! You guys are great! I’m a little ahead of the game and did some things out of order. I moved all content to a newly redesigned blog site at a subdomain Then I switched around the theme, etc on the WP.com blog.
I already own the name of my active blog and have been using that for 7 years at the dot com site. So I do have some readers and a ton of content and I have it linked to Twitter and LinkedIn.
I would think that pointing CactusWrangler to my new subdomain blog should bring my indexing and followers with it, but maybe not. All the content and media is on the new site. I did it all with Jetpack plug in… So am I just ready to tell GoDaddy my new DNS information? Unfortunately, Jetpack’s WP support is out till Sept 24!
Yikes ! My goal is to make my website and blog look similar so the linking back and forth is smooth and congruent. Once I get this done, I need to switch the themes on the main website which is an active site since 1998.
I dont’ know how you do this for a living! My eyes are bleary and my brain is mush! ;-D
Beth Terry, CSP
Does this also apply to moving from WP.com to WP.org? I created a subdomain on my website for my blog so I could create a new design. I have had a blog on WP.com and moved the content to the new design. Now I have two identical sites and I need to shut down the .com one before google marks my new one as fake. I’m trying to figure out the next steps. I haven’t technically gone “live” with the subdomain yet, so my URL for the blog still points to the .com site. The comment below about subdomains concerns me. Is there something I need to watch out for?
I know I’m about 3 steps away from solving this, just not sure how to proceed. Thanks for an informative article!!
David
I was dreading moving my wife’s large site to a new URL. Your instructions are the clearest I could find and the process was not so bad after all. Thanks so much. Best of all, it all works. Still have a few page titles, and SEO settings to manually change. Now I don’t have quite the depth of gratitude in the bank with my wife as I had hoped for, but that’s all for the best, I suppose.
Jenny
This was amazing. An absolute lifesaver. Great article!!
Keshav
Hi, I want to move my wordpress blog from blog.yoursite.com to news.yoursite.com Also, I want to change the URL structure from /postname to /post_id/postname
How shall we proceed with this for URL redirection?
Alberto
Hi!
I have a multisite install. I want to move just one website from that installation.
I already have the new website up and running and just need to make the 301 redirects.
The website I’m moving is oldsite.com/the-site and I’m moving it to newsite.com
How can I do this without redirecting all the websites in the multisite installation?
WPBeginner Staff
No, if your users can still access your site and posts at the same URLs as they did before then you need to set up 301 redirection. But if they can’t then this means search engines cant do that either. That way you will be losing a lot of traffic and your search rankings as well.
Susan Finch
Well, since the old domain will simply be a redirect to the new one, this can be problematic since results are all absolute in search engines. Guess I have some 301s to create. Thank you for the quick reply.
Susan Finch
We are simply changing our WP URL – not moving. Are 301 redirects still needed if we follow permalink and notify users steps?
Simon Somlai
The url currently looks like this http://www.oldsite.com/newsite.com how do I change this to a regulat newsite.com?
John Meese
You’ll need to add “http://” before newsite.com for it to work correctly.
Simon Somlai
Alright John! I got it working Thanks for your help man
Vishal Kumar
Simple yet effective… Thanks WPBegginner team.
I have one more query.. It has been 20 days i have moved my site to the new domain successfully by following the above steps. Now given that the old domain is still live and redirects users to new domain, should i consider deleting the old domain data to avoid duplication penalties. Kindly suggest…
Tim Ludy
Great resource thanks! Is there a way to only redirect the blog articles and not the entire site? We’re creating a whole new website for one area of a business so only some of the old websites pages are switching to the new site and the rest are staying on the old site.
Om Livin'
Quick question about Pinterest…would I need to go and change all my pinned links??
Hieu Nguyen
Excellent! Just what I’m searching.
But if I don’t want to move the WP site, is it possible to just change the URL only?
WPBeginner Staff
you can exclude subdomains from your .htaccess file by adding this line just before the RewriteRule line :
RewriteCond %{HTTP_HOST} !^subdomain.example.com$ [NC]
Shah Jahan
Hi, Thanks for the reply, i have added the code,
RewriteCond %{HTTP_HOST} !^subdomain.olddomain.com$ [NC]
RewriteRule ^(.*)$ http://www.newdomain.com/$1 [R=301,L]
now when i try to access subdomain.olddomain.com it redirects to newdomain.com/subdomain.olddomain.com
Shah Jahan Labar
I have some sub domains, when i tries to apply the redirect rule my subdomains also got redirected .
Kasa
What about redirecting subdomain to new different domain?
Is process the same, as you cant change address for subdomain in webasters tools.