
WordPress sitenizi yeni bir hosting şirketine veya farklı bir sunucuya taşımayı mı planlıyorsunuz? Bu büyük bir karar ve anlaşılır bir şekilde, muhtemelen potansiyel veri kaybı ve kesinti süreleri hakkında bazı endişeleriniz var.
Deneyimlerimize göre, web barındırma hizmeti değiştirirken veya bir web sitesini taşırken kesinlikle en büyük riskler bunlardır. Ancak, kullanıcı deneyiminden veya çalışma süresinden ödün vermeden yeni bir barındırıcıya veya sunucuya güvenle geçebilirsiniz.
Aslında, WPBeginner web sitesini 2020’de HostGator’dan SiteGround’a geçirdik. Dolayısıyla, okuyucularımızı olumsuz etkilemeden bu süreci kendimiz başarıyla yönettik.
Bu adım adım eğitimde, WordPress sitenizi herhangi bir kesinti olmadan güvenli bir şekilde yeni bir barındırıcıya nasıl taşıyacağınızı göstereceğiz. Ayrıca WordPress sitesini yeni bir barındırma sağlayıcısına taşıma hakkında sıkça sorulan soruları da yanıtlayacağız.

Önemli: Başlamadan önce, birçok WordPress barındırma şirketinin ücretsiz taşıma hizmeti sunduğunu bilmenizi isteriz. Web sitelerinde listelenmemiş olabilir, bu yüzden tek yapmanız gereken sormak. Genellikle ücretsizdir, ancak bazıları küçük bir ücret talep edebilir.
Bunu söyledikten sonra, WordPress’i yeni bir barındırma sunucusuna (herhangi bir kesinti olmadan) taşımak için ele alacağımız adımlara bakalım:
Hazır mısınız? Hadi başlayalım.
Adım 1: Yeni WordPress Hostunuzu Seçin
WordPress hızını ve performansını optimize ettikten sonra bile yavaş bir web barındırıcısına takılıp kaldıysanız, WordPress sitenizi artan trafiğinizi kaldırabilecek yeni bir barındırıcıya taşımanın zamanı gelmiş demektir.
Yeni bir WordPress barındırma sağlayıcısı ararken, yakın zamanda tekrar taşınmak zorunda kalmamak için dikkatli seçim yapmak önemlidir.
İşte önerdiğimiz kişiler:
- Güvenilir paylaşımlı barındırma için Bluehost‘u tercih etmenizi öneririz. WordPress.org tarafından resmi olarak tavsiye edilirler. Bluehost kuponumuzu kullanan WPBeginner kullanıcıları %75’e varan indirim ve ücretsiz alan adı kazanıyor.
- Daha hızlı paylaşımlı barındırma için Hostinger‘ı öneriyoruz. En iyi WordPress barındırma şirketleri arasındadır ve olağanüstü müşteri desteği ile daha hızlı sunucular sunarlar.
- Bulut barındırma veya konuma özel sağlayıcılar arıyorsanız, SiteGround‘a göz atmanızı öneririz. Üç farklı kıtada veri merkezleri vardır.
- Yönetilen WordPress barındırma hizmeti arıyorsanız, WP Engine‘e göz atmanızı öneririz. Sektördeki en iyi ve en tanınmış sağlayıcıdır.
Yeni hostinginizi satın aldıktan sonra WordPress’i KURMAYIN. Bunu daha sonraki bir adımda yapacağız.
Şimdilik, yeni web hosting hesabınız boş olmalı, ana dizininizde hiçbir dosya veya klasör bulunmamalıdır.
Adım 2: Kolay Geçiş için Duplicator’ı Kurun
Yapmanız gereken ilk şey, taşımak istediğiniz web sitesine Duplicator eklentisini yüklemek ve etkinleştirmektir. Daha fazla ayrıntı için, bir WordPress eklentisinin nasıl kurulacağına ilişkin adım adım kılavuzumuza bakın.
Duplicator piyasadaki en iyi WordPress geçiş eklentisidir. Ayrıca otomatik zamanlanmış yedeklemeler, bulut depolama desteği, tek tıkla geri yükleme ve akıllı geçişler ile birlikte gelir.
Not: Duplicator’ın Duplicator Lite adında ücretsiz bir sürümü de vardır. Web sitenizi taşımak için kullanılabilir ancak profesyonel sürüme kıyasla sınırlı özelliklere sahiptir.
Duplicator’ı kurup etkinleştirdikten sonra, WordPress yönetici alanınızdaki Duplicator ” Yedeklemeler sayfasına gidin.
Ardından, sol üst köşedeki ‘Yeni Ekle’ düğmesine tıklamanız gerekir.
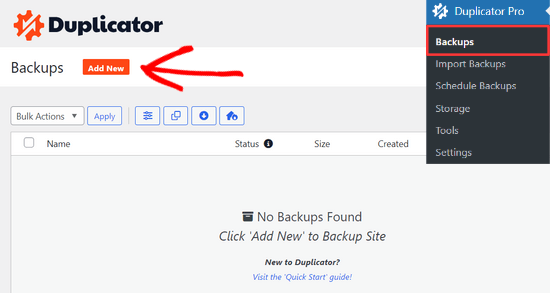
Bu, Duplicator’ın yedekleme sihirbazını başlatacaktır.
Bir sonraki ekranda, yedeklemeniz için bir ad girebilir veya tarih ve sitenizin başlığı gibi bir ad biçimini otomatik olarak oluşturmak için dinamik etiketleri kullanabilirsiniz.
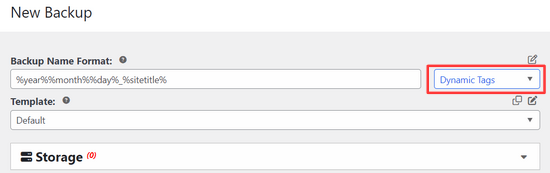
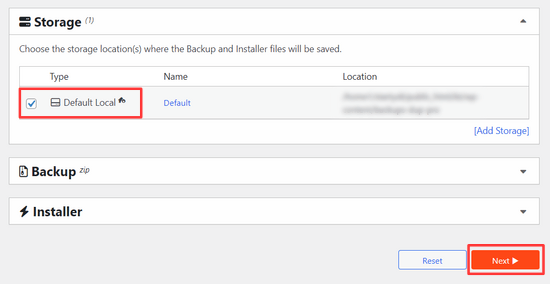
Ardından, bir depolama konumu seçmek için ‘Depolama’ bölümünü genişletebilirsiniz. Bu eğitim için varsayılan konumu kullanacağız, ancak ‘Depolama Alanı Ekle’ bağlantısına tıklayarak Dropbox veya Google Drive gibi yeni bir konum ekleyebilirsiniz.
Devam etmek için ‘İleri’ düğmesine tıklamanız yeterlidir.
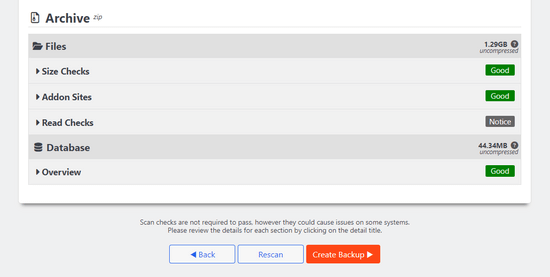
Ardından, Duplicator paketi hazırlamak için her şeyin yolunda olduğundan emin olmak üzere sisteminizi tarayacaktır.
Tarama sonuçlarınızın kontrol edildiğinden emin olun (her şey “İyi” demelidir) ve ardından ‘Yedek Oluştur’ düğmesine tıklayın.
İşlemin tamamlanması birkaç dakika sürebilir, bu nedenle eklenti işini yaparken sekmeyi açık bırakın.
İşlem tamamlandığında, Yükleyici ve Arşiv paketi için indirme seçenekleri göreceksiniz. ‘İndir’ düğmesine tıklamanız ve ardından ‘Her İki Dosya’ seçeneğini seçmeniz gerekir.
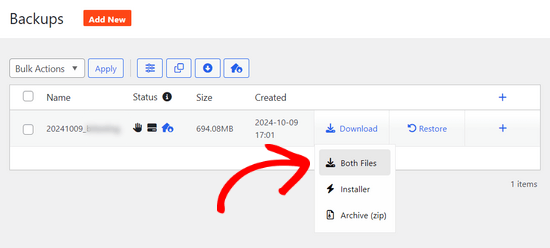
Arşiv dosyası web sitenizin tamamının bir kopyasıdır ve yükleyici dosyası sizin için yükleme işlemini otomatikleştirecektir.
Adım 3: WordPress Sitenizi Yeni Ana Bilgisayara Aktarın
Artık hem arşiv hem de yükleyici dosyalarını indirdiğinize göre, bir sonraki adım bunları yeni web barındırıcınıza yüklemektir.
Bunu, FTP kullanarak yeni web barındırıcınıza bağlanarak yapabilirsiniz.
Bunu daha önce hiç yapmadıysanız, WordPress’e FTP yoluyla dosya yüklemeye yeni başlayanlar için hazırladığımız rehbere göz atın.
Normalde, FTP istemcinize bağlanırken ana bilgisayar olarak web sitenizin alan adını girersiniz.
Ancak, alan adınız hala eski ana bilgisayarınızı gösterdiğinden, sunucunuzun IP adresini veya sunucu ana bilgisayar adını girerek bağlanmanız gerekir.
Bu bilgileri yeni hosting hesabınızın kontrol paneli panosunda bulabilirsiniz.

Bu bilgileri bulamazsanız, yeni web barındırma şirketinizden destek isteyebilirsiniz, size yardımcı olacaklardır.
FTP istemcisini kullanarak, hem installer.php dosyasını hem de arşiv .zip dosyanızı web sitenizin kök dizinine yüklemeniz gerekir.
Bu genellikle /username/public_html/ klasörüdür.
Yine emin değilseniz, web barındırma şirketinize sorun.
Kök dizininizin tamamen boş olduğundan emin olun. Bazı web barındırma şirketleri, kaydolduğunuzda WordPress’i otomatik olarak yükler.
Kök dizininizde WordPress yüklüyse, önce WordPress’i silmeniz gerekir.
Bu işlem tamamlandıktan sonra, hem arşiv zip dosyasını hem de installer.php dosyasını sitenizin kök dizinine yüklemeniz gerekir.
Adım 4: Kesintiyi Önlemek için Hosts Dosyasını Değiştirin
Her iki dosyayı da yeni hostunuza yükledikten sonra, bir tarayıcıda installer.php dosyasına erişmeniz gerekir.
Normalde bu dosyaya aşağıdaki gibi bir URL kullanılarak erişilebilir:
http://www.example.com/installer.php
Ancak, bu URL sizi eski web barındırıcınıza götürecek ve 404 hatası alacaksınız. Bunun nedeni, alan adınızın hala eski web barındırıcınızı göstermesidir.
Normalde diğer eğitimler size alan adı sunucularınızı değiştirmenizi ve yeni hosting şirketinize yönlendirmenizi söyleyebilir, ancak bu yanlıştır.
Bunu şimdi yaparsanız, ziyaretçileriniz taşırken bozuk bir web sitesi görecektir.
Eski sitenizi etkilemeden yeni sitenize bilgisayarınızdan geçici olarak nasıl erişebileceğinizi göstereceğiz.
Bu, bilgisayarınızdaki hosts dosyası ile yapılır.
Hosts dosyası, alan adlarını belirli IP adresleriyle eşlemek için kullanılabilir. Başka bir deyişle, bilgisayarınızı web sitesinin taşınmadığı halde taşındığını düşünmesi için kandırmanızı sağlar.
Yeni hosting şirketinizi işaret etmesi için hosts dosyasına alan adınız için nasıl bir giriş ekleyeceğinize bir göz atalım.
Bu değişiklikleri yapmak, yeni barındırıcınızdaki dosyalara kendi alan adınızı kullanarak erişmenizi sağlarken, dünyanın geri kalanı sitenize eski barındırıcıdan erişmeye devam edecektir. Bu %100 çalışma süresi sağlar.
Yapmanız gereken ilk şey, yeni web barındırma sunucunuzun IP adresini bulmaktır.
Bunu bulmak için cPanel kontrol panelinize giriş yapmanız ve sol kenar çubuğundaki istatistikleri genişlet bağlantısına tıklamanız gerekir. Sunucunuzun adresi ‘Paylaşılan IP Adresi’ olarak listelenecektir.
Örneğin, Hostinger’da sunucu IP adresinizi barındırma planı ayrıntılarınızın altında bulabilirsiniz.

Bir Windows PC kullanıyorsanız, Not Defteri uygulamasını yönetici ayrıcalıklarıyla açmanız gerekir.
Basitçe ‘Başlat; düğmesine tıklayın ve ardından Not Defteri uygulamasını arayın. Not Defteri uygulaması simgesine sağ tıklayın ve ardından ‘Yönetici olarak çalıştır’ı seçin.

Bir Windows UAC istemi görünecektir ve Not Defteri’ni yönetici ayrıcalıklarıyla başlatmak için ‘Evet’e tıklamanız gerekir.
Not Defteri ekranında Dosya ” Aç ‘a gidin ve ardından C:\Windows\System32\drivers\etc klasörüne gidin. Bu klasörden hosts dosyasını seçin ve açın.
Mac kullanıyorsanız, Terminal uygulamasını açmanız ve hosts dosyasını düzenlemek için bu komutu girmeniz gerekir:
sudo nano /private/etc/hosts
Hem Windows hem de Mac kullanıcıları için hosts dosyasının en altına kopyaladığınız IP adresini girmeniz ve ardından alan adınızı girmeniz gerekir. Bunun gibi:
192.168.1.22 www.example.com
IP adresini cPanel’den kopyaladığınız adresle ve example.com adresini kendi alan adınızla değiştirdiğinizden emin olun.
İşiniz bittiğinde değişikliklerinizi kaydedin.
Artık bilgisayarınızdaki alan adınızı kullanarak yeni ana bilgisayardaki dosyalarınıza erişebilirsiniz.
Önemli: Taşıma işlemini tamamladıktan sonra hosts dosyasında yaptığınız değişiklikleri geri almayı unutmayın (6. adım).
Adım 5: Yeni Ana Bilgisayarınızda MySQL Veritabanı Oluşturma
Yükleyiciyi yeni ana bilgisayarda çalıştırmadan önce, yeni barındırma hesabınızda bir MySQL veritabanı oluşturmanız gerekecektir. Eğer zaten bir MySQL veritabanı oluşturduysanız, bir sonraki adıma geçebilirsiniz.
cPanel’de Veritabanı Oluşturma
Yeni hosting hesabınızın cPanel panosuna gidin, Veritabanları bölümüne ilerleyin ve ‘MySQL Veritabanları’ simgesine tıklayın.

Yeni bir veritabanı oluşturmak için bir alan göreceksiniz.
Veritabanınız için bir ad girin ve ‘Veritabanı Oluştur’ düğmesine tıklayın.

MySQL veritabanını oluşturduktan sonra, MySQL Kullanıcıları bölümüne ilerlemeniz gerekir.
Ardından, yeni kullanıcınız için bir kullanıcı adı ve şifre girin ve ‘Kullanıcı Oluştur’ düğmesine tıklayın.

Bundan sonra, bu kullanıcıyı veritabanınıza eklemeniz gerekir. Bu, yeni oluşturduğunuz kullanıcı adına o veritabanı üzerinde çalışması için tüm izinleri verecektir.
Bunu ‘Veritabanına Kullanıcı Ekle’ bölümüne ilerleyerek yapabilirsiniz. Kullanıcının yanındaki açılır menüden oluşturduğunuz veritabanı kullanıcısını seçmeniz, ardından veritabanını seçmeniz ve ‘Ekle’ düğmesine tıklamanız yeterlidir.

Veritabanınız artık WordPress ile kullanılmaya hazırdır. Veritabanı adını, kullanıcı adını ve parolayı not ettiğinizden emin olun. Bir sonraki adımda bu bilgilere ihtiyacınız olacak.
Adım 6: Duplicator Geçiş Sürecini Başlatın
Şimdi, yükleyiciyi çalıştırmaya hazırız. Tarayıcı pencerenizde example.com yerine alan adınızı yazarak aşağıdaki adrese gidin:
http://www.example.com/installer.php

Yükleyici birkaç test çalıştıracak ve arşiv ve doğrulama testlerinin yanında ‘Geçti’ ibaresini gösterecektir.
Şartlar ve koşullar onay kutusunu işaretlemeniz ve ‘İleri’ düğmesine tıklayarak devam etmeniz gerekir.
Şimdi, MySQL ana bilgisayarınızı, veritabanı adınızı, kullanıcı adınızı ve şifrenizi girmeniz istenecektir.
Ana bilgisayarınız muhtemelen localhost olacaktır. Bundan sonra, bir önceki adımda oluşturduğunuz veritabanının ayrıntılarını gireceksiniz.

Ardından, Çoğaltıcının veritabanına bağlanabildiğini ve yüklemeyi çalıştırabildiğini kontrol etmesi gerekir.
Devam etmek için alttaki ‘Doğrula’ düğmesine tıklayın.

Duplicator bağlanabiliyorsa, test sonuçlarını Pass olarak görürsünüz.
Artık şartlar ve bildirimler onay kutusunu işaretleyebilir ve ‘İleri’ düğmesine tıklayabilirsiniz.

Devam etmek için ‘İleri’ düğmesine tıklayın.
Duplicator şimdi WordPress veritabanınızı arşiv zip’inden yeni veritabanınıza aktaracaktır.
Ardından, sizden site URL’sini veya Yolunu güncellemenizi isteyecektir. Alan adlarını değiştirmediğiniz için burada bir şey değiştirmenize gerek YOKTUR.
Devam etmek için ‘İleri’ düğmesine tıklamanız yeterlidir.
Duplicator son adımları çalıştıracak ve size giriş düğmesini gösterecektir.

Artık her şeyin beklendiği gibi çalıştığından emin olmak için yeni barındırıcıdaki WordPress sitenizde oturum açabilirsiniz.
Adım 7: Alan Adı Sunucularınızı (DNS) Güncelleyin
Bu noktada, yeni barındırma sunucunuzda WordPress veritabanınızın ve dosyalarınızın tam bir kopyasını oluşturdunuz, ancak alan adınız hala eski web barındırma hesabınızı işaret ediyor.
Alan adınızı güncellemek için DNS ad sunucularınızı değiştirmeniz gerekir. Bu, kullanıcılarınızın tarayıcılarına alan adınızı yazdıklarında web sitenizin yeni konumuna yönlendirilmelerini sağlar.
Alan adınızı barındırma sağlayıcınıza kaydettirdiyseniz, en iyisi alan adını yeni bir barındırma sağlayıcısına aktarmaktır.
Öte yandan, Domain.com, GoDaddy veya Network Solutions gibi bir alan adı kayıt kuruluşu kullanıyorsanız ad sunucularınızı güncellemeniz gerekir.
Yeni web barındırıcınızdan DNS ad sunucusu bilgilerine ihtiyacınız olacak. Bu genellikle şuna benzeyen birkaç URL’dir:
ns1.hostname.comns2.hostname.com
Bu kılavuzda, GoDaddy ile DNS ad sunucularını nasıl değiştireceğinizi göstereceğiz.
Diğer barındırma sağlayıcıları için alan adı sunucularını değiştirme kılavuzumuza göz atın.
Alan adı kayıt kuruluşunuza veya web barındırıcınıza bağlı olarak ekran görüntüleri farklı görünebilir. Ancak temel konsept aynıdır.
Alan adı yönetimi alanını aramanız ve ardından ad sunucularını aramanız gerekir. Ad sunucularınızı güncellemek için yardıma ihtiyacınız varsa, web barındırma şirketinize sorabilirsiniz.
GoDaddy için GoDaddy hesabınıza giriş yapmanız ve ardından ‘Alan Adları’na tıklamanız gerekir.
Bundan sonra, değiştirmek istediğiniz alan adının yanındaki ‘Yönet’ düğmesine tıklamanız gerekir.

‘Ek Ayarlar’ bölümüne gidin.
Ardından, devam etmek için ‘DNS’yi Yönet’ seçeneğine tıklamanız gerekecektir.

Ardından, ‘Ad Sunucuları’ bölümüne ilerlemeniz gerekir.
Burada, ‘Değiştir’ düğmesine tıklayın.

İlk olarak, ad sunucusu türü açılır menüsünü ‘Varsayılan’dan ‘Özel’e değiştirmeniz gerekecektir.
Bundan sonra, yeni barındırma sağlayıcınızın bilgilerini Nameservers altında doldurabilirsiniz.

Değişikliklerinizi kaydetmek için ‘Kaydet’ düğmesine tıklamayı unutmayın.
Alan adınızdaki ad sunucularını başarıyla değiştirdiniz. DNS değişikliklerinin tüm kullanıcılar için yayılması 4 – 48 saat sürebilir.
Eski hostunuzda ve yeni hostunuzda aynı içeriğe sahip olduğunuz için kullanıcılarınız herhangi bir fark görmeyecektir. WordPress geçişiniz kesinlikle hiçbir kesinti olmadan sorunsuz olacaktır.
Güvenli tarafta olmak için, eski hosting hesabınızı iptal etmek için taşıma işleminizden 7 gün sonrasına kadar beklemenizi öneririz.
Sıkça Sorulan Sorular
WordPress’i bir hosttan diğerine taşırken birçok kullanıcımızın sorduğu birkaç soruyu burada bulabilirsiniz.
1. WordPress web sitemi başka bir host’a nasıl taşıyabilirim?
WordPress dosyalarınızı ve veritabanınızı eski barındırma sağlayıcınızdan yeni barındırma sağlayıcısına taşıyarak WordPress web sitenizi taşıyabilirsiniz.
Bazı barındırma şirketleri ücretsiz web sitesi aktarım hizmetleri de sunar, ancak onlara sormanız gerekir. Alternatif olarak, bir FTP istemcisi kullanarak dosyaları aktararak ve phpMyAdmin aracılığıyla veritabanını içe aktararak bunu kendiniz de yapabilirsiniz.
2. WordPress sitemi başka bir barındırma sağlayıcısına taşıyabilir miyim?
Evet, WordPress sitenizi başka bir barındırma sağlayıcısına taşımakta özgürsünüz.
3. Bir alan adı kaydetmeden yeni hosting hesabına kaydolabilir miyim?
Evet, bir alan adı kaydettirmeden kesinlikle bir hosting hesabına kaydolabilirsiniz.
Alan adı ve hosting iki farklı hizmettir ve yeni bir host’a kaydolurken mutlaka bir alan adı kaydetmeniz gerekmez. Daha fazla ayrıntı için, alan adı ve web barındırma arasındaki fark hakkındaki kılavuzumuza bakın.
Bazı barındırma sağlayıcıları, barındırma satın alırken ilk adım olarak bir alan adı seçmenizi isteyecektir. Ayrıca, zaten bir alan adınız varsa, bir alan adı girmenize de izin verirler.
4. Alan adımı yeni ana bilgisayara aktarmam gerekiyor mu?
Hayır, alan adınızı yeni hostunuza aktarmanıza gerek yoktur. Ancak alan adınızı yeni hostinginize aktarmanız, yeni hosting hesabınızla aynı kontrol paneli altında yenilemenizi ve yönetmenizi kolaylaştıracaktır.
Bu konuda daha fazla bilgi için alan adları ve nasıl çalıştıkları hakkındaki nihai kılavuzumuza bakın.
5. Duplicator’da veritabanı bağlantısı kurma hatasını nasıl düzeltirim?
Duplicator’da veritabanına bağlanırken bir hata veya veritabanı bağlantısı hatası görüyorsanız, muhtemelen veritabanı bağlantınız için yanlış bilgi girmişsinizdir.
Veritabanı adınızın, MySQL kullanıcı adınızın ve parolanızın doğru olduğundan emin olun. Bazı web barındırma şirketleri MySQL sunucuları için ana bilgisayar olarak localhost kullanmaz. Bu durumda, web barındırma şirketinizin destek personelinden size doğru bilgileri sağlamasını istemeniz gerekecektir.
6. Web sitemin yeni hosttan yüklenip yüklenmediğini nasıl kontrol edebilirim?
Bir web sitesini kimin barındırdığını görmenizi sağlayan birkaç çevrimiçi araç vardır. Web sitenizi yeni barındırıcıya aktardıktan sonra, bu araçlardan herhangi birini kullanabilirsiniz ve size web sitenizi barındıran web barındırma şirketinin adını göstereceklerdir.
Web sitenizi taşıyalı ve alan adı sunucunuzda (DNS) değişiklik yapalı uzun zaman olmadıysa, sitenizin hala eski barındırıcınızdan yükleniyor olma ihtimali vardır. Alan adı değişikliklerinin tamamen yayılması 48 saate kadar sürebilir.
7. Eski ana bilgisayardan herhangi bir dosya veya veri silmem gerekiyor mu?
Hosting şirketlerini değiştirirken, eski web sitenizi en az bir hafta boyunca saklamanızı öneririz. Bundan sonra, eski web barındırıcınızdan dosyaları silebilirsiniz. Hesabınızı iptal ediyorsanız, web barındırma sağlayıcınız kendi politikalarına göre tüm verilerinizi silecektir.
8. Hesabımı eski ana bilgisayarda ne kadar süreyle aktif tutmalıyım?
Web sitenizi yeni barındırıcıya taşıdıktan sonra ve eski web barındırıcınızda barındırılan başka web siteniz yoksa, eski web barındırma hesabınızı iptal edebilirsiniz.
Ancak, bazı durumlarda, yıllık barındırma için zaten ödeme yapmış olabilirsiniz. İptal durumunda herhangi bir geri ödeme almaya uygun olup olmadığınızı görmek için geri ödeme politikalarını kontrol etmelisiniz.
9. SSL/HTTPS ile bir WordPress sitesini nasıl taşıyabilirim?
Yeni barındırma sağlayıcınıza bir SSL sertifikası yüklemeniz gerekecektir. Bundan sonra, yukarıda belirtilen aynı adımları takip edebilirsiniz. Sadece URL’lerde HTTPS kullandığınızdan emin olun, örneğin https://example.com
10. Bonus: Yeni Ev Sahibiniz Tarafından Ücretsiz Site Taşıma
Web barındırma hizmetinizi değiştirmek istiyorsanız, ancak yukarıdaki adımlar çok karmaşık geliyorsa, aşağıdaki sağlayıcıları seçebilirsiniz ve web sitenizi sizin için taşıyacaklardır.
SiteGround, Hostinger ve WP Engine, WPBeginner kullanıcıları için ücretsiz web sitesi geçişi sunar.
Umarız bu eğitim WordPress’i yeni hostunuza hiçbir kesinti olmadan taşımanıza yardımcı olmuştur. WordPress geçişinizle ilgili herhangi bir sorunla karşılaşırsanız, en ucuz WordPress barındırma uzman seçimlerimizi veya en yaygın WordPress hataları ve bunların nasıl düzeltileceği hakkındaki kılavuzumuzu da görmek isteyebilirsiniz.
If you liked this article, then please subscribe to our YouTube Channel for WordPress video tutorials. You can also find us on Twitter and Facebook.

")
 in 2024")

Shane
In the next step, Windows users need to go to Programs » All Programs » Accessories, right click on Notepad and select Run as Administrator. A Windows UAC prompt will appear, and you need to click on Yes to launch Notepad with administrator privileges.
On the Notepad screen, go to File » Open and then go to C:\Windows\System32\drivers\etc. Select hosts file and open it.
I’m having trouble with this step. Can anyone shed any light?
WPBeginner Support
Hi Shane,
You just need to open the Notepad app as an administrator so that you can edit the hosts file.
Admin
Shane
Oh, just microfosft simple wordpad and then “run as administrator”?
Is that all I have to do?
Muhammed Shabeer
Thanks for the wonderfull trick. Exactly the trick was intented to migrate WordPress to new host, but I used for migrating from root to subdomain/subfolder. It done successfully with the plugin. Thank for sharing the trick.
Kenneth Aycox
Thank you for a wonderful product! worked perfect.
James Crow
Briliiant! Thanks so much, I’ve just moved a few sites without any problem at all.
Max
Sadly, this didn’t work for me either. I deleted all the website files as directed , uploaded to the installer.php file and package but when I went to website.com/installer.php I was served a 404 error: Not Found
The requested URL /installer.php was not found on this server.
I think it’s easier to just transfer the website the old fashioned way, as others have mentioned. No need for any scripts that might not work.
Max
Please disregard my comment. I later noticed the root folder was set to httpdocs. So created a folder, named it httpdocs and put the package and installer.php in there. Then the website.com/installer.php worked no problem. All went very smoothly thereafter.
Nandan Jha
Hello Max,
Actually it did work for me in the end. I am guessing that you moved the installer and archive to your new host , correct ?
Please look up the IP address from cpanel or equiv of the new host and try accessing via the IP address
http://IPAddress/installer.phpKB
Seems like a good tutorial, but I had no luck with it. There are also a few steps/screens in the Duplicator sequence that were different from mine. The end result was, I got a 404 error upon clicking Site Login – Login to finalize the setup in Step 4 of 4 of the Test Site screen. This differs substantially from the above. Top right corner there’s a version number of 1.2.30. Fairly certain I have the most up to date version of the plugin. If I use File Manager to view the contents of public_html I don’t see the normal list of wp files that I think I should see aside from a wp-snapshots directory, a few web.config files, some installer files and the archive.zip…oh and database.sql. So something has clearly gone wrong, but I’m at a loss to understand what. So…there it is.
Stephen Duffield
Let me guess, you tried to move from a WordPress.com site? Duplicator & Duplicator Pro wont work for wp.com sites. Nothing works unless you use one of two host sites that they recommend. Duplicator after lots of help, ended up giving me a refund.
Rob
Hey, Just wanted to say thanks for this tutorial. Went perfectly smoothly and would use this duplicator again
Nandan Jha
Great article.
Friends, How do I make it work for an Addon Domain. I took a new plan with GoDaddy and now need to move my sites there. What entry do I make in my hosts file to navigate to install.php ? Thank you,
Nandan Jha
I tried it with my AddOn Domain. It worked for me over a couple of iterations. The thing to take care of is to supply the right ‘domain name’ at Step 3 (or Step 4). The default value which it picks is ‘primarydomain.com/addondomain’. Delete the default value and put addondomain.com
Thanks.
Sean
I recently switched hosts and my original hosting plan has expired. I failed to create a back up before it expired. I do have a local copy of my site on my computer (I use Dreamweaver for FTP). Is there any way to recreate the site with the local files?
Thanks.
Dave Porter
Hi Sean,
Try using WayBack Machine – it takes snapshots of websites over time…
You may be able to grab the source code, images etc… and recreate it from that. I’ve had to do that a few times for clients who have come to me after they have lost contact with their developer…
HTH, Dave
Miki
Hi there,
I have used the Wayback machine and was able to make a copy of my site. Unfortunately I have found myself involved with an unsavory company that had other plans for my business (selling their services on my site) without full disclosure in the beginning. I am now tasked with finding a new programmer to finish the site although it is in wordpress. I do not have wordpress at this time as I was not developing the site; however my understanding from these posts is that if I move the site to another host, I should be able to access wordpress. Is that correct?
WPBeginner Support
Hi Miki,
Yes you can move an existing WordPress website to any other host.
Michael
update…
it works….
be careful with IP address information…. you should read the information carefully…
Thanks
Michael
No luck..
After change the host file, my browser shows message:
This site can’t be reached
example.com took too long to respond.
Search Google for idea inspirations
ERR_CONNECTION_TIMED_OUT
I did flush dns, net stop, dan net start and restart my computer & modem, still not working…
Navajo
I have another question:
In the text it says:
“At this point, you’ve created a complete copy of your WordPress database and files on your new hosting server. But your domain still points to your old web hosting account.
To update your domain, you need to switch your DNS nameservers. This ensures that your users are taken to the new location of your website when they type your domain into their browsers.
If you registered your domain with your hosting provider, then it’s best to transfer the domain to the new host.”
I thought that when i buy a new hosting space, i also and immediatly have to name a doman name. As in: buying a hosting space is always linken to buying a domain. So the new ip addres which i have uploaded my old site to, and which i have to link to my old doman name, already HAS a (newly bought) domain name.
Or can i buy a hosting space, ánd get an IP address which i can use in this tutorial, without it already having a domain name?
Regards, Navajo
WPBeginner Support
Hi Navajo,
It is a common misconception. Hosting and domain name are two different services and you can buy them from two different companies. On the same page where hosting companies offer you to register domain name, they also show another option to indicate that you already have a domain name and you can continue without registering a new one.
For more details please see our detailed guide on What is a domain name and how do domains work?
Admin
Uldis
this is really profound stuff. I was just scratching my head how to migrate client’s site without interruption while changing name servers. Eternally grateful!
Shadat
Hello, I face the database connection failed problem.
can you plz help me? plz
see the screenshots
Dave Porter
Shadat – this is quite an old article now – and you don’t give very much to go on – I would seek help from your hosting company, or get onto a WordPress discussion forum where there are active people who may be able to help you.
But if you are getting a database connection error message, it is generally because the database name/user or password is incorrect
I would try one of the backup tools like Duplicator and see if that works better for you.
Slade
Did you set up a new database and user on your new host?
You must make sure the database name and user and password are all correct for the new host.
Usually a database connection error is a simple oversight like a mispelling or something simple like that.
Michael Goriany
Thanks for this excellent tutorial
If I have well understood, the hosts file (Step 4) is providing for 100% uptime only for the Webmanager but not for the public
How can the DNS switchover time be shortened, or how can the downtime for the public be avoided ?
Slade
Editing the host file allows you to see your site at your new host. Until you update your dns nameservers the public will go to the old host.
The time it takes for dns changes to updare (propagate) is not something that can be controlled. However this guide is correct in providing a no down time solution.
What is happening on the backend that the public does not see is that your website is being hosted at two hosts. The nameservers tell the public which host they are viewing the site on. During the dns update process the users will still view the site at the old host until the propogation is complete.
Once the dns change officially kicks in the public will then be viewing the site at your new host.
Again, to provide the no downtime transfer you would need to change your host file on your local machine (tells your computer you want to view the site at the new host).
This allows you to do the actual install of your website on the new host.
Hope that helps
Lydia
i had to move a client’s site off our subdomain into their own hosting overnight and this REALLY REALLY saved my life! Especially as the domain needed to be repointed seamlessly! I only had trouble with the FTP, i dunno what was wrong with all the logins but i couldn’t get it working. Thankfully my hoster always has an awesome file manager on cpanel.
So yes, very nearly seamless, i’m just testing out the contact forms now which seems to need the DNS switchover time in order to function properly…
And one thing to add, Duplicator has changed the SQL database setup to Step 2 in their latest version, which really made me freak out a bit there.
Thanks very much for the detailed and extremely godsent tutorial!
Kurt
I’m getting ready to follow this tutorial. One question: I am switching servers but also am switching domain names. Should I change my website address in the WP admin settings before running duplicator or after? (Does the order matter?) Thanks!
Johel Fernandez
This tutorial worked out perfectly by April, 2017. ¡Thank you so much!
Ravijit
Hey,
I used this plugin so many times. even, once i used it for too. I really like this plugin but, the problem is it do not extract the big package. We’ve to manually unzip it or need to upload unzipped data to the new hosting.
Any fix for that? Reply as soon as possible.
Archit
Duplicator doesn’t work properly with GoDaddy’s cPanel Linux Hosting service. Script gets terminated even if the settings in php.ini are changed. Please suggest what to do to make Duplicator work there? If not possible, what would be the best alternative?
Hernan
Hi Archit,
I’ve just migrated a site to godaddy and it worked just fine. Which part failed?
best
Hernán
Susan Taunton
This GREAT tutorial successfully guided me through my very first migration of a WordPress site to a different host! Especially life saving was the instruction about changing “sudo nano /private/etc/hosts” in Terminal – worked like a charm. wpbeginner.com has the most succinct, articulate and smart tutorials, which I have come to depend on.
Thank you!!!!
Susan
Prinze
hi, pls have been having issues uploading my site to s new server using FTP client, my hosting company tried to give tutorials on how to transfer with no result.
the tutorials am getting from your site is abt using a duplicate plugin. my site is down, i can’t access my wp-admin to install the plugin.
i use a backup plugin when my site is up so i have a backup file from the plugin i used n also i did a cpanel backup from my old server.
pls, i need a tutorial hoe to upload my backup files to my new server, which one is best to upload?
the plugin backup or the cpanel backup…
pls help!
Greg Draven
What backup plugin did you use?
Ritadrik Chowdhury
Hi Sir,
I am stuck up with 3rd part which is verification part. I have changed the permalinks and I can see the dashboard as usual but the site is not running. Whenever I am clicking on “TEST SITE” it returns error 404: File Not Found. I tried their help documents. Made changes as usual but no luck. Can you please help me out?
saurabh shelar
Hello Sir. I am saurabh from India. I love your website. I have a blog about software review. And I saw your posts and observe that you edited image in microscope effect. This is really fantastic. Can you please tell me how you do this or please make tuts for this please.
Thank you.
WPBeginner Support
Hi Saurabh,
Thanks for the kind words. There are actually tons of tutorials already. Try searching for how to add magnifying glass effect in Photoshop.
Admin
Brad
Hello,
I have a situation where it would be ideal to have the database on separate hosting. Just because the host of the current site does not offer mysql. I cannot move the site (for a company)
Can I install wordpress on current hosting in a sub domain and have the database on another host? I have never used anything except “localhost” in the wp-config file? Thank you!
Sachin
php not supported they are giving reason?? what to do??
Samuel
Does it work on addon domain?
Because there is this step
“Make sure that your root directory is completely empty. If you have WordPress installed in your root directory, then you need to delete WordPress first”
While my primary domain is already up and running
Cory
This is a well put together article, nice job guys!
Just as an FYI for users reading through the comments, any comment pre-dated 12-6-2016 does not pertain to the article above or the Duplicator plugin specifically.
This article was originally written using the Backup Buddy plugin and has since been updated and rewritten using the Duplicator plugin. This should help clear-up any confusion should some of the comments not really make sense or refer to topics not covered in the article.
Mark Rudder
This is an excellent tutorial.
I also believe this is the easiest and fastest way to to migrate a site.
Migrating DB files and tables with phpMyAdmin is the long way around.
Using Duplicator or BackupBuddy is way less work and you are less prone to mistakes that way.
You need to change DNS no matter what method you choose, so that aspect can’t be counted as far as which method is best.
Changing TTL settings to 1 hour (3600 seconds) as Dave Porter pointed out is the only missing piece of the puzzle. (even though that is not essential to success)
Augusto
Nice article, guys!
I feel that the most critical point migrating a site to another host is the email service. If the default email solution provided by host need to be replaced, a lot of work will came.
Anyone want to share your workflow to do this kind of thing?
Thanks!
Frans Kemper
hello,
Would this procedure also work for sub domains?
I have an add on domain to transfer with about 10 related sub domains.
Thank you
Dave Porter
A few days before I move a domain, I go into the DNS settings and change the TTL settings to 1 hour (3600 seconds), so that the site will move quickly (and do it overnight – so the new location will show for everyone in the morning)
(I was expecting this to be mentioned in the article when I saw the title!)
And to answer Dave’s question you can have as many entries in your Hosts file as you want – I have a reseller account with my hosting company and I’m often working on 2 or more sites I am working on that are located on a different server. You can’t specify a sub-directory in the entry – the one entry will point to all locations for that domain – to do what you want to do you are better using sub-domains – so for example example.com is the main location, then you can have play1.example.com as a sub domains that will have it’s own hosts entry.
Harindepreet singh
I think you should make a video or attach screenshots
David in Mississippi
Another article – directly related to this one, but sufficiently different to warrant its own separate article – would be “Replacing A Legacy Website with a Fully-Developed WordPress Website.”
This has happened to me several times already. I have clients with older, legacy-type (non-WordPress) websites, and they ask me to convert their site to WordPress.
I have two methods I use to do this, and one of them involves building the brand new WordPress site on a temporary development URL. When it is done, I then need to transfer it to the existing URL for the client.
In other words, I develop it at DevelopmentSite, and when it is done, I then move it to ExistingLegacySite
I should think it would be easier to do this than the procedure outlined in your article above, but it would still be helpful for you to do an article on this type of migration.
Thanks.
Dave
Correct me if I’m missing something, but this ‘hosts file change’ will only work if you have a just one site on your plan at that new IP address. I have several low-usage sites I’m hosting on one plan. They are in subdirectories under phulic_html.
So doing this:
192.168.1.22 http://www.example.com
in the hosts file will not specify which of your 5 sites to point to. And it seems the only thing you can specify in the hosts file is an IP address and a URL.
You can’t do something like this:
192.168.1.22/sitea http://www.example.com
Am I wrong?
Felipe
I think this is correct, it won’t work for shared domains.
It is better explained here: the voted answer says “If you have shared hosting, this will make your site inaccessible by direct IP. In a shared hosting environment, the host (GoDaddy) will have multiple websites living at the same IP address. When a browser requests a website, the server relies on the domain name to determine which of the many websites to serve. Without a domain name, the server has no way to tell what the browser actually wants so you don’t get your website. To avoid this situation, you will need a host to give you exclusive use of an IP address.”
I think this should be highlighted in the article.
WPBeginner Support
Once you have added your domain name to your new host, your webserver knows that it is hosting domain name example.com and it’s root directory (Doesn’t matter if it is also hosting other domains as well). However, DNS servers take time to propagate so instead of sending your request to your new webserver, they will be sending users to old location for a while. The hosts file allows you to send your request directly to the new server. Hope this clears the confusion.
Admin
Matt Davis
Correct me if I’m wrong, but I believe you can type in (directly in the browser’s address bar) the IP address followed by a slash (/) and then the sub-directory of whichever site you’re trying to access. I would avoid changing the hosts file altogether. Most hosting companies I’ve used will also usually assign temporary URLs to each new website as well, so if that’s the case you could use that instead of the IP or messing with the hosts file.
Niko
That’s correct MATT. Temporary using the IP address instead of altering the hosts file seems like a better approach. However, both work fine.
Vyse
hello. good article but what about wp multisite?
Tanisia
I’ve tried for four hours to make these instructions work. The result? Now I can’t access my site at my old host. I tried following the directions on this 2-year-old article (will there be an update, since BackupBuddy has evolved?) and now everything is messed up.
I used FTP to upload the files, and edited the host file as instructed, but the ImportBuddy PHP script won’t run. It just shows me the code. I tried contacting Bluehost for assistance, and they were no help. So I tried setting all my other settings back to where they were before I started this odyssey, and now I can’t see my site at all. Not the Admin panel, nothing.
WPBeginner Support
Tanisia, please refer to our guide on what to do when you are locked out of WordPress admin area.
Admin
Tanisia
I’m back in at my old host – my servers needed to re-propagage from Bluehost, and it took longer than I had anticipated. I’m still left with BackupBuddy not working the way it’s supposed to. Again, do you have updated instructions from 2014, since there have been several updates to BackupBuddy since this was written? When I did the Notepad update in Windows 10, it looked different from what was described here, so I couldn’t be sure if that trick worked.
Thank you for answering back.
Fahim
If it was a primary domain , can i follow this Process? I need to move and that domain is Main/primary domain, how can i move,will u plz help me?
Mark
Just stuck i step 4, can i just simply addon domain and change dns in new host, ? Following that, C:\Windows\System32\drivers\etc. , there is nothing in my etc, nothing like hosts file, btw great tutorial easy to fallow, thanks
Jacob
I was hoping there would be an easier way to do it with a third party service, but I’m not about to shell out 80 bucks just to do that.
Ash
The backupbuddy steps in the new version have changed quite a bit. Nothing to be afraid of though. I was able successfully migrate from t1.micro on aws to t2.small instance. So far so good.
David
A few questions for you:
1. Isn’t there a SIMPLE way to back up one site (themes, child themes, plugins, and post data), then restore it to another site?
It truly should be as simple as (a) Backup To (dropbox mysite.zip), then (b) Restore From (dropbox mysite.zip).
2. Is it possible, perhaps even EASY, to develop a client’s WP site on your development server, then use Backup Buddy (or some other backup/restore program) to migrate it to the client’s site?
3. Does Backup Buddy, or any other backup/restore program you know of, give you the ability to restore to an existing WP installation? In other words, can you set it to restore everything except the WP core files?
Thanks for this article.
David in Mississippi
WPBeginner Support
Actually, in the article we have shown how BackupBuddy does exactly what you are asking for. You simply backup your site, download an archive file and an importer file. Upload these files to the new location and run the script. Hope this helps.
Admin
Ash
@David, with backupbuddy you can choose which files to leave out while backing up. So you can leave out the core WP files.
Robert
hi guys,
A friend just make me a new wordpress website and uploaded it to my hosting account. Now, I want to change the domain and hosting account and want to upload the website to the new hosting account.
My friend sent me the archive with all files of the website including database. How is possible to upload the website to my new host?
I appreciate your answer.
thank you
Ricardo Clarke
I actually just went through this process yesterday and need to transfer another site today. This is hands down the most thorough walkthrough I’ve seen. The 4 to 48 timeframe really helped ’cause I thought something went wrong, but the transfer just needed time to propagate across the interwebs.
WPBeginner Staff
As soon as you figure out that your new domain has regained the search positions for your old site. We hope that you have setup 301 redireccts on old domain otherwise search engines wouldn’t know that your old content has moved to the new domain permanently.
WPBeginner Staff
What’s the shorter way of doing this?
Sebastien
Hi there, thanks for your tutorial, here’s an other way of doing it… free.
1. Tools > export posts and pages from admin panel. If you also need the DB phpMyAdmin export tables from the db. Import them in the new db. Check for the extension of the tables to be the same (_wp for instance)
2. edit your virtual host config file, add what follows between your server {}
allow your_public_ip;
deny all;
3. Access the site by its ip. (make sure you set the ip of your new server instead of the url in phpmyadmin > wp_options > siteurl and home options)
4. Tools > import posts and pages
5. Change your DNS records at the old host.
6. Done. Use another plugin like UpdraftPlus to backup for free.
Ash
Tried UpdraftPlus. Didn’t do anything at all.
Rachel Charles
Clean and modern and Easy to modify!
Kate_H
Great guide. I can confirm these steps work brilliantly as I recently moved a 5 year old WP site from one domain to another domain and swapped web hosts as well.
The only difference I did was redirect the old site to the new site via the .htaccess as I wasn’t migrating the old domain name over at the time.
Out of curiosity how long would you leave it before deleting all the old content from the old domain and setting up a permanent URL redirect via your registrar?
zimbrul
I really hate Backup Buddy. In 80% of cases I got errors and their support is not that good. I’d rather move a site with Duplicator free WordPress plugin
WPBeginner Staff
Zimbrul, Duplicator is a nice plugin too. However, we have moved many WordPress sites using BackupBuddy and it has always worked flawlessly for us. That’s why we recommend it.
Jim
Fully agree. Duplicator has never let me down and I have backed up and installed to many websites to count. No need for a paid plugin.
Dennis Does Cricket
That’s a ridiculously long winded way of doing it.
Jonathan
I was looking for this. This already assumes knowledge of FTP etc. so why not just:
1. Copy over all files (download locally, upload to new server).
2. Export the DB (you can use Migrate DB free version if you can’t access the old hosts phpmyadmin or such). Also, if you’re moving from a different domain it replaces the urls etc.
3. Create a new DB on your new host, import the DB.
4. Transfer the domain.
Same result, no fiddling with installer scripts and such.
Matt Davis
This is how I would do it.. In addition, you would also need to edit your wp-config.php file with the new DB info (Specifically the database host entry, as I believe importing the old database will create the same database name, user and password on the new one). Also, I would avoid editing your hosts file and instead either use the IP address directly in your browser’s address bar followed by your sub-directory name (if needed) or use the temporary URL most hosters provide when a new account is set up.
The steps in this article are good for someone that doesn’t want to touch configuration files in their WordPress folders, or who want an all-in-one solution that gets them their site and DB in one step.