Birçok WordPress kullanıcısı, bilgisayarlarında yerel bir sunucu kullanarak web siteleri üzerinde çalışmayı tercih eder. Bu, değişiklikleri çevrimiçi olarak kullanıma sunmadan önce web siteniz üzerinde özel olarak çalışmanıza olanak tanır.
Sonunda, çevrimiçi ziyaretçilerin erişimine açmak için web sitenizi canlı bir sunucuya taşımanız gerekecektir. Bu geçiş, web sitenizin canlı sitede düzgün çalışmasını sağlamak için çok önemlidir.
Birçok yerel web sitesi üzerinde çalıştık, bu nedenle içeriği canlı web sitelerine aktarmanın en kolay yolunu öğrenmemiz gerekiyordu.
Bu makalede, WordPress’in yerel bir sunucudan canlı bir siteye nasıl taşınacağına ilişkin adım adım talimatlar vereceğiz.
WordPress’i Neden Yerel Sunucudan Canlı Siteye Taşımalısınız?
WordPress blogunuzu yerel bir sunucuda oluşturmak, web sitenizdeki değişiklikleri ziyaretçileri etkilemeden test etmenin güvenli bir yoludur.
Web sitenizi mükemmelleştirmeyi tamamladığınızda, bir sonraki adım yerel sunucunuzdan canlı bir siteye geçmektir.
Sitenizi yerel bir sunucudan canlı bir siteye taşımanın iki yolunu gösterelim.
İlk yöntem bir WordPress geçiş eklentisi kullanır ve yeni başlayanlar için önerilir.
İkinci yöntemde, WordPress’i yerel bir sunucudan canlı bir siteye manuel olarak nasıl taşıyacağınızı göstereceğiz.
Sizin için en uygun olan yöntemi seçebilirsiniz:
WordPress Sitenizi Taşımadan Önce
WordPress’i yerel bir sunucudan canlı bir sunucuya taşımak için birkaç şeye sahip olmanız gerekir.
İlk olarak, bilgisayarınızdaki yerel bir sunucuda (localhost olarak da adlandırılır) çalışan bir WordPress siteniz olduğunu ve buna tam erişiminiz olduğunu varsayıyoruz.
Ardından, bir alan adına ve web barındırma hizmetine sahip olmanız gerekir.
Kötü veya ücretsiz web barındırma sağlayıcılarıyla başlayıp pişman olan yeni başlayanlardan sayısız hikaye duyduk. Deneyimlerimize göre, doğru barındırma sağlayıcısını seçmek herhangi bir web sitesinin başarısı için kritik öneme sahiptir.
Kararınızı kolaylaştırmak için Bluehost kullanmanızı öneririz. Resmi olarak önerilen bir WordPress barındırma şirketidir ve WPBeginner kullanıcılarına özel bir indirim + ücretsiz alan adı ve SSL veriyorlar.
Temel olarak, ayda 1,99 $ gibi düşük bir ücretle başlayabilirsiniz.
Harika bir Bluehost alternatifi istiyorsanız, Hostinger‘a bakabilirsiniz. Ayrıca WPBeginner kullanıcılarına ücretsiz bir alan adı ile özel bir indirim sunuyorlar.
Biraz daha fazla ödemeyi göze alabiliyorsanız, SiteGround‘a göz atın. Ayrıca WPBeginner okuyucuları için özel bir fırsatları var.
Web sitenizi kurmak için yardıma ihtiyacınız varsa, bir web sitesinin nasıl yapılacağına ilişkin adım adım kılavuzumuzu izleyin.
Son olarak, bir FTP programına ihtiyacınız olacak ve yerel sunucu sitenizi canlı siteye yüklemek için FTP’yi nasıl kullanacağınızı bileceksiniz.
Hazır mısınız? WordPress sitenizi taşımaya başlayalım.
Video Eğitimi
Yazılı talimatları tercih ediyorsanız, okumaya devam edin.
Yöntem 1: Bir Geçiş Eklentisi Kullanarak WordPress’i Yerel Sunucudan Canlı Siteye Aktarın (Önerilen)
Bu yöntem daha kolaydır ve yeni başlayanlar için önerilir. WordPress’i localhost’tan canlı bir siteye taşımak için bir WordPress migration eklentisi kullanacağız.
Adım 1: Duplicator Eklentisini Kurun ve Ayarlayın
Öncelikle, yerel sitenize Duplicator eklentisini yüklemeniz ve etkinleştirmeniz gerekir. Daha fazla ayrıntı için, bir WordPress eklentisinin nasıl kurulacağına ilişkin adım adım kılavuzumuza bakın.
Profesyonelİpucu: Duplicator ‘ın güvenli yedeklemeler, bulut depolama, kolay site geri yükleme ve daha fazlasını sunan profesyonel bir sürümü de vardır.
Etkinleştirmenin ardından, Duplicator ” Yedeklemeler sayfasına gitmeniz ve ‘Yeni Oluştur’ düğmesine tıklamanız gerekir.
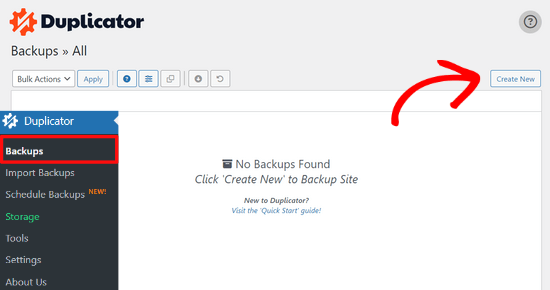
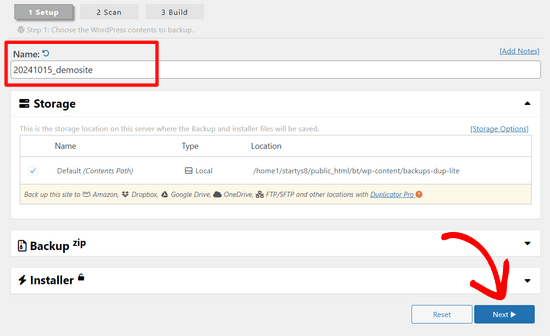
Bu sizi yedeklemenize bir ad verebileceğiniz bir ekrana getirir.
Ardından, ‘İleri’ düğmesine tıklayın.
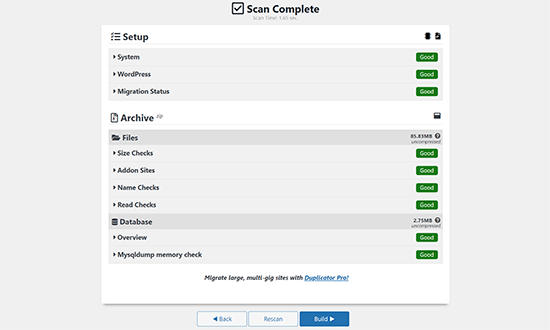
Duplicator şimdi her şeyin yolunda olup olmadığını görmek için bazı testler yapacaktır.
Tüm öğeler ‘İyi’ olarak işaretlenmişse, ‘Oluştur’ düğmesine tıklayın.
Bu işlem, web sitenizin boyutuna bağlı olarak birkaç dakika sürebilir. İşlem tamamlanana kadar bu sekmeyi açık bırakmalısınız.
Tamamlandığında, ‘Yükleyici’ ve ‘Arşiv’ paketleri için indirme seçenekleri göreceksiniz. Her iki dosyayı da bilgisayarınıza indirmek için ‘Her İki Dosyayı da İndir’ düğmesine tıklamanız gerekir.
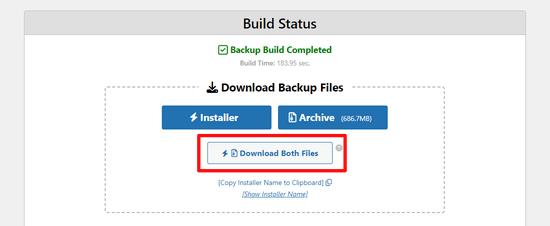
‘Arşiv’ dosyası WordPress sitenizin eksiksiz bir kopyasıdır. Tüm WordPress çekirdek dosyalarının yanı sıra resimlerinizi, yüklemelerinizi, temalarınızı, eklentilerinizi ve WordPress veritabanınızın bir yedeğini içerir.
‘Yükleyici’ dosyası, web sitenizi içeren arşiv dosyasını açarak tüm geçiş sürecini otomatikleştirecek bir komut dosyasıdır.
Adım 2: Canlı WordPress Web Siteniz İçin Bir Veritabanı Oluşturun
Yükleyiciyi çalıştırmadan veya WordPress web sitesini localhost’tan hosting sunucunuza yüklemeden önce, yeni canlı web siteniz için bir MySQL veritabanı oluşturmanız gerekir.
Zaten bir MySQL veritabanı oluşturduysanız, bu adımı atlayabilirsiniz.
Bir veritabanı oluşturmak için hosting hesabınızın cPanel kontrol panelini ziyaret etmeniz gerekir. Ardından, ‘Veritabanları’ bölümünü bulun ve ‘MySQL Veritabanı Sihirbazı’ simgesine tıklayın.
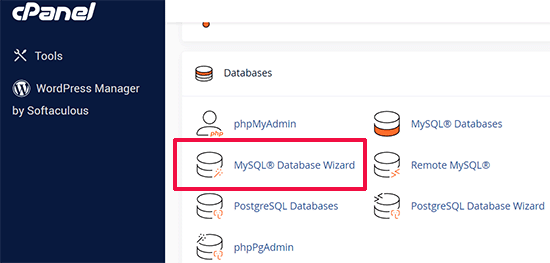
Bir sonraki ekranda, yeni bir veritabanı oluşturmak için bir alan vardır.
Veritabanınız için bir ad girin ve ‘Veritabanı Oluştur’ düğmesine tıklayın.

cPanel şimdi sizin için yeni bir veritabanı oluşturacaktır.
Bundan sonra, yeni kullanıcınız için bir kullanıcı adı ve şifre girmeniz ve ardından ‘Kullanıcı Oluştur’ düğmesine tıklamanız gerekir.
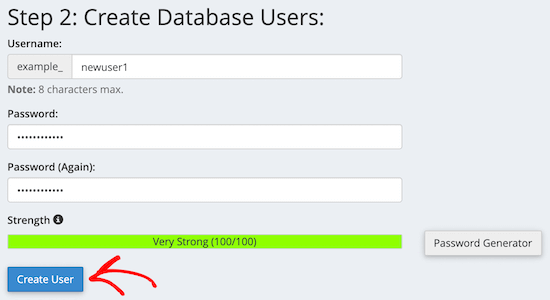
Ardından, yeni oluşturduğunuz kullanıcıyı veritabanına eklemeniz gerekir.
İlk olarak, ‘Tüm Ayrıcalıklar’ onay kutusunu tıklayın.
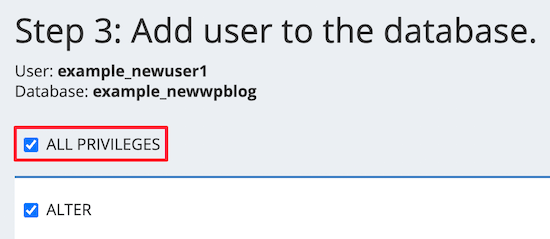
Ardından, aşağı kaydırın ve değişikliklerinizi kaydetmek için ‘Değişiklik Yap’ düğmesine tıklayın.
Veritabanınız artık WordPress sitenizle birlikte kullanılmaya hazırdır. Veritabanı adını, kullanıcı adını ve parolayı not ettiğinizden emin olun. Bu bilgilere bir sonraki adımda ihtiyacınız olacak.
Adım 3: Dosyaları Yerel Sunucudan Canlı WordPress Web Sitesine Yükleyin
Şimdi, arşiv ve yükleyici dosyalarını yerel sitenizden barındırma hesabınıza yüklemeniz gerekir.
İlk olarak, bir FTP istemcisi kullanarak canlı sitenize bağlanın. Bağlandıktan sonra, web sitenizin kök dizininin tamamen boş olduğundan emin olun.
Normalde kök dizin /home/public_html/ klasörüdür.
Bazı WordPress barındırma şirketleri, kaydolduğunuzda WordPress’i otomatik olarak yükler. Eğer orada WordPress dosyalarınız varsa, onları silmeniz gerekir.
Bundan sonra, archive.zip ve installer.php dosyalarını Duplicator’dan boş kök dizininize yükleyebilirsiniz.

Adım 4: Geçiş Komut Dosyasını Çalıştırma
Geçiş dosyalarını yükledikten sonra, tarayıcınızda aşağıdaki URL’yi ziyaret etmeniz gerekir:
http://example.com/installer.php
‘example.com’ yerine kendi alan adınızı yazmayı unutmayın.
Bu, Duplicator geçiş sihirbazını başlatacaktır.
Yükleyici birkaç test çalıştıracak ve komut dosyasını başlatacaktır.
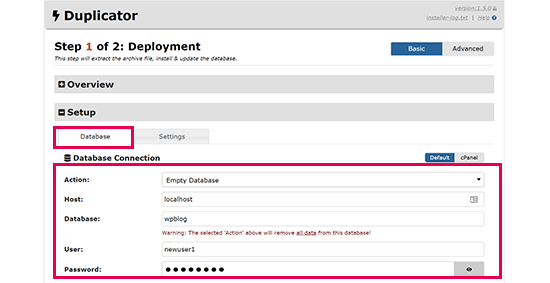
Kurulum bölümü altında, MySQL ana bilgisayarınızı, veritabanı adınızı, kullanıcı adınızı ve şifrenizi girmeniz istenecektir.
Ana bilgisayarınız muhtemelen yerel bir ana bilgisayar olacaktır. Bundan sonra, bir önceki adımda oluşturduğunuz veritabanının ayrıntılarını gireceksiniz.
Ardından, girdiğiniz bilgilerin doğru olduğundan emin olmak için ‘Doğrula’ düğmesine tıklayın.
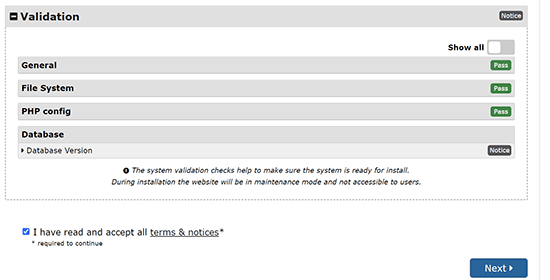
Bundan sonra, devam etmek için ‘İleri’ düğmesine tıklayın.
Duplicator şimdi WordPress veritabanı yedeğinizi arşivden yeni veritabanınıza aktaracaktır.
Ayrıca yerel siteye ve yeni canlı sitenize işaret eden URL’leri de güncelleyecektir.
Artık canlı sitenizin WordPress yönetici alanına girmek için ‘Yönetici Girişi’ düğmesine tıklayabilirsiniz.

Canlı sitenizde oturum açtığınızda, Duplicator kurulum dosyalarını otomatik olarak temizleyecektir.
Hepsi bu kadar. WordPress’i yerel sunucudan canlı sitenize başarıyla taşıdınız.
Yöntem 2: WordPress’i Yerel Sunucudan Canlı Siteye Manuel Olarak Aktarın
Bu yöntemde, WordPress’i yerel sunucudan canlı sitenize manuel olarak nasıl taşıyacağınızı göstereceğiz. İlk yöntem işe yaramazsa veya manuel olarak yapmayı tercih ederseniz faydalı olacaktır.
Adım 1: Yerel WordPress Veritabanını Dışa Aktarın
Yapmanız gereken ilk şey yerel WordPress veritabanınızı dışa aktarmaktır. Bunu yapmak için phpMyAdmin kullanacağız.
Eğer bu konuda bilginiz yoksa, phpMyAdmin kullanarak WordPress veritabanı yönetimi rehberimize göz atmak isteyebilirsiniz.
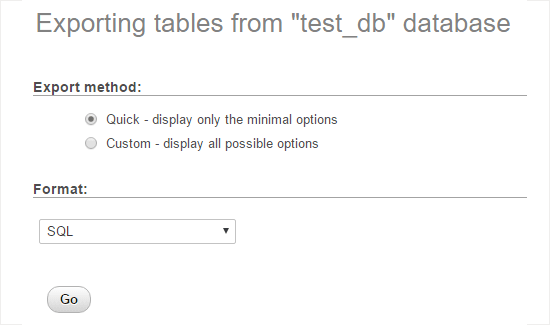
Basitçe http://localhost/phpmyadmin/ adresine gidin ve WordPress veritabanınıza tıklayın. Ardından, üst menü çubuğundan ‘Dışa Aktar’ düğmesine tıklayın.

‘Dışa aktarma yöntemi:’ seçeneğinde, ‘Hızlı’ veya ‘Özel’i seçebilirsiniz. Özel, veritabanınızı dışa aktarmak için size daha fazla seçenek sağlayacaktır.
Ancak veritabanınızı indirmek için ‘Hızlı’yı seçmenizi ve ardından ‘Git’ düğmesine tıklamanızı öneririz.
Adım 2: WordPress Dosyalarını Canlı Siteye Yükleyin
Şimdi, tüm web sitesi dosyalarınızı canlı siteye taşımamız gerekecek.
Başlamak için FTP istemcinizi açın ve web barındırma hesabınıza bağlanın.
Canlı sitenize bağlandıktan sonra, dosyaları doğru dizine yüklediğinizden emin olun. Örneğin, sitenin ‘yoursite.com’ adresinde barındırılmasını istiyorsanız, tüm dosyaları public_html dizininize yüklemek isteyeceksiniz.
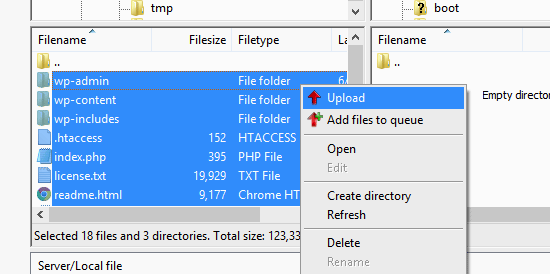
Şimdi yerel WordPress dosyalarınızı seçin ve canlı sunucunuza yükleyin.
Adım 3: Canlı Sitenizde MySQL Veritabanı Oluşturun
FTP istemciniz WordPress dosyalarınızı yüklerken, veritabanınızı canlı sunucuya aktarmaya başlayabilirsiniz.
Çoğu WordPress barındırma sağlayıcısı, barındırma hesabınızı yönetmek için cPanel sunar, bu nedenle size cPanel kullanarak nasıl veritabanı oluşturacağınızı göstereceğiz.
Öncelikle, cPanel panonuza giriş yapmanız ve ‘Veritabanları’ bölümünde bulunan ‘MySQL Veritabanı Sihirbazı’ simgesine tıklamanız gerekir.

Bir sonraki ekranda yeni bir veritabanı oluşturabilirsiniz.
Veritabanınız için bir ad girmeniz ve ardından ‘Veritabanı Oluştur’a tıklamanız gerekir.

cPanel şimdi sizin için otomatik olarak yeni bir veritabanı oluşturacaktır.
Ardından, yeni kullanıcınız için bir kullanıcı adı ve şifre girmeniz ve ardından ‘Kullanıcı Oluştur’a tıklamanız gerekir.
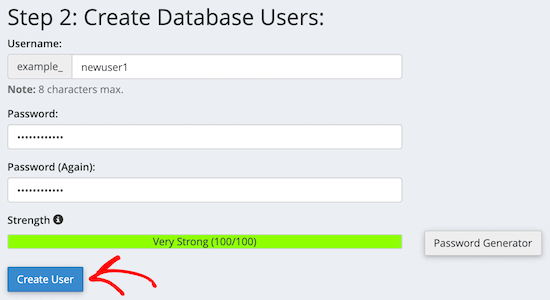
Bundan sonra, yeni oluşturduğunuz kullanıcıyı veritabanına eklemeniz gerekir.
İlk olarak, ‘Tüm Ayrıcalıklar’ onay kutusunu işaretleyin.
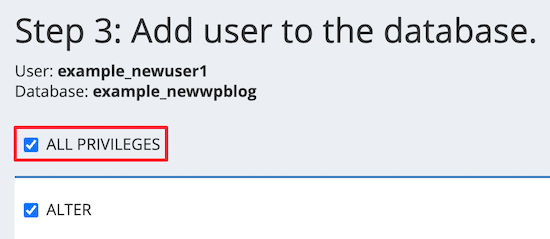
Ardından, aşağı kaydırın ve değişikliklerinizi kaydetmek için ‘Değişiklik Yap’a tıklayın.
Canlı WordPress siteniz için başarıyla yeni bir veritabanı oluşturdunuz.
Adım 4: WordPress Veritabanını Canlı Siteye Aktarın
Süreçteki bir sonraki adım WordPress veritabanınızı içe aktarmaktır.
cPanel panonuza gidin, ‘Veritabanları’ bölümüne ilerleyin ve ‘phpMyAdmin’e tıklayın.
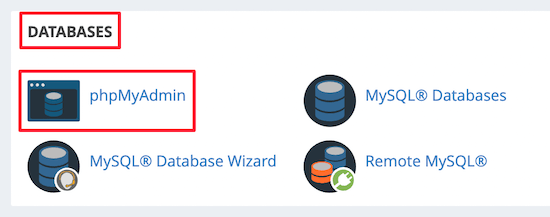
Bu sizi phpMyAdmin’e götürecektir, burada yukarıda oluşturduğunuz veritabanına tıklamak isteyeceksiniz. phpMyAdmin yeni veritabanınızı tablolar olmadan gösterecektir.
Ardından, üst menüdeki ‘İçe Aktar’ sekmesine tıklayın. İçe aktarma sayfasında, ‘Dosya Seç’ düğmesine tıklayın ve ardından ilk adımda kaydettiğiniz yerel sitedeki veritabanı dosyasını seçin.
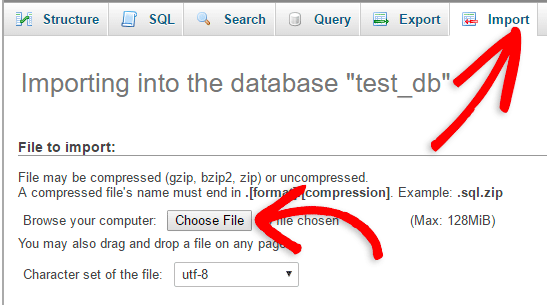
Bundan sonra, sayfanın altındaki ‘Git’ düğmesine tıklayın. Veritabanınız otomatik olarak phpMyadmin’e aktarılacaktır.
Adım 5: Site URL’sini Değiştirin
Şimdi, canlı WordPress sitenize bağlanması için veritabanınızdaki site URL’sini değiştirmeniz gerekir.
phpMyAdmin’de, yukarıda içe aktardığınız veritabanınızdaki wp_options tablosunu arayın.
Veritabanı önekinizi değiştirdiyseniz, wp_options yerine {new_prefix}_options olabilir.
Ardından, wp_options öğesinin yanındaki ‘Gözat’ düğmesine tıklayın. Ya da wp_options tablosundaki alanların bir listesini içeren sayfayı açmak için kenar çubuğundaki bağlantıya tıklayın.
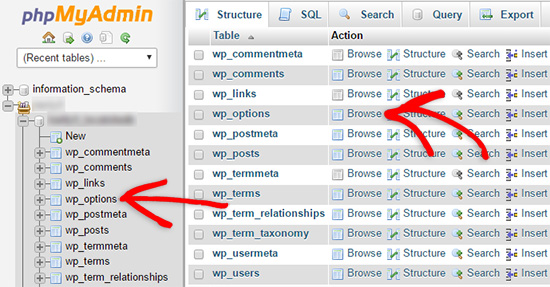
Ardından, options_name sütununda siteurl seçeneğini aramanız gerekir.
Ardından, ‘Düzenle’ simgesine tıklayın.

Bu, alanı düzenleyebileceğiniz bir pencere açar.
option_value giriş kutusunda, yerel yüklemenizin URL’sini göreceksiniz; bu URL http://localhost/test gibi bir şey olacaktır.
Bu alana yeni sitenizin URL’sini girmeniz gerekir, örneğin: https://www.wpbeginner.com.
Ardından, ‘Git’ düğmesine tıklayarak alanı kaydedebilirsiniz.
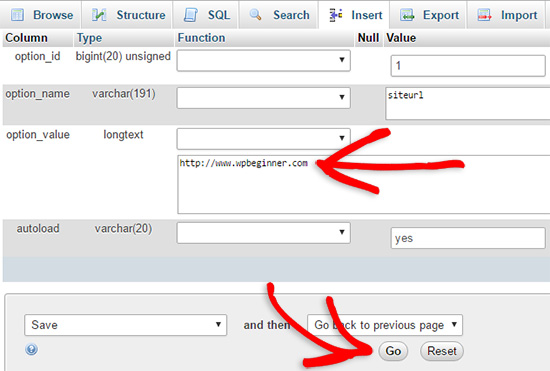
Ardından, ana sayfa seçeneği adı için yukarıdaki adımların aynısını izlemeniz gerekir. wp_options menüsü birkaç sayfa uzunluğunda olabilir. Genellikle, ana sayfa seçeneği ikinci sayfada olacaktır.
Ardından, ana sayfa URL’sini güncelleyin, böylece canlı site URL’nizle aynı olur.
Adım 6: Canlı Sitenizi Kurun
Veritabanını içe aktardığınıza ve içeriğinizi yüklediğinize göre sıra WordPress’i yapılandırmaya geldi.
Şu anda sitenizde‘Veritabanı bağlantısı kurulurken hata oluştu’ hatası görünüyor olmalıdır.
Bunu düzeltmek için, bir FTP istemcisi kullanarak web sitenize bağlanın ve wp-config.php dosyasını açın.
Aşağıdaki kod satırlarını arıyor olacaksınız:
// ** MySQL settings - You can get this info from your web host ** //
/** The name of the database for WordPress */
define( 'DB_NAME', 'database_name_here' );
/** MySQL database username */
define( 'DB_USER', 'username_here' );
/** MySQL database password */
define( 'DB_PASSWORD', 'password_here' );
/** MySQL hostname */
define( 'DB_HOST', 'localhost' );
Daha önce oluşturduğunuz veritabanı adını, kullanıcı adını ve parolayı sağlamanız gerekecektir.
Ardından, wp-config.php dosyasını kaydedin ve WordPress barındırma sunucunuza geri yükleyin.
Şimdi, web sitenizi ziyaret ettiğinizde canlı olması gerekir.
Bundan sonra, WordPress yönetici panelinize giriş yapmanız ve Ayarlar ” Genel bölümüne gitmeniz gerekir. Ardından, hiçbir şeyi değiştirmeden en alta kaydırın ve ‘Değişiklikleri Kaydet’ düğmesine tıklayın.
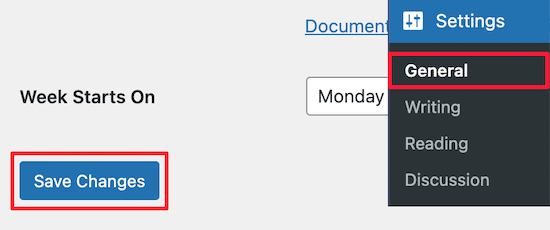
Bu, sitenizin URL’sinin olması gereken başka bir yerde düzeltilmesini sağlayacaktır.
Bunu yaptıktan sonra, Ayarlar ” Kalıcı Bağlantılar’a gidin, ardından aşağı kaydırın ve tüm gönderi bağlantılarının düzgün çalıştığından emin olmak için ‘Değişiklikleri Kaydet’e tıklayın.
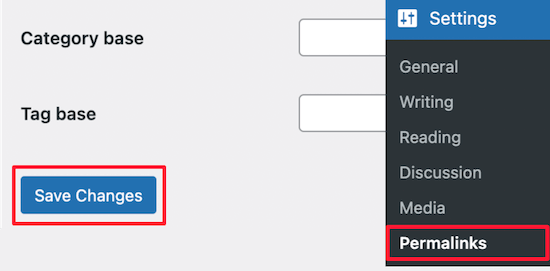
Adım 7: Yolları Güncelleyerek Görüntüleri ve Bozuk Bağlantıları Düzeltin
Bir WordPress sitesini bir etki alanından diğerine veya yerel bir sunucudan canlı bir siteye taşıdığınızda, kırık bağlantılar ve eksik görüntülerle karşılaşırsınız.
URL’leri güncellemek için size iki yol göstereceğiz. Sizin için en uygun olanı seçebilirsiniz.
1. Search & Replace Everything Eklentisini Kullanarak URL’leri Güncelleyin (Önerilen)
Bunu düzeltmenin en güvenli yolu Search & Replace Everything kullanmaktır. Karmaşık veritabanı sorguları yazmadan web sitenizde toplu güncelleme görevlerini kolayca gerçekleştirmenizi sağlayan güçlü bir WordPress eklentisidir.
İlk olarak, Search & Replace Everything eklentisini yüklemeniz ve etkinleştirmeniz gerekir.
Etkinleştirmeden sonra Araçlar ” WP Search & Replace sayfasına gidin.
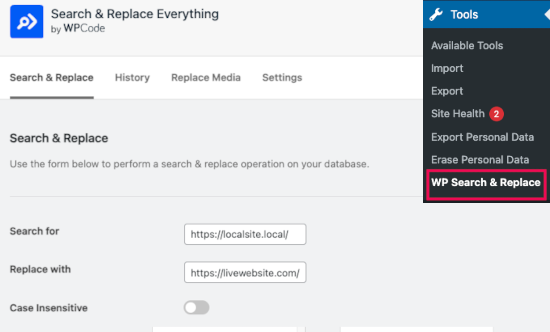
Buradan, yerel site URL’nizi ‘Ara’ alanına ve canlı site URL’nizi ‘Şununla değiştir’ alanına girmeniz gerekir.
Biraz kaydırın ve tabloların altındaki ‘Tümünü Seç’ seçeneğine tıklayın. Bu, eklentinin veritabanındaki her yerde eski URL’yi aramasını sağlar.
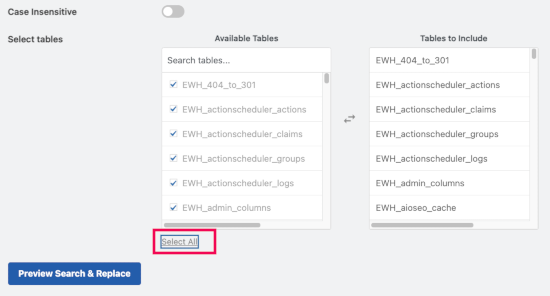
Şimdi devam etmek için ‘Arama ve Değiştirmeyi Önizle’ düğmesine tıklayın.
Eklenti, veritabanınızda eski URL’nin tüm örneklerini arayacak ve ardından sonuçları önizleyecektir.
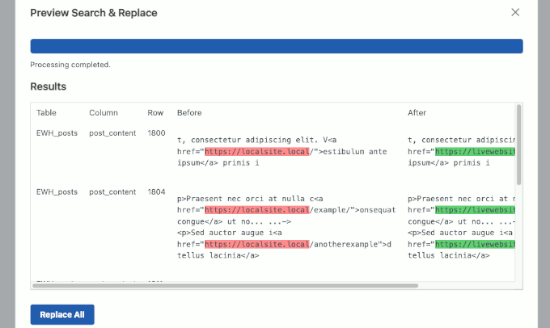
Her şey iyi görünüyorsa, değişiklikleri kaydetmek için ‘Tümünü Değiştir’e tıklayın.
Yaptığınız değişiklikler hakkında bir uyarı göreceksiniz. Devam etmek için ‘Evet’e tıklayın.
Eklenti şimdi veritabanını güncelleyecek ve yerel URL’leri mevcut web sitenizin URL’si ile değiştirecektir.
2. URL’leri Manuel Olarak Güncelleme (Gelişmiş)
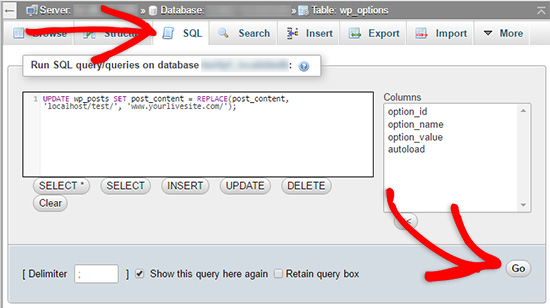
URL’leri güncellemenin bir başka yolu da aşağıdaki SQL sorgusunu kullanmaktır:
UPDATE wp_posts SET post_content = REPLACE(post_content, 'localhost/test/', 'www.yourlivesite.com/');
Basitçe phpMyAdmin‘e gidin, veritabanınıza tıklayın ve ardından üst menüden ‘SQL’e tıklayın ve yukarıdaki sorguyu ekleyin.
Yerel siteniz ve canlı site URL’leri olarak değiştirdiğinizden emin olun ve ‘Git’ düğmesine tıklayın.
İşte bu kadar. Artık WordPress’i yerel sunucunuzdan canlı bir siteye başarıyla geçirdiniz.
Umarım canlı web siteniz sorunsuz bir şekilde çalışır. Herhangi bir hata fark ederseniz, sorun giderme konusunda yardım almak için yaygın WordPress hataları kılavuzumuza göz atabilirsiniz.
Umarız bu makale WordPress’i yerel bir sunucudan canlı bir siteye taşımanıza yardımcı olmuştur. Ayrıca canlı bir siteyi yerel bir sunucuya taşıma kılavuzumuzu görmek veya pratik WordPress taşıma adımları için nihai web sitesi taşıma kontrol listesine bakmak isteyebilirsiniz.
If you liked this article, then please subscribe to our YouTube Channel for WordPress video tutorials. You can also find us on Twitter and Facebook.


WPBeginner Staff
You can try deactivating all the plugins at once by renaming the /wp-content/plugins directory. Here is a tutorial.
Usually plugins store settings in WordPress database so hopefully most of your settings will not get affected by the change.
Neville Campher
I have moved my site from one domain to another, but my all my plugins are not working. If I re-install the plugins I will loose my settings, is there a way to keep my setting without loosing them
orangedrum
I’m wondering the same thing. Just uploading my files didn’t work and when I try and re-export the database I’m getting an error telling me these databases already exist. Help!
santhosh
thanks a lot it was easy and helpful for any beginner like me
Ajay Walia
Thanks wpbeginner.com. i got an Error Establishing Database Connection error (local host to server). then i found your post on google. now i solved this error.
David A. Bennett
Awesome tutorial! Just wondering, if I continued to develop on my website locally, could I simply re-upload the new files (‘m guessing the wp-content folder) via FTP to my site, or would I need to re-export the database everytime?
Naveen Mallikarjuna
After trying another method, I tried your method outlined above and it worked perfectly. Thanks much!
WPBeginner Staff
are you sure you have your site URL as your mysql host? it is usually localhost or a subdomain on your site like mysql.example.com. If you are unsure ask your hosting provider.
Chandara Tieng
Thank you WPBeginner, now every thing are working fine with your guide.
Chandara Tieng
“Error establishing a database connection” I am getting this problem and now not yet fixed.
here is my configuration in wp-config.php
<>
please help me define problem and fixed this.
Thank ahead for kindness.
ben
I quite appreciate your article but i have few problems. i have succesfully uploaded my site but the site is not recognising the style sheet and my admin page is blank after i logged in. what is the way out please?
Anjali
Thank you for this guide. You mention that a plugin such as Backup Buddy or Duplicator can be used to make the migration easier. I’m VERY new to using WordPress, so the answer to this question may be painfully obvious. Would you install the plugin to the local site or the live site before the migration?
Wasim
After completing all the above steps , do in need to replace my index.html file
WPBeginner Staff
No, you don’t.
Roland
First off: thanks a lot for your great blog – it gave me the idea to try WAMP to develop my three current WP site projects!!
I did not install WP on localhost yet, because i am wondering if there could be a problem when I use a multisite installation during the move to the live server of my client.
I would like to develop the 3 sites for my client in one single database through the WP multisite feature. However i am unsure if everything will be fine when going live because I intend to use an alternative multisite installation method by mapping the three distinct domains onto one SQL database (via this plugin: http://wordpress.org/plugins/wordpress-mu-domain-mapping/). I.e. I want to develop example1.com + example2.com + example3.com on my localhost in a multisite setup and export the sites later onto the production server.
If someone could clear my doubts as to whether this could be a potential source for problems later on, please do so.
In that case i would develop 3 separate instances of wordpress, although i would like to avoid this at all costs.
Thank you! Roland
dpi
It works fine. Awesome guide. Thanks WPB
Jørgen Wolf
I loved this. Very good guide. Thank you very much, my site is now online!
Ramo
Thank you very much
WPBeginner Staff
The most probably cause is that your new database is empty, WordPress successfully connects to your new database. Then it finds out that the database is empty and assumes that its a new site. What you need to do is to import your old database. After that you will need to change your sitename and site url and update your links. See this guide.
John Kiathe
That was a nice guide. Thank you.
Crocker27
Hi,
Great tutorials thanks very much! I’ve created my own theme from scratch and am just in the final stages of putting it online, but I have hit a snag…
What could cause the 5 minute install page to come up when I direct my page to the new sql database?
I have exported the SQL database from my localhost. Created a new database on the server and imported it there and I changed the wp-config file to direct to the new database. When I did that I was directed to the 5 minute install page.
When I leave it on the old database, my theme works (although the content/posts/menus etc are all wrong) so I don’t understand what I’ve done. I am guessing it’s something wrong with the database but I have no idea what!
Thanks for your help!
Paul Seidel
I’ve uploaded my website multiple times to the FTP, changed the wp-config, the SQL databases, etc – but for some reason “wordpress” is still in the address ( , etc.) and I can’t log into the backend. Help !
Christopher
i have the same problem
WPBeginner Staff
Those changes will be lost if you uploaded an older version of the database from your local server.
Andrew Avantgardian
Worked like a charm, except i didn’t even need the last step (the MySQL query) for some reason all my links and pictures were fine after the transfer, perhaps it has something to do with the new version of WordPress.
Anyways thanks for this guide
Naveed
Thanks a lot for the tutorial. I was mislead by some plugins claiming automatic transfer.
Excellent work. Keep it up.
WPBeginner Staff
This article assumes that your live site is actually developed on localhost, so it does not assume that you have already taken down a live site to to work on it.
In case you are working on a live site by creating a local copy on your computer. Then this strategy is usually used to only work on site’s layout, adding new features, or testing some functionality. This way you can work on your website without modifying any data and when you move the site from localserver to livesite your database usually remains unchanged.
Hope this helps
npp07
Thanks, but do you have any articles to recommend on how (if possible) to make changes to a website with a community contribution aspect (comments, forums, etc) and be able to develop to include creating posts (not just used for a blog, but something like BuddyPress or Symposium) without overwriting comments added between development versions?
Guest
Yse Livefyre and Disquss comment system
npp07
I thought I replied, but I don’t see it here… by adding new features, do you mean like adding pages and posts using BuddyPress? If a conversation keeps going on the live site while I am developing, will those conversations be lost or merged when I upload to the live site?
npp07
Thanks for the great article, I have done this with a static site before, but in the article you say this is how WPBeginner.com does it daily (but with BackUpBuddy). I haven’t used BackUpBuddy yet, but plan to for a new project.
My question is how does this work for a site with the community commenting? Wouldn’t you lose the comments already on the database if you repeat this process daily and overwrite a database? Is there a slightly different step involved for building development updates onto an already live site?
Husnain
All works fine .. but my header image not work (Crash) .. and when i save permalink in setting it says Connection not established !!
Jenna
Hello!
When I try to import gripped database I get:
SQL query:
—
— Database: `wpdb`
—
— ——————————————————–
—
— Table structure for table `wp_commentmeta`
—
CREATE TABLE `wp_commentmeta` (
`meta_id` BIGINT( 20 ) UNSIGNED NOT NULL AUTO_INCREMENT ,
`comment_id` BIGINT( 20 ) UNSIGNED NOT NULL DEFAULT ‘0’,
`meta_key` VARCHAR( 255 ) DEFAULT NULL ,
`meta_value` LONGTEXT,
PRIMARY KEY ( `meta_id` ) ,
KEY `comment_id` ( `comment_id` ) ,
KEY `meta_key` ( `meta_key` )
) ENGINE = INNODB DEFAULT CHARSET = utf8 AUTO_INCREMENT =1;
MySQL said:
#1046 – No database selected
—
How can I fix this?
Thanks,
Jenna
landi
clean and simple
Changa Masomakali
This is a great article!! Thanks so much for it. But I am not able to pull my site up. I think it has something to do with with the DB Hostname in the wp-config file. What should this be?
Bloodico
This is absolutely a great article !! THANK YOU !!
It would be perfect if you mentioned to also check the wp_postmeta when replacing ‘localhost/test/’ by ‘www.yourlivesite.com/’ on step 7
and added a Step 8 for the.htaccess file which have to be modified too (if it isn’t done automatically ?)
the line “RewriteBase /test/” has to be suppressed and the line “RewriteRule . /test/index.php [L]” has to be changed to “RewriteRule . /index.php [L”
Once again a BIG thank you for this great article that made my day so easy !!
B-Designs
This was exactly the fix I needed for my clients site.
Thank you so much for your insight
David
Im having issues logging in to my admin panel. Site displays correctly but links dont work even after executing the sql script. When I try to log in, no error is returned, the form just clears. Any ideas?
Miguel Leite
Hey there.
Wonderful post!! Thanks a lot, helped me doing this for my very first time, correctly.
I’d like to ask: to do the reverse: moving wordpress from live site to local site, I just have to do de process starting with the live server and ending in the local?
Transient
thanx a lot
Hardeep Kaur
Thank you very much !!! really helpful.
nickesh
i complete all the steps but wp-admin page cannot be accessed and it shows following error
Warning: Cannot modify header information – headers already sent by (output started at /home/sulakasa/public_html/sulakasa/wp-content/themes/CherryFramework/includes/less-compile.php:155) in/home/sulakasa/public_html/sulakasa/wp-includes/pluggable.php on line 1121
Marisa Di Monda
This might be too late but if you or anyone has this problem again this helped me:
https://wordpress.org/support/topic/wp-admin-has-a-redirect-loop-after-migrating-to-new-server
WPBeginner Staff
WordPress.com is still managing your domain name. You can transfer your domain’s registration to your new webhost. Or you can simply update nameserver information for your domain on WordPress.com and point it to your new webhost. Please see the instructions in our guide on how to properly move your WordPress.com blog to WordPress.org
WPBeginner Staff
Yes you could just simply install WordPress and then upload your theme.
jellman
I’m confused, is this to also migrate posts? I have a wordpress site developed locally but with zero content yet. therefore can’t I just install wordpress on my dreamhost site, then move the theme files on my computer to the live server?
WPBeginner Staff
You can not edit theme or install plugins on WordPress.com. Please see our guide on the difference between WordPress.com vs WordPress.org
Mawuli
I have already exported my wordpress.com site to wordpress.org during the installation as your tutorial guided me.
But my problem is, I already have a domain with wordpress.com and when i was trying to move my site to live, i received those feedbacks….May i know if wordpress.com is still my host or i need to purchase another hosting account?
Mawuli
I have a domain with wordpress.com. After successfully installing wordpress with wampserver through your tutorial, I managed to design a new website, uploaded and used all the necessary plugins.
Now, the next thing I want to do is to move to a live site and that’s why I arrived here to be able to display my new site but am stucked in the first step.
I am using File Zilla as my FTP client. I was asked to enter my host name which I did with the name (wordpress.com). I entered my username, password and port number (21). But this is what I get when I try to connect
“Error: Connection timed out
Error: Could not connect to server”
What shall I do? Do I need to buy a hosting service or wordpress.com is still my host. I don’t seem to get this hosting thing at all. Explain this to me.
Thanks you
WPBeginner Staff
Installing WordPress using Sofaculous is not a requirement,
MHK
All the steps in this work as expected….WONDERFUL!!!!, however it should be include in this tutorial as Step One or Prerequisite………That we need to install wordpress from Softaculous and then delete the database created by it and import the database into it and after installing wordpress from softaculous should import the WP files from FTP.
I am facing a strange error. Chrome is opening my website as expected……IE keeps showing the Under construction page?? Any thoughts will be highly appreciated…….I have deleted the index.html file
Yazz Am
Hello, I get ‘Error establishing a database connection’ at step 6 when I try to login to my wordpress admin panel. Help please.
Ferdinand
I want to set up a site on local host which I want to manage locally. I would write the articles and upload them to webhost after I write them. Do I need to update the site and php database in the way that you mentioned above every single time I write a post? Or is there any way to upload only the files that got changed? This I want to know since it would be very time saving to manage the site offline for me.
Rizky M R
My site has working, but i can’t open any page and post of my website, and also the image still doesn’t show up after the sql query fix
Charlie Barnett
Hi, I have found your explanation extremely useful and have managed to trasnfer my locally hosted wp site live. However when I try step 6 to login I can’t seem to login and it throws the following error:
Internal Server Error
The server encountered an internal error or misconfiguration and was unable to complete your request.
Please contact the server administrator, and inform them of the time the error occurred, and anything you might have done that may have caused the error.
More information about this error may be available in the server error log.
Additionally, a 500 Internal Server Error error was encountered while trying to use an ErrorDocument to handle the request.
Does this make sense have I missed something in my upload?
Thanks Charlie
WPBeginner Support
Please take a look at how to fix the internal server error in WordPress. Due to generic nature of this error, it usually does not tell you where to look for the problem.
Admin
wanda serros
My site is up but it’s still not completely functional. When I click on some of my images to get an enlarged view I get a message saying ‘The requested content cannot be loaded. Please try again later.’
I’ve looked in my database and I see that there are still instances of ‘localhost’…. in some fields. I did run the Update to ‘post_contents’ query already. Should I run additional queries to change every mention of ‘localhost’ in the database to my website address?
Thank you. Your site has been very helpful.
Timothy
Ofcourse, replace every instance of localhost and localhost/
Lisa
I figured out how to upload the database, finally. made those text editor changes within the sql file first. Now I’ve done all of the other steps, including changing the wp_options “home” and “siteurl” … and also editing the wp_config.php file from within my live c panel file manager and making those updates. I still get an “error establishing database connection”. I did notice when I installed wordpress on my new hosted site, it created its own database (ss_1). Should i delete that one?
WPBeginner Support
The most common reason for the error is usually incorrect password, database, username or host information. It has nothing to do with other databases on your mysql server, so there is no need to delete them. Make sure you are entering correct information for your database in your wp-config.php file.
Admin
Karlo
I followed your instructions to make a local copy of my live website (the other way around).
The only problem I’m experiencing is that the stylesheet isn’t loading and that my images arent showing up, not even on WP backend.
Do I need to run another SQL query to fix this?