
Canlı sitenizde bir şeyleri bozma korkusu olmadan WordPress web sitenizle denemeler yapmak için güvenli bir alan mı istiyorsunuz?
Bize göre WordPress sitenizi bilgisayarınızdaki yerel bir sunucuya taşımak, özellikle geliştiriciler, tasarımcılar veya WordPress’e yeni başlayanlar için mükemmel bir çözümdür.
WordPress’i bilgisayarınıza (yerel sunucu) yüklemek, WordPress’i kolayca öğrenmenizi ve test etmenizi sağlar. Canlı bir WordPress sitesini yerel bir sunucuya taşıdığınızda, canlı sitenizle aynı verilerle denemeler yapmanızı sağlar.
Bu makalede, canlı bir WordPress sitesini yerel bir sunucuya nasıl kolayca taşıyacağınızı göstereceğiz.

Neden ve Kim Canlı Bir WordPress Sitesini Yerel Sunucuya Taşımak İster?
Bir süredir WordPress web sitesi çalıştırıyorsanız, yeni temalar veya bir eklenti denemek isteyebilirsiniz. Ancak bunu canlı bir web sitesinde yapmak, kullanıcılarınız için kötü bir kullanıcı deneyimine neden olabilir.
Bundan kaçınmak için, birçok kullanıcı yeni temaları, eklentileri test etmek veya geliştirme testleri yapmak için WordPress web sitelerinin bir kopyasını yerel bir sunucuda oluşturur.
Bu, temanızı tüm içeriğinizle kurmanıza ve sitenizi bozma endişesi olmadan tüm özellikleri test etmenize olanak tanır. Birçok kullanıcı WordPress ve kodlama becerilerini gerçek site verileriyle pratik yapmak için sitelerini yerel bir sunucuya kopyalar.
Tüm testleri WordPress’te sahte içerikle yapabilseniz de gerçek site verileri, bu değişikliklerin canlı sitenizde nasıl görüneceğine dair daha iyi bir görsel temsil sağlar.
Yerel Siteyi Yerel Sunucuya Taşımaya Hazırlanma
Öncelikle, WordPress web sitenizi her zaman yedeklediğinizden emin olmanız gerekir. Kullanabileceğiniz birkaç harika WordPress yedekleme eklentisi vardır.
İkinci olarak, bilgisayarınıza yerel bir sunucu ortamı kurmanız gerekir. Windows için WAMP ve Mac için MAMP kullanabilirsiniz. Ortamı kurduktan sonra, phpMyAdmin kullanarak yeni bir veritabanı oluşturmanız gerekir.
phpMyAdmin’i başlatmak için tarayıcınızda aşağıdaki URL’yi ziyaret etmeniz yeterlidir.
http://localhost/phpmyadmin/
http://localhost:8080/phpmyadmin/
Buradan ‘Veritabanları’ sekmesine tıklamanız ve yeni bir veritabanı oluşturmanız gerekir. Bu veritabanına daha sonra canlı site verilerinizi açmak için ihtiyacınız olacak.

Artık canlı WordPress sitenizi yerel sunucuya taşımaya hazırsınız.
Yöntem 1. Canlı WordPress Sitesini Eklenti Kullanarak Yerel Sunucuya Taşıma
Bu yöntem daha kolaydır ve tüm kullanıcılar için önerilir.
Yapmanız gereken ilk şey Duplicator eklentisini yüklemek ve etkinleştirmektir. Daha fazla ayrıntı için, bir WordPress eklentisinin nasıl kurulacağına ilişkin adım adım kılavuzumuza bakın.
Duplicator, tüm web sitenizin bir kopyasını kolayca oluşturmanızı sağlar. WordPress sitenizi yeni bir konuma taşımak için kullanılabilir ve ayrıca bir yedekleme eklentisi olarak da kullanılabilir.
Not: Duplicator ‘ın kullanmaya başlayabileceğiniz ücretsiz bir sürümü vardır. Ancak, Duplicator Pro sınırsız yedekleme ve daha gelişmiş özelliklerle birlikte gelir.
Etkinleştirmenin ardından, WordPress yönetici kenar çubuğunuzdan Duplicator Pro ” Yedeklemeler ‘e gidin. Yeni bir paket oluşturmak için ‘Yeni Ekle’ düğmesine tıklamanız gerekir.

Duplicator daha sonra yedekleme sihirbazını başlatacaktır.
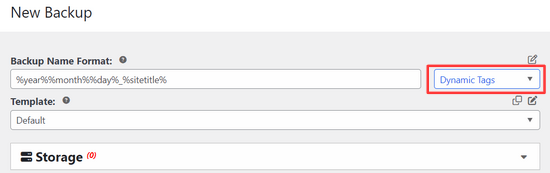
İlk olarak, yedekleme paketiniz için bir ad girmeniz gerekir. Tarih ve sitenizin başlığı gibi bir isim formatını otomatik olarak oluşturmak için dinamik etiketleri de kullanabilirsiniz.
Ardından, ‘Depolama’ bölümünü genişletin ve bir depolama konumu seçin.
Bu eğitim için varsayılan konumu kullanacağız. İsterseniz Dropbox veya Google Drive gibi yeni bir konum eklemek için ‘Depolama Alanı Ekle’ bağlantısına tıklayabilirsiniz.
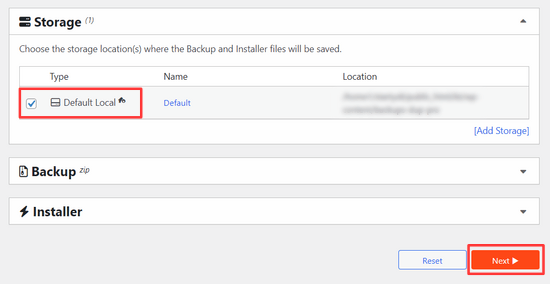
Devam etmek için ‘İleri’ düğmesine tıklayın.
Eklenti daha sonra web sitenizi tarayacak ve bazı arka plan kontrolleri yapacaktır. Daha sonra size bu kontrollerin bir özetini gösterecektir.
Her şey iyi görünüyorsa, devam etmek için‘Yedekleme Oluştur‘ düğmesine tıklayın.

Duplicator şimdi web sitesi paketinizi oluşturacaktır.
Tamamlandığında, tüm web sitesi verilerinizi içeren bir arşiv zip dosyası ve bir yükleyici dosyası göreceksiniz. Her iki dosyayı da bilgisayarınıza indirmeniz gerekir.

Artık bu dosyaları açmaya ve yerel sunucunuza yüklemeye hazırsınız.
Öncelikle, yerel sunucunuzun kök klasöründe yeni bir klasör oluşturmanız gerekir. Bu, yerel sunucunuzun tüm web sitelerini depoladığı klasördür.
Örneğin, MAMP kullanıyorsanız, /Applications/MAMP/htdocs/ klasörü olacaktır. Alternatif olarak eğer WAMP kullanıyorsanız, o zaman C:\wamp\www\ klasörü olacaktır.
Bu klasörün içinde, içe aktarmak veya yerel sunucunuzda oluşturmak istediğiniz her yeni web sitesi için yeni klasörler oluşturabilirsiniz.

Bundan sonra, yerel web siteniz için oluşturduğunuz klasörü açmanız ve ardından hem arşiv zip dosyasını hem de daha önce indirdiğiniz yükleyici komut dosyasını kopyalayıp yapıştırmanız gerekir.

Kurulumu çalıştırmak için web tarayıcınızda installer.php betiğini açmanız gerekir.
Örneğin, her iki dosyayı da /mylocalsite/ klasörüne yapıştırdıysanız, bu dosyalara tarayıcınızda http://localhost/mylocalsite/installer.php adresini ziyaret ederek erişirsiniz.
Şimdi Duplicator kurulum komut dosyasını aşağıdaki gibi göreceksiniz:

Devam etmek için ‘İleri’ düğmesine tıklayın.
Duplicator şimdi arşiv zip dosyasını açacak ve sizden yerel sitenizin veritabanı bilgilerini girmenizi isteyecektir. Bu, daha önce oluşturduğunuz veritabanıdır.

Sunucu adı neredeyse her zaman localhost ve kullanıcı adı root’tur. Çoğu durumda, yerel sunucu kurulumunuzda root için bir parola ayarlanmamıştır, bu nedenle bunu boş bırakabilirsiniz.
Sayfanın alt kısmında, veritabanı bilgilerinizin doğru olduğundan emin olmak için kullanabileceğiniz bir ‘Veritabanını Test Et’ düğmesi göreceksiniz.

Her şey iyi görünüyorsa, devam etmek için ‘İleri’ düğmesine tıklayın.
Duplicator şimdi WordPress veritabanınızı içe aktaracaktır. Bundan sonra, otomatik olarak algıladığı yeni web sitesi bilgilerini iki kez kontrol etmenizi isteyecektir.

Devam etmek için ‘İleri’ düğmesine tıklayın.
Duplicator şimdi kurulumu tamamlayacak ve size yerel sitenizde oturum açmanız için bir düğme gösterecektir. Canlı sitenizde kullandığınız WordPress kullanıcı adı ve şifresinin aynısını kullanacaksınız.

Hepsi bu kadar, canlı sitenizi yerel sunucuya başarıyla taşıdınız.
Yöntem 2. Canlı WordPress Sitesini Elle Yerel Sunucuya Taşıma
Eklentinin sizin için çalışmaması durumunda, canlı sitenizi her zaman manuel olarak yerel bir sunucuya taşıyabilirsiniz. İhtiyacınız olan ilk şey web sitenizi WordPress hosting hesabınızdan manuel olarak yedeklemektir.
Adım 1. Canlı sitenizin WordPress veritabanını dışa aktarın
Canlı sitenizin WordPress veritabanını dışa aktarmak için cPanel panonuza giriş yapmanız ve phpMyAdmin’e tıklamanız gerekir.
Not: Ekran görüntülerini Bluehost kontrol panelinden gösteriyoruz.

phpMyAdmin içinde, dışa aktarmak istediğiniz veritabanını seçmeniz ve ardından üstteki dışa aktar sekmesine tıklamanız gerekir.

phpMyAdmin şimdi sizden hızlı veya özel dışa aktarma yöntemini seçmenizi isteyecektir. Özel yöntemi kullanmanızı ve sıkıştırma yöntemi olarak zip seçmenizi öneririz.
Bazen WordPress eklentileri WordPress veritabanınızda kendi tablolarını oluşturabilir. Artık bu eklentiyi kullanmıyorsanız, özel yöntem bu tabloları hariç tutmanıza olanak tanır.
Geri kalan seçenekleri olduğu gibi bırakın ve veritabanı yedeğinizi zip formatında indirmek için ‘Git’ düğmesine tıklayın.

phpMyAdmin şimdi veritabanı dosyanızı indirecektir. Daha fazla ayrıntı için WordPress veritabanınızı manuel olarak nasıl yedekleyeceğiniz hakkındaki eğitimimize bakın.
Adım 2. Tüm WordPress dosyalarınızı indirin
Bir sonraki adım WordPress dosyalarınızı indirmektir. Bunu yapmak için bir FTP istemcisi kullanarak WordPress sitenize bağlanmanız gerekir.
Bağlandıktan sonra, tüm WordPress dosyalarınızı seçin ve bilgisayarınıza indirin.

Adım 3. WordPress dosyalarınızı ve veritabanınızı yerel sunucuya aktarın
WordPress dosyalarınızı indirdikten sonra, yerel sunucunuzda yerel siteyi içe aktarmak istediğiniz bir klasör oluşturmanız gerekir.
WAMP kullanıyorsanız, yerel siteniz için C:\wamp\www\ klasörü içinde bir klasör oluşturmak istersiniz. MAMP kullanıcılarının /Applications/MAMP/htdocs/ klasöründe bir klasör oluşturmaları gerekir.
Bundan sonra, WordPress dosyalarınızı kopyalayıp yeni klasöre yapıştırmanız yeterlidir.
Ardından, WordPress veritabanınızı içe aktarmanız gerekir. Aşağıdaki URL’yi ziyaret ederek yerel sunucunuzda phpMyAdmin’i açmanız yeterlidir:
http://localhost/phpmyadmin/
Veritabanını daha önce oluşturduğunuz için, şimdi onu seçmeniz ve ardından üstteki ‘İçe Aktar’ sekmesine tıklamanız gerekir.

İlk adımda indirdiğiniz veritabanı dışa aktarma dosyasını seçmek ve yüklemek için ‘Dosya Seç’ düğmesine tıklayın. Bundan sonra, sayfanın altındaki ‘Git’ düğmesine tıklayın.
phpMyAdmin şimdi WordPress veritabanınızı açacak ve içe aktaracaktır.
Veritabanınız tamamen kurulduğuna göre, WordPress veritabanınızdaki canlı sitenize referans veren URL’leri güncellemeniz gerekir.
Bunu phpMyAdmin’de bir SQL sorgusu çalıştırarak yapabilirsiniz. Yerel sitenizin veritabanını seçtiğinizden emin olun ve ardından SQL’e tıklayın.

phpMyAdmin’in SQL ekranında bu kodu kopyalayıp yapıştırın, example.com yerine canlı sitenizin URL’sini ve http://localhost/mylocalsite yerine sitenizin yerel sunucu URL’sini yazdığınızdan emin olun.
UPDATE wp_options SET option_value = replace(option_value,'https://www.example.com','http://localhost/mylocalsite') WHERE option_name ='home'OR option_name ='siteurl';UPDATE wp_posts SET post_content = replace(post_content,'https://www.example.com','http://localhost/mylocalsite');UPDATE wp_postmeta SET meta_value = replace(meta_value,'https://www.example.com','http://localhost/mylocalsite');
Bu sorgu, veritabanından canlı sitenizin URL’sine yapılan referansları değiştirecek ve bunu localhost URL’si ile değiştirecektir.
Adım 4. wp-config.php dosyasını güncelleyin
Son adım, yerel sitenizin wp-config.php dosyasını güncellemektir. Bu dosya, WordPress veritabanınıza nasıl bağlanılacağı da dahil olmak üzere WordPress ayarlarını içerir.
Yerel sunucunuzda WordPress’i yüklediğiniz klasöre gidin ve ardından Not Defteri gibi bir metin düzenleyicide wp-config.php dosyasını açın.
Veritabanı adını localhost’unuzda phpMyAdmin’de oluşturduğunuz veritabanı adı ile değiştirin.
Bundan sonra, veritabanı kullanıcı adını yerel MySQL kullanıcı adınızla değiştirin, genellikle root olur. Localhost’unuzda MySQL kullanıcısı root için bir parola belirlediyseniz, bu parolayı girin. Aksi takdirde boş bırakın ve değişikliklerinizi kaydedin.
/** The name of the database for WordPress */define('DB_NAME','database_name_here');/** MySQL database username */define('DB_USER','username_here');/** MySQL database password */define('DB_PASSWORD','password_here');
Artık URL’yi aşağıdaki gibi girerek yerel sitenizi bir tarayıcı penceresinde ziyaret edebilirsiniz:
http://localhost/mylocalsite/
‘mylocalsite’ yerine WordPress dosyalarınızı kopyaladığınız klasörün adını yazın.
Hepsi bu kadar, canlı WordPress siteniz artık yerel sunucunuza kopyalanmıştır.
Bu makalenin, canlı bir WordPress sitesini yerel sunucuya nasıl kolayca taşıyacağınızı öğrenmenize yardımcı olduğunu umuyoruz. Ayrıca, test için WordPress için kolayca bir hazırlama sitesi oluşturma veya bir WordPress sitesini yerel sunucudan canlı siteye taşıma hakkındaki kılavuzumuzu da görmek isteyebilirsiniz.
If you liked this article, then please subscribe to our YouTube Channel for WordPress video tutorials. You can also find us on Twitter and Facebook.

")


Reese
Hello,
I am receiving an error when reaching this step:
“Now that your database is all set up, you need to update the URLs inside your WordPress database referencing to your live site. You can do this by running an SQL query in phpMyAdmin. Make sure you have selected your local site’s database and then click on SQL. In phpMyAdmin’s SQL screen copy and paste this code, make sure that you replace example.com with your live site’s URL and localhost/test-site with the local server URL of your site. ”
The error is:
#1146 – Table ‘rpd.wp_options’ doesn’t exist
Please advise, thank you!
Martin
Thanks for all of your hard work. I’m a beginning web developer and your site is incredibly helpful.
I have looked at both of your articles about migrating from local to live and vice versa. I built a WordPress site locally and used it to replace an existing HTML site. I then made changes to the live site, and I’m not quite sure how to go about “syncing” them again. What would you suggest?
WPBeginner Support
Hi Martin,
Please take a look at our guide on setting up a staging environment.
Admin
James
Thank you for the article, however i have still been having problems.
One thing i don’t understand, is that you start of by recommending using backupbuddy (which i have been using to backup my sites) but then suddenly say to use this duplicator plugin.
I have my full backup (with db) zip of my wordpress site which i created with backupbuddy and have unzipped it into its own folder in the “www” folder in wamp.
I successfully create a new DB in PhpMyAdmin and then successfully imported my website db into it. I have also changed the config.php db name and password.
However on the next step, trying to change the urls it comes back with:
#1146 – Table ‘zexico.wp_options’ doesn’t exist
#1146 – Table ‘zexico.wp_posts’ doesn’t exist
#1146 – Table ‘zexico.wp_postmeta’ doesn’t exist
What have i done wrong?
thank you
Ozi Diptongo
Hi. I’m getting the same error. Were you able to fix it ? Than you !
Nina Chang
Following on from my earlier comment – I fixed the problem! For some reason the duplicator plugin wasn’t copying across all of my database tables, which was causing the first round of issues – I sorted that by switching to the manual method. Then when I was running the queries in mysql I didn’t realise at first that I had to amend the names of the database tables as well (i.e. was just pasting wp_options when I needed to adapt that) – I’m not sure if this is normal as your lines of code only highlight the urls as needing to be corrected? THEN I had to deal with my strange wp-config.php file that had all the ‘database’, ‘host’, ‘username’ fields already filled in – after trying both options it only worked when I deleted the data that wordpress had already filled in and replaced it with the localhost data as directed. I don’t understand why my wp-config file had its fields already populated but then I’m a complete newbie to all this so I’m bound to have missed/misunderstood lots. Anyway – thanks again for the tutorial as it did FINALLY get me there!
Nina Chang
Hi there,
Thanks for the tutorial. I’ve attempted to migrate my site with duplicator and it seems to work except I then can’t log-in to my locally hosted site – it doesn’t recognise my username at all. After the duplicator installed my files I had two config.php files – one config-sample.php and one config.php, and also two htaccess files – one .htaccess and one ORIG – could these doubled-up files have something to do with my login issues? I’ve tried every variation of deleting one of each pair, and I’ve also tried replacing my wp-login file and deleting plugins as I read elsewhere this might help, but nothing has worked. I redid the entire process from packaging and still no luck! I’ve also tried manually but got stuck at the mysql query updates. Do you have any idea where I’ve gone wrong??
Many thanks!
Nina
Susan Taunton
I can’t tell you how grateful I am for this info. I have put an unbelievable amount of time into trying to get a live site onto my local server to no avail — and then I found your post today. Used the Duplicator and it WORKED!
THANK YOU!!!!!!!!! :-))
Editorial Staff
You’re very welcome Susan
Admin
Dilip Pradhan
I have copied website from hosting domain to local host. everything is fine but all links of menu and all are redirected to
how to solve it
Byron Allen
hi ,
I had the same problem and just found the solution. I’m sure you’ve solved it by now but this might help others down the track.
in WordPress admin area go to settings-> permalinks. Choose Post name.
Your problems should be solved.
John Payne
Thanks for all the excellent advice you give- it’s a wonderful service to the WordPress community.
I’ve begun using the All-in-1 WP Migration plugin to easily backup my site , and later migrate it if necessary.
It would also be good to be able to make changes to the sites on my own computer, checking them out before uploading updated files.
I’, installing XAMPP on my computer. Is there an easy way I can use my All-in-1 WP Migration backup files with this?
Any advice will be much appreciated.
WPBeginner Support
Hi John,
Sorry but we haven’t tested this plugin. Please try contacting the plugin developers.
Admin
Andres
Great tutorial. Its important to mention that you need to delete the HTACCESS File in order to this to work.
Thanks
James orr
From local site?
Siddhartha
Yes from the local site folder. I did that, and my site started working. However there are many other problems that I am facing even now. Like my category links are not working at all.
lohith
cool super clean tutorial, got mine to work without any issues.
Gokiko
Hi WPbeginner,
I have followed all the instructions for manual moving. But I’m getting a “Oops! That page can’t be found.” error on the mainpage, none of the content can be viewed. And all the links in my localhost site direct to my online website.
It seems only the the main structure of my site(theme, menus etc.) has been moved but all the rest is lost.
WPBeginner Support
Is this error shown with your WordPress theme or on a blank white page? If it is shown on a blank white page, then this probably means that your WordPress site is not installed on the URL you are trying.
Admin
Gokiko
It shows on my WordPress theme. It also shows all my menus and content categories. But all the links take to the original websites address. Here is a screenshot if it’s gonna help:
WPBeginner Support
Try refreshing your site’s permalink structure. Go to Settings » Permalinks page and click on the save changes button without making any changes.
Juan
I have the exact same issue, but I can not log-in into my localhost using wp-admin or wp-login as it takes me to the live-site domain.
Is there another way to login to my localhost/dev-site area to make this change? thanks in advance!
Jason Hess
Dear WPBeginner,
First of all, Thank you for all you do in the WP community, my question is hopefully a pretty simple one. (Famous last words huh?) Currently I use CLEF to log in to my “Live Site”. When I move my Live site to my Local server, will this create any issues when attempting to log in to the local site once the move has been completed? Or do I need to create a new log in PW for my site via the Dashboard in my Live site before making the move to a Local environment or will CLEF still continue to work on my “Local Server”?
Also, do you all have any thoughts on using CLEF to log in? I’ve been using WP on and off for about 2 years and just want to get your opinion on CLEF.
Thank you very much in advance! You guys rock! After I get my site up and running you can bet I’ll promote your site to everyone I know. I’ve learned so much already from your site and I’ve only been a member for 2 almost 3 months now.
Have a great Day,
Jason Hess
WPBeginner Support
You can disable Clef at anytime once you have transferred your site to local server.
Admin
Mohd Amir
I forgot the password of filezilla, so I couldn’t download all the file of live site. I have backup of live site wp_content only. What can I do now for local server.
maarja
Hi,
Thank You for Your helpful directions.After a long while, I finally got the live page to my localhost with the plugin BUT for some reason, the content pages are not found on the server-all the information, texts etc is there in the back-office but aren’t shown in the front office except for the front page.
Do You have any idea where/why the problem might occur?
Thank You in advance,
Maarja
WPBeginner Support
Try following the steps in our beginner’s guide to troubleshooting WordPress errors.
Admin
Yellow Canary
Thank you very much I have done it manually… from a live server to localhost. With your instructions I have managed this for the first time. And I even know now how to do a SQL query in phpMyAdmin. I feel like a real pro!
amna
Hi,
i followed all the steps but i am getting internal server error .
I am confused in one step , after downloading the live site through filezill from godaddy host. i replace the wordpress folder with my live site folder i.e.
C:/users/amna/wamp/www/wordpress/old folders
with C:/users/amna/wamp/www/wordpress/mywebsite new folders
please help i am a beginner
Debenkumar Naorem
Hi WEBBIGINNER SUPPORT, I followed the instruction for manual, it works very fine. Thanks for such intructions, I’ve been looking for this. Thanks again.
WPBeginner Support
Hey Debenkumar, you are welcome. Don’t forget to join us Facebook for more WordPress tips and tutorials.
Admin
Manish
Hey! Thanks for the post.
I followed manual instruction and replaced my site URL with localhost/name of blog . The problem I am facing is, no images are being loaded in my blog. All the uploaded images are there in upload folder. The text is absolutely fine. The images url have changed to localhost but they are not showing up.
Could you please help me out in this?
deepthi
hi, i followed the manual procedure to check my wordpress website in localhost using xampp, i hav changed the site URL, home and the wp-posts and wp-postmeta. the problem is my home page loading fine in localhost. but when i go the pages in the menu the following error is coming.
Object not found!
The requested URL was not found on this server. The link on the referring page seems to be wrong or outdated. Please inform the author of that page about the error.
If you think this is a server error, please contact the webmaster.
Error 404
localhost
Apache/2.4.10 (Win32) OpenSSL/1.0.1i PHP/5.5.15
i logged into dashboard and can see all of the page content in the editing section, but from there also, when i try to view the page its reporting the same error.
the url path it is taking is my updatedURL only,
please reply with the solution
WPBeginner Support
Go to Settings » Permalinks page and click on the ‘Save Changes’ button to update your permalinks.
Admin
Joshua S.
Can I hug you? Can I love you forever?
I was having the same issue. I did everything correct, except the homepage would load , but all the other page links seemed to be broken (it just displayed an unstyled layout of my localhost information).
But going into Settings>Permalinks>Save Changes reset my links and now I can access my different pages, even the new pages that I create since moving my site to the local host.
LIKE!
WPBeginner Support
Thanks Joshua, we are glad you found it helpful. You may also want to subscribe to our YouTube Channel for WordPress video tutorials.
Peter
After following the instructions to manually move the site, the home page displayed fine on localhost but none of the links worked. The page below said to “Go to settings/permalinks in the wordpress dashboard and update permalinks by clicking twice on save changes.” That fixed it.
Mohd Hasan
I followed your steps , but only home page works fine and none of the links are working . Give The requested URL /akhdir3/category/health/ was not found on this server.
Anes P A
Dear Author,
I tried your step. But problem is when loading a page the localhost refer online site and the Menu links point to the online web site. How it can solve ?
Please advise.
Thanks
Anes
Bhavana
I have manually done all the above mentioned steps . But I am not getting the actual site which I want.There comes all uninstalled plugins in admin panel and the theme is also uncustomized. Where I am going wrong?
Justin
I’m trying to follow your instructions for a manual move.
When trying to find/replace the live site’s address with my local host, SQL tells me there’s a syntax error.
#1064 – You have an error in your SQL syntax; check the manual that corresponds to your MariaDB server version for the right syntax to use near ‘)’ at line 1
Are you sure the code is correct?
Justin
Fixed my own problem….sort of.
For some reason all my tables begin with wplm instead of just wp (wp_options = wplm_options for example). So updating the code to look for the correct table name allowed the script to run without errors.
But….SQL reports “# MySQL returned an empty result set (i.e. zero rows)” and the values in the table didn’t get updated. I had to go in and update the links by hand. In my case this was only 2 values in wplm_options, but I could imagine some people will have a lot more links to check.
Still, I do have my site imported now, and dealing with local hosting is a notoriously confusing process.
Thanks for the clear and simple instructions!
Lloyd
The instructions for Duplicaor Installer begin with this line:
“Your local server site will need a new database, so you need to create a database on your local server using phpMyAdmin.”
Is creating a new database something simple like clicking a menu option, or is it so complex that it would require an extensive tutorial to explain?
When I explore phpMyAdmin on Xampp, the only thing I see that looks like a possibility is under the Databases tab where it says:
“Create database:
(X) No Privileges”
Is there an authorization problem, and if so where do I go to change that parameter?
I have two web sites on this local host that seem to function properly, so I have assumed that the local host is set up correctly.
Thanks for any help or suggestions,
Lloyd
Ashvani Kumar
I am following the Manual option but when i go to Import Database page in phpMyAdmin then the max size for database upload is (Max: 2,048KiB) but my database backup size is 710MB. How do i increase this limit so that i can upload the database?
Thanks
WPBeginner Support
You need to increase the file upload limit in PHP. See our guide on how to increase the maximum file upload size. and follow the php.ini method
Admin
Abdul Aleem Mohammed
Hi Ashvani,
you can change the max_upload_size in php.ini file in apache.
by default it will be 2 Mb, you can change it according to your convinience.
Thanks
Judy Williams
I am trying this using Duplicator. I have downloaded my site and the installer. I have created a database using phpMyAdmin and have got to the bit ‘you need to copy and paste the package and install file to an empty folder in your local server’s web directory’. I have no idea how to do this! I have Filezilla and XAMPP installed on my laptop. Is there a tutorial on how to create an empty folder in my local server’s web directory? I am stuck now. Thanks
WPBeginner Support
You can just go to the htdocs folder on your computer.
Admin
german
I’ve copied the files and database, when i try to access my localhost/test-site i get redirected to the dashboard. Any ideas why this could be happening?
miguel
thank you for the clear tutorial.
although i’ve done the opposite (from localhost to public server) i thought the reverse would be equally simple.
however, when it comes to connecting the database, i’m stumped. i’ve gone over the settings over and over without being able to connect.
i even got into some trouble and got locked out of the database but fortunately got that resolved.
in my config.php file i’ve changed the user to “root”, then set it to empty, used the user name from the public server and the same with the password. i have set the db name correctly to the localhost name.
i can’t guess what i need to do.
if you could give me a direction to look next, i’ll appreciate it greatly.
thank you for you labor of love. it’s great to see so many people with the knowledge helping us those who look for answers.
Daniel
Hi
I want to do this as well. Is this post written a few years back , still the approach to use or are the other plugins or post I should be looking at .
Daniel
Beatrix K.
Hi everyone,
Just wondering (please bare with me as I am new at this) – if I need to have have my local site to work with on two different devices, say my desktop and my laptop, is there a way for the changes I make on one device to be updated on the other device? I just want to know if it is possible to work from two different devices on the same project and not have to redo all of my changes. Thanks in advance for any insight
B
Muniba
I am confused in step related to Filezeila ,,, how i will download my wordpress site using Filezeila..??
german
download filezilla, establish a connection to your current host, productions site using filezilla. Once you have a connection you will be able to download the files to a local directory on your computer
Dee
So with CPanel, for instance, we’d use the IP associated, our CPanel user and pass, along with “21” as the port value? After establishing a connection with Cpanel host, how can I transfer the files to my localhost while keeping the live site as well? Essentially, how do I create a duplicate with having the same site at both hosts (one to experiment with and one that remains live)?
Dee
After successfully transferring files from remote to local, what is an easy way to bulk copy&paste (instead of manually one-by-one) the files to the local server where we want to install WordPress? I tried selecting all files to copy, but there is no copy function available. Please Help
assal0le
I want to copy my live wordpress site to my local wamp server, note moving it. My question is this will remove my live wordpress site if I follow this tutorial using duplicator plugin?
Thx
Diane Laidlaw
No it only copies it.
Ognatius Chironga
I thank you so much!
I found this article helpful.
I almost restarted creating my site.
Quy P
I have tested and tried a number of time. It does not work untill i delete the .htaccess file on local. Thank you.
Andres
Thanks very much.
Tobias
If you are running a network of sites you should also update the column domain URL’s in the table wp_blogs.
lorenzo
Thank for this useful tutorial. I have to move manually my wp site, but if I type in the browser “http://localhost/phpmyadmin/” it doesn’t appear myphpadmin. Maybe I have to install it? How?
Thank you very much…
Dave
In the wp-config.php file I also have to change the /**MySQL hostname */
/** MySQL hostname */
define(‘DB_HOST’, ‘localhost’);
set if for localhost
nicola
Hi,
i follow your step but the admin login is not visible…. error 404 not found. all the site is good in my local installation. how can i solve my problem?
abdelouahad
i did all the steps but i have always the error page i don’t know why some one can help me please
Paul Denver Sy
Thank you so much for this. It saved my almost a week of agony on running it on my local.
Shilling
Double checked all the steps and it all seems good, but I’m getting this error message when I go to the site on my local URL:
Google Chrome’s connection attempt to localhost was rejected. The website may be down, or your network may not be properly configured.
I don’t think the site is down. My local URL is auto flipping to http://localhost/wordpress-folder-name
when I think it should go to http://localhost:888/wordpress-folder-name
I’m hoping this is an obvious clue. I’m new at this and just have no idea.
Any insight would be much appreciated.
Ebert
This was the clearest tutorial I found which helped me to copy a site I started with iPage to my laptop under localhost. The database was not imported but created a new local copy of the server database. I copied the data tables into my new database and modified the sql commands to match the table names and everything ran smoothly.
I had to reuse the password I used on the live site with the local wordpress copy and I can now access and modify what I need to.
Thanks and you just got another new subscriber to this great site.
Also the post about BackWPup was very helpful as well. I tried to use Duplicator and it kept giving me error messages about permissions to create a backup folder on my machine. I used BackWPup and everything ran without a hitch. Thanks again!!
Eduardo Weidman Barijan
The manual process worked like a charm. Thank you.
Alessio
Hi guys,
I’m trying to config the localhost on my computer with linux mint.
i’ve already set up a new database, transferred the files with FTP to my local wordpress folder.
Now I imported the db, but when I give the query to change the webaddress with a local address, it will give me a message “# MySQL returned an empty result set (i.e. zero rows)”.
Now, if I type in the browser “localhost”, it will lead me to the online website…
what should I do?
thank you!
idriss
Hey Allesio,
Did you manage to solve this?
I have the same issue. How did you manage to solve it?
Thanks
Justin
Same problem here.
SQL is having trouble replacing the live site URL with the local host address.
Without the updates to the database, WP tries to connect to the live site instead of the local site.
Did either of you have any luck fixing this?
Sam
Go to your localhost phpmyadmin and the database you are using for the site. Click wp_options and edit the siteurl and home. Replace the live url with the: localhost/ your-folder-name-goes-here
That should do it.
Sam
Mike
The first step worked with me.
But how can I enter to localhost/test-site/wp-admin? It gives me an error message:
Internal Server Error
Wenke Adam
Updating the local site’s wp-config.php file might not be the last step in this procedure. I followed your instructions and after some trials the public site was working (first I had a typo in the SQL queries and nothing happened) but still I couldn’t access wp-admin.
The solution was to edit the wp_options table in the database. The first row had the wrong URL. I fixed this and finally everything was working fine, even the permalinks.
Thanks for all these very nice and clear tutorials!
Tim
I am reposting this because it seems to have disappeared (at least on my end). So I am sorry if it is a double post.
I am getting an error message when uploading the database. Any ideas?
Thanks
Tim
When I try to upload the database I get a Red Error Screen. I can send a screenshot of the error if you would like.
Thanks
WPBeginner Support
Sure, you can upload the screenshot to a cloud hosting service like dropbox and paste the link as a reply to this comment. We will then take a look and will try to help.
Admin
Ian Hyndman
All day I have been trying to do this change with no effect !
I even had to install word press again on my testing server. Was about to give up then I came across this. My other option was to manually copy and paste and install all the same plugins active on my host server to my testing server.
When i read your post i finished in 5 minutes :):)
Thank you for your tutorial, its just what I needed. !
Well Done
Alexandros
Two days i am trying to do this change alone with no effect !
When i read your post i finished in 5 minutes :):)
Thank you for everything !
Keep up the great work