Mac’inize WordPress yüklemek, bir web barındırıcısına ihtiyaç duymadan özelliklerini keşfetmenizi sağlar.
WordPress’in nasıl çalıştığını öğrenecek ve projeniz için doğru olup olmadığını göreceksiniz. Sitenizi yayına almadan önce temaları ve eklentileri test etmek için de mükemmeldir. Ayrıca, yerel olarak deneme yapmak size hata yapma ve öğrenme özgürlüğü verir.
Hem Mac hem de Windows bilgisayarlarda yerel sitelerle çok oynadık. Bu eğitimde Mac’inizde WordPress kurmak için 2 basit yöntemi paylaşacağız.
Not: Mac kullanmıyor musunuz? WordPress’i Windows’a yerel olarak nasıl yükleyeceğinize dair bir eğitimimiz de var.
Neden WordPress’i Mac’e Yerel Olarak Yüklemelisiniz?
Normalde, bir WordPress web sitesi yapmak için bir web barındırma hesabına ve bir alan adına ihtiyacınız vardır.
Ancak, temel WordPress yazılımını indirmek ücretsizdir ve bilgisayarınızda yerel olarak çalıştırılabilir. Bu yerel WordPress sitesi genellikle internette bulunmaz ve yalnızca bilgisayarınızda görüntülenebilir.
Bu yaklaşımın avantajı, WordPress’i kullanarak özel olarak pratik yapabilmeniz, deneyebilmeniz ve ne tür web siteleri yapabileceğinizi görebilmenizdir.
Bu yerel kurulumu, farklı WordPress temalarını ve eklentilerini canlı web sitenize yüklemeden önce test etmek için de kullanabilirsiniz.
WordPress’i Mac’e Yerel Olarak Yüklemek İçin Neye İhtiyacınız Var?
WordPress temel olarak sunucu taraflı bir programlama dili olan PHP ile yazılmıştır. PHP’yi çalıştırmak için web sunucusu yazılımına ve MySQL veritabanı yönetim sisteminin kurulu olmasına ihtiyacınız olacaktır.
Şimdi, tüm bu yazılımları bağımsız olarak kurmak ve birbirleriyle çalışmalarını sağlamak göz korkutucu bir görev gibi geliyor.
Neyse ki, daha az teknoloji meraklısı kullanıcılar için bile bunları tek bir paket olarak kurmayı çok kolay hale getiren ücretsiz geliştirme araçları var. Bunu akılda tutarak, herhangi bir özel sunucu yönetimi becerisi olmadan WordPress’i bir Mac’e yerel olarak kolayca yüklemek için 2 yöntemi burada bulabilirsiniz:
Hazır mısınız? WordPress’i bilgisayarınızda çalıştıralım.
1. Yerel WP Kullanarak WordPress’i Mac’e Yerel Olarak Yükleme (Önerilen)
Local WP, Mac bilgisayarınızda kolayca yerel bir sunucu kurmanızı sağlayan bir WordPress geliştirme aracıdır. WordPress kurmak için Local’i Windows ve Linux’ta da kullanabilirsiniz.
İlk olarak, Local web sitesini ziyaret etmeniz ve ekranın sağ üst köşesindeki ‘İndir’ düğmesine tıklamanız gerekir.
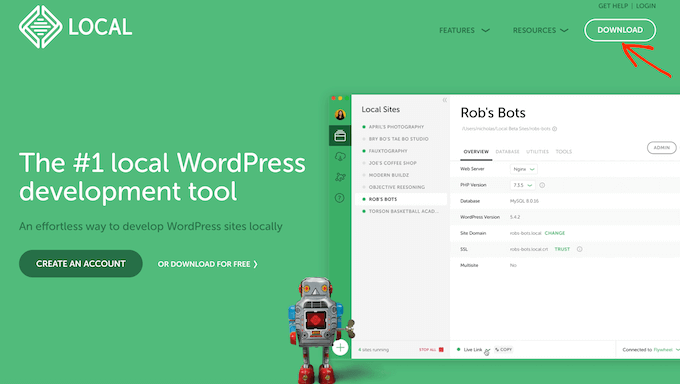
Bu, Yerel İndir açılır penceresini açacaktır.
Burada, platformunuz olarak Mac’i seçelim.
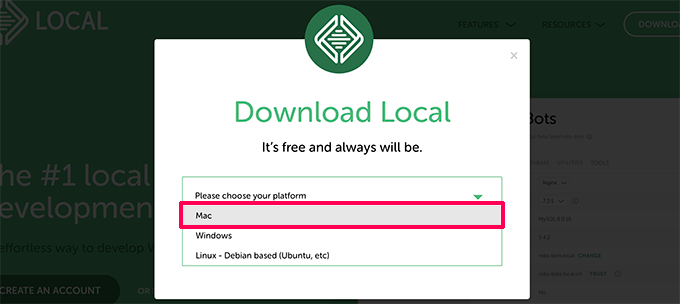
Yerel yönetim daha sonra sizden kısa bir form doldurmanızı isteyecektir.
Adınızı, e-posta adresinizi ve telefon numaranızı yazdıktan sonra, devam edebilir ve ‘Şimdi Al’ düğmesine tıklayabilirsiniz.
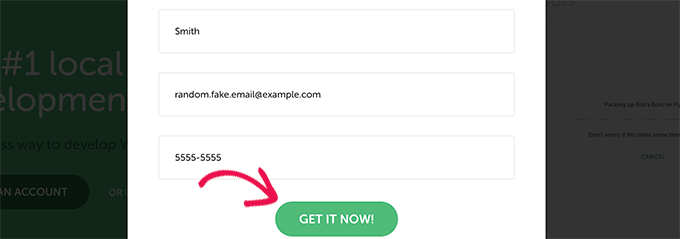
Bu, Yerel kurulum dosyasını bilgisayarınıza indirecektir. İndirilen dosyayı indirme işlemi biter bitmez açmak için çift tıklayabilirsiniz.
Ardından, Local’i bilgisayarınıza yükleme işlemi boyunca size rehberlik edecek bir kurulum sihirbazı göreceksiniz.
Mac kullanıcılarının Local uygulamasını ‘Uygulamalar’ klasörüne sürüklemeleri yeterlidir.
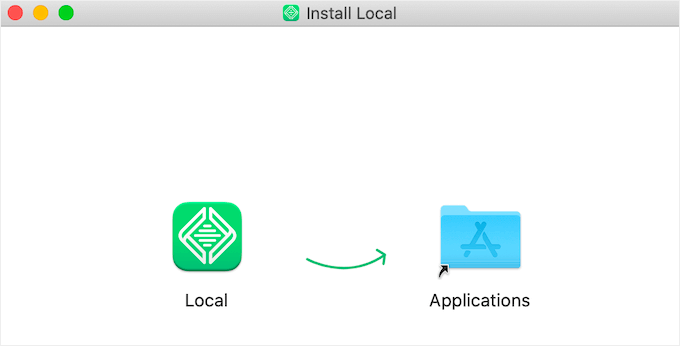
Yükleme tamamlandığında, Uygulamalar klasöründen Yerel uygulamayı başlatabileceksiniz.
İlk açılışta size birkaç soru sorulabilir ve ücretsiz bir Yerel hesap oluşturmanız istenebilir. Bu adımlar isteğe bağlıdır ve isterseniz bunları atlayabilirsiniz.
Yerelde WordPress Web Sitesi Oluşturma
Local, yerel bir web sitesi oluşturmayı ve WordPress’i hızlı bir şekilde yüklemeyi çok kolaylaştırır.
Başlamak için, devam etmek üzere ‘Yeni bir site oluştur’ düğmesine tıklamanız yeterlidir.
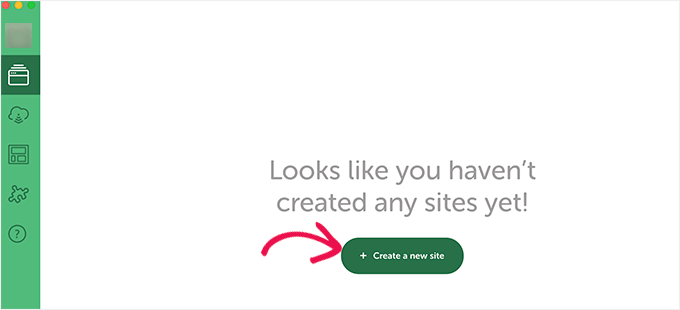
Bir sonraki ekranda, site adınızı girmeniz gerekecektir.
Bundan sonra, devam edin ve ‘Devam Et’ düğmesine tıklayın.

Ardından, platformunuzu seçmeniz istenecektir.
Local, hangi PHP, Apache ve MySQL sürümünü kullanmak istediğinizi seçmenize olanak tanır.
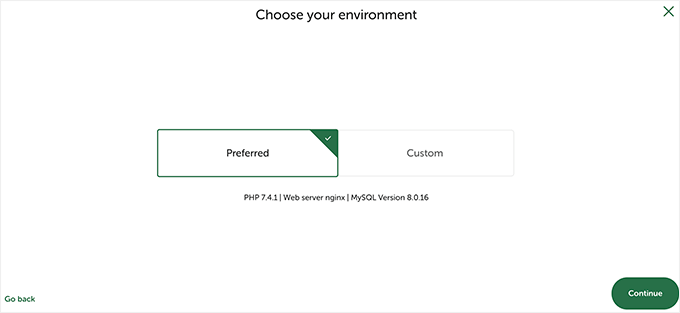
Emin değilseniz, ‘Tercih Edilen’ ayarları seçin ve ‘Devam Et’ düğmesine tıklayın.
Son olarak, bir WordPress kullanıcı adı ve şifresi girmeniz gerekecektir. Ardından, ‘Site Ekle’ düğmesine tıklayabilirsiniz.
Local şimdi web sitenizi oluşturmak için WordPress’i indirecek ve yükleyecektir. Değişiklik yapmak için Mac kullanıcı adınızı ve parolanızı girmeniz istenebilir.
Tamamlandığında, WordPress yönetici alanını ziyaret etmek veya yerel sitenizi görüntülemek için düğmelerle birlikte yeni oluşturduğunuz web sitesi hakkında bilgiler göreceksiniz.
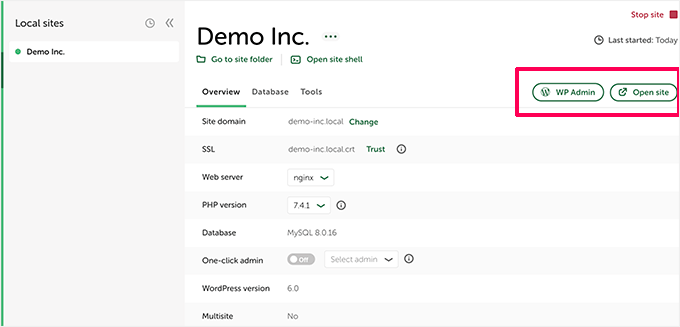
Artık web sitenizi ziyaret edebilir veya WordPress yönetici alanına giriş yapabilirsiniz.
Buradan, yerel olarak barındırılan WordPress sitenizi tıpkı canlı bir web sitesini yönetir gibi kullanabilirsiniz.
Eklentiler ve temalar yükleyebilir ve web sitenizi uygun gördüğünüz şekilde tasarlayabilirsiniz.
2. MAMP Kullanarak Mac’e Yerel Olarak WordPress Yükleme
MAMP, Mac bilgisayarınızda WordPress çalıştırmanıza olanak tanıyan popüler bir programdır.
İlk olarak, MAMP web sitesini ziyaret edelim. Burada MAMP & MAMP Pro’nun en son sürümünü görmelisiniz.
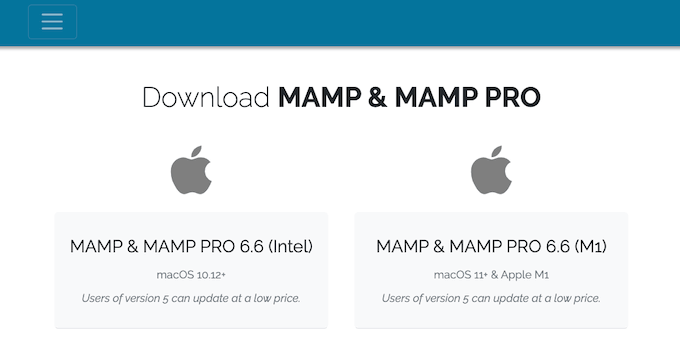
MAMP, macOS işletim sisteminin farklı sürümleri için ayrı indirmelere sahiptir.
Bilgisayarınızda hangi macOS sürümünün yüklü olduğundan emin değil misiniz? Öğrenmek için bilgisayarınızın araç çubuğundaki Apple simgesine tıklamanız yeterlidir.
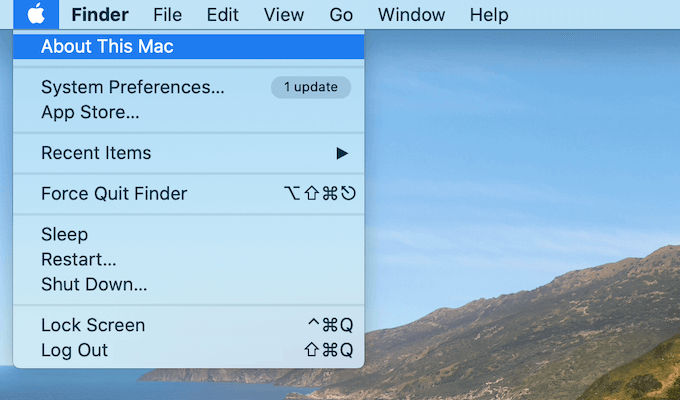
Daha sonra ‘Bu Mac Hakkında’ seçeneğine tıklayabilirsiniz.
Bu, macOS sürümünüz de dahil olmak üzere bilgisayarınız hakkında birçok bilgi gösteren bir açılır pencere açacaktır.
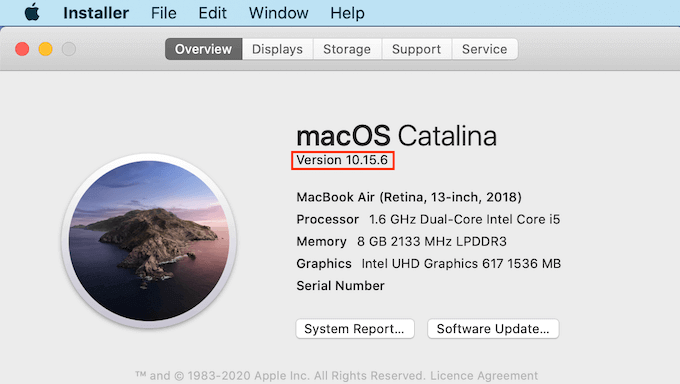
Artık işletim sisteminiz için doğru MAMP sürümünü indirebilirsiniz.
İndirme işleminiz tamamlandığında, MAMP .pkg dosyasına çift tıklayın. Bu, MAMP yükleyicisini başlatacaktır.

Şimdi, MAMP’ı yüklemek için ekrandaki talimatları izleyin.
Bu programı kurduktan sonra, bilgisayarınızın ‘Uygulamalar’ klasörünü açarak MAMP’ı başlatın.
Burada, MAMP’ın 2 versiyonunu bulacaksınız. MAMP Pro ücretli sürümdür, bu nedenle ücretsiz sürümü seçtiğinizden emin olun.
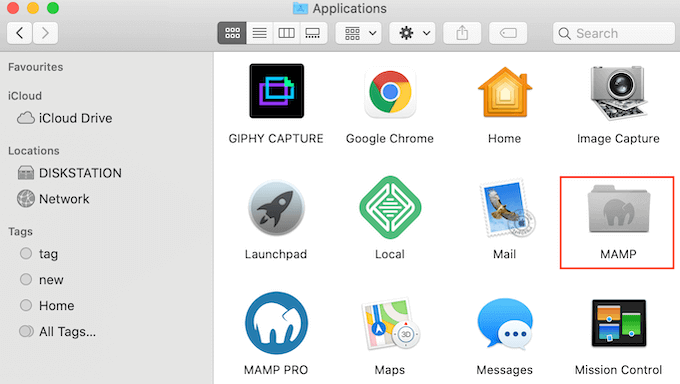
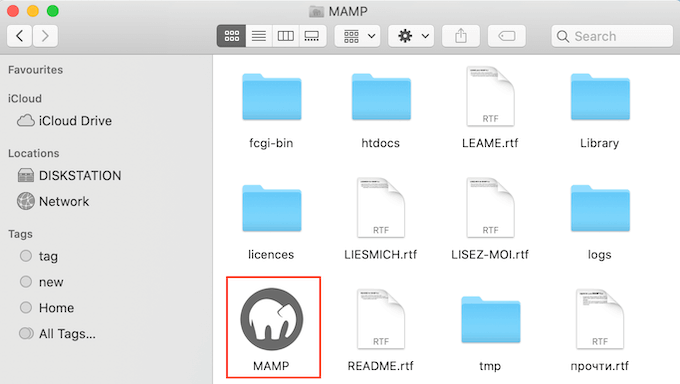
Bu MAMP klasörünün içinde çeşitli dosyaların yanı sıra bir MAMP uygulaması bulacaksınız.
MAMP uygulamasını başlatmak için çift tıklamanız yeterlidir.
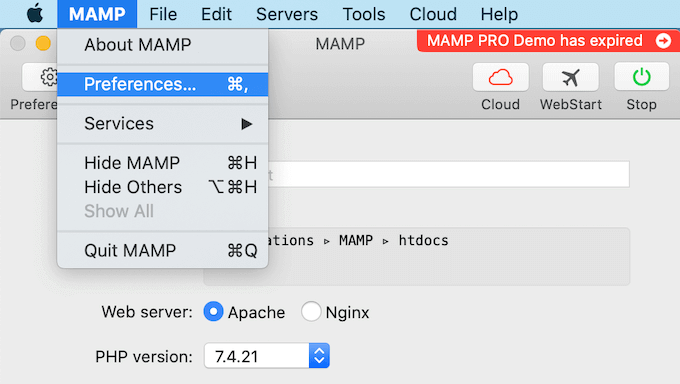
Başlamadan önce, MAMP deneyiminizi daha iyi hale getirmek için birkaç ayarı yapılandırmanızı öneririz.
Bu değişiklikleri yapmak için araç çubuğunuzdaki ‘MAMP’ seçeneğine tıklamanız ve ardından ‘Tercihler….’ seçeneğini seçmeniz gerekir.
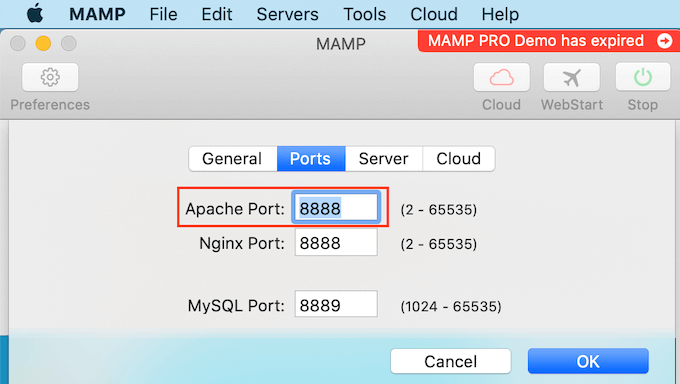
Açılır pencerede, ‘Bağlantı Noktaları’ sekmesine geçmek isteyeceksiniz.
Şimdi MAMP’ın hangi Apache Portunu kullandığını kontrol edebilirsiniz. MAMP zaten bu portu kullanmıyorsa Apache Port 8888’e geçmenizi öneririz.
Bir sonraki adım belge kök klasörünüzü ayarlamaktır. Burası tüm yerel WordPress web sitelerinizi oluşturacağınız ve depolayacağınız yerdir.
MAMP varsayılan olarak /Applications/MAMP/htdocs/ klasörünü kullanır, ancak bunu başka bir konumla değiştirebilirsiniz.
‘Tercihler…’ iletişim kutusunda, ‘Sunucu’ sekmesine tıklayalım. Belge kökünüz şimdi görünür olmalıdır.
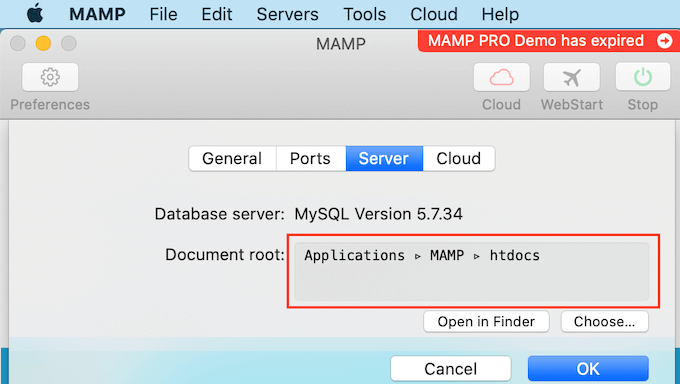
Sitelerinizi başka bir klasörde saklamak için devam edin ve ‘Seç…’ düğmesine tıklayın.
Bu, yeni bir konum seçebileceğiniz bir açılır pencere açacaktır. Ayrıca tüm WordPress web sitelerinizi depolamak için yeni bir klasör oluşturmak isteyebilirsiniz.
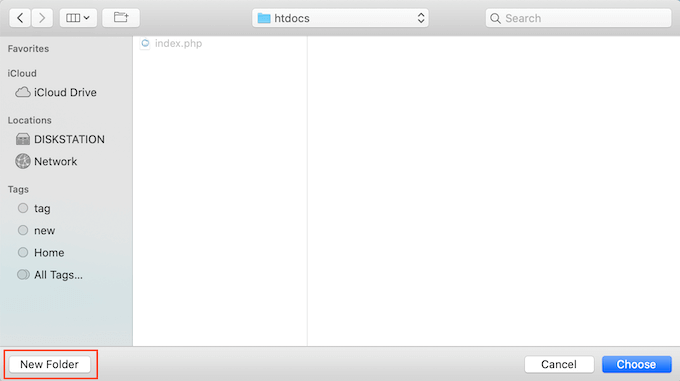
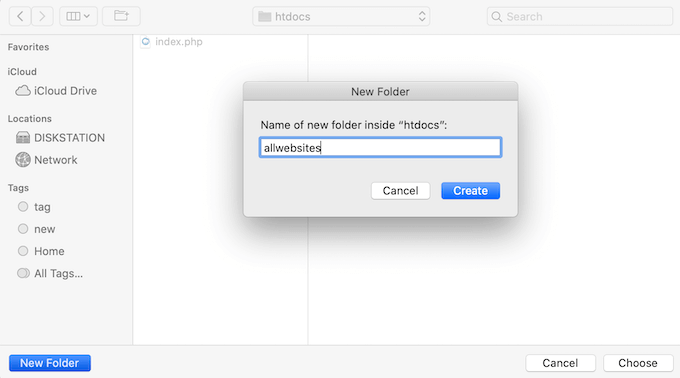
Bu klasöre istediğiniz ismi verebilirsiniz.
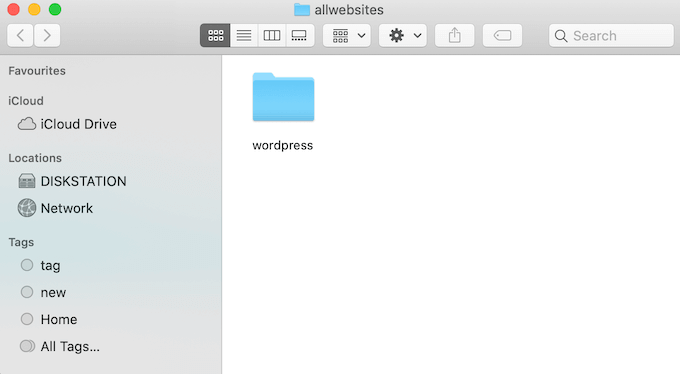
Bu makale için web sitelerimizi ‘allwebsites’ adlı bir klasörde saklayacağız.
MAMP üzerinde WordPress yükleme
Artık MAMP’ı kurduğunuza göre, sıra Mac bilgisayarınıza WordPress’i yüklemeye geldi.
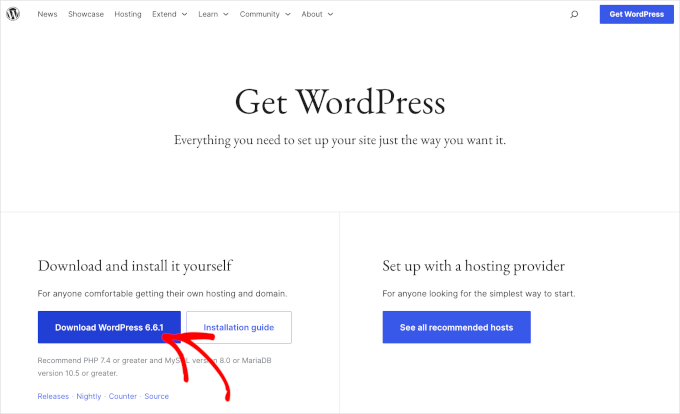
Öncelikle WordPress.org web sitesini ziyaret etmeniz ve WordPress Core’un en son sürümünü indirmeniz gerekir.
NOT: WordPress’in iki sürümü vardır. Daha fazla ayrıntı için WordPress.com ve WordPress.org karşılaştırma makalemize bakın .
Dosyayı WordPress.org’dan indirdikten sonra, sadece sıkıştırmayı açmanız gerekir. Bu, sıkıştırılmamış bir ‘wordpress’ klasörü oluşturacaktır.
Şimdi, bu klasörü MAMP belge kök klasörünüze kopyalayın.
Belge kök klasörünü değiştirdiğimiz için, ‘wordpress’ i applications/MAMP/htdocs/allwebsites içine kopyalamamız gerekiyor.
WordPress’in tüm içeriğini ve verilerini depolamak için bir veritabanına ihtiyacı vardır. Yerel bir web sitesi oluşturmadan önce bu veritabanını oluşturmanız gerekir.
Endişelenmeyin – göründüğü kadar zor değil.
MAMP ‘Tercihler…’ penceresinde, sadece ‘Tamam’ düğmesine tıklayın. Bu, MAMP uygulamasını yeni bir tarayıcı sekmesinde başlatmalıdır.
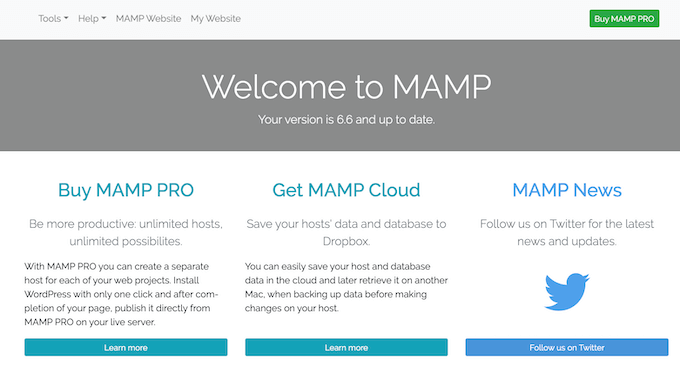
Bir sonraki göreviniz phpMyAdmin’i başlatmaktır. Bu, web sitenizin MySQL veritabanını yönetmek için web tabanlı bir uygulamadır.
Araç çubuğunda Araçlar ” phpMyAdmin‘e gidelim.
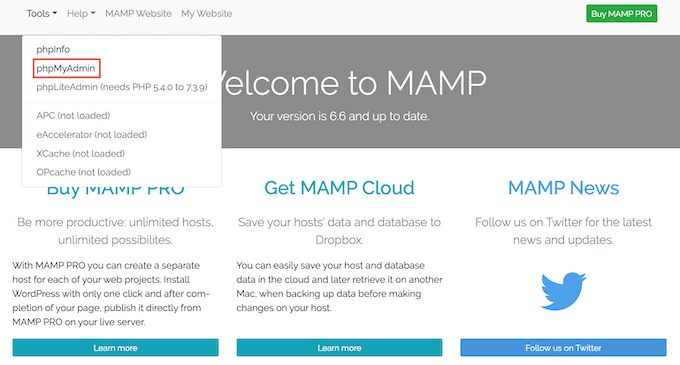
Bu phpMyAdmin’i yeni bir sekmede açacaktır.
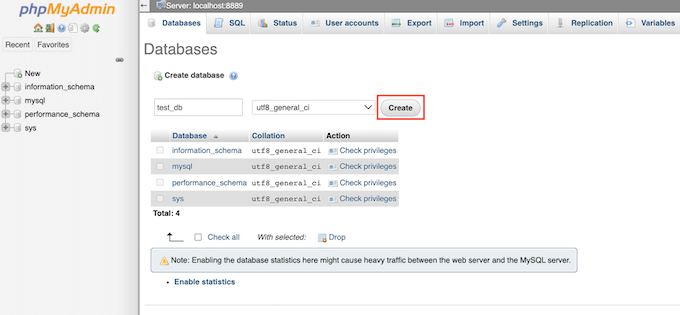
phpMyAdmin panosunda, ‘Veritabanları’ sekmesine gitmek isteyeceksiniz.
Artık veritabanınız için ‘Veritabanı adı’ alanına istediğiniz herhangi bir adı yazabilirsiniz. Bir sonraki adımda kullanacağımız için adı hatırladığınızdan emin olun.
Bu eğitim için veritabanımızı ‘test_db’ olarak adlandıracağız.
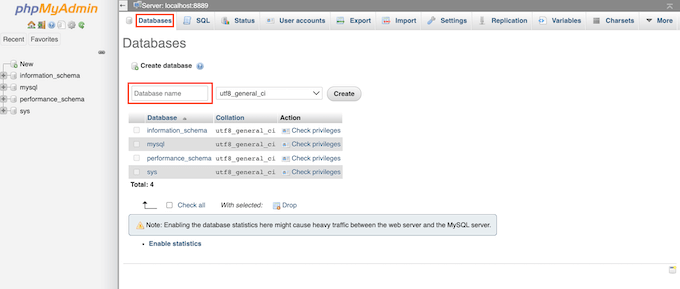
Veritabanı adınızı yazdıktan sonra ‘Oluştur’ düğmesine tıklayabilirsiniz.
PhpMyAdmin daha sonra veritabanınızı oluşturacaktır.
Şimdi sıra WordPress’i yüklemeye geldi.
Yeni bir tarayıcı sekmesinde http://localhost:8888/ adresine gidin. 8888 dışında bir bağlantı noktası kullanıyorsanız, bağlantı noktanızı belirtmek için bu URL’yi değiştirmeniz yeterlidir.
Şimdi kök belge klasörünüze kopyaladığınız ‘wordpress’ klasörüne bir bağlantı görmelisiniz. Devam edin ve bu bağlantıya tıklayın. Bu, WordPress kurulum sihirbazını açacaktır.
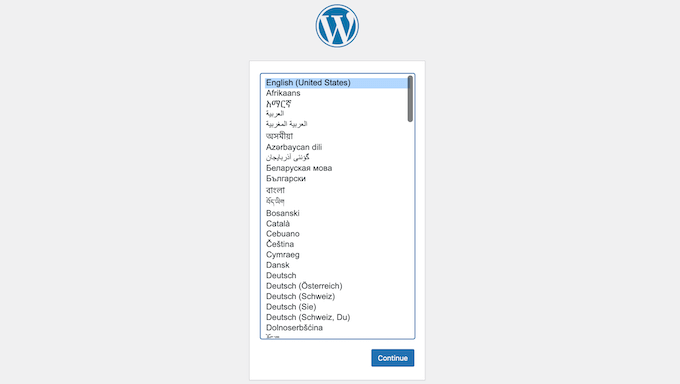
WordPress kurulum sihirbazı sizden bir dil seçmenizi isteyerek başlar. Seçiminizi yaptıktan sonra ‘Devam Et’ düğmesine tıklayabilirsiniz.
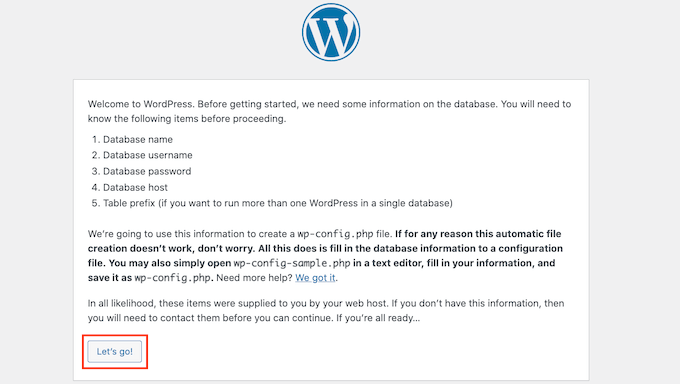
Bir sonraki ekranda WordPress size kurulumu tamamlamak için ihtiyaç duyduğu tüm bilgilerin listesini gösterecektir.
Bu ekranı okuduktan sonra, devam edin ve ilerlemek için ‘Hadi gidelim’ düğmesine tıklayın.
Kurulum sihirbazı şimdi WordPress veritabanı bilgilerinizi isteyecektir. Veritabanı adı için, önceki adımda oluşturduğunuz adı yazmanız yeterlidir.
‘Kullanıcı Adı’ ve ‘Parola’ için sadece ‘root’ yazın.
Daha sonra ‘Veritabanı Ana Bilgisayarı’ alanına ‘localhost’ yazabilirsiniz. Localhost, veritabanı ve web sitesinin aynı sunucuda barındırıldığı anlamına gelir; bu durumda bu sunucu Mac bilgisayarınızdır.
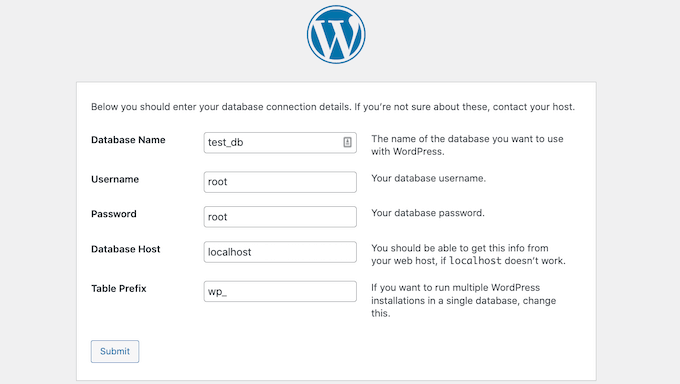
Tüm bu bilgileri yazdıktan sonra ‘Gönder’ düğmesine tıklamanız yeterlidir.
WordPress şimdi veritabanınıza bağlanacak ve sizin için bir yapılandırma dosyası oluşturacaktır. İşlem tamamlandığında bir başarı mesajı göreceksiniz.
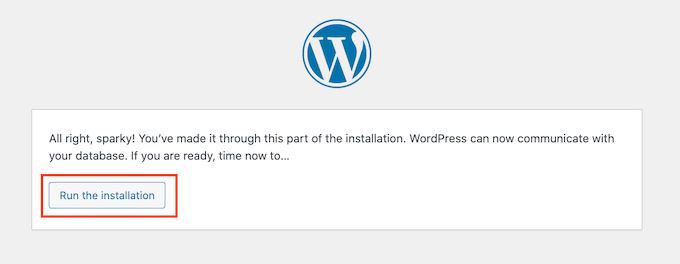
Bir sonraki adıma geçmek için ‘Kurulumu çalıştır’ düğmesine tıklayabilirsiniz.
Bir sonraki ekranda WordPress sizden bir site başlığı eklemenizi isteyecektir. Örneğin, işletmenizin adını kullanabilirsiniz. Çoğu WordPress teması bu başlığı web sitenizin en üstünde gösterir.
Sitenizin başlığından emin değilseniz panik yapmanıza gerek yok. WordPress kontrol panelinizden istediğiniz zaman başlığı değiştirebilirsiniz.
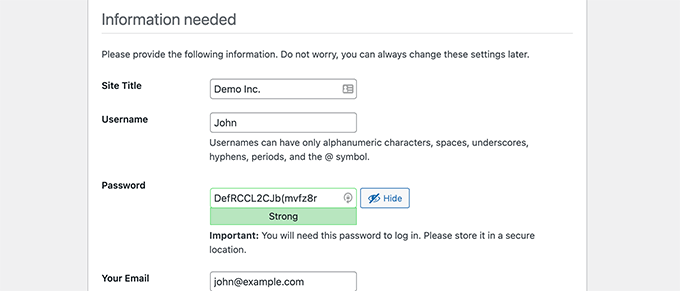
Daha sonra bir kullanıcı adı ve şifre oluşturmanız gerekecektir. Bu, WordPress kontrol panelinize erişmek için kullanacağınız giriş bilgileridir.
E-posta adresinizi ‘E-postanız’ alanına da yazabilirsiniz. Bu, WordPress’in tüm yönetici e-postalarını göndereceği adrestir.
Bu formu doldurduktan sonra ‘WordPress Yükle’ butonuna tıklayın.

WordPress şimdi kurulumu çalıştıracaktır.
Birkaç dakika sonra bir “Başarılı!” mesajı görmelisiniz.

Doğrudan WordPress giriş ekranınıza geçmek için ‘Giriş Yap’ düğmesine tıklayın.
Aşağıdaki URL’yi kullanarak yerel WordPress web sitenize de giriş yapabilirsiniz: http://localhost:8888/wordpress/wp-login.php
Not: Farklı bir Apache Bağlantı Noktası kullanıyorsanız, bu URL’nin ‘8888’ kısmını değiştirmeniz gerekecektir.
Şimdi devam edebilir ve bir önceki adımda oluşturduğunuz kullanıcı adı ve şifreyi girerek WordPress sitenize giriş yapabilirsiniz.
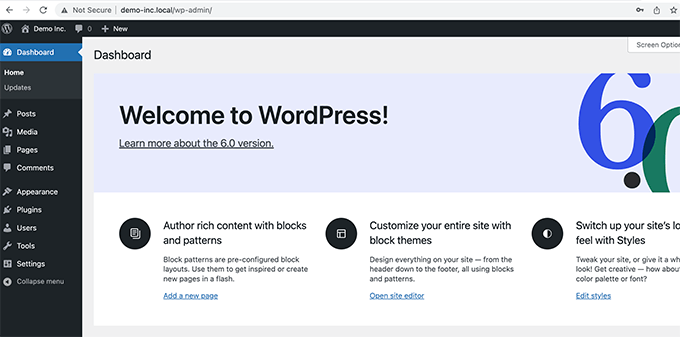
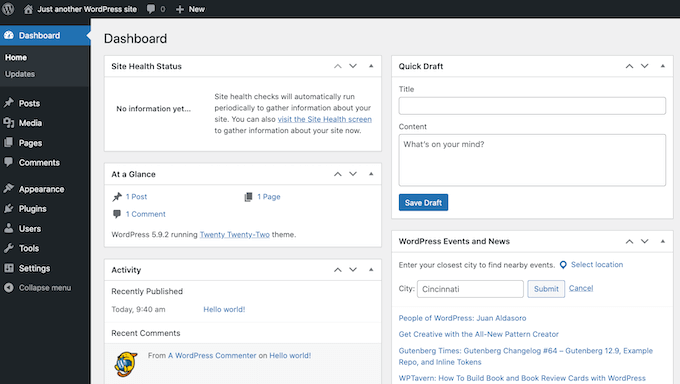
Bu sizi WordPress kontrol paneline götürecektir.
Mac’te Yerel Olarak WordPress Deneme
Yerel kurulum, WordPress’i test etmek veya bilgisayarınızda web siteleri geliştirmek için mükemmeldir. Artık WordPress Mac’inizde yerel olarak çalıştığına göre, burada denemek isteyebileceğiniz birkaç şey var:
- En iyi WordPress temaları ile denemeler yapın.
- Mükemmel WordPress temanızı bulmaya çalışın.
- Temel WordPress eklentilerini yerel olarak test edin.
- Kendi eklentilerinizi ve özel temalarınızı oluşturarak WordPress programlamayı öğrenin.
Yerel WordPress Yüklemenizi Canlı Web Sitesine Taşıma
WordPress ile yerel olarak oynadıktan sonra, WordPress yüklemenizi canlı bir web sitesine taşımak isteyebilirsiniz. Bu, başkalarının web sitenizi görebilmesinin tek yoludur.
Bunu yapmak için bir alan adı ve web barındırma satın almanız gerekir.
Alan adı, web sitenizin internetteki adresidir ve web hosting, web sitenizin dosyalarının depolandığı yerdir. Web hosting’i web sitenizin internetteki evi olarak düşünebilirsiniz.
Web barındırma için Bluehost‘ u öneriyoruz . Dünyanın en büyük hosting şirketlerinden biridir ve WordPress.org tarafından da resmen tavsiye edilmektedir.
Neyse ki Bluehost, WPBeginner kullanıcılarına barındırmada indirim, ücretsiz SSL sertifikası ve ücretsiz alan adı sunuyor. Temel olarak, yerel WordPress kurulumunuzu aylık 1,99 $ karşılığında canlı bir web sitesine dönüştürebilirsiniz.
Hosting satın aldıktan sonra, WordPress’i yerel bir sunucudan canlı bir web sitesine nasıl taşıyacağınıza ilişkin makalemizi görmek isteyebilirsiniz.
Umarız bu makale Mac’e yerel olarak WordPress yüklemeyi öğrenmenize yardımcı olmuştur. Ardından, adresindeki WordPress ile web sitesi oluşturma kılavuzumuza gözatmak veya en iyi yönetilen WordPress barındırma şirketleri karşılaştırmamızı görmek isteyebilirsiniz.
If you liked this article, then please subscribe to our YouTube Channel for WordPress video tutorials. You can also find us on Twitter and Facebook.


WPBeginner Staff
Since we don’t know what went wrong when you deleted the site earlier. We would recommend you to create a new site. Basically repeat the whole process all over again. Except this time create a new directory in your document root folder. Do the same with MySQL DB. Then install WordPress in the new directory using your new MySQL DB.
Steve
Great instructions! I was able to set up a site, but I needed to delete it and start over. I trashed the SQL database and the previous site folder. But when WordPress goes to install itself now, I get a huge error log in the browser saying that a ton of files, info “already exist.” Do I need to get rid of some other previously installed files and, if so, which ones?
Minyan
When I type in http://localhost/wordpress (I name the wordpress folder under the root folder of MAMP wordpress), it shows “404 not found. The requested URL /wordpress was not found on this server”. Can anyone tell me what I did wrong?
Schalk
Minyan,
Any luck with your “404 not found’ issue ??
ej
having the same problem. please help!
Ish
Instead of typing in ‘http://localhost/wordpress’,
just type in ‘localhost’ instead and it should bring you to the wordpress page.
Worked for me, hope it does for you!
ThankQ
Michelle Hamilton
These instructions are the best and easiest to follow out there. I actually used them to help my instructor set up WordPress on her new mac and I used them to set it up on the mac I use in my internship. Thanks so much!!!
Michelle Hamilton
These are the best and easiest to follow instructions out there. I actually used them to help my instructor install MAMP on her mac. I had already used them to do it for my internship that I am participating in. Great Job!!!
Julie Valin
Thank you very much for this great step-by-step tutorial! Very helpful for this first-time MAMP user, when at first I felt overwhelmed. Now I’m feeling informed and happy, and I always like to comment on those posts/tutorials that have really helped me. Kudos!
WPBeginner Staff
You can set up a staging environment for on a live server. Take a look at our guide on how to create staging environment for a WordPress site
Haley
Thanks for this tutorial – quick question for you: I’m designing a site for a client that I will have to build offline using MAMP, however I see the note about only being able to view it on my computer. Is there a way that my client (located in another state) can review the progress without making it live on their site?
Hannah
Oh god, thank you wpbeginner team so much. First time I’ve ever used MAMP and nothing seemed to say ‘Hey, for all you dummys, here’s how you install WordPress’- it just assumed we would know. *forever grateful*
Frank
Too easy guys, thanks a lot!
Alex Koch
Really appreciate your help. MAMP 3.0.3 comes with a slightly different interface and a different setup – you have to redirect Apache to /bin/phpMyAdmin/ in oder to setup your mysql database for wordpress and THEN redirect Apache to you actual root directory localhost/mysitewahtever/ where you put wordpress.
WordPress can access the db nevertheless.
Rich
Thank you for this easy to follow guide! I finally got the motivation up to move forward with a project I’ve almost completed and this guide really helped. Thanks again!
megan Dickson
This was AWESOME. SO EASY.
Thank you!
Tim Aldiss
Really useful, thanks
Tom Nguyen
Is it possible to receive emails from WordPress installed on a local server? I’m only asking because I had installed WordPress and forgot my administrator password. I click the Lost Your Password link to start the password reset process, but I never received an email.
I just ended up going to the local phpMyAdmin interface and reset the password that way.
Kate
I made an assumption when installing mamp/wordpress with my website name. The “website name” I used to set it up using your tutorial is not my website name my business currently owns and I am redoing. I thought if I used that one it would mess up the current site. So…..do I have to go back and put my “real” website name in the install files or can I just switch it over to my current domain name when I am done with the new wordpress site? Thanks!
Leigh
hey
followed steps ….up to setting up to part of .. new database – used test_db as per example
opening http://localhost/mysite in browser and getting 404 kicking out.
should be saying …
WordPress will notify you that it was unable to find wp-config.php file. !!!
…directory set cool , to mysite
///using default mamp ports
thanx for help in advance man !
smiles
Kate
I guess the issue was that I named my wp folder that contains all my wp files in hpdocs folder within MAMP using 2 words. Therefore I put a space in between and when I went to put the local host/mydomainname/wp-admin/ address to find my dashboard I apparently had to add a %20 due to the space. It seems to work now so I think I did it right! Thanks again for your sites guidance and prompt help. I really appreciate it and have added your site to my bookmarks and subscribed!
Kate
Well apparently it was so simple I was missing the part that I needed to put the _db after my new database I created Solved!
Kate
I am switching to wordpress from drupal and I appreciate and value your great resources and thorough steps coming from a newbie with no tech experience and knowledge!! I am having the same problem that Jen did above (12/12/2013). I’m using a Macbook Pro and got as far as trying to figure out whether the database that I set up in my wp-config file exists. I did the steps you recommended (it says all privileges are granted in my root user) , but maybe I’m doing it wrong cause I’m still getting the same error message as she did? Maybe I need another way of explaining the steps? I closed Skype and ensured websharing wasn’t on, but that didn’t change anything. Totally stumped!!
WPBeginner Support
Kate once you start MAMP, you need to go to http://localhost/phpmyadmin create a new database. Open your wp-config.php file and enter the database name on the line:
define('DB_NAME', 'YourDBNameHere');Let us know if this solved your problem.
Admin
Daniel
Thanks for the guide.
Now i have installed wordpress onto my mac, and have created a website. How do I go about starting a new website?
Thanks Dan
WPBeginner Support
Repeat the process by installing WordPress in a new directory (folder) and by creating a new database.
Admin
Syed
I am going through a nightmare. Thanks to your instructions, everything was running fine until today when I clicked on upgrade to the new MAMP version and went for an install, thinking that it will happen in the background.
It appears that the upgrade has either erased my data or has put it away. Incidentally, I had a full copy of the main drive on a different drive (the whole MAMP folder). I can see the folders and files in both places but when I try to start MAMP from the different drive where the old MAMP folders are placed, it still boots up with the new version and I can’t start my site.
I have no way to really know what to do next. Kindly help. Thanks
netyx
Thanks for the guide!
I have a problem though. I created a database and then MySQL server crashed. It’s not working anymore. Could you help me please anyone?
arzu
very helpful, thank you
Art
Yeah dude, this was very helpfull, thanks a lot!
Derek
Great tutorial. Thanks. It all worked fine for me until the very end. After I successfully installed wordpress I clicked on “View Site” and got a white splash screen that says “Your Website” followed by instructions on how to make it “live.” I don’t want to go live. I just want to work on building a theme locally. But for whatever reason, I’m just not able to view the site.
Help!
Thanks.
Ian
Perfect guide, much appreciated
Brandon
A breeze. Many thanks!
GH
Thank you so much. Very helpful explanation.
Jen
I just installed MAMP and my servers won’t start. Have you ever had this problem before? I tried restarting and re-reading the steps, thanks!
WPBeginner Support
check error logs in the directory where you installed MAMP
Admin
Jen
PLEASE HELP! I CANNOT FIND AN ANSWER AND IM ON A DEADLINE!
So everything was working until I clicked the ‘open start page’ button. Originally it just populated a web browser that only said:
It Works
Then, after refreshing it send me straight to the create config screen for wordpress and skipped the database start section. When I submitted the information your tutorial included it says :
“We were able to connect to the database server (which means your username and password is okay) but not able to select the (my database name) database.”
What do I do to fix this?? I was reading online and it says that there are some issues with Mac Mountain Lion, so I turned off the web sharing, which was the solution for this problem on all other sites. Please please please help!!
– Jen
WPBeginner Support
Jen, open your wp-config.php file which is located in your WordPress installation’s root directory. Look at the Database, database username and password sections. Go to phpmyadmin by typing
http://localhost/phpmyadminin the browser. Make sure that the database name in your wp-config file exists. Also check that the username used in wp-config file has all privileges by clicking on the Users tab in phpmyadmin.Admin
brad
i rescind my prior victory, when i finished working on my site, I stopped the servers and quit MAMP. When I restarted MAMP to work on a new project a few hours later I am unable to access any files in htdocs without a 404 error. MAMAP support forums have almost no responses to this issue, any one here have this issue? Any possible help? I’m not a tech person, just a designer so this is mostly greek to me.
Brad
Thanks for a simple and well explained tutorial! I got this up and running in under 15 mins!
Daniele
Thank you guys! Really helpful for a young Mac user like me!
jeroen faber
Great guide!
One thing: the following line in the guide:
“Open a new browser window and type http://localhost/mysite.”
didn’t take me to the WordPress installation screen, just typing “localhost” in the browser did.
Did i make some mistake in the configuration or….?
WPBeginner Support
seems like you have installed wordpress in your main www or htdocs or web directory under your Apache installation.
Admin
Dee
Thanks for this, it was really easy to follow and I had no problems at all!
Ton in 't Veld
I’ve made many sites already with Dreamweaver. Now I want to set up a WordPress blog for my wife. I installed MAMP. So far so good. In the preference I tried to start the servers. MySQL Server worked immediately, but the Apache server doesn’t go to green. I alreadyI switched off Skype (as advised before.
Many thanks for looking atmy problem.
WPBeginner Support
Sometimes skype is running in the background check in the activity monitor to make sure that skype is not running in the background.
Admin
George
Everything was going well until I got to, http://localhost:8888/wordpress. For some reason the Apache Server wouldn’t start with a port of 80. Please tell me what I’m not doing or doing wrong.
Thank you,
George
Editorial Staff
This is happening if you have Skype running. You need to change the port in Skype or quit skype while using Mamp.
Admin
Justin
That was exactly what I needed. One hang up I had was that “Web Sharing” was turned on in my Mac OSX “System Preferences.” It was causing a duplicate Apache server to run, which prevented phpmyadmin or the “Start Page” from running.
Editorial Staff
Thanks for sharing that with us Justin. Hopefully it will help others who read the comments
Admin
Jonas
Hi,
Followed your instructions an successfully installed WP. Many thanks
JaY Srivastava
Thanks for saving me real time, i knew how to do that on windows, but since i use my mac as my main work laptop it was getting difficult for me to test websites.
I have been always fan of wpbeginner but now i guess it has grown more.
Thanks Again !
RW
Been using my first install of mamp ever since I read this tutorial. The only thin that I’m struggling with is, porting it over to a live production site. I’m assuming I have to export my DB and then import it using phpmyadmin, but obviously, some things will have to change. Also have to manually upload all upload folders as well.
Does anyone have recommended workflow ideas?
Thanks,
Bob
Editorial Staff
If you have BackupBuddy, then you can easily create a full backup file and import that. To do it manually:
1. Install WordPress on new site and copy/paste the /wp-content/ directory from the old site.
2. Import all content using phpMyAdmin
3. Change the site_url and home_url options in wp_options to reflect the new site.
4. Login to the new site and go to Settings > General and click on the save button.
5. Go to Settings > Permalinks and click on the save button.
Admin
RW
perfect! thanks! never loved backupbuddy as it didn’t reliably work for me. the manual approach looks simple! thanks so much!
Bob
RW
I’ve been using MAMP for a week now and absolutely love it. Makes testing so much faster!
Thanks,
Bob
Gautam Doddamani
i have been using XAMPP from a long time and its serving me well…it has the same functionality as MAMP and perfectly runs on a mac
Raihan
this post is very useful to me. for this i saved this page
Gunstra
Great Tut, thank you.
Debbie
Finally, concise, step-by-step instructions on how to set-up WordPress. I have followed other instructions and still get lost on what to do. Thank you so much!!
Christopher Anderton
I’m using MAMP myself, however, there is a even simpler way to get up and running in notime using MAMP Stack (http://bitnami.com/stack/mamp) and the WordPress module (see the modules section at the page).
Luke
Definitely a useful process! I wish I had this article the first time I tried to set this up. It would have been a huge help!
What’s your opinion on modifying the hosts file to allow using a DNS name for the local site ( example.com instead of localhost )? Good practice? Bad practice?
I’ve personally found it helpful when transferring a site I’ve developed locally to a live server.
RW
That’s so helpful. I’ve read about doing this and I think it will save so much time working locally on sites. I guess it has to be configured (or reconfigured) for different sites?
Thanks,
Bob