Hiç WordPress sitenize bir dosya yüklemeye çalıştınız ve bir duvara mı çarptınız? İhtiyacınız olan resmi, eklentiyi veya temayı yükleyemediğinizde bu çok sinir bozucudur. Okuyucularımız bize sık sık dosya yükleme sorunlarıyla ilgili yardım istiyor çünkü bunlar iş akışınızı yavaşlatabilir.
Bazen bu dosya yükleme sınırları, medya kütüphanenize içerik eklemenizi veya ihtiyacınız olan daha büyük eklentileri ve temaları yüklemenizi beklenmedik bir şekilde engelleyebilir. Sanki elleriniz bağlı kalmışsınız gibi. Ve bunu nasıl düzelteceğinizi bilmediğinizde daha da sinir bozucu!
Ama endişelenmeyin, yardım etmek için buradayız. WordPress'in bu kadar yapılandırılabilir bir platform olmasını seviyoruz ve aynı sorunu çözmenin genellikle birden fazla yolu vardır.
Bu kılavuzda, WordPress'te maksimum dosya yükleme boyutunu artırmanın en kolay yollarını göstereceğiz. Bu sınırlamaları aşmanızı sağlayarak sevdiğiniz şeye geri dönmenize yardımcı olacağız - web sitenizi çalıştırmak!
WordPress'te Maksimum Dosya Yükleme Boyutunu Neden Artırmalısınız?
WordPress barındırma sağlayıcınız, kaydolduğunuzda ve WordPress kurduğunuzda varsayılan bir maksimum dosya yükleme boyutu belirleyecektir. Bu sınırı barındırma sağlayıcınız tanımlar ve genellikle 2MB ile 500MB arasında değişir.
Çoğu WordPress web sitesi sahibi için bu sınır fazlasıyla yeterli olacaktır.
Ancak, yükleme hatalarıyla karşılaşmamak için bu sınırı yükseltmeniz gereken zamanlar olacaktır.
Örneğin:
- Bir fotoğrafçılık web sitesi çalıştırıyorsunuz ve büyük resimler yüklemeniz gerekiyor.
- Tasarım veya fotoğraf portföyünüzde büyük görseller var.
- Daha büyük bir WordPress teması veya eklentisi yüklemek istiyorsunuz.
- E-kitaplar, fotoğraflar, videolar ve daha fazlası gibi dijital ürünler satmak istiyorsunuz.
- İçeriği düzenli olarak güncelliyor ve mevcut limitin ötesinde ses, fotoğraf ve daha fazlasını ekliyorsunuz.
Bunu belirtmişken, WordPress sitenizde maksimum dosya yükleme boyutunu nasıl artırabileceğinizi size gösterelim.
Not: Web sitenizde çok sayıda büyük dosya görüntülemenin hızını ve performansını ciddi şekilde yavaşlatabileceğini unutmayın. Bu nedenle genellikle videoları WordPress'e yüklememenizi öneririz.
Çoğu kullanıcının farklı WordPress barındırma kurulumları olduğundan, aşağıdakileri ele alacağız:
- WordPress'te Maksimum Dosya Yükleme Boyutu Sınırınızı Nasıl Kontrol Edersiniz
- Yöntem 1: WordPress Barındırma Sağlayıcınızla İletişime Geçin
- Yöntem 2: Mevcut bir php.ini dosyası oluşturma veya düzenleme
- Yöntem 3: WordPress Tema functions.php Dosyanıza Kod Ekleyin
- Yöntem 4: Kodunuzu .htaccess Dosyanıza Ekleyin
- Method 5: Use a WordPress Plugin to Increase File Upload Size
WordPress'te Maksimum Dosya Yükleme Boyutu Sınırınızı Nasıl Kontrol Edersiniz
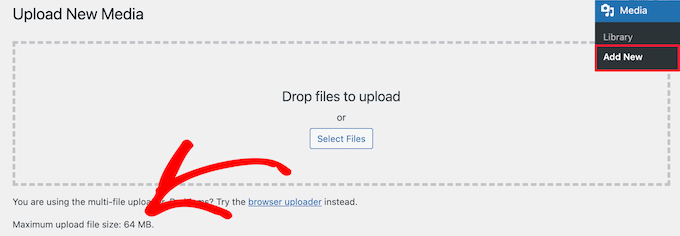
WordPress, görselleri veya diğer medyaları yüklerken otomatik olarak maksimum dosya yükleme boyutu sınırını gösterecektir.
Bunu kontrol etmek için WordPress yönetici panelinizde Medya » Yeni Ekle bölümüne gitmeniz yeterlidir; burada WordPress siteniz için maksimum dosya yükleme boyutu sınırını göreceksiniz.
Yükleme boyutunu nasıl bulacağınızı bildiğinize göre, şimdi WordPress'te maksimum yükleme boyutunu nasıl artıracağınızı göstereceğiz.
Yöntem 1: WordPress Barındırma Sağlayıcınızla İletişime Geçin
WordPress'te maksimum dosya yükleme boyutunu artırmanın en kolay yollarından biri WordPress barındırma sağlayıcınızla iletişime geçmektir.
Bu, müşteri hizmetleri ekipleri için nispeten basit bir görevdir ve birkaç dakika içinde tamamlanabilir.
Yeni başlayanlar için bu, WordPress'e kod eklemekten ve sunucu dosyalarını düzenlemekten çok daha kolay olabilir.
Sadece barındırma sağlayıcınızın web sitesine gidin, örneğin Bluehost gibi ve giriş yapın.
Ardından, ekranın altındaki ‘Sohbet’ simgesine tıklayın. Ardından destek personelinden WordPress sitenizdeki dosya yükleme boyutunu artırmalarını isteyebilirsiniz.
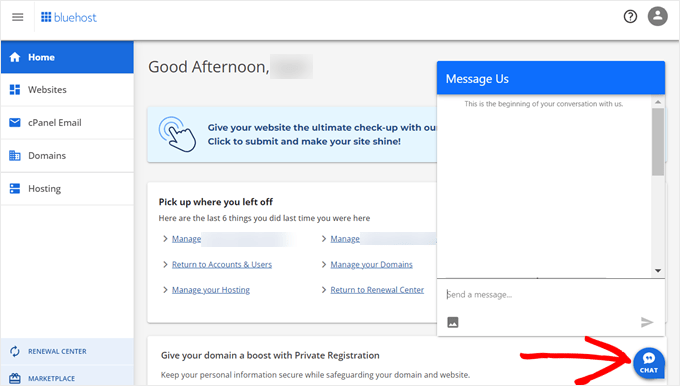
Barındırma hesabı kontrol panelinizden de destek ekibine ulaşabilirsiniz.
Yöntem 2: Mevcut bir php.ini dosyası oluşturma veya düzenleme
Maksimum dosya yükleme boyutunu artırmanın bir başka yolu da php.ini adlı bir dosya oluşturmak veya düzenlemektir. Bu dosya, WordPress barındırma ortamınız için birçok ayarı kontrol eder.
Bluehost gibi çoğu WordPress barındırma sağlayıcısı, web sitenizi yönetmenize yardımcı olmak için başlangıç dostu bir cPanel'e sahiptir.
Web barındırma hizmetinizin bir cPanel kontrol paneli varsa, yerleşik araçlar aracılığıyla dosya yükleme boyutunu artırabilirsiniz.
Not: Aşağıdakiler Bluehost cPanel'den alınmıştır. Ancak, çoğu paylaşımlı hosting sağlayıcısı benzer adımlara sahip olacaktır.
Bluehost'taki Barındırma sekmesinin altında bir cPanel düğmesi bulacaksınız.
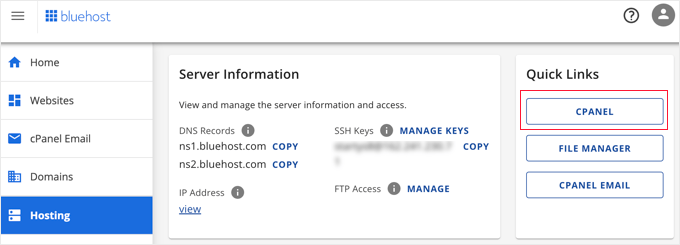
Bu düğmeye tıklamak cPanel kontrol panelinizi açacaktır.
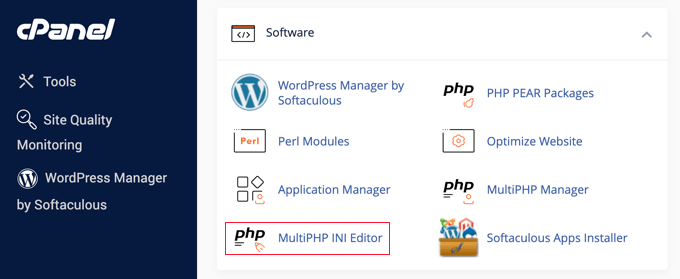
Şimdi aşağı kaydırıp Yazılım bölümüne gitmeniz ve 'MultiPHP INI Düzenleyici'ye tıklamanız gerekiyor.
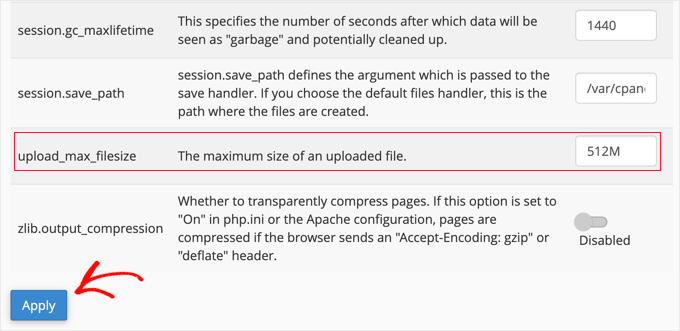
Ardından, 'upload_max_filesize' etiketli bölüme aşağı kaydırın ve kutuya yeni bir maksimum dosya boyutu girin.
Ardından, ‘Uygula’ düğmesine tıklayın.
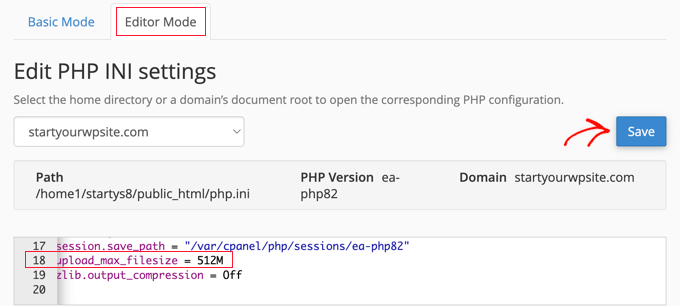
Alternatif olarak, 'Düzenleyici Modu' menü sekmesine tıklayabilir ve ardından maksimum dosya yükleme boyutunu doğrudan düzenleyicide değiştirebilirsiniz.
Dosya yükleme boyutunuzu artırmak için 'upload_max_filesize' bölümünü düzenlemeniz gerekir.
İşiniz bittiğinde, ‘Kaydet’ düğmesine tıklamanız yeterlidir.
Kodu Ekleyerek php.ini'yi Düzenleyin
Mevcut hosting sağlayıcınız cPanel seçeneği sunmuyorsa, bu dosyayı manuel olarak düzenlemeniz gerekecektir.
Bunu yapmak için, WordPress barındırma kontrol panelinizdeki FTP istemcisini veya dosya yöneticisi seçeneğini kullanabilirsiniz.
Eğer paylaşımlı barındırma kullanıyorsanız, barındırma dizininizde php.ini dosyasını görmeyebilirsiniz. Eğer bir tane görmüyorsanız, php.ini adında bir dosya oluşturup kök klasörünüze yüklemeniz yeterlidir.
Ardından, dosyaya aşağıdaki kod parçasını ekleyin:
upload_max_filesize = 256M
post_max_size = 256M
max_execution_time = 300
‘256M’ limitini, WordPress blogunuz için ihtiyacınız olan dosya boyutuna göre değiştirebilirsiniz.
Yöntem 3: WordPress Tema functions.php Dosyanıza Kod Ekleyin
Bu yöntem, functions.php dosyanıza WordPress temanızdaki kod eklemeyi içerir.
Dosyayı doğrudan düzenlemek yerine, WPCode kullanmanızı öneririz. Sitenizi bozmadan kod eklemenizi sağlayan en iyi kod parçacığı eklentisidir.
Daha önce bunu yapmadıysanız, WordPress'e özel kod ekleme konusundaki başlangıç kılavuzumuza bakın.
İlk olarak, ücretsiz WPCode eklentisini yüklemeniz gerekir. Daha fazla ayrıntı için, bir WordPress eklentisinin nasıl kurulacağına dair adım adım kılavuzumuza bakın.
Etkinleştirdikten sonra Kod Parçacıkları » + Parçacık Ekle bölümüne gitmelisiniz.
Fare imlecini 'Özel Kodunuzu Ekleyin (Yeni Parça)' seçeneğinin üzerine getirmeniz ve ardından '+ Özel Parça Ekle' düğmesine tıklamanız gerekecektir.

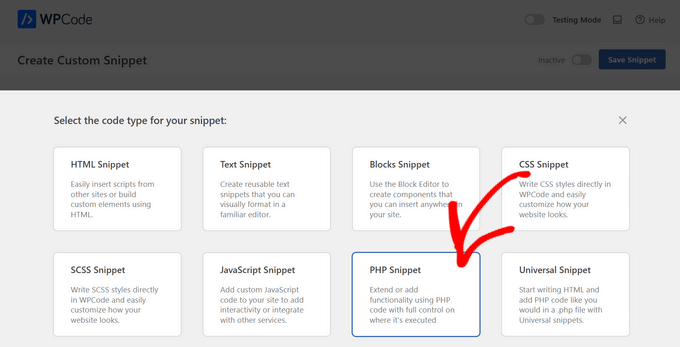
Ardından, görünen seçenekler listesinden kod türü olarak 'PHP Snippet'i seçmeniz gerekir.
Bir sonraki ekranda, kodun ne işe yaradığını hatırlamanıza yardımcı olacak herhangi bir isim verebileceğiniz yeni kod parçacığınız için bir ad girin.
Ardından, aşağıdaki kod parçasını ‘Kod Önizlemesi’ altına kopyalayıp yapıştırabilirsiniz. ‘256M’ değerini ihtiyacınız olan maksimum dosya boyutuna değiştirdiğinizden emin olun:
@ini_set( 'upload_max_size' , '256M' );
@ini_set( 'post_max_size', '256M');
@ini_set( 'max_execution_time', '300' );
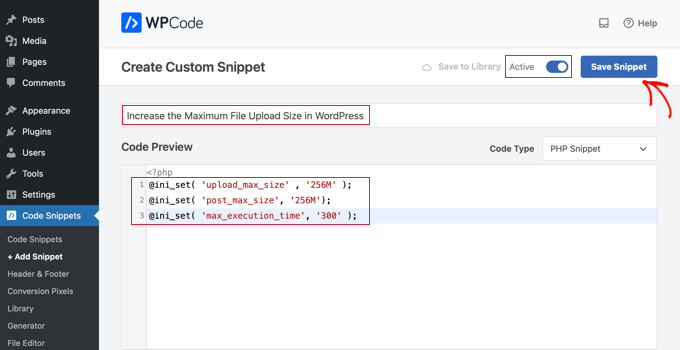
Son olarak, üstteki anahtarı ‘Aktif’ olarak değiştirin ve ardından ‘Snippet Kaydet’ düğmesine tıklayın. Kod artık web sitenizde çalıştırılacaktır.
Yöntem 4: Kodunuzu .htaccess Dosyanıza Ekleyin
Maksimum dosya boyutunu artırmanın bir başka yolu da .htaccess dosyasını değiştirmektir. Bu dosya, web siteniz için üst düzey yapılandırma ayarlarını kontrol eder.
Bunu yapmak için web sitenizin sunucusuna FTP aracılığıyla giriş yapmanız gerekir. Bunu daha önce yapmadıysanız, WordPress için yeni başlayanlar için FTP'nin dosya yüklemek için nasıl kullanılacağına dair kılavuzumuza bakın.
Ardından, web sitenizin kök klasöründeki .htaccess dosyanızı bulmanız gerekir.

.htaccess dosyanızı bulamıyorsanız, dosya yöneticiniz veya FTP istemciniz tarafından gizlenmiş olabilir. Daha fazla bilgi için, WordPress sitenizde .htaccess dosyasını neden bulamadığınıza ilişkin kılavuzumuza bakın.
Ardından, aşağıdaki kod parçasını .htaccess dosyanıza eklemeniz gerekir:
php_value upload_max_filesize 256M
php_value post_max_size 256M
php_value max_execution_time 300
php_value max_input_time 300
Maksimum dosya yükleme boyutunuzu daha da artırmak için, '64M' değerini istediğiniz boyuta değiştirmeniz yeterlidir.
Yöntem 5: Dosya Yükleme Boyutunu Artırmak İçin Bir WordPress Eklentisi Kullanın
Maksimum dosya yükleme limitini artırmanın bir başka yolu da WP Yükleme Dosya Boyutunu Artır eklentisini kullanmaktır. WordPress'e kod eklemek konusunda rahat değilseniz, bu sizin için iyi bir seçenek olabilir.
Yapmanız gereken ilk şey eklentiyi kurmak ve etkinleştirmektir. Daha fazla ayrıntı için, bir WordPress eklentisinin nasıl kurulacağına dair kılavuzumuza bakın.
Etkinleştirdikten sonra, WordPress yönetici panelinizde Medya » Yükleme Limitini Artır bölümüne gidin.
Bu sizi, ‘Maksimum Yükleme Dosya Boyutu Seçin’ açılır menüsünden yeni bir dosya yükleme boyutu seçebileceğiniz bir ekrana getirir.
Ardından, ‘Değişiklikleri Kaydet’ düğmesine tıklayın.

Not: Maksimum dosya yükleme boyutu barındırma sağlayıcınız tarafından ayarlanacaktır. Açılır listede belirtilenden daha büyük bir dosya boyutu sınırı gerekiyorsa, barındırma sağlayıcınızla iletişime geçmeniz ve sınırı artırmasını istemeniz gerekir.
Video Eğitim
Yazılı talimatları takip etmekten hoşlanmıyorsanız, bunun yerine video eğitimimize göz atabilirsiniz:
Bu makalenin WordPress'te maksimum dosya yükleme boyutunu artırmanıza yardımcı olduğunu umuyoruz. Ayrıca, WordPress'te yüklenecek ek dosya türlerinin nasıl ekleneceğine dair kılavuzumuzu ve WordPress yönetim alanını iyileştirmek için eklentiler ve ipuçları hakkındaki uzman seçimlerimizi de görmek isteyebilirsiniz.
Bu makaleyi beğendiyseniz, lütfen WordPress video eğitimleri için YouTube Kanalımıza abone olun. Bizi ayrıca Twitter ve Facebook'ta da bulabilirsiniz.


Abduaziz
Çok teşekkürler!!! 3. Yöntem benim için işe yaradı
WPBeginner Desteği
Glad our recommendation could help
Yönetici
Alexander Gartley
Teşekkürler, bu bir yükleme sınırını gidermeme yardımcı oldu. WordPress çoklu site ağı kurulumundayım, bu yüzden sonunda Ağ Yönetici Ayarlarındaki bir ayar oldu.
Başlangıçta kafam karışmıştı, çünkü php ayarlarım daha büyük yüklemelere izin veriyordu, ancak Ağ Ayarlarında kısıtlanmıştı.
WPBeginner Desteği
Thanks for sharing what solved the problem for you
Yönetici
Ernesto
.user.ini yöntemini dahil etseydiniz harika olurdu.
Düzenlenmiş php.ini dosyanızdaki aynı değere/metne sahip .user.ini kök klasöre yüklendi
Çoğu zaman, paylaşımlı barındırmada yalnızca bu yöntem işe yarar.
ErnestPH
WPBeginner Desteği
The php.ini file should work the same as the user.ini file unless your specific host ignores the php.ini but thank you for sharing your recommendation
Yönetici
Mark
Bu, paylaşımlı barındırma sunucumda çalışan tek çözüm. Teşekkürler Ernesto!
Tamir Davidoff
Bende çalışmıyor.
Bu kılavuzu takip ettim ve değişikliklerin gerçekten kaydedildiğinden emin olmak için php.ini dosyasını tekrar kontrol ettim. Limitleri artırmak için htaccess dosyasını değiştirdim. Ayrıca phpMyAdmin httpd-app.conf ve php-settings.conf dosyasını değiştirmeyi de denedim. Bu dosyaların tümü 40m'den daha yüksek maksimum yüklemeyi yansıtıyor ve WP sitem bu değişikliklerin Hiçbirini yansıtmıyor. Gerçekten sinir bozucu burada.
Lütfen yardım edin, teşekkürler!
WPBeginner Desteği
If you haven’t already, you would want to reach out to your hosting provider to ensure there is not a setting on their end that is overriding what you are setting
Yönetici
rajesh
3 yöntemi de denedim, hiçbiri işe yaramadı. WordPress siteme gazete temasını yüklemeye çalışıyorum. ancak her seferinde php.ini dosyasının yükleme maksimum dosya boyutu hatası veriyor.
Lütfen bana yardım edin
WPBeginner Desteği
Yaptığınız değişiklikleri geçersiz kılan bir ayar olmadığından emin olmak için barındırma sağlayıcınızla iletişime geçmek isteyeceksiniz.
Yönetici
Adam Walsworth
Gizli php.ini dosyalarına dikkat edin. Kurulumumda bunlardan 2 tane buldum. Aslında sorunu çözen dosyayı şurada buldum
./etc/php/7.0/apache2/php.ini
bu dosyayı değiştirmek sorunumu çözdü.
WPBeginner Desteği
Çözümünüzü paylaştığınız için teşekkürler, dosyanın nerede bulunduğunu göz önünde bulundurarak, çoğu kullanıcının bu tür yerlere bakmadan önce barındırma sağlayıcısıyla iletişime geçmesini öneririz.
Yönetici
Rafiq khan
Teşekkürler dostum, php.ini dosyamı düzenleyerek 2. yöntemi benimseyerek sorunumu çözdüm.
Çok teşekkürler, harika çalışıyorsunuz.
WPBeginner Desteği
Glad our article could help
Yönetici
Carla
Yukarıdakilerin hiçbiri benim için işe yaramadı. Hatta htaccess dosyasını düzenlemek, yukarıdaki kodu sildikten sonra bile sitemi bozdu. Yeni bir dosya ile üzerine yazmak sorunu çözdü.
Bluehost'ta özel bir sunucum var. Benim için işe yarayan şey, cpanel veya FTP erişimi değil, WHM kök dizinine girmek oldu. MultiPHP INI Editor'ü arayın. Başlığı ve simgesini yalnızca görüyorsanız yüklenmesi için en az 5 dakika bekleyin. Yükleme sürenizi, gönderi boyutunuzu vb. orada ayarlayabilirsiniz. Siteniz Cloudflare kullanıyor olsa bile, geliştirme moduna almadan veya önbelleği temizlemeden anında çalışır. Umarım bu birilerine yardımcı olur.
WPBeginner Desteği
Thank you for sharing what worked for you, should other users be on a dedicated server, if they reach out and let BlueHost know the need to increase the upload size then BlueHost can normally edit that for them
Yönetici
Pezza
Harika Şeyler! .htaccess benim için işe yaradı!
WPBeginner Desteği
Thank you, glad our guide could help
Yönetici
ReineR
htaccess yöntemi benim için işe yaradı, teşekkürler!
WPBeginner Desteği
Glad our article could help
Yönetici
Ahmed
Benim için çalıştı
3. htaccess Yöntemi
bu dosyayı görüntülemek ve düzenlemek için (gizli dosyaları göster) tıklamanız gerekir.
WPBeginner Desteği
Glad our article could help
Yönetici
rahul
Bunu denediğimde
Ölümcül hataları kontrol etmek için site ile iletişim kurulamadı, bu nedenle PHP değişikliği geri alındı. PHP dosya değişikliğinizi SFTP gibi başka bir yolla yüklemeniz gerekecektir.
bu başıma geldi
Bunun çözümü nedir
WPBeginner Desteği
Kodu eklemek için WordPress'in kendisi yerine FTP kullanmanız gerekir: https://www.wpbeginner.com/beginners-guide/how-to-use-ftp-to-upload-files-to-wordpress-for-beginners/
Yönetici
Ephraim
php.ini yöntemini deniyordum ama hiç çalışmıyor, lütfen nasıl ayarlayabilirim..
Ya da lütfen function.php'ye nereye yapıştıracağımı söyler misiniz?
WPBeginner Desteği
php.ini dosyasındaki içeriği ayarlamak için normalde bir metin düzenleyici kullanırsınız. functions.php dosyanız için, daha sonra gerektiğinde kaldırılabilsin diye normalde sonuna eklenmelidir. Ayrıca, barındırma sağlayıcınızla bu yöntemlerle ilgili sorun yaşıyorsanız, dosya boyutunu sizin için artırıp artıramayacaklarını kontrol etmek isteyebilirsiniz.
Yönetici
Ivos G.
Hiçbiri benim için işe yaramadı. Ama bu onu düzeltti – .htaccess dosyanıza şu satırı ekleyin:
LimitRequestBody 104857600
WPBeginner Desteği
Thanks for sharing your solution for this issue
Yönetici
Achilleas
Nginx kullanıyorum ve php.ini'deki php değerlerini zaten doğru bir şekilde ayarlamıştım ancak beni düzelten şey, sunucu bloğuna aynı değeri client_max_body_size xxxM; değişkeniyle koymaktı.
Umarım birilerine yardımcı olur diye yazıyorum.
Yayın Kadrosu
Thank you for sharing this with us
Yönetici
RAHUL
Bu benim için işe yaradı, teşekkürler
WPBeginner Desteği
Glad our tutorial could help
Yönetici
Adriana Sabo
Seçeneklerin hiçbiri benim için işe yaramadı. İlk ikisini denediğimde hiçbir şey olmadı ve sonuncusu 500 hatası verdi. Yardımcı olabilir misiniz?
Carl
Çok yardımcı oldu, teşekkürler!
Md. Rana
The third option is worked for me.
WPBeginner Desteği
Merhaba Rana,
Sizin için işe yaramasına sevindim. Daha fazla WordPress ipucu ve öğreticisi için bizi Facebook'ta takip etmeyi unutmayın.
Yönetici
Tom Allen
Yukarıdaki açıklama barındırılan siteler için uygundur, ancak biz localhost kullananlar ne olacak? WP Plugins'ten veya bir zip dosyasından Updfaftplus indirirken hala "upload_max_filesize" hatasını çözemiyorum. Ben bir başlangıç seviyesindeyim ve bu süreçte bana yol gösterilmesine ihtiyacım var. Yardımınız takdir edilecektir.
crystal
hta erişimi çalıştı.
Kodu #END Wordpress'ten önce koymalısınız
Eğer #end wordpress'ten sonra koyarsanız, benim godaddy hosting deneyimimde site 500 iç sunucu hatası veriyor
Luis Felipe Lino
Teşekkürler.
Jaime Lopes
Kurduğum paylaşımlı cPanel sitelerinin çoğunda:
- .htaccess dosyasını değiştirmek tüm siteyi çökertiyor (500 dahili hata)
- php.ini veya php5.ini dosyaları eklemek hiçbir işe yaramıyor
- cPanel'de 'Site Yazılımı' seçeneği yok…
Joseph
Çok teşekkürler. .htaccess dosyası benim için işe yaradı
John S
Çok teşekkürler. .htaccess dosyası benim için işe yaradı!
Karina
Thanks you so much!!! The .htaccess version worked for me
Megan
Teşekkürler! Bu çok büyük bir yardım oldu! Eklenti bile yükleyemiyordum çünkü limitim önceden 2MB olarak ayarlanmıştı… Şimdi 64MB'a çıkardım ve çalışabiliyorum.
Teşekkürler!
Okimi Solomon
Çok teşekkürler. İkinci seçenek benim için işe yaradı. Tanrı seni korusun
Benj
.htaccess dosyasını değiştirmek benim için işe yaradı. Çok teşekkürler..
Martin Croker
Vidahost'ta (şimdi TSOhost).
Aşağıdaki php.ini'yi eklemek benim için işe yaradı… ancak (ve hala neden olduğundan biraz kafam karışık), sadece http köküne koymak işe yaramadı – wordpress içindeki wp-admin ve wp-include dizinlerinin içine php.ini dosyasını kopyalamam gerekti.
Kabelo
Çok yardımcı oldu. Çok teşekkürler.
Dwayne S
HostGator kullanıyorum ve şu anda maksimum yürütme süresiyle ilgili bir sorun yaşıyorum. Birkaç hafta önce oldu ve HostGator desteği sorunu çözdü. Şimdi tekrar ortaya çıktı ve destek bana paylaşımlı sunucuda olduğum için bunu çözemeyeceklerini söylüyor. Temsilci, htaccess dosyasını manuel olarak düzenleyerek sitemi çökertti ve çalışıp çalışmadığını doğrulamadı. Ancak, limiti artırmak için koduyla htaccess dosyasını düzenleyecek bir eklenti önerdi ama işe yaramadı. Sanırım HostGator bunu engelliyor.
Jessany
Kodu .php functions klasörüne ekledim ve şimdi Wordpress yüklenmiyor. Bu sorunu nasıl düzeltebilirim??
WPBeginner Desteği
Merhaba Jessany,
FTP veya cPanel'deki Dosya Yöneticisi aracılığıyla web sitenize erişerek eklediğiniz kodu silebilirsiniz.
Yönetici
bala
yukarıdaki kodu .htaccess dosyasına yükleyin, çalışıyor
Caleb
GoDaddy barındırma hizmetim var ve dosya yükleme boyutumu artırmaları için onlarla iletişime geçtim. Çok kolaydı — herhangi bir dosya oluşturmama, temama kod eklememe veya benzeri bir şey yapmama gerek kalmadı. Bu nedenle GoDaddy veya cPanel türü kontrollere sahip olanlarınız için, hileleri unutun ve sadece yönetici ayarlarınızı kullanın.
Destek ekibinin bana yaptırdığı şey şu:
1. cPanel Yönetici'nize gidin (benzer bir barındırma paneli biraz aynı şekilde çalışabilir)
2. 'Yazılım'a aşağı kaydırın ve 'PHP Sürümünü Seç'e tıklayın
3. Sağ üstteki 'PHP Seçeneklerine Geç'e tıklayın VE TADA! Tüm PHP Seçenekleriniz orada!
4. Sadece aşağı inin ve 'post_max_filesize' ve 'upload_max_filesize'i istediğiniz gibi değiştirin, değişikliklerinizi uygulayın ve kaydedin, artık güvenli ve mutlu, kodlama bilmeyen bir web sitesi sahibisiniz.
İyi şanslar!
ZafB
Teşekkürler, mükemmel çalıştı
Alissa
Bunu paylaştığınız için teşekkürler! Harika işe yaradı!
Alejandra
Çok teşekkürler! Gerçekten işe yaradı!!
Paul Palmer
Harika çözüm – mükemmel ve kolay bir şekilde işe yaradı! Çok teşekkürler.
Rich Perozich
Bu benim için işe yaradı, ancak bu dosyaları bulabilmek için Godaddy'yi aramam gerekti, orada bana bu adımlar anlatıldı, yoksa onların yardımı olmadan cpanel Yönetici'sine asla ulaşamazdım.
1. Godaddy'ye giriş yapın
2. Sol üstteki ürünlerim'e tıklayın
3. Web barındırma altında tümünü yönet'e tıklayın
4. C panel ile web barındırma'ya tıklayın
5. C panel Yönetici simgesine tıklayın
6. Yazılım'a aşağı kaydırın ve php sürümünü seç'e tıklayın
7. php seçeneklerine geç'e tıklayın
8. Sayfanın altında upload_max_filesize numarasına tıklayın ve istediğiniz # sayısını maksimum dosya boyutu olarak seçin
9. Uygula'ya tıklayın. İşe yarıyor. Artık dosya boyutları seçilen maksimuma yüklenebilir.
Chris Sandford
Çoklu Site Kullanıcıları:
Benim gibi aptal biriyseniz, boşuna her şeyi denemiş olabilirsiniz.
Wordpress Çoklu Site kullanıyorsanız, bireysel siteler için yükleme ayarlarını değiştirmeyi unutmayın.
Ağ Yöneticisi > Ayarlar > Maksimum yükleme dosya boyutu
Bu makaledeki ipuçlarını hala kullanmanız gerekebilir, ancak çoklu site için yükleme ayarlarını değiştirmeden çalıştığını bilemezsiniz.
Stef Thoen
Kahramanımsın. Bu sorunla çok uzun süredir araştırma yapıyordum, sonunda gönderinizi görene kadar. Çok teşekkürler.
Ron
Bunun için teşekkürler! Bu makalenin gövdesinde yer almalı!
Hitesh L.
İŞE YARADI! size teşekkürler!!!!!!!
Emanuel Pietri
Yöntem 3 – .htaccess ile – tema ile benim için iyi çalışıyor
Stefanos Kargas
Teşekkürler!! .htaccess dosyasını değiştirdim ve işe yaradı.
haadi
Merhaba. Çok teşekkürler. 3. yöntem benim için işe yaradı
Jim R
Seçenek 2 iyi çalıştı. Bilgi için teşekkürler.
Tor Helge
Sonuncuyu .htaccess ile yaptığımda işe yaradı
mara
Burada Godaddy ile bunu çalıştıran var mı? Çok yardımları dokunmuyor. php.ini dosyasını oluşturmam gerektiğini biliyorum (ve yaptım), ancak yayınladığınız çözümlerin hiçbiri işe yaramadı. Herhangi bir yardım takdir edilecektir.
WangTuanJie
3. yöntemden sonra başarı göremedim.
Mahadi
Teşekkürler dostum!! .htacces benim için işe yaradı!
Lynn
Wish you wouldn’t assume everyone looking for this solution knows what you mean by our “Theme Functions File” – do you mean functions.php? I’m not an expert, and I’m really good at following precise directions, and don’t want to even put a toe in the water of editing files if I don’t know EXACTLY what file you’re talking about! No clues were provided, like what other code I might look for in the file to know I’m in the right place, etc. So…this didn’t help me at all
WPBeginner Desteği
Merhaba Lynn,
Evet, temanızın functions.php dosyasına eklemeniz gerekiyor.
Yönetici
Justin
Evet, ama functions.php dosyasına nereye ekleniyor. En üste mi, en alta mı, ortaya mı? Tırnak işaretlerinin içine mi
WPBeginner Desteği
Merhaba Justin,
En sonda.
jack
teşekkürler tüm bu adımlar bana yardımcı oldu
Alex
Teşekkürler, 3. yöntem benim için gerçekten işe yaradı
php_value upload_max_filesize 64M
php_value post_max_size 64M
php_value max_execution_time 300
php_value max_input_time 300
vikram
MERHABA
Paylaşımlı hosting kullanıyor musunuz?
shahrin
harika! htaccess yöntemi benim için işe yaradı. Çok rahatladım, millet! Şimdiden teşekkürler
Samba Siva
.htaccess method worked for me
nelson
htaccess benim için işe yaradı, teşekkürler
Sagar
php.ini benim için işe yaradı.
Sağ ol.
Teşekkürler adamım !!
Mituka
Bu benim için işe yaradı.
.htacess dosyanızı not defteri ile açın.
Gördüğünüz her şeyi atlayın ve en alta inin.
Aşağıdakini yapıştırın ve kaydedin.
php_value upload_max_filesize 64M
php_value post_max_size 64M
php_value max_execution_time 300
php_value max_input_time 300
Thomas
Tam olarak nereye yapıştırdınız?
# BEGIN WordPress
RewriteEngine On
RewriteBase /
RewriteRule ^index\.php$ – [L]
RewriteCond %{REQUEST_FILENAME} !-f
RewriteCond %{REQUEST_FILENAME} !-d
RewriteRule . /index.php [L]
# SON WordPress
php_value upload_max_filesize 64M
php_value post_max_size 64M
php_value max_execution_time 300
php_value max_input_time 300
#END WordPress ifadesinden önce mi? (Bunu yaptığımda hata alıyorum)
Yoksa #END WordPress ifadesinden sonra mı olmalı?
WPBeginner Desteği
Merhaba Thomas,
.htaccess dosyanızın sonuna, #END WordPress satırından sonra yapıştırmanız gerekiyor.
Yönetici