
Hiç WordPress sitenize bir dosya yüklemeye çalıştınız ve duvara tosladınız mı? İhtiyacınız olan görseli, eklentiyi veya temayı yükleyememek çok sinir bozucu. Okurlarımız sık sık dosya yükleme sorunlarıyla ilgili bizden yardım istiyor çünkü bu sorunlar iş akışınızı yavaşlatabiliyor.
Bazen bu dosya yükleme sınırları beklenmedik bir şekilde medya kitaplığınıza içerik eklemenizi veya ihtiyacınız olan daha büyük eklentileri ve temaları yüklemenizi engelleyebilir. Eliniz kolunuz bağlı kalmak gibi bir şey. Ve bunu nasıl düzelteceğinizi bilmediğinizde daha da can sıkıcıdır!
Ama endişelenmeyin, yardım etmek için buradayız. WordPress’in bu kadar yapılandırılabilir bir platform olmasını ve aynı sorunu çözmenin genellikle birden fazla yolu olmasını seviyoruz.
Bu kılavuzda, WordPress’te maksimum dosya yükleme boyutunu artırmanın en kolay yollarını göstereceğiz. Bu sınırlamaları aşmanızı sağlayacağız, böylece sevdiğiniz şeyi yapmaya geri dönebilirsiniz – web sitenizi çalıştırmak!

WordPress’te Maksimum Dosya Yükleme Boyutu Neden Arttırılmalı?
WordPress barındırma sağlayıcınız, kaydolduğunuzda ve WordPress‘i yüklediğinizde varsayılan bir maksimum dosya yükleme boyutu belirleyecektir. Bu sınırı barındırma sağlayıcınız belirler ve genellikle 2 MB ile 500 MB arasında değişir.
Çoğu WordPress web sitesi sahibi için bu sınır fazlasıyla yeterli olacaktır.
Ancak, yükleme hatalarıyla karşılaşmamak için bu sınırı yükseltmeniz gereken zamanlar olabilir.
Örneğin:
- Bir fotoğrafçılık web sitesi işletiyorsunuz ve büyük resimler yüklemeniz gerekiyor.
- Tasarım veya fotoğraf portföyünüzde büyük görseller var.
- Daha büyük bir WordPress teması veya eklentisi yüklemek istiyorsunuz.
- E-Kitaplar, fotoğraflar, videolar ve daha fazlası gibi dijital ürünler satmak istiyorsunuz.
- İçeriği düzenli olarak günceller ve mevcut sınırın ötesinde ses, fotoğraf ve daha fazlasını eklersiniz.
Bununla birlikte, WordPress sitenizdeki maksimum dosya yükleme boyutunu nasıl artırabileceğinizi gösterelim.
Not: Web sitenizde çok sayıda büyük dosya görüntülemenin web sitenizin hızını ve performansını ciddi şekilde yavaşlatabileceğini unutmayın. Bu yüzden genellikle WordPress’e asla video yüklememenizi öneririz.
Çoğu kullanıcı farklı WordPress barındırma kurulumlarına sahip olduğundan, aşağıdakileri ele alacağız:
- How to Check Your Maximum File Upload Size Limit in WordPress
- Method 1: Contact Your WordPress Hosting Provider
- Method 2: Create or Edit an Existing php.ini file
- Method 3: Add Code to Your WordPress Theme functions.php File
- Method 4: Add Code to Your .htaccess File
- Method 5: Use a WordPress Plugin to Increase File Upload Size
WordPress’te Maksimum Dosya Yükleme Boyutu Sınırınızı Kontrol Etme
WordPress, görüntüleri veya diğer medyaları yüklerken otomatik olarak maksimum dosya yükleme boyutu sınırını gösterecektir.
Bunu kontrol etmek için WordPress yönetici panelinizde Medya ” Yeni Ekle bölümüne gidin ve WordPress siteniz için maksimum dosya yükleme boyutu sınırını göreceksiniz.

Artık boyut sınırını nasıl bulacağınızı bildiğinize göre, WordPress’te maksimum yükleme boyutunu nasıl artıracağınızı gösterelim.
Yöntem 1: WordPress Hosting Sağlayıcınızla İletişime Geçin
WordPress’te maksimum dosya yükleme boyutunu artırmanın en kolay yollarından biri WordPress barındırma sağlayıcınıza ulaşmaktır.
Bu, müşteri hizmetleri ekibi için nispeten basit bir görevdir ve birkaç dakika içinde yapılabilir.
Yeni başlayanlar için bu, WordPress’e kod eklemekten ve sunucu dosyalarını düzenlemekten çok daha kolay olabilir.
Bluehost gibi barındırma sağlayıcınızın web sitesine gidin ve oturum açın.
Ardından, ekranın altındaki ‘Sohbet’ simgesine tıklayın. Daha sonra destek personelinden WordPress sitenizdeki dosya yükleme boyutunu artırmasını isteyebilirsiniz.

Ayrıca hosting hesabınızın kontrol panelinden de desteğe ulaşabilirsiniz.
Yöntem 2: Mevcut bir php.ini dosyası oluşturun veya düzenleyin
Maksimum dosya yükleme boyutunu artırmanın bir başka yolu da php.ini adlı bir dosya oluşturmak veya düzenlemektir. Bu dosya WordPress barındırma ortamınız için birçok ayarı kontrol eder.
Bluehost gibi çoğu WordPress barındırma sağlayıcısı, web sitenizi yönetmenize yardımcı olacak yeni başlayan dostu bir cPanel’e sahiptir.
Web barındırıcınızın bir cPanel panosu varsa, yerleşik araçlar aracılığıyla dosya yükleme boyutunu artırabilirsiniz.
Not: Aşağıdakiler Bluehost cPanel’den alınmıştır. Ancak, çoğu paylaşılan barındırma sağlayıcısı benzer adımlara sahip olacaktır.
Bluehost’ta Hosting sekmesinin altında bir cPanel düğmesi bulacaksınız.

Bu düğmeye tıkladığınızda cPanel kontrol paneliniz açılacaktır.
Şimdi Yazılım bölümüne gitmeniz ve ‘MultiPHP INI Editor’ seçeneğine tıklamanız gerekiyor.

Ardından, ‘upload_max_filesize’ etiketli bölüme gidin ve kutuya yeni bir maksimum dosya boyutu girin.
Ardından, ‘Uygula’ düğmesine tıklayın.

Alternatif olarak, ‘Editör Modu’ menü sekmesine tıklayabilir ve ardından maksimum dosya yükleme boyutunu doğrudan editörden değiştirebilirsiniz.
Dosya yükleme boyutunuzu artırmak için ‘upload_max_filesize’ bölümünü düzenlemeniz gerekir.
İşiniz bittiğinde, sadece ‘Kaydet’ düğmesine tıklayın.

Kod Ekleyerek php.ini’yi Düzenleme
Mevcut barındırma sağlayıcınız cPanel seçeneği sunmuyorsa, bu dosyayı manuel olarak düzenlemeniz gerekir.
Bunu yapmak için bir FTP istemcisi veya WordPress hosting kontrol panelinizdeki dosya yöneticisi seçeneğini kullanabilirsiniz.
Eğer paylaşımlı hosting kullanıyorsanız, hosting dizininizde php.ini dosyasını göremeyebilirsiniz. Eğer göremiyorsanız, php.ini adında bir dosya oluşturun ve kök klasörünüze yükleyin.
Ardından, aşağıdaki kod parçacığını dosyaya ekleyin:
1 2 3 | upload_max_filesize = 256Mpost_max_size = 256Mmax_execution_time = 300 |
‘256M’ sınırını WordPress blogunuz için ihtiyacınız olan dosya boyutuna göre değiştirebilirsiniz.
Yöntem 3: WordPress Temanızın functions.php Dosyasına Kod Ekleyin
Bu yöntem, WordPress temanızdaki functions.php dosyanıza kod eklemeyi içerir.
Dosyayı doğrudan düzenlemek yerine WPCode kullanmanızı öneririz. Web sitenizi bozmadan kod eklemenizi sağlayan en iyi kod parçacıkları eklentisidir.
Bunu daha önce yapmadıysanız, WordPress’te özel kod eklemeye ilişkin başlangıç kılavuzumuza bakın.
Öncelikle ücretsiz WPCode eklentisini yüklemeniz gerekir. Daha fazla ayrıntı için, WordPress eklentisinin nasıl kurulacağına ilişkin adım adım kılavuzumuza bakın.
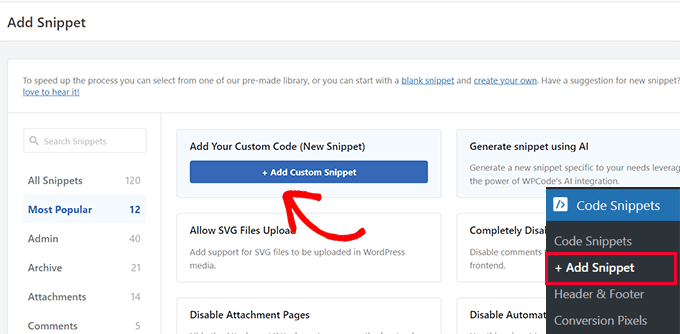
Etkinleştirmenin ardından Code Snippets ” + Add Snippet bölümüne gitmelisiniz.
Farenizi ‘Özel Kodunuzu Ekleyin (Yeni Snippet)’ seçeneğinin üzerine getirmeniz ve ardından ‘+ Özel Snippet Ekle’ düğmesine tıklamanız gerekecektir.
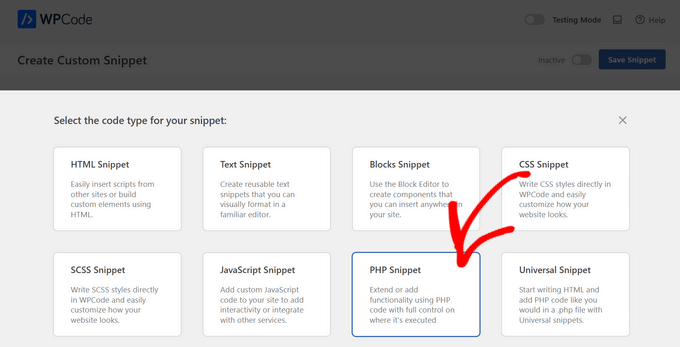
Ardından, görünen seçenekler listesinden kod türü olarak ‘PHP Snippet’i seçmeniz gerekir.
Aşağıdaki ekranda, yeni snippet’iniz için bir ad girin; bu, kodun ne için olduğunu hatırlamanıza yardımcı olacak herhangi bir şey olabilir.
Ardından, aşağıdaki kod parçacığını kopyalayıp ‘Kod Önizleme’ altına yapıştırabilirsiniz. ‘256M’yi ihtiyacınız olan maksimum dosya boyutuyla değiştirdiğinizden emin olun:
1 2 3 | @ini_set( 'upload_max_size' , '256M' );@ini_set( 'post_max_size', '256M');@ini_set( 'max_execution_time', '300' ); |

Son olarak, üstteki geçişi ‘Etkin’ olarak değiştirin ve ardından ‘Snippet’i Kaydet’ düğmesine tıklayın. Kod artık web sitenizde çalıştırılacaktır.
Yöntem 4: .htaccess Dosyanıza Kod Ekleyin
Maksimum dosya boyutunu artırmanın bir başka yolu da .htaccess dosyasını değiştirmektir. Bu dosya web siteniz için üst düzey yapılandırma ayarlarını kontrol eder.
Bunu yapmak için web sitenizin sunucusuna FTP aracılığıyla giriş yapmanız gerekir. Bunu daha önce yapmadıysanız, yeni başlayanlar için WordPress’e dosya yüklemek için FTP’nin nasıl kullanılacağına ilişkin kılavuzumuza bakın.
Bundan sonra, .htaccess dosyanızı web sitenizin kök klasöründe bulmanız gerekir.

Eğer .htaccess dosyanızı bulamıyorsanız, dosya yöneticiniz veya FTP istemciniz tarafından gizlenmiş olabilir. Daha fazla bilgi edinmek için WordPress sitenizdeki .htaccess dosyasını neden bulamadığınızla ilgili kılavuzumuza bakın.
Ardından, aşağıdaki kod parçacığını .htaccess dosyanıza eklemeniz gerekir:
1 2 3 4 | php_value upload_max_filesize 256Mphp_value post_max_size 256Mphp_value max_execution_time 300php_value max_input_time 300 |
Maksimum dosya yükleme boyutunuzu daha da artırmak için ’64M’ değerini istediğiniz boyutla değiştirmeniz yeterlidir.
Yöntem 5: Dosya Yükleme Boyutunu Artırmak için WordPress Eklentisi Kullanın
Maksimum dosya yükleme sınırını artırmanın bir başka yolu da WP Increase Upload Filesize eklentisini kullanmaktır. WordPress’e kod ekleme konusunda rahat değilseniz, bu sizin için iyi bir seçenek olabilir.
Yapmanız gereken ilk şey eklentiyi yüklemek ve etkinleştirmektir. Daha fazla ayrıntı için WordPress eklentisi yükleme kılavuzumuza bakın.
Etkinleştirmenin ardından, WordPress yönetici panelinizde Medya ” Yükleme Sınırını Artır bölümüne gidin.
Bu sizi ‘Maksimum Dosya Yükleme Boyutunu Seçin’ açılır menüsünden yeni bir dosya yükleme boyutu seçebileceğiniz bir ekrana getirir.
Ardından, ‘Değişiklikleri Kaydet’ düğmesine tıklayın.

Not: Maksimum dosya yükleme boyutu barındırma sağlayıcınız tarafından belirlenecektir. Açılır menüde listelenenden daha büyük bir dosya boyutu sınırına ihtiyacınız varsa, barındırma sağlayıcınızla iletişime geçmeniz ve sınırı artırmayı istemeniz gerekir.
Video Eğitimi
Yazılı talimatları takip etmekten hoşlanmıyorsanız, bunun yerine video eğitimimize göz atabilirsiniz:
Umarız bu makale WordPress’te maksimum dosya yükleme boyutunu artırmanıza yardımcı olmuştur. WordPress ‘ te yüklenecek ek dosya türlerinin nasıl ekleneceğine ilişkin kılavuzumuzu ve WordPress yönetici alanını iyileştirmek için uzman eklenti ve ipuçlarımızı da görmek isteyebilirsiniz.
If you liked this article, then please subscribe to our YouTube Channel for WordPress video tutorials. You can also find us on Twitter and Facebook.

 in 2024")


Sushil Kumar
Thank you Yasir Imran it works for me via .htaccess
Pedro Viana
.htaccess rules! thanks.
Amit Kumar Gupta
Very useful Article for me . Thanks wpbeginner
Steve S
I figured out a work-around that does not involve messing with php.ini, .htaccess, functions.php, or any other systtem files. All I did was the following:
* FTP the file up to /wp-content/uploads/year/month/filename.mp4
* New Post –> Add Media –> Insert from URL
* Cut and paste the appropriate URL based on where you uploaded the file.
* Hit Insert Into Post. Done.
kenny
Perfect! ps if you are inserting an image for a slide background in slider Revolution, use option ‘External URL’
vic
the .htaccess worked fine for me. thanks alot
Anchal Singh
my website have got the same issue but thanks to this post its now work perfect
Matt
Thanks. I want to also know how to make a website portal using wordpress. Any information from you will be highly appreciated.
marta
Thanks. For me htaccess Method did his job
Rifqi Arief
Thanks Bro, Its Work On My Free Hosting via .htacess
RT
Please try below steps as well after creating the php.ini
(1) Go to My Sites -> Network Admin -> Settings from WordPress admin dashboard.
(2) Uncheck the checkbox for “Site upload space: Limit total size of files uploaded to 10 MB” and Save changes.
(3) Done.
Regards,
-RT
Suika
Thanks, I forgot there was a setting there for that.
Abhishek
I’m on goddady hosting, none of the 3 solutions worked for me.
But some users reported .user.ini file worked for them in goddady.
can anybody tell me where to put this file?
I have tried root folder and wp-admin folder nothing worked.
Raman Gutyan
htaccess Method is working great in my localhost.
Thanks for sharing.
DVR
If you are hitting a wall. Go to your host. Advance setting for PHP. Scan the code looking for max upload & file size. Change it to your required setting.
Done.
See NICOLAS’ reply above.
martin kendall
Hi DVR I had tried everything and nothing worked, with what had been posted here. I tried multi times in every why to get it to work. Nothing, but your post put me on the correct answer. Thanks very much for that.
Ok this is what i did, Signed into my host server, where my website is. the host server runs on cPanel and the theme is paper_lantern. It should not matter what your sever is or the theme. If you do not have access to this area you will have to get your host to make the changes y cotacting your technical help.
In the panel you will have categories like = files, database, domains, email etc and what you are looking for is software, under software / apps look for multiPHP INI Editor or something like that. Its going to be different on other platforms but should be in that area. What you are looking for is configure PHP INI basic settings or editor mode. I got offered home directory or my domain name. I picked the domain name but maybe need to change both but I did not need to. Scrolled down to upload_max_filesize and changed to 64M but this did not work as you have to also change the momory_limit to 64M also. They have to be the same figure. and then it will work.
Has I understand, when you make the changes in wordpress code. the instruction talk to your data base through the PHP files and instruct the server software to change the database settings. For some reason It would not work for me. So this route, bypass that and making the changes on the server software and not on the wordpress software. In future I will go this way as it was really quick. I hope this helps as a last resort. Martin p.s. this was WordPress 4.8.1 and I found that it did not have, after loading it any PHP.INI or .htaccess files. I did install them but made no difference and or where I put them.
Jeet Patel
THank you so much it’s working really
Silentnight
Thank u so much… I increased my uploading size.
Gopi krishnan
For me, this is not working, but i did this in htaccess file in this way,
php_value post_max_size 10M
php_value upload_max_filesize 40M
php_value memory_limit 500M
This works !
agnieszka00
Thank you!!!!!
Michael Serovey
I have my websites hosted with GoDaddy and so far, NONE of the above suggestions have worked! I have paid for this plugin and now I that I wasted my money!
Paul
Hi,
To avoid the plugin upload limit you can just upload the plugin with filezilla to your plugin directory. After uploading you can extract the zip file in the file manager and after you have done this the plugin is visible and ready to activate in your admin –> plugin panel
Hope this helped.
Cheers
Pooya
WOW! THANK YOU PAUL!!
This worked perfectly for me!
and it is MUCH easier and more reliable than any of those methods.
just go to File Directory under the cPanel -> Public-html -> [ you site folder] -> wp-content ->themes or plugins
Then upload the zip file here and extract it.
login to your wp-admin dashboard. and bam, you got yourself the theme or plugin.
Tom
Thank the Lord (paul) this took way too long.
Nicolas
Just go to your hosting control pannel -> Advanced -> PHP Settings -> upload_max_filesize ( it usually is on 2M you can change it up to 8M in my case… the point is that it shouldn’t be higher than your post_max_size)
You are welcome!
Jake
Best answer yet.
Steven Gliebe
functions.php is not the best place to put the code because raising the PHP max upload size limit is unrelated to a specific theme. Users shouldn’t be changing theme files directly anyway. wp-config.php is probably a better place. The .htaccess or php.ini method is even better (or just ask the host).
Stephanie
php.ini needs to be in wp-admin folder. This article states it needs to be in the root, which I tried but it made no difference. FYI
Thank you for the information!
Aaron
Thanks so much for your reply Stephanie. Your information was exactly what I needed.
Mike Serovey
So far, NONE of the above suggestions have worked. My control panel does NOT allow me to change the PHP Settings, modifying the .htaccess created an internal server error and modifying the theme failed to work as well. Have any other suggestions?
Mike Serovey
With GoDaddy hosting, I discovered that I needed to use the lines of code that someone posted for the .user.ini file and then refresh my browser and recheck the plugin about three times each before the thing FINALLY worked!
Robert
Thank you! ini file need to be uploaded in wp-admin folder.
Emmanuel Parbey
Thank you.
It worked perfectly.
Somnath
@Stephnie Thanks a Lot .It Workz
Sorin
In wp-admin put php.ini and work
Angel Rodriguez
This worked for me as well.
shemmy
thanks ..this works fine
Prabhat
yes this is helpfull
Matt
Worked Immediately! Thanks! By the way if anyone else wants to know, my host is BlueHost and I am using a Genesis Theme.
Panagiotis Sakalakis
Using the .htaccess I got an Internal Error, and then I just removed the code and it fixed. After that, I created a php.ini file in /public_html/wp-admin, pasted the code and saved it. Everything’s work like a charm now and I can upload my files just fine without any problem.
Umesh Shejole
Yes, Useful……
Subin Babukuttan
htaccess worked fine .thanks 4 d post
hol
Hi
Does anyone know why if the PHP.INI file is changed as mentioned why when the file has completed to 100% nothing happens and it displays http error.
I can upload small files and small videos.
I cant upload anything bigger than say 200mb
I had this working and accepting larger files then I had a restore done on website.
I have changed the PHP.INI…
Is there any reason why just large files don’t work ?
do I need to edit the hta.access file ?
thanks
Ian
.htaccess method worked for Media Temple grid hosting, others didnt affect it, just in case anyones wondering…
Jay
IF YOUR STILL FINDING NOTHING IS WORKING..
(In my case the problem was with WP MULTISITES)..,
FIRST CHECK THE FOLLOWING:
1. check your hosting limits (although this was not my problem) make sure your hosting allows the limit you are trying to set ie if on a shared hosting you might find the maximum is 64M.
NOTE: The following solution may also apply If in WordPress, Maximum upload file size will not change even when changed in the php.ini file etc.
The 1M max upload problem lies with WP MULTISITES default settings!!
To change this, do the following to change the Maximum upload file size within WP admin:
LOG INTO YOUR ADMIN DASHBOARD:
1. At the top, hover over My Sites and then click Network Admin.
2. At the left, hover over Settings and then click Network Settings.
3. Scroll to the bottom of the page and change the Max upload file size to whatever you would like in KB.
4. Click Save Changes.
Hope this helps
Gregg
YESSSS. Thank yo sir.
Milton
Thanks Jay you were right on point for WP multisites
Denis
Worked for me. The site used to work and I couldn’t understand why it didn’t anymore. It was my conversion to multisite which caused the ptoblem.
Sam
Amazing!!! This works!
Adam
Thanks!!!! Jeez there’s not much help on the changes mutli-site makes!
Bhanu uday
It worked like a charm. Thank you very much.
AmanDeep Singh
Working !.I use Create or Edit an existing PHP.INI file method and after applying the settings as mentioned in the article now i am able to upload themes and plugins which are large in size.Thanks for sharing solution.
Judy
I am new to WordPress, I usually use Joomla but I have a new client that wants a WordPress site. When trying to upload images the WordPress message was that the file limit was 3Mb. I spent hours searching websites for an answer. I am using WAMP and localhost to create the site. Through localhost phpinfo() I could verify which php.ini was active, the one in Apache. I had a file limit of 64Mb but still WordPress had a 3Mb limit. This site gave the instructions under #3 to edit the .htaccess file in the WordPress folder. I copied and pasted the text into this file and IT WORKED! Thank you wpbeginner.
KenSanDiego
forgot to mention, my WP site is in a subdirectory with a domain pointer. Powweb’s php applies to everything in all subdirectories. So if you have any installations in subdirectories the change applies to all installations.
Ugyen Zangmo
Create php.ini in wp-admin folder
In the file put the following 3 lines:
upload_max_filesize = 2048M
post_max_size = 2048M
max_execution_time = 3000
Goto to your website as admin and check the upload new media page, it should now display Maximum upload file size: 2 GB.
Thanks to Yasir Imran for sharing your tip!
This worked for me. Thank you James for sharing the Yasir Imran tip. Cheers
sadiq
it is not working i have done same
in godaddy server
Raton Miah
working!
Brendan
That was a great tip… it worked for me.. thanks!
Ben
Holy crap! Thanks so much man, after the last wordpress update to 4.3.1 my upload size reverted back to the default of 50 MB even though my php.ini, .htaccess, and wp-config.php files hadn’t changed and were still reflecting a max upload size of 512 MB! You’re a hero!
Alain
Thank you very much!
I tried ALL of the three methods with no results.
I asked the webhost and the raised the limit to 40 MB.
Then, finally, I tried yours and it worked fantastically!
dominio público
post_max_size should be larger than upload_max_filesize to allow room for other information. The defaults are 2MB max file size and 8MB max post size.
From PHP’s documentation:
post_max_size integer
Sets max size of post data allowed. This setting also affects file upload. To upload large files, this value must be larger than upload_max_filesize.
Nori
Thanks for this! Tried the php.ini and I am quite surprised it worked and was so easy
Dan
php.ini file worked perfectly for me. I simply changed the existing values to 100M. All good. Thanks for the advice.
James
Create php.ini in wp-admin folder
In the file put the following 3 lines:
upload_max_filesize = 2048M
post_max_size = 2048M
max_execution_time = 3000
Goto to your website as admin and check the upload new media page, it should now display Maximum upload file size: 2 GB.
Thanks to Yasir Imran for sharing your tip!
Zain
Hy,
Please tell me the names of best themes for softwares/download sites?
i am waiting.
Thanks,
Zain.
Markus Aurelius
Nothing of the above worked for me on GoDaddy so I had to use .user.ini instead of php.ini and that worked fine. Thanks for pointing me in the right direction!
Keith
Thank you so much. I am on GoDaddy and this worked whereas several other methods did not.
Raj Kothari
Hi Keith, can you tell me under which folder you have put this file? .user.ini
Need help
Oliver
Thanks .user.ini worked for me on Godaddy
sam
1:- open “C:wampbinapacheapache2.4.9bin” folder and find “php” which is a configuration file and open it in ur notepad and again find “upload_max_filesize” and “post_max_size” and change both and save.
2:- open “C:wampbinphpphp5.5.12” folder and find “php” and “phpforapache” which are configuration file and open both in ur notepad and again find “upload_max_filesize” and “post_max_size” and change both and save.
3:- finally restart all services of wamp and enjoy…lov u all
Decb
Hi Guys, I’m REALLY new to this but can you look at what I see when I click to edit the .htaccess file – where do i add the code? at the start? at the end? Do I put my cursor at the begining and click return (then put it in) ??? Please help
Gerard ONeill
Deb, it wouldn’t matter where you added it; but make sure its outside of a block. To be safe, just add it at the end.
However, the better way (as of php5.5) is to modify the .user.ini file in a per directory basis. If you did the top level directory, it would apply to all sub directories (unless overridden).
http://php.net/manual/en/configuration.file.per-user.php
And obviously the system wide php.ini works too.
BenPDX
+1 for Alex’s solution. Upload php.ini folder to wp-admin folder worked for me on Lithium Hosting. 30 second Google search and 1 min to create text file and upload to server!
Dede Erik
I choice the third method and this is worked to me, thanks so much
Hasan Tareq
.htaccess works for my wpenigne site
Vineesh
Hi alex, you are right. php.ini file should be added to wp-admin folder. It will work perfectly…. thanks alex
Rafael
Just adding the php.ini file into wp admin folder worked perfectly!!! thanks!
chandan
thnx alot Alex this worked for me to..
Tony_atf
I keep getting http error even with your suggestion. im on godaddy I have filesize 300m but anything over 150Mb chokes. it uploads, sits for a few seconds and then the http error displays. wordpress never shows the error.
SunnyK
same with me. did you found any solution yet?
WPBeginner Staff
You can connect to your website using an FTP client and undo the changes you made.
Nitesh Magan
Hey I added the 1st code to my theme function file, but now everything on my site went blank. I cant even access my wp-admin of my site !!
Please Help …
Chris
If you’re just trying to upload files yourself in the admin panel (media), make a new plain text document, save it as whatever name (including extension) of the large file you’re trying to upload. So if you’re trying to upload “files.zip,” save a blank text document as files.zip. Upload this blank text file you just created in WordPress. Then, go to FTP or file manager, go to wp-content/uploads/(whatever year it is)/(whatever month it is). You should fine files.zip there. Delete that file (which is just a plain text file) then upload the real files.zip, making sure the names match up. Then when you go back to media it will be the right file.
Yasir Imran
I tried htaccess method and found 500 internal server error, then placed php.ini with 3 given lines in root directory, again didn’t work. Then I placed it in wp-admin folder and it worked. I think the author should mention it.
Alexandre
This worked for me while everything else had failed. Thanks for sharing.
Mel
I had the exact same experience and this worked for me. Thanks Yasir!
Les B
Thank you Yasir Imran…your method works where all others, including .htaccess fails!
(The php.ini must be in the wp-admin folder.)
Les