Hiç WordPress sitenize bir dosya yüklemeye çalıştınız ve duvara tosladınız mı? İhtiyacınız olan görseli, eklentiyi veya temayı yükleyememek çok sinir bozucu. Okurlarımız sık sık dosya yükleme sorunlarıyla ilgili bizden yardım istiyor çünkü bu sorunlar iş akışınızı yavaşlatabiliyor.
Bazen bu dosya yükleme sınırları beklenmedik bir şekilde medya kitaplığınıza içerik eklemenizi veya ihtiyacınız olan daha büyük eklentileri ve temaları yüklemenizi engelleyebilir. Eliniz kolunuz bağlı kalmak gibi bir şey. Ve bunu nasıl düzelteceğinizi bilmediğinizde daha da can sıkıcıdır!
Ama endişelenmeyin, yardım etmek için buradayız. WordPress’in bu kadar yapılandırılabilir bir platform olmasını ve aynı sorunu çözmenin genellikle birden fazla yolu olmasını seviyoruz.
Bu kılavuzda, WordPress’te maksimum dosya yükleme boyutunu artırmanın en kolay yollarını göstereceğiz. Bu sınırlamaları aşmanızı sağlayacağız, böylece sevdiğiniz şeyi yapmaya geri dönebilirsiniz – web sitenizi çalıştırmak!
WordPress’te Maksimum Dosya Yükleme Boyutu Neden Arttırılmalı?
WordPress barındırma sağlayıcınız, kaydolduğunuzda ve WordPress‘i yüklediğinizde varsayılan bir maksimum dosya yükleme boyutu belirleyecektir. Bu sınırı barındırma sağlayıcınız belirler ve genellikle 2 MB ile 500 MB arasında değişir.
Çoğu WordPress web sitesi sahibi için bu sınır fazlasıyla yeterli olacaktır.
Ancak, yükleme hatalarıyla karşılaşmamak için bu sınırı yükseltmeniz gereken zamanlar olabilir.
Örneğin:
- Bir fotoğrafçılık web sitesi işletiyorsunuz ve büyük resimler yüklemeniz gerekiyor.
- Tasarım veya fotoğraf portföyünüzde büyük görseller var.
- Daha büyük bir WordPress teması veya eklentisi yüklemek istiyorsunuz.
- E-Kitaplar, fotoğraflar, videolar ve daha fazlası gibi dijital ürünler satmak istiyorsunuz.
- İçeriği düzenli olarak günceller ve mevcut sınırın ötesinde ses, fotoğraf ve daha fazlasını eklersiniz.
Bununla birlikte, WordPress sitenizdeki maksimum dosya yükleme boyutunu nasıl artırabileceğinizi gösterelim.
Not: Web sitenizde çok sayıda büyük dosya görüntülemenin web sitenizin hızını ve performansını ciddi şekilde yavaşlatabileceğini unutmayın. Bu yüzden genellikle WordPress’e asla video yüklememenizi öneririz.
Çoğu kullanıcı farklı WordPress barındırma kurulumlarına sahip olduğundan, aşağıdakileri ele alacağız:
- How to Check Your Maximum File Upload Size Limit in WordPress
- Method 1: Contact Your WordPress Hosting Provider
- Method 2: Create or Edit an Existing php.ini file
- Method 3: Add Code to Your WordPress Theme functions.php File
- Method 4: Add Code to Your .htaccess File
- Method 5: Use a WordPress Plugin to Increase File Upload Size
WordPress’te Maksimum Dosya Yükleme Boyutu Sınırınızı Kontrol Etme
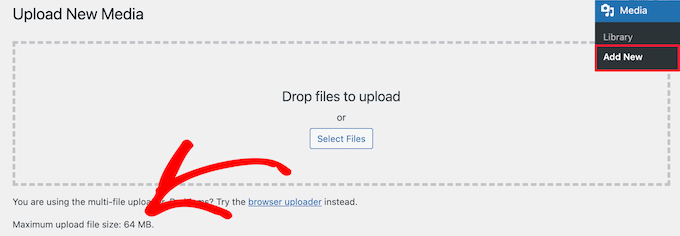
WordPress, görüntüleri veya diğer medyaları yüklerken otomatik olarak maksimum dosya yükleme boyutu sınırını gösterecektir.
Bunu kontrol etmek için WordPress yönetici panelinizde Medya ” Yeni Ekle bölümüne gidin ve WordPress siteniz için maksimum dosya yükleme boyutu sınırını göreceksiniz.
Artık boyut sınırını nasıl bulacağınızı bildiğinize göre, WordPress’te maksimum yükleme boyutunu nasıl artıracağınızı gösterelim.
Yöntem 1: WordPress Hosting Sağlayıcınızla İletişime Geçin
WordPress’te maksimum dosya yükleme boyutunu artırmanın en kolay yollarından biri WordPress barındırma sağlayıcınıza ulaşmaktır.
Bu, müşteri hizmetleri ekibi için nispeten basit bir görevdir ve birkaç dakika içinde yapılabilir.
Yeni başlayanlar için bu, WordPress’e kod eklemekten ve sunucu dosyalarını düzenlemekten çok daha kolay olabilir.
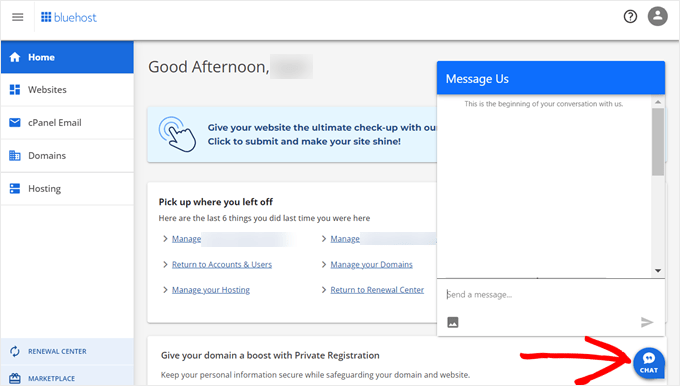
Bluehost gibi barındırma sağlayıcınızın web sitesine gidin ve oturum açın.
Ardından, ekranın altındaki ‘Sohbet’ simgesine tıklayın. Daha sonra destek personelinden WordPress sitenizdeki dosya yükleme boyutunu artırmasını isteyebilirsiniz.
Ayrıca hosting hesabınızın kontrol panelinden de desteğe ulaşabilirsiniz.
Yöntem 2: Mevcut bir php.ini dosyası oluşturun veya düzenleyin
Maksimum dosya yükleme boyutunu artırmanın bir başka yolu da php.ini adlı bir dosya oluşturmak veya düzenlemektir. Bu dosya WordPress barındırma ortamınız için birçok ayarı kontrol eder.
Bluehost gibi çoğu WordPress barındırma sağlayıcısı, web sitenizi yönetmenize yardımcı olacak yeni başlayan dostu bir cPanel’e sahiptir.
Web barındırıcınızın bir cPanel panosu varsa, yerleşik araçlar aracılığıyla dosya yükleme boyutunu artırabilirsiniz.
Not: Aşağıdakiler Bluehost cPanel’den alınmıştır. Ancak, çoğu paylaşılan barındırma sağlayıcısı benzer adımlara sahip olacaktır.
Bluehost’ta Hosting sekmesinin altında bir cPanel düğmesi bulacaksınız.
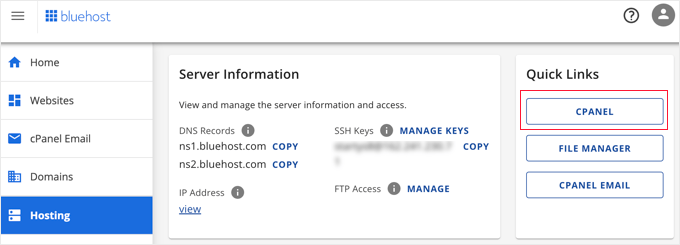
Bu düğmeye tıkladığınızda cPanel kontrol paneliniz açılacaktır.
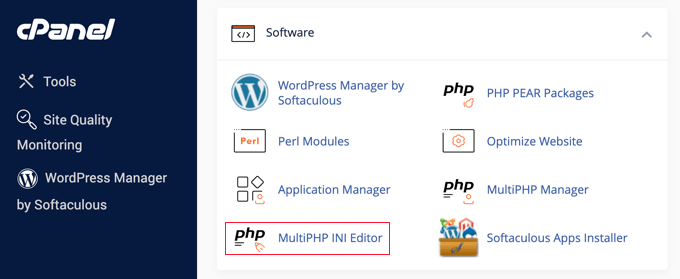
Şimdi Yazılım bölümüne gitmeniz ve ‘MultiPHP INI Editor’ seçeneğine tıklamanız gerekiyor.
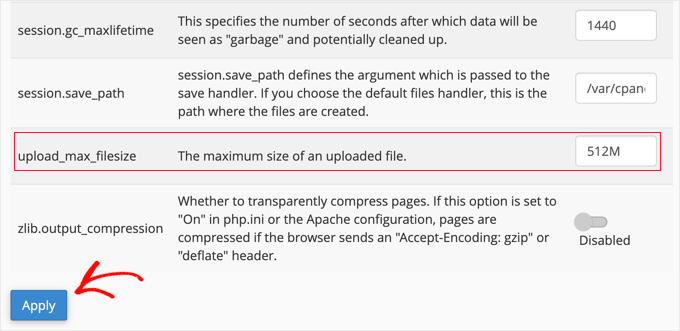
Ardından, ‘upload_max_filesize’ etiketli bölüme gidin ve kutuya yeni bir maksimum dosya boyutu girin.
Ardından, ‘Uygula’ düğmesine tıklayın.
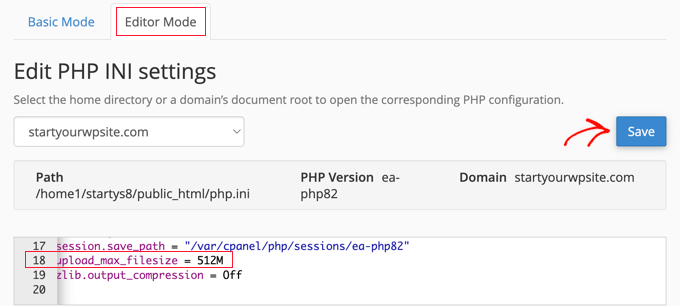
Alternatif olarak, ‘Editör Modu’ menü sekmesine tıklayabilir ve ardından maksimum dosya yükleme boyutunu doğrudan editörden değiştirebilirsiniz.
Dosya yükleme boyutunuzu artırmak için ‘upload_max_filesize’ bölümünü düzenlemeniz gerekir.
İşiniz bittiğinde, sadece ‘Kaydet’ düğmesine tıklayın.
Kod Ekleyerek php.ini’yi Düzenleme
Mevcut barındırma sağlayıcınız cPanel seçeneği sunmuyorsa, bu dosyayı manuel olarak düzenlemeniz gerekir.
Bunu yapmak için bir FTP istemcisi veya WordPress hosting kontrol panelinizdeki dosya yöneticisi seçeneğini kullanabilirsiniz.
Eğer paylaşımlı hosting kullanıyorsanız, hosting dizininizde php.ini dosyasını göremeyebilirsiniz. Eğer göremiyorsanız, php.ini adında bir dosya oluşturun ve kök klasörünüze yükleyin.
Ardından, aşağıdaki kod parçacığını dosyaya ekleyin:
1 2 3 | upload_max_filesize = 256Mpost_max_size = 256Mmax_execution_time = 300 |
‘256M’ sınırını WordPress blogunuz için ihtiyacınız olan dosya boyutuna göre değiştirebilirsiniz.
Yöntem 3: WordPress Temanızın functions.php Dosyasına Kod Ekleyin
Bu yöntem, WordPress temanızdaki functions.php dosyanıza kod eklemeyi içerir.
Dosyayı doğrudan düzenlemek yerine WPCode kullanmanızı öneririz. Web sitenizi bozmadan kod eklemenizi sağlayan en iyi kod parçacıkları eklentisidir.
Bunu daha önce yapmadıysanız, WordPress’te özel kod eklemeye ilişkin başlangıç kılavuzumuza bakın.
Öncelikle ücretsiz WPCode eklentisini yüklemeniz gerekir. Daha fazla ayrıntı için, WordPress eklentisinin nasıl kurulacağına ilişkin adım adım kılavuzumuza bakın.
Etkinleştirmenin ardından Code Snippets ” + Add Snippet bölümüne gitmelisiniz.
Farenizi ‘Özel Kodunuzu Ekleyin (Yeni Snippet)’ seçeneğinin üzerine getirmeniz ve ardından ‘+ Özel Snippet Ekle’ düğmesine tıklamanız gerekecektir.

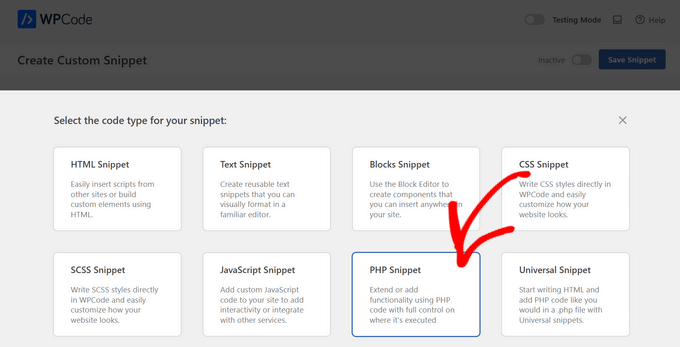
Ardından, görünen seçenekler listesinden kod türü olarak ‘PHP Snippet’i seçmeniz gerekir.
Aşağıdaki ekranda, yeni snippet’iniz için bir ad girin; bu, kodun ne için olduğunu hatırlamanıza yardımcı olacak herhangi bir şey olabilir.
Ardından, aşağıdaki kod parçacığını kopyalayıp ‘Kod Önizleme’ altına yapıştırabilirsiniz. ‘256M’yi ihtiyacınız olan maksimum dosya boyutuyla değiştirdiğinizden emin olun:
1 2 3 | @ini_set( 'upload_max_size' , '256M' );@ini_set( 'post_max_size', '256M');@ini_set( 'max_execution_time', '300' ); |
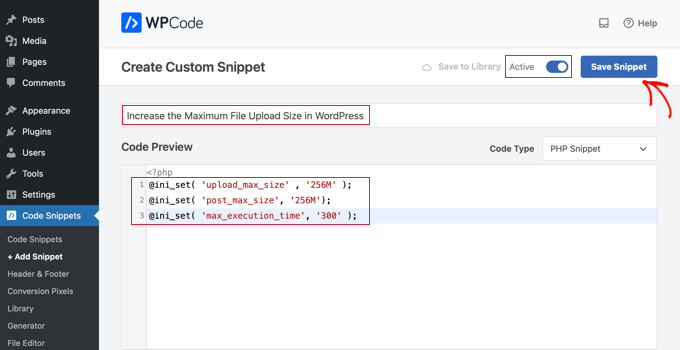
Son olarak, üstteki geçişi ‘Etkin’ olarak değiştirin ve ardından ‘Snippet’i Kaydet’ düğmesine tıklayın. Kod artık web sitenizde çalıştırılacaktır.
Yöntem 4: .htaccess Dosyanıza Kod Ekleyin
Maksimum dosya boyutunu artırmanın bir başka yolu da .htaccess dosyasını değiştirmektir. Bu dosya web siteniz için üst düzey yapılandırma ayarlarını kontrol eder.
Bunu yapmak için web sitenizin sunucusuna FTP aracılığıyla giriş yapmanız gerekir. Bunu daha önce yapmadıysanız, yeni başlayanlar için WordPress’e dosya yüklemek için FTP’nin nasıl kullanılacağına ilişkin kılavuzumuza bakın.
Bundan sonra, .htaccess dosyanızı web sitenizin kök klasöründe bulmanız gerekir.

Eğer .htaccess dosyanızı bulamıyorsanız, dosya yöneticiniz veya FTP istemciniz tarafından gizlenmiş olabilir. Daha fazla bilgi edinmek için WordPress sitenizdeki .htaccess dosyasını neden bulamadığınızla ilgili kılavuzumuza bakın.
Ardından, aşağıdaki kod parçacığını .htaccess dosyanıza eklemeniz gerekir:
1 2 3 4 | php_value upload_max_filesize 256Mphp_value post_max_size 256Mphp_value max_execution_time 300php_value max_input_time 300 |
Maksimum dosya yükleme boyutunuzu daha da artırmak için ’64M’ değerini istediğiniz boyutla değiştirmeniz yeterlidir.
Yöntem 5: Dosya Yükleme Boyutunu Artırmak için WordPress Eklentisi Kullanın
Maksimum dosya yükleme sınırını artırmanın bir başka yolu da WP Increase Upload Filesize eklentisini kullanmaktır. WordPress’e kod ekleme konusunda rahat değilseniz, bu sizin için iyi bir seçenek olabilir.
Yapmanız gereken ilk şey eklentiyi yüklemek ve etkinleştirmektir. Daha fazla ayrıntı için WordPress eklentisi yükleme kılavuzumuza bakın.
Etkinleştirmenin ardından, WordPress yönetici panelinizde Medya ” Yükleme Sınırını Artır bölümüne gidin.
Bu sizi ‘Maksimum Dosya Yükleme Boyutunu Seçin’ açılır menüsünden yeni bir dosya yükleme boyutu seçebileceğiniz bir ekrana getirir.
Ardından, ‘Değişiklikleri Kaydet’ düğmesine tıklayın.

Not: Maksimum dosya yükleme boyutu barındırma sağlayıcınız tarafından belirlenecektir. Açılır menüde listelenenden daha büyük bir dosya boyutu sınırına ihtiyacınız varsa, barındırma sağlayıcınızla iletişime geçmeniz ve sınırı artırmayı istemeniz gerekir.
Video Eğitimi
Yazılı talimatları takip etmekten hoşlanmıyorsanız, bunun yerine video eğitimimize göz atabilirsiniz:
Umarız bu makale WordPress’te maksimum dosya yükleme boyutunu artırmanıza yardımcı olmuştur. WordPress ‘ te yüklenecek ek dosya türlerinin nasıl ekleneceğine ilişkin kılavuzumuzu ve WordPress yönetici alanını iyileştirmek için uzman eklenti ve ipuçlarımızı da görmek isteyebilirsiniz.
If you liked this article, then please subscribe to our YouTube Channel for WordPress video tutorials. You can also find us on Twitter and Facebook.


Being Stealth
Adding php.ini file in wp-admin folder worked for me. Yahoooo thanks.
Mouad Chafai
Thanks php.ini method worked perfectly.
i’ve created the php.ini
wp-adminphp.ini
add lines:
upload_max_filesize = 64M
post_max_size = 64M
max_execution_time = 300
thanks for the article.
Saleh Shaukat
Thanks .htaccess worked for me perfectly !!.
Dan Rosenberg
PHP.INI method worked perfectly. Thanks!
Ben Peacock
Sorry please find this instead Login to the root machine type the following command nano /usr/lib/php.ini
find ; Maximum size of POST data that PHP will accept.
post_max_size = 2M change this to 64
Save and exit and then you should be able to upload what you need hope this helps
QuangPham
Thanks for the instructions on how to fix.
Voicu Ioan Virgil
Thanks, great tutorial !
Maria McCarthy
Adding the php.ini file to my wp-admin folder SPECIFICALLY worked for me as well! Thanks everyone! Only took me almost 4 hours to find a page that had the info which would work for me – lifesavers!
pete
found the php.ini worked in wp-admin network php.ini
Tabassum Javaid
htaccess method works fine for me. thanks
Mike
with some host ( godaddy ) for example, there may be some additional steps.
And to what php you are running. For godaddy with php5, rename php.ini to php5.ini and remember if you have accuracies running, you will have to temp. end them before the file will even take over, or wait awhile for it.
System Processes / End all
jaymz
Many thanks for the article. For self-hosted there’s another way as methods 2 and 3 didn’t work for me as the .htaccess change had no effect and neither did adding a php.ini file in /wp-admin. It was simply a case of finding the existing php.ini file for Apache. On Ubuntu I ran;
sudo find / -name php.ini
This found my ini file in /etc/php5/apache2/
All that was needed was to locate the parameters and update the values for;
upload_max_filesize
post_max_size
max_execution_time
Thanks for getting me there!
D Winzell
Thanks for writing this. The php.ini does need to be in the wp-admin directory to function correctly. Just checked my host (Vaurent) and they allows up to 105M file uploads so I am going to find something that size and see if it makes it’s merry way up to my blog.
Matt
I just want to add, using godaddy you cannot use the htaccess method, it will throw you into a 500 internal service error.
You must use the php.ini method. Only difference will be you have to have a php.ini and a php5.ini and the lines must be added to both. The files need to be in the root directory of where the wordpress install is, not in the wp-admin folder, outside of it.
Also if you have multiple wordpress installations This has to be done and placed into each directory that each wordpress installation is located.
GSJha
Very Good Post.
sandeep
php_value upload_max_filesize 64M
php_value post_max_size 64M
php_value max_execution_time 1500
php_value max_input_time 1500
i use these values in .htaccess and it works !
thanks
Thyme
So I did all of those and changed the php.ini in the /etc folder (my site is on mediatemple’s grid-service) and nothing was working but then I vaguely remembered there was something I had to change in the network settings if my installation was multisite and there it was. Ugh.
So yeah, if you’ve got a WordPress network, go to your network settings and change the max file size upload near the bottom of the page.
Alex
This is the only thing that worked for me, I tried all the options, I’m on 1&1
memory_limit = 32M
upload_max_filesize = 32M
post_max_size = 32M
file_uploads = On
** Size can be anything
The key was the “file_uploads” line
Place this in the /wp-admin/ folder.
Kristina
Worked for me! I’m on Bluehost.
Thanks for your post
Brandon
this worked for me after everything else hadn’t. I’m so relieved!
I’m also on 1&1. Once I added the “file_uploads = On” line to my php.ini file it worked like a charm!!
thanks!
Hafeez Ansari
Thank you Alex, This works for me in /wp-admin/ folder. Problem solved.
Jordan Miller
Thank you so much
Mike
Awesome! thanks Alex. I was limited to 2mb…really useful.
Sam
Alex you are the great! Your solution worked for me! Many thanks!
Johnny T
Genius! This worked for me! Just to clarify. Create a php.ini file in the wp-admin folder and only add the lines of code in Alex’s post. FTP this to your server and you’re good to go. Thanks Alex. You are a genius!
Luan
Thanks you Johnny and Alex! It was really helpful.
vanniee
what is the name of the file?
Togi Tan
But, it’s not working on free hosting. All methods I’ve tried. I think this might depend on server.
Duncan
Wow wow wow wow! Thank you for that clear comment that helped me get it to work. You are a star.
Nomo
Alex – Your post continues to be helpful. Very much appreciated!
Noor
Worked by .htaccess method. Salute man.
Bogdan
Great advice. My upload limit was 8MB and I only tried the htaccess trick and it worked, it increased to 64MB. I tested it and it is owrking beautiful! Thank you so much for your great advice!
VoidnessMD
Important thing to note: Using the php.ini method requires that the file be located in the wp-admin folder, not the root of your WP installation.
DJ
THANKS!! This sorted it out for me on my end
David Connolly
Superb… clear and the final solution worked.
a big thank you
Bongo
This website is the coolest for learning WP! Keep up the good work guys…more please…more! lol
Editorial Staff
Thanks for the kind words
Admin
Ido Schacham
Finally, a post that clearly explains how to change the memory limit in WP. Thanks!
mostafa
hi.
i successfully did it with the third method. my upload size was 8 M, but now its 64 M. for me its more than enough.
Thanks a million.
by the way i’m from Iran.
Rowan Evenstar
The creating a php.ini file and popping it on the route sorted it straight away!
Cheers, much appreciated!
assassinateur
thnx, but i am in a shared hosting so nothing work, i did put the php.ini in wp-admin and in the blog folder and in the homefolder and dodnt work also .htaccess didnt work changed the theme and didnt work
Arvind Kukreti
Adding code in .htaccess file might throw you 500 Internal Error… the best way is create a php.ini file and upload it in wp-admin folder
Stephen Afije
Waooo that was brilliant one there all i did was to create php.ini and uploaded to the wp-admin folder it worked like no other thing thanks
leo
htaccess method works fine for me. thanks
Andrew Lilly
Hi,
I have done all of the above and still wont let me import an 11mb xml file. i need it as its got 1500 products on i need to import.
I have spoken to my virtual server provider 1and1 and they said all i need to do is add the code to the .htaccess file but it doesnt seem to work
Please someone help
Editorial Staff
If none of the above works, then the only person who can help you is your host.
Admin
Ali Amer
It may be related to MIME Type. In that case, resolve it from cpanel
Dominique
None of this worked for me. I tried them all. I am using WPEngine to host.
Any suggestions?
Editorial Staff
Ask WPEngine to increase the limit for you.
Admin
Thad
The htaccess method worked for me. Thanks for the post. Good info, well presented.
Richard
php.ini option worked for me but on the php.ini file in /wp-admin directory
Mike
perfect – worked a treat – set to 200MB and works fine.
Matheus M.
In localhost work the .htaccess. But in host only php.ini. Thanks for help.
dan
Yes, php.in works in /wp-admin. thanks
marin
Thanks htaccess worked for me appreciate it.
Makarand Mane
I have hosting on mediatemple. First two methods are not worked me. Only htaccess methos is worked for me.
Thanks.
Gavin
I found that php.ini was hidden in the cgi-bin folder which some shared servers have in their root directories. I amended this as above (AND added a php5.ini jut in case) but until I’d amended this, nothing else worked. Thanks for the VERY useful thread!
Cath
Thanks Gavin, none of the other methods worked for me then I saw your comment, there were php.ini and php4.ini files were in the cgi-bin folder. I found the relevant code in both files – post_max_size = , and upload_max_filesize = , amended these and now all works fine.
Jarod Billingslea
Thank you very much for this article!
Void lon iXaarii
thank you so much! had tried so many solution and your .htaccess finally worked
Anthony
The only thing that worked for me was to create/edit a php.ini file and add the following:
memory_limit = 100M upload_max_filesize = 100M post_max_size = 100M file_uploads = On
and uploading it to the wp-admin folder.
Alan
Option 2 worked perfectly fine, though I had to place the php.ini file into the wp-admin folder instead of the root directory.
phpinfo was detecting the php.ini file in the root, but not WordPress.
I currently have WP 3.2 installed…
RPaterson
Thanks for that extra tip, this is what finally worked for mine
arun
thanks anthony, your method saved me a lot.
Quest The Wordsmith
This is exactly what worked for me as well.
RamiAlloush
Thx
Snowboard
thx for this post , but what is the default limit ?
almb1111
64 MB
kat1111
It was 8MB, but I got it to 192 MB @almb1111
kat1111
Ty for responding, I finally got some help with it, I needed to change the PHP to PHP-5.
kat1111
I am evidently newer than most here, I don’t understand which is “root” directory, is it Editor under the Appearance tab? Also, I don’t undertand how to get to hcaccess. Any help is appreciated.
jameserie
htaccess method works for me. – cheers!
nycxs
If you are using PHP5 the file should be called php5.ini and be in the root of the shared folders.
MyDreamDinZ
What is the highest limit for upload
can i set it to 1024M ?
alexlee.cs
The .htaccess method works for me. Thanks.
rajkanuri
Thanks for the code.. it is really helpful for me..
pranjalgupta2009
Yes ! putting php.ini also in wp-admin works for me. thanks
Snipsley
Thanks, but neither of this worked for me.
But I found the solution!
I had to place that php.ini to /public_html AND /public_html/wp-admin and it works!
Biju Subhash
ya..the same thing works me too..
Thanks Snisley
Trond
Great! This worked for me as well I run WordPress on an MS Server 2008 with IIS 7.5 from my host provider, btw
kenseneff
Worked for me as well. Thanks!
Kiran
Thanks dude. It’s works for me.
Rollie Osayan
Yes. It is also working here. thanks
Kaushik Biswas
At the end of a post, I want to display recent posts from that specific category under that post – how can I do this?