Görüntüleri yüklemeden önce siyah beyaza dönüştürmek için sürekli olarak WordPress ve bir fotoğraf düzenleyici arasında geçiş mi yapıyorsunuz? Her fotoğrafı önceden tek tek düzenlemek sıkıcı ve verimsiz bir süreçtir.
Neyse ki, yıllarca süren WordPress denemeleriyle, yükleme sırasında görüntüleri otomatik olarak gri tonlamaya dönüştürmenin basit bir yolunu keşfettik ve size değerli zaman kazandırdık.
Bu makalede, WordPress'te görselleri sitenize yüklerken adım adım nasıl gri tonlamalı hale getireceğinizi göstereceğiz.

WordPress'te Ne Zaman Koyu Tonlu (Grayscale) Görüntüler Kullanmalısınız?
Gri tonlamalı görüntüler, tüm renk bilgilerini soyarak, görüntü renklerini yalnızca siyah ve beyaz arasında değişen gri tonlarını gösterecek şekilde bırakır.
Belirli durumlarda, koyu tonlu (grayscale) görüntüler kullanmak WordPress web siteniz için faydalı olabilir. Örneğin, görüntüde gösterilen nesnelerin okunabilirliğini artırmak için kullanabilirsiniz.
Veya web siteniz için zamansız, klasik bir görünüm oluşturmak amacıyla gri tonlamalı görselleri kullanmak isteyebilirsiniz.
Öte yandan, gri tonlamalı görüntüler de küçük boyutları nedeniyle görüntü işleme için yaygın olarak kullanılır. Bu, geliştiricilerin daha kısa sürede karmaşık işlemleri çalıştırmasına olanak tanır.
Bununla birlikte, görüntülerinizi yüklerken WordPress'te nasıl koyu tona (grayscale) dönüştürebileceğinizi görelim.
WordPress'te Yükleme Sırasında Görüntüleri Gri Tonlamaya Dönüştürme
WordPress'e resim eklerken, Photoshop gibi bir fotoğraf düzenleme yazılımı kullanarak yüklemeden önce düzenlemeniz ve renkli resimleri gri tonlamaya dönüştürmeniz gerekir.
Yüzlerce veya binlerce resmi yüklemeniz gerekiyorsa, her resmi manuel olarak düzenlemek çok zaman alabilir.
Ancak, yükleme sırasında bunları otomatik olarak gri tonlamalı görsellere dönüştürebilirsiniz. Başlamak için tek yapmanız gereken aşağıdaki kodu temanızın functions.php dosyasına eklemektir:
add_filter('wp_generate_attachment_metadata','rb_bw_filter');

function rb_bw_filter($meta) {

    $path = wp_upload_dir(); // get upload directory
    $file = $path['basedir'].'/'.$meta['file']; // Get full size image

    $files[] = $file; // Set up an array of image size urls

    foreach ($meta['sizes'] as $size) {
        $files[] = $path['path'].'/'.$size['file'];
    }

    foreach ($files as $file) { // iterate through each image size

        // Convert image to grayscale credit to http://ottopress.com/2011/customizing-wordpress-images/

        list($orig_w, $orig_h, $orig_type) = @getimagesize($file);
        $image = wp_load_image($file);
        imagefilter($image, IMG_FILTER_GRAYSCALE);
        switch ($orig_type) {
            case IMAGETYPE_GIF:
                imagegif( $image, $file );
                break;
            case IMAGETYPE_PNG:
                imagepng( $image, $file );
                break;
            case IMAGETYPE_JPEG:
                imagejpeg( $image, $file );
                break;
        }
    }
    return $meta;
}
Kod eklemenin basit bir yolu, WordPress için WPCode eklentisini kullanarak tema dosyalarına eklemektir.
Bu, kod parçacıklarını temanızın functions.php dosyasını manuel olarak düzenlemeye gerek kalmadan çalıştırmanıza yardımcı olan en iyi kod parçacıkları eklentisidir. Böylece sitenizi bozma endişesi taşımanıza gerek kalmaz.

Öncelikle, sitenize ücretsiz WPCode eklentisini indirip yüklemeniz gerekecek. Yardıma ihtiyacınız olursa, lütfen WordPress eklentisi nasıl kurulur hakkındaki rehberimizi izleyin.
Not: WPCode'un ücretsiz sürümü, WordPress'e özel kod eklemek için ihtiyacınız olan her şeyi sunar. Özel kod parçacığı kitaplığı, zamanlanmış kod parçacıkları, dönüşüm pikselleri ve daha fazlası gibi daha gelişmiş özellikler için WPCode Pro'ya yükseltebilirsiniz.
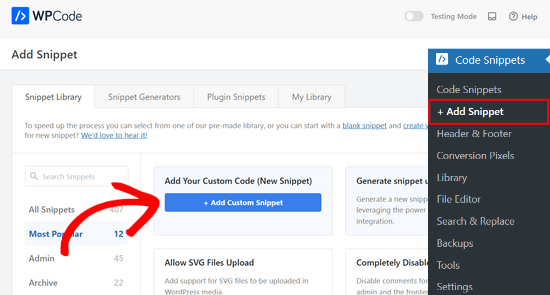
Etkinleştirdikten sonra, WordPress kontrol panelinizden Kod Parçacıkları » + Yeni Ekle bölümüne gidebilirsiniz.
Ardından, 'Özel Kodunuzu Ekleyin (Yeni Snippet)' seçeneğine gidin ve '+ Özel Snippet Ekle' düğmesine tıklayın.
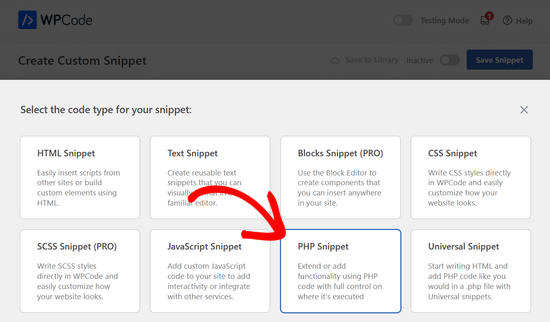
Ardından, görünen seçeneklerden kod türü olarak ‘PHP Snippet’i seçmeniz gerekir.
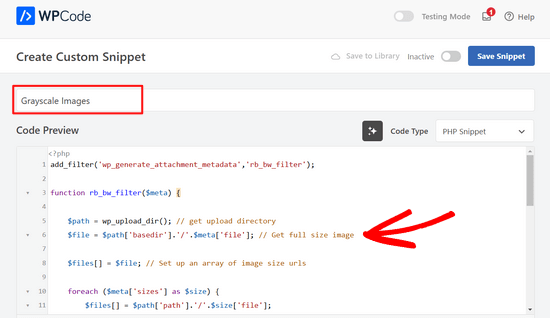
Şimdi, Özel Kod Parçacığı Oluştur sayfasında, kod parçacığınız için bir ad girin. Bu, kodun ne işe yaradığını hatırlamanıza yardımcı olacak herhangi bir şey olabilir.
Ardından, yukarıdaki kodu ‘Kod Önizleme’ alanına yapıştırın.
Kodu girdikten sonra, aşağı kaydırarak 'Ekleme' bölümüne gidebilirsiniz.
Burada, ‘Otomatik Ekle’ seçeneğini seçili bırakabilirsiniz. Bu, kodu sizin için otomatik olarak ekleyecek ve yürütecektir.

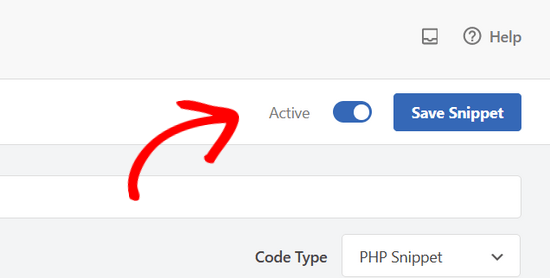
Son olarak, ekranın üst kısmına geri dönün ve anahtarı 'Etkin Değil'den 'Etkin'e getirin ve 'Snippet Kaydet' düğmesine tıklayın.
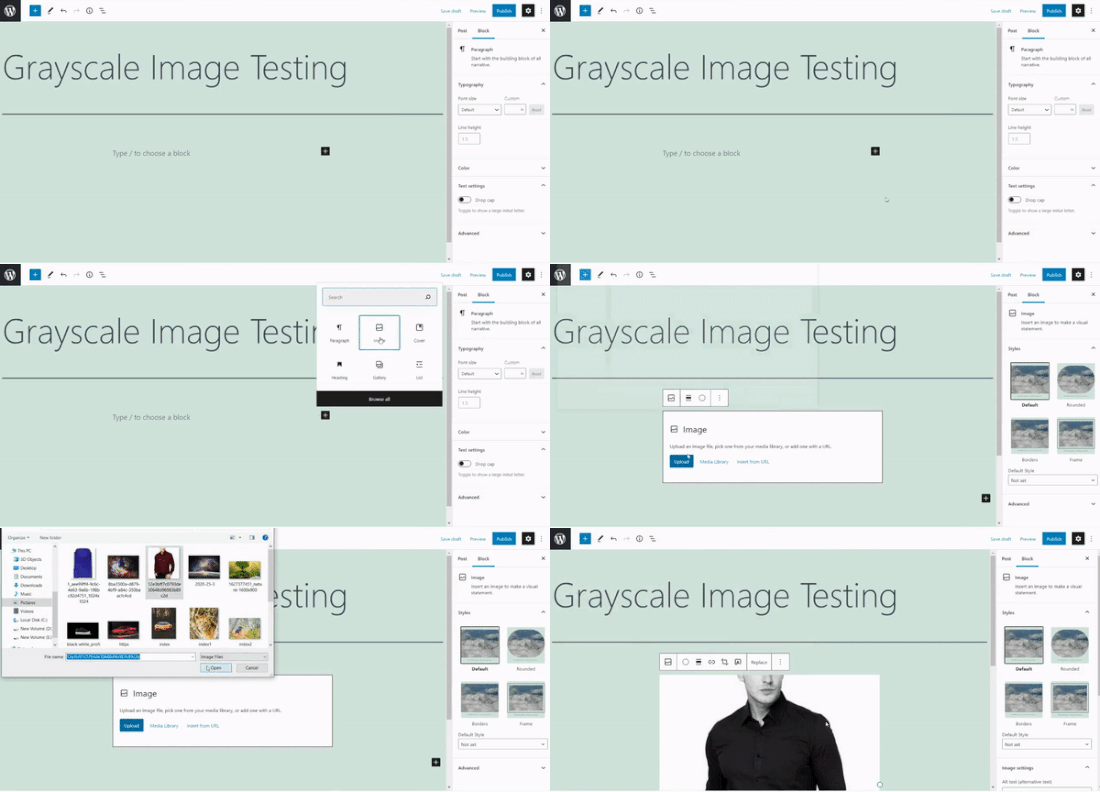
Ardından, yeni bir sayfa düzenleyerek veya ekleyerek kodu test edebilirsiniz. WordPress düzenleyicisinde, '+' düğmesine tıklayın ve bir Görüntü bloğu ekleyin.
Artık WordPress blogunuza herhangi bir resim yükleyebilirsiniz ve bu resim otomatik olarak gri tonlamalı bir resme dönüştürülecektir.
Bu makalenin WordPress'te görüntüleri nasıl gri tonlamalı hale getireceğinizi öğrenmenize yardımcı olduğunu umuyoruz. Ayrıca WordPress sitenize karanlık mod ekleme rehberimize ve en iyi web tasarım yazılımları hakkındaki uzman seçimlerimize de göz atabilirsiniz.
Bu makaleyi beğendiyseniz, lütfen WordPress video eğitimleri için YouTube Kanalımıza abone olun. Bizi ayrıca Twitter ve Facebook'ta da bulabilirsiniz.


Tomas Kapler
Harika bir ipucu, birçok kullanım için CSS filtresiyle bunu yapmanın daha iyi olabileceğini belirtmek isterim, örneğin.
img.bw {
filter: grayscale(1);
}
varsayılan olarak siyah beyaz gösterebilir veya üzerine gelindiğinde renkli gösterebilirsiniz, ya da siyah beyazdan tam renge ve geri animasyon yapabilirsiniz, örneğin.
img.bw {
filter: grayscale(0);
}
img.bw.grey { filter: grayscale(1); transition-property: filter; transition-duration: 1s; }
wp_generate_attachment_metadata filtresinin kullanılacak doğru filtre olduğunu düşünmüyorum, çünkü meta oluşturmada sadece görüntü oluşturmada değil, ikinci bir görüntü manipülasyonu yapıldığı için çağrılıyor, ancak doğru çözüm çok daha uzun olurdu, bu yüzden neden bu şekilde yapıldığını anlıyorum.
rok
Güzel çalışıyor ancak yükleme sırasında WP 4.3 medya kütüphanesinde hata veriyor.
Sanırım yorumlarda yazan tüm düzeltmeleri uyguladım ama hala hata var.
kodum şöyle görünüyor:
add_filter(‘wp_generate_attachment_metadata’,’themename_bw_filter’);
function themename_bw_filter($meta) {
$time = substr( $meta[‘file’], 0, 7); // <- yüklemenin doğru zamanını al
$file = wp_upload_dir( $time ); // <- doğru yükleme dizinini bulur
$file = trailingslashit($file[‘path’]).$meta['sizes']['slide-pic']['file'];
if( $file ) {
list($orig_w, $orig_h, $orig_type) = @getimagesize($file);
}
$image = wp_load_image($file);
imagefilter($image, IMG_FILTER_GRAYSCALE);
switch ($orig_type) {
case IMAGETYPE_GIF:
imagegif( $image, $file );
break;
case IMAGETYPE_PNG:
imagepng( $image, $file );
break;
case IMAGETYPE_JPEG:
imagejpeg( $image, $file );
break;
}
return $meta;
}
Kim
Bu, word press'teki tüm resimleri gri tonlamaya mı yoksa yalnızca yeni güncellenenleri mi değiştirecek?
Tomaž Zaman
Tartışmaya biraz geç kaldığımı biliyorum ama aynı sorunla (başkalarının bildirdiği hata) karşılaştım:
imagefilter() parametre 1'in kaynak, verilen dize olmasını bekliyorBu, mevcut aydan daha eski bir gönderiyi düzenlerken medya modülü aracılığıyla görsel yüklemeye çalıştığınızda olur; bu durum, WordPress'in orijinal görselin hangi dizinde olduğunu ve gri tonlamalı görseli hangi dizine kaydetmesi gerektiğini karıştırır.
Çözüm bu:
<?php

add_filter('wp_generate_attachment_metadata','themename_bw_filter');

function themename_bw_filter($meta) {

  $time = substr( $meta['file'], 0, 7); // <- yüklemenin doğru zamanını al

  $file = wp_upload_dir( $time ); // <- doğru yükleme dizinini bulur

  $file = trailingslashit($file['path']).$meta['sizes']['themename-bw-image']['file'];

  list($orig_w, $orig_h, $orig_type) = @getimagesize($file);

  $image = wp_load_image($file);

  imagefilter($image, IMG_FILTER_GRAYSCALE);

  switch ($orig_type) {

    case IMAGETYPE_GIF:

      imagegif( $image, $file );

      break;

    case IMAGETYPE_PNG:

      imagepng( $image, $file );

      break;

    case IMAGETYPE_JPEG:

      imagejpeg( $image, $file );

      break;

  }

  return $meta;

}
endul
sonucu filtre görüntüsünü belirli bir klasöre/dizine nasıl değiştirilir
geertvdheide
Bir ekleme: Aynı boyutta iki add_image_size çağrısı olmasından kaynaklanan, aynı dosya adına sahip iki resim sorununu aşmak için birkaç satır ekledim. Ek kod burada bulundu:
http://bavotasan.com/2011/create-black-white-thumbnail-wordpress/
mklemme
@geertvdheide
Birden fazla boyut desteği eklemek isteseydiniz, benim kullandığımı deneyin:
if ( function_exists( ‘add_theme_support’ ) ){
add_theme_support( ‘post-thumbnails’ );
set_post_thumbnail_size( 50, 50, true );
add_image_size( ‘medium-thumb’, 660, ”, true );
add_image_size( ‘large-thumb’, 960, ”, true );
add_image_size( ‘small-thumb’, 100, ”, true );
}
(Yükseklik tanımlanmamış, yalnızca genişlik.)
hepsine uygulanması için farklı adları eklemeniz gerekir:
[‘medium-thumb’ , ‘large-thumb’ , ‘small-thumb’] filtre kodunda.
Temanızdaki küçük resmi makalede listelenenle aynı şekilde çağırın:
Mike Logan
Mükemmel fikir, neredeyse 10 yıl sonra bu hala kullanışlı.
geertvdheide
Bu kodu paylaştığınız için teşekkürler! Uygulamaya çalışırken garip bir sorunla karşılaştım. Yüklenen görüntünün boyutuyla (piksel boyutu, yani boyutları) ilgili. Kodu kelimesi kelimesine temanın functions.php dosyasına kopyaladım ve add_image_size çağrısında belirtilen boyuttan daha büyük görüntülerle harika çalışıyor. Ancak belirtilen boyuttan küçük veya eşit bir görüntü kullanıldığında, WordPress'teki yükleyici hatalar veriyor ve görüntü boyutunu işlemez (yönetici ortamının medya bölümünden veya belirli bir gönderi veya sayfadan). Hata:
Uyarı: imagefilter() parametre 1'in kaynak, dize verilmesini bekliyor.
Hata içinde başka şeyler de var, ancak ana neden bu gibi görünüyor. imagefilter fonksiyonuna verilen görüntü verileri geçerli değil mi veya mevcut değil mi?
Bunun nedenini bilen var mı? Benim durumumla temiz bir kurulum arasındaki tek gerçek fark, başka amaçlar için birkaç tane daha add_image_size çağrısı eklemiş olmam. Aynı boyutu iki kez ekliyorum (biri siyah/beyaz, biri normal), ancak bu daha büyük görsellerde bir sorun gibi görünmüyor.
Ed Nailor
@GEERTVDHEIDE
ve bunu ihtiyacı olan diğerleri için:
Betik resmi gri tonlamaya dönüştürürken ve yüklenen dosya dosya boyutuna uymuyorsa, bu betiğin bozulmasına neden olur. Bunu önlemek için, $file olduğundan emin olmak için hızlı bir if() koşulu eklemeniz yeterlidir.
$dosya = trailingslashit($dosya['path']).$meta['sizes']['themename-bw-image']['file'];
if( $dosya ) {
list($orig_w, $orig_h, $orig_type) = @getimagesize($dosya);
——– kodun geri kalanı ——–
return $meta;
}
Bu, dönüştürmeye çalışmadan önce istediğiniz dosya boyutunun mevcut olup olmadığını kontrol edecektir.
Umarım yardımcı olur!
frankiegershwin
@Otto42 Teklifin için teşekkürler. Yapacağım.
Otto42
@frankiegershwin çok kötü! Kod yardımı için bana doğrudan e-posta göndermekten çekinmeyin. otto@wordpress.org
frankiegershwin
@Otto42 thank you! I had a bit of a hard time, actually and had to undoe it will pick it up tomorrow. It’s a good way to mix it up onsite
Otto42
@frankiegershwin Yardım gerekirse bana bildirin. Orijinal gönderideki yorumlarıma sepya tonları ekleme şeklini de ekledim: http://t.co/avDNNEX
rodhk
@rodriguezhernan ne aptalca bir hile…. bunun için kodu değiştirmem gerekiyor
wpbeginner
@Otto Thanks for the comment Otto. Updated the post as well
Otto
İnsanların “temaismi”ni kendi temalarının adıyla değiştirmeleri gerektiğini unutmayın.