WordPress siteniz e-posta gönderemiyor. İletişim formu gönderimleri kayboluyor ve önemli bildirimler asla ulaşmıyor. Tanıdık geliyor mu?
Yalnız değilsiniz ve şöyle bir şey var: Sorun WordPress’in kendisi değil. Web sitelerinin genellikle e-posta dağıtımını nasıl ele aldığıdır.
WPBeginner’da tam olarak bu sorunla uğraştık. Bu nedenle tüm WordPress e-postalarımızı işlemek için WP Mail SMTP’yi kullanıyor ve ona güveniyoruz. E-postalarınızın gerçekten hedeflerine ulaştığından emin olmak için SMTP (güvenilir e-posta teslimatı için endüstri standardı) kullanır.
Bu kılavuzda, e-posta sorunlarınıza tam olarak neyin neden olduğunu ve SMTP kullanarak bunları nasıl çözeceğinizi göstereceğiz, böylece bir daha asla önemli bir bildirimi kaçırmayacaksınız.
WordPress Sitenizden Neden E-posta Alamıyorsunuz?
E-postaların kaybolmasının en yaygın nedeni, WordPress barındırma sunucunuzun PHP mail() işlevini kullanacak şekilde düzgün yapılandırılmamış olmasıdır.
Barındırma hizmetiniz bunu kullanacak şekilde yapılandırılmış olsa bile, Gmail ve diğerleri gibi birçok e-posta hizmet sağlayıcısı, e-posta spam‘ini azaltmak için çeşitli araçlar kullanır. Bu araçlar, bir e-postanın iddia ettiği konumdan geldiğini tespit etmeye çalışır.
WordPress web siteleri tarafından gönderilen e-postalar genellikle bu testte başarısız olur.
Bu, WordPress sitenizden bir e-posta gönderildiğinde (bir iletişim formu eklentisinden, yönetici bildiriminden vb.), bırakın gelen kutusunu, alıcının spam klasörüne bile giremeyebileceği anlamına gelir.
Bu nedenle e-posta bülteninizi göndermek için WordPress kullanmamanızı öneririz.
WordPress’te e-posta göndermek için herkese SMTP kullanmalarını önermemizin nedeni de budur.
SMTP Nedir?
SMTP (Basit Posta Aktarım Protokolü) e-posta göndermek için endüstri standardıdır.
PHP mail() işlevinin aksine, SMTP uygun kimlik doğrulama kullanır ve bu da yüksek e-posta teslim edilebilirliği sağlar.
WordPress, WordPress sitenizi PHP mail() işlevi yerine SMTP kullanarak e-posta gönderecek şekilde yapılandıran bir WP Mail SM TP eklentisine sahiptir.
SendLayer, Brevo (eski adıyla Sendinblue), Gmail (Google Workspace), Amazon SES ve daha fazlası gibi tüm popüler SMTP hizmetlerine bağlanmak için kullanabilirsiniz.
Eklenti hakkında daha fazla ayrıntıya ihtiyacınız varsa WP Mail SMTP incelememizi okuyabilirsiniz.
Bununla birlikte, WordPress’in e-posta göndermeme sorununu nasıl çözeceğimize bir göz atalım. Bu makalede gezinmek için aşağıdaki hızlı bağlantıları kullanabilirsiniz:
Alternatif: WooCommerce kullanıyorsanız ve sipariş e-postalarınız teslim edilmiyorsa, bunun yerine WooCommerce’in sipariş e-postası göndermeme sorununu nasıl çözeceğinize ilişkin kılavuzumuzu okuyun.
Adım 1: WP Mail SMTP Eklentisini Kurun
Hangi SMTP hizmetini seçerseniz seçin, WP Mail SMTP eklentisini sitenize yüklemeniz gerekir. Bu, WordPress’i yerleşik PHP mail() işlevini kullanmaktan SMTP hizmetinizi kullanmaya geçirmenizi sağlar.
İlk olarak, WP Mail SMTP eklentisini kurun ve etkinleştirin. Nasıl yapılacağından emin değilseniz, bir WordPress eklentisinin nasıl kurulacağına ilişkin adım adım kılavuzumuza bakın.
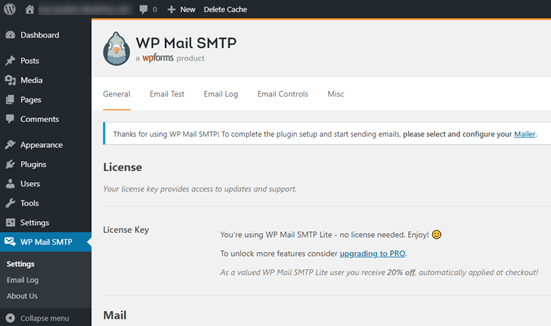
Ardından, eklenti ayarlarını yapılandırmak için WordPress kontrol panelinizdeki ‘WP Mail SMTP’ye tıklayın.
Sitenizin e-postalarının gelmesini istediğiniz adı ve iş e-posta adresini girerek başlamanız gerekecektir.
Burada SMTP posta hizmetiniz için kullanacağınız e-posta adresinin aynısını kullandığınızdan emin olun.
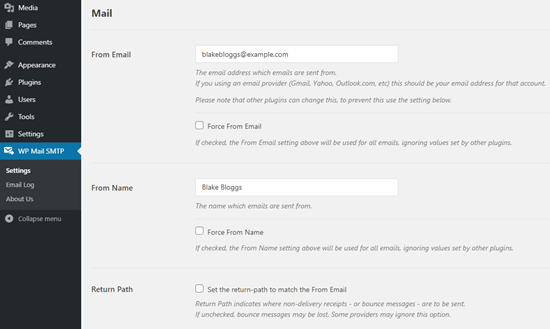
WPForms gibi diğer eklentiler farklı ayarlara sahip olsa bile, e-postaları bu adı ve e-posta adresini kullanmaya zorlamayı seçebilirsiniz. WP Mail SMTP diğer eklentilerin ayarlarını geçersiz kılacaktır.
Bundan sonra, siteniz için bir SMTP posta hizmeti seçmeniz gerekir. Bu eğitim için, SendLayer kullanarak SMTP kuracağız.
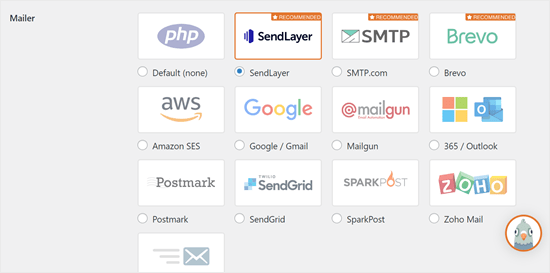
WP Mail SMTP kurulumunu tamamlamak için SendLayer’da bir hesap oluşturmanız gerekir. Daha sonra buna geçeceğiz ve ardından WP Mail SMTP kurulumunu tamamlamak için geri döneceğiz, bu nedenle bu sekmeyi açık tuttuğunuzdan emin olun.
Adım 2: SMTP Posta Hizmetinizi Kurun
SendLayer güvenilir bir e-posta servis sağlayıcısıdır. Yüksek teslim edilebilirlik ile çok sayıda e-posta göndermenize izin verir.
SendLayer’ı 200 adede kadar e-postayı ücretsiz olarak göndermek için kullanabilirsiniz, bu da çoğu küçük web sitesinin başlaması için fazlasıyla yeterlidir.
Bunlar iletişim formunuzdan gelen e-postalar, yeni kullanıcı hesabı ayrıntıları, şifre kurtarma e-postaları veya WordPress siteniz aracılığıyla gönderilen diğer e-postalar olabilir.
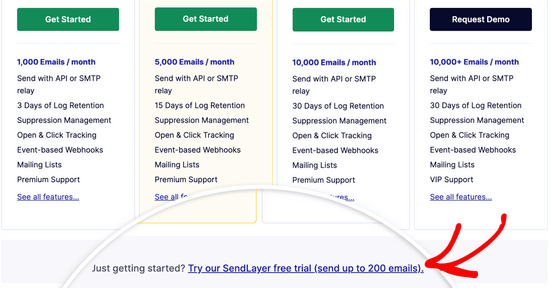
Öncelikle, bir hesap oluşturmak için SendLayer web sitesine gitmeniz gerekir. Fiyatlandırma sayfasında, hesabınızı oluşturmak için ‘SendLayer ücretsiz deneme sürümümüzü deneyin (200 e-postaya kadar gönderin)’ bağlantısına tıklayın.
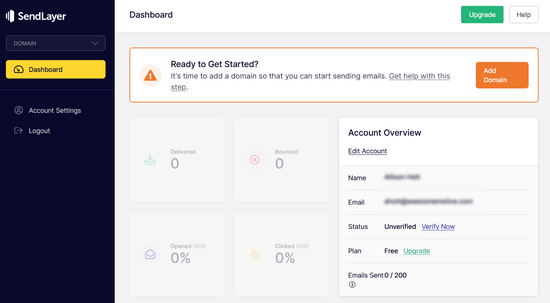
Bir hesap oluşturduktan sonra, SendLayer kontrol panelinizi göreceksiniz.
Artık bir SendLayer hesabınız olduğuna göre, e-posta sağlayıcınızı WordPress ile ayarlayalım.
Adım 3: WordPress Web Sitenizi SendLayer ile Bağlayın
SendLayer ile e-posta gönderebilmeniz için önce alan adınızı yetkilendirmeniz gerekir.
Bu, e-posta sunucularına gönderen alan adınızın onaylanmış sahibi olduğunuzu ve e-postalarınızın meşru bir kaynaktan gönderildiğini kanıtlar.
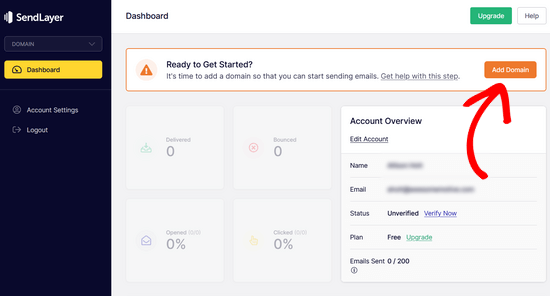
Alan adınızı yetkilendirmek için SendLayer kontrol panelinden turuncu renkli ‘Alan Adı Ekle’ düğmesine tıklayın.
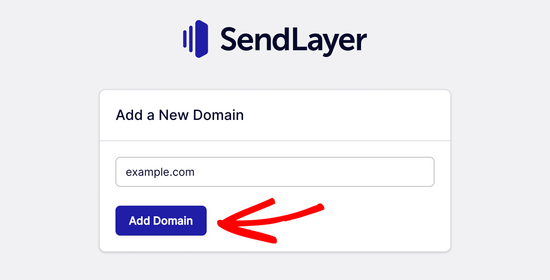
Sonraki sayfada, sağlanan alana alan adınızı yazmanız yeterlidir.
Ardından, ‘Alan Adı Ekle’ düğmesine tıklayın.
Not: Brevo (eski adıyla Sendinblue) gibi diğer posta hizmetlerinde, önce web siteniz için bir alt alan adı ayarlamanız gerekir. Ancak SendLayer, alt alan adını gönderen alan adının DNS kayıtlarına otomatik olarak ekleyecektir.
Dolayısıyla, alan adını kaydederken ekstra bir alt alan adı eklemenize gerek yoktur.
Alan adınızı ekledikten sonra, SendLayer size alan adınızın DNS kayıt ayarlarına eklemeniz gereken 5 DNS kaydı gösterecektir.
Bu kod satırları SendLayer’ın alan adınızı yetkilendirmesini sağlar.
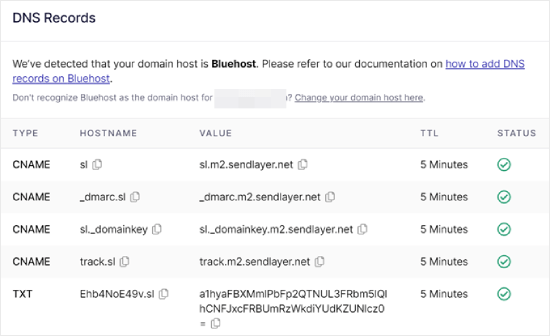
Bu DNS kayıtlarını WordPress sitenize eklemeniz gerekir. Bu karmaşık görünebilir, ancak tek yapmanız gereken bunları kopyalayıp doğru yere yapıştırmaktır.
Bu eğitimin amacı doğrultusunda, Bluehost‘taki hosting hesabımızı kullanarak örneğimizi göstereceğiz.
Başka barındırma şirketleri kullanıyorsanız veya DNS’niz Domain.com, Network Solutions veya GoDaddy gibi bir alan adı kayıt kuruluşu tarafından yönetiliyorsa, ilgili talimatları izleyin.
WP Mail SMTP’yi herhangi bir host ile nasıl kuracağınıza dair rehberimizi de okuyabilirsiniz.
İlk olarak, yeni bir tarayıcı sekmesi açın ve WordPress hosting hesabınıza giriş yapın. Ardından, alan adınızın DNS kayıtlarını bulun.
Bluehost’ta bunu ‘Alan Adları’na giderek yaparsınız. Ardından, SendLayer ile bağlanmak istediğiniz alan adının yanındaki ‘Ayarlar’a tıklayın.
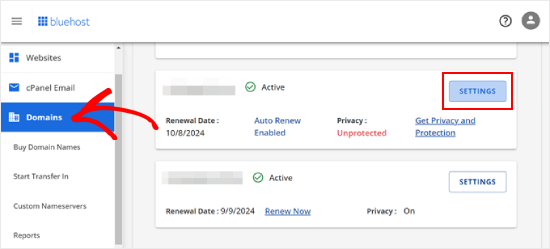
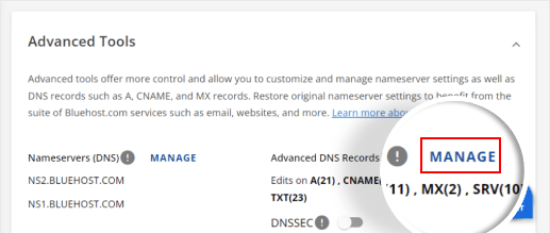
Bir sonraki sayfada, ‘Gelişmiş Araçlar’ bölümüne ilerleyin.
Bundan sonra, Gelişmiş DNS Kayıtlarının yanındaki ‘Yönet’ düğmesine tıklayın.
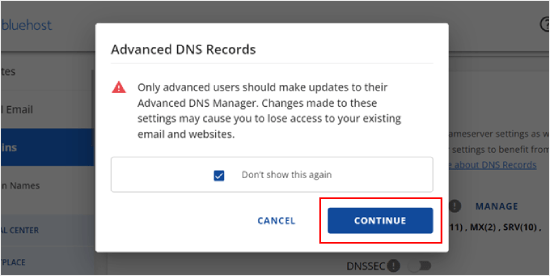
DNS kayıtlarının gelişmiş bir kullanıcı tarafından düzenlenmesi gerektiğini söyleyen bir uyarı mesajı göreceksiniz. Bu mesaj için endişelenmeyin, çünkü bu işlem oldukça kolaydır.
Devam etmek için devam edin ve ‘Devam’a tıklayın.
Şimdi Gelişmiş DNS Kayıtlarını Yönet sayfasına ulaşacaksınız.
Başlamak için ‘+ Kayıt Ekle’ düğmesine tıklayın.
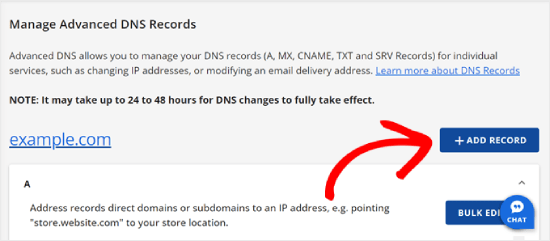
Şimdi SendLayer’ın sağladığı DNS kayıtlarını eklemeye başlayalım.
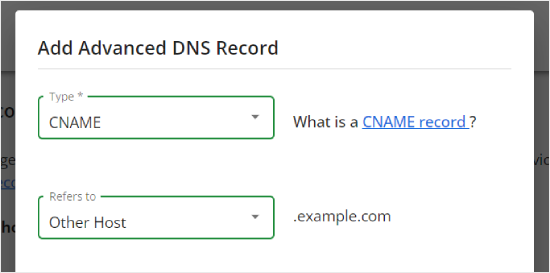
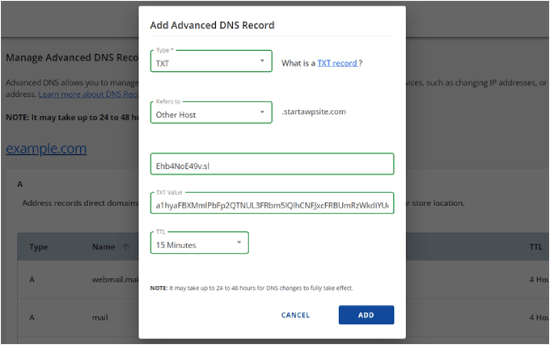
İlk olarak, DNS kaydının türünü seçin. Bu durumda, ilk kayıt için CNAME kullanacağız.
‘Refers to’ bölümünde ‘Other Host’ seçeneğine tıklayın. Aynı seçeneği daha sonra tüm DNS kayıtlarınız için seçeceksiniz.
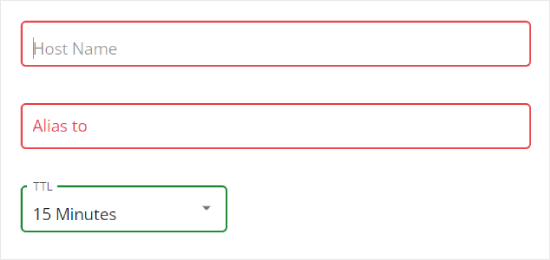
Aşağı kaydırdığınızda üç alan göreceksiniz: Ana Bilgisayar Adı, Diğer Ad ve TTL.
Ana Bilgisayar Adı, SendLayer tarafından sağlanan ‘Ana Bilgisayar Adı’ içindeki değerle doldurulmalıdır. Takma Ad, ‘Değer’ içindeki değerle doldurulmalıdır. TTL için ise 15 dakika olarak bırakabilirsiniz.
Aşağıdaki ekran görüntüsü, ilk CNAME kaydımızı eklediğimizde ekranımızın nasıl göründüğünü göstermektedir.
İşiniz bittiğinde ‘Ekle’ye tıklayın.
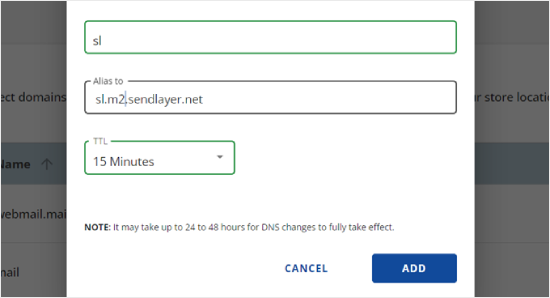
Bu adımları tüm DNS kayıtları (hem CNAME hem de TXT) için tekrarlayabilirsiniz.
TXT kaydını eklerken, SendLayer’daki ‘Hostname’ değerini ‘Host Name’ alanına ve ‘Value’ değerini ‘TXT Value’ alanına yapıştırdığınızdan emin olun.
İşte böyle görünüyor:
Kayıtlarınızı ekledikten sonra SendLayer’a geri dönün ve ‘Bu DNS kayıtlarını ekledim ve devam etmeye hazırım’ seçeneğinin yanındaki kutuyu işaretleyin.
Ardından, ‘DNS Kayıtlarını Doğrula’ düğmesine basın.
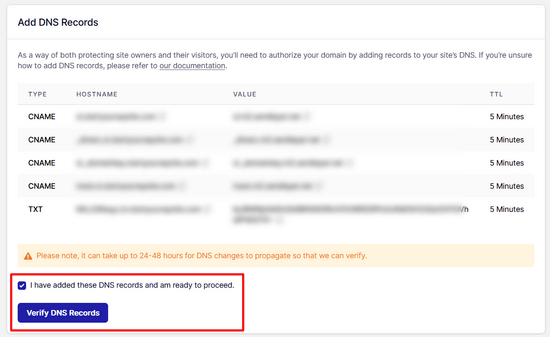
SendLayer’ın kayıtlarınızı doğrulayabilmesi 24-48 saat sürebilir. Deneyimlerimize göre, bu birkaç saat sürmüştür.
Bu düğmeye tıkladığınızda hiçbir şey olmuyorsa, kayıtlar henüz doğrulanamamıştır. Kayıtların doğrulanıp doğrulanmadığını daha sonra SendLayer panonuzdan ‘Ayarlar’a gidip ‘DNS Kayıtları ve Ayarları’ sekmesine giderek tekrar kontrol edebilirsiniz.
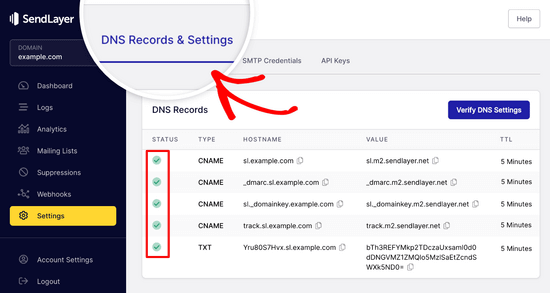
Burada, tüm DNS kayıtlarınızın bir listesini tek bir yerde bulacaksınız. Alan adınız başarıyla yetkilendirildikten sonra, ‘Durum’ sütununda her DNS kaydının yanında yeşil onay işaretleri göreceksiniz.
Yetkilendirmenin gerçekleşmesini beklerken bu eğitime devam edebilirsiniz.
Adım 4: SendLayer Kullanmak için WP Mail SMTP Kurulumunu Bitirin
Kurulumu tamamlayalım. İlk olarak, API anahtarınızı bulmak için SendLayer hesabınıza gidin.
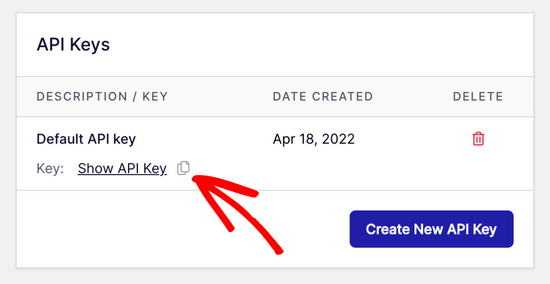
SendLayer kontrol panelinden Ayarlar “ API Anahtarları sayfasına gitmeniz yeterlidir. Burada, alan adınızı SendLayer’da yetkilendirdiğinizde oluşturulan varsayılan bir API anahtarı göreceksiniz.
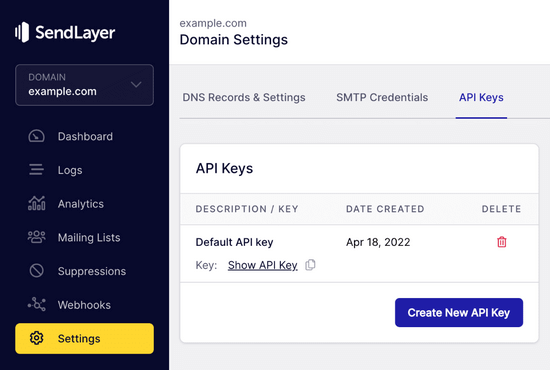
Kopyalama simgesine tıklayarak API anahtarını bu sayfadan kopyalayabilirsiniz.
Bu şekilde:
Bunu yaptıktan sonra, WP Mail SMTP kurulum sihirbazı sekmenize geri dönebilirsiniz.
Ardından, API anahtarını uygun yere yapıştırın.

Tebrikler. Artık her şeyi ayarladınız. Son adım, her şeyin çalıştığından emin olmak için bir test e-postası göndermektir.
WP Mail SMTP “ Araçlar bölümüne gidin. ‘E-posta Testi’ sekmesinde, e-posta göndermek için bir e-posta adresi girin. Bu varsayılan olarak sitenin yönetici e-postası olacaktır. ‘E-posta Gönder’e tıklayın.
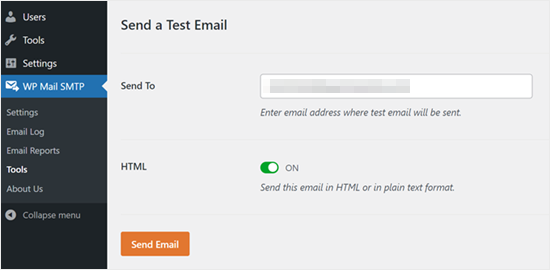
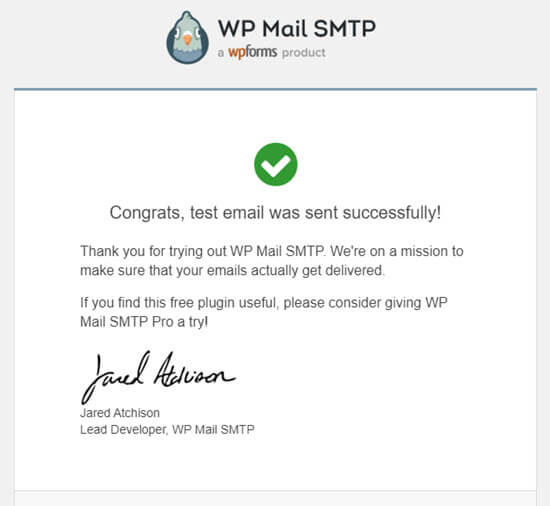
‘Test HTML e-postası başarıyla gönderildi!’ mesajını görmelisiniz.
Gelip gelmediğini görmek için gelen kutunuzu kontrol edin. Şöyle görünecek:
Not: SendLayer hesabınız henüz etkinleştirilmemişse, şu mesajı alırsınız: [permission_denied]: E-posta gönderilemiyor. SMTP hesabınız henüz etkinleştirilmedi.
WordPress E-posta Göndermeme Sorununu Çözmenin Alternatif Yolları
WP Mail SMTP eklentisinin posta seçenekleri listesinden de görebileceğiniz gibi, SendLayer kullanmak zorunda değilsiniz. En iyi ücretsiz önerimiz olsa da, Microsoft 365, Gmail(Google Workspace), Amazon SES vb. dahil olmak üzere kullanabileceğiniz başka seçenekler de vardır.
WordPress E-postalarını Düzeltmek için WP Mail SMTP ile Gmail veya Google Workspace Kullanma
Gmail’iniz varsa, e-postalarınızı göndermek için bunu kullanabilirsiniz. WP Mail SMTP eklentisini kullanırken WordPress’te e-posta giriş bilgilerinizi girmeniz gerekmeyecektir.
Gmail veya Google Workspace kullanmak için, WP Mail SMTP’yi yukarıda gösterildiği gibi ayarlayın ve ardından posta göndericiniz için ‘Google / Gmail’ seçeneğine tıklayın.
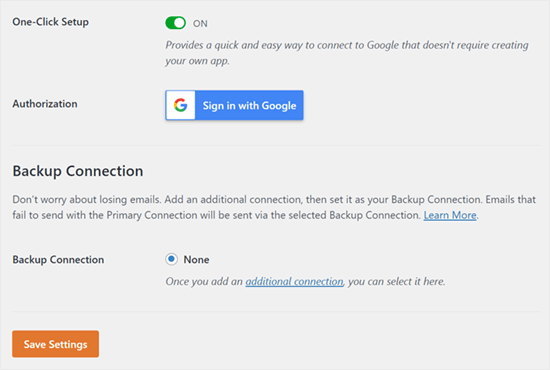
Ardından, WP Mail SMTP’nin tek tıklamayla kurulumunu kullanarak mailer ayarlarını yapılandırabilirsiniz.
Bu yöntem, çok daha kolay olan kendi uygulamanızı oluşturmanızı gerektirmez. Yalnızca Gmail hesabınızda oturum açmanız ve ‘Ayarları Kaydet’e tıklamanız yeterlidir.
Ancak profesyonel Gmail’inizi veya Google Workspace‘inizi kullanmanın birkaç önemli dezavantajı vardır.
Birincisi, web barındırıcınızla iletişime geçerek doğru sertifikayı yüklemelerini sağlamanız gerekebilir.
Bir diğeri ise, gelecekte e-posta adresini değiştirirseniz, tüm süreci tekrar gözden geçirmeniz gerekecektir. Bu, yeni bir web uygulaması oluşturmayı da içerecektir.
WordPress E-postalarını Düzeltmek için Microsoft 365’i WP Mail SMTP ile Kullanma
Normal e-posta hesabınız için Microsoft Office 365 veya Outlook kullanıyorsanız, WordPress üzerinden e-posta göndermek için bunu da kullanabilirsiniz. Ancak bu, daha az güvenli olduğu için önerilen bir seçenek değildir.
WP Mail SMTP’yi yukarıdaki gibi kurmanız, ardından SMTP postacınızı seçerken ‘365 / Outlook’ seçeneğine tıklamanız gerekir. Ardından, aşağıdaki alanları doldurabilmeniz için Microsoft Azure’da bir uygulama kaydetmeniz gerekir.
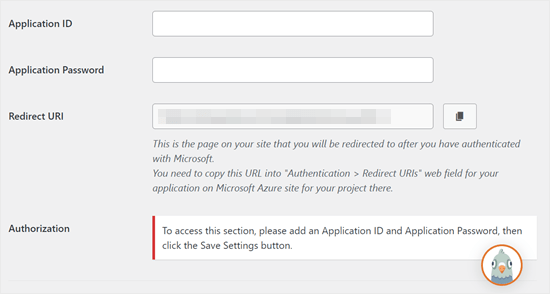
Daha fazla ayrıntı için, Outlook’un WP Mail SMTP ile nasıl kurulacağına ilişkin ayrıntılı kılavuza bakın.
WordPress E-postalarını Düzeltmek için Amazon SES’i WP Mail SMTP ile Kullanma
Amazon AWS platformu, WordPress e-posta sorununu çözmek için kullanabileceğiniz bir Basit E-posta Hizmetine (SES) sahiptir.
Amazon’un en iyi yanı, her ay 62.000’e kadar e-postayı ücretsiz olarak göndermenize izin vermesidir. Dezavantajı ise kurulumun yeni başlayanlar için biraz daha zorlayıcı olması, bu yüzden tercih ettiğimiz seçenek olarak önermiyoruz.
Ancak tahmin edebileceğiniz gibi, birçok profesyonel ve uzman WordPress e-posta SMTP hizmeti için Amazon SES kullanıyor, bu yüzden ondan bahsetmeden bir makale yazamazdık.
Amazon SES’i WordPress ile kurmakla ilgileniyorsanız, Amazon SES’in WordPress ile nasıl kurulacağına ilişkin talimatların tamamına bakın.
Hangi posta göndericisini kullanmaya karar verirseniz verin, e-postaların başarıyla gönderildiğinden emin olmak için her zaman ‘E-postayı Test Et’ özelliğini kullanmayı unutmayın.
Gelen kutunuzu da kontrol ettiğinizden ve test e-postasını aldığınızı onayladığınızdan emin olmalısınız.
Video Eğitimi
Görsel talimatları tercih ediyorsanız, bu videoya göz atın:
Başka WordPress Hataları mı Yaşıyorsunuz? Bu Kılavuzlara Göz Atın
WordPress mükemmel değildir ve zaman zaman bazı yaygın hatalarla karşılaşabilirsiniz. İşte bunları çözmek için göz atabileceğiniz bazı eğitimler:
- WordPress’te Medya Ekle Düğmesinin Çalışmaması Nasıl Giderilir
- WordPress’te Resim Yükleme Sorunu Nasıl Giderilir (Adım Adım)
- WordPress’te Karışık İçerik Hatası Nasıl Giderilir (Adım Adım)
- WordPress Yazılarının 404 Hatası Vermesi Nasıl Giderilir (Adım Adım)
- “WordPress Veritabanı Hatası Disk Dolu” Hatası Nasıl Giderilir
- WordPress’te Veritabanı Bağlantısı Kurulurken Oluşan Hata Nasıl Giderilir?
- WordPress’te “Üzgünüz, Bu Dosya Türüne Güvenlik Nedenleriyle İzin Verilmiyor” Hatası Nasıl Giderilir
- WordPress’te 502 Hatalı Ağ Geçidi Hatası Nasıl Giderilir?
- WordPress Arama Çalışmıyor Nasıl Onarılır
- WordPress Formu Çalışmıyor: 7 Sorun Giderme İpucu
Umarız bu makale WordPress e-posta göndermeme sorununu nasıl çözeceğinizi öğrenmenize yardımcı olmuştur. Ayrıca en yaygın WordPress blok düzenleyici sorunları listemizi veya en iyi WooCommerce e-posta özelleştirici eklentileri seçimlerimizi görmek isteyebilirsiniz.
If you liked this article, then please subscribe to our YouTube Channel for WordPress video tutorials. You can also find us on Twitter and Facebook.


Will
My problem is that wordpress won’t send emails to or from an address that is coming from my domain name. E.g. @domain.com. But it will send from any other email address type.
Md Sajid
i successfully setup my site, and it is working very well.
thanks for this nice and working tutorial..
i used gmail api first method..
SORRY FOR MY BAD ENGLISH
idayat
hello, please does anyone know how can stop WordPress from sending automatic emails to blog subscribers, i want to use MailChimp but it seems i have to first disable WordPress. thank you
Lyndsay
Great instructions! Clear, easy to follow and they work!
Iman
Thank you so much. You have tutorial helped me fix my email problem . this was one of the best tutorials I have ever seen. every step is very well explained.
alex
Hi, I have installed SMTP – I think right.. but I’m still not receiving emails from the contact form. I’m also not getting new order notifications. can someone please help me?
Sagar Awal
check spam mail.
Nifemi
I’ve completed all the steps using mailgun but when I try to send a test email to my other webmails in that same domain, they never get delivered. However it works pretty well with other emails such as gmail.
Any idea about what might be causing this issue?
WPBeginner Support
Hi Nifemi,
Please contact Mailgun support they would be able to help you troubleshoot this.
Admin
Ron
Is there a way to find the emails that were sent and you did not receive because of this issue?
WPBeginner Support
Hi Ron,
Default WordPress notification emails are not stored in the database. However, if you are using a plugin which stores entries in the database then you may be able to see them.
Admin
Daniel Koo
Instead of the Success! message, I get an error like this:
——–
Not Acceptable!
An appropriate representation of the requested resource could not be found on this server. This error was generated by Mod_Security.
——-
What is the problem?
Colin
I’m having the exact same problem. The answer appears to lie in complicated CSS maneuvers that I hate.
Abhishek Kumar
Thank you so much for useful tutorials.
Anthony
Thank a lot. i followed your method 1 and it worked perfectly!
Michael Zorko
So…this used to be my go to app. Found a similar help video from you guys a while back. Loved Mailgun – then they started changing their policy. Now, it only works for verified email addresses..unless…you put a credit card on file.
Jack Hernandez
I’ve been having problems with admin and users (and new users) not receiving automatic notifications.
Will this also solve that issue?
Thanks
WPBeginner Support
Hi Jack,
Yes, it would. Missing notifications are almost always caused by email issues in WordPress.
Admin
Chloe
Hi,
I’m confused in the step of opening the cPanel in the hosting account. What is the hosting account? Is it found in WordPress? Thanks
WPBeginner Support
Hi Chloe,
Seems like you are using WordPress.com. Please see our guide on the difference between self hosted WordPress.org vs free WordPress.com blog.
Admin
Owen
I was having the exact same problem with e-mails not sending and these instructions were v useful. I have now fully resolved the issue – thank you very much
WPBeginner Support
Hi Owen,
We are glad you found the instructions helpful You may also want to subscribe to our YouTube Channel for WordPress video tutorials.
Admin
Amol
Hello,
Thank you for the topic. It helped me a lot and fixed the issue I was struggling with for last 3 days.
Regards,
Amol
Fred
I started to use the video guide and the first step was to set up a mailgun account. I created a password and clicked the verification link in my email to complete the account. However they then wanted to text me a confirmation code to a cell phone as a second verification. I only own a landline not a cell phone and there was no workaround so it is impossible for me to use mailgun. I realize most people these days have cell phones but it seems stupid they would not allow signup via computer (or via a voice code over the phone).
Fernán
Thank you so much! I just had some changes regarding domain settings, and this pointed me in the right way.
Pankaj Kumar
Hi, If i am using Zoho mail for example.com for email.
Can i still use mail1.example.com and configure mx record?
Will it work or stops my email account created on zoho mail for example.com
Melinda Thome
This worked perfectly, and solved all my WordPress email sending issues. Thank you!!
Melinda
Leo
My wordpress send emails, but, this emails Go to Spam folder… I need a soluction. I try using codes from functions.php but does not work. My solution was install Mail Bank plugin but, I dont want this plugin. I want a simple soluction.
casey
hello! I am having issues with my Contact page, we are not receiving new contact information in our CRM site. Can you please guide me to fix the issue?
Doron
Hey
Thanks for the great tutorial. I’m getting
“Mailgun HTTP API Test Failure; status “Free accounts are for test purposes only. Please upgrade or add the address to authorized recipients in Account Settings.”
Do you know why or how to resolve?
(Added an “authorized user” to my acount)
Alex Cramer
I’m having the same problem. I also don’t understand how to get to the cPanel. What am I missing?
Lawrence Ip
Ah! When in doubt add this TXT Record. @ v=spf1 include:_spf.google.com ~all
That is, this works for Namecheap (and most likely others) when Gmail is enabled. Enjoy!
Aaron Williams
I am having the problem that the wp_mail() function is not showing up in our functions.php document. If I read the documentation correctly, that means Gmail SMTP plugin still won’t work because it uses that function still. Every time I have tried to add the wp_mail() function it has resulted in a fatal error that kills the website and I have to remote into our server to delete the code to get the page working again. Any ideas?
WPBeginner Support
Hey Aaron,
wp_mail function resides in the core WordPress files, so you will not find it in your theme’s functions.php file. Since it is already part of the core, you do not need to add it. Try installing Gmail SMTP plugin, and it should work.
Admin
Clare
Hi there, so happy to have found this tutorial! Can anyone tell me if you need to use a subdomain to setup Mailgun? We have set this up using our root domain and are having some issues and I am wondering if this could be why. Any advice would be appreciated! Thanks, Clare.
Michael Halbrook
It can cause problems if you set it up with out one from what I’ve been reading, because if you set up the MX records for MailGun with your current e-mail address it can be problematic.
Michael Tillman
Great tutorial. I have to say the narrator has a really nice voice, nice and pleasant.
Eric
Using Mailgun worked like a charm. Thanks!
John F
will this fix conformation email not sending?
Callan
Hi,
I think I found an easy workaround for this problem. When setting up form fields, instead of using the generic email field I just use a different type of field and mark it as a “required” field. That way people will know that it is a required field and still provide you with a valid email address.
I have just had the same problem with all of a sudden WordPress not sending me mail from anyone who has a gmail address. I’ve changed the field types and am again receiving emails from submitted forms.
I’d be interested to see if anyone else would try to see if this works.
Steve
First off…very informative article…including the YouTube video on setting up the Google Apps for Work. So thank you for that!
A couple questions:
I use Mad Mimi for my email marketing…and they sent the below article out a while ago telling Gmail users to not use Gmail addresses for sending out Mad Mimi email campaigns (which is what I used to do), but instead to use a custom domain. So that’s what I did. I set up a custom “name@domain.com” address and have been using that. If I want to use the exact same “name@domain.com” address for the Google Apps for Work setup to receive notifications from my WordPress site…will this mess up stuff with the Mad Mimi emails?
Additionally, I currently have my personal Gmail setup to be able to send and receive email from the “name@domain.com” address…so how is that effected as well? Do I need to delete that stuff out of there if I go with this Google Apps for Work option to fix my issue with not receiving my WordPress notification emails?
Thank you so much in advance for any clarification on this.
Sacha Doucet
The article and video were super helpful! Thank you!!
WPBeginner Support
Hey Sacha,
Glad you found it useful. You may also want to subscribe to our YouTube Channel for more WordPress video tutorials.
Admin
Amy
Just wanted to say – thank you so much for this article! Has helped me fix my forms not sure what the issue was before, if it was the server or what – but the mailgun solution worked perfectly for me.
Akinola King
Thanks for this article.
David
Great article! Thank you for sharing!
1) Why does the mailgun HTTP API not require a username and password like the SMTP solution does? Is it because mailgun is verifying at the DNS level (with its SPF and domain key records) and with the API — so this setup removed the need for the SMTP credentials?
2) Am I correct that these sending issues (being rejected by Google or Yahoo’s mail servers) are mostly because people are trying to send email from their WP installations but are using a personalAccount@aol.com to send email from a WP install at example.com?
3) Would mailgun allow someone to send email as personalAccount@aol.com even though the mail is coming from the WP install at example.com
Thanks for your help!
Shaun Lawson
Thank you so much for these great instructions.
Worked for me first time.
Shaun
Lucas Shepherd
Postman SMTP fixed my wordpress email after trying everything everyone told me to try.
Doug
Thanks for pointing me to Postman SMTP. I too had tried several setups to no avail.
Jerry
Thanks Lucas, Me too!
Postman SMTP solved all my email woes.. I’ve been trying to test mail function on WordPress installed on localhost under Xampp for a day or two.
I’m brand new to WordPress and I’m learning that the secret to a happy life is getting the right Plugin.. recommendations are invaluable.
meenakshi
My cpanel is not showing Advanced DNS Zone edittor in Domain section . Wha shoud I do?
WPBeginner Support
You can try DNS Zone Editor or ask your hosting provider for help.
Admin
Mabel
I need help. I have successfully installed mailgun using your videio How to Fix WordPress Not Sending Email Issue, but my email notifications still do not send. Do I have to enter some code into each email template? I have no idea what I am doing.
bobby
You should really warn people about changing the mx records. It ruined my incoming mail for 5 hours and i had to change them back.
Bobby
I set this all up and never got an activation email from Mailgun. Pretty pathetic that an email smtp service can’t even figure out their own account activation system through….ugh….email.
I sent a support ticket in. Now, because I changed the settings on my hosting, NONE OF MY EMAIL IS WORKING. I have tried three different emails to activate the account, and none have gotten the activation email.
Luke Cavanagh
SendGrid is the best option now, the free plan covers up to 12,000 emails a month.
https://wordpress.org/plugins/sendgrid-email-delivery-simplified/
Marco Floriano
Amazing video, amazing tutorial. Nice solution. Perfect! Mailgun is amazing, thanks a ton guys!
Ademide
Thank you for tutorials. I couldn’t proceed because I was having the following error “Your account is temporarily disabled. Business Verification Please contact support to resolve”. I have raised two tickets already, it doesn’t seem to be helping. Any idea what I need to do to get this resolved?
WPBeginner Support
Mailgun has internal checks in place which may sometimes flag an innocent account as suspicious. You simply need to contact their support, they will ask you a few questions about your email usage and will unlock your account.
Admin
Wout
Oh man thank you so much for this! You’re lifesavers! Mails from my wp-site used to end up in Spam, now they reach the inbox with no problems… One thing worth mentioning may be that the domain you set up in Mailgun doesn’t show up in WP mails to users/customers, so you don’t have to use a matching domain for your site. You can setup mail1.example.com in Mailgun for your WordPress site anotherexample.com and it works.
WPBeginner Support
It works, but to ensure maximum delivery in the long run, it is recommended to use the same domain as your website.
Admin
Wout
Actually I still had some issues after testing, and decided to install sendgrid plugin, and that was easier to setup and works like a charm…
Lavish
My domain name is attached to Google Apps emails, I don’t want to mess up things. Can I instead use .org version of my domain name. I have .org and it is just parked (redirecting to .com) unused.
Thanks
Luke Cavanagh
Just make it easy and use SendGrid. You just create a general API and then add it into the settings of the SendGrid plugin on the site you need to use it on.
Michael Story
Hi you mention needing the shortcode for later in the video, where do you use the shortcode? Does it replace gravity forms?
Bill Frankell
Oh man, where were you last week with this? I spent four days of vacation working all this out on my own.
However I do not see my problem listed, which was using Yahoo mail.
Been a yahoo user since 2000 so hated to give way but finally set up new gmail accounts on all my websites which changed everything. I now have those accounts all forwarding to Yahoo, each with a note in the from address telling me their source.
There may have been a way to make Yahoo work, but I didn’t find it and finally gave up. This is a better setup because it lets me set up separate mailing lists and work with mail chimp and sumo me. So far in the last week we have collected over a hundred new members on one site, the difference is that now I get to see each one as it comes in, can delete my yahoo notice and still have the record on Gmail archives.
Having said all this, this page is being bookmarked for future reference. Thanks, it was almost timely.
amit
Sending WordPress Emails Using Gmail SMTP Servers. is it free feature
WPBeginner Support
There are both free and paid options. The free option is less reliable than the paid option.
Admin