
WordPress sitenizde güncellemeler veya önemli değişiklikler yapmak söz konusu olduğunda, bunu doğrudan yapmak riskli olabilir. İşte bu noktada bir hazırlık sitesi devreye girer.
Değişiklikleri güvenle test edebileceğiniz, sorunları giderebileceğiniz ve güncellemeleri ana sitenize dağıtmadan önce iyileştirebileceğiniz canlı web sitenizin mükemmel bir klonudur.
WPBeginner’da, web sitesi güncellemelerini canlı sitelerimizde yayınlamadan önce test etmek için hazırlama siteleri kullanıyoruz. Bu bizi potansiyel kesinti sürelerinden, bozuk özelliklerden ve diğer komplikasyonlardan kurtarır.
Bu adım adım kılavuzda, WordPress siteniz için nasıl kolayca bir hazırlama ortamı oluşturacağınızı göstereceğiz. Birkaç farklı yöntemi ele alacağız ve bunların çoğu yalnızca birkaç tıklama gerektiriyor.

Hazırlık Sitesi Nedir?
Hazırlama sitesi, canlı web sitenizin, değişiklikleri canlı hale getirmeden önce test etmek için kullanılan bir klonudur. Hazırlama siteleri hataları yakalamanıza yardımcı olur, böylece canlı web sitenizi bozmazsınız.
Eskiden bir WordPress hazırlık sitesi kurmak çok zordu, ancak şimdi bu durum değişti ve teknik olmayan bir kişi bile bunu yapabilir.
Birçok kullanıcı değişiklikleri test etmek için WordPress’i Windows veya Mac bilgisayarlarına yerel olarak yükler. Güncellemeleri tamamladıklarında, bu değişiklikleri localhost’tan canlı sunucuya yüklemeleri yeterlidir.
Bu yaklaşımla ilgili en büyük sorun, localhost’unuzda çalışan bir şey canlı sunucuda çalışmazsa ne olacağıdır.
Genellikle yerel siteler ve canlı WordPress barındırma sunucuları aynı ortamda çalışmaz.
Hazırlama sitesi web barındırma sunucunuzda bulunduğundan, canlı sitenizle aynı sunucu yapılandırmasını çalıştırdığı için tüm bu hataları kolayca önleyebilirsiniz.
Bununla birlikte, WordPress için bir hazırlama sitesinin nasıl kurulacağına bir göz atalım.
Kolayca WordPress Hazırlama Sitesi Oluşturma
WordPress için bir hazırlık sitesi oluşturmanın birden fazla yolu vardır. En kolayı, barındırma sağlayıcınızın yerleşik hazırlama sitesi özelliğini kullanmaktır.
En iyi WordPress barındırma şirketlerinden bazıları zaten tek tıklamayla hazırlama siteleri sunuyor. Web siteniz bunlardan birinde barındırılıyorsa, herhangi bir güçlük çekmeden kolayca bir hazırlık sitesi oluşturabilirsiniz.
Bu popüler barındırma çözümlerinden birine sahip değilseniz, bir eklenti kullanarak (ve hatta manuel olarak) bir WordPress hazırlama sitesi oluşturmanıza yardımcı olacak bir çözümümüz de var.
Daha hızlı gezinmek için aşağıdaki navigasyonu kullanarak sizin için en uygun bölüme atlayabilirsiniz:
Bluehost’ta Hazırlama Sitesi Oluşturma
Bluehost en iyi WordPress barındırma şirketlerinden biridir. Tüm planlarında tek tıkla hızlı bir hazırlama sitesi çözümü sunuyorlar.
İlk olarak, Bluehost kontrol panelinize gitmeli ve ‘Sitelerim’ bölümünü ziyaret etmelisiniz.
Ardından, ‘Eklentiler’ sekmesine geçin ve ‘Bluehost Eklentisi’ seçeneğinin yanındaki anahtarı değiştirin.

Bundan sonra, WordPress sitenizin kontrol paneline gidin ve Bluehost ” Staging sayfasını ziyaret edin.
Şimdi devam edin ve ‘Hazırlama Sitesi Oluştur’ düğmesine tıklayın.

Bluehost şimdi web siteniz için hazırlama ortamını hazırlayacaktır.
Bu işlem tamamlandığında, “Şu anda düzenlenmiyor” kutusunu işaretlemeniz gereken bir “Hazırlama Sitesi” bölümü görüntülenecektir.

Şimdi ekranınızda hazırlık sitesine geçmenizi isteyen bir istem açılacaktır.
Buradan, ‘Değiştir’ düğmesine tıklayın.

Geçiş yaptıktan sonra, ekranda hazırlık web sitesinde çalıştığınızı belirten bir düğme göreceksiniz.
Canlı sitenizi etkilemesi konusunda endişelenmeden web siteniz üzerinde çalışmaya devam edebilirsiniz.

Bluehost’ta Değişiklikleri Hazırlama Aşamasından Canlı Siteye Dağıtma
Değişiklikleri hazırlama aşamasından canlı siteye aktarmaya hazır olduğunuzda, WordPress yönetici kenar çubuğundan Bluehost “ Hazırlama sayfasına gitmeniz yeterlidir.
Buradan, hazırlama web sitenizin yanında dağıtım seçenekleri açılır menüsünü göreceksiniz. Yalnızca dosyaları, yalnızca veritabanını veya tüm değişiklikleri dağıtabilirsiniz.
Emin değilseniz, devam etmek için ‘Tüm Değişiklikleri Dağıt’ düğmesine tıklayın.

Bundan sonra, açılır menünün yanındaki ‘Siteyi Dağıt’ düğmesine tıklayın.
Bu, hazırlama sitesini üretim sitesine dağıtmak istediğinizi onaylamanız istenecek bir açılır pencere getirecektir. Devam etmek için ‘Dağıt’ düğmesine tıklayın.

Bluehost şimdi hazırlık sitenizi canlı siteye dağıtmaya başlayacaktır. Web sitenizin büyüklüğüne bağlı olarak bu işlem biraz zaman alabilir.
Artık Üretim sitesi seçeneğinin altındaki Radyo düğmesine tıklayarak değişikliklerinizi çalışırken görmek için canlı web sitenize geri dönebilirsiniz.

Üretim Sitesini Evrelemeye Klonlama
Şimdi, üretim web sitesine geri döndüğünüzde, orada yaptığınız herhangi bir değişiklik otomatik olarak hazırlık web sitenizle senkronize edilmez.
Gelecekte, hazırlama web sitenizde daha fazla şeyi test etmek isterseniz sitenizi çoğaltmanız gerekecektir.
Bunu yapmak için Bluehost ” Staging sayfasını ziyaret etmeli ve ‘Clone to staging’ düğmesine tıklamalısınız.

Bluehost daha sonra canlı web sitenizdeki en son değişiklikleri hazırlık web sitenize klonlayacaktır. Bundan sonra, test ve geliştirme için hazırlama web sitesine geçebilirsiniz.
SiteGround’da Hazırlama Sitesi Oluşturma
SiteGround, GrowBig ve GoGeek planlarıyla tek tıklamayla sahneleme özelliği sunan bir başka üst düzey WordPress barındırma şirketidir.
Bu hosting hizmetini WPBeginner’da kullanıyoruz ve harika bir deneyim yaşadık. Güvenilir, hızlı ve yönetimi kolay olması onu web sitemiz için sağlam bir seçim haline getirdi.
Daha fazla bilgi edinmek için SiteGround incelememize bakın.
Web siteniz SiteGround ile barındırılıyorsa, bu şekilde bir hazırlık web sitesi kurarsınız.
İlk olarak, SiteGround kontrol panelinize giriş yapmanız ve Web Siteleri sekmesine geçmeniz gerekir. Buradan web sitenizin altındaki Site Araçlarını seçmeniz gerekir.

Bir sonraki ekranda sol sütundan WordPress ” Staging menüsüne tıklamanız gerekiyor.
Buradan web sitenizi seçin ve ardından hazırlık kopyanız için bir ad girin.

Devam etmek için ‘Oluştur’ düğmesine tıklayın ve Siteground web sitenizin aşamalı bir kopyasını oluşturacaktır.
Bundan sonra, hazırlama web sitenizi parola ile koruyabilmeniz ve gizli tutabilmeniz için ‘Korumalı URL’lere git’ düğmesine tıklamanız gerekir.

Bir sonraki ekranda, Siteground otomatik olarak hazırlama web siteniz için URL ve yolu dolduracaktır.
Hazırlama sitenizi korumak için kullanmak istediğiniz kullanıcı adı ve parolayı girmeniz gerekir.

Ayarlarınızı kaydetmek için ‘Koru’ düğmesine tıklayın.
Artık WordPress “ Hazırlama sayfasına geri dönebilir ve hazırlama web sitenizin yanındaki ‘Yönetici Panelinde Oturum Aç’ düğmesine tıklayabilirsiniz.

SiteGround şimdi hazırlık web sitenizin WordPress yönetici alanını açacaktır. Değişikliklerinizi bu hazırlık web sitesinde test edebilirsiniz.
Değişiklikleri Canlı Web Sitenize Geri Dağıtın
Değişikliklerinizi hazırlık web sitesinde denedikten sonra, bunları canlı web sitenizle birleştirmek isteyebilirsiniz.
SiteGround bunu da kolaylaştırır.
Sol sütundan WordPress ” Staging menüsüne tıklamanız yeterlidir. Ardından ‘Hazırlama Kopyalarını Yönet’ bölümü altında hazırlama sitenizin yanındaki üç noktalı menüye tıklayın.

Menü size iki dağıtım seçeneği gösterecektir. ‘Tam Dağıtım’ ya da ‘Özel Dağıtım’ seçeneklerinden birini seçebilirsiniz.
‘Tam Dağıtım’ seçeneği, hazırlık web sitesindeki her şeyi canlı web sitenizle birleştirir. ‘Özel dağıtım’, hangi dosyaları veya verileri birleştirmek istediğinizi seçmenize olanak tanır.
Emin değilseniz, ‘Tam Dağıtım’ seçeneğini seçin.
SiteGround daha sonra hazırlık sitesini canlı web sitenize kopyalayacaktır.
Canlı Yayını Evreleme Web Sitenizle Birleştirme
Canlı web sitenizde yaptığınız değişiklikler otomatik olarak hazırlama web sitenize kopyalanmaz.
Hazırlama web siteniz üzerinde her çalışmanız gerektiğinde, yeni bir hazırlama web sitesi oluşturmak için yukarıdaki işlemi tekrarlayın.
WP Engine’de Hazırlama Sitesi Oluşturma
WP Engine, dünyanın en iyi WordPress yönetimli barındırma şirketidir. Yönetilen WordPress barındırma, WordPress siteniz için barındırma sağlayıcısının güncellemeler, yedeklemeler, güvenlik ve performansla ilgilendiği bir konsiyerj hizmetidir.
WP Engine, tüm planlarında tek tıklamayla hazırlama çözümü sunar. Web sitenizi barındırmak için WP Engine kullanıyorsanız, siteniz için bir hazırlama ortamını bu şekilde kurarsınız.
İlk olarak, WP Engine kontrol panelinize giriş yapmanız gerekir. Ardından, ‘Siteler’ sayfasına gidin ve üzerine tıklayarak web sitenizi seçin.

Bu sizi web sitenizin kontrol paneline götürecektir.
Şimdi, sol sütundan ‘Evreleme Ekle’ bağlantısına tıklamanız veya üstteki site adınızın altından seçmeniz gerekir.

Bu sizi ‘Ortam Ekle’ ekranına getirecektir.
Hazırlama ortamınızla nasıl devam etmek istediğinizi seçmeniz istenecektir.

İşte bu seçeneklerin her birinin ne yaptığı:
- ‘Yeni bir boş site ile başla’ yeni bir boş site oluşturur.
- ‘Rehberli bir deneyimle başlayın’, rehberli bir deneyim ve demo içeriğine sahip yeni bir site oluşturur.
- ‘Mevcut bir ortamı bu siteye kopyala’, üretim veya geliştirme ortamınızı bu siteye kopyalayacaktır (örneğin, canlı sitenizi bu ortama kopyalayın).
- ‘Mevcut bir ortamı taşı’ bir ortamı bu siteye taşır (örneğin, geliştirme ortamını Staging’e taşımak)
- ‘Bir WooCommerce sitesiyle başlayın’ seçeneği, WooCommerce’in önceden yüklenmiş olduğu yeni bir WordPress sitesi oluşturur.
Canlı web sitemizin aşamalı bir kopyasını oluşturmak istediğiniz için, ‘Mevcut bir ortamı bu siteye kopyala’ seçeneğine tıklamanız gerekecektir.

Bir ortam seçtikten sonra kopyalamak istediğiniz en son yedeği seçin ve ardından devam etmek için ‘İleri’ düğmesine tıklayın.
Şimdi, hazırlama siteniz için bir ad sağlamanız gerekir. Bu ad, hazırlama sitenizin URL’sinde kullanılacaktır. Bundan sonra, ortam türünüz olarak STG’yi (evreleme) seçin.

Devam etmek için ‘Ortam Oluştur’ düğmesine tıklayın.
WP Engine şimdi sizin için bir hazırlık sitesi oluşturacaktır. Bundan sonra, Hazırlama ortamı kontrol panelinize yönlendirileceksiniz.

Ardından, hazırlama siteniz için parola korumasını etkinleştirmek üzere Asma Kilit düğmesine tıklamanız gerekir.
Bundan sonra, hazırlama sitesi kullanıcı adınızı ve şifrenizi kopyalamak için ‘Yardımcı Programlar’ sekmesine geçmeniz gerekir.

Artık hazırlama web sitenizde oturum açmak için üstteki ‘WP Admin’ düğmesine tıklayabilirsiniz.
Tıpkı başka bir yere kurduğunuz tipik bir WordPress sitesinde yaptığınız gibi, hazırlık web sitesinde değişiklikler yapmaktan ve özellikleri denemekten çekinmeyin.

WP Engine’de Değişiklikleri Evrelemeden Canlı Web Sitesine Dağıtma
Hazırlama web sitesinde yaptığınız değişiklikleri canlı web sitenizle birleştirmek mi istiyorsunuz?
Dağıtıma başlamak için ‘Ortamı Kopyala’ düğmesine tıklamanız yeterlidir.

Bu sizi seçenekler sayfasına götürecektir. Buradan, kopyalama için kaynak ve hedef ortamlarınızı seçmeniz gerekir.
Burada kaynak ortam olarak hazırlama web sitenizi ve hedef ortam olarak üretim veya canlı web sitenizi seçeceksiniz.

Neyi kopyalamak istediğinizi seçebilirsiniz. Örneğin, tüm veritabanı tablolarını ve dosyalarını, belirli dosyaları ve veritabanı tablolarını veya yalnızca dosya sistemini kopyalayabilirsiniz.
Not: Her şeyi kopyalarsanız, hazırlama ortamını oluşturmak için kullandıktan sonra canlı web sitenizde depolanan tüm verileri kaybedersiniz. Bu, yeni gönderiler, sayfalar, müşteriler ve siparişler gibi önemli verileri içerebilir. Bu nedenle, hazırlama ortamından dağıtım yapmadan önce canlı sitenizin bir yedeğini çalıştırmak iyi bir fikirdir.
Ardından, dağıtıma başlamak için ‘İncele ve Onayla’ düğmesine tıklayın. Her şeyin canlı web sitenize kopyalanması biraz zaman alacaktır.
İşlem tamamlandığında bir e-posta bildirimi alacaksınız.
WordPress Eklentisi Kullanarak Hazırlama Sitesi Oluşturma
WordPress barındırma şirketiniz bir hazırlık sitesi özelliği sağlamıyorsa, bir WordPress eklentisi kullanarak yine de bir hazırlık web sitesi oluşturabilirsiniz.
Bu yöntemi kullanmanın bazı dezavantajları vardır.
İlk olarak, bir eklenti barındırma sunucunuz üzerinde sınırlı kontrole sahip olacaktır. Bu yüzden her zaman en iyi sonuçları vermeyebilir.
İkinci olarak, kullanacağımız eklenti hazırlık sitenizi kendi sunucularında depolayacaktır. Gizlilik ve veri koruma konusunda endişeleriniz varsa, bu sizin için ideal olmayabilir.
Son olarak, eklentinin bilinen birkaç uyumsuzluğu vardır. Web sitenizin uyumlu olduğundan emin olmak için lütfen uyumsuzluklar sayfasını kontrol edin.
Bununla birlikte, bir WordPress eklentisi kullanarak bir hazırlama WordPress sitesinin nasıl oluşturulacağını görelim.
Yapmanız gereken ilk şey WP Stagecoach eklentisini kurmak ve etkinleştirmektir. Daha fazla ayrıntı için, bir WordPress eklentisinin nasıl kurulacağına ilişkin adım adım kılavuzumuza bakın.
Etkinleştirmenin ardından eklenti, yönetici çubuğunuza WP Stagecoach etiketli yeni bir menü öğesi ekleyecektir. Üzerine tıkladığınızda sizi eklentinin ayarlar sayfasına götürecektir.

WP Stagecoach kullanıcı adınızı ve eklenti web sitesindeki hesabınızda bulabileceğiniz API anahtarını girmeniz gerekecektir.
Bundan sonra, WP Stagecoach ” WP Stagecoach sayfasını ziyaret etmeniz ve hazırlık siteniz için bir ad seçmeniz gerekir. Bu ad aynı zamanda WordPress hazırlama web sitenizin alt alan adı olarak da kullanılacaktır.

‘Hazırlama sitesini parola ile koru’ seçeneğinin yanındaki kutuyu işaretlemeyi unutmayın. Bu, hazırlama web sitenizi genel görünümden ve arama motorlarından koruyacaktır.
Devam etmek için ‘Posta Arabasına Bin’ düğmesine tıklayın.

Eklenti şimdi WordPress dosyalarınızın ve veritabanınızın bir yedeğini oluşturarak bunları hazırlama siteniz için dışa aktaracaktır.
WordPress web sitenizin boyutuna bağlı olarak biraz zaman alabilir.
Tamamlandığında, hazırlık sitenizin ve yönetici alanının bağlantısını göreceksiniz.

Hazırlama sitenizi ziyaret etmek ve üzerinde çalışmaya başlamak için bağlantıya tıklayabilirsiniz.
En üstteki yönetici çubuğunda, hazırlık siteniz üzerinde çalıştığınızı belirten parlak turuncu bir mesaj göreceksiniz.

WP Stagecoach Kullanarak Evreleme Sitesini Canlıya Dağıtma
Değişiklikleri canlı sitenize aktarmaya hazır olduğunuzda, WP Stagecoach ” Değişiklikleri İçe Aktar sayfasına gidin ve değişiklikleri kontrol et düğmesine tıklayın.

Eklenti şimdi hazırlık sitenizdeki değişiklikleri kontrol edecek ve ardından bunları içe aktarmak için seçenekler gösterecektir.
Tüm değişiklikler, dosya değişiklikleri veya veritabanı değişiklikleri arasından seçim yapabilirsiniz.

Eklenti size içe aktarma işleminin ilerleyişini gösterecek ve tamamlandığında sizi bilgilendirecektir.
Artık tüm değişikliklerin başarıyla içe aktarılıp aktarılmadığını görmek için canlı sitenizi test edebilirsiniz.
WordPress için Manuel Olarak Hazırlama Sitesi Oluşturma
Bu yöntem size WordPress kurulumunuz için manuel olarak bir hazırlama sitesi oluşturmayı öğretecektir. İleri düzey kullanıcılar içindir ve yukarıda açıklanan diğer yöntemlerden daha fazla çalışma gerektirir.
Bu yöntemin bir başka dezavantajı da, değişiklikleri hazırlama aşamasından canlı sunucuya geri dağıtırken web sitenizin geçici olarak kullanılamayacak olmasıdır.
Bununla birlikte, WordPress siteniz için manuel olarak nasıl bir hazırlama ortamı oluşturacağınızı görelim.
Öncelikle, hazırlık web siteniz için bir alt alan adı oluşturmanız gerekir. Bluehost kullanıyorsanız, hosting hesabınızın kontrol paneline gidin ve ‘Gelişmiş’ sekmesine geçin.
Ardından, ‘cPanel’ seçeneğinin yanındaki ‘Yönet’ düğmesine tıklayın.

Bu işlem cPanel’i yeni bir sekmede açacak ve burada ‘Alan Adı’ bölümüne ilerlemeniz gerekecektir.
Buradan, ‘Alan Adları’ seçeneğine tıklayın.

Bu, hosting hesabınızdaki tüm alan adlarının bir listesini açacaktır. Burada, ‘Yeni Alan Adı Oluştur’ düğmesine tıklamalısınız.
Bunu yaptığınızda, ekranda yeni bir sayfa açılacak ve burada ‘Alan Adı’ alanının altına alt alan adınızı ve ardından alan adını aşağıdaki gibi yazmanız gerekecektir:
subdomain.example.com
Bundan sonra, ayarlarınızı kaydetmek için ‘Gönder’ düğmesine tıklamanız yeterlidir.

Not: Örnek ekran görüntülerimizde Bluehost kullanıyoruz, bu nedenle ekranınız farklı görünebilir.
Hosting kontrol paneliniz şimdi canlı WordPress sitenizi içe aktarmak için kullanabileceğiniz alt alan adınızı ekleyecektir.
Ardından, ücretsiz Duplicator eklentisini canlı sitenize yüklemeniz ve etkinleştirmeniz gerekir. Tüm özelliklere ihtiyacınız varsa, Duplicator’ın premium sürümünü buradan edinebilirsiniz.
İş ortağı markalarımızdan bazıları da yedekleme oluşturmak için bu aracı kullandı ve mükemmel sonuçlar elde etti. Daha fazlasını öğrenmek için Duplicator incelememize bakın.
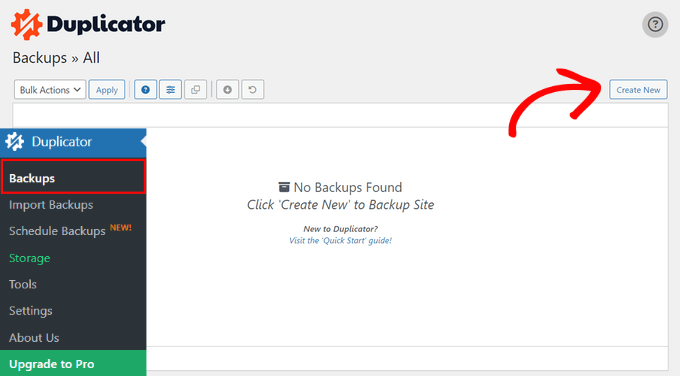
Etkinleştirmenin ardından, WordPress yönetici kenar çubuğunuzdaki Duplicator menüsüne tıklamanız ve Yedeklemeler altındaki ‘Yeni Oluştur’ düğmesine tıklamanız gerekir.
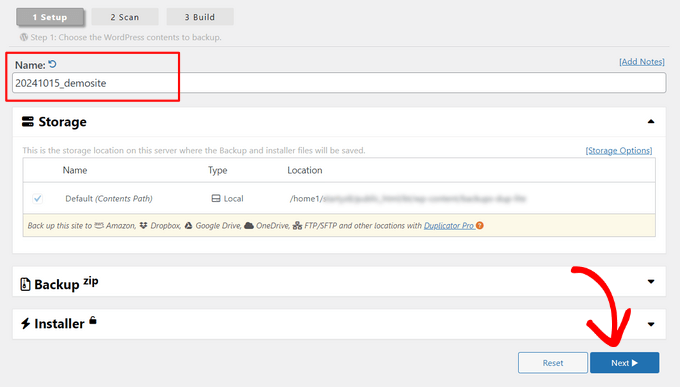
Ardından, yedeklemeniz için bir ad girebilir ve devam etmek için ‘İleri’ düğmesine tıklayabilirsiniz.
Bundan sonra, Duplicator şimdi web sitesi çoğaltıcı sihirbazını çalıştıracaktır.
İlk olarak, her şeyin yolunda olup olmadığını görmek için bazı testler yapacaktır. Tüm öğeler ‘İyi’ olarak işaretlenmişse, ‘Oluştur’ düğmesine tıklayın.

Eklenti şimdi WordPress siteniz için bir Duplicator yedekleme paketi oluşturmaya başlayacaktır. Bu işlem web sitenizin büyüklüğüne bağlı olarak birkaç dakika sürebilir.
Tamamlandığında, Yükleyici ve Arşiv paketi için indirme seçenekleri göreceksiniz. Her iki dosyayı da bilgisayarınıza indirmek için ‘Her İki Dosyayı da İndir’ düğmesine tıklamanız gerekir.

Bu dosyaların her ikisini de yeni oluşturduğunuz alt alan adının dosya dizinine yüklemeniz gerekir. Ayrıntılar için WordPress web sitenize dosya yüklemek için FTP’yi nasıl kullanacağınıza ilişkin kılavuzumuza bakın.
Ardından, yeni hazırlık WordPress sitenizin yeni bir veritabanına ihtiyacı olacaktır. Hadi bir tane oluşturalım.
WordPress hosting hesabınızın kontrol paneline gidin ve ‘Gelişmiş’ sekmesine geçin.
Bundan sonra, ‘Veritabanları’ bölümüne gidin ve yanındaki ‘Yönet’ düğmesine tıklayın.

Bluehost kullanmıyorsanız, WordPress barındırma ortamınız biraz farklı görünebilir. Endişelenmeyin ve sadece Veritabanları bölümünü arayın.
Bu sizi veritabanınız için bir ad vererek başlayabileceğiniz ‘MySQL Veritabanları’ sayfasına götürecektir.
Ardından, ‘Veritabanı Oluştur’ düğmesine tıklayın.

Ardından, veritabanınız için bir MySQL kullanıcısı oluşturmanız gerekir.
MySQL Kullanıcıları bölümüne ilerleyin ve yeni veritabanı kullanıcınız için bir kullanıcı adı ve parola girin.

Şimdi bu kullanıcıya daha önce oluşturduğunuz veritabanına erişim ve veritabanını değiştirme izni vermelisiniz.
Basitçe ‘Veritabanına kullanıcı ekle’ bölümüne gidin ve veritabanınızı ve yeni oluşturduğunuz kullanıcıyı seçin.

Bundan sonra, devam etmek için ‘Ekle’ düğmesine tıklayın.
Kullanıcı için ayrıcalıkları seçmeniz istenecektir. Devam edin ve ‘Tüm Ayrıcalıklar’ onay kutusunu seçin ve ardından ‘Değişiklik yap’ düğmesine tıklayın.

Artık veritabanınız hazırlık web siteniz için kullanılmaya hazırdır.
Ardından, yeni bir tarayıcı sekmesi açmanız ve hazırlama sitenizin alt alan adını şu şekilde girmeniz gerekir:
https://yoursubdomain.example.com/installer.php
yoursubdomain ifadesini gerçek alt alan adıyla ve example.com ifadesini kendi alan adınızla değiştirmeyi unutmayın.
Bu, Duplicator yükleyici sihirbazını başlatacaktır.

‘Kurulum’ bölümü altında, yükleyici sizden WordPress veritabanı bilgilerinizi girmenizi isteyecektir.
Ana bilgisayarınız muhtemelen localhost olacaktır. Bundan sonra, bir önceki adımda yeni alan adınız için oluşturduğunuz veritabanının ayrıntılarını gireceksiniz.
Duplicator’ın veritabanınıza bağlanabildiğinden emin olmak için ‘Doğrula’ düğmesine tıklayın.

Tamamlandığında, devam etmek için ‘İleri’ düğmesine tıklayın.
Duplicator şimdi WordPress veritabanınızı ve dosyalarınızı açacak ve bunları hazırlama sitenize aktaracaktır.
Tamamlandığında bir başarı mesajı göreceksiniz.

Yeni hazırlama sitesinde web sitenizin WordPress yönetici alanına girmek için ‘Yönetici Girişi’ düğmesine tıklayabilirsiniz.
Artık hazırlama sitenizi kurdunuz. Alt alan adına parola koruması ekleyerek onu koruyabilirsiniz.
Hosting hesabınızın kontrol paneline gidin ve ‘Gelişmiş’ sekmesine geçin.
Bundan sonra, ‘cPanel’ bölümüne gidin ve yanındaki ‘Yönet’ düğmesine tıklayın.

Bu, cPanel’i ‘Dosyalar’ bölümüne kaydırmanız gereken yeni bir pencerede açacaktır.
Buradan, ‘Dizin Gizliliği’ simgesine tıklayın.

Ardından, alt alan adı klasörünüzü seçmeniz ve ardından ‘bu dizini parola ile koru’ onay kutusunu işaretlemeniz gerekir.
Bu ayar için bir ad vermeniz ve ardından ‘Kaydet’ düğmesine tıklamanız istenecektir.

Hazırlama siteniz artık parola korumasının arkasına gizlenecek ve arama motorlarının ve halkın gözünden uzak tutulacaktır.
Artık hazırlık siteniz üzerinde çalışabilir ve istediğiniz değişiklikleri yapabilirsiniz.
Hazırlama Sitesini Canlıya Elle Dağıtma
Hazırlama sitenizdeki değişiklikleri canlı sunucuya dağıtmaya hazır olduğunuzda, yukarıda açıklanan aynı adımları izleyeceksiniz.
Hazırlama sitenizde yeni bir Duplicator paketi oluşturun ve Yükleyici ve Arşiv dosyalarını bilgisayarınıza indirin (Yukarıdaki talimatlara bakın).
Ardından, canlı sitenize gitmeniz ve eksiksiz bir WordPress yed eği oluşturmanız gerekir (eksiksiz bir yedek oluşturmak için Duplicator ‘ı da kullanabilirsiniz).
İşiniz bittiğinde, canlı web sitenizden tüm WordPress dosya ve klasörlerini silmeniz gerekecektir. Bu, WordPress sitenizin bir süre kapalı kalacağı anlamına gelir.
Son olarak, hazırlama sitesini canlı sunucuya aktarmak üzere Duplicator yükleyici sihirbazını çalıştırmak için yukarıdaki talimatları izleyin.
Gördüğünüz gibi, son yöntem hiç de iyi bir yöntem değil. İşlem sırasında sitenize zarar verebilecek birçok şey vardır.
Başka seçeneğiniz olmadığı sürece bu yöntemden kaçınmanızı öneririz. Bluehost, SiteGround veya WP Engine gibi yerleşik hazırlama sitesi özelliklerine sahip güvenilir bir barındırma sağlayıcısı kullanmanızı öneririz.
Bu makalenin WordPress siteniz için kolayca bir hazırlama ortamı oluşturmayı öğrenmenize yardımcı olduğunu umuyoruz. Herhangi bir sorunla karşılaşırsanız, sitenizi Gutenberg’e güncellemek için nasıl test edeceğinize ilişkin kılavuzumuza göz atın. Test için tarayıcınızda WordPress Playground’u nasıl kullanacağınızı da öğrenmek isteyebilirsiniz.
If you liked this article, then please subscribe to our YouTube Channel for WordPress video tutorials. You can also find us on Twitter and Facebook.

")

 in 2024")
Lynda Joy
Hi,
I just did the first five or so steps of this, and then got lost at “upload your WordPress content to. So now I have completely messed up my site and I would like to know how to undo what I have done.
Thanks.
– Lynda
Rachel
Thanks so much for this – I am very much a beginner but trying to figure out how to do these things myself so I can launch a new design by first using a test site in order to get it right. I have managed to follow your instructions perfectly until this part:
“After copying your database, you need to copy your WordPress files, plugins, themes, and uploads. First download a fresh copy of WordPress from WordPress.org. Upload the contents of WordPress to your staging site. Note, do not run the WordPress install yet”
Can you please advise as to how this is done or direct me to another instruction article? I can’t seem to find out how to do it otherwise. Many many thanks in advance
Sanket D.
So I’ve managed to create my staging environment successfully — I’ve all my media, themes, plugins, everything else properly transferred. However, I’d made some changes to my theme (not through any codes, but through the theme’s inbuilt settings — basic stuff like a custom logo (which I can see in my media library), theme color, homepage layout, etc. These changes are the only thing that for some reason are missing from my staging site. Anybody knows why this might be?
byberkan
I’m hoping you can find the solution. Same problem exists for me.
Joe
It seems we have to do the steps in here after we have our theme, plugin etc.
Mark Park
Great article! Just one thing that isn’t clear to me.
If I have the current non-wordpress website on a domain name example.com and I want to build a new website using WordPress and develop it on a staging environment on a sub-domain dev.example.com – is this possible?
Can I make a sub-domain dev.example.com and install WP on the same server used by the current non-WP website?
Later when the website is finished I want to connect my WP developed site with the domain name example.com.
Thank you for your help.
WPBeginner Support
Yes this is possible. Make sure you block search engines on your development subdomain.
Admin
Maria
Thanks for a Very helpful article! I am in a similar situation as Mark, however my current website is a WordPress site. Can I still develop the redesigned website on a staging site within a sub domain? And if so do I have to create a new database?
byberkan
You really didn’t read the article, do you?
Benito
Hello, great article, but what if I don’t want to use XAMPP, and I just want to use a subdomain as a staging site and then push changes to live? What would be the best way to deploy the changes?
Raj
Will this process create a Database User and add it to the database we created while copying giving it all privileges by itself? or do we need to create a database user at some point?
Raj
Okay I tried it.. both ways.
Once I created the database user before installing wordpress on the staging site and it worked. The other time around, I didn’t and got the issue “We were able to connect to the database server (which means your username and password is okay) but not able to select the a*******_ata_d2db database.”
That to me means that one has to create a user manually, only copying database won’t do. Right?
Sanny
Raj, I see the same error (“Can’t select database”). How did you fix it ?
Scott
Hopefully you guys figured this out, but just to leave this here for others to find, you do indeed need to create a database user (which is not clear in this article). While using Bluehost, I had to do about three steps. First step is to use the MySQL Database cPanel to get access to the list of MySQL databases. Once there, I could see that the new staging database that I had copied using phpMyAdmin per the article, did not have a privileged user assigned to it. So, I created a user, but then discovered that the user I created had too many characters (16 is the max). Once I got that straightened out, I then had to Add this user to a database using the same MySQL page. As part of this assignment step, I was able to select “ALL PRIVILEGES” to make this user a privileged user for this new staging database. Once that was all setup, I was able to configure WordPress to connect up to the staging database.
Gayle
Terrific resource! Reached a WP staging breaking point and then found this. Lifesaver! Thank you! Only things I’d add would be some meta information for newbies like me. : )
LizP
Yikes, too hard for me!
Deborah
Thanks for the tutorial. I seem to be stuck on one of the very first steps. When clicking go after changing the URL’s in SQL, I get a message of ‘# MySQL returned an empty result set (i.e. zero rows)’
This is how I’ve entered the data:
UPDATE wp_options SET option_value = REPLACE(option_value, ‘http://www.example.co.za/wp’, ‘http://staging.example.co.za’);
UPDATE wp_postmeta SET meta_value = REPLACE(meta_value, ‘http://www.example.co.za/wp’, ‘http://staging.example.co.za’);
UPDATE wp_posts SET guid = REPLACE(guid, ‘http://www.example.co.za/wp’, ‘http://staging.example.co.za’);
UPDATE wp_posts SET post_content = REPLACE(post_content, ‘http://www.example.co.za/wp’, ‘http://staging.example.co.za’);
Can anyone please help me with this?
Thanks
Andreas Kofoed
Hi,
First of all thanks for an amazing tut on this.
I’ve encountered one problem so far and that is when I try to enter my subdomain through
www.staging.example.com. I get this message: err_connection_timed_out ???Andreas Kofoed
Hi,
I figured this out as I was due to some table prefix.
Now my staging.mysite.com is up and running, but the styling and layout is totally different.
How do I do, so my files in my child theme applies to the current theme???
It seems like it is missing a lot of pictures, css and some basic settings?…
Patrick
Thanks for this great tutorial!
I’m finding that after setting everything up, comments on the live blog are now going to the sub-domain staging blog. I can’t find anything in the settings that explains this behavior. Do subdomains perhaps take precedence for some reason?
Any ideas?
Jennifer Filgate
Perhaps when you ran the operation to update the URLs in your database you performed it on your live site’s database instead of the new staging site’s database? You have to select the staging site’s database after you create it before you run the operation. Maybe you missed that selecting step.
Arjun Singhal
I got errors regarding SSL certificates. I am a newbie when it comes to using Git and the command prompt on my Mac. So I couldn’t get to syncing everything like I wanted.
Also, how it appears is that the steps are good to sync the local disks files to the server – changes in the theme folder etc.
However, there is no syncing mechanism highlighted for the MySQL server changes in the case of WordPress.
Evan
I don’t know. This just seems really confusing.
So, a Git Bucket is like an intermediary between your local computer and the hosted dev server? For example, if I have website.com then I create dev.website.com then I create an account and empty repository in Git Bucket then I create an empty folder on my local computer, and I edit files locally and sync them to the Git Bucket repository and then how do I commit to the live site? Is there any connection and control to the live site? It seems like from here, you sync your Git Bucket repository to the dev.website.com
Then what? I wish this article had a diagram to understand how this all works. It might make sense to you guys because you do it all day, but for the first time, this is a dizzying experience. Especially since multiple points in this setup failed and I had to go about custom fixing each one. At this point, I have created dev.website.com, copied all files from the live site to it, copied the database, connected it in, logged into the dev.website.com wordpress site, made sure all is cool, but now … I am lost as to what I do next.
In your article, you ask us to INIT a local directory on our computer. Well, I’m trying out Git Bucket’s SOURCE TREE, which by the way looks great. But now what? Any help on what is the procedure from here? What’s the logic to all this?
I create a folder on my local drive, it syncs to a Git Bucket Repository so that people can develop collaboratively. But who uploads the changes to the dev.website.com server? Don’t users need to be able to do that to see live changes on the server? So how does that all connect?
And how do you update the final changes to the live website once you’re ready? Man I’m confused. I spent 3 days getting this setup and I can’t figure out this next step, because I don’t understand how that all works.
Any help?
Oscar
Hi Evan, although I am sure you figured it out by now as its months later, I figured it may help others with the same question. After you have committed your code to version control, you would move your changes over to the server of your choice (dev/staging/production) using the deploy feature. This is described in the section above titled, “Deploying Changes From BitBucket to Staging Site”. Hope this helps clarify!
vjohnson
I am truly a beginner at this, and I have read the article a couple of times. I think my environment is almost set up, the piece that appears to be missing is in the install step. The directions say copy the files but do not install “yet”, when in this process do I run an install of wp? I am unsure if some of the issues that i ran into are due to my host which is hostgator or something that I’ve done wrong. Any input would be great.
What is happening at this point is no errors but nothing is rendered on at the url for my staging area.
Martin
Nice article. Although, the whole way, you’re talking about setting up a development site on the server as a subdomain. But at the end your using a local Xammp server.
How would you setup a test environment on the server where the doomain is hosted? Do you use bitbucket for it as well?
Thanks, cheers.
Alberto Serrano
Hello , I made a staging site successfully but my live site already had a little problem with a plug in , I contacted the developer and he asked for my admin credentials , following your advice on other article I gave him log in credentials to my staging site and he fixed the issue , to make the changes on the live site he told me to import the database from the staging site to the live site , my concern is the sql changes I made to the staging database , if I copy the database isn’t my live site going to redirect to the staging site now ? I can’t find the SQL queries to delete them
Thanks
WPBeginner Support
See our tutorial on how to update URLS when moving WordPress site.
Admin
isagani
hey,
nice article, i followed all instructions and gave me a clean view process on using git and staging environment. hope all experienced people do what you did so many can step forward from beginner to advance.
Thanks a lot.
Isagani
Kristof Bernaert
Just a perfect article that helped me to setup the whole thing.
My staging environment is on the same shared linux hosting, just in another directory.
I used this also as the repo for git.
With Coda, I’m working online in that staging. As I save changed files (mainly css), I see instantly the updates.
So I don’t need the local files on my laptop.
But how to checkout those remote files under the staging folder, without fetching a local copy?
Thx!
Kristof
bcall
Thanks for the article!
I have one problem, though: I have two databases and am not sure which one (or maybe both) is connected to my live site. I checked the wp-config.php file and it’s linking to a database with a different name, one that does not appear in my database list (in phpMyAdmin). Is it possible that the database was renamed?
Nick Jubrey
Look in your wp-config.php file that’s where wp is directed to that particular database, the db your using will be listed there.
Tiffany Johnson
I’m having some issues with the dev site recognizing my theme and content. I copied over the following files prior to running my installation of wordpress, however the pages and content are still not being recognized. I checked the files and my media is in the uploads file, my themes are present, as are my plugins, but none of them are recognized in the actual wordpress site.
/wp-content/uploads
/wp-content/themes
/wp-content/plugins
Any suggestions on what else I can try? Thanks!
Nicole
I’m having this same problem. Any suggestions of what to try? I followed the instructions to copy those files from one folder to the other, and it is in the right place.
Brad Scott
@WPBeginner,
For my case.
Create subdomain: staging.example.com
Create Document Root: public_html/staging
Need to run the following SQL queries:
The NEW_URL should be http://example.com/staging not http://staging.example.com
Login: http://example.com/staging/wp-login.php
Cheers & Thanks
byberkan
Brad, so that means you are not using the subdomain. You are just using it as a subdirectory which you didn’t have to create a subdomain to use that..
Paula Lay
Thank you so much for this tutorial! The step-by-step instructions are perfect for someone who hasn’t done this before. I encountered a snag where I was getting an error message after creating a subdomain (something like a problem configuring the DNS). For anyone that encounters this problem – clear your browser cache and cookies, and then you will see the correct screen. Took me days to figure this out (I gave it a few days because I thought it would take 24hrs or so for the domain to propogate).
Random Dev
Whoa. Wouldn’t it be simpler, cutting down on quite a few steps and reducing the technical nature of this process, to just use a backup plugin with a migrator (search/replace the database) function… instead of copying the databases manually, *and* instead of using Git/Bitbucket? Or am I not understanding something?
Cannonpult
For smaller sites, maybe. But plugins like Duplicator start to fail or have significant diminishing returns on larger sites. For example, if you were working on a site with a lot of media, Duplicator will never be able to transfer everything. You will get warning messages and have to leave media behind in the transfer.
Yes, this tutorial would be overkill for a small blog. But it’s absolutely the way you should go for say, a woocommerce site with 3,000 products (including images and custom data).
The other big consideration is frequency of changes. Some sites are fairly hands-off after they go live. Maybe you just update core + plugins and perform a few minor changes per year. Other sites might require weekly or even more frequent changes. If this were the case, it would become a pain to wait for backups and then drop a backup on the new site (crossing your fingers that it works each time). By using the method described in the tutorial, you can commit smaller changes at a time right after testing them.
mgiulio
Excellent article.I was looking for info about best practices for wordpress staging sites. The additional section on the git-bitbucket workflow is very much appreciated.
nwesource
Fantastic tutorial, thank you! I know WPEngine.com has a staging site built into their hosting options which seems fantastic although I haven’t tried it just yet. Are there any other easier options you know of to setup and operate a staging site, with more of a plugin functionality like WPEngine? They literally have a clone to staging button and a clone to live button that makes this seem like a process from the 80’s LOL…
Amazing tutorial, thank you for enterprise level content!
WPBeginner Staff
No you first need to extract the zip folder and then upload the contents of wordpress directory to your staging site.
Tony Leary
Can someone elaborate on this one step:
“First download a fresh copy of WordPress from WordPress.org. Upload the contents of WordPress to your staging site. Note, do not run the WordPress install yet.”
I read that as “1) download WordPress zip file from WordPress.org and 2) upload .zip file to /staging folder via File Manager.” However, I don’t think that’s correct.
bcall
You can upload the .zip file and then extract the contents within file manager.
WPBeginner Staff
Most probably your subdomain is not configured correctly.
Julius
I actually found out the problem..and it’s been resolved…however, I am unable to add images to my library….anyone else experienced this challenge.
Hans Lindgren
Is the wordpress install running on Windows?
(If so, you need to grant Modify NTFS permissions to IUSR on C:WindowsTemp)
Julius
Awesome tutorial…however, after I attempt to log into the staging site I am taking to the “Opps! Google Chrome could not find http”. What am I doing wrong?
Julius
This is really a great tutorial and something I been wanting to do for quite sometime. My problem is that when I visit the WP login screen it appears that the styling from my theme isn’t applied. Is this normal? Also, when I enter my credentials from the live site into the fields for the staging site, it doesn’t log me in. It’s taking me to the “Oops! Google Chrome could not find http”. Am I doing something wrong?
Sloan Stewart
Very helpful article. Only issue I have is that when it begins discussing version control, it switches from focusing on the alternate wordpress installation on the server to a local installation on one’s machine.
I am assuming one would build your site locally (I am using WAMP) and then use Git/Bitbucket & Ftploy to update your dev/staging wordpress install? That would mean one would have three versions of the wordpress site at all times [Production, Dev/Staging, Local].
How does one ensure your local wordpress install remains compatible with the database and other configuration on the server? Or is there a way to utilize Git/Bitbucket/Ftploy on the server without having to involve a local copy of your wordpress site.
Karlis
Do you need to create user for your freshly created phpmyadmin database?
WPBeginner Staff
No this tutorial is not written for WordPress multisite.
Aathi
Hi,
Will the above process works for wordpress multisite ?
Cheryl S.
Because I typically develop in a staging area on my server and then move it to the clients server to go live, rolling back to previous versions is nearly impossible. This article has made me seriously consider implementing version control with Git and Bitbucket. Thank you so much for this tutorial.
WPBeginner Staff
Yes this would be a better approach.
Mimi Bondi
Thank you. Is it safe to simply copy all the files from the ”test” site and paste them over the current ”live” files via FTP? Or is there more to it?
Mimi Bondi
Would this be the best way to duplicate a website, set it up with a new theme/content then copy it over to the current live website?
I want to change theme but it’s quite a big job so instead of activating it then frantically trying to fix things for days, I’m looking for a way to copy my current site, change it all ”in the background” then make the new one live. Please let me know if it’s even possible?
Mimi Bondi
Once i have my site exacty how i want it in the staging environment,
is there a safeway to copy those files to the real live site?
My goal is to change themes but because this would involve quite a bit of
setting up, i am looking for a way to do this safely and only replace my
current content with the new content when it’s ready (without changing
permalinks and SEO hopefully). Is that possible?
Larry
Excellent article….I was able to follow the instructions step-by-step and complete the creation of development site on my hosting server. Kudos to the writter.
Mike
I’m having some issues when I try to run the SQL queries to change the references to the staging site. I am receiving the following error:
”
#1064 – You have an error in your SQL syntax; check the manual that corresponds to your MySQL server version for the right syntax to use near ‘1
UPDATE wp_options SET option_value = REPLACE(option_value, ‘http://example’ at line 1
”
My SQL query is as follows:
”
1
UPDATE wp_options SET option_value = REPLACE(option_value, ‘http://example.com’, ‘http://dev.example.com’);
2
UPDATE wp_postmeta SET meta_value = REPLACE(meta_value, ‘http://example.com’, ‘http://dev.example.com’);
3
UPDATE wp_posts SET guid = REPLACE(guid, ‘http://example.com’, ‘http://dev.example.com’);
4
UPDATE wp_posts SET post_content = REPLACE(post_content, ‘http://example.com’, ‘http://dev.example.com’);
”
As I missing a step or do I have something incorrect in query? Thanks for your help.
Mike
Never mind, I figured out my issue. Feel free to delete this comment.
djramc
i have the same problem. could i ask how did you solve this issue?
thanks by advance
#1064 – You have an error in your SQL syntax; check the manual that corresponds to your MySQL server version for the right syntax to use near ‘)’ at line 1
WPBeginner Support
You need to remove numbers from lines, replace example.com with your live site url and dev.example.com with your development or staging site URL.
Admin
Bevis Larsen
This article is most useful for the user who want to make advance wordpress application
Brad E
I followed the directions and am able to get the staging site to work. However, every link, page and even login revert to the live site not the staging site. How do I fix this?
WPBeginner Support
you need to change site address and wordpress address. To do that you need to run this SQL query in phpmyadmin for the database of your staging site:
UPDATE wp_options SET option_value = REPLACE(option_value, ‘ORIGINAL_URL’, ‘NEW_URL’);
UPDATE wp_postmeta SET meta_value = REPLACE(meta_value, ‘ORIGINAL_URL’, ‘NEW_URL’);
UPDATE wp_posts SET guid = REPLACE(guid, ‘ORIGINAL_URL’, ‘NEW_URL’);
UPDATE wp_posts SET post_content = REPLACE(post_content, ‘ORIGINAL_URL’, ‘NEW_URL’);
Don’t forget to replace the original url with the url of your live site and new url with the URL of your staging site.
Admin
Brad E
OK – it works now. I had to run the query several times, but got it to work. The problem I am having now, is that all of the theme settings are missing. The header, widgets, background, etc. are set to the theme’s defaults. I am not sure how to update the settings to what the live site has. I copied the 3 files from the wp-content directory. Thanks for the outstanding article and support.
ROHIT
Hi,
As usual, just read you well written article on staging. I’ve got only question in mind right now and is that if there is any changes made in database while working on any project then do I need to upload it seperately on server from local environment whereas files would automatically get deployed via ftploy.
Cheers and Thanks.
Keep your good work up.
Clive
If I make changes on my local WP project, I understand files in my theme are changed, and those are uploaded to staging via BitBucket/Ftploy. What about the database/tables from my local project? I don’t understand why those aren’t also included? Or would the database/tables in staging be updated based on theme changes that are uploaded? Thanks!!
WPBeginner Support
Clive, in your BitBucket repository you can only store your WordPress files. FTPloy simply syncs those files to your staging site.
Admin
Paul Sweany
What do you recommend for when database changes are made? Let’s say I create a new page; should I just re-import the database on the dev server after I make changes to it on my local copy? Also, moving it from dev to live, any recommendations other than manually importing it and running a search and replace to fix the URL?
Glen Clay
As usual, great article and right when I need it. Keep up the great work! On another note, I am on my iPhone and that annoying floating black ‘Trending’ bar keeps getting in the way of me commenting. This article benefited me so much that I went through the several tries it took for me to comment.
WPBeginner Support
Glen, thanks for your feedback. We will look into it.
Admin
Eben
I wasn’t really mentioned on what to do with the staging database and how to transfer the changes to the live database, especially if your client has been making changes to the live site while you’ve been making changes to the staging site and there are changes in both databases.
This is one area of staging environments with wordpress that I haven’t been able to get my head around.
WPBeginner Support
Staging is basically for development, when working on themes or plugins. We imported the database only so that we have actual data to test with. It is not supposed to be a synchronized mirror of your live site.
Admin
Juliana Maggioli
I don’t know if is the same as Eben’s question, but everything is going fine till…: upload/transfer the staging content to the live site. supposing everything is perfect in the staging, how do i make all this perfect structure/content be the live site, without risks?
Damien Carbery
I have started using WP Migrate DB (http://wordpress.org/plugins/wp-migrate-db/) to convert urls and paths in the DB. It will also convert urls and paths that are in serialised data.
So I copy the files to the staging server and create a database and then export the live db via WP Migrate DB and import it to the new database via phpMyAdmin.
The biggest issue is when the live site is updated before I bring the staging server db back.
Zimbrul
If you have Softaculous is even easier to deploy a staging site to the live site: you can clone the site to a location within the same server.
It’s what I’m doing: I create the staging environment and when done I just go the the list of my WordPress installs in Softaculous control panel and “clone” the site to the live location. The live location must be empty by other files for this to work.
WPBeginner Support
Thats another way to do it.
Admin
Giacomo Ardesi
Hey Zimbrul, can you give some more details about Softaculous and how you used it please?
Giacomo Ardesi
Hey Zimbrul, could you please give some more details on how you use Softaculous to clone your WP staging site? Thank you!
M Asif Rahman
Thanks Syed & The Team, that’s one of the most complete and understandable for normal readers Staging Guide for WP. Nicely done.