WordPress sitenizdeki farklı içerik türlerini organize etmekte zorlanıyor musunuz?
Her şey için normal blog gönderilerini kullanmaya çalışıyorsanız – ürün listeleri, referanslar, portföy öğeleri – her şeyin ne kadar çabuk kafa karıştırıcı bir karmaşa haline geldiğini fark etmişsinizdir. 🤦
Bunun ne kadar sinir bozucu olabileceğini tamamen anlıyoruz. Neyse ki, kaosa düzen getirmenin kolay bir yolu var: özel gönderi türleri.
Özel gönderi türleri, tüm içeriğiniz için özel bölümler oluşturmanıza olanak tanır. Bu, ürünlerin, referansların veya portföylerin her birinin, normal blog gönderilerinizden ve sayfalarınızdan tamamen ayrı olarak kendi düzenine ve yapısına sahip olabileceği anlamına gelir.
Bu kılavuzda, özel gönderi türleri oluşturmak için iki farklı yöntem göstereceğiz. Bu sayede, rahatlık seviyenize uyan yöntemi seçebilir ve içeriğinizi bugün düzenli bir şekilde organize edebilirsiniz.

WordPress'te Özel Gönderi Türü Nedir?
Özel gönderi türü, WordPress'te oluşturabileceğiniz, normal gönderilerden ve sayfalardan farklı bir içerik türüdür. Portföyler, ürünler veya film incelemeleri gibi benzersiz içerik türlerini daha yapılandırılmış bir şekilde düzenlemenize ve görüntülemenize olanak tanır.
Her şeyi tek bir çekmeceye atmak yerine, farklı içerik türleri için düzenlenmiş dosya dolaplarına sahip olmak gibi düşünün!
Derinlemesine dalmadan önce, WordPress farklı içerikleri birbirinden ayırmak için gönderi türlerini kullanır. “Gönderi” ve “sayfa” en yaygın türler olsa da, WordPress aslında varsayılan olarak birkaç tane daha içerir:
- Gönderi – blog girişleri için
- Sayfa – Hakkımızda sayfası gibi statik içerikler için
- **Ek** – medya dosyaları için
- Revizyon – içerik taslakları ve düzenlemeler için
- Nav Menü – menü öğeleri için
Özel gönderi türleri, belirli içerik türleri için WordPress web sitenizde özel bölümler oluşturmanıza olanak tanır.
Diyelim ki bir film inceleme web sitesi işletiyorsunuz. O zaman muhtemelen bir 'film incelemeleri' gönderi türü oluşturmak istersiniz. Bir portföy sitesinde Projeler gönderi türü oluşturabilirsiniz. Oysa bir e-ticaret sitesi Ürünler gönderi türünden faydalanacaktır.
📝 İçeriden Not: WPBeginner olarak biz de özel gönderi türleri kullanıyoruz. Bunları blog yazılarımızdan ayrı tutmak için Fırsatlar ve Sözlük bölümlerimiz için kullanıyoruz.
Ardından, her özel gönderi türünün kendi düzenine, özel alanlarına ve hatta kendi özel kategori veya etiket yapısına sahip olabilir. Bu, sitenizi daha organize ve kullanıcı dostu hale getirir!
Ayrıca, birçok popüler WordPress eklentisi, verileri WordPress web sitenizde depolamak için özel gönderi türlerini kullanır. Aşağıda, özel gönderi türlerini kullanan birkaç popüler eklenti bulunmaktadır:
- WooCommerce çevrimiçi mağazanıza bir 'ürün' gönderi türü ekler
- WPForms, tüm formlarınızı depolamak için bir 'wpforms' gönderi türü oluşturur
- MemberPress, bir 'memberpressproduct' özel gönderi türü ekler
Özel Yazı Tipleri Oluşturmam Gerekir mi?
WordPress sitenizde özel gönderi türleri oluşturmaya başlamadan önce ihtiyaçlarınızı değerlendirmeniz önemlidir. Çoğu zaman, normal bir gönderi veya sayfa ile aynı sonuçları elde edebilirsiniz.
Özel gönderi türlerine ihtiyacınız olup olmadığından emin değilseniz, WordPress'te özel bir gönderi türüne veya taksonomisine ne zaman ihtiyacınız olduğuna dair rehberimize bakın.
Bunu akılda tutarak, kendi kullanımınız için WordPress'te özel gönderi türlerini kolayca nasıl oluşturacağınıza bakalım. İki yöntem göstereceğiz ve özel gönderi türlerini WordPress web sitenizde görüntülemenin bazı yollarını da ele alacağız:
- Yöntem 1: WPCode Kullanarak Manuel Olarak Özel Bir Gönderi Türü Oluşturma (Daha Esnek)
- Yöntem 2: Bir Eklenti ile Özel Gönderi Türü Oluşturma (Kodlama Gerektirmez)
- Bonus İpucu: Özel Gönderi Türlerini Sitenizde Görüntüleme
- Sıkça Sorulan Sorular (SSS): WordPress Özel Gönderi Türleri
- Video Eğitim – WordPress'te Özel Gönderi Türleri Nasıl Oluşturulur
- WordPress Gönderi ve Sayfa Yönetimi Hakkında Daha Fazla Rehber
Hazır mısınız? Başlayalım.
Yöntem 1: WPCode Kullanarak Özel Bir Gönderi Türü Oluşturma
Özel bir gönderi türü oluşturmak, temanızın functions.php dosyasına kod eklemenizi gerektirir. Ancak, bunu ileri düzey kullanıcılar dışında kimseye önermiyoruz çünkü en ufak bir hata bile sitenizi bozabilir. Ayrıca, temanızı güncellerseniz kod silinecektir.
Bunun yerine, WordPress web sitenize özel kod eklemek için en iyi eklenti olan WPCode'u kullanacağız.
WPCode ile özel kod parçacıkları ekleyebilir ve yerleşik, önceden yapılandırılmış kod kitaplığından birçok özelliği etkinleştirebilirsiniz. Başka bir deyişle, yüklü olabilecek birçok özel veya tek kullanımlık eklentinin yerini alabilir.
ayrıntılı WPCode incelememizde test ettiğimiz tüm özellikleri keşfedin.

Öncelikle, ücretsiz WPCode eklentisini yüklemeniz ve etkinleştirmeniz gerekecektir. Ayrıntılı talimatlar için, bir WordPress eklentisinin nasıl kurulacağına dair adım adım kılavuzumuza göz atın.
📝 Not: WPCode'un ücretsiz sürümü bu eğitim için iyi çalışır. Ancak, WPCode Pro'ya yükseltmek, özel kod zamanlaması ve tam revizyon geçmişi gibi gelişmiş özellikleri açar.
Etkinleştirdikten sonra, WordPress kontrol panelinizden Kod Parçacıkları » Parçacık Ekle'ye gidin.
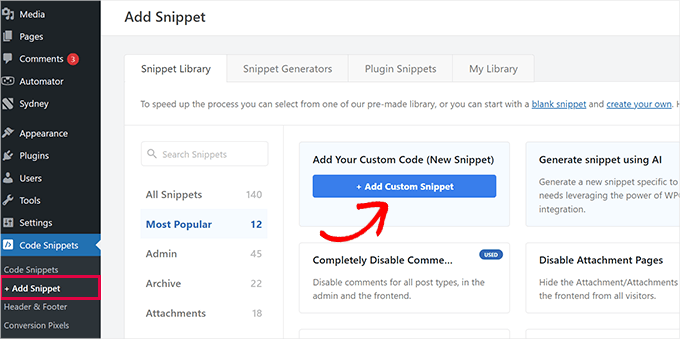
Ardından, 'Özel Kodunuzu Ekleyin (Yeni Kod Parçacığı)' üzerine fareyle gelin ve ardından '+ Özel Kod Parçacığı Ekle'ye tıklayın.
Görünen pop-up'ta, seçenekler listesinden kod türü olarak 'PHP Kod Parçacığı'nı seçin.
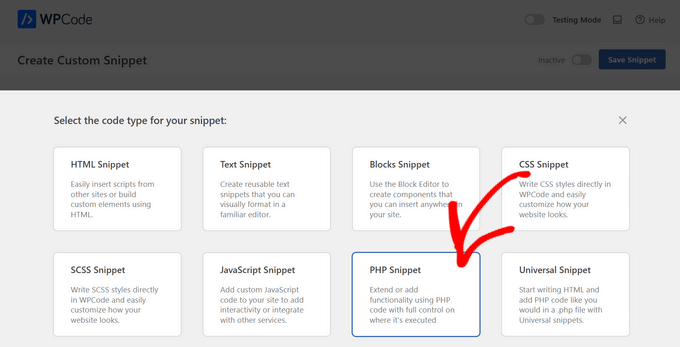
Bu, 'Özel Kod Parçacığı Oluştur' sayfasını açacaktır.
Şimdi, kodun ne işe yaradığını hatırlamanıza yardımcı olacak herhangi bir şey olabilecek kod parçacığı başlığını ekleyebilirsiniz.
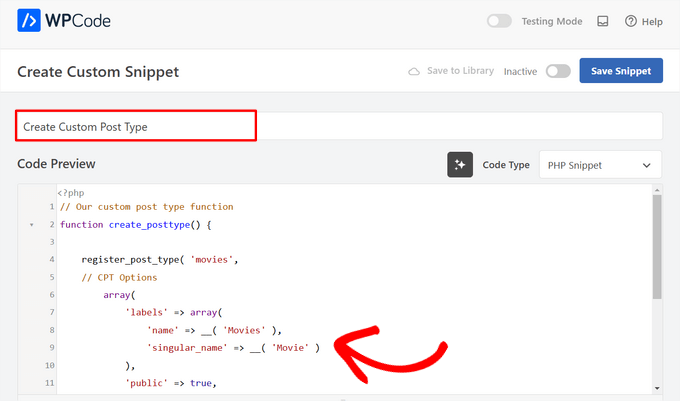
Bundan sonra, aşağıdaki kodu 'Kod Önizleme' alanına yapıştırmanız yeterlidir.
Bu kod, yönetici kenar çubuğunuzda görünecek ve herhangi bir WordPress teması ile çalışacak 'Filmler' adlı temel bir özel gönderi türü oluşturur.
// Our custom post type function
function create_posttype() {

    register_post_type( 'movies',
    // CPT Options
        array(
            'labels' => array(
                'name' => __( 'Movies' ),
                'singular_name' => __( 'Movie' )
            ),
            'public' => true,
            'has_archive' => true,
            'rewrite' => array('slug' => 'movies'),
            'show_in_rest' => true,

        )
    );
}
// Hooking up our function to theme setup
add_action( 'init', 'create_posttype' );
Temel bir özel gönderi türü istiyorsanız, movies ve Movies yerine kendi CPT takma adınızı ve adınızı yazıp 'Güncelle' düğmesine tıklamanız yeterlidir.
Ancak, özel gönderi türünüz için daha da fazla seçeneğiniz olmasını istiyorsanız, yukarıdaki kod yerine aşağıdaki kodu kullanmalısınız.
Aşağıdaki kod, revizyonlar, öne çıkan görseller ve özel alanlar için destek gibi 'Filmler' özel gönderi türüne birçok ek seçenek ekler ve ayrıca özel gönderi türünü 'türler' adlı bir özel taksonomi ile ilişkilendirir.
☝ Önemli: Bu iki kod parçasını birleştirmeyin, aksi takdirde WordPress hata verecektir çünkü her iki parça da aynı özel gönderi türünü kaydeder. Kaydetmek istediğiniz her ek gönderi türü için WPCode kullanarak tamamen yeni bir kod parçası oluşturmanızı öneririz.
/*
* Creating a function to create our CPT
*/

function custom_post_type() {

// Set UI labels for Custom Post Type
    $labels = array(
        'name'                => _x( 'Movies', 'Post Type General Name', 'twentytwentyone' ),
        'singular_name'       => _x( 'Movie', 'Post Type Singular Name', 'twentytwentyone' ),
        'menu_name'           => __( 'Movies', 'twentytwentyone' ),
        'parent_item_colon'   => __( 'Parent Movie', 'twentytwentyone' ),
        'all_items'           => __( 'All Movies', 'twentytwentyone' ),
        'view_item'           => __( 'View Movie', 'twentytwentyone' ),
        'add_new_item'        => __( 'Add New Movie', 'twentytwentyone' ),
        'add_new'             => __( 'Add New', 'twentytwentyone' ),
        'edit_item'           => __( 'Edit Movie', 'twentytwentyone' ),
        'update_item'         => __( 'Update Movie', 'twentytwentyone' ),
        'search_items'        => __( 'Search Movie', 'twentytwentyone' ),
        'not_found'           => __( 'Not Found', 'twentytwentyone' ),
        'not_found_in_trash'  => __( 'Not found in Trash', 'twentytwentyone' ),
    );

// Set other options for Custom Post Type

    $args = array(
        'label'               => __( 'movies', 'twentytwentyone' ),
        'description'         => __( 'Movie news and reviews', 'twentytwentyone' ),
        'labels'              => $labels,
        // Features this CPT supports in Post Editor
        'supports'            => array( 'title', 'editor', 'excerpt', 'author', 'thumbnail', 'comments', 'revisions', 'custom-fields', ),
        // You can associate this CPT with a taxonomy or custom taxonomy.
        'taxonomies'          => array( 'genres' ),
        /* A hierarchical CPT is like Pages and can have
        * Parent and child items. A non-hierarchical CPT
        * is like Posts.
        */
        'hierarchical'        => false,
        'public'              => true,
        'show_ui'             => true,
        'show_in_menu'        => true,
        'show_in_nav_menus'   => true,
        'show_in_admin_bar'   => true,
        'menu_position'       => 5,
        'can_export'          => true,
        'has_archive'         => true,
        'exclude_from_search' => false,
        'publicly_queryable'  => true,
        'capability_type'     => 'post',
        'show_in_rest' => true,

    );

    // Registering your Custom Post Type
    register_post_type( 'movies', $args );

}

/* Hook into the 'init' action so that the function
* Containing our post type registration is not
* unnecessarily executed.
*/

add_action( 'init', 'custom_post_type', 0 );
Hiyerarşik değeri false olarak ayarladığımız kısmı fark edebilirsiniz. Özel gönderi türünüzün gönderiler yerine sayfalar gibi davranmasını istiyorsanız, bu değeri true olarak ayarlayabilirsiniz.
Dikkat edilmesi gereken bir diğer şey ise twentytwentyone dizesinin tekrar tekrar kullanılmasıdır, buna 'Metin Etki Alanı' denir. Temanız çeviriye hazır ise ve özel gönderi türlerinizin çevrilmesini istiyorsanız, temanız tarafından kullanılan metin etki alanını belirtmeniz gerekecektir.
Tema metin alan adınızı tema dizininizdeki style.css dosyasında veya yönetici panelinizde Görünüm » Tema Dosyası Düzenleyici'ye giderek bulabilirsiniz. Metin alan adı dosyanın başlığında belirtilecektir.
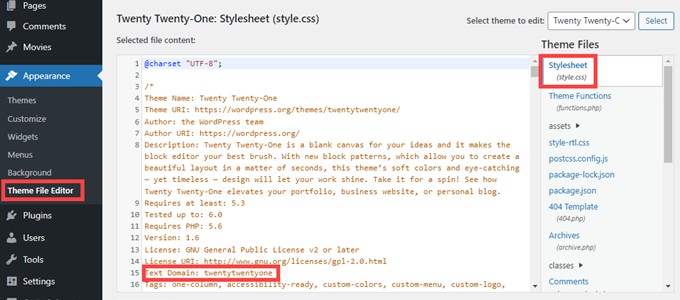
Yalnızca twentytwentyone'ı kendi temanızın 'Metin Etiketi' ile değiştirin.
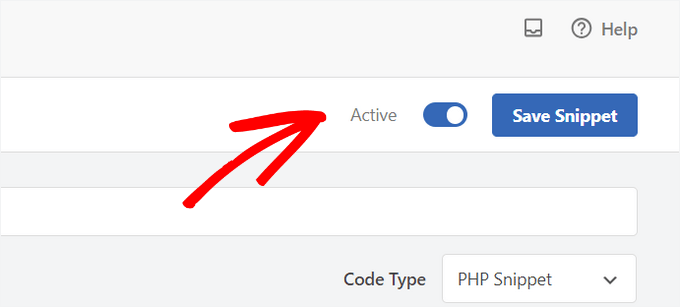
Değişikliklerden memnun kaldığınızda, sayfanın üst kısmındaki geçişi ‘Etkin Değil’den ‘Etkin’e getirin.
Son olarak, ‘Snippet Kaydet’ düğmesine tıklayın ve WPCode gerisini halledecektir.
Yöntem 2: Bir Eklenti ile Özel Gönderi Türü Oluşturma
WordPress'te özel bir gönderi türü oluşturmanın bir başka kolay yolu da eklenti kullanmaktır. Bu yöntem yeni başlayanlar için önerilir çünkü güvenli ve süper kolaydır.
Yapmanız gereken ilk şey, Custom Post Type UI eklentisini kurmak ve etkinleştirmektir. Daha fazla ayrıntı için, bir WordPress eklentisinin nasıl kurulacağına dair adım adım kılavuzumuza bakın.
Etkinleştirdikten sonra, yeni bir özel gönderi türü oluşturmak için CPT UI » Gönderi Türleri Ekle / Düzenle bölümüne gitmeniz gerekir. 'Yeni Gönderi Türü Ekle' sekmesinde olmalısınız.
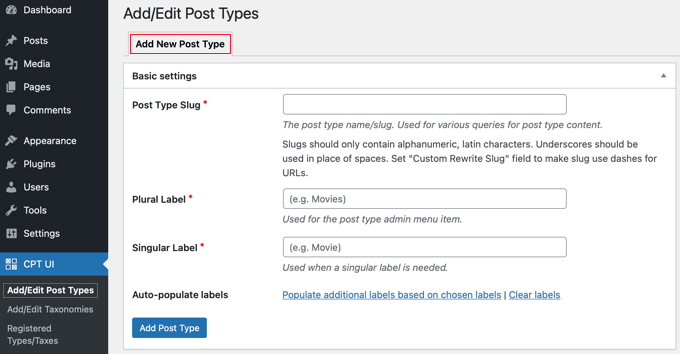
Bu alanda, özel yazı tipiniz için 'filmler' gibi bir slug sağlamanız gerekecektir. Bu slug URL'de ve WordPress sorgularında kullanılacaktır, bu nedenle yalnızca harf ve rakam içerebilir.
Slug alanının altında, özel gönderi türünüz için çoğul ve tekil adları sağlamanız gerekir.
İsterseniz, ‘Seçilen etiketlere göre ek etiketleri doldur’ diyen bağlantıya tıklayabilirsiniz. Bu, aşağıdaki ek etiket alanlarını otomatik olarak dolduracak ve genellikle zamandan tasarruf etmenizi sağlayacaktır.
Artık aşağı kaydırarak 'Ek Etiketler' bölümüne gidebilirsiniz. Bahsettiğimiz bağlantıya tıklamadıysanız, yazı tipiniz için bir açıklama sağlamanız ve etiketleri değiştirmeniz gerekecektir.
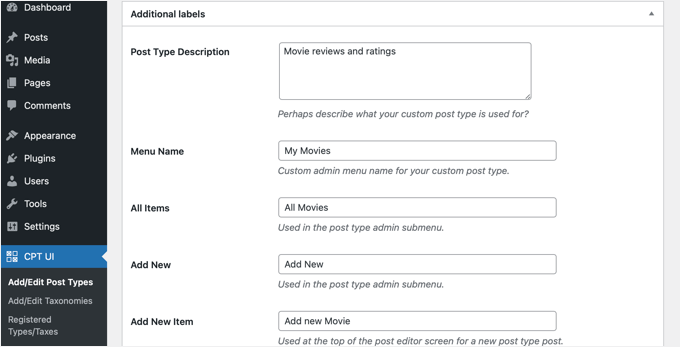
Bu etiketler, belirli gönderi türündeki içeriği yönetirken WordPress kullanıcı arayüzünde kullanılacaktır.
Sonra gönderi türü ayarları gelir.
Buradan, gönderi türünüz için farklı öznitelikler ayarlayabilirsiniz. Her seçeneğin ne yaptığını açıklayan kısa bir açıklaması vardır.
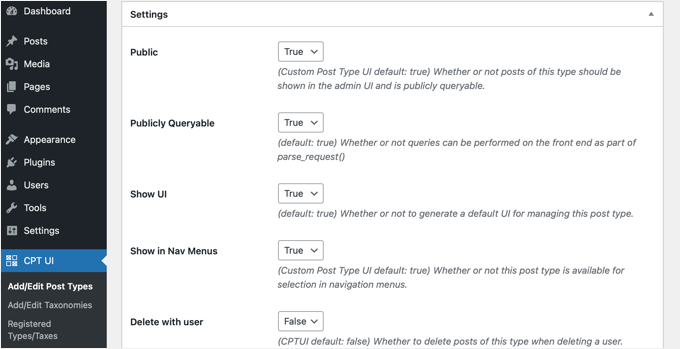
Örneğin, bir gönderi türünü sayfalar gibi hiyerarşik yapmamayı veya kronolojik gönderileri ters sırada sıralamayı seçebilirsiniz.
Genel ayarların altında, bu gönderi türünün hangi düzenleme özelliklerini destekleyeceğini seçme seçeneğini göreceksiniz. Dahil etmek istediğiniz seçenekleri işaretlemeniz yeterlidir.
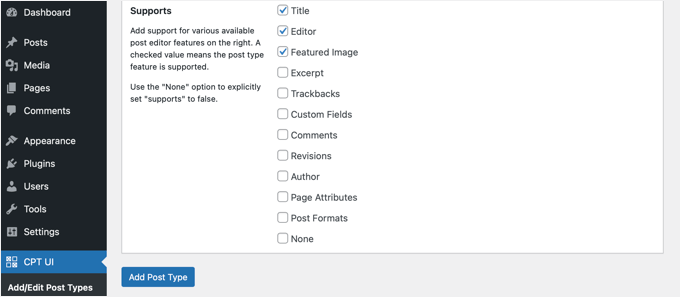
Son olarak, özel gönderi türünüzü kaydetmek ve oluşturmak için 'Gönderi Türü Ekle' düğmesine tıklayın.
Hepsi bu kadar, özel gönderi türünüzü başarıyla oluşturdunuz! Artık içeri eklemeye başlayabilirsiniz.
Bonus İpucu: Özel Gönderi Türlerini Sitenizde Görüntüleme
WordPress, özel gönderi türlerinizi görüntülemek için yerleşik destekle birlikte gelir. Yeni özel gönderi türünüze birkaç öğe ekledikten sonra, bunları web sitenizde görüntüleme zamanı gelmiş demektir.
Kullanabileceğiniz birkaç yöntem vardır ve her birinin kendi faydaları vardır.
Özel Gönderi Türlerini Varsayılan Arşiv Şablonunu Kullanarak Görüntüleme
İlk olarak, basitçe Görünüm » Menüler'e gidip menünüze özel bir bağlantı ekleyebilirsiniz. Bu özel bağlantı, özel gönderi türünüze giden bağlantıdır.
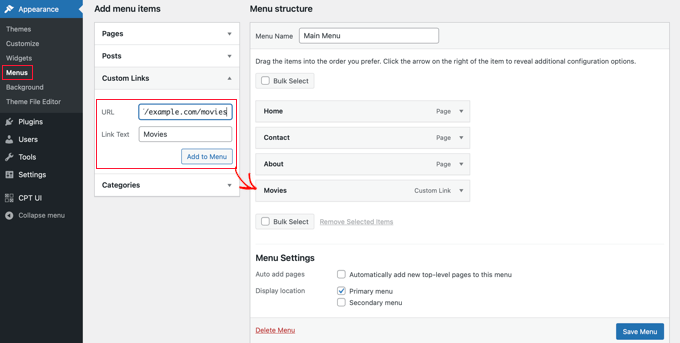
SEO dostu kalıcı bağlantılar kullanıyorsanız, özel gönderi türünüzün URL'si büyük olasılıkla şöyle olacaktır:
http://example.com/movies
SEO dostu kalıcı bağlantıları kullanmıyorsanız, özel gönderi türü URL'niz şuna benzer olacaktır:
http://example.com/?post_type=movies
'example.com' yerine kendi alan adınızı ve 'movies' yerine özel gönderi türü adınızı değiştirmeyi unutmayın.
Ardından menünüzü kaydedebilir ve web sitenizin ön yüzünü ziyaret edebilirsiniz. Eklediğiniz yeni menü öğesini göreceksiniz ve üzerine tıkladığınızda, temanızdaki archive.php şablon dosyasını kullanarak özel gönderi türünüzün arşiv sayfasını gösterecektir.

Özel Gönderi Türü Şablonları Oluşturma
Özel gönderi türünüzün arşiv sayfasının görünümünü beğenmezseniz, özel gönderi türü arşivleri için özel bir şablon kullanabilirsiniz.
Tek yapmanız gereken tema dizininizde yeni bir dosya oluşturmak ve adını archive-movies.php olarak belirlemektir. 'movies' yerine özel gönderi türünüzün adını değiştirdiğinizden emin olun.
Başlamak için, temanızın archive.php dosyasının içeriğini archive-movies.php şablonuna kopyalayabilir ve ardından ihtiyaçlarınıza göre değiştirebilirsiniz.
Artık özel gönderi türünüzün arşiv sayfasına erişildiğinde, bu şablon görüntülenecektir.
Benzer şekilde, gönderi türünüzün tekil giriş gösterimi için özel bir şablon oluşturabilirsiniz. Bunu yapmak için tema dizininizde single-movies.php dosyasını oluşturmanız gerekir. 'movies' yerine özel gönderi türünüzün adını değiştirmeyi unutmayın.
Tema'nızın single.php şablonunun içeriğini single-movies.php şablonuna kopyalayarak ve ardından ihtiyaçlarınıza göre değiştirerek başlayabilirsiniz.
Daha fazla bilgi edinmek için, WordPress'te özel tek gönderi şablonlarının nasıl oluşturulacağına dair rehberimize bakın.
Özel Gönderi Türlerini Ana Sayfada Görüntüleme
Özel gönderi türlerini kullanmanın bir avantajı, özel içerik türlerinizi normal gönderilerinizden ayrı tutmasıdır. Ancak, isterseniz özel gönderi türlerini web sitenizin ana sayfasında görüntüleyebilirsiniz.
Bu kodu, ücretsiz WPCode eklentisini kullanarak yeni bir parçacık olarak ekleyin.
Lütfen ayrıntılı talimatlar için bu makalenin kodu manuel olarak ekleme bölümüne bakın.
add_action( 'pre_get_posts', 'add_my_post_types_to_query' );

function add_my_post_types_to_query( $query ) {
    if ( is_home() && $query->is_main_query() )
        $query->set( 'post_type', array( 'post', 'movies' ) );
    return $query;
}
'movies' yerine özel gönderi türünüzü eklemeyi unutmayın.
Özel Gönderi Türlerini Sorgulama
Kodlamaya aşina iseniz ve şablonlarınızda döngü sorguları çalıştırmak istiyorsanız, bunu nasıl yapacağınız aşağıdadır. Veritabanını sorgulayarak, özel bir gönderi türünden öğeler alabilirsiniz.
Özel gönderi türünü görüntülemek istediğiniz şablona aşağıdaki kod parçasını kopyalamanız gerekecektir.
<?php
$args = array( 'post_type' => 'movies', 'posts_per_page' => 10 );
$the_query = new WP_Query( $args );
?>
<?php if ( $the_query->have_posts() ) : ?>
<?php while ( $the_query->have_posts() ) : $the_query->the_post(); ?>
<h2><?php the_title(); ?></h2>
<div class="entry-content">
<?php the_content(); ?>
</div>
<?php endwhile;
wp_reset_postdata(); ?>
<?php else:  ?>
<p><?php _e( 'Sorry, no posts matched your criteria.' ); ?></p>
<?php endif; ?>
Bu kod, yeni WP_Query sınıfımız için argümanlarda gönderi türünü ve sayfa başına gönderi sayısını tanımlar. Ardından sorguyu çalıştırır, gönderileri alır ve döngü içinde görüntüler.
Özel Gönderi Türlerini Widget'larda Görüntüleme
WordPress'in son gönderileri görüntülemek için varsayılan bir widget'ı olduğunu fark edeceksiniz, ancak özel bir gönderi türü seçmenize izin vermez.
Yeni oluşturduğunuz gönderi türünden en son girişleri bir widget'ta görüntülemek isteseydiniz ne olurdu? Neyse ki, bunu yapmanın kolay bir yolu var.
Yapmanız gereken ilk şey Custom Post Type Widgets eklentisini kurmak ve etkinleştirmektir. Daha fazla ayrıntı için, WordPress eklentisinin nasıl kurulacağına dair adım adım kılavuzumuza bakın.
Etkinleştirdikten sonra, sadece Görünüm » Widget'lar bölümüne gidin ve 'Son Gönderiler (Özel Gönderi Türü)' widget'ını bir kenar çubuğuna sürükleyip bırakın.
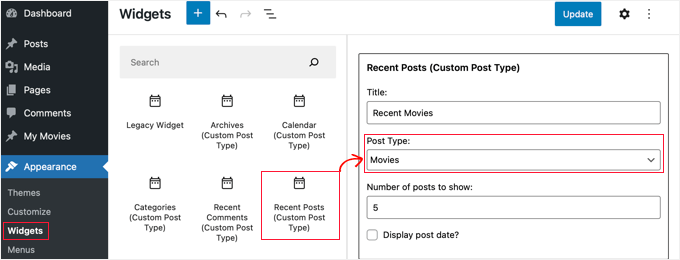
Bu widget, herhangi bir gönderi türünden son gönderileri göstermenizi sağlar. 'Gönderi Türü' açılır menüsünden özel gönderi türünüzü seçmeniz ve istediğiniz seçenekleri belirlemeniz gerekir.
Bundan sonra, ekranın üst kısmındaki ‘Güncelle’ düğmesine tıkladığınızdan ve ardından widget'ı çalışırken görmek için web sitenizi ziyaret ettiğinizden emin olun.

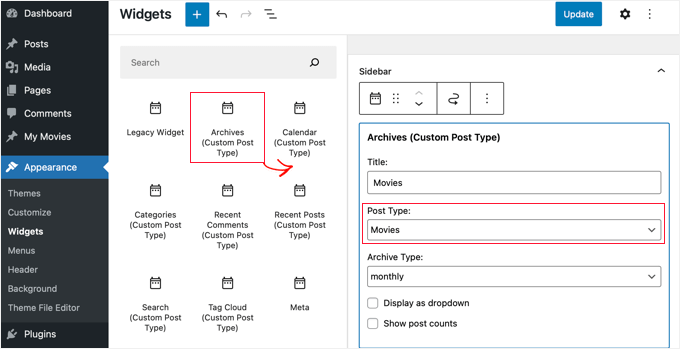
Eklenti ayrıca arşivleri, takvimi, kategorileri, son yorumları, aramayı ve etiket bulutunu görüntüleyen özel gönderi türü widget'ları sağlar.
Bu nedenle, keşfetmekten ve ihtiyacınız olanı seçmekten çekinmeyin.
Sıkça Sorulan Sorular (SSS): WordPress Özel Gönderi Türleri
WordPress'te özel gönderi türleri oluşturma hakkında en sık sorulan sorulardan bazıları şunlardır.
Özel gönderi türü ile kategori arasındaki fark nedir?
Özel bir gönderi türü, yepyeni bir içerik türü oluşturmak içindir, oysa bir kategori mevcut içeriği gruplandırmak içindir. Örneğin, ‘Kitap İncelemeleri’ özel bir gönderi türü olurdu. ‘Kurgu’ ve ‘Kurgu Dışı’ bu kitap incelemelerini düzenlemek için kategoriler olurdu.
Özel bir gönderi türünü silmek, tüm içeriğini de siler mi?
Hayır, içerik veritabanınızdan silinmez, ancak gizlenir ve erişilemez hale gelir. Gönderileri tekrar görünür hale getirmek için özel gönderi türünü tam olarak aynı adla yeniden kaydetmeniz gerekir.
Gönderi türlerini kaldırmadan önce her zaman tam bir WordPress yedeklemesi yapmanızı öneririz.
Özel gönderi türüme özel alanları nasıl eklerim?
Gönderi türlerinize daha yapılandırılmış bilgiler eklemek için özel alanlar ekleyebilirsiniz, örneğin 'Filmler' gönderi türüne bir 'Yönetmen' alanı eklemek gibi. Bunu kodla yapabilir veya kullanıcı dostu bir arayüz için Gelişmiş Özel Alanlar (ACF) gibi popüler bir eklenti kullanabilirsiniz.
Video Eğitim – WordPress'te Özel Gönderi Türleri Nasıl Oluşturulur
Gitmeden önce, WordPress'te özel gönderi türlerinin nasıl oluşturulacağına dair video eğitimimize göz atmayı unutmayın.
WordPress Gönderi ve Sayfa Yönetimi Hakkında Daha Fazla Rehber
Bu öğreticinin WordPress'te özel gönderi türleri oluşturmayı öğrenmenize yardımcı olduğunu umuyoruz. Sonra, şunları da öğrenmek isteyebilirsiniz:
- WordPress'te Blog Gönderileri İçin Özel Gönderi Durumu Nasıl Eklenir
- Özel Gönderi Türlerini WordPress Arama Sonuçlarına Nasıl Dahil Edilir
- WordPress'te Widget'ları Belirli Sayfalarda Nasıl Gösterir veya Gizlersiniz
- WordPress'te Çocuk Sayfa Nasıl Oluşturulur
- WordPress'te Özel Arşiv Sayfası Nasıl Oluşturulur
- Her WordPress Blogunun Sahip Olması Gereken Önemli Sayfalar
- En Kullanışlı WordPress Özel Gönderi Türü Eğitimleri
Bu makaleyi beğendiyseniz, lütfen WordPress video eğitimleri için YouTube Kanalımıza abone olun. Bizi ayrıca Twitter ve Facebook'ta da bulabilirsiniz.


R Davies
İkinci (daha ayrıntılı) örneğinizde bir sözdizimi hatası var, kod en son Wordpress 7.4.3'te çalışmıyor
) Uyarı: call_user_func_array() parametre 1'in geçerli bir geri çağrı olmasını bekliyor, 'custom_post_type' fonksiyonu bulunamadı veya geçersiz fonksiyon adı
Güncelleme / düzeltme şansı var mı?
WPBeginner Desteği
Merhaba R Davies,
Kontrol ettik ve mükemmel çalıştı.
Yönetici
Archit
Özel gönderi türü seçeneklerindeki (supports dizisindeki) son virgül kasıtlı mı?
Robert Stuart
31. satırda mı? Evet, bu normal PHP kodudur.
“Son dizi öğesinden sonra gelen virgül isteğe bağlıdır ve atlanabilir. Bu genellikle tek satırlık diziler için yapılır, yani array(1, 2, ) yerine array(1, 2) tercih edilir. Diğer yandan, çok satırlık dizilerde, sonuna yeni öğeler eklemeyi kolaylaştırdığı için, sondaki virgül yaygın olarak kullanılır.”
saurabh
Özel Gönderi Türü'nde 'Gönderi Ayarları' nasıl etkinleştirilir (Özel Gönderi Türü Arayüz Eklentisi kullanılarak)?
Aryalar
Merhaba, bu eklentiyle ilgili sorunlar yaşıyorum.
Kategori ve etiket oluşturma seçeneğini devre dışı bıraktı,
Bunları manuel olarak yerleştirmek için bir örnek arıyordum ama hala hiçbir şey bulamadım.
Bu yöntemle sorunu çözebilir miyim diye geri almayı deniyorum ama yardımınız için çok minnettar olurum.
stormonster
'$args' dizinizde, 'taxonomies' dizinine 'category' ve 'post_tag' ekleyin.
Bu işe yarayacaktır.
John D
Çok fazla kodlama. Wordpress işleri daha basit tutmalı.
Ilija
Bu yüzden kendi CMS'imi kullanıyorum, burada yeni gönderi türlerini saniyeler içinde doğrudan CMS'in kendisi aracılığıyla oluşturabiliyorum. Kodlama olmadan, ne yazık ki büyük ajanslar Wordpress geliştiricileri istiyor ve öğrenmek zorunda kalıyorlar, bu çok karmaşık görünüyor..
Sarah A
Merhaba, bir resme tıkladığınızda açılan bir pop-up'ta belirli bir tasarımla özel bir yazı tipi grubu görüntülemeyi başardım, ancak yeni bir sayfa açılıyor ve pop-up'ın dışına tıklayarak çıkmak istediğinizde ana sayfaya dönmüyorsunuz, ben bunu istemiyorum. Her şeyin ana sayfada olmasını istiyorum.
CPT'nin kodunu, pop-up olarak göstermek için "single-chg_projet.php" dosyasına yerleştirdim ve pop-up'ı javascript ile açıp kapatıyorum. Zaten single-chg_projet.php dosyasının tüm kodunu index'e koymayı denedim ama hiçbir şey göstermiyor. Ya da bir yerde hata yapmış olabilirim. Lütfen yardım edin. Teşekkürler
Ghulam Mustafa
Merhaba,
Harika kod için teşekkürler. Koda küçük bir düzeltme. Querying Custom Post Types bölümünde else: ifadesinden önce endwhile; ifadesi eksik =)
Tony Peterson
BU! Lütfen bu sözdizimi hatasını yansıtacak şekilde kodunuzu güncelleyin, çünkü Ghulam'ın yorumunu bulana kadar bana biraz baş ağrısına neden oldu. Şimdi çalışıyor.
Arkanum
Yes! True. It’s miss befire wp_reset_postdate();
The cycle while does not end
Azamat
Yazım hatası: “Özel bir gönderi türüne ne zaman ihtiyacım var?”
WPBeginner Desteği
Thanks for notifying us We have updated the article.
Yönetici
Jhon
hey, sitenizdeki gibi özel bir sözlük oluşturma sürecinde bana rehberlik edebilir misin?
WPBeginner Desteği
Terimleri görüntülemek için özel alanlar ve özel bir şablon kullanıyoruz.
Yönetici
Anil Reddy
Web sitemin kategori sayfası için gönderiler için liste türü oluşturmak istiyorum
david ben oren
Belirli bir tabloya sahip bir gönderi türünü nasıl klonlarım, diğer tablolar için ayrı bir gönderi türü oluşturmam gerekiyor.
betty
Bir Gönderi Türüne özel alan nasıl eklenir?
WPBeginner Desteği
Lütfen WordPress Özel Alanları 101 rehberimize göz atın.
Yönetici
Megan
Eklentiyi indirdim ve iki özel gönderi türü eklemek istiyorum. 1. Tüm yazı işlerim için Fanfiction ve 2. Tüm sanat eserlerim için Fanart.
Fanfiction için – Bölümleri bir hikaye halinde birbirine bağlama ve yazdıkça hikayeye bölümler yükleyebilme yeteneği istiyorum.
Fanart için – (elbette) bir görselin ve altında bir açıklamanın ön planda olmasını isterim
Bu makale ihtiyacım olan şey mi yoksa tamamen farklı bir şey mi?
Teşekkürler,
Megan
Zubair Abbas
Merhaba,
Kodu sitemin functions.php dosyasına kopyaladım. Yeni gönderi türü kontrol panelinde görünüyor ancak yayınladıktan sonra bir gönderiyi görmeye çalıştığımda boş bir sayfa çıkıyor. Daha sonra varsayılan gönderilerin bile açılmadığını fark ettim.
functions.php dosyasındaki kodu kaldırdığımda her şey tekrar yolunda gidiyor.
Please help
Teşekkürler,
Zubair Abbas
Jouke Nienhuis
Boş bir sayfa görüyorsanız, bu genellikle bir karakteri unuttuğunuz anlamına gelir. Özel kodunuzu sildiğinizde gönderileri görmeniz, bir yazım hatası yaptığınızı doğrular. Noktalı virgülleri ” ; ” ve açılış/kapanış parantezlerini kontrol edin.
Hatasını tam olarak nerede yaptığınızı görmek için wp-config dosyasını düzenleyebilirsiniz. ERROR REPORTING'i arayın ve bu değeri true olarak ayarlayın. Ardından tekrar test edin ve orada bir hata ve eksiklik olan bir satır bulacaksınız.
Alex
CPT'yi oluşturdum ve harika çalışıyor, ancak site haritalarını güncelledikten, SEO eklentileri kullandıktan veya Google Webmaster Araçları'nda getirdikten sonra bile Google onu bulamıyor. Bunun neden olduğunu düşündüren herhangi bir şey var mı?
WPBeginner Desteği
Google'ın yeni içeriği arama sonuçlarında göstermeye başlaması zaman alır. Güvenli tarafta kalmak için, CPT'lerinizin veya CPT arşiv sayfalarınızın indekslenmesini engellemediğinizden emin olmak için SEO eklentisi ayarlarınızı kontrol edin.
Yönetici
Amunet
Özel Gönderi Türü Oluşturmak, özellikle bir eklenti ile kolay olabilir. Asıl püf noktası onları sayfada göstermektir. Genellikle oldukça gelişmiş özel geliştirme veya Avada gibi tema özel eklentilere ihtiyacınız olur.
Ne yazık ki, CPT'yi WordPress'te görüntülemenin evrensel bir yolu yoktur.
WPBeginner Desteği
Aslında, WordPress'te CPT'leri görüntülemenin doğrudan ve standart yolları vardır. Yukarıdaki makalede bunlardan birini belirttik.
Yönetici
Jouke Nienhuis
Yazarın dediği gibi, ancak cevabı tekrarlayacağım.
Kısacası, navigasyon menünüzde bir bağlantı oluşturun
Kısacası gelişmiş cevap: bir arşiv sayfası ve tekil bir sayfa oluşturun
Chuck
Harika bir makale. Özel taksonomiye göre tekil gönderi CPT gönderi bilgileri nasıl değiştirilebilir? Örneğin:
Tarih | Yazar | Seri | Kitap | Konu
Bunu yazmak kolay ama Eksik olan Seri taksonomilerinden biri varsa değiştirilmiş gönderi bilgilerini nasıl göstereceğimi bulmak istiyorum, örneğin:
Tarih | Yazar | Kitap | Konu
Aksi takdirde varsayılan gönderi bilgileri şu şekilde görüntülenir:
Tarih | Yazar | | Kitap | Konu
borahan
Mevcut kullanıcı için sayfada belirli kategori gönderilerini görüntülemek istiyorum. Bunu nasıl yapabilirim?
Moazam Ali
Sevgili,
Gönderi için teşekkürler. E-kitaplardan oluşan bir kütüphane oluşturmak istiyorum ve ön uçta kitapların küçük resimlerini göstermek için özel gönderi türünü ve portföyü kullanmak istiyorum. Bunu nasıl yapabileceğim konusunda bana rehberlik edebilir misiniz?
Sharon Wallace
Herkese merhaba,
Bu harika bir eklenti. Taksonomiyi sayfada göstermeye çalışıyorum. Sunucular adında bir tane oluşturdum. Burada görebilirsiniz.
Bunu nasıl yapabilirim?
Teşekkürler
WPBeginner Desteği
Lütfen WordPress'te özel taksonomilerin nasıl oluşturulacağına bir göz atın. Umarım bu sorunuzu yanıtlar.
Yönetici
Sharon Wallace
Merhaba,
Yanıtınız için teşekkürler. Hala çalışmıyor ama beni doğru yöne yönlendirdiniz. Oynamaya devam edeceğim.
Harika bir gün geçirin.
Dave S.
Merhaba,
ArForms eklentisini kullanarak bir form oluşturdum ve bunu bir Post-Type'a dönüştürmem gerekiyor. Bunu nasıl yapabileceğim konusunda herhangi bir öneriniz var mı lütfen?
Teşekkür ederim.
Mark Greenway
Bunun için teşekkürler, özel gönderi türlerini anlamama yardımcı olması için tam olarak bilmem gereken şey buydu.
Mark.
shashik
Teşekkürler canım..çok faydalı..
Graham
Teşekkürler! Tam aradığım şeydi. WordPress'te ne kadar çok geçici çözüm bulduğuma ve sonra onları nasıl yaptığımı unutup geri dönmek zorunda kaldığıma şaşırıyorum.
Çok takdir edildi!
Ram
Çok kullanışlı! Teşekkürler....
MELAS
Sevgili,
Kodlama hakkında çok bilgim yok. Bu Özel gönderi türlerini ve taksonomilerini belirli sayfada nasıl görebilirim?
Şimdiden teşekkürler!
MELAS
Mike Ritter
Bir hata mı var? Fonksiyon `create_post_type` olmalı değil mi?
WPBeginner Desteği
Hayır mike, bu çekirdek bir işlev değil. Bu işlevi istediğiniz gibi tanımlayabilirsiniz.
Yönetici
Vera
Merhaba,
Bu güzel eğitim için teşekkür ederim.
Söylediğiniz her şeyi yaptım.
Anlamadığım iki şey var:
1.
“Tür” taksonomisini belirttiniz. Bu nerede ayarlanıyor? Eğer bunun altındaki gerçek türleri yapmak istersem ne olur? Onları nasıl yaparım? Nerede görürüm?
2.
Menü bağlantılarını “Filmler” ve altında – “Türler” alt bağlantılarını yapmak istiyorum. Menü bölümünde “Filmler”i, her gönderiyi, sayfalar gibi görebiliyorum. Gerçekten buna ihtiyacım yok ama umursamam. “Türler”i orada nasıl görürüm?
Teşekkürler,
Vera
WPBeginner Desteği
Özel gönderi türünüzü, yani Filmleri başarıyla oluşturmuş görünüyorsunuz. Bir sonraki adım, Türler özel taksonomisini oluşturmaktır. Taksonomi, WordPress'te içeriği sıralamanın bir yoludur. Kategoriler ve etiketler, WordPress ile birlikte gelen iki varsayılan taksonomidir ve varsayılan olarak 'Gönderiler' ile ilişkilidir. Lütfen WordPress'te özel taksonomiler oluşturma eğitimimize bakın. Türler özel taksonominizi oluşturmak ve bunu filmler gönderi türüyle ilişkilendirmek için o eğitimdeki talimatları izleyin. Özel taksonominiz, WordPress yönetici alanındaki Filmler menüsünün altında görünecektir.
Yönetici
Hamed 3daJoo
Bunun hepsini yapıyorum ama bu gönderi türüyle bir gönderi yayınlamak istediğimde gönderi türlerim ana sayfaya yönlendiriliyor (sadece kodunuzu hiçbir değişiklik yapmadan kopyaladım)
örneğin bu gönderiyi Filmler gönderi türüyle yazıyorum
lütfen bana yardım et, gönderi türünü seviyorum ama doğru kullanamıyorum
Ciprian
Kalıcı bağlantı yapısını yeniden kaydetmeyi denediniz mi?
Şerefe!
Aaron
Mükemmel yazı! İçerik için teşekkürler.. çok yardımcı oldu.
antonio
Merhaba, film türü için kod parçasını eklemeye çalışıyorum... functions.php'ye kopyaladım ancak sayfayı yenilediğimde hiçbir şey görünmüyor. yirmi on dört temasını kullanıyorum... ne yanlış olabilir?
ashish shestha
Özel gönderi türünü ön uçta nasıl gösterebilirim??
Fahd
Merhaba, WordPress sitemdeki özel gönderi türleri 2 yıldır sorunsuz çalışıyordu. Ancak olan şey şu ki, gönderinin başlığını değiştirdiğimde ve güncelle'ye tıkladığımda diğer değişiklikleri de kaydediyor. Ancak gönderi başlığını aynı tutar ve gönderide değişiklik yaparsam, kaydetmiyor. Herhangi bir tavsiye lütfen?
WPBeginner Ekibi
WordPress gönderilerinde metni geçiş efektiyle gösterme/gizleme hakkında bu öğreticiye göz atın.
Arup Ghosh
Bilgi için teşekkürler.
Arup Ghosh
Kuponları göster seçeneğiyle özel bir kupon gönderi türü oluşturmak ve kodun mağaza URL'sine bağlanmasını istiyorum, bunu nasıl yapabileceğimi söyler misiniz? Kodlama konusunda çok bilgim yok.
Isaías Subero
Harika bir yazı. Resimde gösterildiği gibi özel gönderi türlerine wordpress arka ucuna nasıl simge ekleyebilirim?
Jouke Nienhuis
özel gönderi türünü tanımlarken argümanlardan biri ($args) budur.
$args listesine ‘menu-icon’ => ‘dashicons-cart’ ekleyin.
WordPress yerleşik dashicon'ları kullanır, ancak kendi simgelerinizi de kullanabilirsiniz.
Bu bağlantıdaki daha fazla bilgi:
Johan
Merhaba, alıntı ve özel alan verileri ön yüzde görüntülenmiyor… bunun neden olduğuna dair bir fikriniz var mı?
Bill Querry
Bahsetmeyi unuttum, tercihen kod aracılığıyla functions.php dosyam için, çünkü curernet CPT'lerin tanımlandığı yer burası.
Bill Querry
Mevcut özel gönderi türlerine kategoriler eklemenin bir yolunu arıyorum. Bana doğru yolu gösterebilecek biri var mı?
Jouke Nienhuis
Mevcut bir Gönderi Türüne (özel veya değil) yeni taksonomiler ekleyebilirsiniz, bunu yalnızca onu oluşturmak için işlevi yazdığınızda doğru gönderi türünü doldurarak yapabilirsiniz. Kategori, bir kategoriye sahip tüm gönderileri içeren bir taksonomi adıdır.
Yeni bir kategori yapmak istiyorsanız, menüdeki kategoriye tıklamanız ve yenisini oluşturmanız yeterlidir.
Kategorilere örnek olarak, gönderiniz teknelerle ilgiliyse Tekneler veya gönderiniz uçaklarla ilgiliyse Uçaklar verilebilir. Daha fazla kategori de mümkündür, yeni bir gönderi yazarken veya bir gönderiyi düzenlerken sağ kenar çubuğundan seçmeniz veya eklemeniz yeterlidir.
Bir gönderi türü belirli bir kategoriye bağlı veya ilişkilendirilmemiştir, bir gönderi.
Robey Lawrence
Özel Gönderi Türlerini Sorgulama altındaki kod parçasını kullanmaya çalıştım ve sıfırlamadan önce bir
gerektirdiğini fark ettim.
YassinZ
Temiz ve kullanışlı makale için teşekkürler
Özel gönderideki metin düzenleyiciyi kullanmak istiyorum
böylece html etiketlerini kullanabilirim,
Yasin
Harika ve anlaşılır bir eğitim için teşekkürler
ancak CPT'yi görüntülemede bir sorun yaşıyorum. SEO dostu kalıcı bağlantıları kullanıyorum, web sitem/filmler adresine yönlendirdiğimde CPT'ler yineleniyor
Aris Giavris
Çok faydalı! Teşekkürler.
Gönderilerimin her etiketine şu işaretlerden birini eklemek istiyorum: +, -, +/-. Yapabilir miyim?
Eğer öyleyse, imzalanmış etiketleri şu şekilde temsil etme seçeneğine sahip olmak isterim: tüm +etiketler, tüm -etiketler, tüm +/-etiketler.
Sanırım birçok şeyi sorguluyorum.
Sakin
Merhaba,
Özel bir gönderi türünü doğru bir şekilde uygulamakta zorlanıyorum. Uzun zamandır bir çözüm aradım ama hiçbirini bulamadım. Yaptıklarım şunlar:
1. Yerel wamp sunucumda yeni kurulmuş WordPress (önce apache rewrite_module etkinleştirilmiş).
2. Varsayılan temayı kullanma (twenty fourteen). Eklenti yüklenmedi.
3. Kalıcı bağlantılar "Gönderi adı" olarak değiştirildi
4. Eklentiler klasöründe pr_custom_posts adında bir klasör oluşturdum ve bunun içine pr_custom_posts.php adında bir dosya oluşturdum. Dosyada özel bir gönderi türü oluşturdum. Kod şu şekildedir:
register_post_type();
//flush_rewrite_rules();
}
public function register_post_type () {
$args = array(
'etiketler' => dizi (
‘name’ => ‘Filmler’,
‘singular_name’ => ‘Film’,
‘add_new’ => ‘Yeni Film Ekle’,
‘add_new_item’ => ‘Yeni Film Ekle’,
'edit_item' => 'Filmi Düzenle',
‘new_item’ => ‘Yeni Film Ekle’,
‘view_item’ => ‘Film Görüntüle’,
‘search_items’ => ‘Filmleri Ara’,
‘not_found’ => ‘Film Bulunamadı’,
‘not_found_in_trash’ => ‘Çöp Kutusunda Film Bulunamadı’
),
‘query_var’ => ‘movies’,
‘rewrite’ => array (
‘slug’ => ‘movies/’,
‘with_front’=> false
),
'public' => true,
‘publicly_queryable’ => true,
‘has_archive’ => true,
‘menu_position’ => 10,
‘menu_icon’ => admin_url().’/images/media-button-video.gif’,
‘supports’ => array (
'başlık',
'thumbnail',
‘editör’
)
);
register_post_type(‘jw_movie’, $args);
//flush_rewrite_rules();
}
}
add_action(‘init’, function() {
new PR_Movies_Custom_Post();
//flush_rewrite_rules();
});
?>
İyi Yanı: CPT, yönetici panelimde görünüyor ve orada film ekleyip görüntüleyebiliyorum.
SORUN: Filmleri ön uçta önizleyemiyorum (Yönetici panelindeki CPT'de "görünüm"e tıklayarak). Kalıcı bağlantıyı varsayılana ayarladığımda (http://localhost/wp02/?p=123) ön uçta görünüyor.
Deneydiklerim:
1. Kalıcı bağlantı ayarlarına gidin, kalıcı bağlantı ayarlarını "Yazı adı" olarak bırakın ve değişiklikleri kaydedin.
2. flush_rewrite_rules() fonksiyonunu kodumun birkaç yerine (tek tek) kullanın. Lütfen yukarıdaki kodda yorum satırı haline getirilmiş kısımlara bakın.
3. Bir menü öğesi oluşturdum:
URL: http://localhost/wp02/movies
Gezinme Etiketi: Filmler
Bu, ön uçta bir menü öğesi oluşturur ancak “Filmler” bağlantısına tıklandığında “Bulunamadı” mesajını gösterir.
Bu beni çıldırtıyor. Lütfen biri yardım edebilir mi? Gerçekten minnettar olurum.
kikilin
Ben de aynı "Bulunamadı" sorunuyla çıldırıyordum, ta ki şunu deneyene kadar: Ayarlar > Kalıcı Bağlantılar'a gidin ve ayarlarınızı yeniden kaydedin. Ayarımı Varsayılan'a çevirmiştim ve sonra (projemin ihtiyaçları için) Gönderi Adı'na değiştirdim. Ondan sonra bağlantılar beklendiği gibi çalışıyordu.
WPBeginner Ekibi
Evet, yakında bir video eğitim hazırlamaya çalışacağız. Güncel kalmak için lütfen YouTube Kanalımıza abone olun.
rehan
Helpfull tutorials and posts thanks
ceslava
Başka bir kolay yol ise archive.php'yi kopyalayıp archive-movies.php olarak yeniden adlandırmak ve single.php için de aynı şeyi yapmak -> single-movies.php
Ardından temanızın php dosyalarında değişiklikler yapabilirsiniz.
Saygılarımla
Mladen Gradev
lol eklenti süper kullanışlı görünüyor, teşekkürler.
Achilles Khalil
Göstermesi çok zor. lütfen bir video eğitim hazırlayabilir misiniz?
Mik
Merhaba, yazılarınızı uzun zamandır okuyor ve takip ediyorum, harikasınız ve yeni başlayanların eksik kalan yönlerini hedefliyorsunuz… Teşekkür ederim.
Davide De Maestri
This plugin should be okay, but after every upgrade they’ve got some bug. Due to exporting field, or while migrating from local to remote etc… So It’s better to hand-write the code and put into functions.php