Yapışkan bir kayan altbilgi çubuğu, kullanıcılar sayfanızda aşağı kaydırsa bile web sitenizde görünür kalır. İndirim tekliflerini, önemli duyuruları veya sosyal medya hesaplarını tanıtmanıza yardımcı olarak hemen çıkma oranlarını azaltabilir ve daha fazla dönüşüm elde edebilirsiniz.
Yıllar boyunca, e-ticaret mağazalarımızda ve web sitelerimizde indirimleri tanıtmak veya haber bültenlerini sergilemek için kayan bir altbilgi çubuğu kullandık. Bunu yapmak daha fazla potansiyel müşteri oluşturmamıza, e-posta listeleri oluşturmamıza ve satışları artırmamıza yardımcı oldu.
Bu makalede, WordPress’te yapışkan bir kayan altbilgi çubuğunun nasıl kolayca oluşturulacağını adım adım göstereceğiz. Bu eğitim için, herhangi bir kodlama gerektirmeyen yeni başlayan dostu yöntemler kullandık.
WordPress’te Yüzen Altbilgi Çubuğu Nedir?
Yapışkan bir kayan altbilgi çubuğu, kullanıcılara önemli içerik ve haberleri belirgin bir şekilde göstermenizi sağlar.
Bu çubuk ziyaretçiler tarafından her zaman görülebildiği için ziyaretçilerin çubuğa tıklama ve daha faydalı içerikler keşfetme olasılığı daha yüksektir.
Kayan altbilgi çubuğunu şunlar için kullanabilirsiniz:
- Diğer blog yazılarına daha fazla tıklama sağlayın.
- Potansiyel müşteriler oluşturun ve e-posta listenizi oluşturun.
- Özel kuponlara veya indirim tekliflerine/satışlara dikkat çekin.
- Sosyal medya hesaplarınızı tanıtın.
- Marka bilinirliği oluşturun.
- WordPress web sitenizdeki önemli kaynaklara erişim sağlayın.
Bunu söyledikten sonra, WordPress’te yapışkan bir kayan altbilgi çubuğunun nasıl kolayca oluşturulacağını görelim. Bu eğitimde size iki yöntem göstereceğiz ve istediğiniz yönteme geçmek için aşağıdaki bağlantıları kullanabilirsiniz:
Yöntem 1: OptinMonster ile Yapışkan Yüzen Altbilgi Çubuğu Oluşturun (Önerilen)
OptinMonster ile kolayca yapışkan bir kayan altbilgi çubuğu oluşturabilirsiniz. Piyasadaki en iyi potansiyel müşteri oluşturma ve dönüşüm optimizasyon aracıdır ve web sitenizin ziyaretçilerini abonelere dönüştürmeyi çok kolaylaştırır.
OptinMonster, herhangi bir kod kullanmadan kayan bir altbilgi çubuğu, kayan açılır pencereler ve afişler oluşturmanıza olanak tanıyan sürükle ve bırak oluşturucu ve önceden hazırlanmış şablonlarla birlikte gelir.
OptinMonster’ın kullanımı çok kolay olduğu ve ücretsiz eklenti yöntemine göre daha fazla özelleştirme seçeneği sunduğu için bu yöntemi öneriyoruz.
Adım 1: OptinMonster’ı Web Sitenize Kurun
Öncelikle, OptinMonster web sitesinde ‘OptinMonster’ı Şimdi Alın’ düğmesine tıklayarak kaydolmanız gerekecektir.

Ardından, web sitenize ücretsiz OptinMonster bağlayıcı ek lentisini yüklemeniz ve etkinleştirmeniz gerekir. Daha fazla talimat için, bir WordPress eklentisinin nasıl kurulacağına ilişkin başlangıç kılavuzumuza bakın.
Etkinleştirmenin ardından, OptinMonster kurulum sihirbazı ekranınızda açılacak ve burada ‘Mevcut Hesabınızı Bağlayın’ düğmesine tıklamanız gerekecektir. Bu, WordPress sitenizi OptinMonster hesabınıza bağlayacaktır.
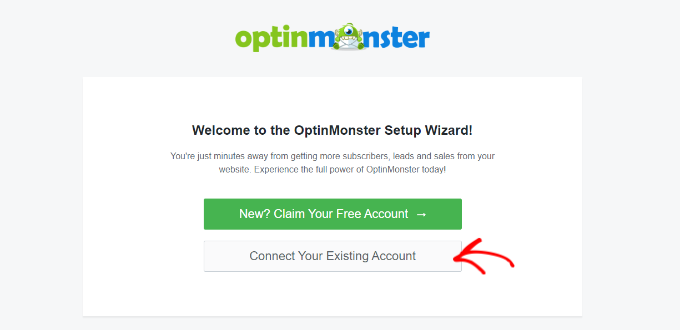
Bunu yaptığınızda, ekranınızda yeni bir pencere açılacaktır.
Burada, ilerlemek için ‘WordPress’e Bağlan’ düğmesine tıklayın.

Adım 2: Yüzen Yapışkan Altbilgi Çubuğunu Oluşturun ve Özelleştirin
Artık OptinMonster’ı web sitenize bağladığınıza göre, yapışkan bir kayan altbilgi çubuğu oluşturmanın zamanı geldi.
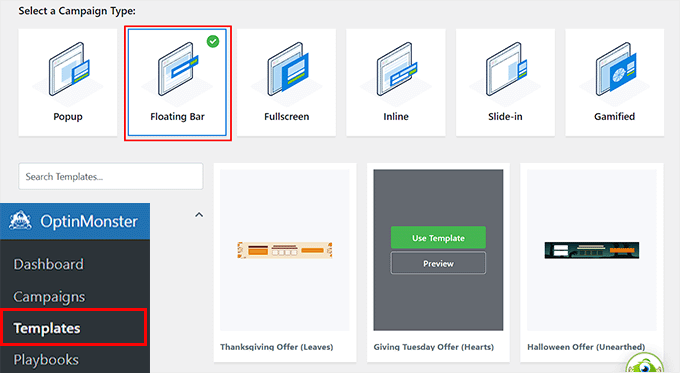
Bunu yapmak için, WordPress yönetici kenar çubuğundan OptinMonster ” Şablonlar sayfasını ziyaret etmeniz ve kampanya türü olarak ‘Kayan Çubuk’u seçmeniz gerekir.
Bunu yaptığınızda, kayan çubuk için önceden hazırlanmış tüm şablonlar ekrana yüklenecektir. Buradan, kullanmak istediğiniz şablonun üzerindeki ‘Şablonu Kullan’ düğmesine tıklayabilirsiniz.
Bu, ekranda oluşturmak üzere olduğunuz kayan altbilgi çubuğu için bir ad ekleyebileceğiniz ‘Kampanya Oluştur’ istemini açacaktır. İsim ziyaretçilerinize gösterilmeyeceği için istediğiniz herhangi bir şey olabilir.
Bundan sonra, sadece ‘İnşa Etmeye Başla’ düğmesine tıklayın.
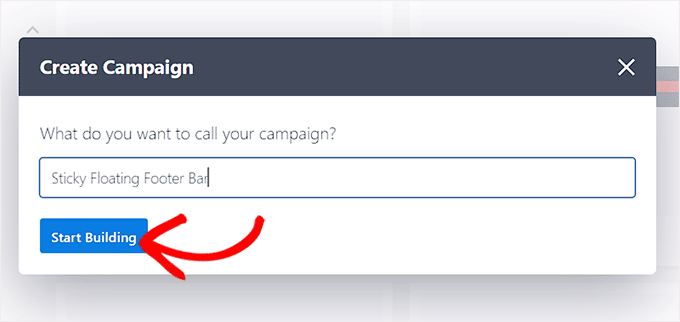
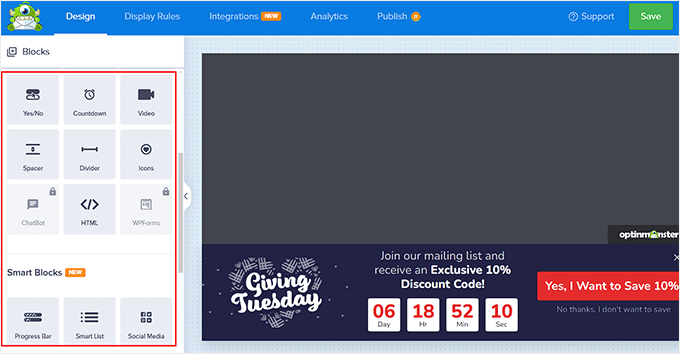
OptinMonster’ın sürükle ve bırak oluşturucusu şimdi ekranınızda başlatılacak ve burada kayan altbilgi çubuğunuzu özelleştirmeye başlayabilirsiniz. Burada, sol sütunda bloklarla birlikte sağda bir kayan çubuk önizlemesi göreceksiniz.
Örneğin, kayan altbilgi çubuğunuz bir indirim teklifini tanıtıyorsa bir geri sayım sayacı bloğu kullanabilirsiniz. Bu, kullanıcılar arasında bir aciliyet duygusu yaratmaya ve onları harekete geçmeye teşvik etmeye yardımcı olacaktır.
Ayrıca altbilgi çubuğuna bir CTA, video veya sosyal medya bloğu da ekleyebilirsiniz. Ayrıntılı talimatlar için WordPress’te nasıl uyarı çubuğu oluşturulacağına ilişkin eğitimimize bakabilirsiniz.
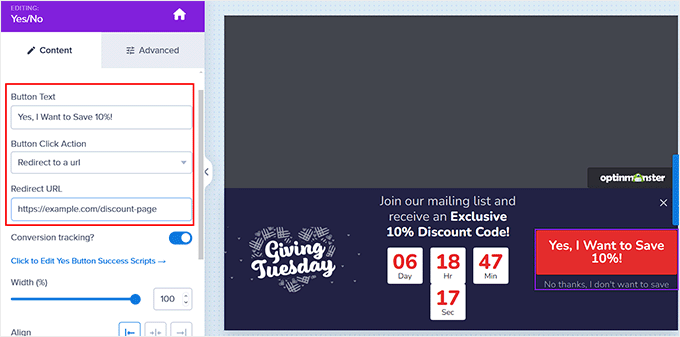
Altbilgi çubuğundaki metni de üzerine tıklayarak düzenleyebilirsiniz. Bu, sol sütunda blok ayarlarını açacak ve bunları beğeninize göre ayarlayabileceksiniz.
Örneğin, şablondaki indirim teklifini değiştirmek istiyorsanız, düğme metnini değiştirebilirsiniz. Bundan sonra, ‘Bir URL’ye Yönlendir’ seçeneğini seçebilir ve kullanıcıların düğmeye tıkladıktan sonra yönlendirilmesini istediğiniz sayfa bağlantısını ekleyebilirsiniz.
Adım 3: Kayan Altbilgi Çubuğunuz İçin Görüntüleme Kurallarını Yapılandırma
Altbilgi çubuğunuzun özelleştirmesinden memnun kaldığınızda, üstteki ‘Görüntüleme Kuralları’ sekmesine geçmeniz yeterlidir.
Burada, çubuğun sayfanızda ne zaman görüntüleneceğini yapılandırabilirsiniz. Yüzen altbilgi çubuğunu her zaman görüntülemek istiyorsanız, soldaki açılır menüden ‘sayfada kalma süresi’ seçeneğini seçmelisiniz.
Bundan sonra, sağdaki açılır menüden ‘hemen’ seçeneğini seçin.
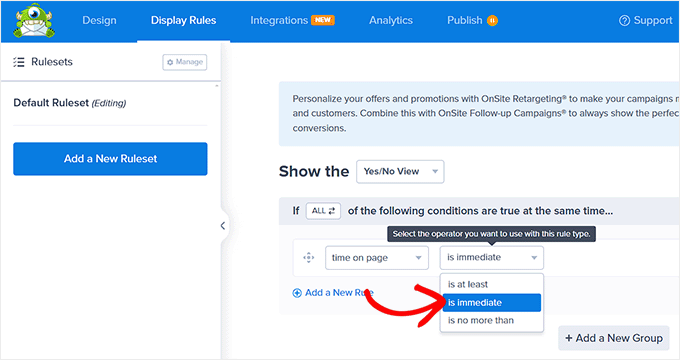
Ancak, kayan altbilgi çubuğunu belirli bir sayfada görüntülemek için, sağ açılır menüden ‘Sayfa Hedefleme’ seçeneğini seçmelisiniz.
Bundan sonra, ortadaki açılır menüden ‘tam olarak eşleşiyor’ seçeneğini seçin ve ardından bir sayfa URL’si ekleyin. Bunu yaptığınızda, kayan altbilgi çubuğu yalnızca seçtiğiniz sayfada görüntülenecektir.
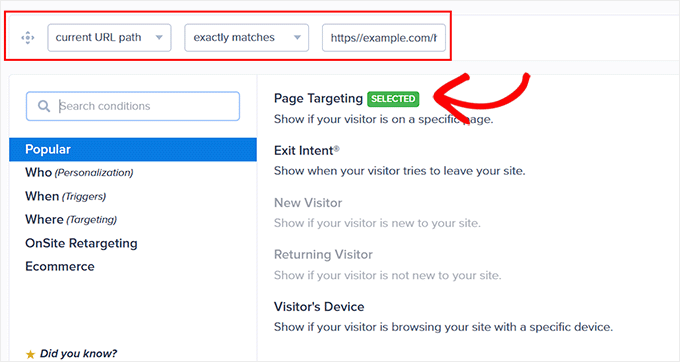
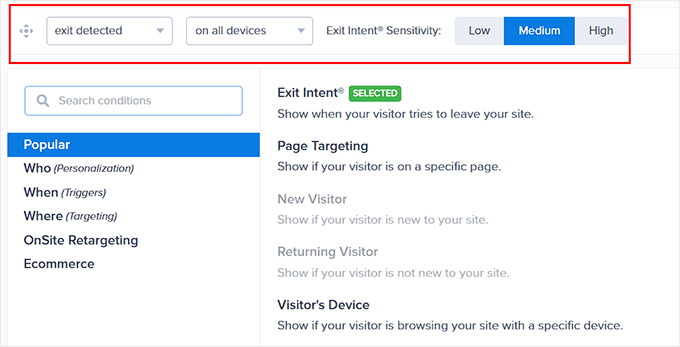
Ayrıca, kullanıcı sitenizden ayrılmak üzereyken yapışkan kayan altbilgi çubuğunu göstermek için ‘Çıkış Amacı’ seçeneğini belirleyebilirsiniz. Daha sonra çıkış amacı hassasiyetini yapılandırabilir ve altbilgi çubuğunun görüntüleneceği cihazları seçebilirsiniz. Hemen çıkma oranınızı düşürmek istiyorsanız bu kullanışlı olabilir.
Yüzen altbilgi çubuğunu yalnızca masaüstü ziyaretçilerine göstermek istiyorsanız ‘Ziyaretçinin Cihazı’ seçeneğini bile belirleyebilirsiniz.
Sol sütundan ‘Ne zaman’ seçeneğini seçerek görüntüleme kurallarını tarih, saat veya kaydırma mesafesine göre de yapılandırabilirsiniz.
Daha fazla görüntüleme kuralı seçeneğinin açıklaması için OptinMonster incelememizin tamamını görebilirsiniz.
Adım 4: Yüzen Altbilgi Çubuğunuzu Yayınlayın
Altbilgi çubuğunuz için görüntüleme koşullarını tanımladıktan sonra, üst kısımdan ‘Yayınla’ sekmesine geçin.
Burada, ‘Yayınla’ düğmesine tıklamanız yeterlidir.
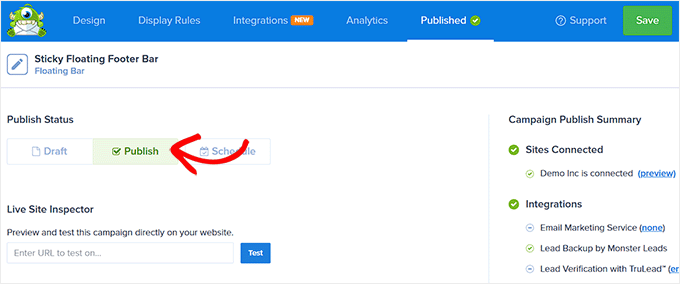
Bundan sonra, değişikliklerinizi canlı hale getirmek için ‘Kaydet’e tıklamayı unutmayın.
Şimdi, yapışkan kayan altbilgi çubuğunu çalışırken görmek için WordPress blogunuzu ziyaret edebilirsiniz.
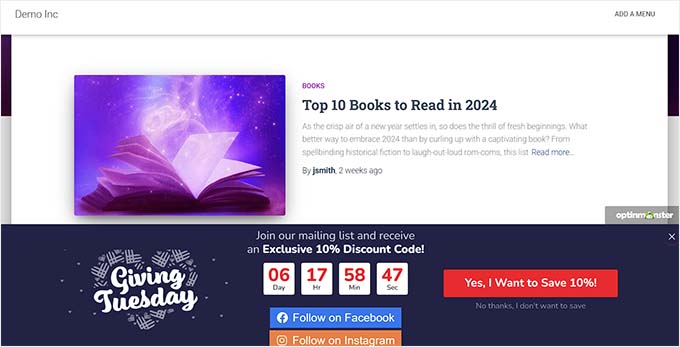
Alternatif: Thrive Ultimatum ‘u web sitenizde geri sayım sayacı kayan altbilgi çubuğu göstermek için de kullanabilirsiniz. Daha fazla ayrıntı için Thrive Themes Suite incelememize bakın.
Yöntem 2: Ücretsiz Bir Eklenti ile Yapışkan Kayan Altbilgi Çubuğu Oluşturun
Yapışkan bir kayan altbilgi çubuğu oluşturmak için ücretsiz bir yol arıyorsanız, bu yöntem tam size göre. Ancak, OptinMonster kullanımına kıyasla sınırlı özelleştirme seçeneklerine sahip olacağınızı unutmayın.
Öncelikle Firebox Popup Builder eklentisini yüklemeniz ve etkinleştirmeniz gerekir. Ayrıntılı talimatlar için WordPress eklentisi yükleme eğitimimize bakın.
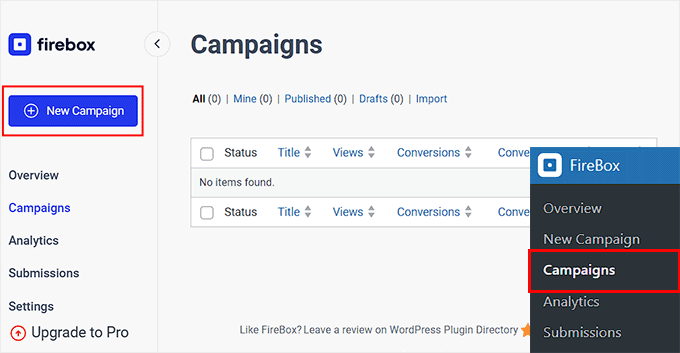
Etkinleştirmenin ardından, WordPress panosundan Firebox ” Kampanyalar sayfasını ziyaret edin ve ‘+ Yeni Kampanya’ düğmesine tıklayın.
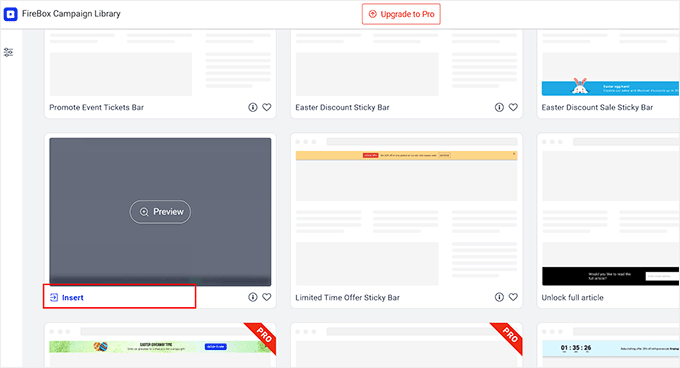
Bu, yapışkan kayan çubuk hazır şablonlarını arayabileceğiniz Firebox kampanya kitaplığını açacaktır.
Ardından, beğendiğiniz kayan altbilgi çubuğunun altındaki ‘Ekle’ bağlantısını tıklamanız yeterlidir. Bir üstbilgi çubuğu seçerseniz, konumunu değiştiremeyeceğinizi unutmayın. Seçtiğiniz şablonun bir altbilgi çubuğu için olduğundan emin olmalısınız.
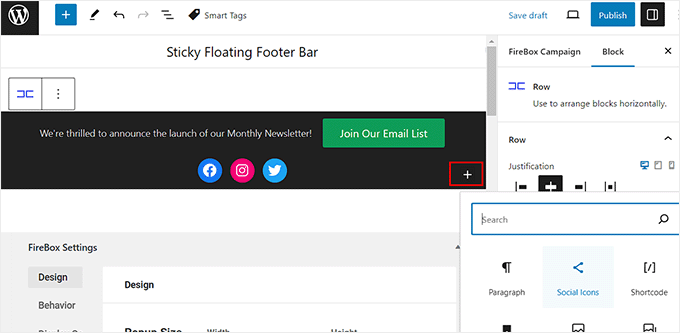
Blok düzenleyici şimdi ekranınızda açılacak ve burada kayan çubuğunuz için bir ad ekleyerek başlayabilirsiniz.
Bundan sonra, altbilgideki metni üzerine tıklayarak düzenleyebilir ve ‘+’ düğmesine tıklayarak yeni bloklar ekleyebilirsiniz. Bu, resim, başlık, paragraf, video, alıntı veya liste blokları ekleyebileceğiniz blok menüsünü açacaktır.
Örneğin, sosyal medya tanıtıcıları eklemek istiyorsanız, Sosyal Simgeler bloğunu seçebilirsiniz. Bundan sonra, blok panelini kullanarak sosyal medya hesapları ve bağlantıları ekleyebilirsiniz.
Daha fazla ayrıntı için WordPress menülerine sosyal medya ikonlarının nasıl ekleneceğine dair eğitimimize göz atabilirsiniz.
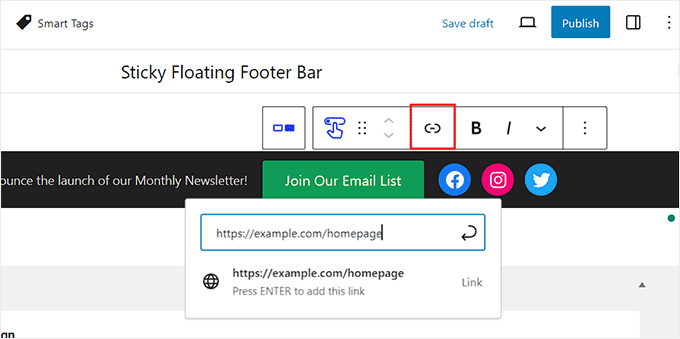
Ayrıca düğme bloğundaki metni değiştirebilir ve blok araç çubuğundaki bağlantı simgesine tıklayarak kullanıcıları yönlendirmek istediğiniz sayfaya bir bağlantı ekleyebilirsiniz.
Bundan sonra, seçtiğiniz URL’yi yazın ve ‘Enter’ tuşuna basın.
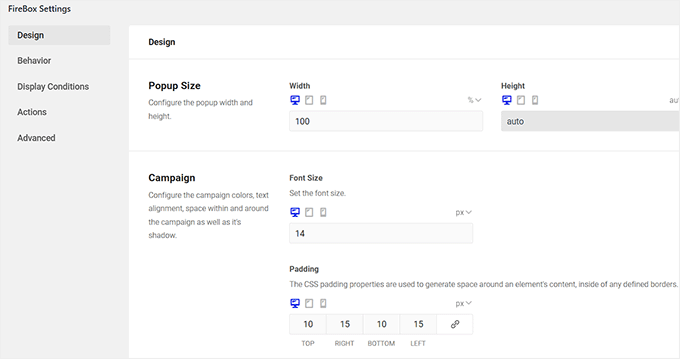
Ardından, ‘Firebox Ayarları’ bölümüne ilerleyebilirsiniz.
Burada, kayan altbilgi çubuğu için arka plan rengini, metin rengini, hizalamayı, boyutu, dolguyu ve kenar boşluğunu değiştirebilirsiniz.
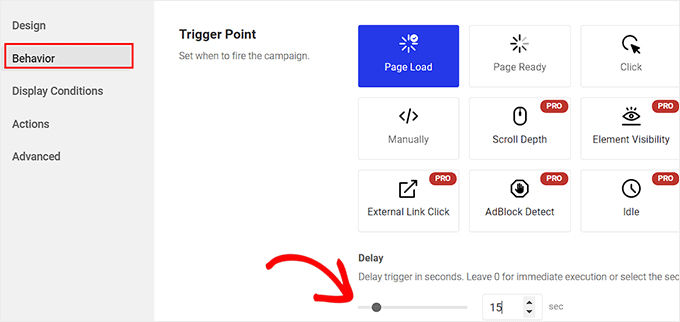
Bundan sonra, sol sütundan ‘Davranış’ sekmesine geçin ve kayan çubuk tetikleme noktası olarak ‘Sayfa Yükleme’yi seçin.
Ardından, kayan çubuk için bir gecikme zamanlaması seçmek üzere ‘Gecikme’ kaydırıcısını kullanın. Örneğin, kaydırıcıyı 15 saniyeye sürüklerseniz, kullanıcı sitenizde 15 saniye geçirdikten sonra kayan altbilgi çubuğu görüntülenecektir.
Yapışkan kayan altbilgi çubuğunun hemen görüntülenmesini istiyorsanız kaydırıcıyı 0’da tutabilirsiniz.
Ardından, diğer ayarları olduğu gibi bırakabilir veya beğeninize göre yapılandırabilirsiniz.
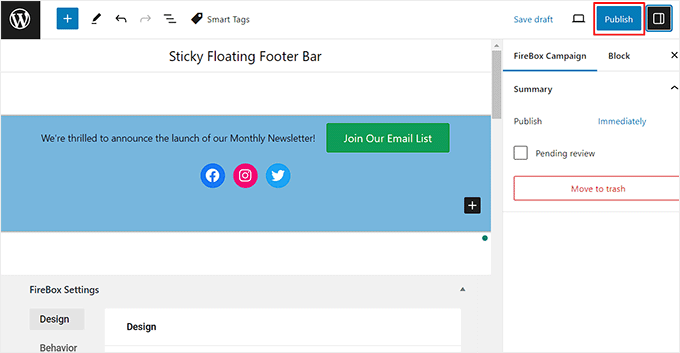
İşiniz bittiğinde, üstteki ‘Yayınla’ düğmesine tıklamayı unutmayın.
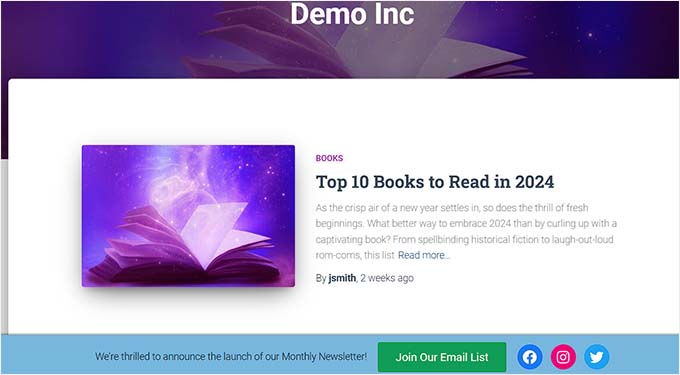
Şimdi yapışkan kayan altbilgi çubuğunu çalışırken görmek için WordPress sitenizi ziyaret edin.
Demo sitemizde bu şekilde görünüyordu.
Bonus: WordPress’te Yapışkan Kayan Gezinme Menüsü Oluşturun
Yapışkan bir altbilgi çubuğu eklemenin yanı sıra, WordPress sitenizde yapışkan bir kayan gezinme menüsü oluşturmak da isteyebilirsiniz.
Gezinti menüsü, WordPress blogunuzdaki en önemli sayfalara bağlantılar içerir ve web siteniz için organizasyonel bir yapı görevi görür.
Bu menüyü yapışkan hale getirirseniz, kullanıcı ekranınızda aşağı kaydırsa bile sayfanızda her zaman görünür kalacaktır. Bu, etkileşimi artırabilir ve web sitenizde gezinmeyi kolaylaştırabilir.

Yapışkan bir kayan navigasyon menüsü oluşturmak için Yapışkan Menü ve Yapışkan Başlık eklentisini kurup etkinleştirmeniz yeterlidir. Ayrıntılar için WordPress eklentisi yükleme eğitimimize bakın.
Etkinleştirmenin ardından, WordPress panosundan Ayarlar ” Yapışkan Menü sayfasını ziyaret edin ve ‘Yapışkan Öğe (gerekli)’ seçeneğinin yanına #main-navigation yazın.
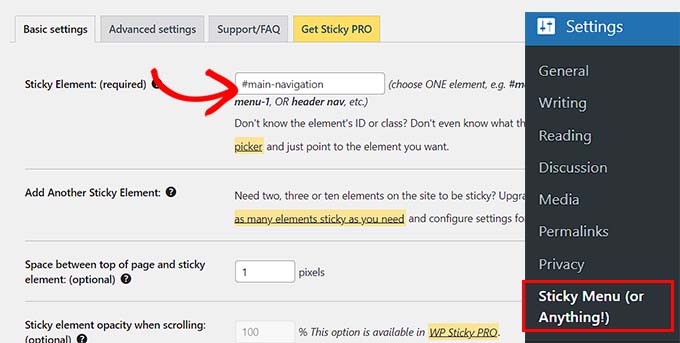
Bundan sonra, ayarlarınızı kaydetmek için ‘Değişiklikleri Kaydet’ düğmesine tıklayın. Artık yapışkan bir kayan gezinme menüsünü başarıyla oluşturdunuz.
Ayrıntılı talimatlar için lütfen WordPress’te yapışkan bir kayan gezinme menüsünün nasıl oluşturulacağına ilişkin eğitimimize bakın.
Bu makalenin WordPress’te kolayca kayan yapışkan bir altbilgi çubuğu oluşturmayı öğrenmenize yardımcı olduğunu umuyoruz. WordPress’te üstbilgi ve altbilgi kodunun nasıl ekleneceğine ilişkin başlangıç kılavuzumuza ve WordPress sitenizde altbilgiye eklenecek şeylere ilişkin kontrol listemize de göz atmak isteyebilirsiniz.
If you liked this article, then please subscribe to our YouTube Channel for WordPress video tutorials. You can also find us on Twitter and Facebook.


Moinuddin Waheed
Having a floating footer bar is very effective for marketing and lead generation.
It gives a constant temptation in the users mind about the ongoing promotions and offers.
I have made purchase in the past because of this constant reminder and a fomo that this offer would end up soon.
Thanks for step by step breakdown of steps of how can we make one for our websites.
WPBeginner Support
You’re welcome, glad our guide was helpful!
Admin
Hajjalah
I use the OptinMonster plugin to add a floating footer bar with my social links which has drastically increased my social media audience, courtesy of this detailed step by step article .
But if I may ask. Is it possible to add some code so that the OptinMonster plugin footer bar does not appear or appears after when a footer Ad like Google AdSense footer Ads is available?
WPBeginner Support
You would want to reach out to OptinMonster’s support and they can help you look into and/or set up something like that
Admin
Ahmed Omar
An excellent tutorial on creating a “sticky” floating footer bar in WordPress
Your step-by-step guide, especially the first method is clear and effective.
I use the first method for this floating footer
Thanks for this practical solution
WPBeginner Support
You’re welcome!
Admin
Steve Alvi
Please I want a close button with this footer floating bar.
WPBeginner Support
OptinMonster would be the method that allows you to have a close button the easiest.
Admin
Jiří Vaněk
I use Optin Monster where I can configure the closing and even measure the closing. That way I know how many people used the floating bar and how many closed it because they weren’t interested.
Trendy Avinash
Worked Like a Charm,Without any Plugins.
Thanks
WPBeginner Support
Glad our guide was helpful
Admin
Alejandro Ferguson
The floating footer code really works. Thank u
WPBeginner Support
Glad our guide could help set it up
Admin
John SMith
How to add a FB sharing button in a floating bar in the only mobile, not for desktop.
WPBeginner Support
You would want to take a look into option 2 in our social media plugins here: https://www.wpbeginner.com/plugins/best-social-media-plugins-for-wordpress/
Admin
wlepcha
How to add menus in the sticky footer instead of random ads.
WPBeginner Support
You would want to take a look at our article here: https://www.wpbeginner.com/wp-themes/how-to-create-a-sticky-floating-navigation-menu-in-wordpress/
Admin
Marius
Very nice tutorial. I implemented the manual code and worked like a charm. Only one more feature I need… can we also have a X or close button to close the floatingbar and remain like this for the rest of the visit? I know, cookies are involved, but maybe you can give us a simple solution. Thank you!
Greg Guz
Very clear and east to follow tutorial.
Floating bar seem to work absolutely fine, but I’m getting following error in chrome console:
Failed to load resource: the server responded with a status of 404 ()
Any ideas?
Ankush jain
Very helpful your website
thank you very much
Mark Rowles
Just a quick pointer CSS wont work for this.
You’ve got fixedBar in the html as a class name (capital B) and you’ve got fixedbar in the css (lowercase b) so the css doesn’t apply.
Can someone correct the code please to help others that discover this post?
WPBeginner Support
Hey Mark,
Thanks for pointing this out. We have updated the code.
Admin
Robi
Dear WPBeginner, and Friends
If I have specific section that I’ve created using Elementor Page Builder, How I can use it as a custom sticky footer? (It contains more than one column, some buttons and text). I want this type of sticky footer, Instead of simple text as explained in this tutorial.
Thanks..
Daniel
1) Added code just before the tag in the footer.php from my theme dir /wp-content/themes/mytheme/
2) Added code to my theme dir /wp-content/themes//mytheme/style.css not working deleted and then i try to added from the theme option to custom css menu same problem not working
3) Added floatingbar.js with the code inside in /wp-content/themes/mytheme/js
4) Added code to functions.php first not working.. tried with site-specific plugin also same thing
I tried on both website different theme same problem not working just sit there it`s not floating
Some help will be welcome… I really need this
WPBeginner Support
Hey Daniel, try using Inspect tool to troubleshoot any issue with CSS.
Admin
Daniel
Thanks for the replay but for me messing with css and js it`s like building a space ship… i will give a try to figure out whats rong
Regards
Daniel
Daniel
I used the inspector tools and i don`t see any read lines there….
Dueadla Framin
I have the same issue! The code you posted isn’t even working on default twenty sixteen theme. It’s not floating it’s just stuck on the bottom of the webpage after you scroll all the way to the bottom.
Igor
there is an error in the fixedBar reference in the css code (it is referencing as “.fixedbar” whereas it should be “.fixedBar”. Change that and see if it works.
henrykene
WpBeginner please i will like to use it for displaying my Adsense ads on mobile views. How will i go about it and what are the code to make it show Adsense stick footer for mobile viewers?
Nawaf
Awesome.
But there is a bug. When you open it in mobile. The ribbon gets cutted. And u can see only half of it
Tip
In my new theme, I have the option of using an infinite scroll feature. This is great except that the reader would have to scroll a long time to reach my old footer, which is where I put the legal disclosures, etc.
With this floating footer bar, I was able to nicely put the links there and now I can use the infinite scroll feature without having to reposition a bunch of required links.
Thanks for this tutorial. I learned a little bit more PHP and CSS too!
Sarah Noah
I have a client who wants to have a link to REQUEST A QUOTE on every page so when I saw this sticky footer it seemed perfect until I read that somer users are annoyed by it. Do you guys think REQUEST A QUOTE stuck on the bottom of every page is annoying? Of course it is the most important thing the company wants the user to do.
Roy E
Footer bar shows fine in FireFox but is not sticky in IE11 where I had to scroll down to see “About WPBeginner”, “Site Links”, and “Sites We Like” ??
Roy E
Of course, when I pressed Enter on the previous comment ( IE issue), the sticky footer bar appeared. Not sure what happened but the problem went away. Please disregard this comment and the previous one.
yugishtha
do we also have a floating top bar menu plugin for WP?
Hutzel
I tried all, but it does not Show me the fixed footer. Can somebody help or assist me please? thanks
Devendra Meena
Is there any plug in, which can have some scripts on a floating box, and with a x button to close it.
Khushal Rao
this can also be used to showing ads too..
Dick Sijtsma
Lowering the opacity to, for example 0.60 gives the visitor a glimps of the underlying content. I think that would be a nice effect. But changing the opacity of the bar, changes the opacity of the text too. And that ‘dilutes’ the message. Any trick to prevent that?
Thanks.
Jan dB
As mentioned earlier, this is a very easy tutorial and works like a charm on most computers.
However, I also have issues regarding the mobile browsers.
Have you already come up with a solution for that?
Thanks and keep up the good work!
Editorial Staff
For mobile browsers if you have a responsive design, then you can simply use media queries and display: none the entire footer bar.
Admin
Theresa @DearCreatives
Nice. I am actually looking for a tutorial for adding script to top of post that is there every time I post for disclosure purposes. If you have one like that or know of a plugin can you send me an @DearCreatives on twitter or email me thanks!!
Dick Sijtsma
Hi, looks good, but i do understand the reasons some people dislike these kinds of footers very much. Nevertheless i’m trying to accomplish this effect too.
In the source of this very page, i saw you externalized the javascript. You’ve put it in the main.js javascript file, and linked this main file to the page in the header.
So far so good, i can manage that. But, i can’t find the place where the ‘randomtip’ function is called.
In short my question is: how do i externalize the javascript? Hope to hear from you.
Matthew
Great tutorial. One issue that other might also run into – I only have one footer link (as opposed to having several in rotation) and this footer bar shows even on the page that I link to in the footer. Do you know of a quick way to not show this footer on particular pages? Or to, perhaps, only show it on the homepage?
Editorial Staff
Sure just wrap the text with the conditional statement is_front_page().
Admin
Antonio
Here a true beginner. How do I actually do that? I totally new to WP and PHP. As far as I understand I have to put somewhere in the footer.php but I really have no idea where. Great article though. It managed to add it to my blog as well
Caio
I like it, but it is a bit too distracting. Maybe make it nice and light by turning down the opacity, and then adding a style statement on hover to turn the opacity back up to .9
Sopheak
Wow! It was a great tutorial.
Pawan
Great, I was looking for same.
Sai Kumar
Hi, this sticky floating footer bar is really awesome! I am going to add it in my blog for sure. Thanks a lot for Sharing!!
Max Manroe
Wow nice tutorial and think this is great, I will try it to my blog. Thanks
Zseller Istvan
Guys, this is the only thing that I really hate about WpBeginner. When I read your articles on my tablet, with Opera this footer bar stays in the middle of the page for seconds when scrolling. It is a new tablet, and powerful enough. The footer bar covers the content, which is really annoying. After some time it moves to place.
Editorial Staff
We are working on a mobile/tablet version. This won’t be an issue soon enough.
Admin
Salman Ahmad
Wow ! This is Awesome ,Thanks for sharing
Peter
Thanks a lot for providing us this great tutorial. Definitely it will be helpful for me.
Amitabha Chakraborty
Hi
Nice tutorial. Was thinking a “X” button to close it if it annoys someone would have been great.
Regards
Amitabha
David
I like a footer bar. I think its a great place to put social sharing buttons. I made my own on a client’s site but it has the option of being able to close. It also holds the go to the top button. Pretty nifty. However, like the footer bar I made, on my HTC EVO 4G your footer bar doesn’t stick at the bottom as it should. It actually is stuck in the middle of an article and is really annoying because it covers up a bit of the text. The bar I made can be closed so it is only a quick annoyance. Your bar cannot so I can never read that text. Again this is on my phone. If you can figure out the workaround please let me know.
I came to this article through your newsletter which is great. Thanks for that.
Michael
Like or hate these types of bars, there is great value in seeing how the code is written to implement such a thing, at least. I use Hello Bar and the Wibya bar on several of my sites and although I think some people have become blind to them, including myself, and some hate them, they still work to help convert and share content a lot of the time.
I appreciate what I view as a helpful little code lesson. Great site!
Taryn Fox
I personally feel that the floating footer bar is an extremely user-hostile feature, especially one like yours which is a) unhideable, and b) expands to twice its intended size (or greater) when viewed while the font size is increased.
Speaking of which, even with nosquint magnifying the rest of the text on this site, the text in the comments field is tiny and hard to read if you have visual accessibility issues.
Speaking of other accessibility issues, asking for a person’s “Real Name” is hostile to anyone who uses a pseudonym. This includes trans women, people who are being stalked, people who are hiding their online activity from others who are capable of hurting them, and people who simply prefer and are better known by their pseudonyms than their legal or birth names (both of which are more inclusive and accurate terms for what you call a “real name”).
Also, you misspelled “meaningful” in the “Add a comment” notice.
I wasn’t going to leave a long rambling comment of criticism, but I feel most people have banner blindness to footer bars, and are ambivalent towards them at best and annoyed by them at worst. Most people who aren’t web designers, anyway. I thought maybe someone should speak up for the people who are actually affected by them. Then I ran into the other issues once I went to your site from Google Reader, and tried to leave a comment.
Thank you for your tutorials, and I hope things go well for you.
Editorial Staff
Hey Taryn,
We really appreciate your invaluable feedback. There are definitely pros and cons to having a floating footer bar like this ones. The cons you have already pointed out. We thought about doing a cookie tracking option where regular users can close the bar and never have it shown again. But even the regular users sometime miss out on great deals because of that. Also if they clear their browser’s cache or use a different computer, the bar shows up again. Yet another downside of cookie tracking. We’ve given extensive thoughts of having user registration and offer personalization on the site.
As for comments, the real name text in the field is there to serve one purpose, stop spammers. If you read the comments policy, it says “We do not allow Keywords stuffed in the name field. You must use your name or nick name for commenting.” Often folks use their nicknames, and we are completely ok with it. But if your nickname is “best insurance company” or something like that… then we mark it as spam.
Thanks for pointing out the typo. We have fixed that.
Admin
Partha Bhattacharya
This is with respect to Taryn’s comment above:
“…I feel most people have banner blindness to footer bars, and are ambivalent towards them at best and annoyed by them at worst.”
Since you continue using them there is no doubt you get benefits from them, and people do click on them to remain updated just as I did just now…coming here from another page.
Would you mind sharing some stats / lookins as to how effective is the footer bar for you, and also how effective it is as against using a header bar!
staion
Thanks for this easy and amazing small tutorials! I’ve already implemented it on my site, but without the jquery thing, just using it as announcements.
FreedomJackson
Awesome thanks for sharing this dude I’m doing some updating and I was trying to find a good way to add this footer bar.
mucho grande gracias senior