
Widget’lar, WordPress sitenizdeki bir kenar çubuğuna veya widget’a hazır herhangi bir alana içerik dışı öğeler eklemenize olanak tanır. Bunları web sitenize afişler, reklamlar, bülten kayıt formları ve diğer öğeleri eklemek için kullanabilirsiniz.
Ayrıca sosyal medya akışları, son gönderiler veya HTML etiketleri gibi kişiselleştirilmiş bir dokunuşa sahip benzersiz işlevleri yerleştirmek için özel bir widget oluşturabilirsiniz.
WPBeginner’da, web sitemizin kenar çubuğunda farklı içerik türlerini görüntülemek için özel widget’lar kullanıyoruz. Bu makalede, size adım adım özel bir WordPress widget’ının nasıl oluşturulacağını göstereceğiz.
")
Not: Bu eğitim WordPress geliştirmeyi ve kodlamayı öğrenen DIY WordPress kullanıcıları içindir.
WordPress Widget’ı Nedir?
WordPress widget’ları, web sitenizin kenar çubuklarına veya widget’a hazır alanlarına ekleyebileceğiniz kod parçaları içerir.
Bunları sitenize farklı öğeler ve özellikler eklemek için kullanabileceğiniz modüller olarak düşünün.
WordPress varsayılan olarak, herhangi bir WordPress temasıyla kullanabileceğiniz standart bir widget setiyle birlikte gelir. Daha fazla ayrıntı için WordPress’te pencere öğelerinin nasıl ekleneceği ve kullanılacağına ilişkin başlangıç kılavuzumuza bakın.

WordPress ayrıca geliştiricilerin kendi özel widget’larını oluşturmalarına da olanak tanır.
Birçok premium WordPress teması ve eklentisi, kenar çubuklarınıza ekleyebileceğiniz kendi özel widget’larıyla birlikte gelir.
Örneğin, herhangi bir kod yazmadan bir kenar çubuğuna bir iletişim formu, özel bir giriş formu, bir fotoğraf galerisi, bir e-posta listesi kayıt formu ve daha fazlasını ekleyebilirsiniz.
Bunu söyledikten sonra, WordPress’te kendi özel widget’larınızı nasıl kolayca oluşturabileceğinizi görelim.
WordPress’te Özel Bir Widget Oluşturmadan Önce
WordPress kodlamayı öğreniyorsanız, yerel bir geliştirme ortamına ihtiyacınız olacaktır. Bu size sitenizin canlı olması endişesi olmadan bir şeyler öğrenme ve test etme özgürlüğü verir.
WordPress ‘i MAMP kullanarak Mac ‘e veya WAMP kullanarak Windows‘a yerel olarak yükleyebilirsiniz.
Zaten canlı bir siteniz varsa, sitenizi yerel bir sunucuya taşıyabilirsiniz. Daha fazla ayrıntı için, canlı bir WordPress sitesini yerel bir sunucuya taşıma hakkındaki kılavuzumuza bakın.
Bundan sonra, WordPress’te özel widget kodunuzu eklemenin birkaç yolu vardır.
İdeal olarak, siteye özel bir eklenti oluşturabilir ve widget kodunuzu buraya yapıştırabilirsiniz. Bu, WordPress’e WordPress temanıza bağlı olmayan kod eklemenizi sağlar.
Kodu temanızın functions.php dosyasına da yapıştırabilirsiniz. Ancak, yalnızca söz konusu tema etkin olduğunda kullanılabilir olacaktır.
Kullanabileceğiniz bir başka araç da web sitenize kolayca özel kod eklemenizi sağlayan WPCode eklentisidir.
Bu eğitimde, sadece ziyaretçileri karşılayan basit bir widget oluşturacağız. Buradaki amaç WordPress widget sınıfına aşina olmaktır.
Hazır mısınız? Hadi başlayalım.
Temel WordPress Widget’ı Oluşturma
WordPress, yerleşik bir WordPress Widget sınıfı ile birlikte gelir. Her yeni WordPress widget’ı WordPress widget sınıfını genişletir.
WordPress geliştirici el kitabında WP Widget sınıfı ile kullanılabilecek 19 yöntemden bahsedilmektedir.
Ancak, bu eğitimin amacı doğrultusunda aşağıdaki yöntemlere odaklanacağız.
- __construct() : Bu, widget kimliğini, başlığını ve açıklamasını oluşturduğumuz kısımdır.
- widget : Burası widget tarafından üretilen çıktıyı tanımladığımız yerdir.
- form : Kodun bu kısmı, arka uç için widget seçenekleriyle formu oluşturduğumuz yerdir.
- güncelleme: Bu, widget seçeneklerini veritabanına kaydettiğimiz kısımdır.
Özel bir widget oluşturmak için aşağıdaki kod parçacığını kopyalayıp functions.php dosyanıza veya WPCode’a (önerilir) yapıştırabilirsiniz:
1 2 3 4 5 6 7 8 9 10 11 12 13 14 15 16 17 18 19 20 21 22 23 24 25 26 27 28 29 30 31 32 33 34 35 36 37 38 39 40 41 42 43 44 45 46 47 48 49 50 51 52 53 54 55 56 57 58 59 60 61 62 63 64 65 66 67 68 69 70 71 72 73 74 75 | <?php// Creating the widgetclass wpb_widget extends WP_Widget { function __construct() { parent::__construct( // Base ID of your widget 'wpb_widget', // Widget name will appear in UI __( 'WPBeginner Widget', 'textdomain' ), // Widget description [ 'description' => __( 'Sample widget based on WPBeginner Tutorial', 'textdomain' ), ] ); } // Creating widget front-end public function widget( $args, $instance ) { $title = apply_filters( 'widget_title', $instance['title'] ); // before and after widget arguments are defined by themes echo $args['before_widget']; if ( ! empty( $title ) ) { echo $args['before_title'] . $title . $args['after_title']; } // This is where you run the code and display the output echo __( 'Hello, World!', 'textdomain' ); echo $args['after_widget']; } // Widget Settings Form public function form( $instance ) { if ( isset( $instance['title'] ) ) { $title = $instance['title']; } else { $title = __( 'New title', 'textdomain' ); } // Widget admin form ?> <p> <label for="<?php echo $this->get_field_id( 'title' ); ?>"> <?php _e( 'Title:', 'textdomain' ); ?> </label> <input class="widefat" id="<?php echo $this->get_field_id( 'title' ); ?>" name="<?php echo $this->get_field_name( 'title' ); ?>" type="text" value="<?php echo esc_attr( $title ); ?>" /> </p> <?php } // Updating widget replacing old instances with new public function update( $new_instance, $old_instance ) { $instance = array(); $instance['title'] = ( ! empty( $new_instance['title'] ) ) ? strip_tags( $new_instance['title'] ) : ''; return $instance; } // Class wpb_widget ends here}// Register and load the widgetfunction wpb_load_widget() { register_widget( 'wpb_widget' );}add_action( 'widgets_init', 'wpb_load_widget' ); |
WordPress sitenize özel kod eklemenin en kolay yolu WPCode kullanmaktır. Hiçbir şeyi bozma riski olmadan sitenize kod parçacıklarını yönetmeye ve eklemeye yardımcı olan en iyi kod parçacığı eklentisidir.
Öncelikle, sitenize WPCode eklentisini yüklemeniz ve etkinleştirmeniz gerekir. Yardıma ihtiyacınız varsa, lütfen bir WordPress eklentisinin nasıl kurulacağına ilişkin kılavuzumuza bakın.
Etkinleştirmenin ardından WordPress yönetici panelinden Code Snippets ” + Add Sn ippet seçeneğine gidebilirsiniz. Buradan ‘Özel Kodunuzu Ekleyin (Yeni Snippet)’ seçeneğini seçin.

Bundan sonra, özel widget kodunu Kod Önizleme alanına yapıştırabilirsiniz.
Ayrıca ‘Kod Türü’ açılır menüsüne tıklamanız ve ‘PHP Snippet’ seçeneğini seçmeniz gerekir.

Ardından, aşağı kaydırabilir ve kodunuz için Ekleme yöntemini seçebilirsiniz.
WPCode, kodun nerede çalıştırılacağını seçmenize izin verir. Bu eğitim için varsayılan seçenekleri kullanabilir ve her yerde çalıştırabilirsiniz.

Bu işlem tamamlandığında, snippet’i kaydetmek için en üste geri dönebilirsiniz.
Snippet’i etkinleştirmek için ‘Aktif’ seçeneğine tıklamanız yeterlidir.

Daha fazla bilgi edinmek için lütfen WordPress sitenize özel kod ekleme hakkındaki kılavuzumuza bakın.
Kodu WordPress’e ekledikten sonra, WordPress yönetici panelinizdeki Görünüm ” Widget ‘lar sayfasına gitmeniz gerekir.
Ardından, ‘Artı’ blok ekle simgesine tıklayın, ‘WPBeginner Widget’ için arama yapın ve yeni widget’ı seçin.

Bu widget’ta doldurulacak yalnızca bir form alanı vardır.
Metninizi ekleyebilir ve değişikliklerinizi kaydetmek için ‘Güncelle’ düğmesine tıklayabilirsiniz.

Şimdi, özel widget’ı çalışırken görmek için WordPress web sitenizi ziyaret edebilirsiniz.
İşte demo sitemizde nasıl göründüğüne dair bir örnek.

WordPress Klasik Düzenleyicide Özel Widget Ekleme
Sitenize yeni widget ‘lar eklemek için klasik widget düzenleyicisini kullanıyorsanız, süreç benzer olacaktır.
Kullanılabilir widget’lar listesinde ‘WPBeginner Widget’ adında yeni bir widget olacaktır. Bu widget’ı kenar çubuğunuza sürükleyip bırakmanız gerekir.
Ardından, bir başlık girin ve widget ayarlarınızı kaydetmek için ‘Kaydet’e tıklayın.

Yeni özel widget’ınız artık web sitenizde yayında olacaktır.
Şimdi kodu tekrar inceleyelim.
İlk olarak, ‘wpb_widget’ı kaydettik ve özel widget’ımızı yükledik. Bundan sonra, bu widget’ın ne yaptığını ve widget’ın arka ucunun nasıl görüntüleneceğini tanımladık.
Son olarak, widget üzerinde yapılan değişikliklerin nasıl ele alınacağını tanımladık.
Şimdi, sormak isteyebileceğiniz birkaç şey var. Örneğin, textdomain‘in amacı nedir?
WordPress, çeviri ve yerelleştirme işlemlerini gerçekleştirmek için ‘gettext’ kullanır. Bu textdomain ve _e , ‘gettext’ e bir dizeyi çeviri için kullanılabilir hale getirmesini söyler. Daha fazla bilgi edinmek için çeviriye hazır WordPress temalarını nasıl bulabileceğinize ilişkin kılavuzumuza bakın.
Temanız için özel bir widget oluşturuyorsanız textdomain ‘i temanızın metin alanıyla değiştirebilirsiniz.
Alternatif olarak, WordPress’i kolayca çevirmek ve çok dilli bir WordPress sitesi oluşturmak için bir WordPress çeviri eklentisi kullanabilirsiniz.
Bonus: WordPress Widget’larınıza Özel Stiller Ekleyin
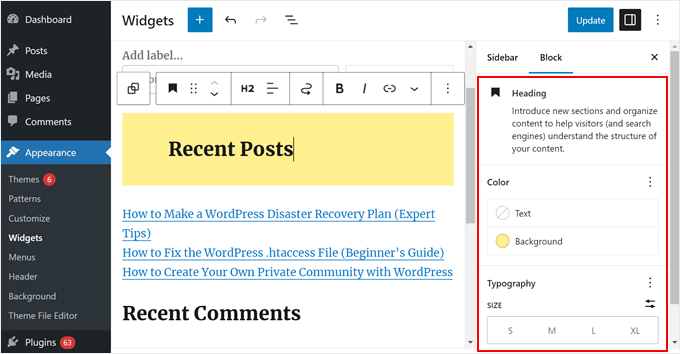
Bir WordPress widget’ı oluşturduktan sonra, ona özel stiller de ekleyebilirsiniz. Bu, web sitenizin görünümünü iyileştirebilir, tutarlılığı koruyabilir ve önemli bilgilere dikkat çekebilir.
Bunu yapmak için Görünüm ” Widget ‘lar sayfasını ziyaret edin ve özelleştirmek istediğiniz widget’ı ekleyin. Şimdi sağdaki blok panelinde renklerini ve tipografisini değiştirmek için bazı seçenekler göreceksiniz.
Ancak, widget bu seçeneği göstermiyorsa, ‘Gelişmiş’ sekmesini genişlettikten sonra CSS sınıfları ekleyerek özelleştirebilirsiniz.
Artık WordPress temanıza söz konusu CSS sınıfını hedefleyen özel CSS ekleyebilirsiniz.

Bunun için Görünüm ” Özelleştir sayfasına gidin ve Ek CSS sekmesine geçin. Burada, CSS kurallarınızı eklemek için bir kutu ile web sitenizin bir önizlemesini göreceksiniz.
Artık widget’ınızın görünümünü özelleştirmek için özel CSS kullanabilirsiniz. Ayrıntılar için WordPress widget’larınıza özel stilleri nasıl ekleyeceğinize ilişkin eğitimimize bakın.

Bu makalenin kolayca özel bir WordPress widget’ı oluşturmayı öğrenmenize yardımcı olduğunu umuyoruz. WordPress’te widget bloklarının nasıl devre dışı bırakılacağına ilişkin rehberimizi ve WordPress’te etkin olmayan widget’ların nasıl kaldırılacağına ilişkin eğitimimizi de görmek isteyebilirsiniz.
If you liked this article, then please subscribe to our YouTube Channel for WordPress video tutorials. You can also find us on Twitter and Facebook.
 in 2024")

")

Dan
The ‘wpb_text_domain’ string is not found in the example code. I’m guessing the example code was updated and the article verbiage was not?
Also to confirm, is ‘wpb_text_domain’ actually ‘web_widget_domain’ from the sample code?
Thanks in advance for any feedback.
WPBeginner Support
Thank you for pointing this out, we’ll update this article and clarify this better and make it clear.
Admin
marwan
hi,
can I put the code as separate class.php and not in the functions.php
Karel Hanton
Thank you for great tutorial. I add code to my test plugin and It works perfectly as described – I see the Widget in Appearance » Widgets list and I can add it to Sidebar.
But I do not see the new Widget on page editor list. Do I miss something, is there need another registration or settings?
Thanks again for help.
Aldo
This is now displayed as a “Legacy Widget” in WordPress. Is there a new way to create widgets?
JP
this is great, simple cut and paste example was exactly what I was looking for. Thanks!
WPBeginner Support
You’re welcome
Admin
Banu
I have created a CRUD Plugin and i need to use it in one page could you please guide me how to use that plugin in page ?
WPBeginner Support
It would depend on how you set up the plugin, for having it on one page you could either look to use a shortcode for front-end display or look into the options API if you wanted to display it on the admin side of a site.
Admin
Kishan
How can I create more than 1 custom widget?
And also, how can I set other fields like radio, checkbox, dropdown, text in widget?
WPBeginner Support
You would need to replace the wpb_widget with what you want your new widget to be called and then the code would depend on what specifically you would like to add. If you take a look at the WordPress codex you can see the different codes available.
Admin
Carmen
Hello!
Currently, I am developing a plugin and I need to create a widget to let the user add a specific functionality to his/her site.
I copied the code for your widget in a file and saved the file in my plugin’s directory. I used add_action and do_action in my plugin’s main file to load it but it still doesn’t work. Can you help me, please?
Thank you!
WPBeginner Support
Sadly, that would depend heavily on how your plugin is set up, you may want to ensure both sections of this code are being loaded for the widget to be added and displayed
Admin
Maximilian K.
A short question, what if i want to create widgets in where i also can place other widgets? Like empty bootstrap columns 6-3-3 e.g. and in each column i can place then widgets like image, text, latest posts etc.
Is there a command / keyword to signalize that there is place for other widgets in this widget…
because im kind of confused about my own created theme and how WP is working… you see im a beginner ^^
I already placed general information like page title, make widget areas in my footer so ich can place menus, related links etc. on it. It worked.
But now im confused how i can realize my content in wordpress as i designed it before. Maybe some keywords are helpful to read more about them.
WPBeginner Support
That would require more customization than we go into in this article, you may need to look into how to create a sidebar for code you can use: https://www.wpbeginner.com/wp-themes/how-to-add-dynamic-widget-ready-sidebars-in-wordpress/
Admin
Lars
Great tutorial! Worked perfectly.
WPBeginner Support
Glad our tutorial could help
Admin
Watson Anikwai
How do you get a custom post type field from wp database and use a widget to display on front end?
vicky
i can’t add two custom widgets .. the second widget is not showing up….
what should i do???.. pls help
Ahad Bhatti
Really understandable and helpful. Thank you.
Belitza Gomez
hello, i would like to know where i can find in available widgets the “custom menu”. it doesn’t show and i haven’t been able to add a page to the footer through this widget.
thank you for your help!!!!
Samdoxer
hi, how would i show a logo in place of text. would replacing logo url with the text suffice.
Thanks in advance.
WPBeginner Support
Please see your theme settings or visit Appearance » Customizer page in admin area. There you will find an option to upload your logo image.
Admin
Gary Foster
Which came first the widget or the app?
Does a widget have to be registered if so how Please?
How do you best protect your idea of a widget or app?
Thanks all
shelley
These instructions worked beautifully for creating my custom widget. I cannot, however, figure out how to change the font size to 60px. I did manage to add CSS to Divi theme options that centered the text and added a line border. But how do I change the styling of the font please? Adding “font-size:60px” does not work. I want the font to be large, like a tagline running across the page. Thanks.
Ahmad Farhan
Very helpfull. tankyou
Eyad
Thanks so much for your tutorials
Luigi Briganti
Hi! I hope you can help me.
I’ve created a custom post type that show the timetable for a shop. Of course, you can create as much timetables as you want, but my necessity is to show a given timetable in the sidebar of the website.
For this purpose I made a widget that loop the timetable posts showing only 1 (namely the first one, since I ordered in ASC order). This is a temporary solution, just to see if the widget works and it does, actually.
What I really want to do is to show in the backend a dropdown list of all posts belonging to “timetable” post type so that I can choose the one I need when I need it and show it in the frontend. How can I do this?
Thanks if you may/want to help.
Anees Ijaz
Thanks Man for saving my time ..
Kevin
I love this post, helped me often a lot! Thanks!