Sosyal medyada manuel olarak paylaşım yapmak çok zaman ve enerji alabilir. Bu nedenle uzun süredir tüm iş web sitelerimizde sosyal medya otomasyon araçlarını kullanıyoruz.
Sosyal medya otomasyonu, tekrarlayan görevleri yerine getirerek size çok zaman kazandırabilir. Tutarlı bir yayın programı, kitlenizi etkileşimde tutar ve içeriği birden çok platformda paylaşarak erişiminizi artırır.
Neyse ki, IFTTT, Zapier ve Uncanny Automator gibi araçlar, WordPress blog yazılarınızı Facebook, Twitter, LinkedIn, Instagram ve daha fazlası gibi platformlarda otomatik olarak paylaşmanıza olanak tanır.
Bununla birlikte, bu araçlarda gezinmek göz korkutucu olabilir. Ve bu yüzden buradayız.
Bu makalede, sosyal medya pazarlamanızı otomatikleştirebilmeniz ve diğer görevler için biraz zihin boşluğu açabilmeniz için bu otomasyon araçlarını nasıl kuracağınızı inceleyeceğiz.
WordPress ve Sosyal Medyayı Neden Otomatikleştirin?
WordPress web sitenizi ve sosyal medya hesaplarınızı otomatikleştirmek, bu platformlarda manuel olarak içerik paylaşma ihtiyacını ortadan kaldırır.
Gönderileri tek tek oturum açıp paylaşmak zorunda kalmadan aynı anda çeşitli sosyal medya platformlarında yayınlanacak şekilde kolayca zamanlayabilirsiniz.
Örneğin, web sitenizde önemli bir duyuru yapmanız gerekiyorsa, duyurunun planlanmış bir zamanda tüm sosyal platformlarda yayına girmesi için WordPress ve sosyal medyayı otomatikleştirebilirsiniz.
Bu, zamandan ve emekten tasarruf sağlar, sosyal medya varlığınızı artırır ve web sitesi görünürlüğünü artırabilir.
Ayrıca, WordPress'i sosyal medya ile otomatikleştirmek, beğeniler, paylaşımlar ve yorumlar gibi sosyal medya sinyallerini artırarak sitenizin SEO'sunu da iyileştirebilir.
Bunu akılda tutarak, IFTTT, Zapier ve Uncanny Automator kullanarak WordPress'i sosyal medya ile nasıl kolayca otomatikleştireceğinizi göstereceğiz. Kullanmak istediğiniz yönteme atlamak için aşağıdaki hızlı bağlantıları kullanabilirsiniz:
- WordPress ve Sosyal Medyayı IFTTT ile Otomatikleştirin (Ücretsiz)
- WordPress ve Sosyal Medyayı Otomatikleştirmek İçin Zapier Kullanın
- WordPress ve Sosyal Medyayı Uncanny Automator ile Otomatikleştirin (Önerilir)
Hazır mısınız? Hemen başlayalım.
Yöntem 1: WordPress ve Sosyal Medyayı IFTTT (Ücretsiz) ile Otomatikleştirin
IFTTT (If This Then That), kullanıcıların web tabanlı görevleri otomatikleştirmelerine yardımcı olan ücretsiz bir web hizmetidir. İki veya daha fazla uygulamayı ve cihazı bağlamak için uygulama (applet) kullanır.
Örneğin, Twitter hesabınızı WordPress web sitenize bağlamak için bir Twitter applet'i kullanabilirsiniz.
Sosyal medyayı ve WordPress'i otomatikleştirmek için ücretsiz bir yol arıyorsanız, bu yöntem tam size göre.
Bir IFTTT Hesabı Oluşturun
WordPress web sitenizi ve sosyal medyanızı otomatikleştirmek için IFTTT'de bir hesap oluşturmanız gerekecektir.
Öncelikle, IFTTT web sitesini ziyaret etmeli ve ekranın sağ üst köşesindeki ‘Başlat’ düğmesine tıklamalısınız.
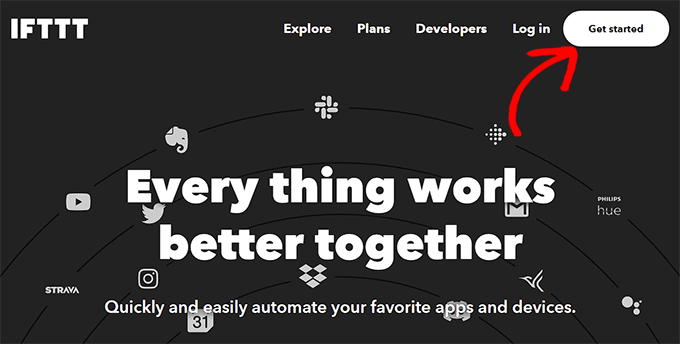
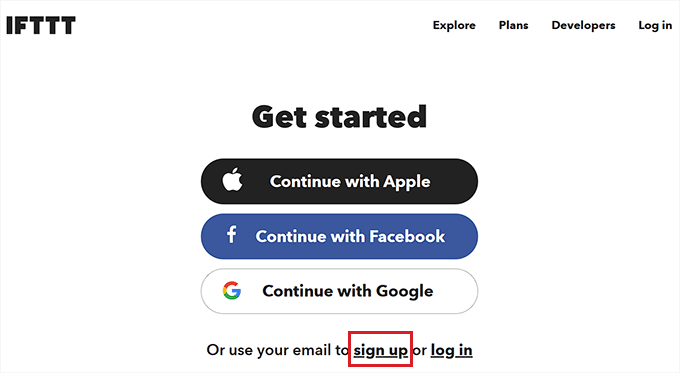
Bu sizi yeni bir sayfaya yönlendirecektir, burada ‘Kaydol’ bağlantısına tıklamanız gerekir.
Ardından, IFTTT'de bir hesap oluşturmak için e-posta kimlik bilgilerinizi sağlayın.
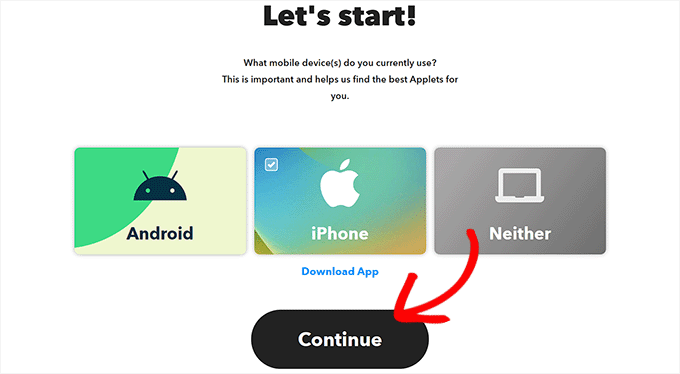
Bunu yaptıktan sonra, ‘Başlayalım’ sayfasını göreceksiniz, burada şu anda kullandığınız mobil cihazın türünü seçmeniz gerekecek.
Bir seçenek belirleyin ve 'Devam' düğmesine tıklayın.
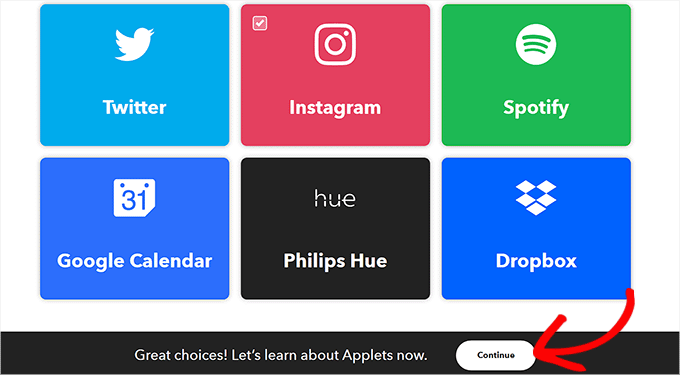
Bundan sonra, 'Keşfet' sayfanızı daha iyi özelleştirmek için sık kullandığınız sosyal medya platformlarını seçmelisiniz.
İşiniz bittiğinde, ilerlemek için 'Devam Et' düğmesine tıklayın.
Bir IFTTT Applet'i Kurun
Hesabınız hazır olduğuna göre, size uygun bir uygulama seçebileceğiniz 'Keşfet' sayfasına yönlendirileceksiniz.
Bu eğitim için WordPress ve Facebook'u otomatikleştireceğiz.
Bunu yapmak için, listeden 'WordPress'ten FB Sayfasına' uygulamacığına tıklayın.
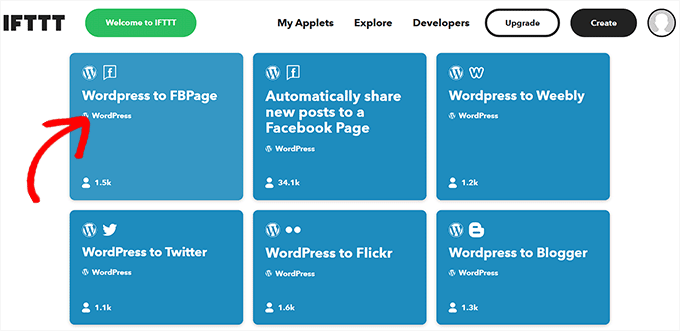
Şimdi 'WordPress'ten FB Sayfasına' ekranına yönlendirileceksiniz.
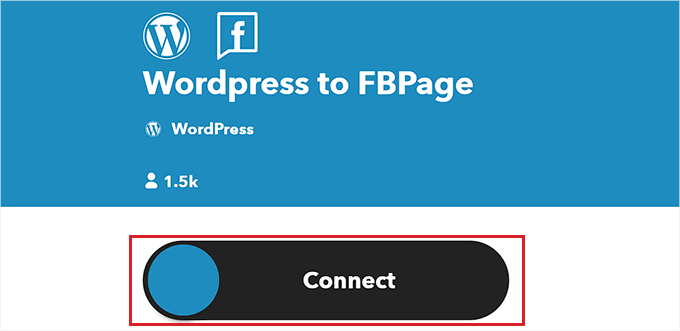
Ardından, 'Bağlan' anahtarını açmanız yeterlidir.
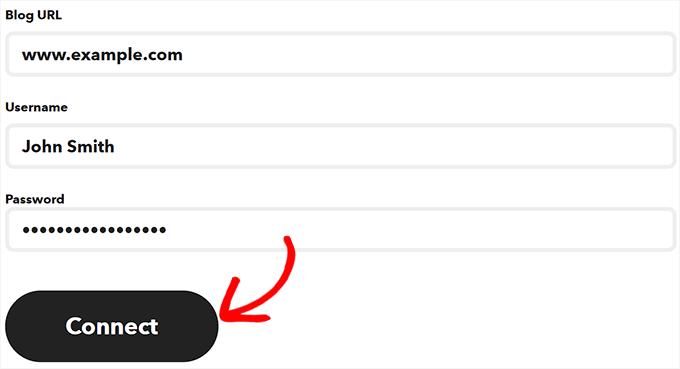
Bu sizi, WordPress blog URL'nizi, kullanıcı adınızı ve şifrenizi sağlamanız gereken yeni bir sayfaya götürecektir.
İşiniz bittiğinde, WordPress'i IFTTT ile entegre etmek için 'Bağlan' düğmesine tıklayın.
WordPress web siteniz bağlandıktan sonra, ‘WordPress’ten FBSayfasına’ ekranına yönlendirileceksiniz.
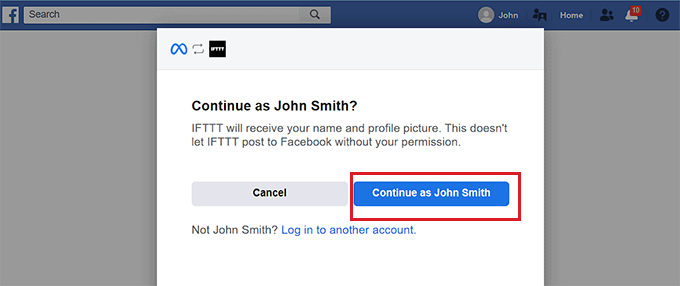
Burada, 'Bağlan' düğmesini tekrar etkinleştirmeniz yeterlidir. Bu sizi Facebook platformuna yönlendirecektir; burada Facebook hesabınızı IFTTT ile bağlamak için izin vermeniz gerekir.
Emin olduğunuzdan emin olduğunuzda ‘Devam Et’ düğmesine tıklamanız yeterlidir.
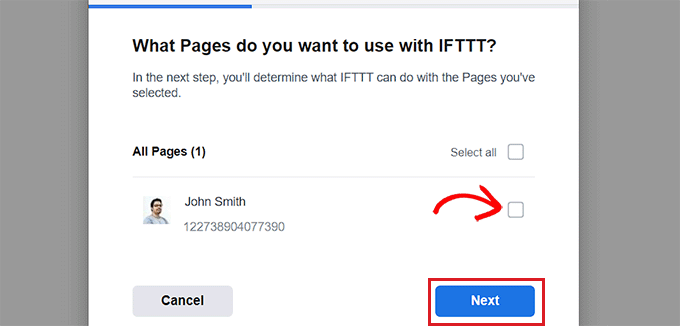
Ardından IFTTT ile bağlamak istediğiniz sayfalar sorulacaktır. WordPress blog yazılarınızı paylaşacağınız Facebook sayfasını seçin.
Bunu yaptıktan sonra ‘Sonraki’ düğmesine tıklayın.
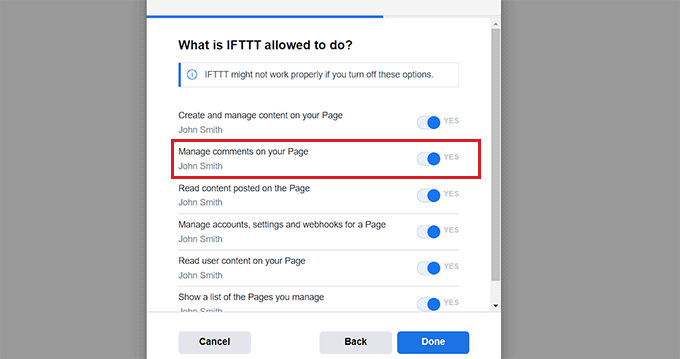
Ardından, IFTTT'nin Facebook sayfanızda yapmasına izin verilen tüm eylemleri seçin.
Örneğin, IFTTT'nin sayfanızdaki yorumları yönetmesini istiyorsanız, 'Evet' seçeneğinin yanındaki anahtarı açın. Ardından, 'Bitti'ye tıklamanız yeterlidir.
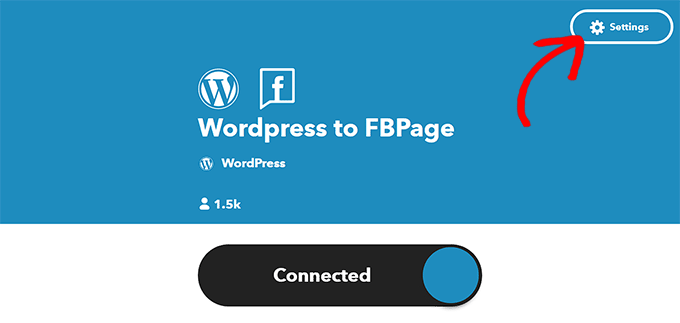
Artık 'WordPress'ten FB Sayfasına' ekranını göreceksiniz, burada geçiş düğmesi WordPress web sitenizin ve Facebook sayfalarınızın bağlı olduğunu gösterecektir.
Buradan, üstteki 'Ayarlar' düğmesine tıklamanız yeterlidir.
Şimdi ‘Oluştur’ sayfasına yönlendirileceksiniz.
‘Eğer Bu’ ve ‘Sonra O’yu Kurun
Burada, WordPress web sitenizde bir şey olduğunda IFTTT'nin Facebook sayfanızda gerçekleştirmesini istediğiniz eylemleri yapılandırabilirsiniz.
'Eğer Bu' seçeneğinin yanındaki 'Ekle' düğmesine tıklayın.
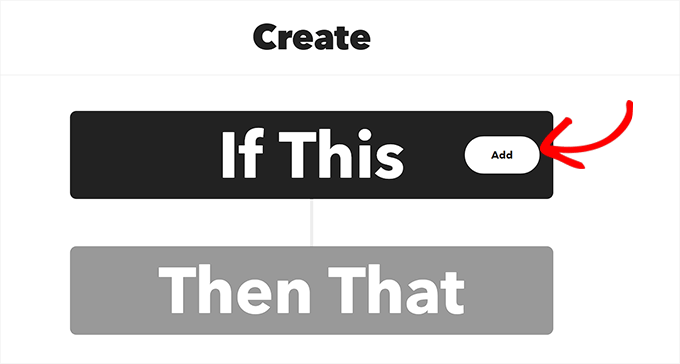
Ardından, ‘Hizmet Seç’ sayfasından hizmet olarak WordPress'i seçin.
Bu sizi ‘Tetikleyici Seç’ sayfasına yönlendirecektir. Burada, Tetikleyicinin ne zaman tetiklenmesini istediğinizi seçin. Bu Tetikleyici, web sitenizde bir eylem gerçekleştiğinde IFTTT'yi uyaracaktır.
Örneğin, her yeni gönderi eklediğinizde bir Tetikleyici'nin tetiklenmesini istiyorsanız, basitçe bu seçeneği seçin.
Kendi Tetikleyicinizi de oluşturabilirsiniz. Ardından, 'Tetikleyici Oluştur' düğmesine tıklamanız yeterlidir.
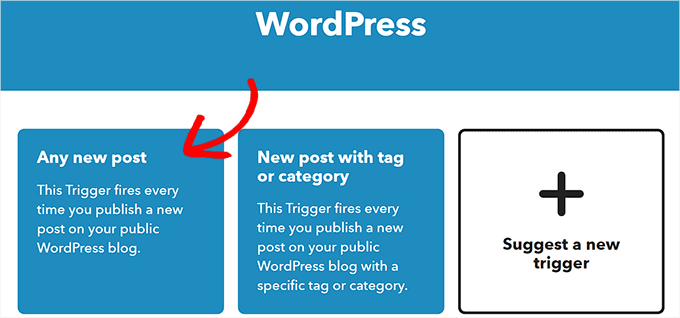
Tetikleyici hazır olduğuna göre, 'Oluştur' sayfasına yönlendirileceksiniz.
Devam edin ve 'Sonra Bunu' seçeneğinin yanındaki 'Ekle' düğmesine tıklayın.
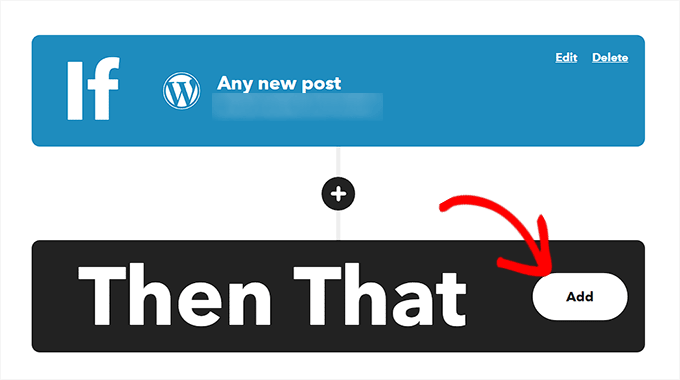
Ardından, 'Bir Hizmet Seçin' sayfasından 'Facebook Sayfaları'nı seçin.
Artık bir Eylem seçmelisiniz. Bu, WordPress web sitenizde belirli bir eylem gerçekleştiğinde IFTTT'nin Facebook sayfanızda yapacağı şeydir.
Örneğin, web sitenizde yeni bir gönderi yayınlandığında IFTTT'ye WordPress gönderi bağlantısını Facebook sayfanızda paylaşmasını söyleyebilirsiniz.
Bundan sonra, ‘Eylem Oluştur’ düğmesine tıklayın.
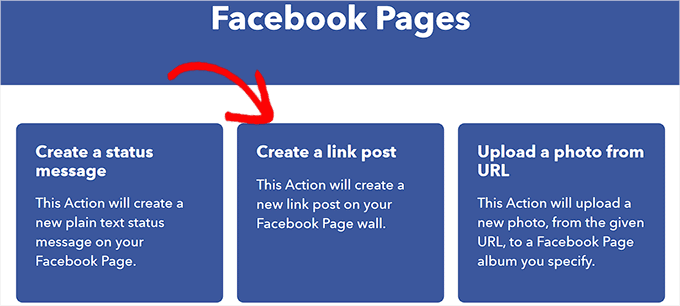
Bir IFTTT eylemi başarıyla oluşturduktan sonra 'Oluştur' sayfasını göreceksiniz.
Ayarlarınızı kaydetmek için ‘Kaydet’ düğmesine tıklayın.
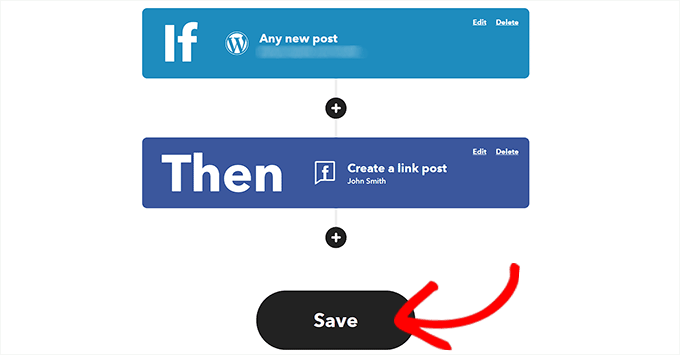
Artık WordPress ve Facebook'u IFTTT ile başarıyla otomatik hale getirdiniz.
Yöntem 2: WordPress ve Sosyal Medyayı Otomatikleştirmek İçin Zapier Kullanın
Zapier kullanarak sosyal medyayı ve WordPress'i otomatikleştirmek istiyorsanız, bu yöntem tam size göre.
Zapier, kullanıcıların Gmail, Trello, Slack, Facebook, Twitter ve daha fazlası dahil olmak üzere çeşitli web uygulamalarını bağlamasına olanak tanıyan bulut tabanlı bir otomasyon aracıdır.
Ayrıca, ihtiyaçlarınıza göre daha fazla özelleştirebileceğiniz 'Zap' olarak bilinen önceden oluşturulmuş otomasyon iş akışları kütüphanesi de sunar.
Zapier'i Kurun
WordPress ve sosyal medyayı otomatikleştirmek için öncelikle web sitenize Zapier for WordPress eklentisini yükleyip etkinleştirmeniz gerekecektir. Daha fazla talimat için lütfen WordPress eklentisinin nasıl kurulacağına dair adım adım kılavuzumuza bakın.
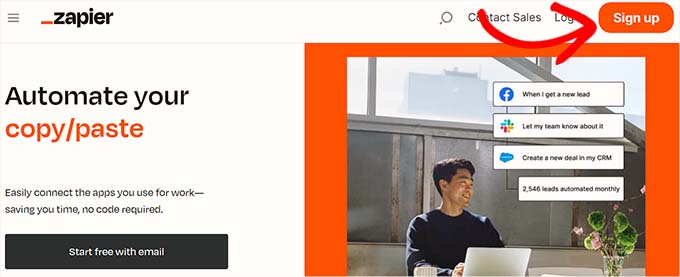
Ardından, bir hesap oluşturmaya başlamak için Zapier web sitesini ziyaret etmeniz ve ekranın sağ üst köşesindeki 'Kaydol' düğmesine tıklamanız gerekir.
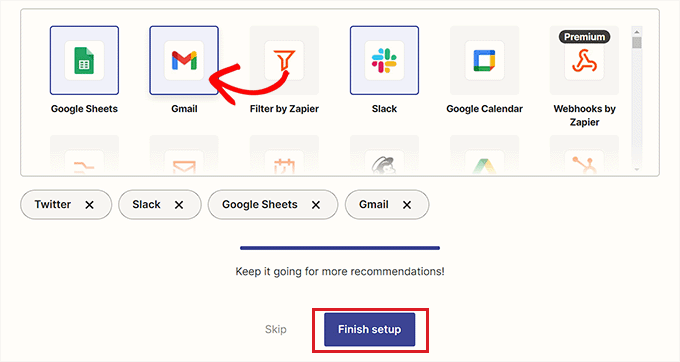
Kimlik bilgilerini sağladıktan sonra, 'Hangi uygulamaları kullanıyorsunuz?' sayfasını göreceksiniz.
Burada, kullandığınız uygulamaları seçin ve ‘Kurulumu Bitir’ düğmesine tıklayın. En azından WordPress'i ve web sitenize bağlamak istediğiniz sosyal medya platformlarını seçmeniz gerekecektir.
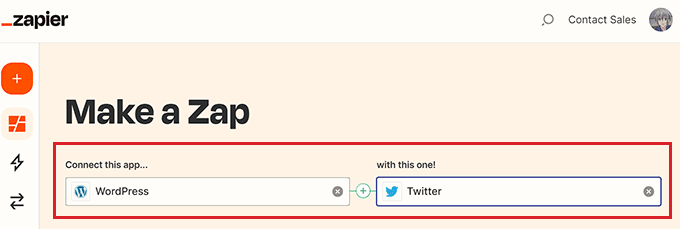
Şimdi Zapier kontrol panelinize yönlendirileceksiniz. Burada, ‘Bu uygulamayı bağla…’ seçeneği altında WordPress'i arayıp eklemeniz yeterlidir.
Ardından, ‘bu seçenekle!’ seçeneğinin altına WordPress ile bağlanmak istediğiniz sosyal medya platformunu ekleyin.
Bu eğitimde WordPress'i Twitter ile bağlayacağız.
Bir Zap Oluşturun
Ardından, açılır menüden WordPress için bir tetikleyici seçmelisiniz. WordPress web sitenizde belirli bir eylem gerçekleştiğinde, bu tetikleyici Zapier'e Twitter'da bir eylem gerçekleştirmesini söyleyecektir.
Bunu yaptıktan sonra, Zapier'in 'sonra şunu yap!' açılır menüsünden gerçekleştirmesini istediğiniz eylemi seçin.
Örneğin, WordPress'te yeni bir gönderi yayınladığınız her seferinde bir tweet oluşturmak istiyorsanız, bu seçenekleri belirlemeniz gerekir.
İşiniz bittiğinde, bir Zap oluşturmak için 'Dene' düğmesine tıklayın.

WordPress Sitenizi ve Twitter Hesabınızı Zapier'e Bağlayın
Ardından Zapier düzenleyicisini göreceksiniz.
WordPress ve Zapier'i bağlamak için 'WordPress Tetikleyici' sekmesini genişletmeniz ve ardından 'Giriş Yap' düğmesine tıklamanız gerekir.
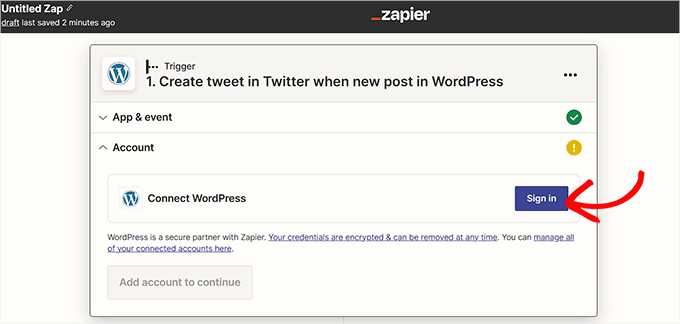
Bu, yeni bir pencerede 'Hesap Bağla' sayfasını açacaktır.
WordPress sitenizin kullanıcı adını, parolasını ve URL'sini girin. Ardından, ilerlemek için 'Evet, WordPress'e Devam Et' düğmesine tıklayın.
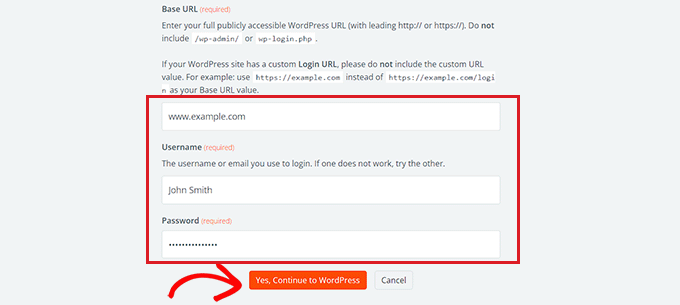
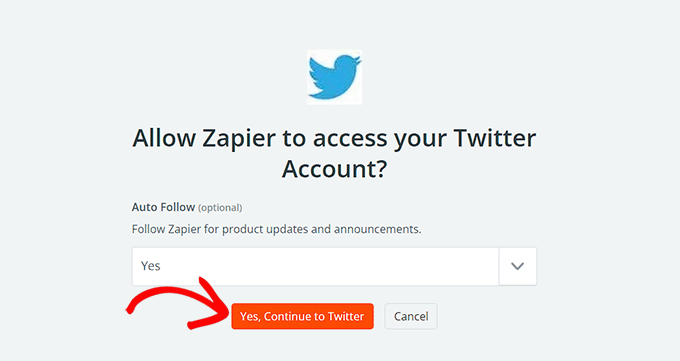
WordPress web siteniz bağlandıktan sonra, ‘Twitter’ sekmesini genişletin ve ‘Giriş Yap’ düğmesine tıklayın.
Zapier'in Twitter hesabınıza bağlanmasına izin vermeniz gereken ‘Hesap Bağla’ sayfasına tekrar yönlendirileceksiniz.
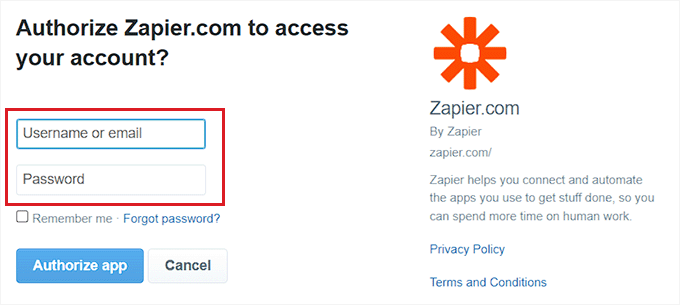
Twitter hesabınızın kullanıcı adını ve şifresini girin ve 'Uygulamayı Yetkilendir' düğmesine tıklayın.
Zapier şimdi Twitter hesabınızı WordPress web sitenizle bağlayacaktır.
Zap'ınızı Kişiselleştirin
Ardından, her yeni makale yayınladığınızda gönderilecek tweetin içeriğini seçmek için 'Mesaj' açılır menüsünü kullanabilirsiniz.
Örneğin, tweet'e gönderi bağlantısını, tarihini ve yazar adını eklemek istiyorsanız, bu seçenekleri açılır menüden seçmeniz yeterlidir.
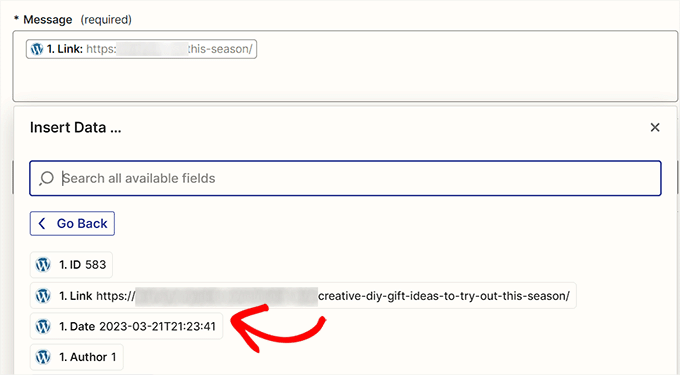
Ardından, ilerlemek için 'Devam Et' düğmesine tıklayın.
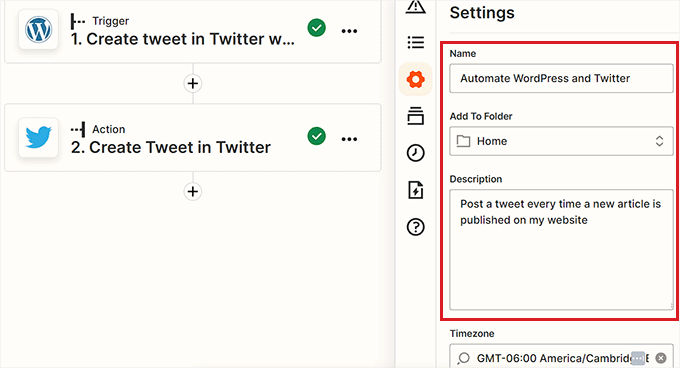
Ardından, soldaki kenar çubuğundan 'Ayarlar' sekmesine geçin. Oluşturduğunuz Zap için bir ad girerek başlayabilirsiniz.
Ardından, bir açıklama yazın ve Zap için bir saat dilimi seçin.
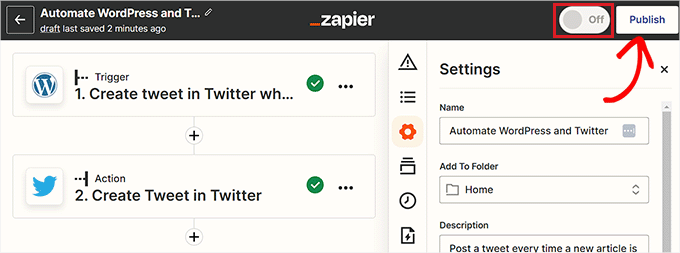
Son olarak, üstteki anahtarı ‘Açık’ konumuna getirin ve ardından Zap'inizi oluşturmak ve etkinleştirmek için ‘Yayınla’ düğmesine tıklayın.
Artık WordPress ve Twitter'ı başarıyla otomatik hale getirdiniz.
İlgili: en iyi WordPress Zapier eklentileri listemize göz atın.
Yöntem 3: WordPress ve Sosyal Medyayı Uncanny Automator ile Otomatikleştirin (Önerilir)
Uncanny Automator'ı Kurun
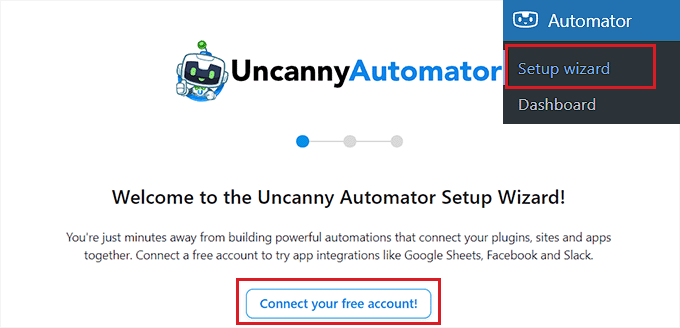
Bu, yeni bir pencerede 'Giriş Yap' sayfasını açacaktır.
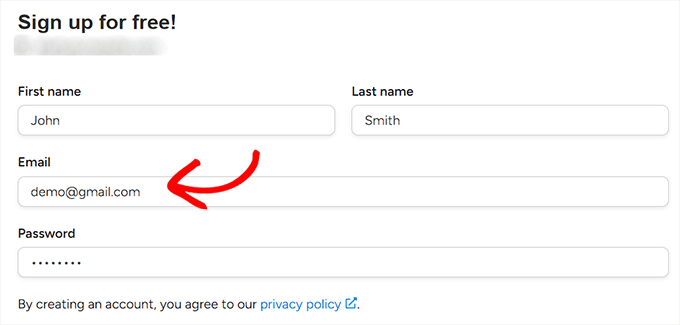
Burada, ücretsiz bir Uncanny Automator hesabı oluşturmak için kimlik bilgilerinizi girmeniz yeterlidir ve ardından alttaki ‘Kaydol’ düğmesine tıklayın.
Bir Uncanny Automator Tetikleyicisi Seçin
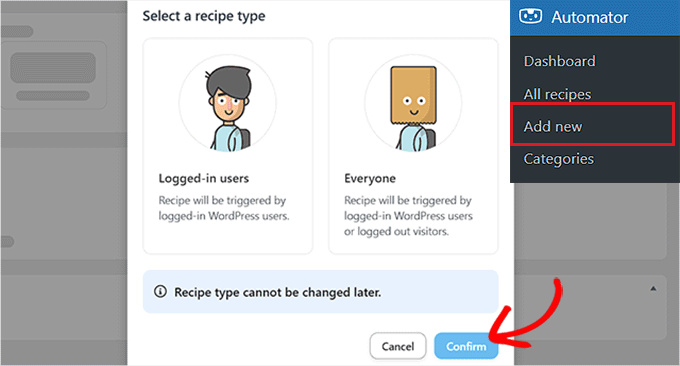
Ardından, WordPress yönetici kenar çubuğundan Automator » Yeni Ekle sayfasına gidin. Automator, oluşturmak istediğiniz tarifin yalnızca oturum açmış kullanıcılar tarafından mı yoksa sitenizi ziyaret eden herkes tarafından mı tetiklenmesi gerektiğini soracaktır.
Bir seçenek belirledikten sonra 'Onayla' düğmesine tıklayın.
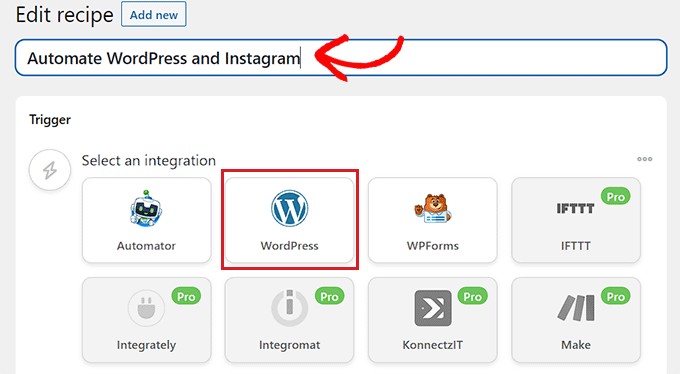
Bundan sonra, tarif için bir başlık ekleyerek başlayabilirsiniz. Örneğin, WordPress ve Instagram'ı otomatikleştirmek istiyorsanız, bunu bir tarif adı olarak kullanabilirsiniz.
Ardından, 'Tetikleyici' bölümünde 'WordPress' seçeneğini seçin.
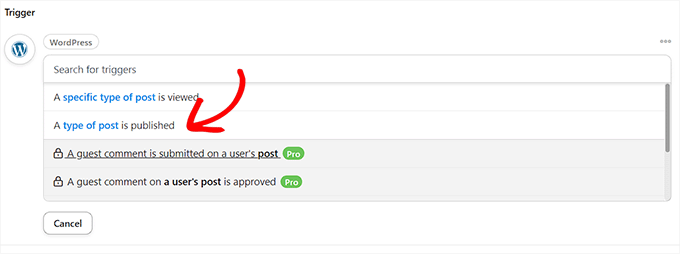
Şimdi, WordPress için bir Tetikleyici seçmeniz gerekiyor.
Örneğin, yeni bir WordPress gönderisi yayınladığınızda her zaman bir Instagram gönderisinin yayına girmesini istiyorsanız, açılır menüden ‘Bir gönderi türü yayınlandığında’ seçeneğini seçin.
Uncanny Automator'ı Instagram'a bağlayın
Bir Tetikleyici seçtikten sonra, entegrasyon listesini açmak için ‘Eylem ekle’ düğmesine tıklayın.
Bu eğitim için WordPress ve Instagram'ı otomatikleştireceğiz.
Listeden ‘Instagram’ seçeneğini seçin.
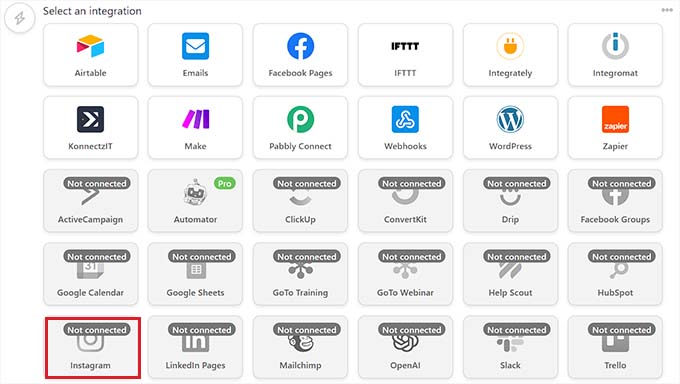
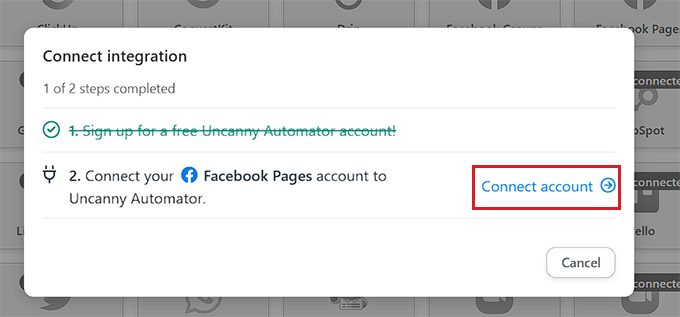
Şimdi ekranınızda bir açılır pencere görünecektir.
Yalnızca zaten bir Facebook sayfasına bağlı olan bir Instagram işletme hesabını bağlayabileceğinizi unutmayın. Kişisel bir Instagram hesabını da bağlayamazsınız.
Şimdi, Instagram'ı Uncanny Automator ile entegre etmek için ‘Hesap bağla’ bağlantısına tıklayın.
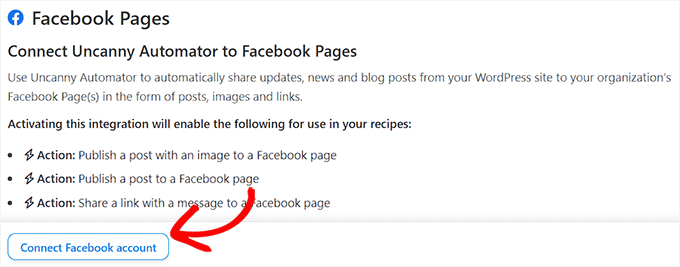
Bu, yeni bir pencerede 'Hesap Bağla' sayfasını açacaktır.
Burada, ilerlemek için 'Facebook hesabını bağla' düğmesine tıklamanız yeterlidir.
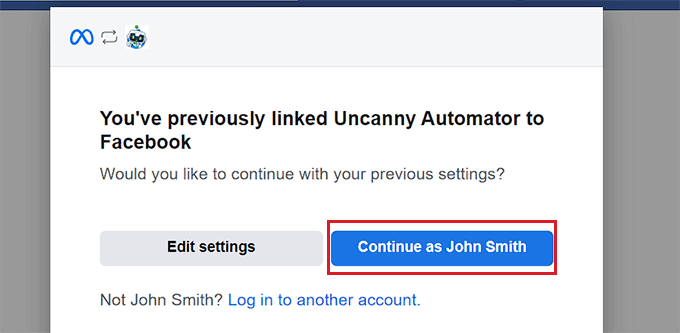
Şimdi Facebook web sitesine yönlendirileceksiniz, burada giriş kimlik bilgilerinizi sağlamanız gerekecek. Aynı kimlikle devam etmek isteyip istemediğiniz sorulacaktır.
Facebook'u Uncanny Automator'a bağlamak için ‘Devam Et’ düğmesine tıklamanız yeterlidir.
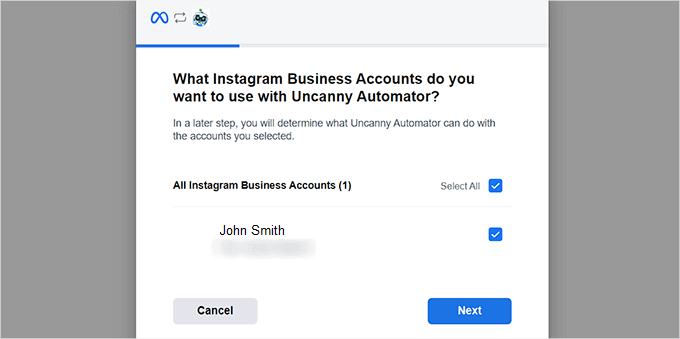
Ardından, Facebook hesabınıza bağlı işletme Instagram hesabını seçmeniz gerekir.
Ardından, devam etmek için 'İleri' düğmesine tıklayın.
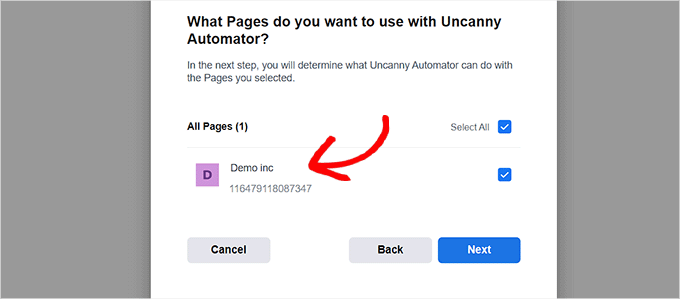
Ardından bir Facebook sayfası seçmeniz gerekir. Basitçe birini seçin ve 'İleri' düğmesine tıklayın.
Instagram işletme hesabınıza bağlı sayfayı seçtiğinizden emin olun. Aksi takdirde işlem işe yaramaz.
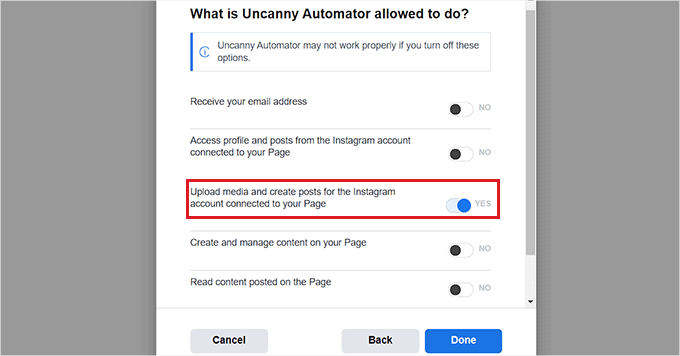
Ardından, Uncanny Automator'ın Instagram sayfanızda gerçekleştirmesine izin verilen tüm eylemleri seçmeniz gerekecektir.
Örneğin, Instagram hesabınızda gönderi oluşturma izni vermek istiyorsanız, o seçeneğin yanındaki anahtarı çevirmeniz yeterlidir.
Şimdi devam edin ve 'Bitti' düğmesine tıklayın.
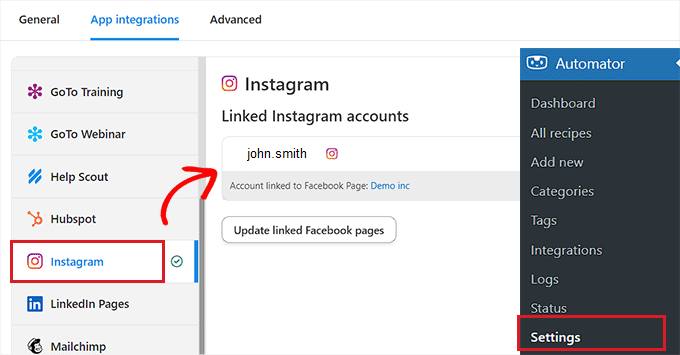
Şimdi WordPress yönetici kontrol panelinizdeki Otomatikleştirici » Ayarlar sayfasına yönlendirileceksiniz. Oradayken, sol sütundaki ‘Instagram’ sekmesine geçin.
Burada, Facebook sayfanıza bağlı Instagram işletme hesabını göreceksiniz.
Instagram hesabı ekranda görüntülenmiyorsa, bu bir şeylerin ters gittiği anlamına gelir ve süreci tekrar baştan yapmanız gerekir.
Artık bu pencereden çıkabilir ve 'Entegrasyon Bağla' açılır sayfasına gidebilir ve 'Hesap Bağla' bağlantısına tekrar tıklayabilirsiniz. Bu, Instagram'ı Uncanny Automator ve WordPress web sitenizle entegre edecektir.
Bir Acayip Otomatik Eylem Seçin
Şimdi, WordPress web sitenizde bir şey olduğunda Instagram'da Uncanny Automator'ın gerçekleştirmesini istediğiniz eylemi seçme zamanı.
Örneğin, bir makale yayınlandığında her seferinde Instagram'da bir fotoğraf yayınlamak istiyorsanız, ‘Bir Instagram İşletme hesabına fotoğraf yayınla’ seçeneğini seçin.

Ardından, Instagram'da yayınlamak istediğiniz fotoğrafın URL'sini veya medya kitaplığı kimliğini yazın.
Yeni bir WordPress gönderisi yayınladığınız her seferinde fotoğraf URL'sini WordPress kontrol panelinden değiştirebilirsiniz.
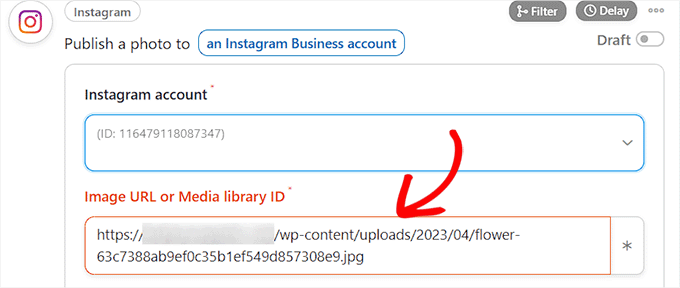
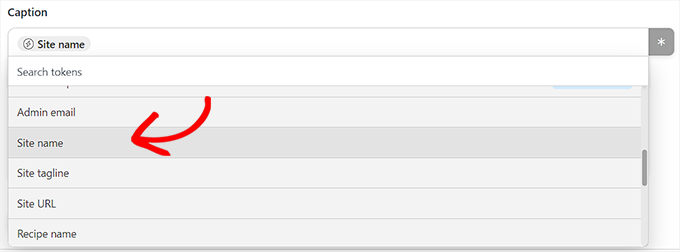
Ardından, gönderilerinizle birlikte yayınlanacak bir başlık taslağı hazırlamanız gerekir. Açılır menüden beğendiğiniz seçenekleri seçmeniz yeterlidir.
Seçenekler listesinden bir site adı, e-posta adresi, web sitesi URL'si, tarih ve daha fazlasını ekleyebilirsiniz.
İşiniz bittiğinde, değişiklikleri kaydetmek için 'Kaydet' düğmesine tıklayın.
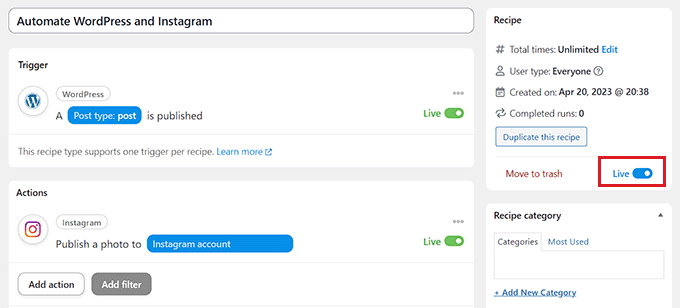
Son olarak, ekranın sağ köşesindeki ‘Tarife’ bölümüne gidin ve anahtarı ‘Canlı’ konumuna getirin.
Artık WordPress ve Instagram'ı başarıyla otomatik hale getirdiniz.
Umarım bu makale, IFTTT, Zapier ve Uncanny Automator kullanarak WordPress ve sosyal medya platformlarını nasıl otomatikleştireceğinizi öğrenmenize yardımcı olmuştur. Ardından, WordPress web sitenize sosyal giriş ekleme veya WordPress için en iyi sosyal medya eklentileri hakkındaki uzman seçimlerimizi de görmek isteyebilirsiniz.
Bu makaleyi beğendiyseniz, lütfen WordPress video eğitimleri için YouTube Kanalımıza abone olun. Bizi ayrıca Twitter ve Facebook'ta da bulabilirsiniz.


Umayr Agha
Thank you for the process.
Mrteesurez
Web Sitesi Otomasyonu dikkat çekmeye değer. Bir otomasyon sağlar ve web sitesi içeriklerini farklı sosyal hesaplarınıza paylaşır, bu da zamandan ve enerjiden tasarruf etmenizi sağlar.
Bu özel gönderi türü için de çalışabilir mi??
WPBeginner Desteği
Evet, IFTTT'nin görebilmesi için özel gönderi türünü bir RSS akışına dahil etmek isteyeceksiniz.
Yönetici
ALLAH'A ŞÜKÜR JONATHAN
Ücretsiz Zapier'i sosyal medya gönderilerimi otomatikleştirmek için kullanıyordum ama bugün bir alternatif buldum.
IFTTT'yi denemem gerekecek. Bu eğitimden anladığım kadarıyla Zapier'den daha kolay kullanılabilecek.
Moinuddin Waheed
Bu, ücretsiz olmasına rağmen çok güçlü ve kullanımı kolay. IFTTT, tartışmasız en iyi ücretsiz sosyal medya otomasyon eklentisi.
Diğerleri ücretli seçenekler ve elbette sahip olmaya değer, ancak yeni başlayanlar ve bütçesi kısıtlı olanlar için, sosyal medya gönderilerini ve sayfalarını otomatikleştirmek için bu ifttt en iyi seçenektir.
Matthew Carney
Her şeyi kurdum ama ifttt'nin bir kategoriden gönderi çekmesini istiyorum ancak “https://domain.name/local-news/feed/” bağlantısını kullandığımda çekmiyor ancak site genelini çekmesini istediğimde “https://domain.name/feed/” her şeyi çekiyor. kafam çok karışık neden çalışmadığını bilmiyorum
Andrew B.
Tamam, yani sadece normal site URL'si mysitename.com, giriş yapmak için arka uca bağlantı gibi özel bir şey yok, doğru mu? Bu tür şeylerde yeniyim, sadece bir aydan biraz fazla süredir web sitem var. Zamanınız ve yardımınız için tekrar teşekkürler.
WPBeginner Desteği
Belirli bir URL istemediği sürece, birincil site URL'nize gidersiniz
Yönetici
Andrew B.
Harika, yardımlarınız için çok teşekkür ederim.
Andrew B.
Bir bluehost wordpress web sitem var. If this then that hesabımı yeni oluşturdum. Web sitemin blogunu sosyal medyada yayınlamak için bağlamak istiyorum.
Blog URL'sini girin dedi. Ben de mysitename.com/blog/ kullandım ve geçerli bir blog URL'si olmadığını söyledi.
Sitemin adı/blogu değilse başka hangi URL olurdu?
WPBeginner Desteği
IFTTT normalde sitenizin URL'sine, sitenizin blog sayfasına değil, ihtiyaç duyar.
Yönetici
Emmanuel Ajayi
Güzel bir şey. Teşekkür ederim.
WPBeginner Desteği
You’re welcome
Yönetici
Jen
Merhaba,
IFTT'yi üçüncü taraf bir eklenti ile kurmanın bir yolu var mı? Örneğin takvim eklentim. Her gönderi yaptığımda, sosyal medyada da paylaşılmasını isterim. Şu anda Wordpress Gönderilerim için yaptığı gibi.
Teşekkürler!
WPBeginner Desteği
IFTTT ile çalışıp çalışmadığını görmek için o eklentinin desteğiyle görüşmek isteyebilirsiniz.
Yönetici
Chinecherem Somto
bu harika! Uzun zamandır bunu arıyordum, WPBeginner'a teşekkürler
WPBeginner Desteği
You’re welcome, glad our article could help
Yönetici
Rohit Singh
Merhaba yönetici.
Bu makaleyi okudum ama bir web sitem olduğunu ve SEO istatistiklerini kontrol ettiğimde sosyal sayımın 0 olduğunu gösterdiğini bilmek istedim. Sosyal sayımı nasıl artırabilirim. Lütfen bana cevap verin.
WPBeginner Desteği
Kullanıcılarınız henüz içeriğinizi paylaşmıyor olabilir, sitenize şu adresteki eklentilerden birini kullanarak sosyal simgeler ekleyebilirsiniz: https://www.wpbeginner.com/plugins/best-social-media-plugins-for-wordpress/
şu anda paylaşımınız yoksa.
Yönetici
Terri Scheffler
Wordpress blog girişlerimi FB sayfasına göndermesi için IFTTT'yi kurdum. Harika çalışıyor ve yapması çok kolaydı!
Bir sorun var. Her gönderiyle birlikte görünen 'logo', WP sayfamdan geliyor. Çok büyük ve kesiliyor, aptalca görünüyor. Medya kütüphanesine girdim, 'logo' grafiğimde bir küçük resim oluşturdum ve bunun yerine onu kullanacağını umdum. Kullanmadı.
IFTTT'nin blogun üst kısmında görünen daha büyük olan yerine küçük resim grafikini almasını sağlamanın bir yolu var mı? Lütfen nazik olun, ben acemiyim. Ancak bu siteden çok iyi bilgiler aldım, teşekkür ederim!
marc
neden ifttt'deki wordpress uygulamaları, wordpress gönderisindeki öne çıkan resmi seçtiğiniz sosyal medyada yayınlamıyor. LinkedIn veya Facebook'a gönderilecek ama resmiyle birlikte yayınlanmayan çok sayıda gönderim var. Yanlış bir şey mi yapıyorum?
Simran
İpuçları için teşekkürler. Ifttt'nin wordpress için çalışması biraz zaman aldı ama sonunda oldu.
Tom
Zaten yayınlanmış bir sürü wordpress gönderisini facebook'ta nasıl yayınlayacağımı bilen var mı?
Bir blogumda, eski gönderilerimi Facebook'ta (günde 2-5 hızında) yavaş yavaş yayınlamak istiyorum.
Daretoeatapeach
ITTT'nin birçok hizmeti olmasına rağmen, sorunu, kullanışlı olacak kadar ayrıntılı olanların az olmasıdır. Örneğin, hangi Tumblr bloglarıma gönderi yapacağını söylemenin bir yolu yok, belirli kategorileri Tumblr'a göndermesini de sağlayamıyorum, bu yüzden Tumblr seçeneği işe yaramaz, gönderilerimi Tumblr'a göndermek için bir çözüm arıyor olmama rağmen. ITTT'yi her denediğimde, sağladıkları hizmetler için ayrıntılı seçeneklerin eksikliğinin ihtiyaçlarımı karşılamadığını görüyorum.
Sadiq Ali Baloch
Merhaba
lütfen bana söyleyin
twitter hesaplarımı f.b sayfalarıma nasıl bağlayabilirim?
Benson
Kendi barındırılan WordPress blogunu IFTTT ile bağlamak çok kötü. Ve öneriler büyük ölçüde takdir edilecektir. Sadece WordPress.com bağlanıyor. Ah! Başım ağır.
markwoff
WP gönderilerini tumblr'a göndermek için IFTTT'yi kullanmaya çalışıyorum. Tumblr'da 'harici resim/resim bulunamadı' mesajı alıyorum. Bunu nasıl düzeltebilirim? Şimdiden teşekkürler...
Ann Murugi
Bir blogum var, bağlantılarımı Twitter'da paylaşmaya çalıştığımda 'site otomatik olabilir' uyarısı veriyor.
Bunu nasıl düzeltebilirim?
Katia
teşekkürler! çok yardımcı oldu!
Tony
Bu gönderi için çok teşekkürler. Sosyal medyaya otomatik paylaşım yapan eklentilerin bir WordPress sitesini oldukça yavaşlatabileceğini duymuştum, bu yüzden bu çok daha iyi. IFTTT harika ve video ile birlikte talimatlar son derece yardımcı oldu.
WPBeginner Ekibi
Aslında diğer web sitesinin içerik yayınlamak için hangi CMS veya yazılımı kullandığına bağlıdır.
poonam
Bu gerçekten harika bir makale ama sorum şu: WordPress sitemde yeni bir blog yazısı yayınladığımda otomatik olarak bazı wordpress olmayan sitelere nasıl gönderi yapabilirim. Bu mümkün mü. Bunun hakkında yazarsanız benim için gerçekten çok yardımcı olur. teşekkürler
Marco Miomac
Eski WordPress gönderilerini IFTTT kullanarak Twitter'a nasıl gönderilir?
Fabula
Merhaba.
Bir süredir IFTTT kullanıyorum. Bunun var olduğunu söylediğin için teşekkürler! =)
Ancak, Wordpress Blog'umdan Facebook veya Twitter'a resim gönderirken bir sorunum var. Gönderilerim için her zaman bir öne çıkan resim ayarlıyorum, ancak sosyal medyada bir resim gönderisi oluşturmak istediğimde, resmin orada bulunmadığını söylüyor.. Çalışması için bir hile var mı?
Blog gönderimi bir resim gönderisi yapmayı bile denedim, ancak o da işe yaramadı.
Ve tarifleri, sadece ne göstermesi gerektiğini yazdığım şekilde ayarlayabilir miyim, yoksa bu bana verdikleriyle mi sınırlı (Örneğin gönderilerimde ne yayınlamak istediğim, imageURL gibi)?
Yardım için teşekkürler!
WPBeginner Ekibi
Web sitenizin URL'sini IFTTT'ye gireceksiniz
http://www.example.com
IFTTT yine de blog akışınızı alacaktır. Twitter kanalını etkinleştirdiğinizden ve IFTTT'ye sizin adınıza tweet atma izni verdiğinizden emin olun. Ardından bir gönderi yayınlamayı deneyin ve ardından IFTTT'ye geri dönüp tarifi manuel olarak çalıştırın. Size herhangi bir hata gösterip göstermediğini kontrol edin.
darkhorse85
WordPress BLOG'umu bir kanal olarak etkinleştiremiyorum:
[IFTTT.com'da]
Blog URL'mden "mywebsite.co.uk/blog" WordPress gönderilerini kanal olarak etkinleştirmeye çalıştığımda çalışmıyor.
IFTTT.com, "mywebsite.co.uk" yazarak WordPress gönderilerinde kanal olarak etkinleştirildiğinde gerçekten etkinleşir (ancak gönderileri blog sayfamdan Twitter'a aktarmaz).
Lütfen bana bildirin, burada neyin yanlış gittiği konusunda iyi bir fikriniz olup olmadığını biliyorum. Teşekkürler.
WPBeginner Ekibi
Sitenizin statik bir ana sayfaya ve blog gönderileri için ayrı bir sayfaya sahip olduğu görülüyor. Bu gibi durumlarda, blogunuzun URL'si hala kök alan adıdır, blog sayfası değil. Bazen IFTTT'nin yeni gönderinizi alıp tweetlemesi biraz zaman alabilir. Ayrıca bir tarifi manuel olarak çalıştırmayı deneyebilir ve eylemin tetiklendiğini veya herhangi bir hata gösterdiğini görebilirsiniz.
Ayrıca Twitter kanalını etkinleştirmeniz ve IFTTT'ye sizin adınıza gönderi yapma izni vermeniz gerekecektir.
darkhorse85
Evet, blogumun ön sayfa olmadığı çok sayfalı bir sitem var. Ön sayfam Ana sayfam olmalı ve statik bir sayfa olmalı ve Blog adında bir sayfa blog olarak kategorize edilmelidir.
Söylediklerinizi tam olarak anlamadığımı ve buradan nereye gideceğimden emin olmadığımı itiraf etmeliyim.
Q1: What address should enter use activate and use my WP blog?
Q2: How would I run a recipe “manually”
Lütfen tavsiyede bulunun. Teşekkürler
Adam Kaan
Bu sorunu çözmek için haftalarca kabus gördüm, sonunda beslememi kullanarak kurabileceğimi öğrendim. Örneğin benimki, site URL'nizi girin ve ardından eğik çizgi besleme ekleyin, bunu ifttt'de kurmak için bu adresi kullanmayı deneyin.
Sheridan
Merhaba, gerçekten harika bir gönderi!
IFTTT, gönderilen gönderinin altına bir bitly bağlantısı (kısaltılmış bağlantı) oluşturabilir mi, böylece okuyucular siteme geri döner, yoksa bu araç böyle bir şey yapıyor mu – belki de IFTTT'nin sosyal platformlara göndermesine izin vermeden önce bitly bağlantısını (kısaltılmış bağlantı) WP POST'umda oluşturmam mı gerekiyor – biri doğru mu yanlış mı olduğumu biliyor mu?
Cevapladığın için teşekkürler!
Sheridan
Tim Buttle
Yakın zamanda IFTTT üzerinde bir 'tarif' oluşturdum, bu da her retweet yaptığımda blogumda Wordpress sitemde görünmesi anlamına geliyor. Ancak Wordpress'te görünen bağlantıya tıkladığımda, orijinal Twitter akışına değil (daha çok Wordpress sitemdeki bir alt sayfaya) götürüyor. Bağlantının sitemden Twitter'a geri dönmesini nasıl sağlayabilirim?
Aptalca bir soru olabilir ve yardımlarınız için şimdiden çok teşekkürler! Tim.
Lav Singh
IFTTT kullanarak eski WordPress yazılarını Twitter'a nasıl gönderilir? (Bazı WordPress yazılarını yayınladıktan sonra oluşturulan Twitter hesabı)
toddbot
Bir videoyu YouTube'a yüklediğimde WordPress'e göndermesi için ifttt'yi yeni kurdum. Tarifeye kısa kod [publicize off] eklemenin, WordPress'e bağladığım diğer sitelere göndermemesini sağlayacak bir yolu var mı?
Pundi
WP eklentimle saçlarımı yoluyordum.. bu makale için teşekkürler. IFTTT'ye katılmam gerekiyor
Robin Rico
Bu küçük mücevher gibi siteyi yeni keşfettim. Bayıldım! Kullandığım bir tarif fb hayran sayfası wordpress'e idi. Bir müşterim her şeyi blogu yerine fb'de yayınlamayı tercih ediyor. Sorun çözüldü!!
Joanne Marcinek
Harika gönderi. Teşekkür ederim.
IFTTT'yi seviyorum ama bunu özel olarak işaretlediğim (kişisel günlük olarak kullanıyorum) bir Wordpress.com blogu ile kullanmaya çalışıyorum. Ancak, yedekleme için RSS'yi IFTTT aracılığıyla erişmek istiyorum.
Blog RSS'sine bağlanmaya çalıştığımda bu hatayı alıyorum: Geçerli bir besleme URL'si değil, besleme başlığı eksik
Bunun blogun özel olarak işaretlenmiş olmasından mı kaynaklandığını düşünüyorsunuz? Yoksa başka bir şey mi ters gidiyor? (XML-RPC'yi etkinleştirme önerinizi denedim, ancak ayarlarımda bu seçeneği göremiyorum.
Teşekkürler!
Yayın Kadrosu
Evet, çünkü blogunuz özel olarak ayarlanmış.
Yönetici
B
O zaman neden Wordpress kullanıcı adı ve şifresi istiyor. Gizlilik ayarlarının önemi olmamalı…
darkhorse85
Aslında bunun nedeni, kullandığınız WordPress sürümünde XML-RPC'nin otomatik olarak etkinleştirilmiş olması olabilir. Kontrol etmek için Google'da şunu arayın: “WordPress (kullandığınız sürümü girin)” ardından “XML-RPC otomatik olarak etkin” ve ne
çıktığına bakın!
WordPress 4.0'ı wordpress.org sitesinde kullanıyorum ve bu benim
XML-RPC ikilemimi çözdü.
Mattia
WordPress'i IFTTT'ye bağlamaya çalıştığımda şunu söylüyor:
Canlı kanal alanları değeri geçerli bir Wordpress URL'si değil
Wordpress kimlik bilgileri doğrulanamıyor. Lütfen tekrar deneyin.
Bir şeyi mi kaçırıyorum? Teşekkürler
Dan Deeble
wordpress.com blogumla çalışmıyor gibi görünüyor, tabii ki tamamen sakat bir şey yapmıyorsam.
Bunu doğrulayabilecek var mı?
Teşekkürler
Dan
Yayın Kadrosu
Sorunsuz çalışmalıdır. RSS yöntemini de kullanabilirsiniz.
Yönetici
Julien Maury
Blog hayatımı kolaylaştırdığınız için çok teşekkürler!
Zimbrul
Bu oldukça harika. Dropbox veya Google Drive'a yedekleme iyi ama sorum şu: herhangi bir gönderinin yedeği nasıl görünüyor? Sanırım kendim denemeliyim, değil mi.
Sorun (en azından yakın zamana kadar) Facebook'un WordPress ile iyi çalışması ve öne çıkan görseli veya gönderideki görseli ve alıntıyı almasıydı. Bu hizmetin alıntıyı ve gönderi görselini nasıl çektiğini merak ediyorum?
Yayın Kadrosu
Doğru og: etiketleri tanımlanmışsa, Facebook resmi çekecektir. Gönderi başına yedekleme için, gönderiyi PDF olarak saklar.
Yönetici
Tom Hermans
Bunun tersi daha da kullanışlıdır, sosyal medya yazılarınızı getirip KENDİ alanınızda arşivler. WordPress, kendi içeriğinize sahip olmak ve onu kontrol etmekle ilgilidir ve bu şekilde tüm tweetlerinizi, fb durum güncellemelerinizi vb. tek bir merkezi olarak yönetilen merkezde saklayabilir, paketleyebilir ve görüntüleyebilirsiniz.
Kişisel bir blog için bundan daha kişisel bir şey olamaz.
Yayın Kadrosu
Kesinlikle katılıyorum. RSS, FB, Twitter ve her türlü yerden çekiyor.
Yönetici
Charles
Tüm yeni gönderilerimi blogumda otomatik olarak tweetlemek ve Facebook'ta paylaşmak için IFTTT kullanıyorum. İyi ama tek şikayetim, bunun yalnızca her 30 dakikada bir etkinleşmesi.
Manveet Singh
Blog yazılarını yedeklemek için Google Drive ile IFTTT'yi zaten kullanıyorum ve harika çalışıyor.
There’s only one thing that I have been trying to find a solution though. When I update an already published post, how to get a backup of that! Still trying to figure out
Shea Bunge
Şu anda IFTTT Google+'ı desteklemiyor ve bu nedenle “WordPress’ten Google+’a” tarif öneriniz geçersizdir.
Birgit
Bu gerçekten HARİKA, vay canına! Bu harika ipucu için teşekkürler!
Acaba eski güzel Feedburner posta aboneliğini IFTTT ile değiştirmek mümkün mü?
IFTTT'de kendi/herhangi bir feed'i kendi (!) e-posta adresime göndermek için bir tarif oluşturma olasılığını buldum. Ama kendi blog ziyaretçilerine posta aboneliği ile en yeni gönderileri alma olasılığını nasıl sunabilirim (normal RSS'deki gibi)? Bu IFTTT ile mümkün değil mi yoksa başka bir önerisi olan var mı?
Yayın Kadrosu
Hayır, bu IFTTT ile mümkün değil. MailChimp veya Aweber gibi bir hizmet kullanmanız gerekir.
Yönetici
Shea Bunge
E-posta abonelikleri IFTTT ile mümkün olmasa da, Jetpack E-posta Abonelikleri eklentisini kullanabilirsiniz.
Lawrence
Twitter, Facebook, LinkedIn ve Tumbler için Jetpack'in Publicize aracının çok iyi çalıştığını gördüm.
Yukarıdakilerin hepsi için IFTTT kullanıyordum ve Jetpack'e geçtim.
Yayın Kadrosu
Evet, WordPress'te işi yapabilen harika eklentiler var. Ancak Jetpack'i yalnızca bu özellik için kullanacaksanız, o zaman IFTTT'yi kullanmanız daha iyi olur. Yine de Jetpack, herkesin ihtiyaç duymayabileceği/istemeyebileceği çok daha fazlasını sunuyor.
Yönetici
zimbrul
Jetpack'in bir WordPress sitesi için oldukça "ağır" olduğunu duydum...
Matt Litherland
I have literally skim read this, and it looks great. I’m hoping when i get time later tonight to read it fully that it fulfils what im after. Posting blog posts to facebook or twitter automatically is something i’ve wanted to build into my themes for a while