Bir web siteniz olduğunda, muhtemelen diğerlerinden daha önemli olan bazı gönderileriniz vardır. Ziyaretçilerinizin bu gönderileri ilk olarak görmesini sağlamanın bir yolu, onları sayfanın en üstüne yerleştirmektir.
WordPress yapışkan yazılar özelliği bunu standart yazılarla yapmanıza olanak tanır. Ancak web sitenizde özel yazı türleri kullanıyorsanız, bu yapışkan yazılar beklediğiniz gibi sayfanın en üstünde görünmeyecektir.
Bu makalede, özel gönderi türlerinize yapışkan gönderi işlevselliğini nasıl ekleyeceğinizi ve bunları özel gönderi türü arşiv sayfalarında nasıl görüntüleyeceğinizi göstereceğiz.

WordPress Özel Yazılarını Neden Yapışkan Yapalım?
WordPress web sit eniz için standart bir yazı veya sayfadan farklı bir formatta içerik oluşturuyorsanız, muhtemelen zaten özel bir yazı türü kullanıyorsunuzdur. Örneğin, bir kitap inceleme web sitesi işletiyorsanız, bir Kitap İncelemeleri yazı türü oluşturmuş olabilirsiniz.
En önemli içeriğinizi özel gönderi türü arşivinin en üstüne yerleştirmek isteyebilirsiniz. Derinlemesine ve zamana duyarlı içeriklerin yanı sıra en popüler özel gönderilerinizi öne çıkarmanın en iyi yollarından biridir.
Ancak WordPress yapışkan yazılar özelliği sunsa da bu özellik özel yazı türleri için mevcut değildir.
Özel gönderi türü arşiv sayfalarınıza yapışkan özelliğini nasıl ekleyeceğinize bir göz atalım.
Özel Yazı Türlerine Yapışkan Yazılar Ekleme
Öncelikle Sticky Posts – Switch eklentisini yüklemeniz ve etkinleştirmeniz gerekir. Daha fazla ayrıntı için, bir WordPress eklentisinin nasıl kurulacağına ilişkin adım adım kılavuzumuza bakın.
Not: Bu eklenti bir süredir güncellenmemiş olsa da, testlerimizde hala iyi çalışıyor. WordPress sürümünüzle test edilmemiş eklentileri kullanıp kullanmama hakkındaki makalemizi okumak isteyebilirsiniz.
Etkinleştirme sırasında, eklentiyi yapılandırmak için Ayarlar ” Yapışkan Yazılar – Değiştir sayfasını ziyaret etmeniz gerekir. Yapışkan olmasını istediğiniz özel yazı türlerinin yanındaki kutuyu işaretlemeniz yeterlidir.
Bu eğitim için ‘Kitap İncelemeleri’ gönderi türünü kontrol edeceğiz.
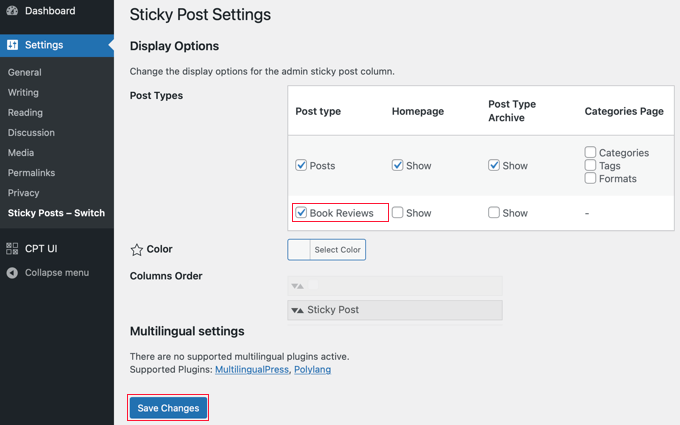
Bundan sonra, ekranın altındaki ‘Değişiklikleri Kaydet’ düğmesine tıklamanız gerekir.
Şimdi, bu özel gönderi türünün yönetici sayfasını ziyaret ettiğinizde, gönderileri yapışkan hale getirebileceğiniz yeni bir sütun göreceksiniz. Tek yapmanız gereken, öne çıkarmak istediğiniz gönderilerin yanındaki yıldıza tıklamak.
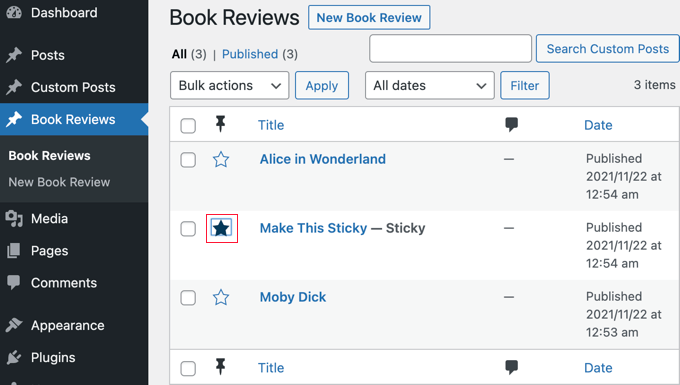
Şimdi yazıyı yapışkan hale getirdiniz. Sorun şu ki WordPress yapışkan yazıları yalnızca ana sayfada gösteriyor. Daha sonra, yapışkan yazıların arşiv sayfalarında nasıl görüntüleneceğine bir göz atacağız.
Özel Yazı Tipi Arşivlerinde Yapışkan Yazıları Görüntüleme
Yapışkan gönderilerinizi özel gönderi arşivi sayfanızın en üstünde görüntülemek için yeni bir şablon oluşturmanız gerekir.
Bunu yapmak için bir FTP istemcisi veya WordPress hosting kontrol panelinizdeki dosya yöneticisi seçeneğini kullanmanız gerekir. Daha önce FTP kullanmadıysanız, WordPress’e dosya yüklemek için FTP’nin nasıl kullanılacağına ilişkin kılavuzumuza göz atmak isteyebilirsiniz.
FTP istemcinizi veya dosya yöneticinizi kullanarak sitenize erişmeniz ve ardından /wp-content/themes/YOURTHEME/ klasörüne gitmeniz gerekir.
Örneğin, Twenty Twenty-One temasını kullanıyorsanız, /wp-content/themes/twentytwentyone/ adresine gitmeniz gerekir.
Ardından, bu klasörde archive-POSTTYPE.php gibi bir adla yeni bir dosya oluşturmanız gerekir.
Örneğin, özel gönderi türü slug’ınız ‘bookreviews’ ise, archive-bookreviews.php adında yeni bir dosya oluşturmalısınız.
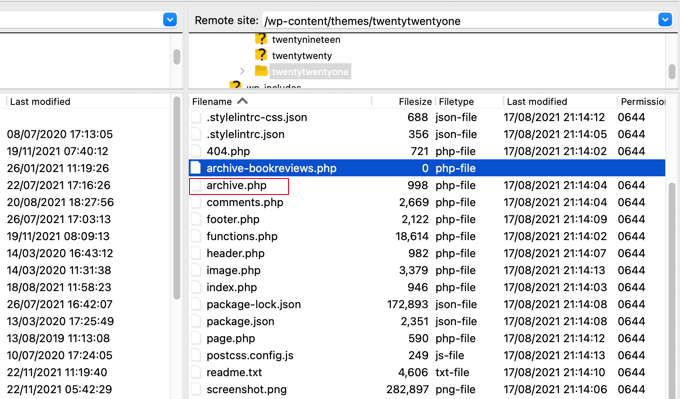
Bundan sonra, aynı klasörde archive.php dosyasını bulmanız gerekir. Basitçe archive.php’nin içeriğini kopyalayın ve oluşturduğunuz yeni dosyaya yapıştırın.
Bir sonraki adım tema dosyalarınıza kod eklemenizi gerektirir. Sitenize kod ekleme konusunda yardıma ihtiyacınız varsa, WordPress’te özel kod ekleme hakkındaki kılavuzumuza bakın.
Hazır olduğunuzda, aşağıdaki kodu temanızın functions.php dosyasına veya WPCode gibi bir kod parçacıkları eklentisine eklemeniz gerekir (önerilir):
1 2 3 4 5 6 7 8 9 10 11 12 13 14 15 16 17 18 19 20 21 22 23 24 25 26 27 28 29 30 31 32 33 34 35 36 37 38 39 40 41 42 43 44 45 46 47 48 49 50 51 52 53 54 55 56 57 58 59 60 61 62 63 | function wpb_cpt_sticky_at_top( $posts ) { // apply it on the archives only if ( is_main_query() && is_post_type_archive() ) { global $wp_query; $sticky_posts = get_option( 'sticky_posts' ); $num_posts = count( $posts ); $sticky_offset = 0; // Find the sticky posts for ($i = 0; $i < $num_posts; $i++) { // Put sticky posts at the top of the posts array if ( in_array( $posts[$i]->ID, $sticky_posts ) ) { $sticky_post = $posts[$i]; // Remove sticky from current position array_splice( $posts, $i, 1 ); // Move to front, after other stickies array_splice( $posts, $sticky_offset, 0, array($sticky_post) ); $sticky_offset++; // Remove post from sticky posts array $offset = array_search($sticky_post->ID, $sticky_posts); unset( $sticky_posts[$offset] ); } } // Look for more sticky posts if needed if ( !empty( $sticky_posts) ) { $stickies = get_posts( array( 'post__in' => $sticky_posts, 'post_type' => $wp_query->query_vars['post_type'], 'post_status' => 'publish', 'nopaging' => true ) ); foreach ( $stickies as $sticky_post ) { array_splice( $posts, $sticky_offset, 0, array( $sticky_post ) ); $sticky_offset++; } } } return $posts;} add_filter( 'the_posts', 'wpb_cpt_sticky_at_top' ); // Add sticky class in article title to style sticky posts differently function cpt_sticky_class($classes) { if ( is_sticky() ) : $classes[] = 'sticky'; return $classes; endif; return $classes; } add_filter('post_class', 'cpt_sticky_class'); |
Bu kod yapışkan gönderilerinizi en üste taşır. Temanız post_class() işlevini kullanıyorsa, yapışkan gönderilerinizi CSS kullanarak şekillendirebilmeniz için bir ‘yapışkan’ sınıfı da ekler.
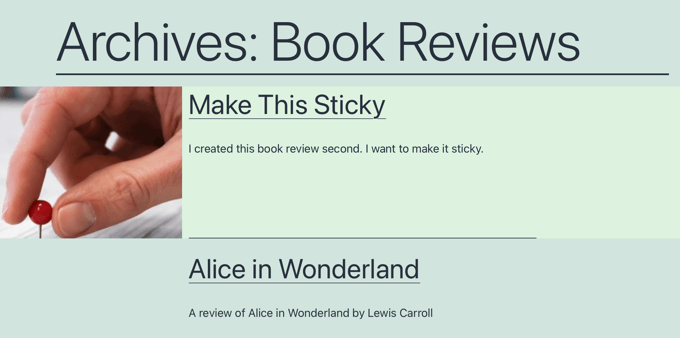
Kitap İncelemeleri özel gönderi türü arşivi demo sitemizde bu şekilde görünüyor. Kodu eklemeden önce, yapışkan gönderi listede ikinci sıradaydı.
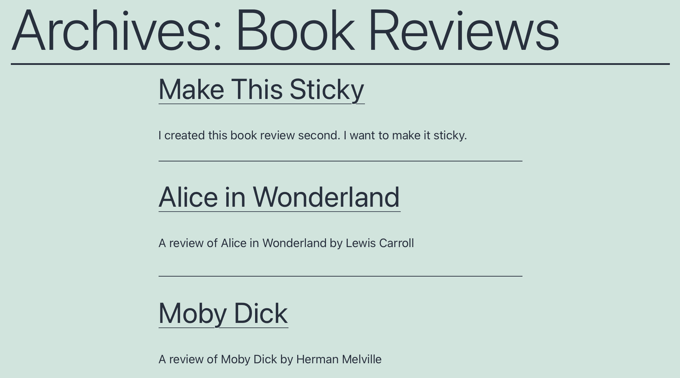
Artık yapışkan yazılarınızı temanızın style.css stil sayfasında .sticky sınıfını kullanarak şekillendirebilirsiniz. İşte bir örnek:
1 2 3 4 5 6 | .sticky { background-color:#ededed;background-image:url('http://example.com/wp-content/uploads/featured.png');background-repeat:no-repeat;background-position:right top;} |
İşte demo web sitemizden güncellenmiş bir ekran görüntüsü.
Yapışkan Gönderiler Hakkında Uzman Kılavuzları
Umarız bu eğitim WordPress özel yazı türü arşivlerine yapışkan yazı eklemeyi öğrenmenize yardımcı olmuştur. WordPress’te yapışkan yazılarla ilgili diğer bazı kılavuzları da görmek isteyebilirsiniz:
- WordPress’te Yapışkan Yazılar Nasıl Yapılır (Hızlı ve Kolay)
- WordPress’te Kategoriler için Yapışkan Yazılar Nasıl Eklenir
- WordPress’te Yapışkan Yazılarla Yapabileceğiniz Harika Şeyler
- WordPress’te Yapışkan Yazılar Döngüden Nasıl Çıkarılır
- WordPress’te Yazılar Nasıl Kolayca Yeniden Sıralanır (Adım Adım)
- WordPress’te Yapışkan Kayan Navigasyon Menüsü Nasıl Oluşturulur
- WordPress’te Yapışkan Kayan Kenar Çubuğu Widget’ı Nasıl Oluşturulur
- WordPress’te “Yapışkan” Yüzen Altbilgi Çubuğu Nasıl Oluşturulur
If you liked this article, then please subscribe to our YouTube Channel for WordPress video tutorials. You can also find us on Twitter and Facebook.


Clare
I got a custom post type to be “sticky” in an archive in 15 minutes following your example. Super helpful, thank you!
WPBeginner Support
Glad to hear our guide was helpful!
Admin
rom
Hi,
I’m banging my head right now….
I’m using this plugin, it works fine, I can see it in the admin, and on the data base, I can see it update the sticky_posts in wp_options. But, when I try to use ‘post__not_in’ => get_option(‘sticky_posts’), it doesn’t filter any thing.
So I try to var_dump(get_option(‘sticky_posts’)), and all I get is the id of the ‘normal post’, not the full list of id who I can see are in the wp_options/sticky_posts.
Which mean if I try to use is_stiky in my loop, it only work in ‘normal’ post, not in CPT, which is logic, since get_option(‘sticky_posts’) is not working properly…. Any idea how I can fix that ? it’s driving me crazy
Markus Froehlich
You can use this Sticky Post Switch Plugin
It also enables the featuere for custom post types
Pat Ducat
This works good however it makes it sticky on every page of a paginated archive. Is this how the built-in sticky functionality for standard posts work too?
Aaron
How could i set this up to work with a custom taxonomy archive page?
I’ve tried adding ‘is_tax’ and ‘is_category’ instead of the is_post_type_archive() on line 4 of your function but it just breaks the page.
I’m missing something obviously but can’t seem to find it.
Any ideas?
Daniel Dropik
Thanks. Is it possible to adapt this tutorial to display sticky posts onto a specialized page template, rather than on the archives page? If so how might I accomplish this?
WPBeginner Support
Daniel, yes sure it can be done in a separate page template. Simply create a custom template and follow the instructions given above.
Admin
Shawn
How do you do this for Custom Taxonomy.php instead of archives.
WPBeginner Support
if the custom taxonomy is displaying post types with sticky posts support, then you can display it in the same manner. Instead of archive-post-type.php template, make changes in taxonomy-custom-taxonomy.php template.
Admin
Mr.Ultra
Thanks. This is useful.
But if it’s possible not using a plugin to add sticky functionality to custom post types?
Can you share the snippet?
Anir
Very informative, thanks for sharing. It helps a lot.
Daniel
Really nice tut.